1. Definition
var plan =
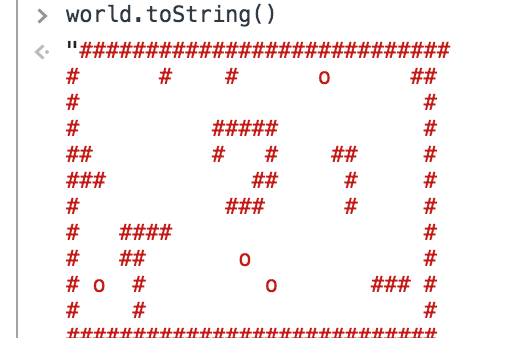
["############################",
"# # # o ##",
"# #",
"# ##### #",
"## # # ## #",
"### ## # #",
"# ### # #",
"# #### #",
"# ## o #",
"# o # o ### #",
"# # #",
"############################"];Build a virtual ecosystem, as shown above. The picture represents a small world and is a game scene. The Every turn, the creature moves a grid randomly, either into a blank space or hits a wall.
All we need to do is to print such a graph in console with three characters (#, o, space) to simulate the ecosystem. Write a turn function again, and each call, the creatures move a turn, and then print the whole picture.
The plan above represents a state of the ecosystem.
coordinate
Use Vector for Exercise Questions in the previous Chapter
function Vector(x, y) {
  this.x = x;
  this.y = y;
}
Vector.prototype.plus = function(other) {
  return new Vector(this.x + other.x, this.y + other.y);
};
Map
Define a Grid class that uses an array inside to store what's on each coordinate (walls, creatures, blanks).
From an intuitive point of view, this array should be two-dimensional, because the map is a two-dimensional space. Access a coordinate on the map: grid[y][x].
An array that stores maps can also be defined as a one-dimensional array of width x height, accessing a coordinate: grid[x+y*width].
This array is an attribute of a map object, and only the map object itself can directly access this array, so it doesn't matter which way to choose for other objects. Here, we choose a one-dimensional array because it's simpler to create.
function Grid(width, height) {
  this.space = new Array(width * height);
  this.width = width;
  this.height = height;
}
Grid.prototype.isInside = function(vector) {
  return vector.x >= 0 && vector.x < this.width &&
         vector.y >= 0 && vector.y < this.height;
};
Grid.prototype.get = function(vector) {
  return this.space[vector.x + this.width * vector.y];
};
Grid.prototype.set = function(vector, value) {
  this.space[vector.x + this.width * vector.y] = value;
};
1. A Critter's Programming Interface
Define the interface of Critter object
The Critter object only needs an interface, act, which is the action it performs for each turn.
To execute an action, you need to understand the geographic information, so we define a navigator (Golden Navigation) object: View.
Let's Abstract "Action" into an object: Action. With this Action, we can determine the new location of the critter.
So the definition of act is: var action = critter.act(view);
First, define the View interface:
Method find(): Randomly find a moving direction. If not, return null.
Method look(): Given a direction, return the next character (#, or space) in that direction.
Define the interface of Action:
Attribute type: "move", and now our critter has only this action type.
Attribute direction: Which direction to move. If we limit critter to moving only one grid at a time, then direction is the eight coordinates around critter. It is represented by strings such as "n" (north), and "ne" (northeast).
By using the directions variable defined below, we can easily establish a relationship between "direction" and "map coordinates".
var directions = {
  "n":  new Vector( 0, -1),
  "ne": new Vector( 1, -1),
  "e":  new Vector( 1,  0),
  "se": new Vector( 1,  1),
  "s":  new Vector( 0,  1),
  "sw": new Vector(-1,  1),
  "w":  new Vector(-1,  0),
  "nw": new Vector(-1, -1)
};
Well, with the above definitions of View, Action and direction, we can implement Critter:
Note that the critter implemented here has a default direction of movement and records the direction of movement for a round, that is to say, if there are no obstacles, it will continue to move in one direction (one grid at a time).
function randomElement(array) {
  return array[Math.floor(Math.random() * array.length)];
}

var directionNames = "n ne e se s sw w nw".split(" ");

function BouncingCritter() {
  this.direction = randomElement(directionNames);
};

BouncingCritter.prototype.act = function(view) {
  if (view.look(this.direction) != " ")
    this.direction = view.find(" ") || "s";
  return {type: "move", direction: this.direction};
};
1. The World Object
With a Grid and a Critter, we can build a World. The goal of this section is to build a plan into a World.
In the plan variable initially defined in this chapter, we can see that each grid in the World will contain one element, a total of three kinds: wall, Critter, blank.
Wall:
Symbols:#
prototype: Wall
Implementation: FunctionWall () {} does not require any behavior or attributes on the wall, so defining an empty constructor is enough.
Biology:
Symbol:o
prototype: BouncingCritter
Implementation: See the code in the previous section
Blank:
Symbol: Spaces
prototype: null
Blankness does not require any behavior or attributes, it can be distinguished from walls. So, null can be used.
Constructing element s by symbols
Define an object that contains constructors for various element s
var legend = {
  "#": Wall,
  "o": BouncingCritter
};
function elementFromChar(legend, ch) {
  if (ch == " ")
    return null;
  var element = new legend[ch]();
  element.originChar = ch;
  return element;
}
Creating the Initial World through plan
function World(map, legend) {
  var grid = new Grid(map[0].length, map.length);
  this.grid = grid;
  this.legend = legend;

  map.forEach(function(line, y) {
    for (var x = 0; x < line.length; x++)
      grid.set(new Vector(x, y),
               elementFromChar(legend, line[x]));
  });
}Explain this constructor:var world = new World(plan, {"#": Wall, "o": BouncingCritter});
1. The first parameter, map, is an array like plan.
2. Create grid (map);
3. Keep legend for later use.
4. Create corresponding element s according to each symbol in map (#, o, blank) and save them in Grid (map).
Print the world to console
Convert element s into symbols
function charFromElement(element) {
  if (element == null)
    return " ";
  else
    return element.originChar;
}
Note that the originChar is saved when the element is built above.
Add toString method to World
World.prototype.toString = function() {
  var output = "";
  for (var y = 0; y < this.grid.height; y++) {
    for (var x = 0; x < this.grid.width; x++) {
      var element = this.grid.get(new Vector(x, y));
      output += charFromElement(element);
    }
    output += "\n";
  }
  return output;
};
Save all of the above code in an html and enter: world.toString() in the console.
1. This and Its Scope
Notice the first two lines of code for the World constructor
var grid = new Grid(map[0].length, map.length);
this.grid = grid;
Why do you write this way? Can't you write it in one line?
Notice that the following forEach traverses each line of the map with a function. This function uses grid. Note that there is no grid before it. This function is not a World object in this function, because this function is not a member function of World.
This is a very weird place for js. Only in member functions, this represents the object itself, otherwise, it refers to the global object. Global objects do not have grid attributes. So, we need to define var grid in addition.
The second model
var self = this;
Using self in function, self is a common variable, which is more clear in semantics.
The third mode, using bind
var test = {
  prop: 10,
  addPropTo: function(array) {
    return array.map(function(elt) {
      return this.prop + elt;
    }.bind(this));
  }
};
console.log(test.addPropTo([5]));
// → [15]
Do you remember bind? With the first parameter of bind, this inside the function is no longer a global variable.
The fourth model
Most standard higher-order functions can pass in a second parameter, which is also treated as this inside the function.
var test = {
  prop: 10,
  addPropTo: function(array) {
    return array.map(function(elt) {
      return this.prop + elt;
    }, this); // ← no bind
  }
};
console.log(test.addPropTo([5]));
// → [15]
Fifth Model
Referring to the fourth pattern, we can define our own higher-order function forEach for the Grid class, noting that the second parameter context is that one.
Grid.prototype.forEach = function(f, context) {
  for (var y = 0; y < this.height; y++) {
    for (var x = 0; x < this.width; x++) {
      var value = this.space[x + y * this.width];
      if (value != null)
        f.call(context, value, new Vector(x, y));
    }
  }
};
1. Implementing Navigator-View
View objects have been mentioned in the discussion of the interface of Critter objects. Whenever Critter starts to move, it needs to take out the navigator first to determine the course of action. Obviously, the navigator needs two data: the current coordinates and the map. Look at the constructor below. vector is the coordinate and world is the map.
function View(world, vector) {
  this.world = world;
  this.vector = vector;
}
In the BouncingCritter object, we see that the act method needs to use two methods of the View object: look and find.
look is used to see what's in a direction
View.prototype.look = function(dir) {
  var target = this.vector.plus(directions[dir]);
  if (this.world.grid.isInside(target))
    return charFromElement(this.world.grid.get(target));
  else
    return "#";
};
The find method is simple: Given a character, find which direction of the eight surrounding squares contains the character, if not found, return null, find, and randomly return one.
View.prototype.find = function(ch) {
  var found = this.findAll(ch);
  if (found.length == 0) return null;
  return randomElement(found);
};
findAll method is used in find
View.prototype.findAll = function(ch) {
  var found = [];
  for (var dir in directions)
    if (this.look(dir) == ch)
      found.push(dir);
  return found;
};
1. Animating Life
Add turn method to World
Every turn is called, and every critter on the map has a chance to move once.World.prototype.turn = function() {
var acted = [];
this.grid.forEach(function(critter, vector) {
if (critter.act && acted.indexOf(critter) == -1) {
acted.push(critter);
this.letAct(critter, vector);
}
}, this);
};var acted = []; what is this for? We traverse every coordinate on the map in the forEach loop, and critter on that coordinate may move to coordinates that forEach has not traversed. So, write it down. If you encounter this critter twice in a turn, skip it the second time and don't move it many times.
World.prototype.letAct = function(critter, vector) {
  var action = critter.act(new View(this, vector));
  if (action && action.type == "move") {
    var dest = this.checkDestination(action, vector);
    if (dest && this.grid.get(dest) == null) {
      this.grid.set(vector, null);
      this.grid.set(dest, critter);
    }
  }
};
World.prototype.checkDestination = function(action, vector) {
if (directions.hasOwnProperty(action.direction)) {
var dest = vector.plus(directions[action.direction]);
if (this.grid.isInside(dest))
return dest;
}
};1. It Moves
The small world is finally built. Let's run and see:
for (var i = 0; i < 5; i++) {
  world.turn();
  console.log(world.toString());
}
// → ... five turns of moving critters
1. More Life Forms
In this section, we will add new species of organisms.
For the world built above, if we look at more rounds, we will find that if two critter s meet, they will automatically pop up.
We can create a new Critter, which has different behaviors, such as climbing along the wall. Imagine this new creature using a left hand (claw? Suction cup? Grab the wall and move one grid along it in each turn.
Climbing a wall has the concept of direction. First of all, we need to add a method to calculate the direction.
dir represents a given direction, then:
dir + 1 = move 45 degrees clockwise;
Dir-2 = move 90 degrees counterclockwise;
By analogy.
For example, dirPlus("n", 1) returns "ne"
function dirPlus(dir, n) {
  var index = directionNames.indexOf(dir);
  return directionNames[(index + n + 8) % 8];
}
Add a wall-climbing creature
function WallFollower() {
  this.dir = "s";
}
WallFollower.prototype.act = function(view) {
var start = this.dir;
if (view.look(dirPlus(this.dir, -3)) != " ")
start = this.dir = dirPlus(this.dir, -2);
while (view.look(this.dir) != " ") {
this.dir = dirPlus(this.dir, 1);
if (this.dir == start) break;
}
return {type: "move", direction: this.dir};
};My spatial awareness is so poor that it is very difficult for me to study geometry in middle school. I really can't understand this algorithm.
Building a New World
new World(
  ["############",
   "#     #    #",
   "#   ~    ~ #",
   "#  ##      #",
   "#  ##  o####",
   "#          #",
   "############"],
  {"#": Wall,
   "~": WallFollower,
   "o": BouncingCritter}
)
Let it move and have a look.

1. A More Lifelike Simulation
To make the world we create more interesting, we need to add food to it and let critter multiply.
Add an attribute energy to each organism, and each action consumes energy, while eating increases energy. When a critter has enough energy, it can generate a new critter.
Adding another biological Plant, which does not move, increases growth and reproduction by photosynthesis.
In order to achieve the above purpose, we need to modify the World class, mainly the letAct method. But this time, we inherit to create a new world, Lifelike World, so that we can create the previous world at any time.
function LifelikeWorld(map, legend) {
  World.call(this, map, legend);
}
LifelikeWorld.prototype = Object.create(World.prototype);

var actionTypes = Object.create(null);

LifelikeWorld.prototype.letAct = function(critter, vector) {
  var action = critter.act(new View(this, vector));
  var handled = action &&
    action.type in actionTypes &&
    actionTypes[action.type].call(this, critter,
                                  vector, action);
  if (!handled) {
    critter.energy -= 0.2;
    if (critter.energy <= 0)
      this.grid.set(vector, null);
  }
};
Comparing with the previous letAct, we can see that the new letAct is no longer responsible for the execution of specific actions, but gives the execution power to the action itself. This can make the program structure more concise and clear, and is conducive to expansion. Let Act is responsible for only one action, or rather, an action that is not an action: stationary. When critter doesn't have the right action in a round, it stays still, energy minus one fifth.
In previous World s, there was only one action - move. Now add three kinds: eat, group and reproduce. So you need a container to store them.
1. Action Handlers
The actions container in the previous section is still empty. Now fill it in.
grow
actionTypes.grow = function(critter) {
  critter.energy += 0.5;
  return true;
};
move
actionTypes.move = function(critter, vector, action) {
  var dest = this.checkDestination(action, vector);
  if (dest == null ||
      critter.energy <= 1 ||
      this.grid.get(dest) != null)
    return false;
  critter.energy -= 1;
  this.grid.set(vector, null);
  this.grid.set(dest, critter);
  return true;
};
eat
actionTypes.eat = function(critter, vector, action) {
  var dest = this.checkDestination(action, vector);
  var atDest = dest != null && this.grid.get(dest);
  if (!atDest || atDest.energy == null)
    return false;
  critter.energy += atDest.energy;
  this.grid.set(dest, null);
  return true;
};
reproduce
actionTypes.reproduce = function(critter, vector, action) {
  var baby = elementFromChar(this.legend,
                             critter.originChar);
  var dest = this.checkDestination(action, vector);
  if (dest == null ||
      critter.energy <= 2 * baby.energy ||
      this.grid.get(dest) != null)
    return false;
  critter.energy -= 2 * baby.energy;
  this.grid.set(dest, baby);
  return true;
};
This is a good design, and if this whole bunch of code is put into the letAct method of the World class, it will drive programmers crazy.
1. Populating the New World
Then two critters are defined: Plant and Platform Eater. WallFollower and Bouncing critter, defined previously, are not suited to the world. They can neither grow nor reproduce.
Plant
function Plant() {
  this.energy = 3 + Math.random() * 4;
}
Plant.prototype.act = function(view) {
  if (this.energy > 15) {
    var space = view.find(" ");
    if (space)
      return {type: "reproduce", direction: space};
  }
  if (this.energy < 20)
    return {type: "grow"};
};
PlantEater
function PlantEater() {
  this.energy = 20;
}
PlantEater.prototype.act = function(view) {
  var space = view.find(" ");
  if (this.energy > 60 && space)
    return {type: "reproduce", direction: space};
  var plant = view.find("*");
  if (plant)
    return {type: "eat", direction: plant};
  if (space)
    return {type: "move", direction: space};
};
1. Bringing It To Life
var valley = new LifelikeWorld(
  ["############################",
   "#####                 ######",
   "##   ***                **##",
   "#   *##**         **  O  *##",
   "#    ***     O    ##**    *#",
   "#       O         ##***    #",
   "#                 ##**     #",
   "#   O       #*             #",
   "#*          #**       O    #",
   "#***        ##**    O    **#",
   "##****     ###***       *###",
   "############################"],
  {"#": Wall,
   "O": PlantEater,
   "*": Plant}
);
A method is given in the accompanying code: animateWorld(valley), which can run automatically in the browser.
I do valley.turn(); valley.toString(); and print in console to see the dynamic effect. Typically, only plant is left for dozens of executions.
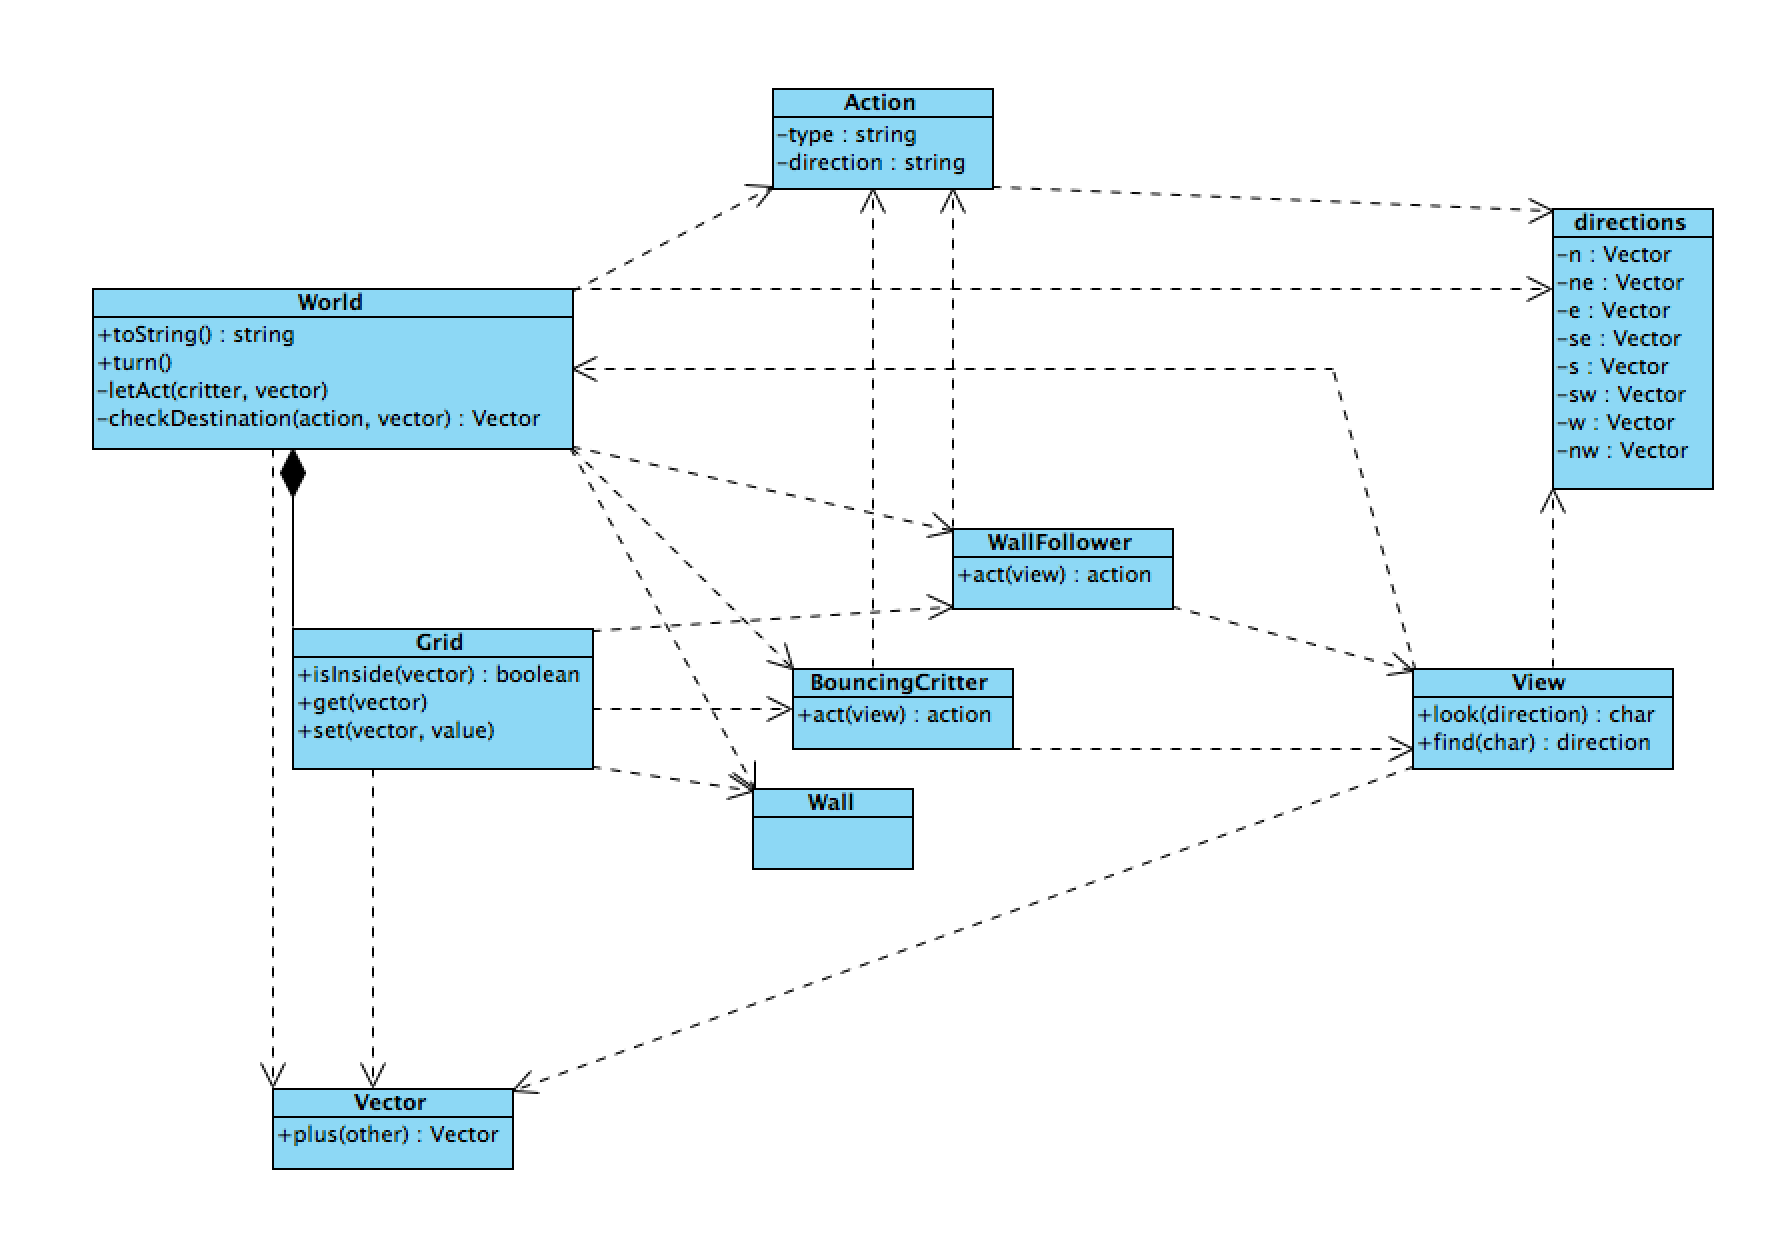
This chapter is too long, and the logic of the code is rather complex and hard to understand. I drew a class diagram before I joined Plant, and the dependencies were quite complex.
After reading this chapter for several days, I was too lazy to do exercises. However, these codes are interesting, and I'll take some time to play with them later.