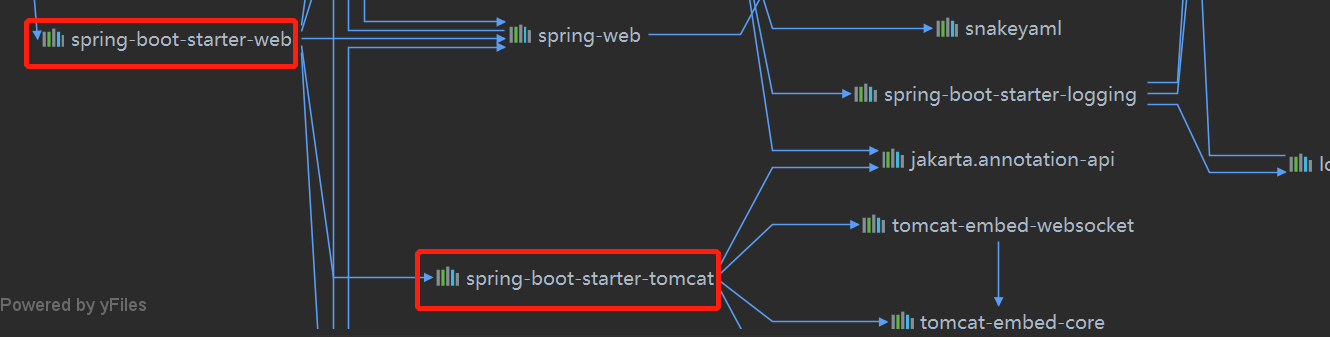
1. SpringBoot is the default servlet container
The default servlet container of SpringBoot is tomcat, as shown in the following figure:
2. Embedded servlet configuration modification
2.1. Modify through global configuration file
1. You can use server XXX for web service configuration. If there is no server name, it is a general configuration, as shown below:
2. By adding a specific server name, you can set the server separately, such as server tomcat. XXX is a configuration specifically for Tomcat.
server.port=8081
server.servlet.context-path=/tomcat
2.2. Bean modification through WebServerFactoryCustomizer interface
We create a class to implement the WebServerFactoryCustomizer interface. The configuration in it will take precedence over the global configuration and complement each other. The code is as follows:
package cool.ale.component;

import org.springframework.boot.web.server.WebServerFactoryCustomizer;
import org.springframework.boot.web.servlet.server.ConfigurableServletWebServerFactory;
import org.springframework.stereotype.Component;

@Component
public class CustomizationBean implements WebServerFactoryCustomizer<ConfigurableServletWebServerFactory> {

    @Override
    public void customize(ConfigurableServletWebServerFactory server) {
        server.setPort(8090);
    }
}
3. Three components of registered servlet
First, we need to know what the three components of servlet are
The three major components of servlet are: servlet, listener and filter
We have two ways to register
3.1,servlet3. The annotation method provided by the 0 specification is registered
We need to create a class first and import one of these annotations.
@WebServlet
@WebListener
@WebFilter
Then add the annotation @ ServletComponentScan that can scan the above annotations in the startup class, as shown below:
package cool.ale;

import org.springframework.boot.SpringApplication;
import org.springframework.boot.autoconfigure.SpringBootApplication;
import org.springframework.boot.web.servlet.ServletComponentScan;

@SpringBootApplication
@ServletComponentScan
public class SpringbootServletApplication {

    public static void main(String[] args) {
        SpringApplication.run(SpringbootServletApplication.class, args);
    }

}
Then improve the class just created, as shown below. After starting SpringBoot, you can access it.
package cool.ale.servlet;

import javax.servlet.ServletException;
import javax.servlet.annotation.WebServlet;
import javax.servlet.http.HttpServlet;
import javax.servlet.http.HttpServletRequest;
import javax.servlet.http.HttpServletResponse;
import java.io.IOException;
import java.io.PrintWriter;

@WebServlet(name = "HelloServlet",urlPatterns = "/HelloServlet")
public class HelloServlet extends HttpServlet {

    @Override
    protected void doGet(HttpServletRequest req, HttpServletResponse resp) throws ServletException, IOException {
        PrintWriter writer = resp.getWriter();
        writer.println("hello servlet!");
    }
}
Three components provided by spring boot servlet
Servlet, Filter and Listener can be registered as corresponding spring beans
You can register with the following three beans: ServletRegistrationBean, FilterRegistrationBean and ServletListenerRegistrationBean. Register one of these three classes in the configuration file and return it.
First create a servlet class as follows:
package cool.ale.servlet;

import javax.servlet.ServletException;
import javax.servlet.http.HttpServlet;
import javax.servlet.http.HttpServletRequest;
import javax.servlet.http.HttpServletResponse;
import java.io.IOException;
import java.io.PrintWriter;

public class BeanServlet extends HttpServlet {
    @Override
    protected void doGet(HttpServletRequest req, HttpServletResponse resp) throws ServletException, IOException {
        PrintWriter writer = resp.getWriter();
        writer.println("hello beanServlet!");
    }
}
Then create a configuration class, return to the ServletRegistrationBean class above, and configure the servlet class we just created, as shown below:
package cool.ale.config;

import cool.ale.servlet.BeanServlet;
import org.springframework.boot.web.servlet.ServletRegistrationBean;
import org.springframework.context.annotation.Bean;
import org.springframework.context.annotation.Configuration;

@Configuration
public class WebMvcConfiguration {

    @Bean
    public ServletRegistrationBean myServlet(){
        // Declare a servlet registrar Bean
        ServletRegistrationBean servletRegistrationBean = new ServletRegistrationBean();
        // Set the corresponding servlet
        servletRegistrationBean.setServlet(new BeanServlet());
        // Set name
        servletRegistrationBean.setName("BeanServlet");
        // Add mapping rule
        servletRegistrationBean.addUrlMappings("/BeanServlet");
        return servletRegistrationBean;
    }

}
Just start the access directly.
4. Switch to other embedded servlet containers
SpringBoot includes support for embedded Tomcat, Jetty, and Undertow servers
tomcat (default embedded servlet container)
Jetty (generally used for long links, such as socket s)
Undertow (generally used for non blocking, responsive, etc.)
Generally, when we need to switch to the other two servlet containers, we need to operate the following two steps
1. Exclude the tomcat server and select it in the figure below
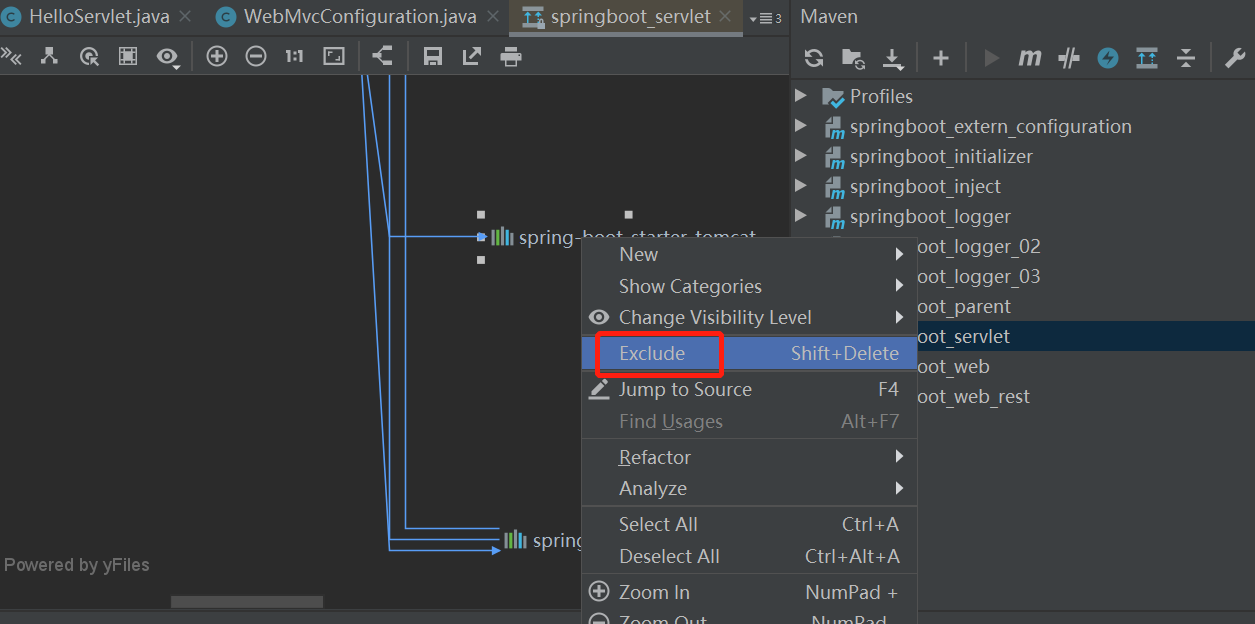
Then the code will correspond to the following:
<dependency>
    <groupId>org.springframework.boot</groupId>
    <artifactId>spring-boot-starter-web</artifactId>
    <exclusions>
        <exclusion>
            <artifactId>spring-boot-starter-tomcat</artifactId>
            <groupId>org.springframework.boot</groupId>
        </exclusion>
    </exclusions>
</dependency>
2. Add the dependency of jetty or undertow to the pom file, as shown below:
<!-- jetty Dependence of -->
<dependency>
    <groupId>org.springframework.boot</groupId>
    <artifactId>spring-boot-starter-jetty</artifactId>
</dependency>

<!-- undertow Dependence of -->
<dependency>
    <groupId>org.springframework.boot</groupId>
    <artifactId>spring-boot-starter-undertow</artifactId>
</dependency>
Just start.
5. Automatic configuration principle of embedded servlet container
Before we track the source code, we need to ask a few questions to facilitate us to seek the purpose of tracking the source code.
1. Why can the corresponding servlet container be used automatically according to the configured dependency.
2. How to use the server in the configuration file XXX and when inheriting the WebServerFactoryCustomizer interface, you can set some parameters of the servlet container.
3. How to make all webserverfactory customizer beans work together one by one?
4. How the embedded tomcat container starts.
Next, let's enter the servlet automatic configuration class to see the principle according to these problems.
ServletWebServerFactoryAutoConfiguration.
First analyze the annotation of this class
@Configuration(
    proxyBeanMethods = false
)
@AutoConfigureOrder(-2147483648)
// As long as you depend on any servlet container, you will depend on this class
@ConditionalOnClass({ServletRequest.class})
@ConditionalOnWebApplication(
    type = Type.SERVLET
)
// Server is enabled The configuration of XXX is bound to the current class. For details, please analyze serverproperties class
@EnableConfigurationProperties({ServerProperties.class})
@Import({ServletWebServerFactoryAutoConfiguration.BeanPostProcessorsRegistrar.class, EmbeddedTomcat.class, EmbeddedJetty.class, EmbeddedUndertow.class})
public class ServletWebServerFactoryAutoConfiguration {
}
5.1. Why can the corresponding servlet container be used automatically according to the configured dependency?
Because the ServletWebServerFactoryAutoConfiguration class imports three classes, as shown below:
@Import({ServletWebServerFactoryAutoConfiguration.BeanPostProcessorsRegistrar.class, EmbeddedTomcat.class, EmbeddedJetty.class, EmbeddedUndertow.class})
public class ServletWebServerFactoryAutoConfiguration {
}
Among the classes imported above, we can click one at will. For example, I click embedded tomcat When class is implemented, this annotation says that there should be tomcat Class exists in the IOC container, and the configuration of tomcat will take effect.
@Configuration(
        proxyBeanMethods = false
    )
    // Dependent on servlet class, Tomcat. class, UpgradeProtocol. Class three classes
    @ConditionalOnClass({Servlet.class, Tomcat.class, UpgradeProtocol.class})
    @ConditionalOnMissingBean(
        value = {ServletWebServerFactory.class},
        search = SearchStrategy.CURRENT
    )
    static class EmbeddedTomcat {
        EmbeddedTomcat() {
        }
}
5.2. How to use the server in the configuration file XXX set some parameters of servlet container?
In the ServletWebServerFactoryAutoConfiguration class, we can see the following methods. The ServletWebServerFactoryCustomizer class also implements the WebServerFactoryCustomizer class, which is used for automatic configuration of servlet containers. The code is as follows:
@Bean
// Modify servlet configuration through Bean of WebServerFactoryCustomizer interface
public ServletWebServerFactoryCustomizer servletWebServerFactoryCustomizer(ServerProperties serverProperties, ObjectProvider<WebListenerRegistrar> webListenerRegistrars) {
    return new ServletWebServerFactoryCustomizer(serverProperties, (List)webListenerRegistrars.orderedStream().collect(Collectors.toList()));
}
When we click the ServletWebServerFactoryCustomizer class, we can see that the customize method in it uses the new features of jdk8. Take out the corresponding configuration parameters from the configuration file to modify the default value:
public void customize(ConfigurableServletWebServerFactory factory) {
    PropertyMapper map = PropertyMapper.get().alwaysApplyingWhenNonNull();
    ServerProperties var10001 = this.serverProperties;
    var10001.getClass();
    map.from(var10001::getPort).to(factory::setPort);
    var10001 = this.serverProperties;
    var10001.getClass();
    map.from(var10001::getAddress).to(factory::setAddress);
    Servlet var5 = this.serverProperties.getServlet();
    var5.getClass();
    map.from(var5::getContextPath).to(factory::setContextPath);
    var5 = this.serverProperties.getServlet();
    var5.getClass();
    map.from(var5::getApplicationDisplayName).to(factory::setDisplayName);
    var5 = this.serverProperties.getServlet();
    var5.getClass();
    map.from(var5::isRegisterDefaultServlet).to(factory::setRegisterDefaultServlet);
    var5 = this.serverProperties.getServlet();
    var5.getClass();
    map.from(var5::getSession).to(factory::setSession);
    var10001 = this.serverProperties;
    var10001.getClass();
    map.from(var10001::getSsl).to(factory::setSsl);
    var5 = this.serverProperties.getServlet();
    var5.getClass();
    map.from(var5::getJsp).to(factory::setJsp);
    var10001 = this.serverProperties;
    var10001.getClass();
    map.from(var10001::getCompression).to(factory::setCompression);
    var10001 = this.serverProperties;
    var10001.getClass();
    map.from(var10001::getHttp2).to(factory::setHttp2);
    var10001 = this.serverProperties;
    var10001.getClass();
    map.from(var10001::getServerHeader).to(factory::setServerHeader);
    var5 = this.serverProperties.getServlet();
    var5.getClass();
    map.from(var5::getContextParameters).to(factory::setInitParameters);
    map.from(this.serverProperties.getShutdown()).to(factory::setShutdown);
    Iterator var3 = this.webListenerRegistrars.iterator();

    while(var3.hasNext()) {
        WebListenerRegistrar registrar = (WebListenerRegistrar)var3.next();
        registrar.register(factory);
    }

}
Of course, similar to the above structure, the following method is used to configure the parameters of tomcat. The code is as follows. You can also click to see the corresponding customize method
@Bean
@ConditionalOnClass(
    name = {"org.apache.catalina.startup.Tomcat"}
)
public TomcatServletWebServerFactoryCustomizer tomcatServletWebServerFactoryCustomizer(ServerProperties serverProperties) {
    return new TomcatServletWebServerFactoryCustomizer(serverProperties);
}
5.3. How to make all webserverfactorycustomizer beans work together one by one?
We all know that when we create a class to implement the WebServerFactoryCustomizer interface, we can set the parameter configuration of the corresponding servlet container in this class, but these parameters and the global configuration are complementary, so we need to study why they are complementary. In fact, the focus is on the BeanPostProcessorsRegistrar class, This class is the first class imported from our automatic configuration file. The code is as follows:
@Import({ServletWebServerFactoryAutoConfiguration.BeanPostProcessorsRegistrar.class, EmbeddedTomcat.class, EmbeddedJetty.class, EmbeddedUndertow.class})
public class ServletWebServerFactoryAutoConfiguration {
}
When we click in, we find beanpostprocessorsregistrar Class implements the ImportBeanDefinitionRegistrar interface, which provides a method registerBeanDefinitions and a Bean registrar to enable us to register beans. The code is as follows:
public void registerBeanDefinitions(AnnotationMetadata importingClassMetadata, BeanDefinitionRegistry registry) {
    if (this.beanFactory != null) {
        this.registerSyntheticBeanIfMissing(registry, "webServerFactoryCustomizerBeanPostProcessor", WebServerFactoryCustomizerBeanPostProcessor.class, WebServerFactoryCustomizerBeanPostProcessor::new);
        this.registerSyntheticBeanIfMissing(registry, "errorPageRegistrarBeanPostProcessor", ErrorPageRegistrarBeanPostProcessor.class, ErrorPageRegistrarBeanPostProcessor::new);
    }
}
According to the above code, we found that webserverfactorycustomizer BeanPostProcessor is registered Class, webserverfactorycustomizer BeanPostProcessor Class class implements BeanPostProcessor. This class provides two methods postProcessBeforeInitialization and postProcessAfterInitialization during Bean initialization. We can see the complementarity by looking at the following two methods:
public Object postProcessBeforeInitialization(Object bean, String beanName) throws BeansException {
	// Every class that implements the WebServerFactoryCustomizer interface will come here, so it is complementary
    if (bean instanceof WebServerFactory) {
    	// When it is a subclass of WebServerFactory, the postProcessBeforeInitialization method is called
        this.postProcessBeforeInitialization((WebServerFactory)bean);
    }

    return bean;
}

public Object postProcessAfterInitialization(Object bean, String beanName) throws BeansException {
    return bean;
}
Go to the postProcessBeforeInitialization method and call back the corresponding customize method. The code is as follows:
private void postProcessBeforeInitialization(WebServerFactory webServerFactory) {
	// Call getcustomizators () method to get all beans that implement WebServerFactoryCustomizer
    ((Callbacks)LambdaSafe.callbacks(WebServerFactoryCustomizer.class, this.getCustomizers(), webServerFactory, new Object[0]).withLogger(WebServerFactoryCustomizerBeanPostProcessor.class)).
    // The invoke() method here will get the array of all beans that implement WebServerFactoryCustomizer just obtained and call its corresponding customize method in a loop
    invoke((customizer) -> {
        customizer.customize(webServerFactory);
    });
}

private Collection<WebServerFactoryCustomizer<?>> getCustomizers() {
    if (this.customizers == null) {
        this.customizers = new ArrayList(this.getWebServerFactoryCustomizerBeans());
        this.customizers.sort(AnnotationAwareOrderComparator.INSTANCE);
        this.customizers = Collections.unmodifiableList(this.customizers);
    }

    return this.customizers;
}
5.4 how does the embedded tomcat container start?
In our program When run ning, Spring Ioc will be loaded. When loading Ioc, the following methods will be called to start tomcat.
// TomcatServletWebServerFactory
public WebServer getWebServer(ServletContextInitializer... initializers) {
    if (this.disableMBeanRegistry) {
        Registry.disableRegistry();
    }

    Tomcat tomcat = new Tomcat();
    File baseDir = this.baseDirectory != null ? this.baseDirectory : this.createTempDir("tomcat");
    tomcat.setBaseDir(baseDir.getAbsolutePath());
    Connector connector = new Connector(this.protocol);
    connector.setThrowOnFailure(true);
    tomcat.getService().addConnector(connector);
    this.customizeConnector(connector);
    tomcat.setConnector(connector);
    tomcat.getHost().setAutoDeploy(false);
    this.configureEngine(tomcat.getEngine());
    Iterator var5 = this.additionalTomcatConnectors.iterator();

    while(var5.hasNext()) {
        Connector additionalConnector = (Connector)var5.next();
        tomcat.getService().addConnector(additionalConnector);
    }

    this.prepareContext(tomcat.getHost(), initializers);
    return this.getTomcatWebServer(tomcat);
}