1. Home page implementation
1.1. Access index
Because the static files under the template package cannot be accessed directly, they need to be accessed indirectly; View jump is required;
- Create a new config package in the main program statistics directory to store your own configuration classes
- Create your own configuration class MyMvcConfig to add your own view jump
@Configuration
public class MyMvcConfig implements WebMvcConfigurer {
    @Override
    public void addViewControllers(ViewControllerRegistry registry) {
        registry.addViewController("/").setViewName("index");
        registry.addViewController("/index.html").setViewName("index");
    }
}
The thymeleaf dependency must be imported before startup is effective!
After starting the main program, access the test and visit localhost:8080 / or localhost:8080 / index html
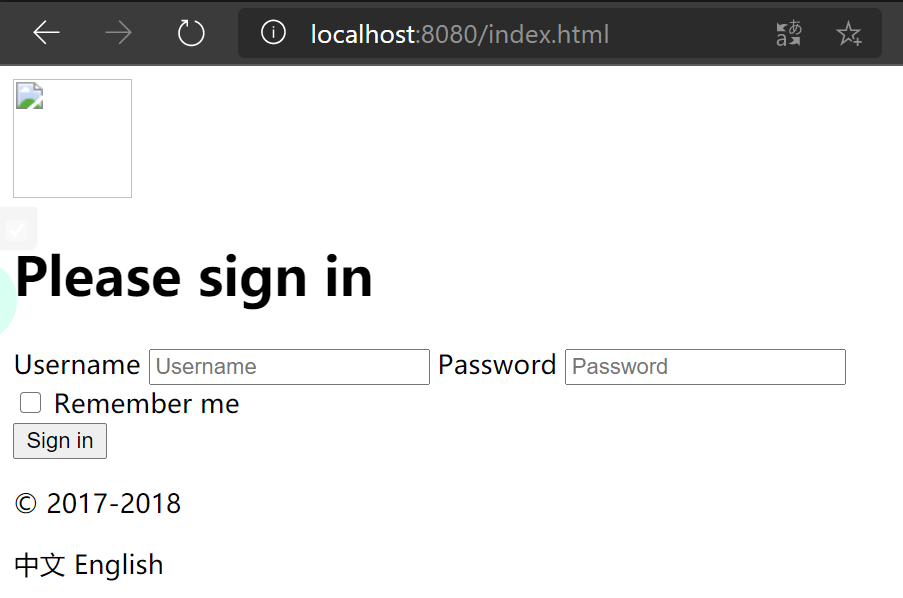
Obviously, there is a problem with the front-end html code at this time, and some static resources have not been successfully introduced.
1.2. Index HTML introduces thymeleaf
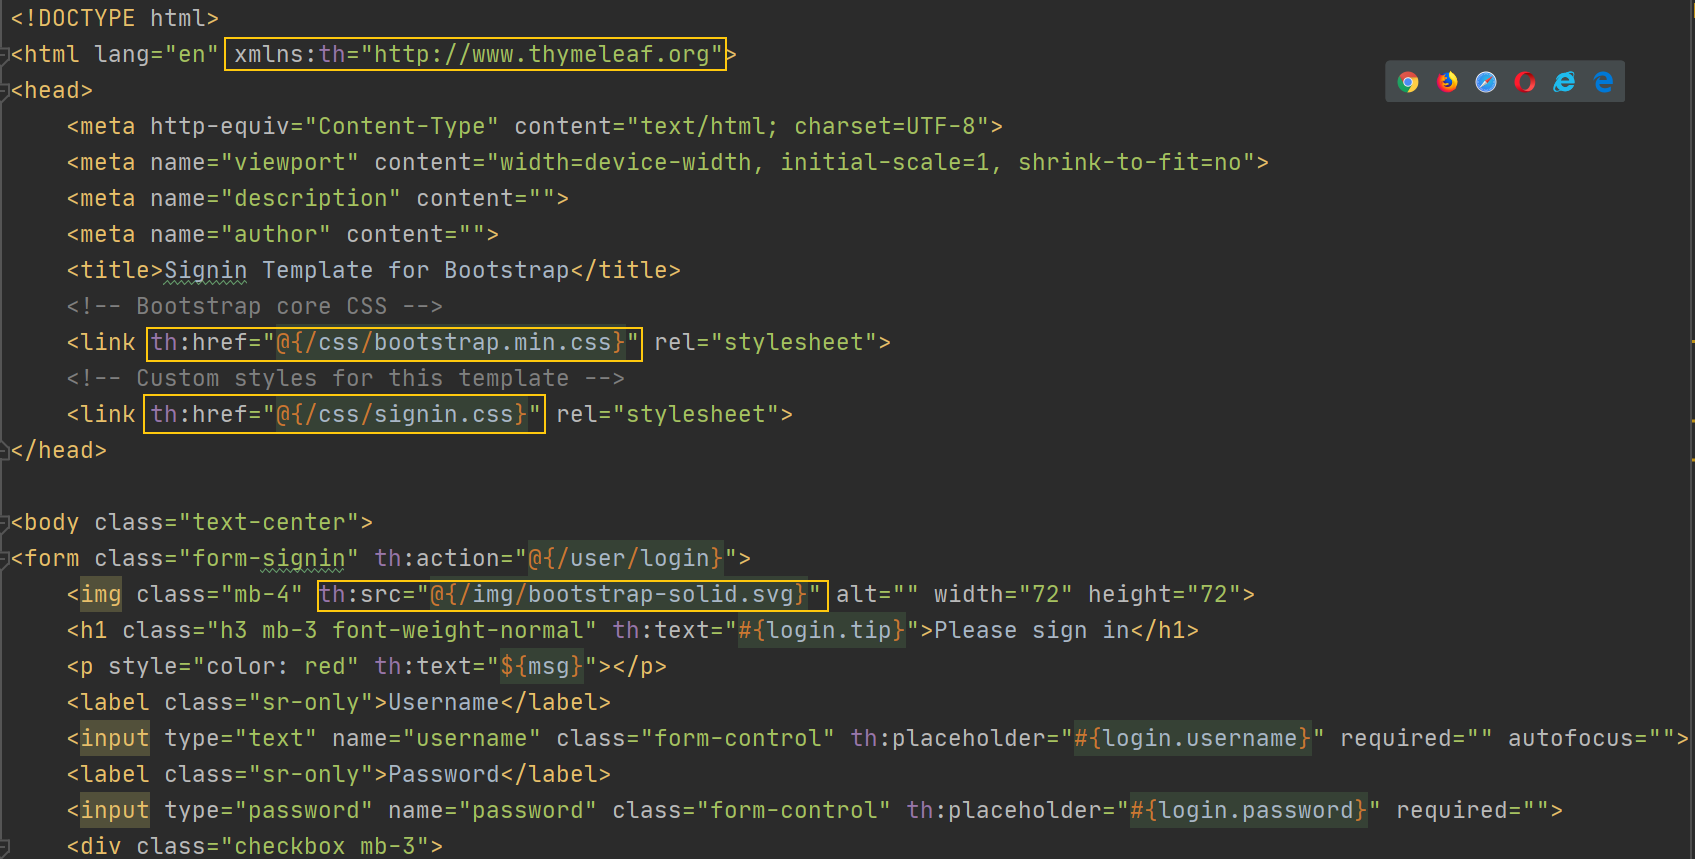
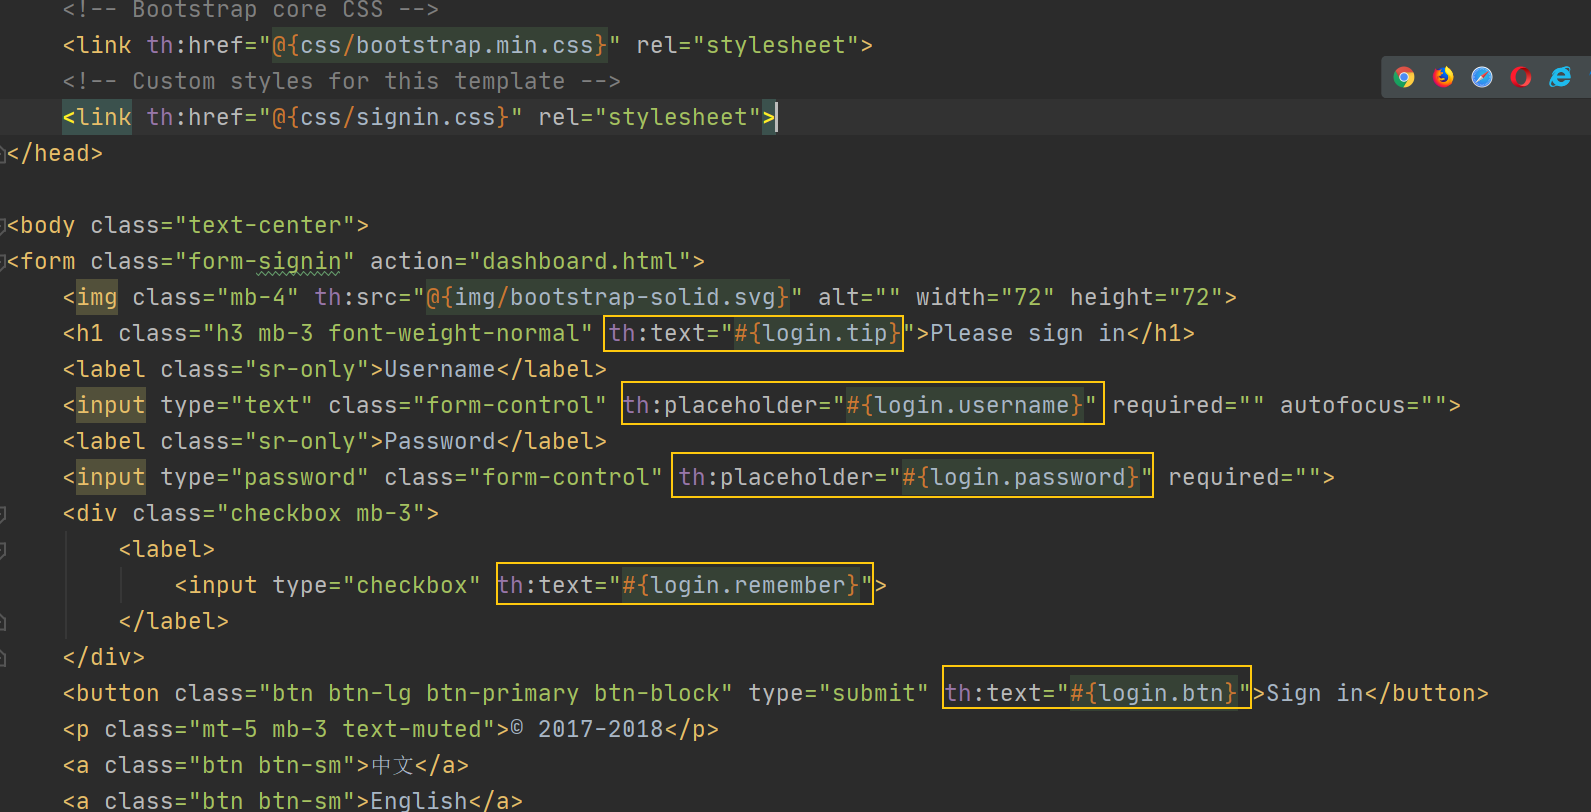
In the above test, we can see that there are pictures on the page that are not loaded, and there are no css and js styles. This is because there is a problem with the syntax introduced by the static resources in our html page. In SpringBoot, it is recommended to use Thymeleaf as the template engine. We change the syntax to Thymeleaf, which needs to be used for the static resources of all pages
- Note that all html needs to introduce the Thymeleaf namespace
xmlns:th="http://www.thymeleaf.org"
- Then modify the introduction of all page static resources and use @ {...} link expression
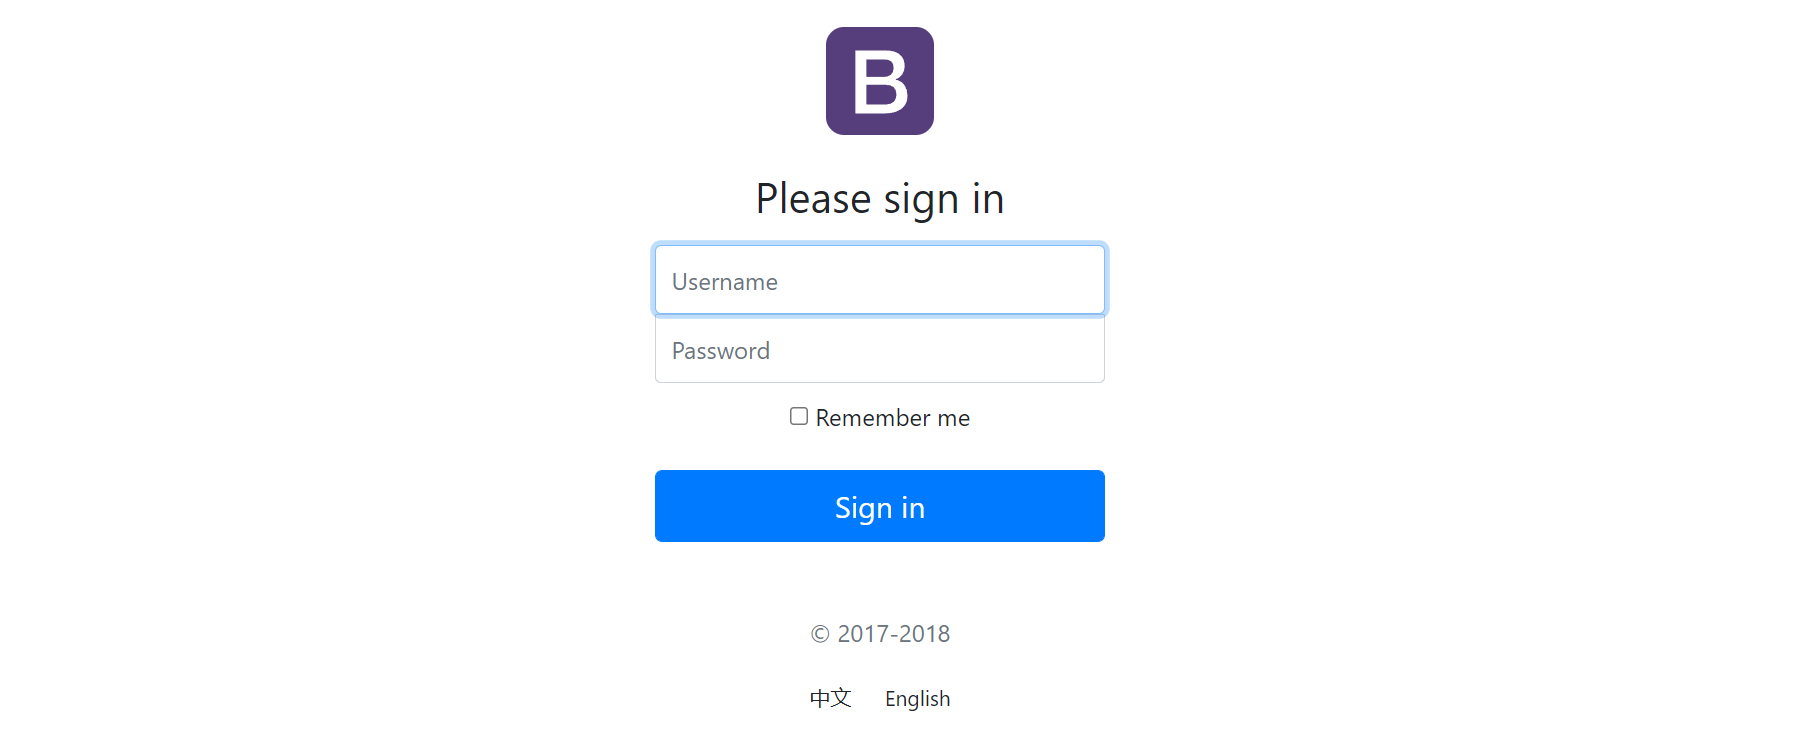
Visit here to display the page correctly:
2. Page internationalization
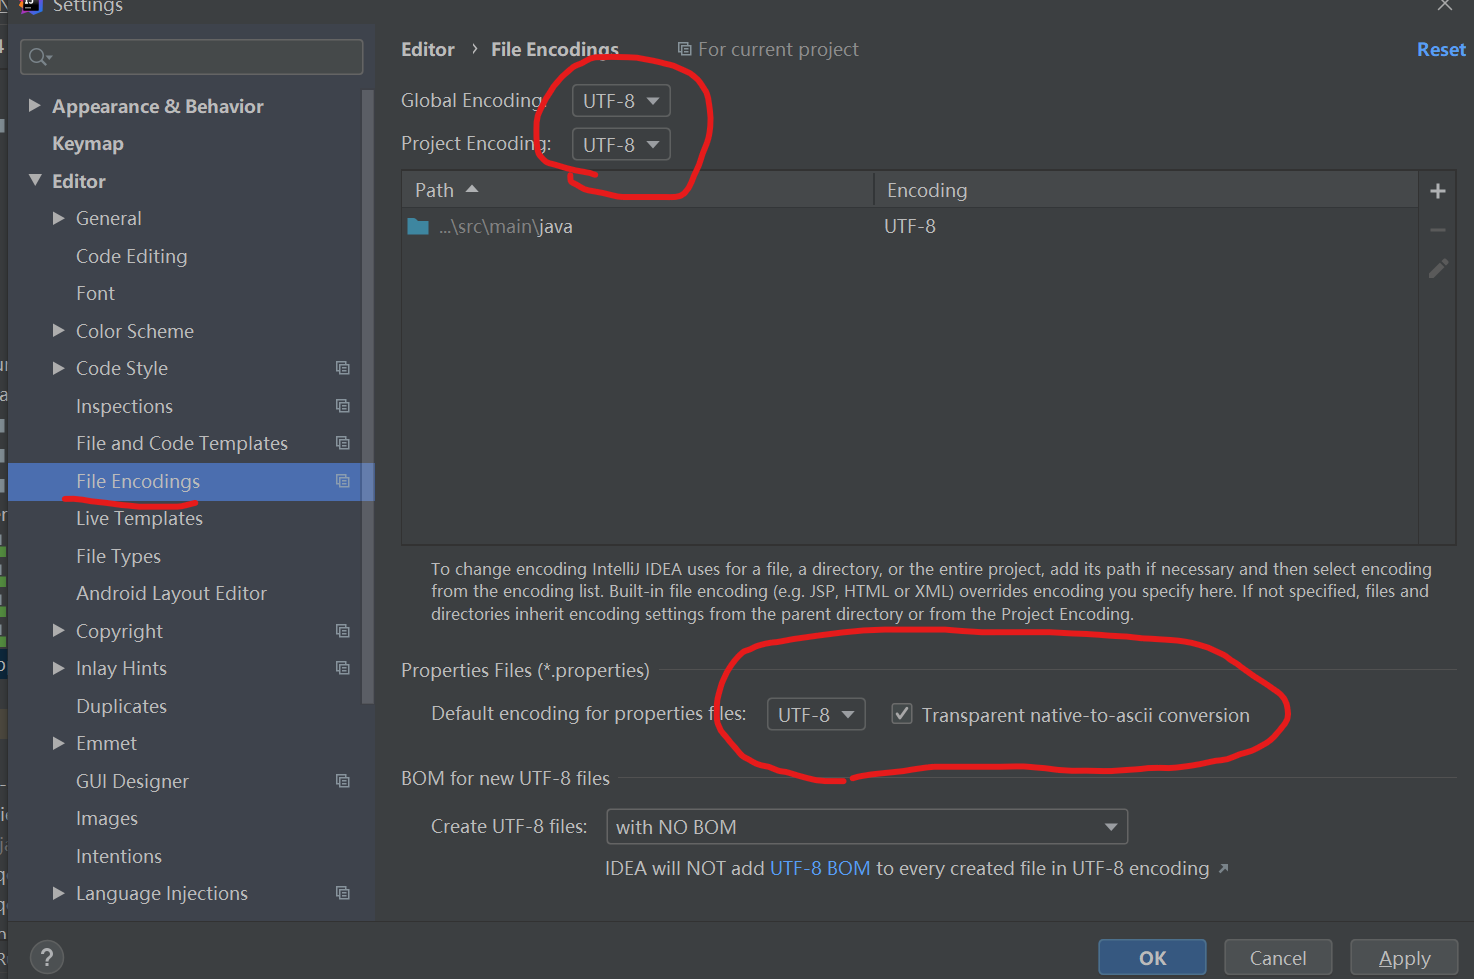
2.1. Unified property code
In the IDEA, uniformly set the code of properties as UTF-8
2.2. Prepare i18n international resource documents
-
Create a new i18n package in the resources directory to place internationalization related configurations
-
Three new configuration files are created to configure the language:
-
login.properties: effective when there is no language configuration;
-
login_en_US.properties: effective in English;
-
login_zh_CN.properties: effective in Chinese;
The naming method is a combination of underscores: file name_ Language_ country. properties
-
With this naming method, IDEA will help us recognize that this is an international configuration, which is automatically bound together and converted into the following mode:
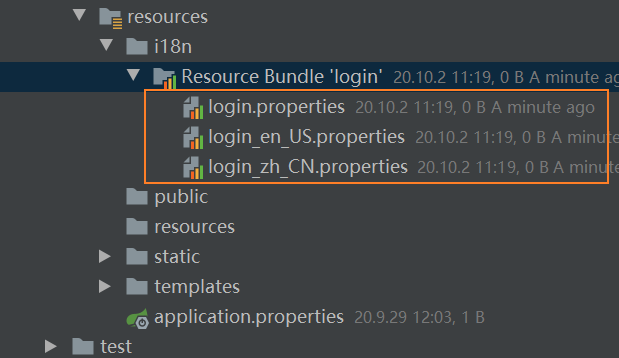
After binding together, if we want to add more language configurations, we just need to right-click the large resource package to add it to the binding file

At this time, you only need to enter the area name to create it successfully, such as en_US, it will be automatically recognized as the United States:

Then open the properties file in English or Chinese, and click Resources Bundle to enter the visual editing page

After entering the visual editing page
- Click+
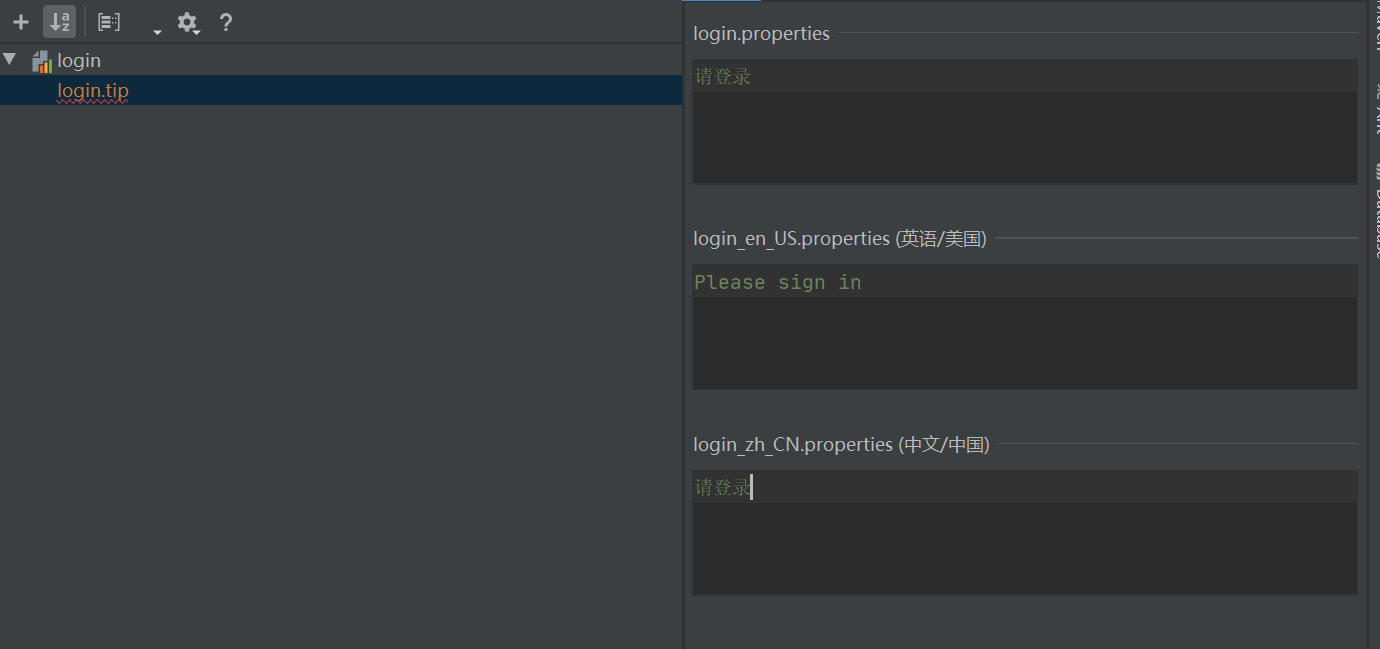
- Add attribute: first create a login Tip stands for the prompt in the home page (custom name login.XXX)
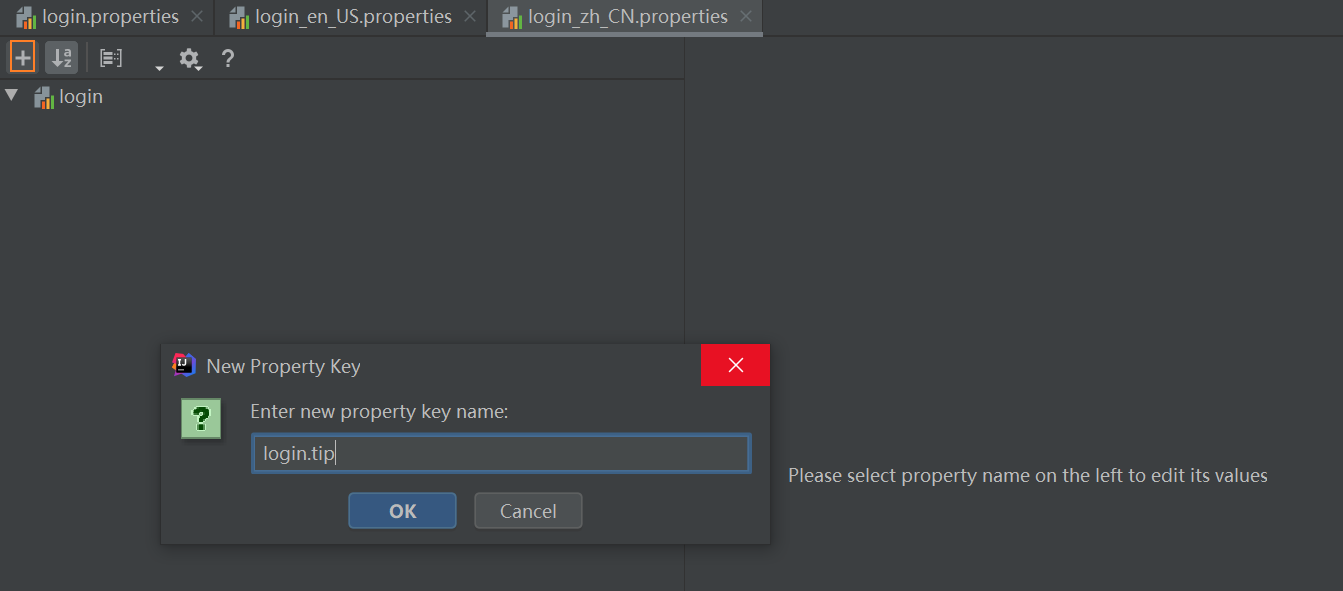
- Then, make language configuration for the prompts in three cases, and input them in three corresponding input boxes
Similar to tips for configuring tip, we are configuring more information
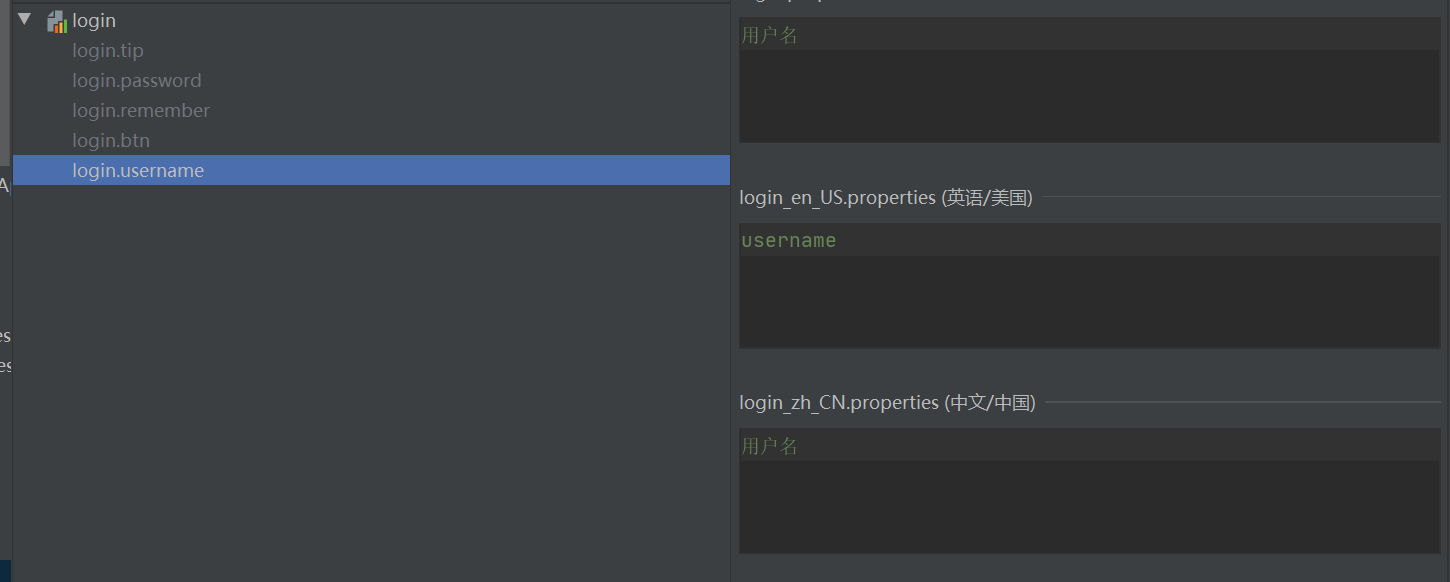
Then open the three configuration files and view the text content. You can see that all the configurations have been made
login. Properties (default)
login.btn=Sign in
login.password=password
login.remember=Remember me
login.tip=Please login
login.username=user name
login_ en_ US. Properties (English)
login.btn=login
login.password=password
login.remember=remember me
login.tip=Please sign in
login.username=username
login_ zh_ CN. Properties (Chinese)
login.btn=Sign in
login.password=password
login.remember=Remember me
login.tip=Please login
login.username=user name
2.3. Configure internationalization resource file name
In Spring programs, internationalization is mainly realized through the ResourceBundleMessageSource class
Springboot automatically configures the components for us to manage internationalization resource files through MessageSourceAutoConfiguration
Let's take a look at this class first
@Configuration(proxyBeanMethods = false)
@ConditionalOnMissingBean(name = AbstractApplicationContext.MESSAGE_SOURCE_BEAN_NAME, search = SearchStrategy.CURRENT)
@AutoConfigureOrder(Ordered.HIGHEST_PRECEDENCE)
@Conditional(ResourceBundleCondition.class)
@EnableConfigurationProperties
public class MessageSourceAutoConfiguration {

    private static final Resource[] NO_RESOURCES = {};

    @Bean
    @ConfigurationProperties(prefix = "spring.messages")
    public MessageSourceProperties messageSourceProperties() {
        return new MessageSourceProperties();
    }

    @Bean
    public MessageSource messageSource(MessageSourceProperties properties) {
        ...
    }
}
Let's focus on the messageSource() method
You can see that the parameter of this method is messageSourceProperties object. Analyze this class:
public class MessageSourceProperties {

    /*Comma separated list of base names (essentially fully qualified Classpaths)
      Each follows the ResourcesBundle Convention and easily supports slash based placement
      If it does not contain a full qualifier (such as org.mypackage), it will be resolved from the root directory of the classpath*/
    private String basename = "messages";

    /**
	 * Message bundles encoding.
	 */
    private Charset encoding = StandardCharsets.UTF_8;
intend:
- If you don't specify in the springboot configuration file Separated internationalized resource file names
- By default, he will go to the classpath to find messages Properties as internationalization resource file
Because we have customized the internationalization resource file, we need to configure the application.exe in the springboot configuration file Add the following configuration in propreties to specify the name of our configuration file
spring.message
2.4. Home page acquisition and display internationalization
Use the #{...} message expression to go to the homepage index HTML get internationalized values
Restart the project and visit the home page. It has been automatically recognized as Chinese
2.5. Configure international components to switch between Chinese and English
2.5.1 add Chinese and English switching label link
index. You can see two tags at the bottom of the HTML
<a class="btn btn-sm">chinese</a>
<a class="btn btn-sm">English</a>
To switch between Chinese and English through these two tags, first add jump links and response parameters to these two tags
<a class="btn btn-sm" th:href="@{/index.html(l='zh_CN')}">chinese</a>
<a class="btn btn-sm" th:href="@{/index.html(l='en_US')}">English</a>
Therefore, we need to customize the locale parser MyLocaleResolver to handle the link request with parameters
2.5.2. Custom region parser component
Locale resolver: locale resolver
In webmvcoautoconfiguration, find the * * localeResolver() * * method
This method is used to obtain the locale resolver object parser:
- If the user has configured, the user configured locale parser is used
- If the user has no configuration, the default is used
@Override
@Bean
@ConditionalOnMissingBean(name = DispatcherServlet.LOCALE_RESOLVER_BEAN_NAME)
public LocaleResolver localeResolver() {
    if (this.webProperties.getLocaleResolver() == WebProperties.LocaleResolver.FIXED) {
        return new FixedLocaleResolver(this.webProperties.getLocale());
    }
    AcceptHeaderLocaleResolver localeResolver = new AcceptHeaderLocaleResolver();
    localeResolver.setDefaultLocale(this.webProperties.getLocale());
    return localeResolver;
}
Therefore, in order to implement the effectiveness of customized international resources, we need to write a local parser to inherit the LocleResolver interface and rewrite its methods.
public class MyLocaleResolver implements LocaleResolver {
    //Parse request
    @Override
    public Locale resolveLocale(HttpServletRequest request) {
        //Gets the internationalization parameter in the request
        String language = request.getParameter("l");
        //Default address
        Locale locale = Locale.getDefault();
        //If the requested link parameter is not empty, the internationalization parameter is carried
        if(!StringUtils.isEmpty(language)){
            String[] split = language.split("_");//zh_ CN (language region)
            locale = new Locale(split[0], split[1]);
        }
        return locale;
    }

    @Override
    public void setLocale(HttpServletRequest request, HttpServletResponse response, Locale locale) {

    }
}
In order for our regionalization information to take effect, we need to configure this component! Add bean s under our MyMvcConfig configuration class
@Configuration
public class MyMvcConfig implements WebMvcConfigurer {

    ...

    @Bean
    public LocaleResolver localeResolver(){
        return new MyLocaleResolver();
    }
}
We restart the project and visit it. We found that clicking the button can switch!
4. Implementation of login function
When we click the login button, we will enter an interface (dashboard page)
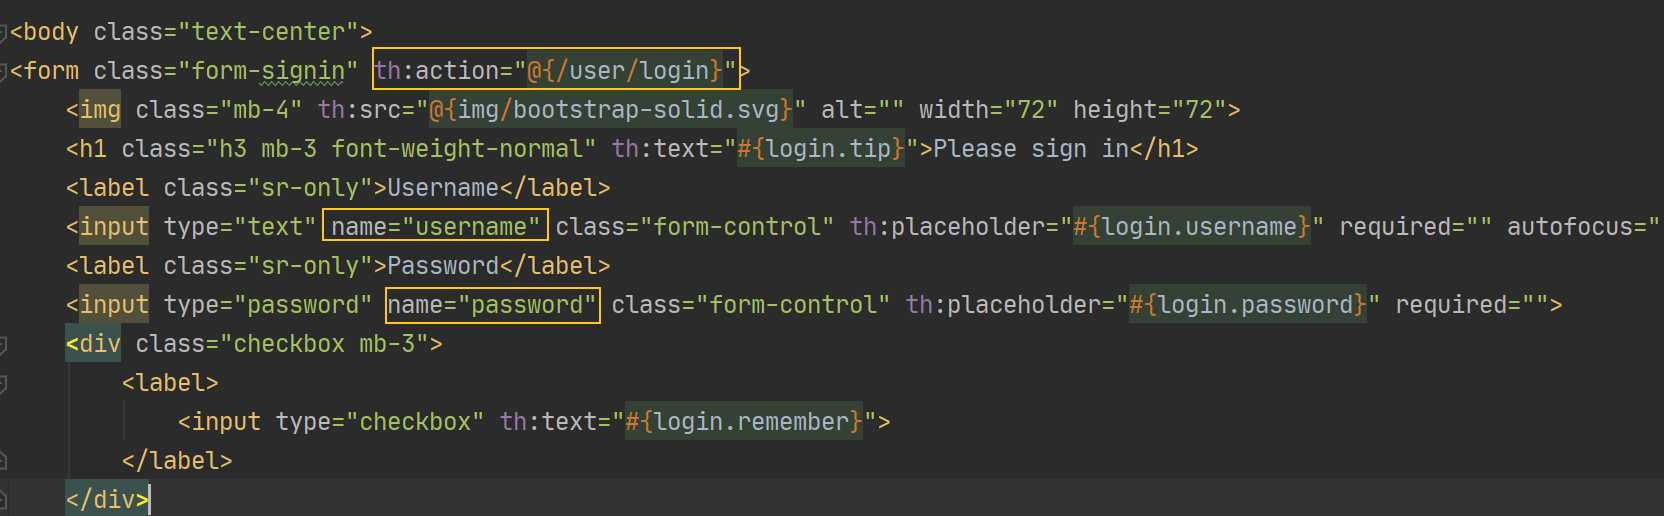
1. First, in index Change the submission address / user/login in the HTML form, and add the name attribute to the name and password input box for subsequent reference
2. Write the controller of the control layer
@Controller
public class LoginController {

    @RequestMapping("/user/login")
    public String login(@RequestParam("username") String username,
                        @RequestParam("passwrod") String password,
                        Model model){
        if("admin".equals(username) && "123123".equals(password)){
            return "dashboard";
        }else{
            model.addAttribute("msg", "Wrong user name or password");
            return "index";
        }
    }
}
3. In index HTML home page, add a tag to display the login error information returned from the controller
<p style="color: red" th:text="${msg}"></p>
Restart and test:
[Note: url divulges information]
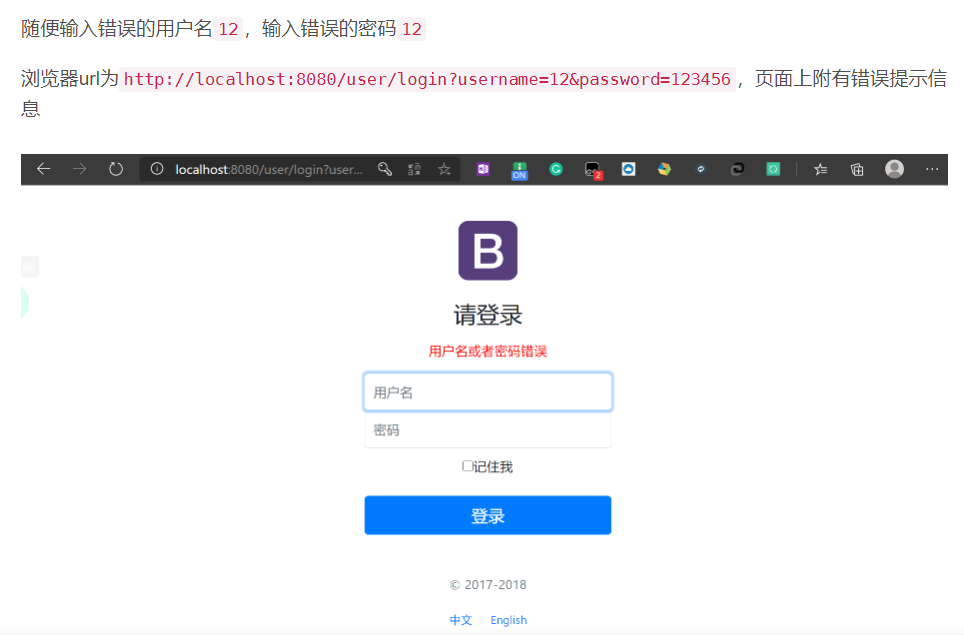
At this time, the login function is completed, but now there is a big problem. The url of the browser exposes the user's user name and password and divulges the user's information. At this time, we need to write a mapping!
- We add a code in MyMvcConfig
registry.addViewController("/main.html").setViewName("dashboard");
That is, access main The HTML page jumps to the dashboard page
- Then modify the LoginController and redirect to main. After login is successful HTML page, which will jump to the dashboard page
...
if("admin".equals(username) && "123123".equals(password)){
    return "redirect:/main.html";
}else{
...
Because:
==Is the original request forwarding: = = to the dashboard, or is the original request forwarded to the dashboard page
Reset backward: Yes to request Mian HTML, the request has changed!

Retest again. Enter the correct user name and password. After successful login, the browser will not carry the leaked information.
[Note: block unauthorized access]
There are new problems. Whether you log in or not, we visit localhost: 8080 / main HTML will jump to the dashboard page, and the interceptor is needed.
5. Login interceptor
To solve the above problem, we need to customize an interceptor
In the config directory, create a new login interceptor class: LoginHandlerInterceptor
After successful login, our user information will be obtained in the background; If you are not logged in, there will be no user information. We use this to intercept with interceptors:
- Put the user name information after user login into the session. When accessing the page, first judge whether there is user information in the session
- If not, the interceptor intercepts
- If so, release the interceptor
1. Save session information
It should be designed in LoginController first: after the user logs in successfully, the user information is stored in the session
@RequestMapping("/user/login")
public String login(@RequestParam("username") String username,
                    @RequestParam("password") String password,
                    Model model,
                    HttpSession session){
    if("admin".equals(username) && "123123".equals(password)){
        session.setAttribute("LoginUser", username);
        return "redirect:/main.html";
    }else{
        model.addAttribute("msg", "Wrong user name or password");
        return "index";
    }
}
2. Customize the preHandle method of the HandlerInterceptor interface
2. Then create a custom LoginHanderInterceptor class in the config directory (inheriting the HandlerInterceptor interface)
public class LoginHanderInterceptor implements HandlerInterceptor {
    @Override
    public boolean preHandle(HttpServletRequest request, HttpServletResponse response, Object handler) throws Exception {
        HttpSession session = request.getSession();
        Object loginUser = session.getAttribute("LoginUser");

        //LoginUser information in session, release
        if(loginUser != null){
            return true;
        }else{
        //If there is no LoginUser information in the session, it will refuse to release, put msg information in the request context, and extract the p tag of the index
          ,Forward request to index.html page
            request.setAttribute("msg", "Insufficient permissions, please log in first!");
            request.getRequestDispatcher("/index.html").forward(request,response);
            return false;
        }
    }
}
3. Inject bean s into configuration classes
Override the addInterceptors method of the WebMvcConfigurer interface
@Override
public void addInterceptors(InterceptorRegistry registry) {
    registry.addInterceptor(new LoginHanderInterceptor())
        .addPathPatterns("/**")
        .excludePathPatterns("/index.html", "/", "/user/login", "/css/**", "/js/**", "/img/**");
}
Like adding a visual controller, add your custom interceptors through the addInterceptors method
- Interceptor action path:/**
- Exclusion of functions: "/ index.html", "/", "/user/login", "/css/**", "/js/**", "/img / * *"
6. Display employee information
1. Implement Customers view jump
Need to be in dashboard In the sidebar of the HTML page, click the Customers link to jump to the user information list page
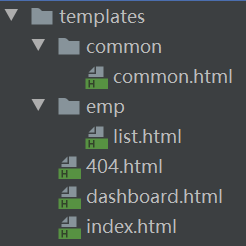
1. Create a new package in the templates Directory: emp, which is used to put the page about employee information. We will list Move HTML page into it
2. Write the controller, process the / emps request, and create an EmployeeController class under the controller package
/***
     * All employee information
     * @param model view resolver
     * @return Return to the list page (list page: display all employee information)
     */
@RequestMapping("/emps")
public String list(Model model){
    Collection<Employee> allEmployee = employeeDao.getAllEmployee();
    model.addAttribute(allEmployee);

    return "emp/list";
}
3. Modify list HTML and dashboard Customer link request path in HTML
<a class="nav-link" th:href="@{/emps}">
Restart the main program, log in to the great God board page, click Customer, and successfully jump to / emps
[question]
- After clicking Customer, the link here should be highlighted, but after clicking here, it is still in the normal style, and the highlight point is still on the dashboard
- list.html and dashboard The side bar and top bar of HTML page are the same, which can be extracted and shared!
2. Extract the public part of the page
1. In the templates directory, create a new common package (used to store the extracted public parts)
2,dashboard.html and list There are common part codes in HTML (top bar, side bar)
-
So take out its public code and put it into the new html file under the common directory: common html
-
Take out the label and write: th:fragment="topbar", th: fragment = "sidebar"
<!DOCTYPE html>
<html lang="en" xmlns:th="http://www.thymeleaf.org">

<!--Top navigation bar, using th:fragment Extracted, named topbar-->
<nav th:fragment="topbar" class="navbar navbar-dark sticky-top bg-dark flex-md-nowrap p-0">
   ......
</nav>

<!--Sidebar, using th:fragment Extracted, named sidebar-->
<nav th:fragment="sidebar" class="col-md-2 d-none d-md-block bg-light sidebar">
   ......
</nav>

</html>
3. Delete the extracted part of the original code and insert common. In your original place HTML code
<body>
		<div th:insert="common/common::topbar"></div>

		<div class="container-fluid">
			<div class="row">
				<div th:insert="~{common/common::sidebar}"></div>
            </div>
            ....
</body>
- With or without ~{}
- th:insert or th:replace
- Note that the inserted file is the same as common Relative directory hierarchy of HTML
3. Click highlight
In common Judging links in HTML
<a th:class="${active == 'dashboard.html'? 'nav-link active' : 'nav-link'}" href="http://getbootstrap.com/docs/4.0/examples/dashboard/#">
If active is dashboard HTML, class is equal to NAV link active (highlight), otherwise it is set to NAV link
Where does the value of active come from?
Each time you enter an html page, the corresponding value is passed on the inserted common part code tag, for example:
<!--sidebar -->
<div th:replace="~{common/common::sidebar(active='list.html')}"></div>
After entering the list page, list When the sidebar code of HTML is introduced into the public code, a parameter is passed to it. The public code part recognizes this parameter and displays it highlighted or not highlighted after making a judgment.
4. Display employee information
1. Put all the employee information found in the EmployeeController into the model
Collection<Employee> allEmployee = employeeDao.getAllEmployee();
model.addAttribute("emps", allEmployee);
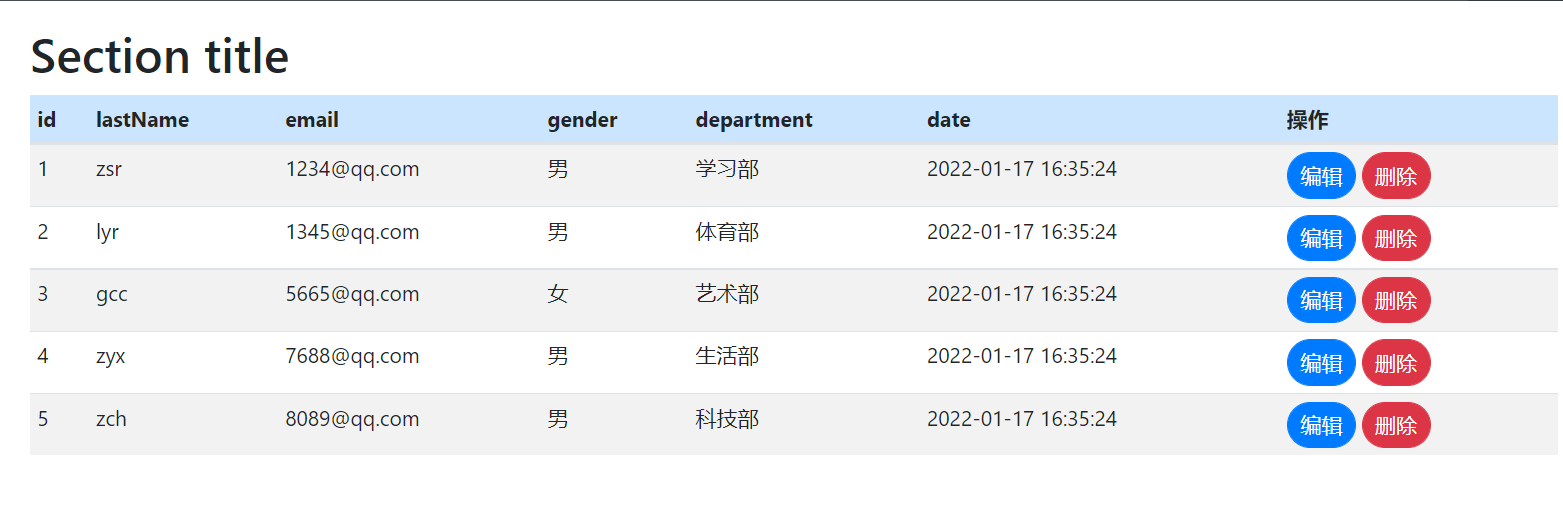
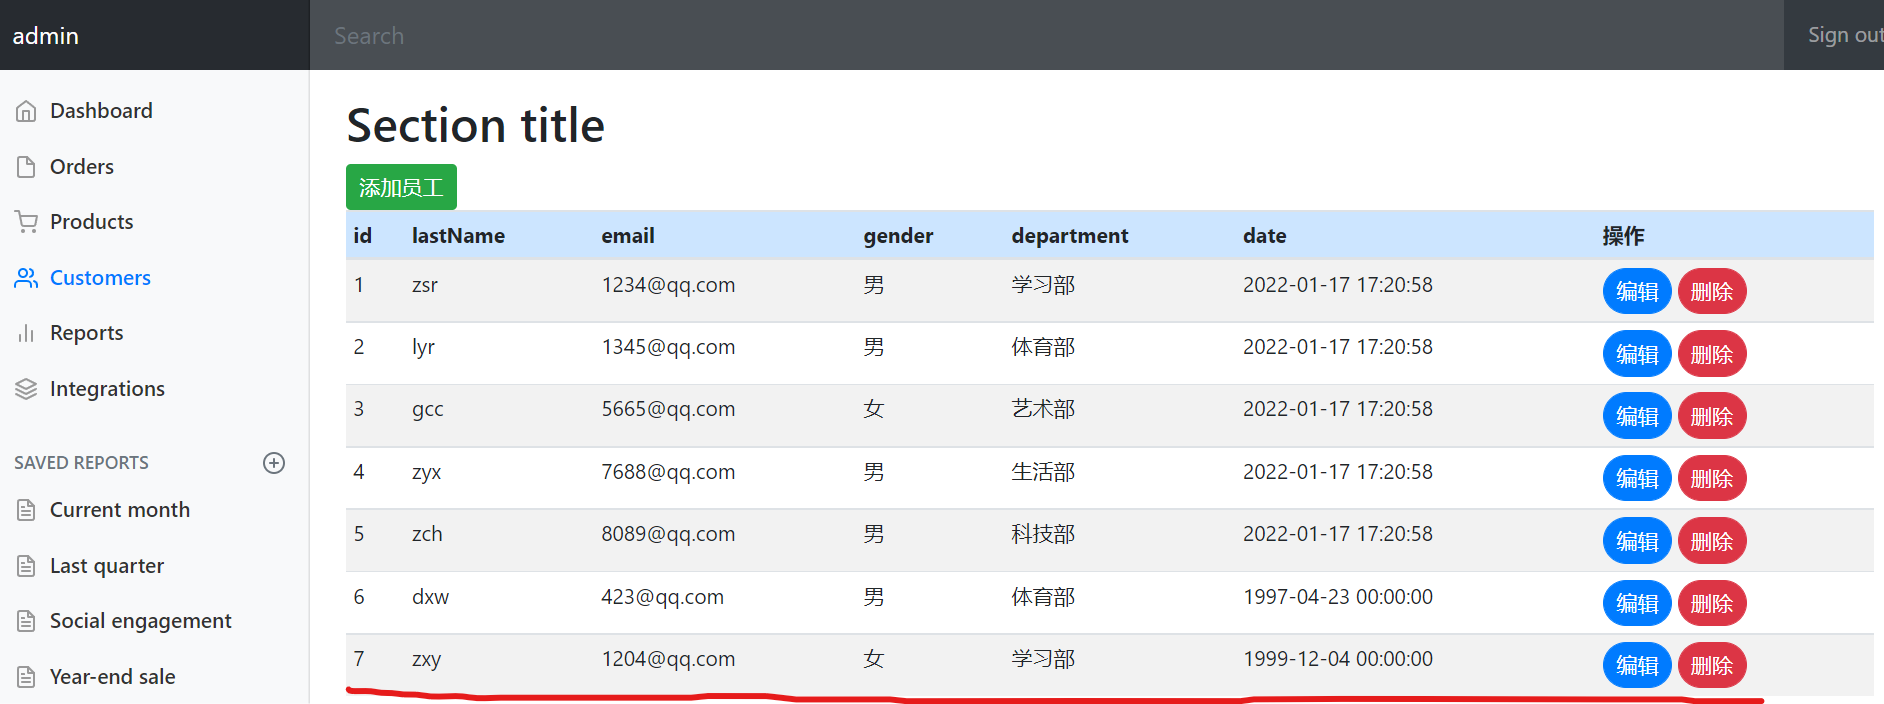
2. In the previous section, take out emps, and traverse each in the table
<table class="table table-striped table-sm">
    <thead>
        <tr>
            <th>id</th>
            <th>lastName</th>
            <th>email</th>
            <th>gender</th>
            <th>department</th>
            <th>date</th>
        </tr>
    </thead>
    <tbody>
        <tr th:each="emp:${emps}">
            <td th:text="${emp.getId()}">
            <td th:text="${emp.getLastName()}">
            <td th:text="${emp.getEmail()}">
            <td th:text="${emp.getGender() == 1 ? 'male' : 'female'}">
            <td th:text="${emp.getDepartment().getDepartmentName()}">
            <td th:text="${#dates.format(emp.getDate(),'yyyy-MM-dd HH:mm:ss')}">
            </td>
        </tr>
    </tbody>
</table>
[note]
Date format conversion: thymeleaf syntax is a special conversion format #dates format(emp.getDate(),'yyyy-MM-dd HH:mm:ss')
3. Add two buttons in each row of the employee list: edit and delete
Restart the main program test here. Success:
7. Increase staff
[overall flow chart]
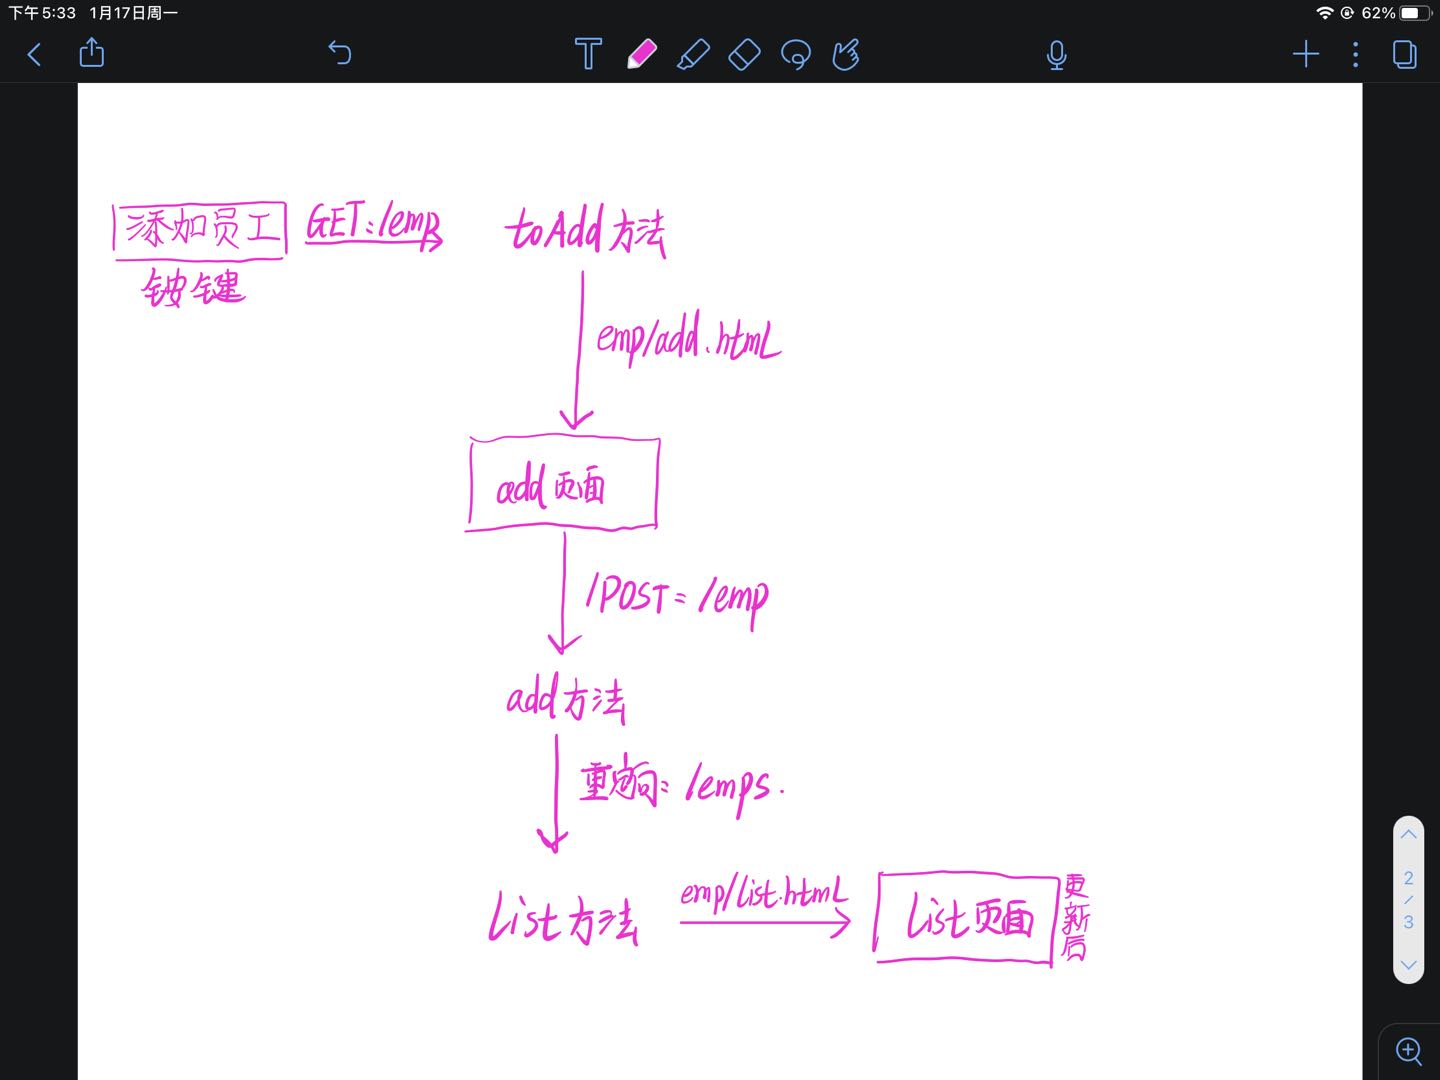
1. Add employee button on the list page
1. First, in the list On the HTML page, add a button to add employees. Click the button to initiate a request: / add
<a class="btn btn-sm badge-success" th:href="@{/emp}">Add employee</a>
2. Write the controller corresponding to / emp, add a toAdd method in EmployeeController to handle the button submission action in the list page, and return to add HTML page
/***
     * Get all departments information
     * @param model view resolver
     * @return Jump to add HTML page
     */
@GetMapping("/emp")
public String toAdd(Model model){
    Collection<Department> allDepartments = departmentDao.getAllDepartments();
    model.addAttribute("departments", allDepartments);

    return "emp/add";
}
[note]
add. In HTML, there is a partial option: the front end needs to get all the departments information, so the toAdd method has two functions:
- Put the departments information into the model;
- Jump to add HTML interface
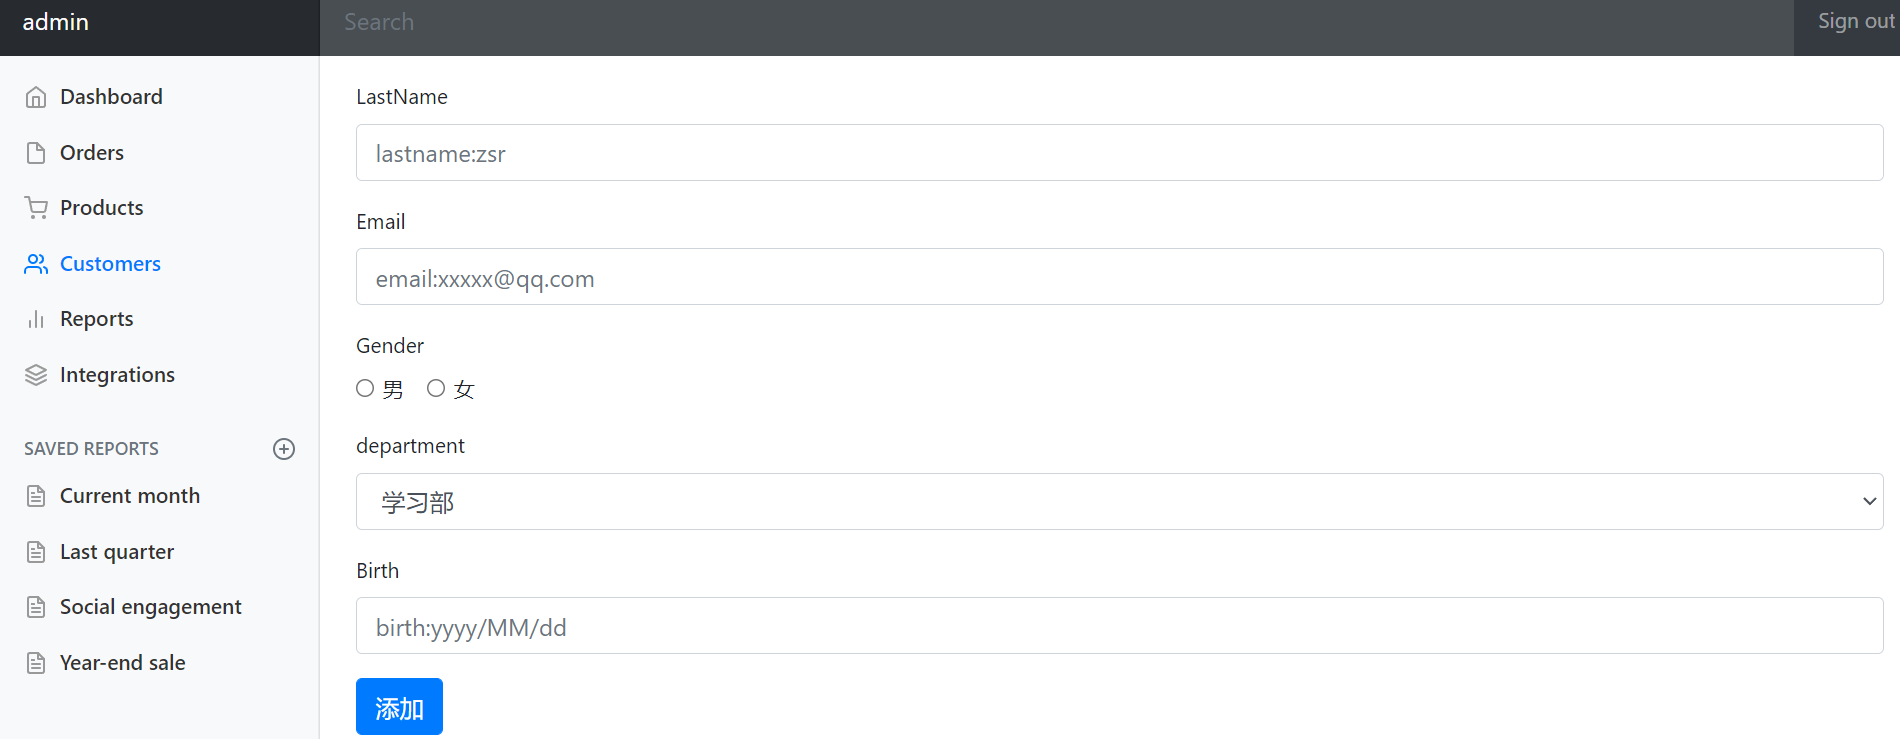
2. Create add employee page add
1. Create a new add. In the templates/emp directory html
2. We copied the list HTML, modify the central content information and change it to our table
<form th:action="@{/emp}" method="post">
    <div class="form-group">
        <label>LastName</label>
        <input type="text" name="lastName" class="form-control" placeholder="lastname:zsr">
    </div>
    <div class="form-group">
        <label>Email</label>
        <input type="email" name="email" class="form-control" placeholder="email:xxxxx@qq.com">
    </div>
    <div class="form-group">
        <label>Gender</label><br/>
        <div class="form-check form-check-inline">
            <input class="form-check-input" type="radio" name="gender" value="1">
            <label class="form-check-label">male</label>
        </div>
        <div class="form-check form-check-inline">
            <input class="form-check-input" type="radio" name="gender" value="0">
            <label class="form-check-label">female</label>
        </div>
    </div>
    <div class="form-group">
        <label>department</label>
        <!--Pay attention here name yes department.id,Because the parameter passed in is id-->
        <select class="form-control" name="department.id">
            <option th:each="department:${departments}" th:text="${department.getDepartmentName()}" th:value="${department.getId()}"></option>
        </select>
    </div>
    <div class="form-group">
        <label>Birth</label>
        <!--springboot The default date format is yy/MM/dd-->
        <input type="text" name="date" class="form-control" placeholder="birth:yyyy/MM/dd">
    </div>
    <button type="submit" class="btn btn-primary">add to</button>
</form>
Restart and see
Click add employee - > successfully jump to add HTML page

[note]
The department drop-down box should be all parts, which is obtained by traversing the display after we get the departments from the front end
- Note that the employee object is received in the background, and the Department attribute is the object, so the name of the front end cannot be department, but the value is department ID, the backend parameter parser will be incorrectly configured!
- Directly let the front end pass in department ID, instantiate the object after the backend, but the departmentName property may be NULL
<!--Pay attention here name yes department.id,Because the parameter passed in is id-->
<select class="form-control" name="department.id">
    <option th:each="department:${departments}" th:text="${department.getDepartmentName()}" th:value="${department.getId()}"></option>
</select>
3. Add page add employee request
In add HTML page, after we fill in the information and click the Add button, we should complete the addition and return to the list page to display the new employee information;
So in add The moment the HTML button is clicked, we also initiate a post request / emp(restF style)
<form th:action="@{/emp}" method="post">
Then write the add method under the corresponding controller: EmployeeController
/****
     * Add new users
     * @param employee The user information passed in from the front end is received by employee
     * @return Jump to list HTML page
     */
@PostMapping("/emp")
public String add(Employee employee){
    employeeDao.insert(employee);

    return "redirect:/emps";
}
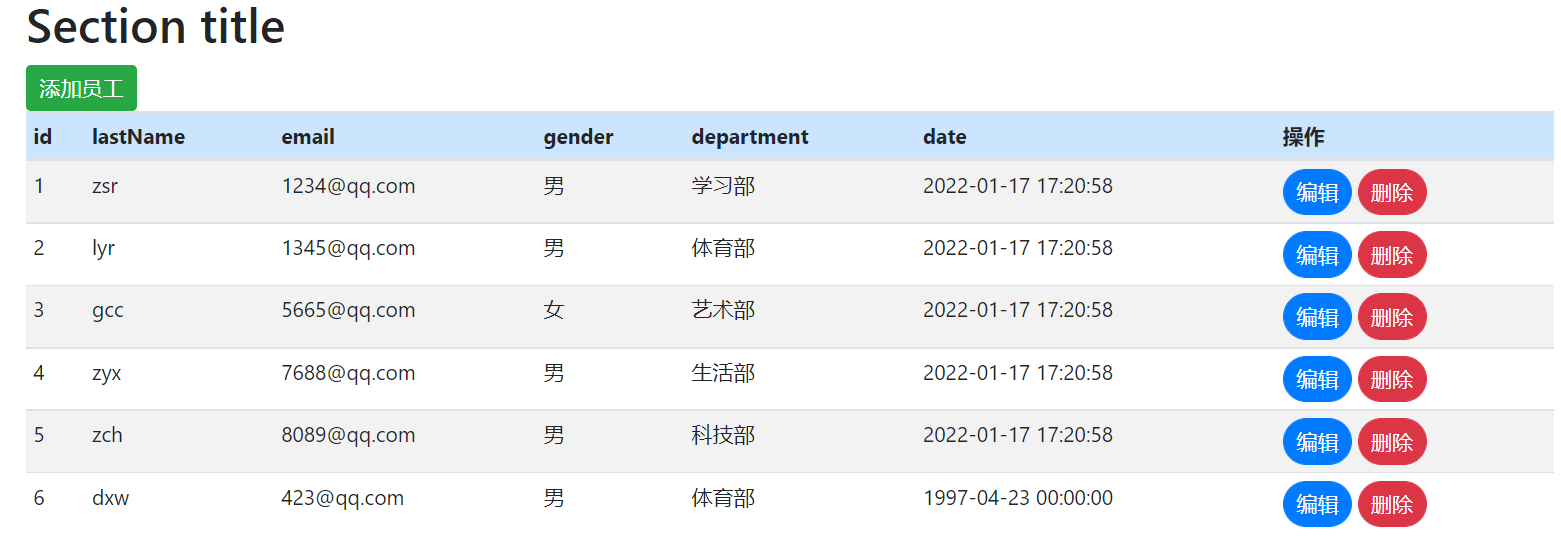
Note: after adding, redirect to emps to obtain the employee information used in the database, and then to list HTML page display
Test after restart:
Click the Add button to successfully add employees
8. Modify employee information
1. list page edit button, add request
After clicking Edit, you should jump to edit HTML for editing
- The first is to list Add a href attribute to the HTML tag to implement the click request / edit/id number (restFul style)
<a th:href="@{/edit/${emp.getId()}}" style="color: white ; border-radius: 50px" class="btn btn-sm btn-primary">edit</a>
- Then write the corresponding controller, add a new method called edit under the EmployeeController class to handle the list page, click the edited operation and return to edit HTML edit employee page
 /***
     * restful Style receiving parameters
     * @param id list Edit the parameters carried in the request for the key
     * @param model view resolver
     * @return Jump to the editing interface
     */
    @RequestMapping("/edit/{id}")
    public String edit(@PathVariable("id") Integer id, Model model){
        //Query the employee with the specified id and add it to the employee for front-end reception
        Employee employee = employeeDao.getEmployeeByID(id);
        model.addAttribute("employee", employee);

        //Find out the information of all parts and add it to departments for front-end reception (the same as add)
        Collection<Department> allDepartments = departmentDao.getAllDepartments();
        model.addAttribute("departments", allDepartments);

        return "/emp/edit";
    }
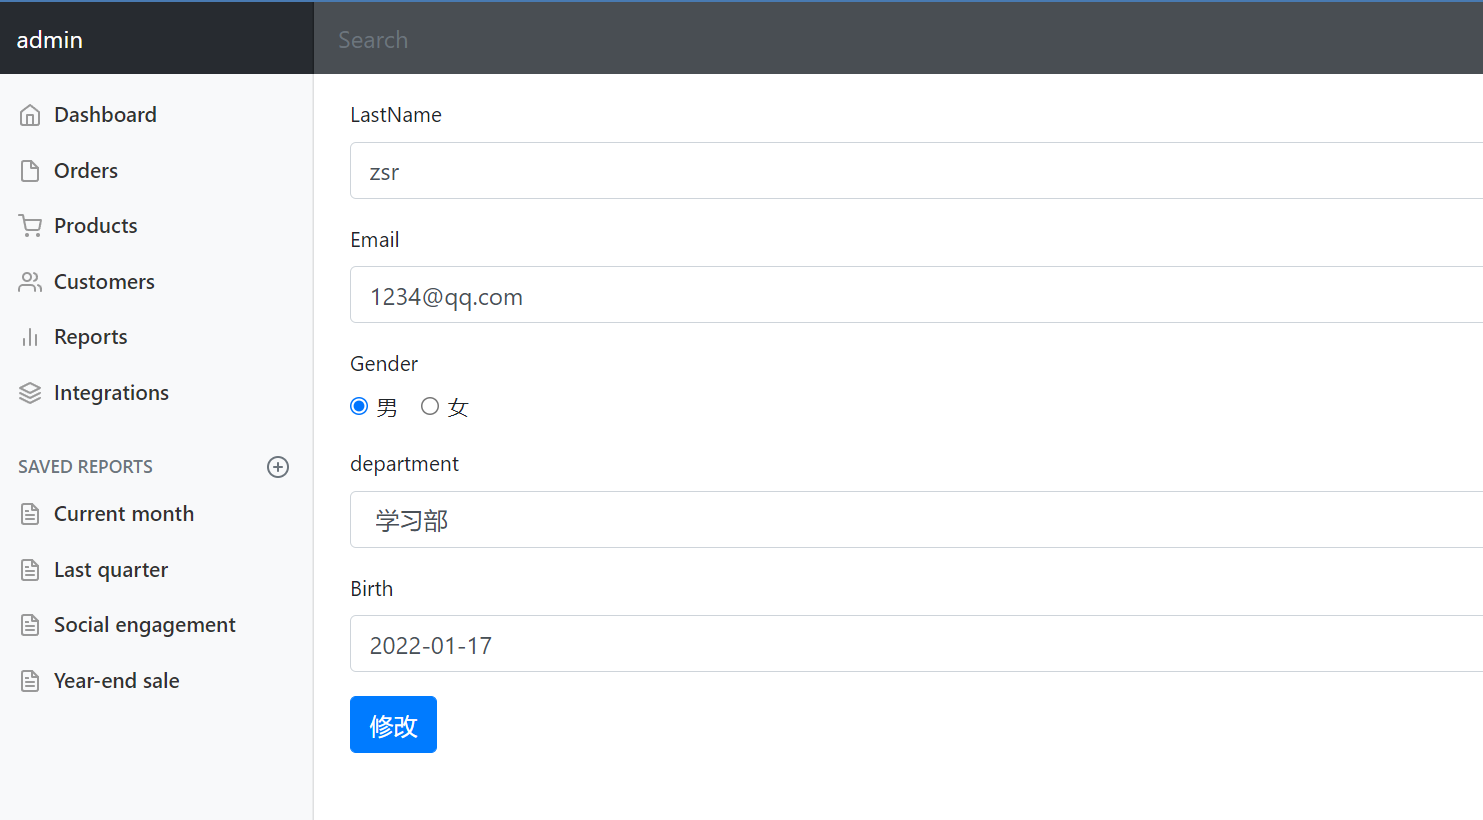
2. Create edit employee page edit
edit.html
Modification:
- th:value="${employee.getLastName()}" put values in advance. Different types of tags have different properties!
- th:checked="${employee.getGender() == 1}"
- th:selected="${department.getId() == employee.getDepartment().getId()}"
<form th:action="@{/edit}" method="post">
    <div class="form-group">
        <label>LastName</label>
        <input th:value="${employee.getLastName()}" type="text" name="lastName" class="form-control" placeholder="lastname:zsr">
    </div>
    <div class="form-group">
        <label>Email</label>
        <input th:value="${employee.getEmail()}" type="email" name="email" class="form-control" placeholder="email:xxxxx@qq.com">
    </div>
    <div class="form-group">
        <label>Gender</label><br/>
        <div class="form-check form-check-inline">
            <input th:checked="${employee.getGender() == 1}"  value="1" class="form-check-input" type="radio" name="gender" value="1">
            <label class="form-check-label">male</label>
        </div>
        <div class="form-check form-check-inline">
            <input th:checked="${employee.getGender()==0}" value="0" class="form-check-input" type="radio" name="gender" value="0">
            <label class="form-check-label">female</label>
        </div>
    </div>
    <div class="form-group">
        <label>department</label>
        <!--Pay attention here name yes department.id,Because the parameter passed in is id-->
        <select class="form-control" name="department.id">
            <option th:each="department:${departments}"
                    th:selected="${department.getId() == employee.getDepartment().getId()}"
                    th:text="${department.getDepartmentName()}"
                    th:value="${department.getId()}">
            </option>
        </select>
    </div>
    <div class="form-group">
        <label>Birth</label>
        <!--springboot The default date format is yy/MM/dd-->
        <input th:value="${employee.getDate()}" type="text" name="date" class="form-control" placeholder="birth:yyyy/MM/dd">
    </div>
    <button type="submit" class="btn btn-primary">modify</button>
</form>
Start the main program test:
[note]
To modify the date format in advance
<input th:value="${#dates.format(employee.getDate(), 'yyyy-MM-dd')}" type="text" name="date" class="form-control" placeholder="birth:yyyy/MM/dd">
[Note: modify the date attribute format of employee]
@DateTimeFormat(pattern = "yyyy-MM-dd HH:mm:ss")
private Date date;
Make it compatible with the time format parameters returned by the front end.
3. Edit page edit complete submit request
In edit HTML after clicking the Modify button, we need to return to the list page to update the employee information. Therefore, we need to add a href attribute to implement the request after clicking the button: / editEmp
<form th:action="@{/editEmp}" method="post">
Write the corresponding controller, process the request to modify the button, and use the editEmp method
/***
     * Handle the request for the edit key
     * @param employee Parameters passed from the front end
     * @return Redirect to / emps to refresh the list
     */
    @RequestMapping("/editEmp")
    public String editEmp(Employee employee){
        employeeDao.insert(employee);

        return "redirect:/emps";
    }
[Note: hide submission id when modifying]
If you press add HTML style submits the modified information, and id=null is passed in the parameters to the back end. Therefore, the employee object received by the back end has no ID value, which will trigger the self increasing ID condition and generate a new user.

Therefore, you need to edit Add hidden submission values to the from form of HTML
<input type="hidden" name="id" th:value="${employee.getId()}">
Then click Modify to finish the modification normally and return to the list HTML page.
4. Delete employee information
Write a request to the delete tag in the list (pay attention to the writing method)
<a th:href="@{/delete/{id}(id=${emp.getId()})}" style="color: white; border-radius: 50px" class="btn btn-sm btn-danger">delete</a>
[Note: restFul style thymeleaf request style]
{id}(id = ${...}) - parameter value
Then write the controller to process the request to delete the tag and delete the employee with the specified id
 /***
     * Processing delete requests
     * @param id Specify employee id
     * @return Redirect to emps and refresh the list
     */
    @RequestMapping("/delete/{id}")
    public String deleteEmp(@PathVariable("id") Integer id){
        employeeDao.deleteEmployeeByID(id);

        return "redirect:/emps";
    }
After the test is restarted, it is successfully deleted and the page is refreshed.
9. 404 page customization
Just create an error package in the templates directory, and then 404 When html is put into it and an error is reported, Springboot will automatically find this page
Test: casually visit a non-existent page
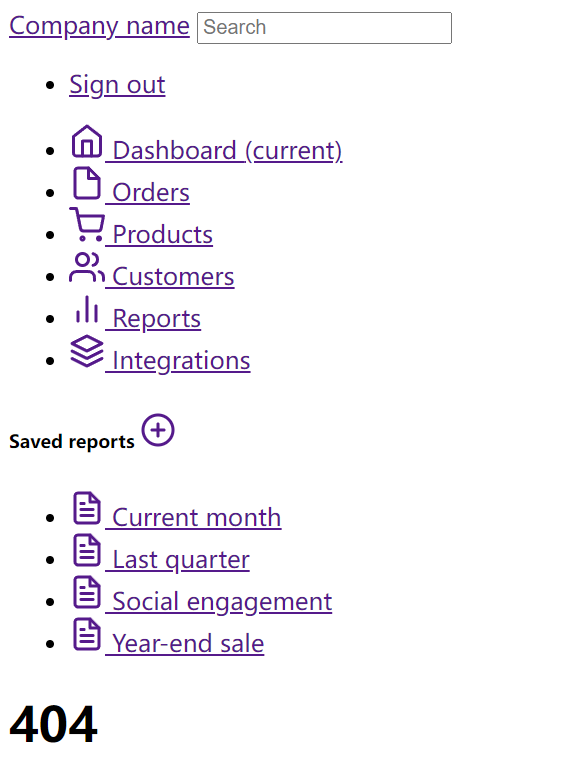
The 404 page that appears is our own 404 html
10. Logoff operation
On the common page, modify the href attribute of the top navigation bar tab to click initiate request / logout
<li class="nav-item text-nowrap">
            <a class="nav-link" th:href="@{/logout}">Sign out</a>
</li>
Then write the corresponding controller to handle the request of clicking Logout, write the method in LoginController, clear the session and redirect to the home page
/***
     * Log off user session
     * @param session HttpSession
     * @return Redirect to: index html
     */
    @RequestMapping("/logout")
    public String signout(HttpSession session){
        session.invalidate();

        return "redirect:index.html";
    }
Retest. After successful login, click sign out to exit the home page.
Employee id
*@ return redirect to emps to refresh the list
*/
@RequestMapping("/delete/{id}")
public String deleteEmp(@PathVariable("id") Integer id){
employeeDao.deleteEmployeeByID(id);
    return "redirect:/emps";
}
After the test is restarted, it is successfully deleted and the page is refreshed.


# 9. 404 page customization

Just in templates Create a new directory error Package, then 404.html Put it into it and report an error Springboot This page will be found automatically


Test: casually visit a non-existent page

[External chain picture transfer...(img-VdUALG20-1642820791754)]

The 404 page that appears is our own 404.html


# 10. Logoff operation

stay common Page, modify the top navigation bar label href Property to implement Click to initiate a request/logout

```html
<li class="nav-item text-nowrap">
            <a class="nav-link" th:href="@{/logout}">Sign out</a>
</li>
Then write the corresponding controller to handle the request of clicking Logout, write the method in LoginController, clear the session and redirect to the home page
/***
     * Log off user session
     * @param session HttpSession
     * @return Redirect to: index html
     */
    @RequestMapping("/logout")
    public String signout(HttpSession session){
        session.invalidate();

        return "redirect:index.html";
    }
Retest. After successful login, click sign out to exit the home page.