Learning objectives and contents
1. Be able to understand the purpose of reading and writing separation
2. It can describe the common implementation of read-write separation
3. It can realize the separation of reading and writing through the project framework configuration file
4. It can realize read-write separation through middleware
1, Background description and scheme design
1. Business background description
Date: June, 2014- two thousand and fifteen point nine
Release product type: Internet dynamic site mall
Number of users: 10000-12000 (surge in number of users)
PV: 100000-500000 (total number of 24-hour visits)
QPS: 50-100 * (accesses per second)
DAU: 2000 (number of active households per day)
In the previous business, a single MySQL server was used to provide services, and multiple MySQL database servers were used to reduce the pressure on a single server, so as to achieve the stability of the cluster architecture and the consistency and integrity replication of high availability data
Through business comparison and analysis, it is found that as the number of active users increases, there are more requests to read data, so we focus on solving the pressure of reading data
2. Simulation operation and maintenance design scheme
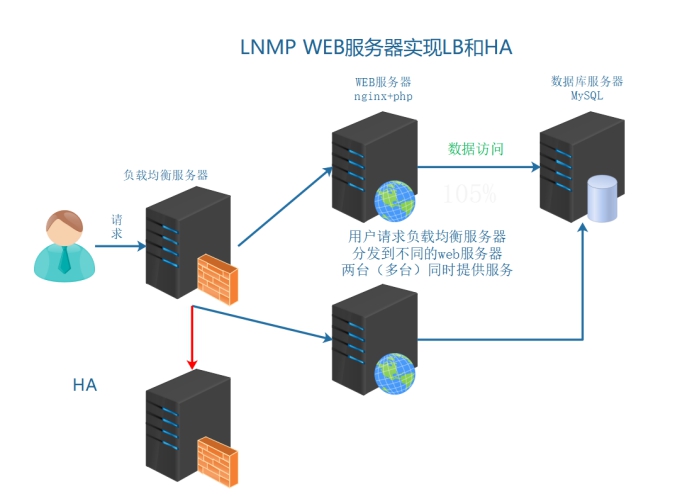
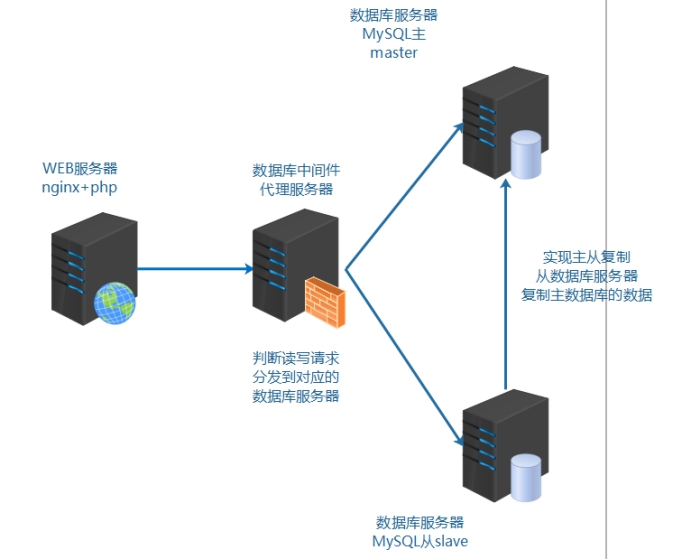
According to the above business requirements, the data read-write separation is realized on the basis of the previous business architecture
2, Introduction to MySQL read / write separation
1. Purpose of read-write separation
Database load balancing:
When the number of database requests increases, the single instance database cannot meet the business requirements. The database instance needs to be expanded. Multiple databases make corresponding requests at the same time. In other words, load balancing is required for database requests
However, due to the special reasons of database service, the basic requirements of database expansion are: data consistency and integrity. Therefore, to ensure the data consistency and integrity of multiple database instances, take MySQL as an example, the official provides a master-slave replication mechanism.
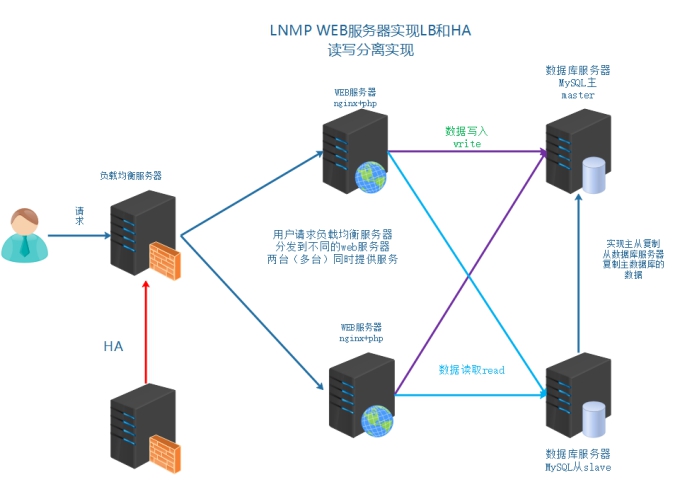
Read write separation:
The load balancing of database is different from that of other services, and the data requires consistency. Based on master-slave replication, common database load balancing uses read-write separation. Write to the master database and read to the slave database. It can be considered that the separation of database read and write is a special implementation of load balancing.
In real business, there is a problem of read-write separation, which is not real-time enough.
For businesses requiring high real-time performance
① Cache write master library write cache read cache
② Can read Master
③ After adding data, there is a jump waiting time (5s), and the data is under review
2. Common implementation methods of read-write separation
① Read write separation of business code
In the business code, you need to judge whether the data operation is read or write. The read connection operates from the data server and the write connection operates from the main database server
Taking the current LNMP as an example, it is necessary to realize read-write separation through PHP code
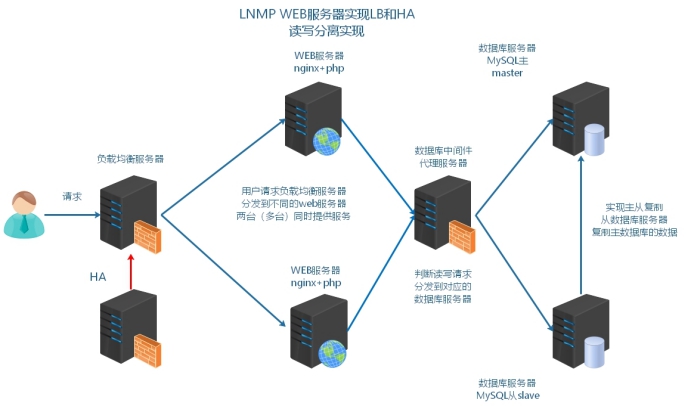
② Read write separation of middleware agent
In the business code, the operation of the database does not directly connect to the database, but first requests to the middleware server (agent)
The proxy server determines that the read operation goes to the slave data server and the write operation goes to the master data server
| MySQL Proxy | MySQL official beta is no longer maintained |
|---|---|
| Atlas | Qihoo 360 is based on MySQL Proxy https://github.com/Qihoo360/Atlas |
| DBProxy | Meituan comments |
| Amoeba | Early Alibaba |
| cobar | Alibaba |
| MyCat | Cobar based on Ali open source |
| kingshared | go language development https://github.com/flike/kingshard |
| proxysql | http://www.proxysql.com/ |
That is, the architecture shown below
Q: how to choose?
① The business realizes read-write separation with convenient operation and low cost. The current development framework basically supports read-write separation
② Middleware proxy server can not only realize the separation of reading and writing, but also serve as the management platform of database cluster
3, Implementation of MySQL read / write separation case list
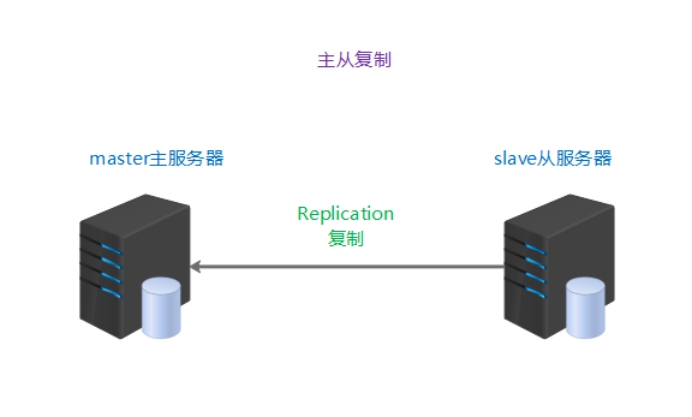
1. Set up M-S replication
Principle of master-slave replication: the master server starts the bin log (write operations are recorded) and obtains the bin log of the master server from the server and records it in the relay log. The slave server replays the relay log through asynchronous threads.
server02 mysql master 192.168.17.100
server06 mysql slave 192.168.17.105
2. master configuration
① On the master server, authorize the slave server to copy the slave permission
slave logs in to the master through MySQL connection to read binary logs, so it needs to
Configure permissions for slave on master
mysql > grant replication slave on *.* to 'slave'@'192.168.17.%'identified by '123456';
② The master server opens the bin log and identifies the server ID
shell > vim /etc/my.cnf
Profile content
[mysqld]
log-bin = mysql-index
server-id = 1
Note: restart mysql to make the configuration take effect
③ Make a full backup
If the master-slave database is confirmed, the default start data is consistent, and no backup can be made
shell > mysqldump -uroot -p'123456' --all-databases > /root/mysql.sql
④ View the bin log on the master and its position location
mysql > show master status;
View and record the value of File and Position. Then you need to point to this information on the slave server
| parameter | effect |
|---|---|
| File | Bin log log file name recorded |
| Position | Location recorded by bin log log file |
3. slave configuration
① Restore backup files
If the data of slave and master are the same, you can choose not to backup or import
② Configure the server ID to identify the server
shell > vim /etc/my.cnf
Profile content
[mysqld]
server-id=2
Since it is a MySQL instance obtained by cloning, auto Like the UUID recorded in conf, you need to delete / usr / local / MySQL / data / auto Conf file, otherwise the master and slave cannot identify each other, restart and automatically generate a new one.
③ Configure slave replication
mysql > stop slave;
mysql> change master to master_host='192.168.17.101',master_user='slave1',master_password='123456',master_log_file='mysql-bin.000002',master_log_pos=333;
mysql > start slave;
Parameter description
master_host IP address of the master
master_ The user master is allowed to log in and has the permission of replication slave
master_password the password of the user
You need to use MySQL > show master status; Execute on master
master_ log_ Name of bin log log file recorded by file master
master_ log_ The location corresponding to the bin log log file recorded by the POS master
④ Start replication and check the results
mysql > show slave status\G;
Two yes's are found, and the master-slave replication is successful. Otherwise, view the information at the bottom of the display and troubleshoot the problem through the error information.
4. Simple business code implementation
Example syntax Code:
<?php
//Create class
class Mysql {
  //Construction method
  //This method is triggered when the class is instantiated
  public function __construct(){
     $this->master = @new mysqli('192.168.17.100','tp5shop','$Abc3721','tp5shop');
	 $this->slave = @new mysqli('192.168.17.105','tp5shop','$Abc3721','tp5shop');
     // If an error is reported from the slave connection, connect to the master
     if($this->slave->connect_errno){
      $this->slave=$this->master;
     }
  }
  // SQL execution method
  public function query($sql){
    //Determine whether selete exists in the statement
    if(strpos($sql, 'select') !== false){
      //This is a query operation
      $rs = $this->slave->query($sql);
    }else{
      $rs = $this->master->query($sql);
    }
    return $rs;
  }
}
$mysql = new Mysql();
$sql = "select * from tpshop_goods";
$rs = $mysql->query($sql);
while($row = $rs->fetch_assoc()){
    var_dump($row['goods_name']);
}
Upload this code to the web server to test whether read-write separation can be realized. Pay attention to modifying the corresponding connection address, user name, password and other information.
#How the command line executes php code
#php needs to configure the environment variable XXX in advance php is the php script file that needs to be executed
shell > php  xxx.php
5. The framework configuration realizes read-write separation
① Find the solution by checking the thinkphp5 manual
② Modify project profile
Make sure that the data in the master-slave database is consistent (TP5 shop), and the user name and password can be used for login
shell > vim /usr/local/nginx/html/tp5shop/application/database.php
Configuration file example
return [
    // Database type
    'type'            => 'mysql',
    // server address
    // 1. The connection address of the master-slave database is in the front and the slave in the back
    'hostname'        => '192.168.17.100,192.168.17.105',
    // 2. If the name, user and password of the master-slave database are the same, only one copy can be configured. If not, separate them with commas in order
    // Database name
    'database'        => 'tp5shop',
    // user name
    'username'        => 'tp5shop',
    // password
    'password'        => '$Abc3721',
    // port
    'hostport'        => '3306',
    // Connect dsn
    'dsn'             => '',
    // Database connection parameters
    'params'          => [],
    // The database code is utf8 by default
    'charset'         => 'utf8',
    // Database table prefix
    'prefix'          => 'tpshop_',
    // Database debugging mode
    'debug'           => true,
    // 3. The business code of the project framework realizes the separation of reading and writing, and the distributed (master-slave server) configuration is 1
    // Database deployment mode: 0 centralized (single server), 1 distributed (master-slave server)
    'deploy'          => 1,
    // 4. Database read-write separation is implemented by business code and configured as true
    // Whether the database read-write separation is effective
    'rw_separate'     => true,
    // Number of primary servers after read / write separation
    'master_num'      => 1,
    // Specifies the serial number from the server
    'slave_no'        => '',
    // Strictly check whether the field exists
Test the down master library to see if the slave library can be accessed. In thinkphp5, if the slave goes down, the master provides a read service.
6. MyCAT realizes the separation of reading and writing
6.1 introduction
Prepare a server as the middleware server of the database, and configure the basic environment, network card and FQDN
server01 web1 192.168.17.102
server02 master 192.168.17.100
server06 slave 192.168.17.105
server07 mycat 192.168.17.106
Mycat database middleware
The most active and best performance open source database middleware in China!
Official website: http://www.mycat.io/
https://github.com/MyCATApache/MyCAT-Server/
Because mycat is developed by the java language, you must use the java runtime environment to start and operate
6.2 jdk installation
java statically compiled programming language code is compiled into machine code, and the machine code is executed to output the results.
Compiling jdk javac compiling java code
Run jre compiled machine code (executable file) java
Q: is the java environment deployed by the company's servers jdk or jre?
A: jre java parses the running environment. Generally, jre is enough for compiled executable java programs.
jdk javac compilation environment. If the server uploads a source code file, it can be compiled and executed later.
In the actual business environment, if there is a need to compile, choose jdk.
① Download and install jdk
https://www.oracle.com/technetwork/java/javase/downloads/jdk8-downloads-2133151.html
Choose to download x64 architecture tar.gz package
Upload mycat and jdk to the soft directory
shell > tar xvf jdk-8u192-linux-x64.tar.gz
shell > mv jdk1.8.0_192 /usr/local/java
② Configure environment variables
#Append environment variable
shell > echo "PATH=/usr/local/java/bin:$PATH" >> /etc/profile
shell > source /etc/profile
#Detecting java environment variables is successful if you see the version information
shell > java -version
6.3 mycat installation and test startup
① Unzip and install MyCAT
shell > tar xvf Mycat-server-1.6.5-release-20180122220033-linux.tar.gz -C /usr/local
You can actually extract it to the directory without installation
② Introduction to software catalog
| Directory or file | effect |
|---|---|
| bin | Relevant software management commands, etc |
| conf | Profile directory |
| logs | Log directory |
③ Start mycat
By default, you can start mycat
#Start the front end through the console, and you can see the execution process
shell > /usr/local/mycat/bin/mycat console
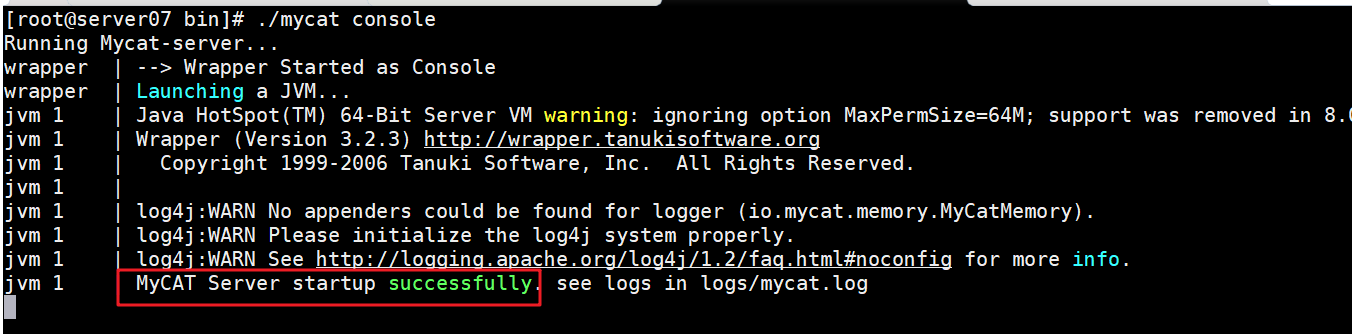
Note that if the startup is not successful, it may be because the host name is not resolved. It needs to be parsed in the hosts file.
6.4 configure read-write separation
Read write separated configuration file:
| File name | effect |
|---|---|
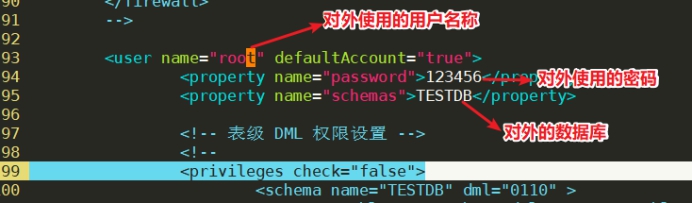
| server.xml | Configure the external user, password, mapping database name and other information of mycat |
| schema.xml | Configure the user, password, real database name and other information of the back-end real database |
Mycat is developed by java. Most of the configuration files of the software developed by java are in xml format. Note its basic format.
Notes for xml format:
1. xml declaration information
2. Has a root label
3. Double label and single label formats
4. Pay attention to the closed label
5. The annotation format is
① View server xml
Default server XML can be used without modification
shell > /usr/local/mycat/conf
shell > vim server.xml
Modify server xml
Configure the external user information of mycat
② Modify schema xml
Configure the server of name in the schema tag The name of the virtual database in XML. dataNode fill in the dataNode name used later
The dataNode tag and dataHost specify the configuration to use
Configure writeHost and readHost (password, address, user name) in the dataHost tab
schema=>dataNode=>dataHost=>writeHost=>readHost
You can use the streamlined configuration file
<?xml version="1.0"?>
<!DOCTYPE mycat:schema SYSTEM "schema.dtd">
<mycat:schema xmlns:mycat="http://io.mycat/">
    <!-- 1,TESTDB and server.xml The mapped database names in the configuration file should be consistent   dataNone Fill in the form below dataNode name -->
	<schema name="TESTDB" checkSQLschema="false" sqlMaxLimit="100" dataNode="dn3"></schema>
	<!-- 2,dataNode name Same as above  dataHost Fill in the form below dataHost of name name  database Fill in the back-end real database name-->
    <dataNode name="dn3" dataHost="localhost1" database="tp5shop" />
    <!-- 3,Load balancing and read-write separation algorithms can be configured, and they can not be used for the time being-->
	<dataHost name="localhost1" maxCon="1000" minCon="10" balance="0" writeType="0" dbType="mysql" dbDriver="native" switchType="1"  slaveThreshold="100">
        <!-- Heartbeat detection sent by backend database server -->
		<heartbeat>select user()</heartbeat>
		<!-- can have multi write hosts -->
        <!-- 4,Configure the login information related to the back-end real database -->
		<writeHost host="hostM1" url="192.168.17.100:3306" user="tp5shop" password="$Abc3721">
			<!-- can have multi read hosts -->
			<readHost host="hostS2" url="192.168.17.105:3306" user="tp5shop" password="$Abc3721" />
		</writeHost>
		<!-- <writeHost host="hostS1" url="localhost:3316" user="root" password="123456" />-->
		<!-- <writeHost host="hostM2" url="localhost:3316" user="root" password="123456"/> -->
	</dataHost>
</mycat:schema>
Notice line 7, the name of the real database
③ Start mycat service
shell > /usr/local/mycat/bin/mycat start
#Confirm whether mycat is really started and check its port 9066 8066
shell > netstat -lntp|grep 8066
Tip: if mycat is started after configuration, it cannot be started
By looking at / usr / local / MYCAT / logs / wrapper log
6.5 mycat client
Connect mycat client
shell > mysql -h127.0.0.1 -uroot -p123456 -P8066
Execute query command test results
mysql > show databases;
mysql > use TESTDB;
mysql > show tables;
6.6. mycat management end
Connect mycat management end
shell > mysql -h127.0.0.1 -uroot -p123456 -P9066
Execute management commands to view
mysql > show @@help;  //View all help commands on the management monitoring side
mysql > show @@heartbeat;  //View server status
6.7. Business code configuration
The database middleware server is used to realize the separation of reading and writing and the management of back-end real database. For the front-end business, the data operation needs to be connected to the database middleware server. The operation is connected to the database middleware server instead of directly connecting to the real server of multiple instances.
① Modify project database configuration file
shell > vim /usr/local/nginx/html/tp5shop/application/database.php
Configuration file example
return [
    // Database type
    'type'            => 'mysql',
    // server address
    // 1. Connecting mycat database middleware server
    'hostname'        => '192.168.17.106',
    // 2. Database name of mycat external mapping
    // Database name
    'database'        => 'TESTDB',
    // 3. User of mycat external mapping
    // user name
    'username'        => 'root',
    // 4. Password and port of mycat external mapping
    // password
    'password'        => '123456',
    // port
    'hostport'        => '8066',
    // Connect dsn
    'dsn'             => '',
    // Database connection parameters
    'params'          => [],
    // The database code is utf8 by default
    'charset'         => 'utf8',
    // Database table prefix
    'prefix'          => 'tpshop_',
    // Database debugging mode
    'debug'           => true,
    // 5. The database middleware is used. For the front-end business server, the centralized single server configuration is 0
    // Database deployment mode: 0 centralized (single server), 1 distributed (master-slave server)
    'deploy'          => 0,
    // 6. The centralized single server does not perform read-write separation in the business code, but is configured as false by the database middleware
    // Whether the database read-write separation is effective
    'rw_separate'     => false,
    // Number of primary servers after read / write separation
    'master_num'      => 1,
    // Specifies the serial number from the server
    'slave_no'        => '',
    // Strictly check whether the field exists
② Test access
mycat defaults to writeHost and readHost. If writeHost is unavailable, readHost is also unavailable. Use two writehosts to change from writeHost to writable. Set readonly on the slave server
6.8. balance attribute and writeType attribute
balance attribute
There are three load balancing types:
1. balance = "0", the read-write separation mechanism is not enabled, and all read operations are sent to the currently available writeHost.
2. balance = "1", all readhosts and stand by writeHost participate in the load balancing of the select statement. In short, in the dual master and dual slave mode (M1 - > S1, M2 - > S2, and M1 and M2 are both active and standby), under normal circumstances, M2, S1 and S2 participate in the load balancing of the select statement.
3. balance = "2", all read operations are randomly distributed on writeHost and readhost.
4. Balance = "3". All read requests are randomly distributed to the readhost corresponding to the writerHost for execution. The writerHost does not bear the reading pressure. Note that balance=3 is only available in 1.4 and later versions, but not in 1.3.
writeType property
There are three load balancing types:
1. writeType = "0", all write operations are sent to the first writeHost configured. The first writeHost is suspended and switched to the second writeHost that still exists. The one that has been switched after restart shall prevail
2. writeType = "1". All write operations are randomly sent to the configured writehost. It is not recommended to discard after 1.5
switchType property
-1 means no automatic switching
1 default, automatic switching
2 decide whether to switch based on the master-slave synchronization status of MySQL