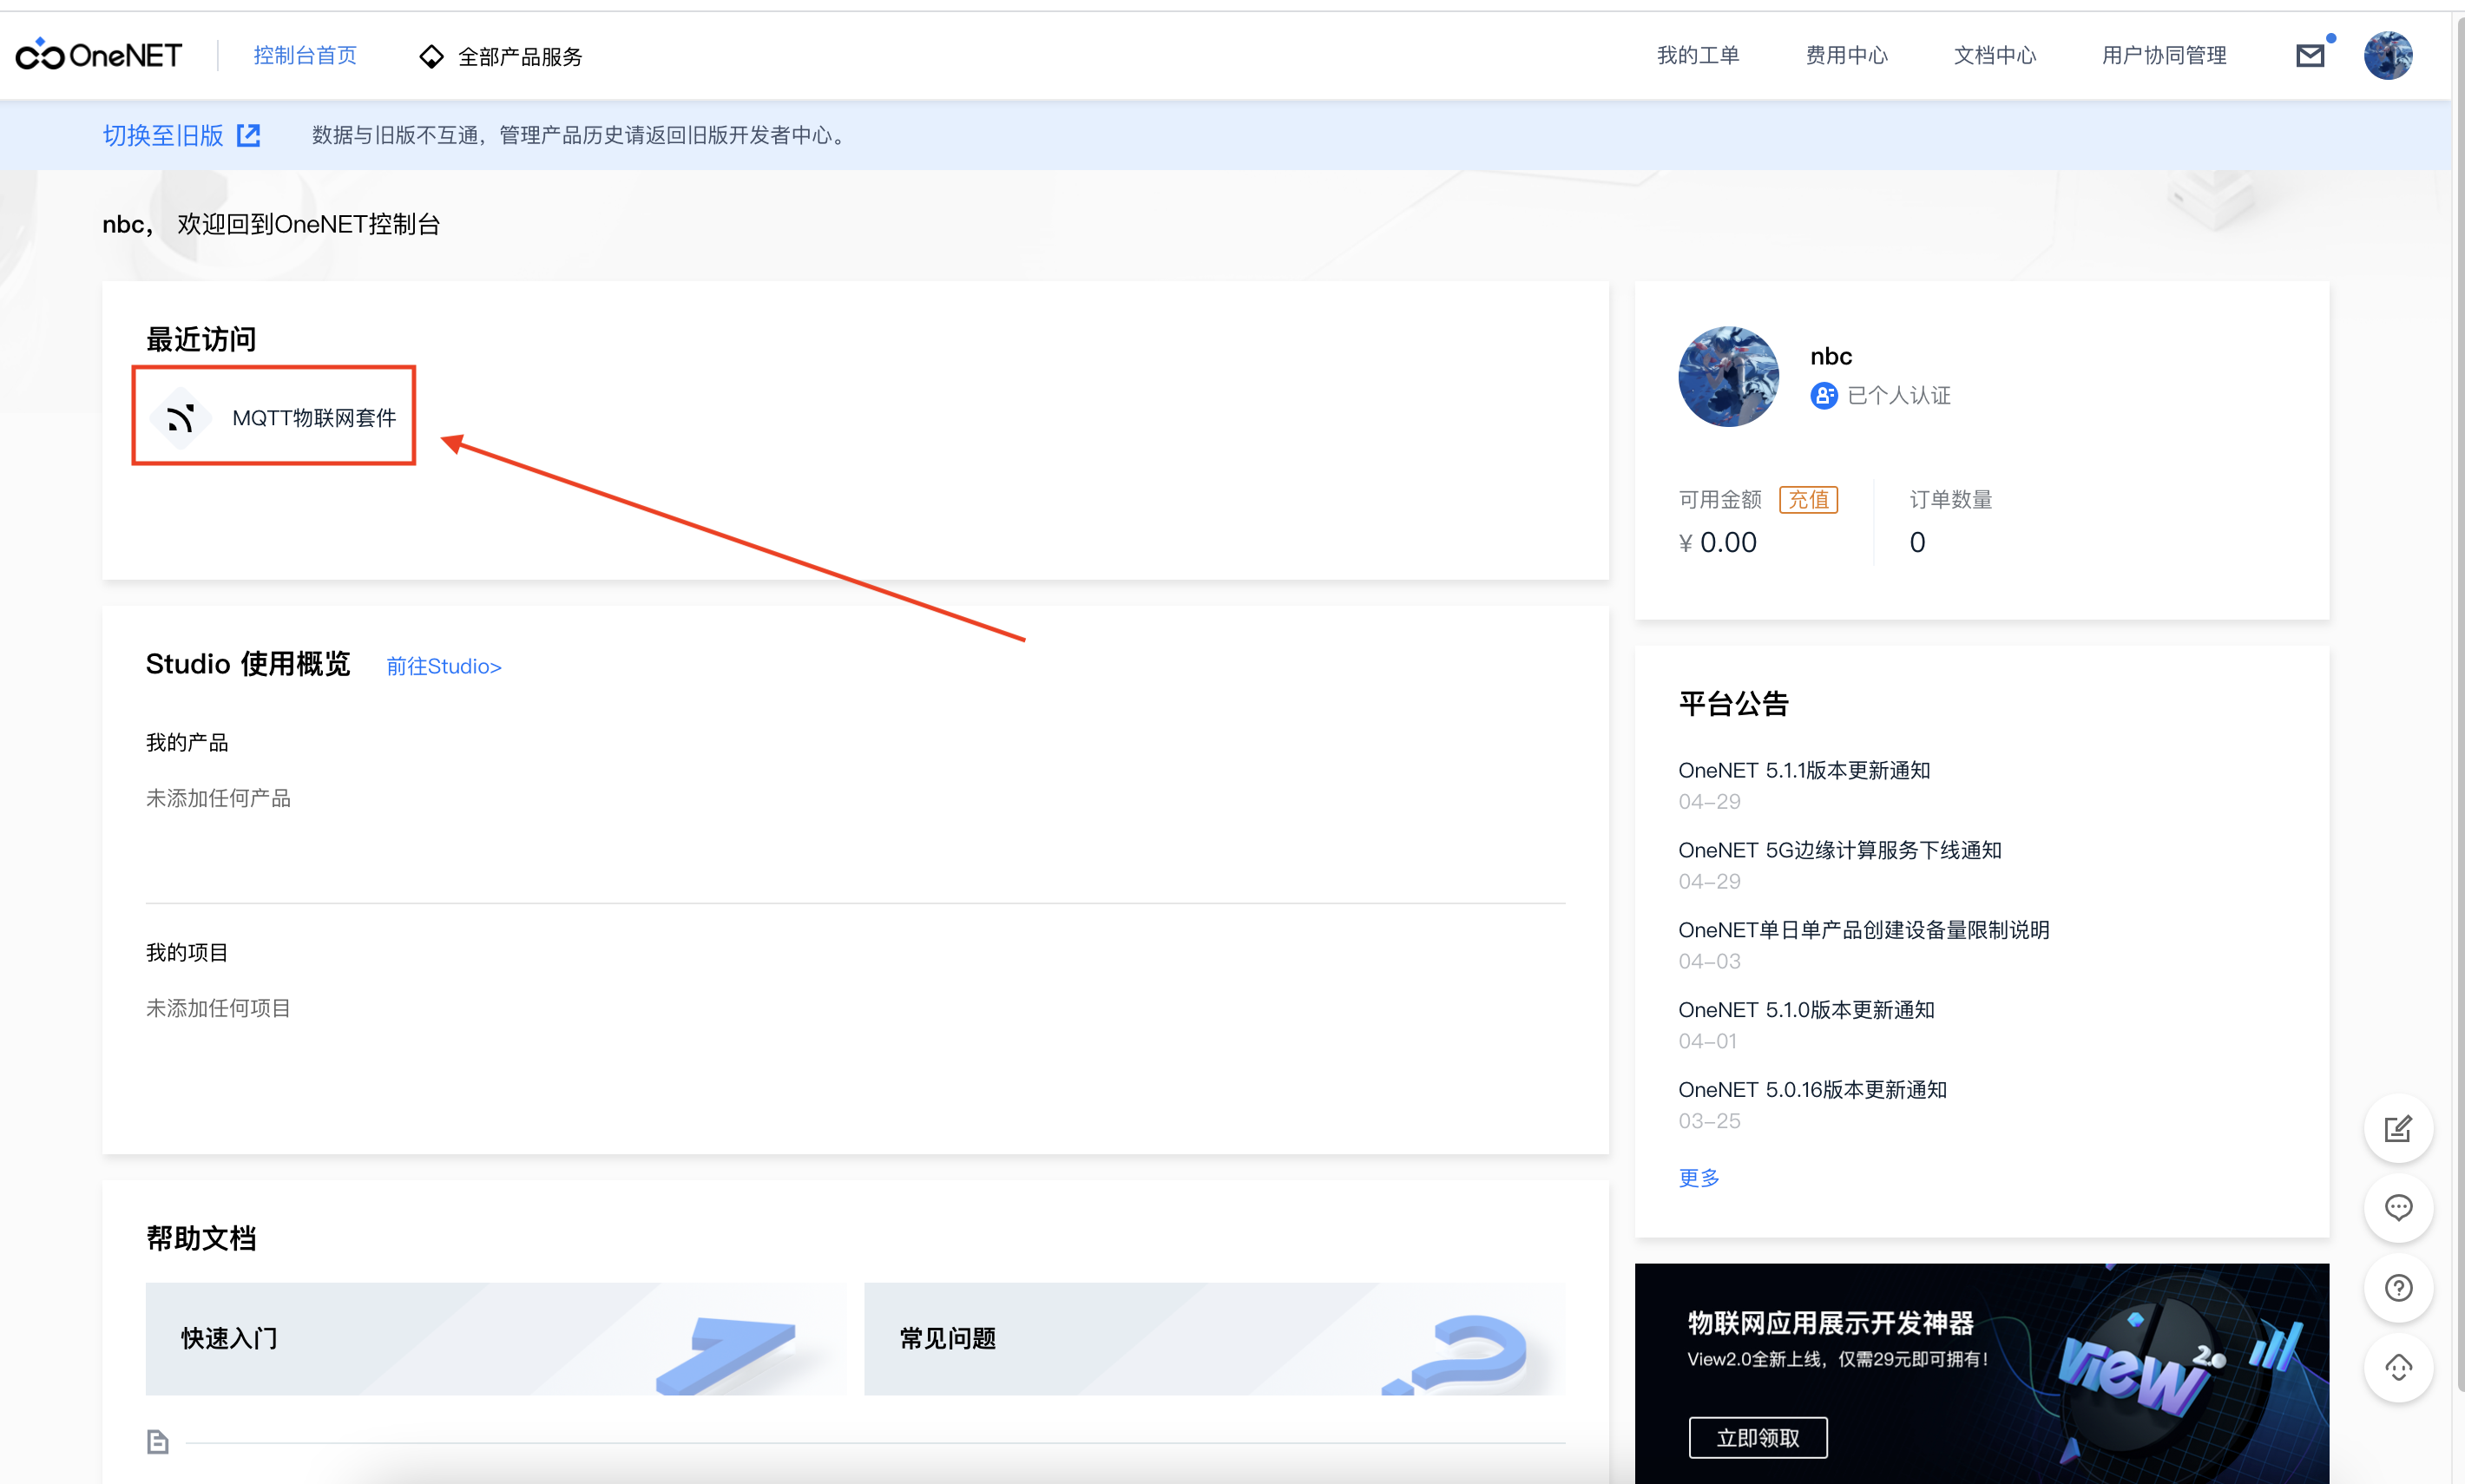
1, First, create a product and a device on OneNet
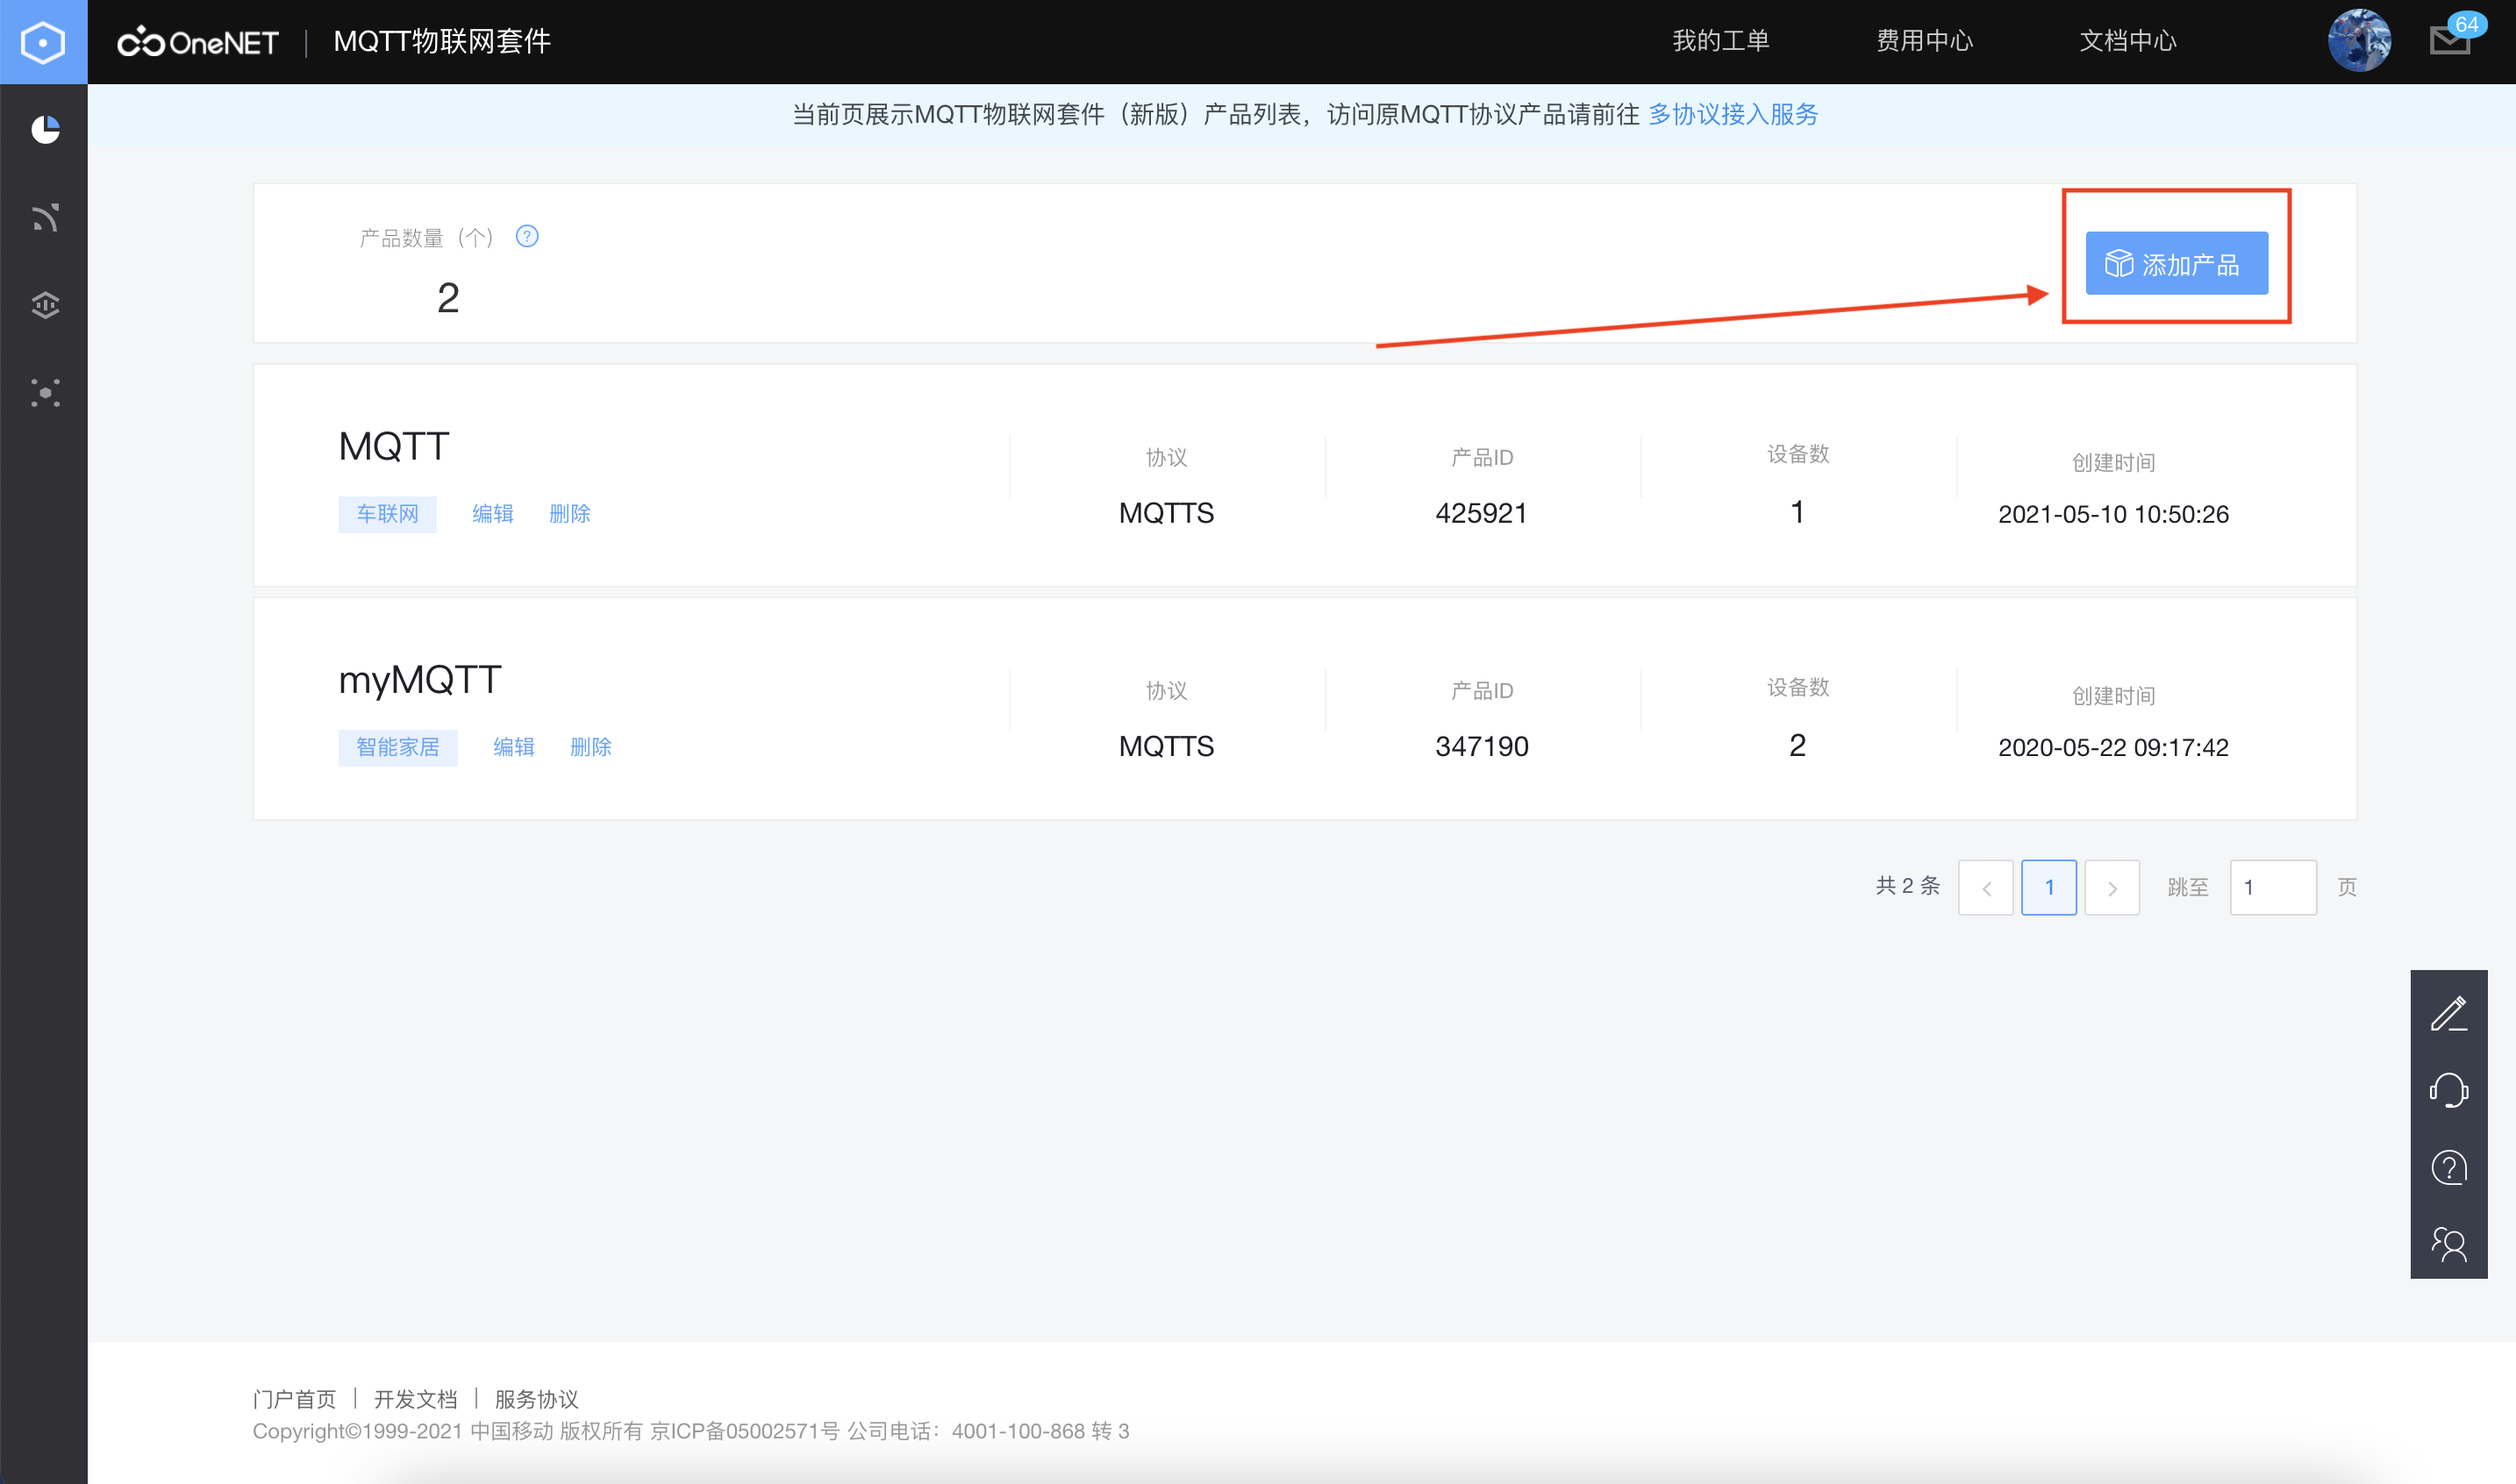
1. Create MQTT products
Step 1:
Step 2:
Step 3:
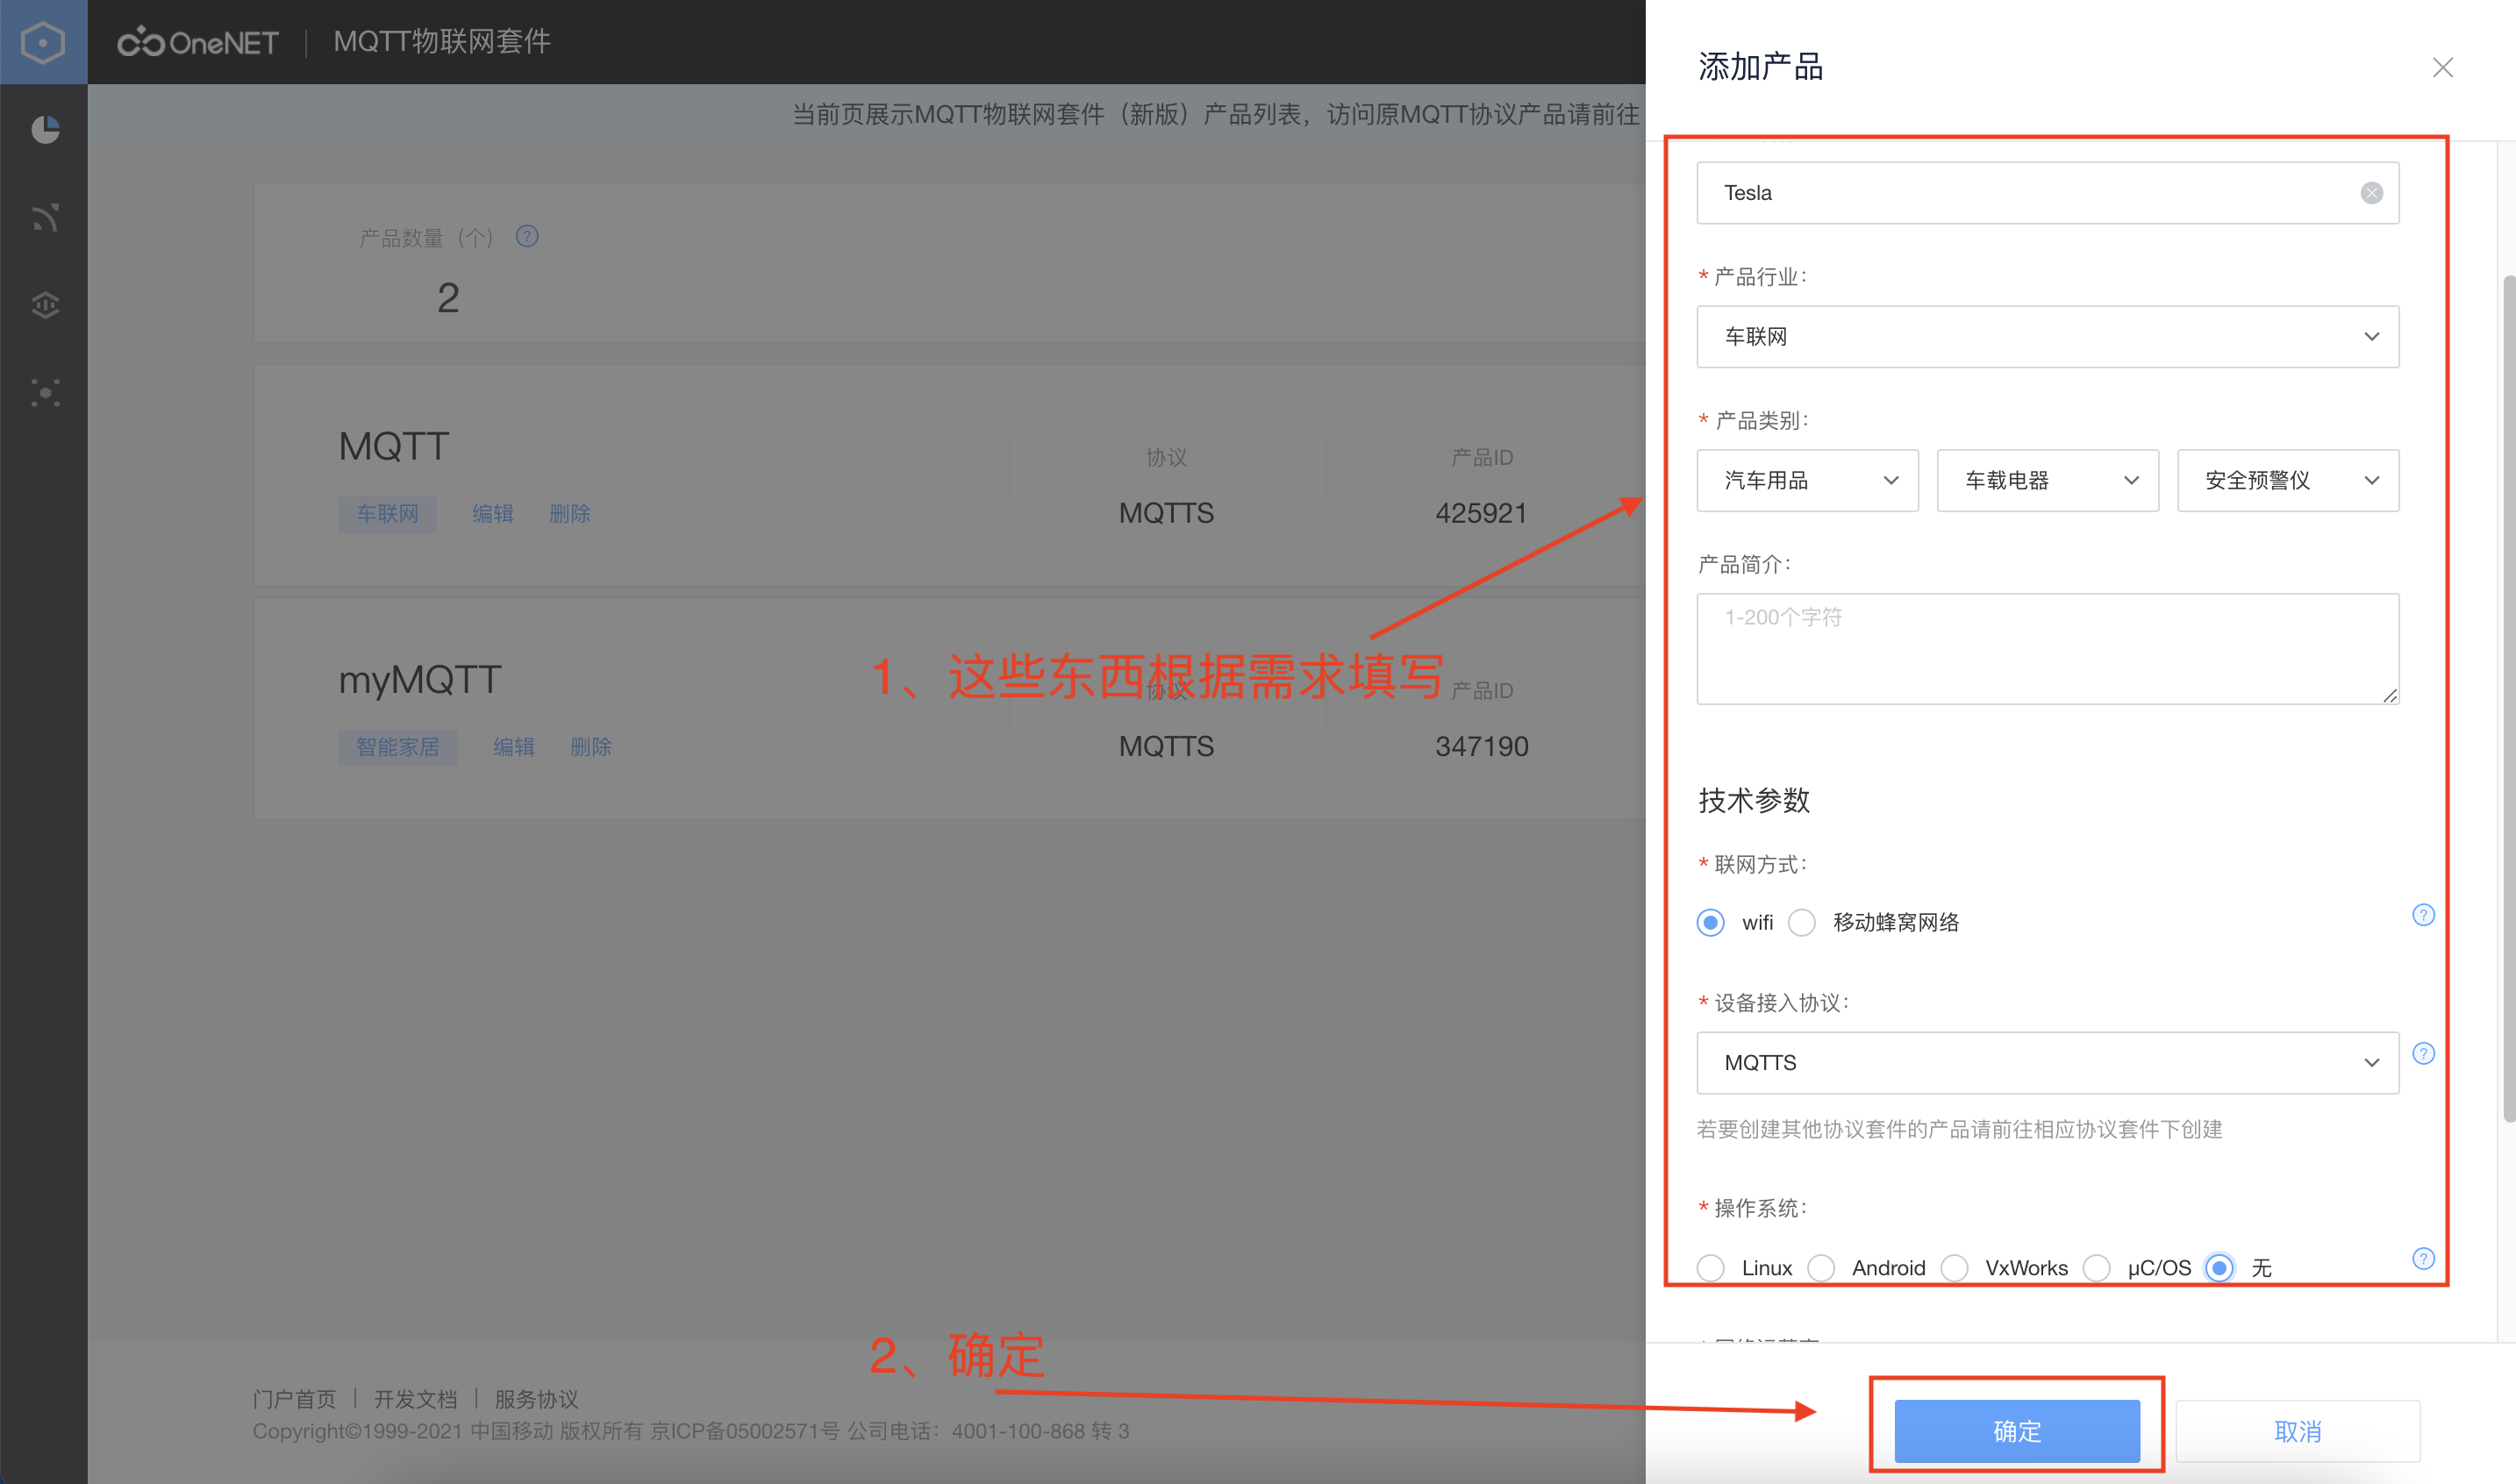
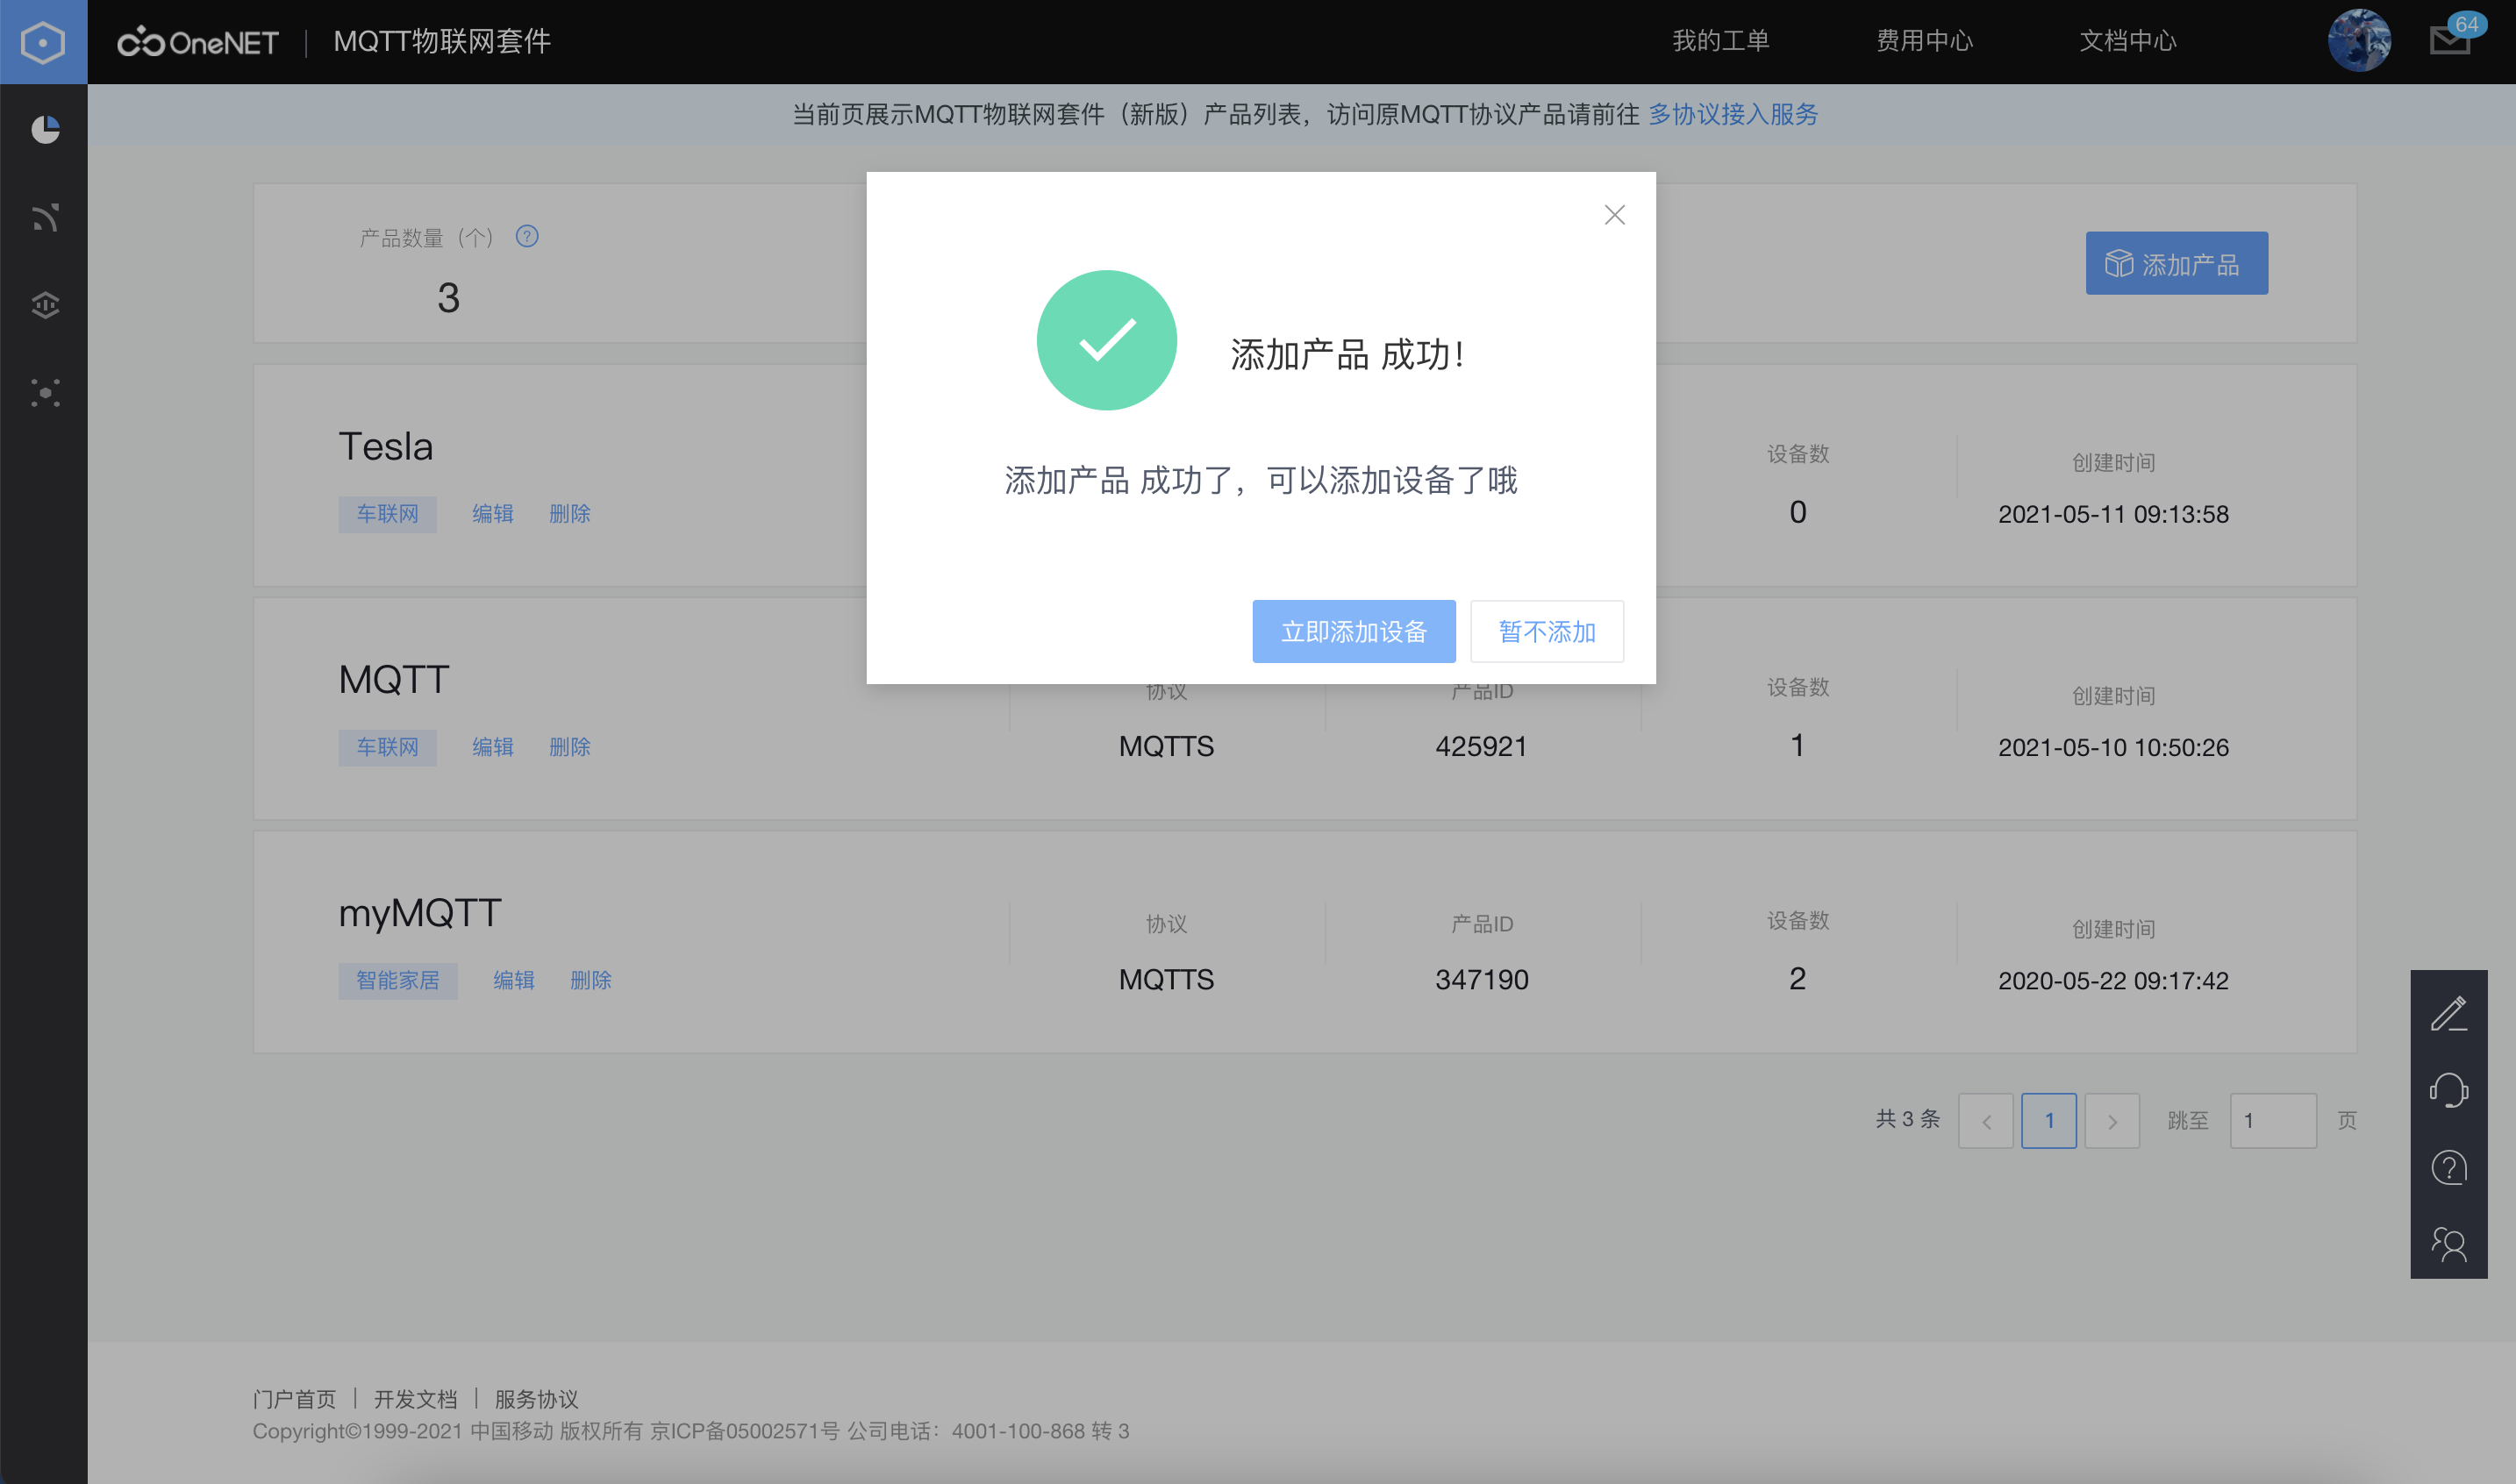
After clicking OK:
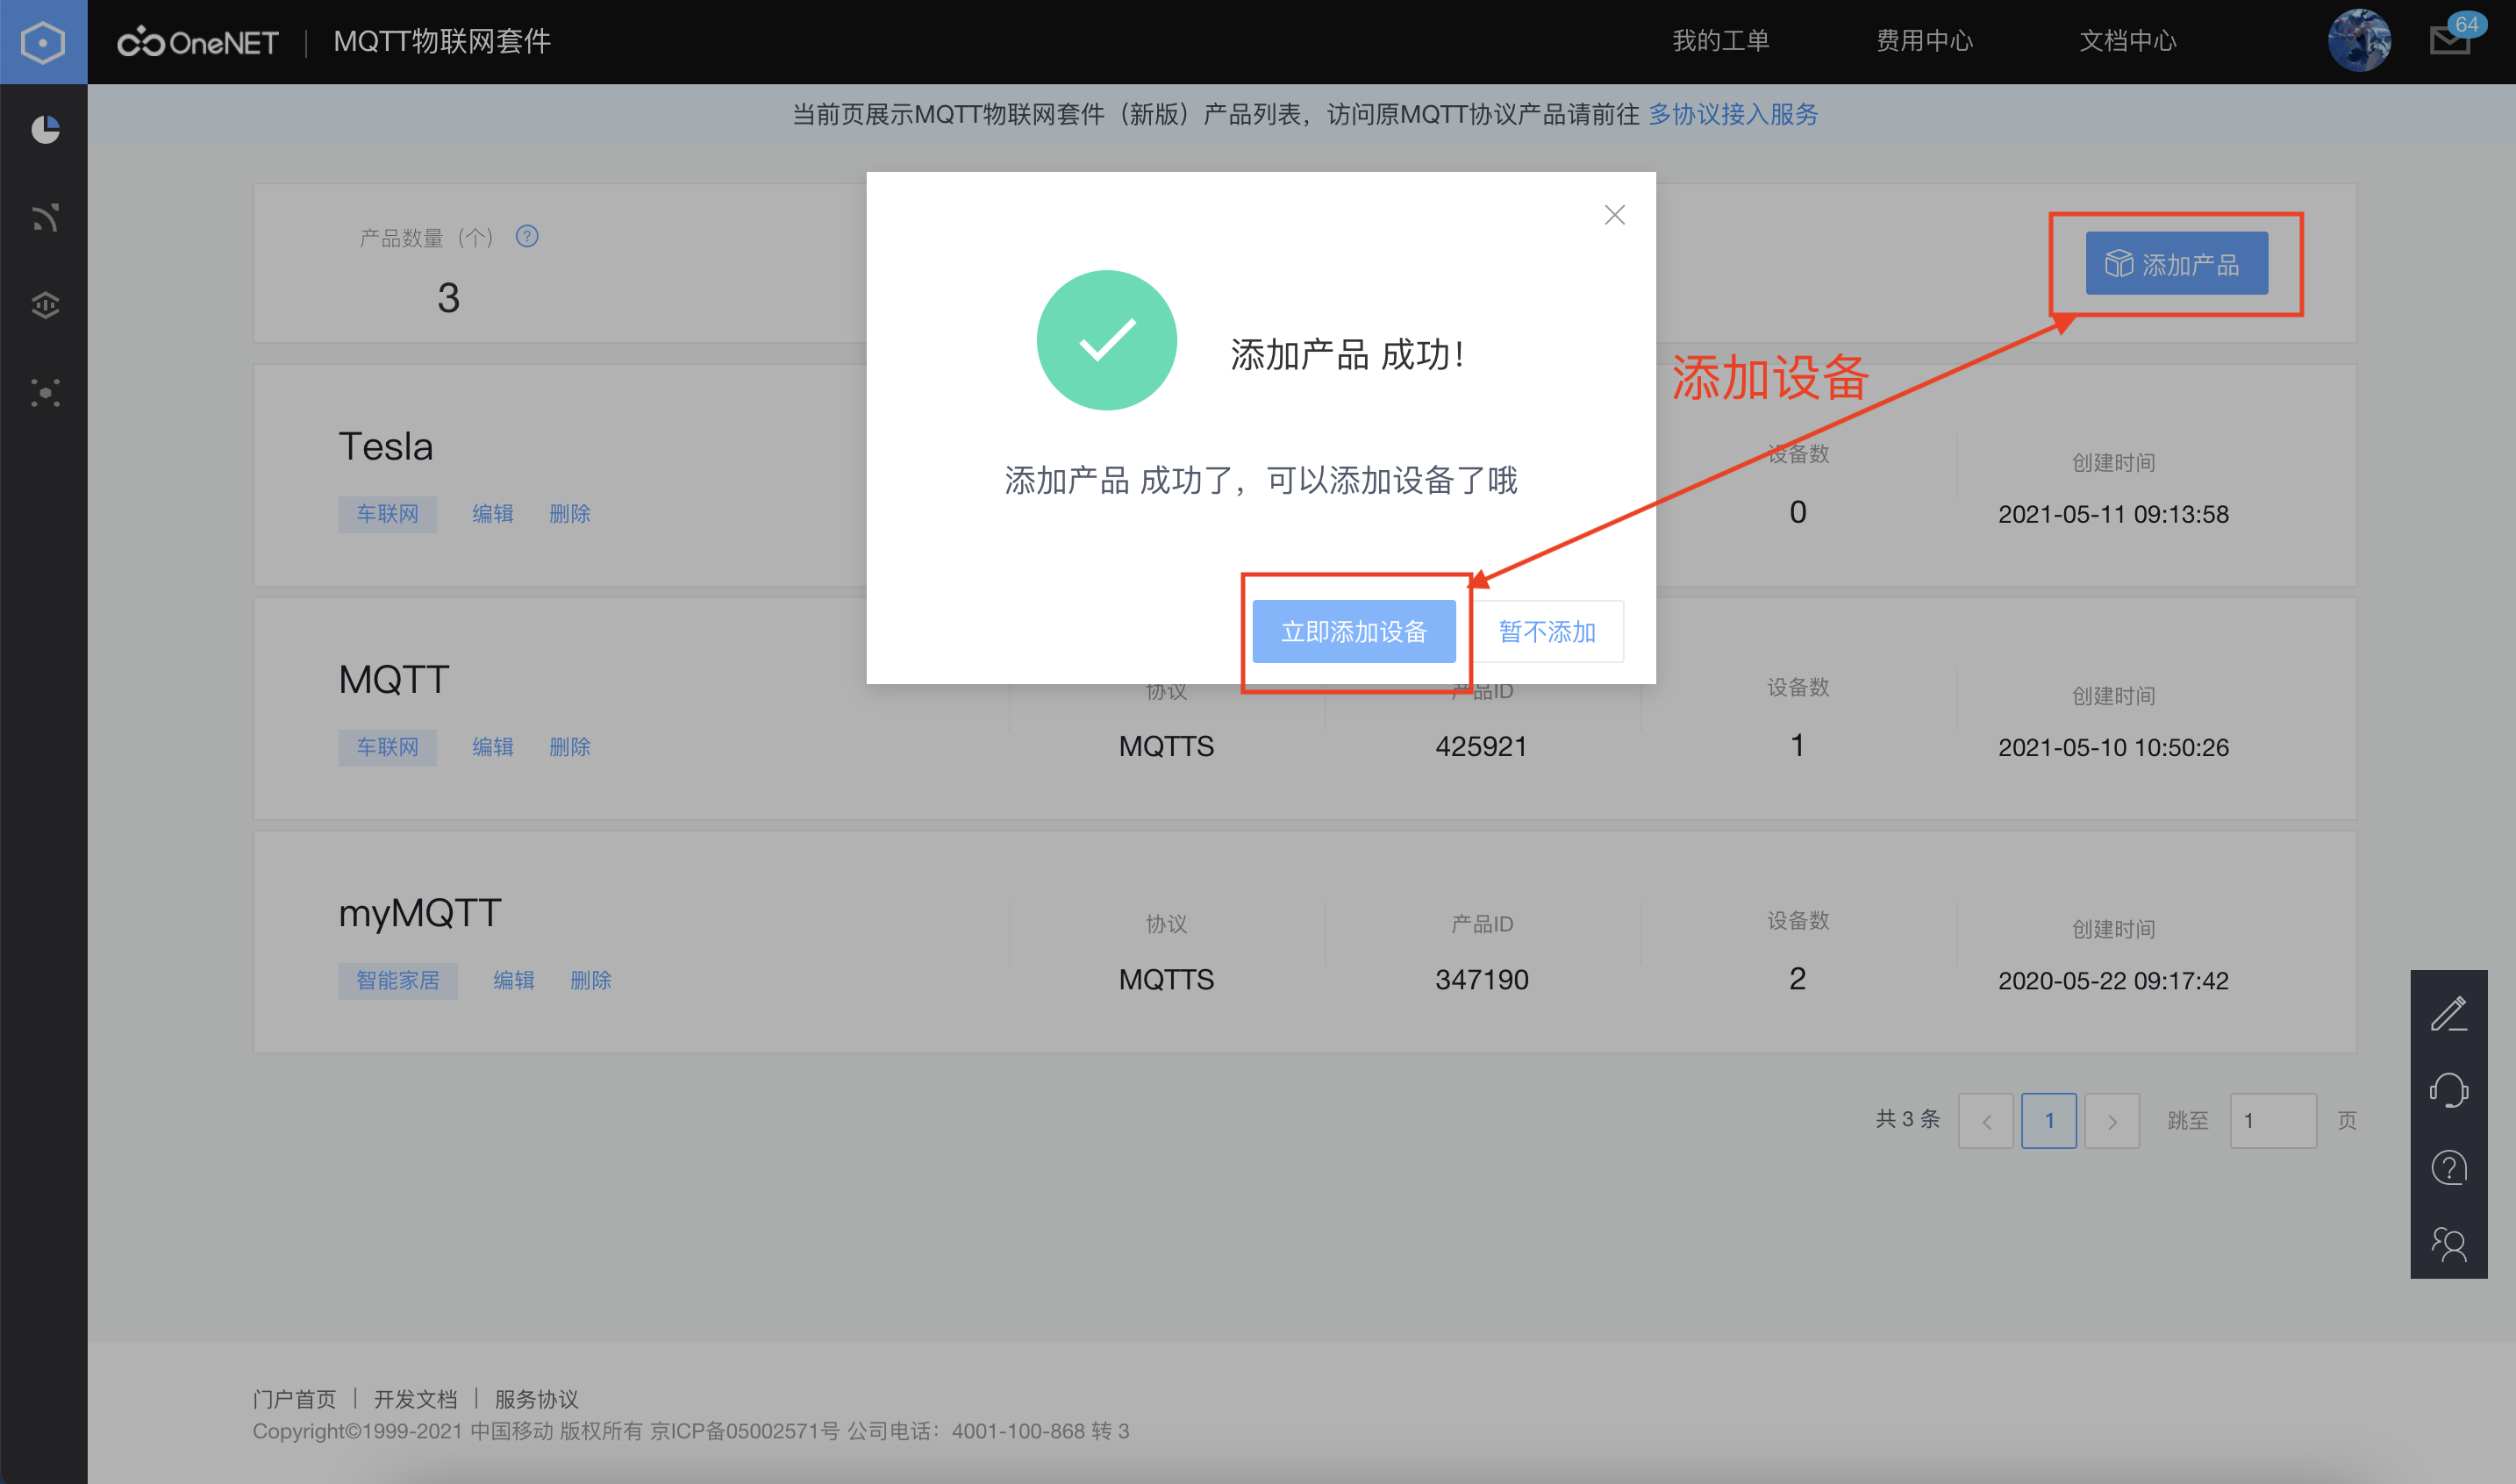
2. Add device to product
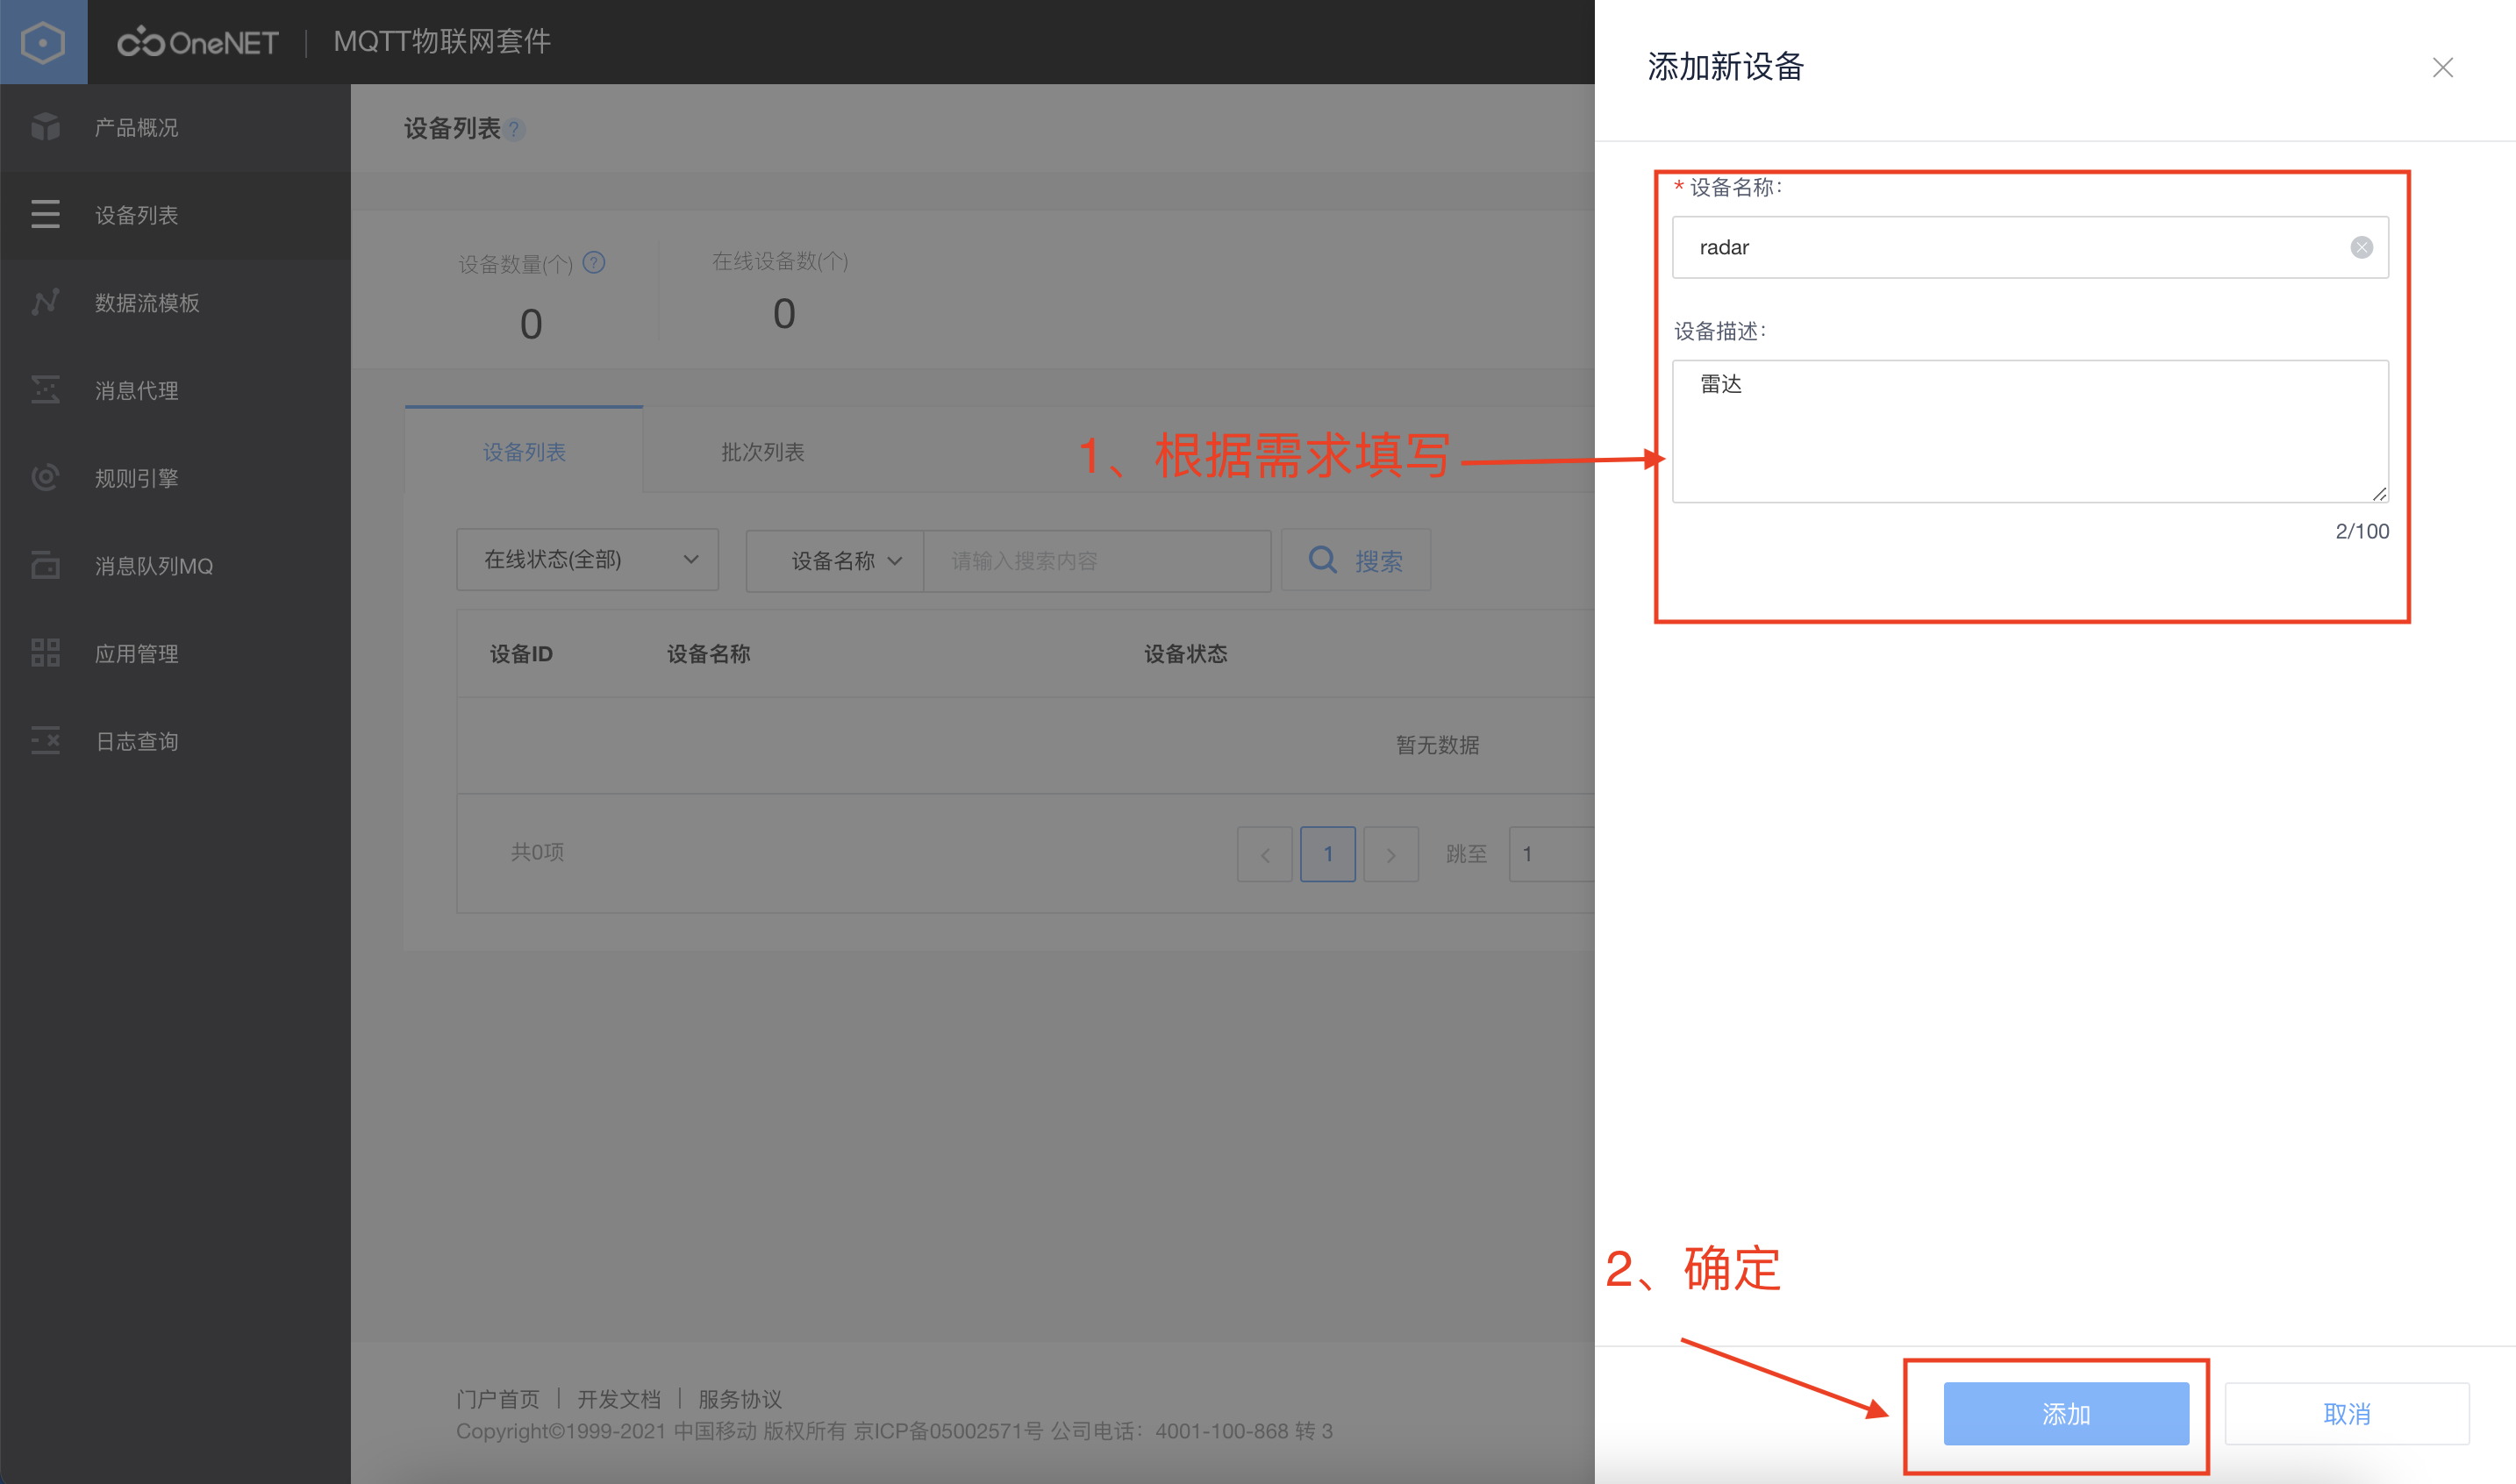
Step 1:
Step 2:
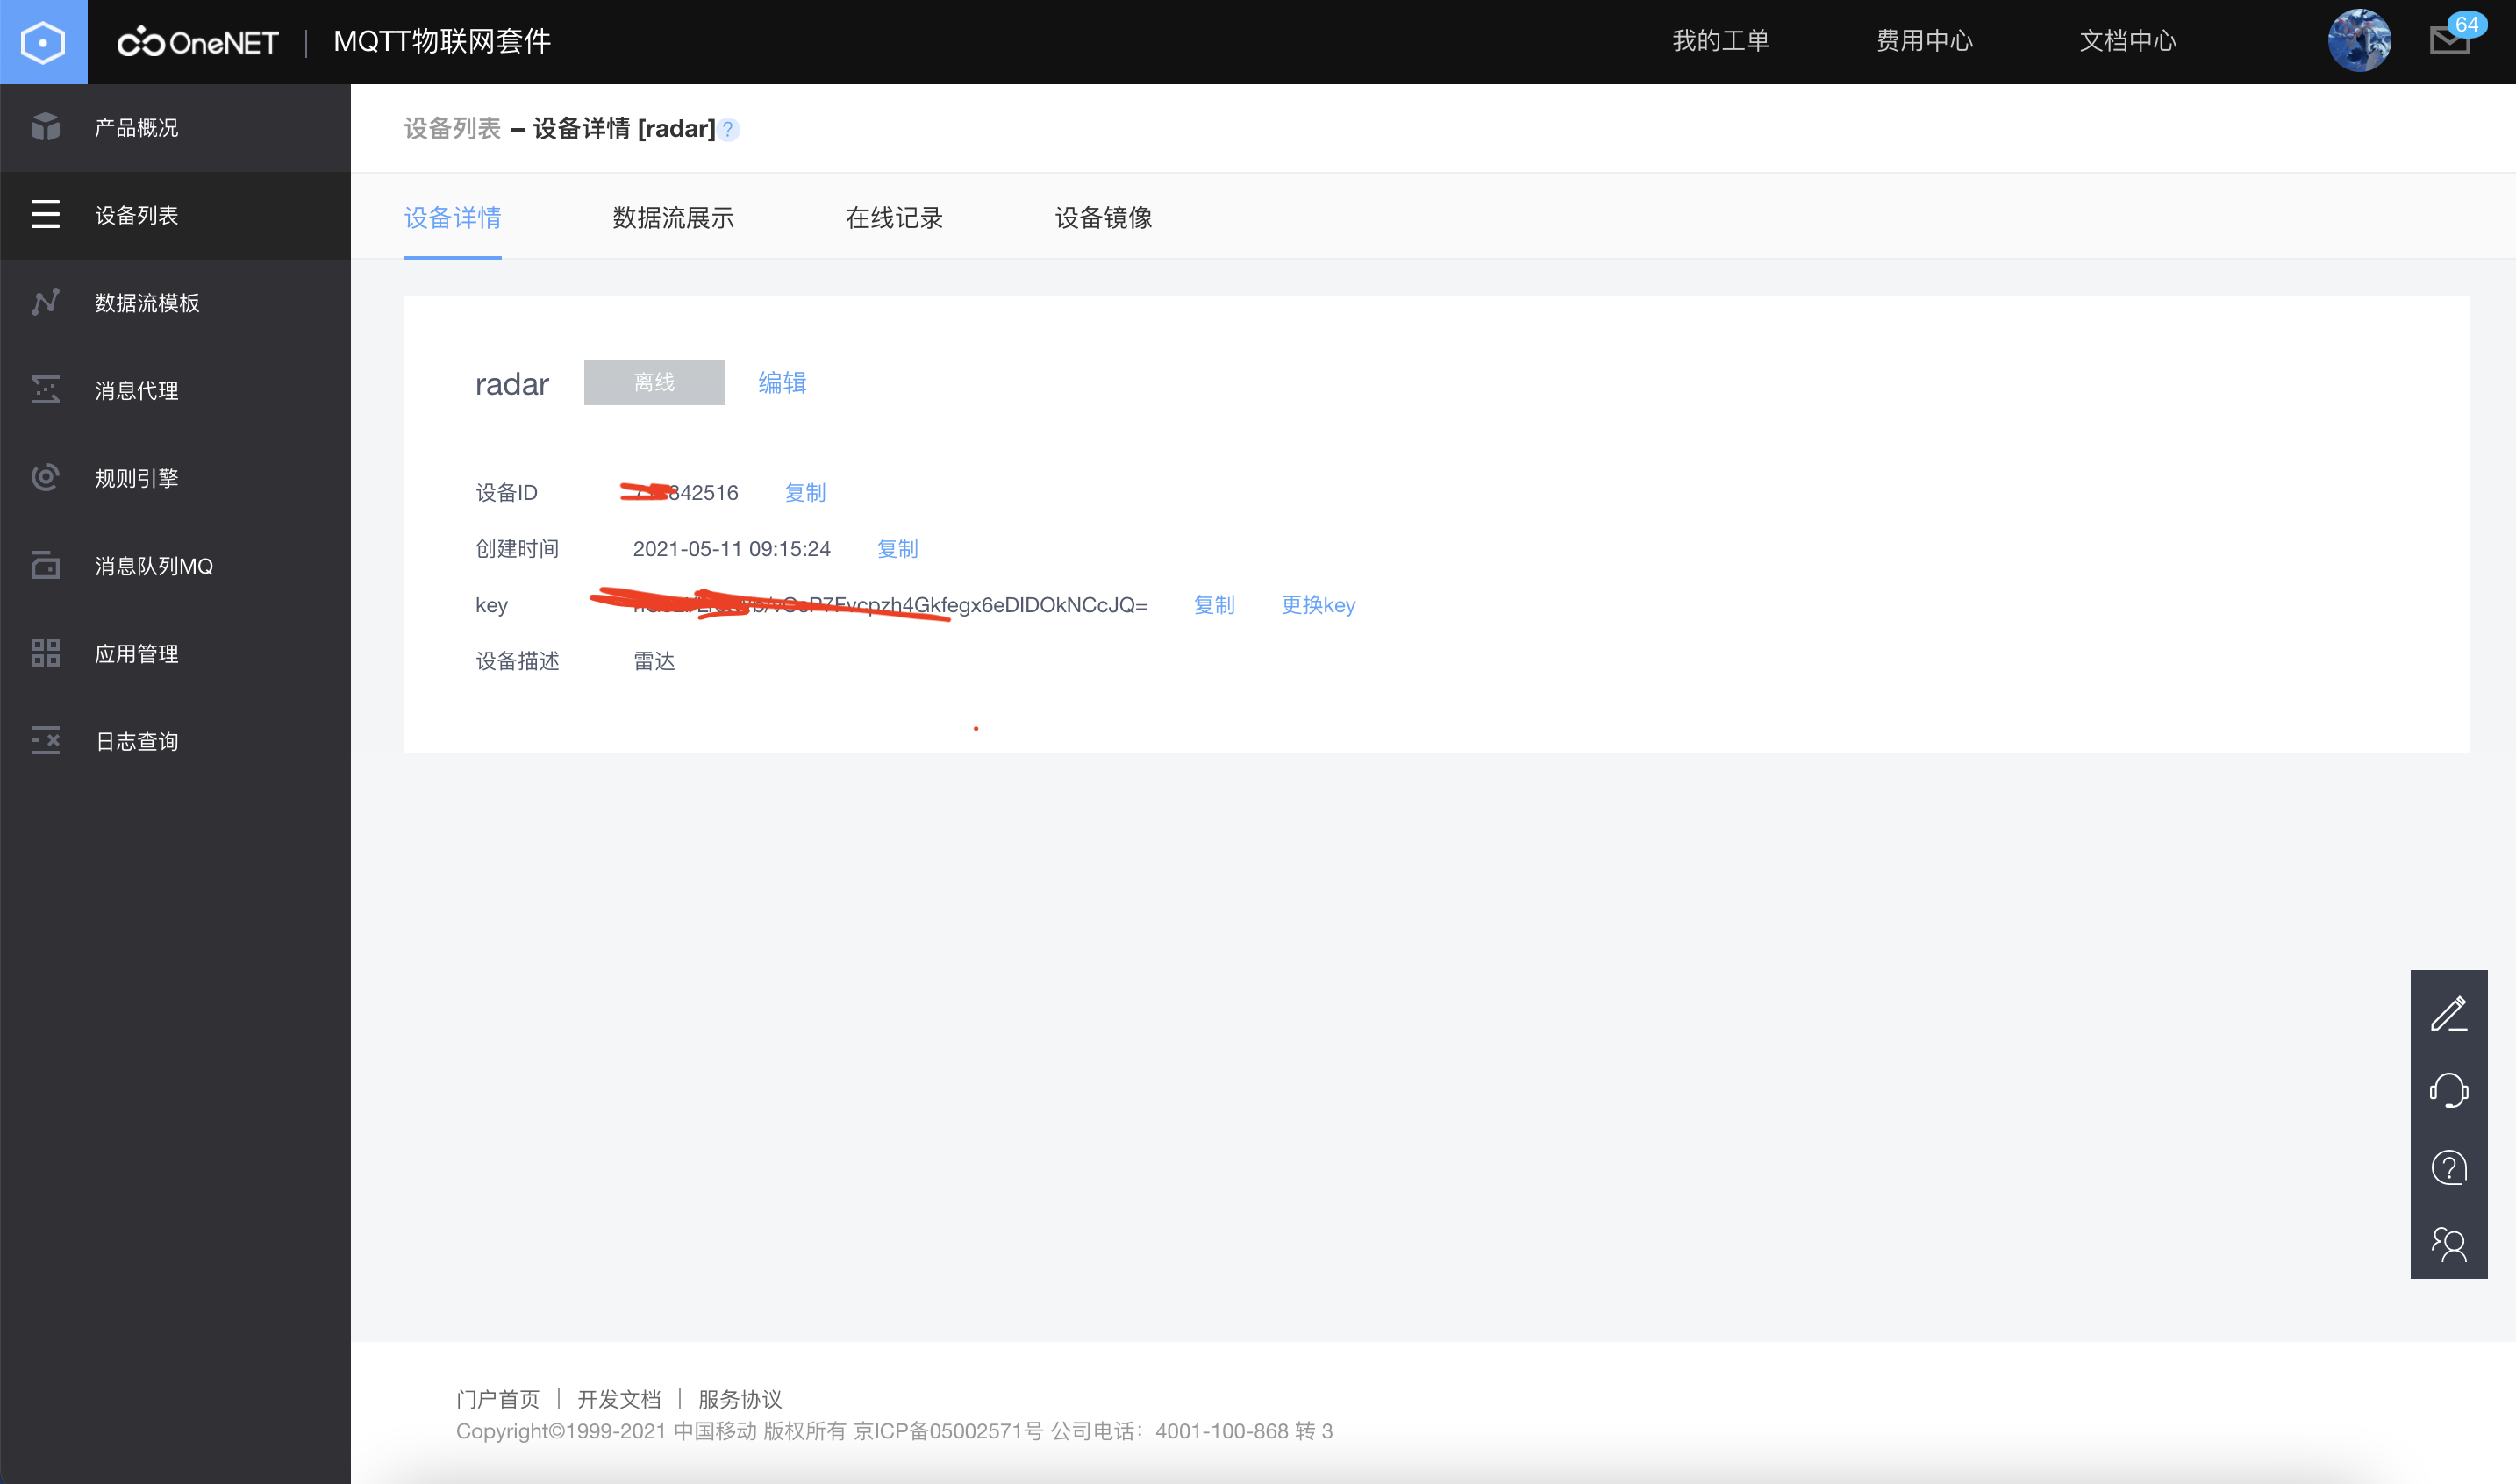
Step 3: after creation, you can view the ID and Key of the device.
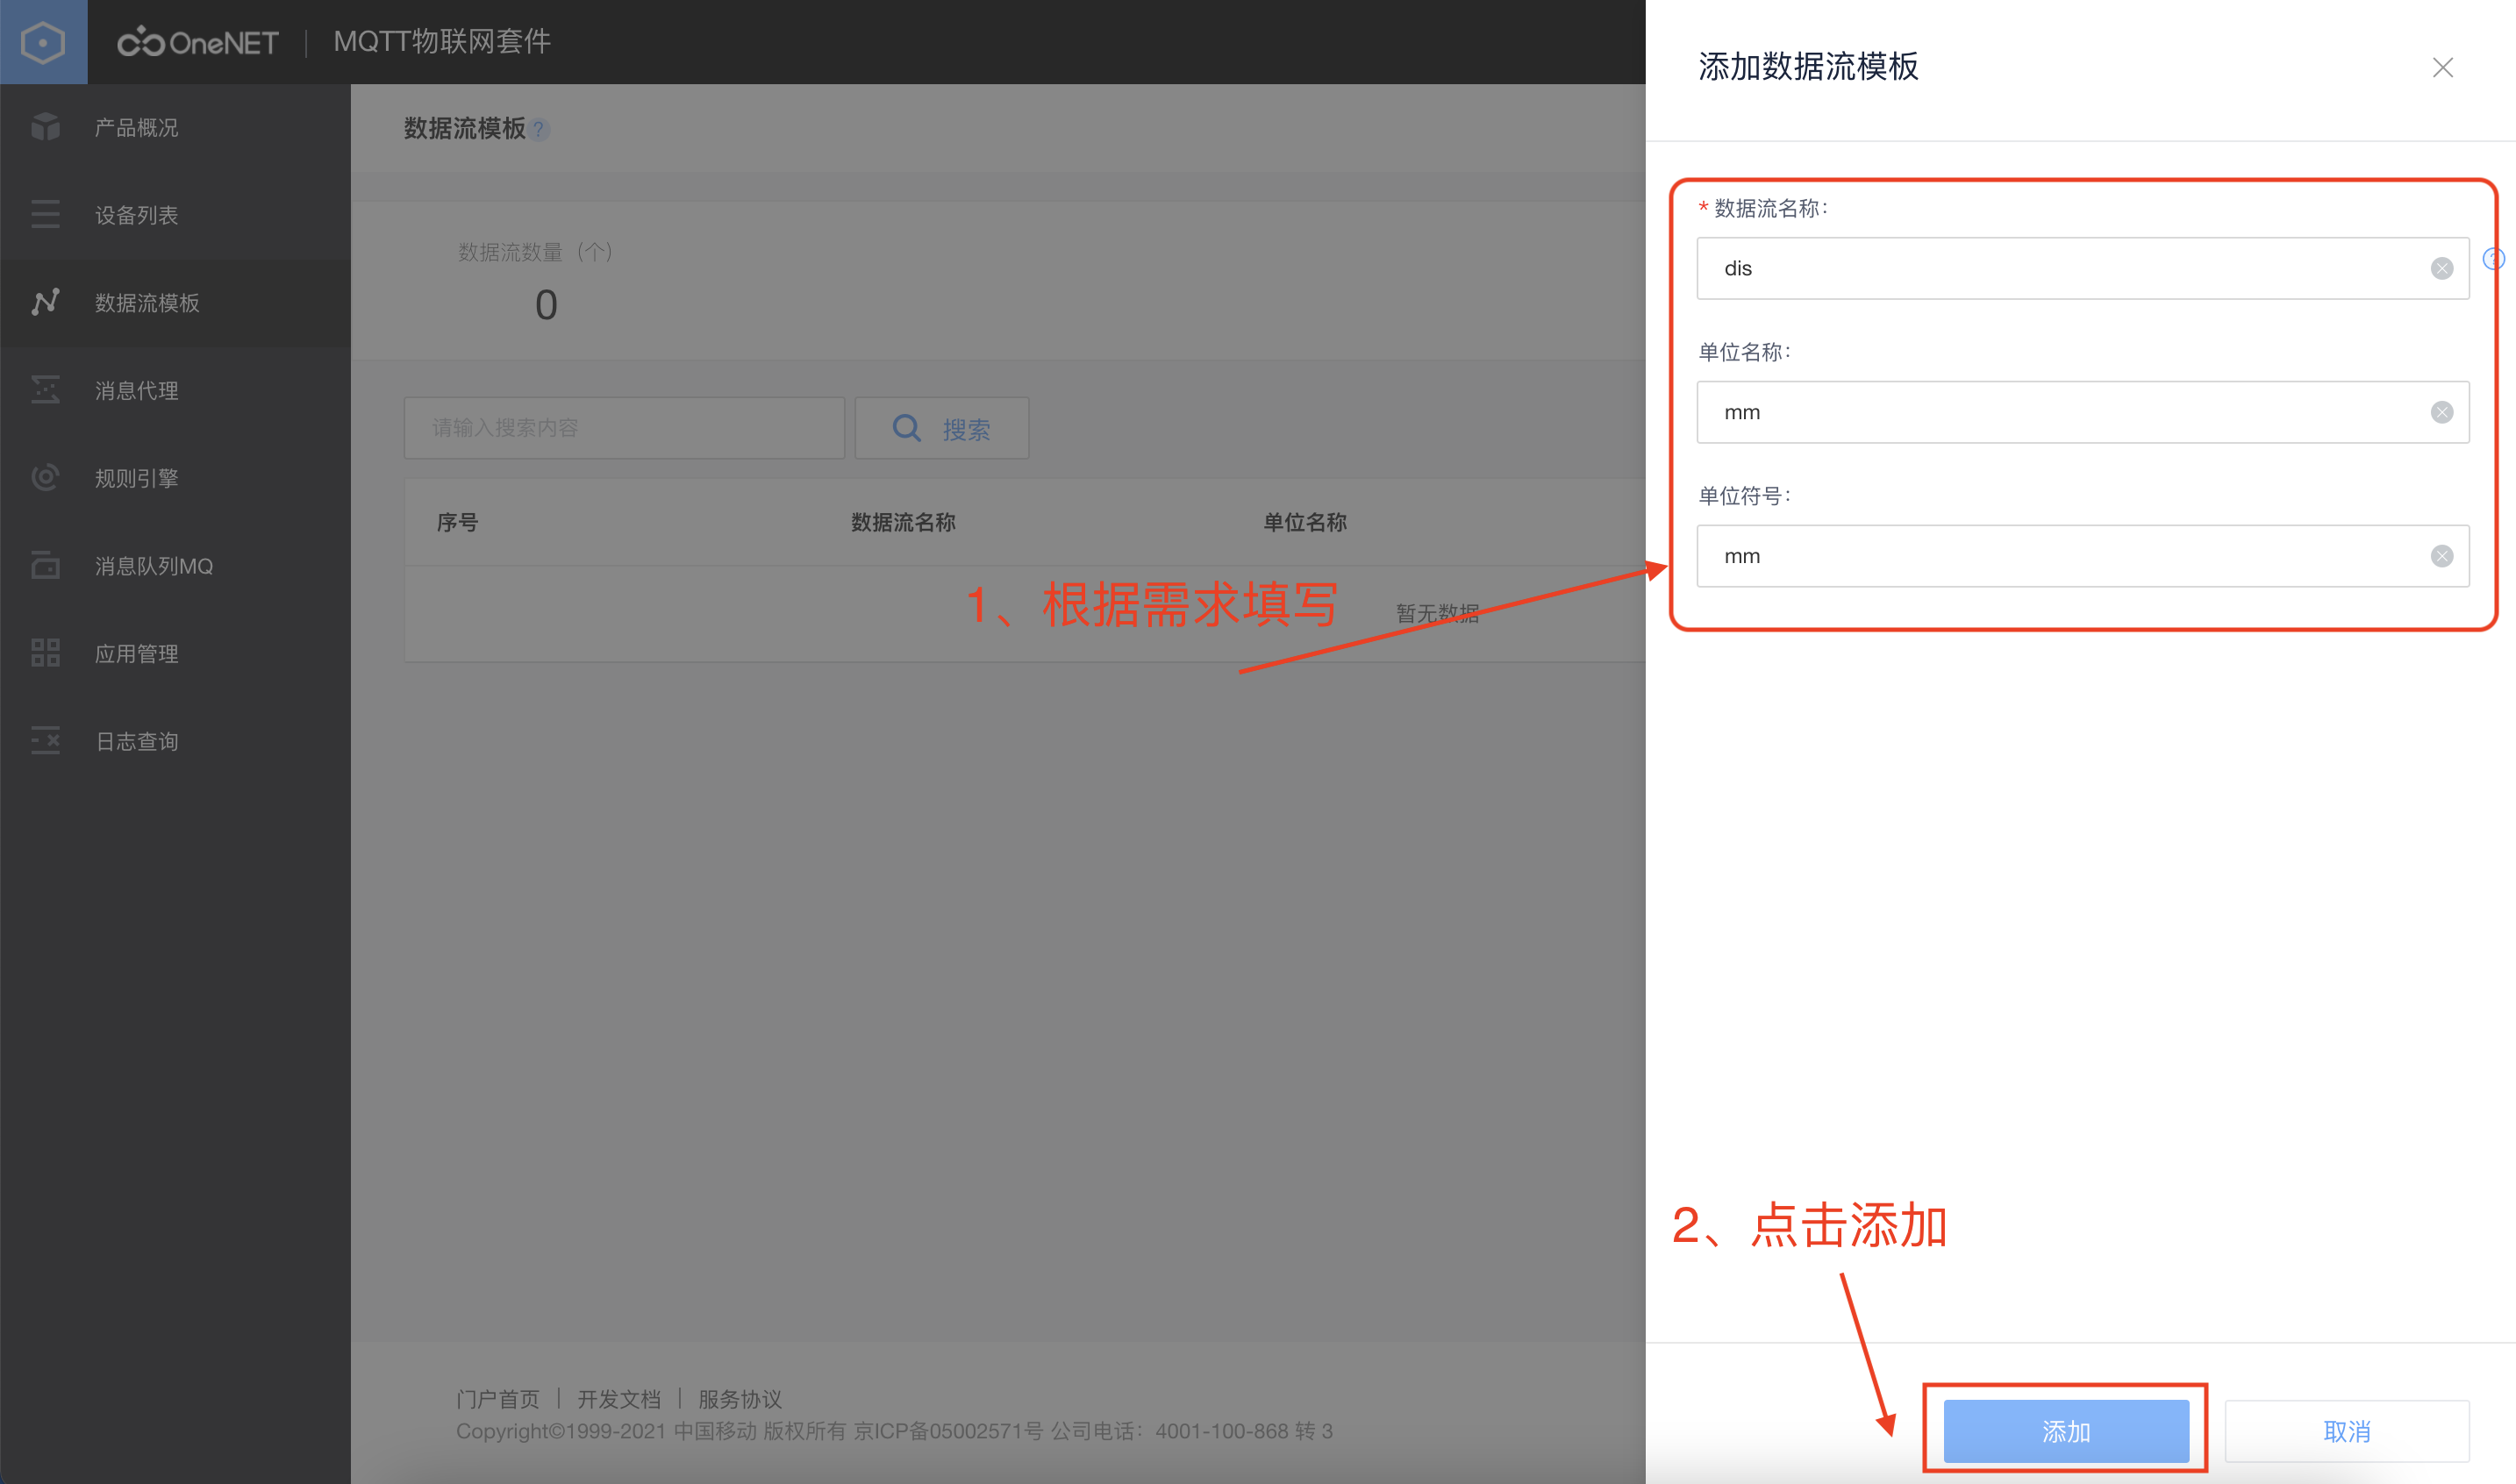
3. Create data flow for device
Step 1:
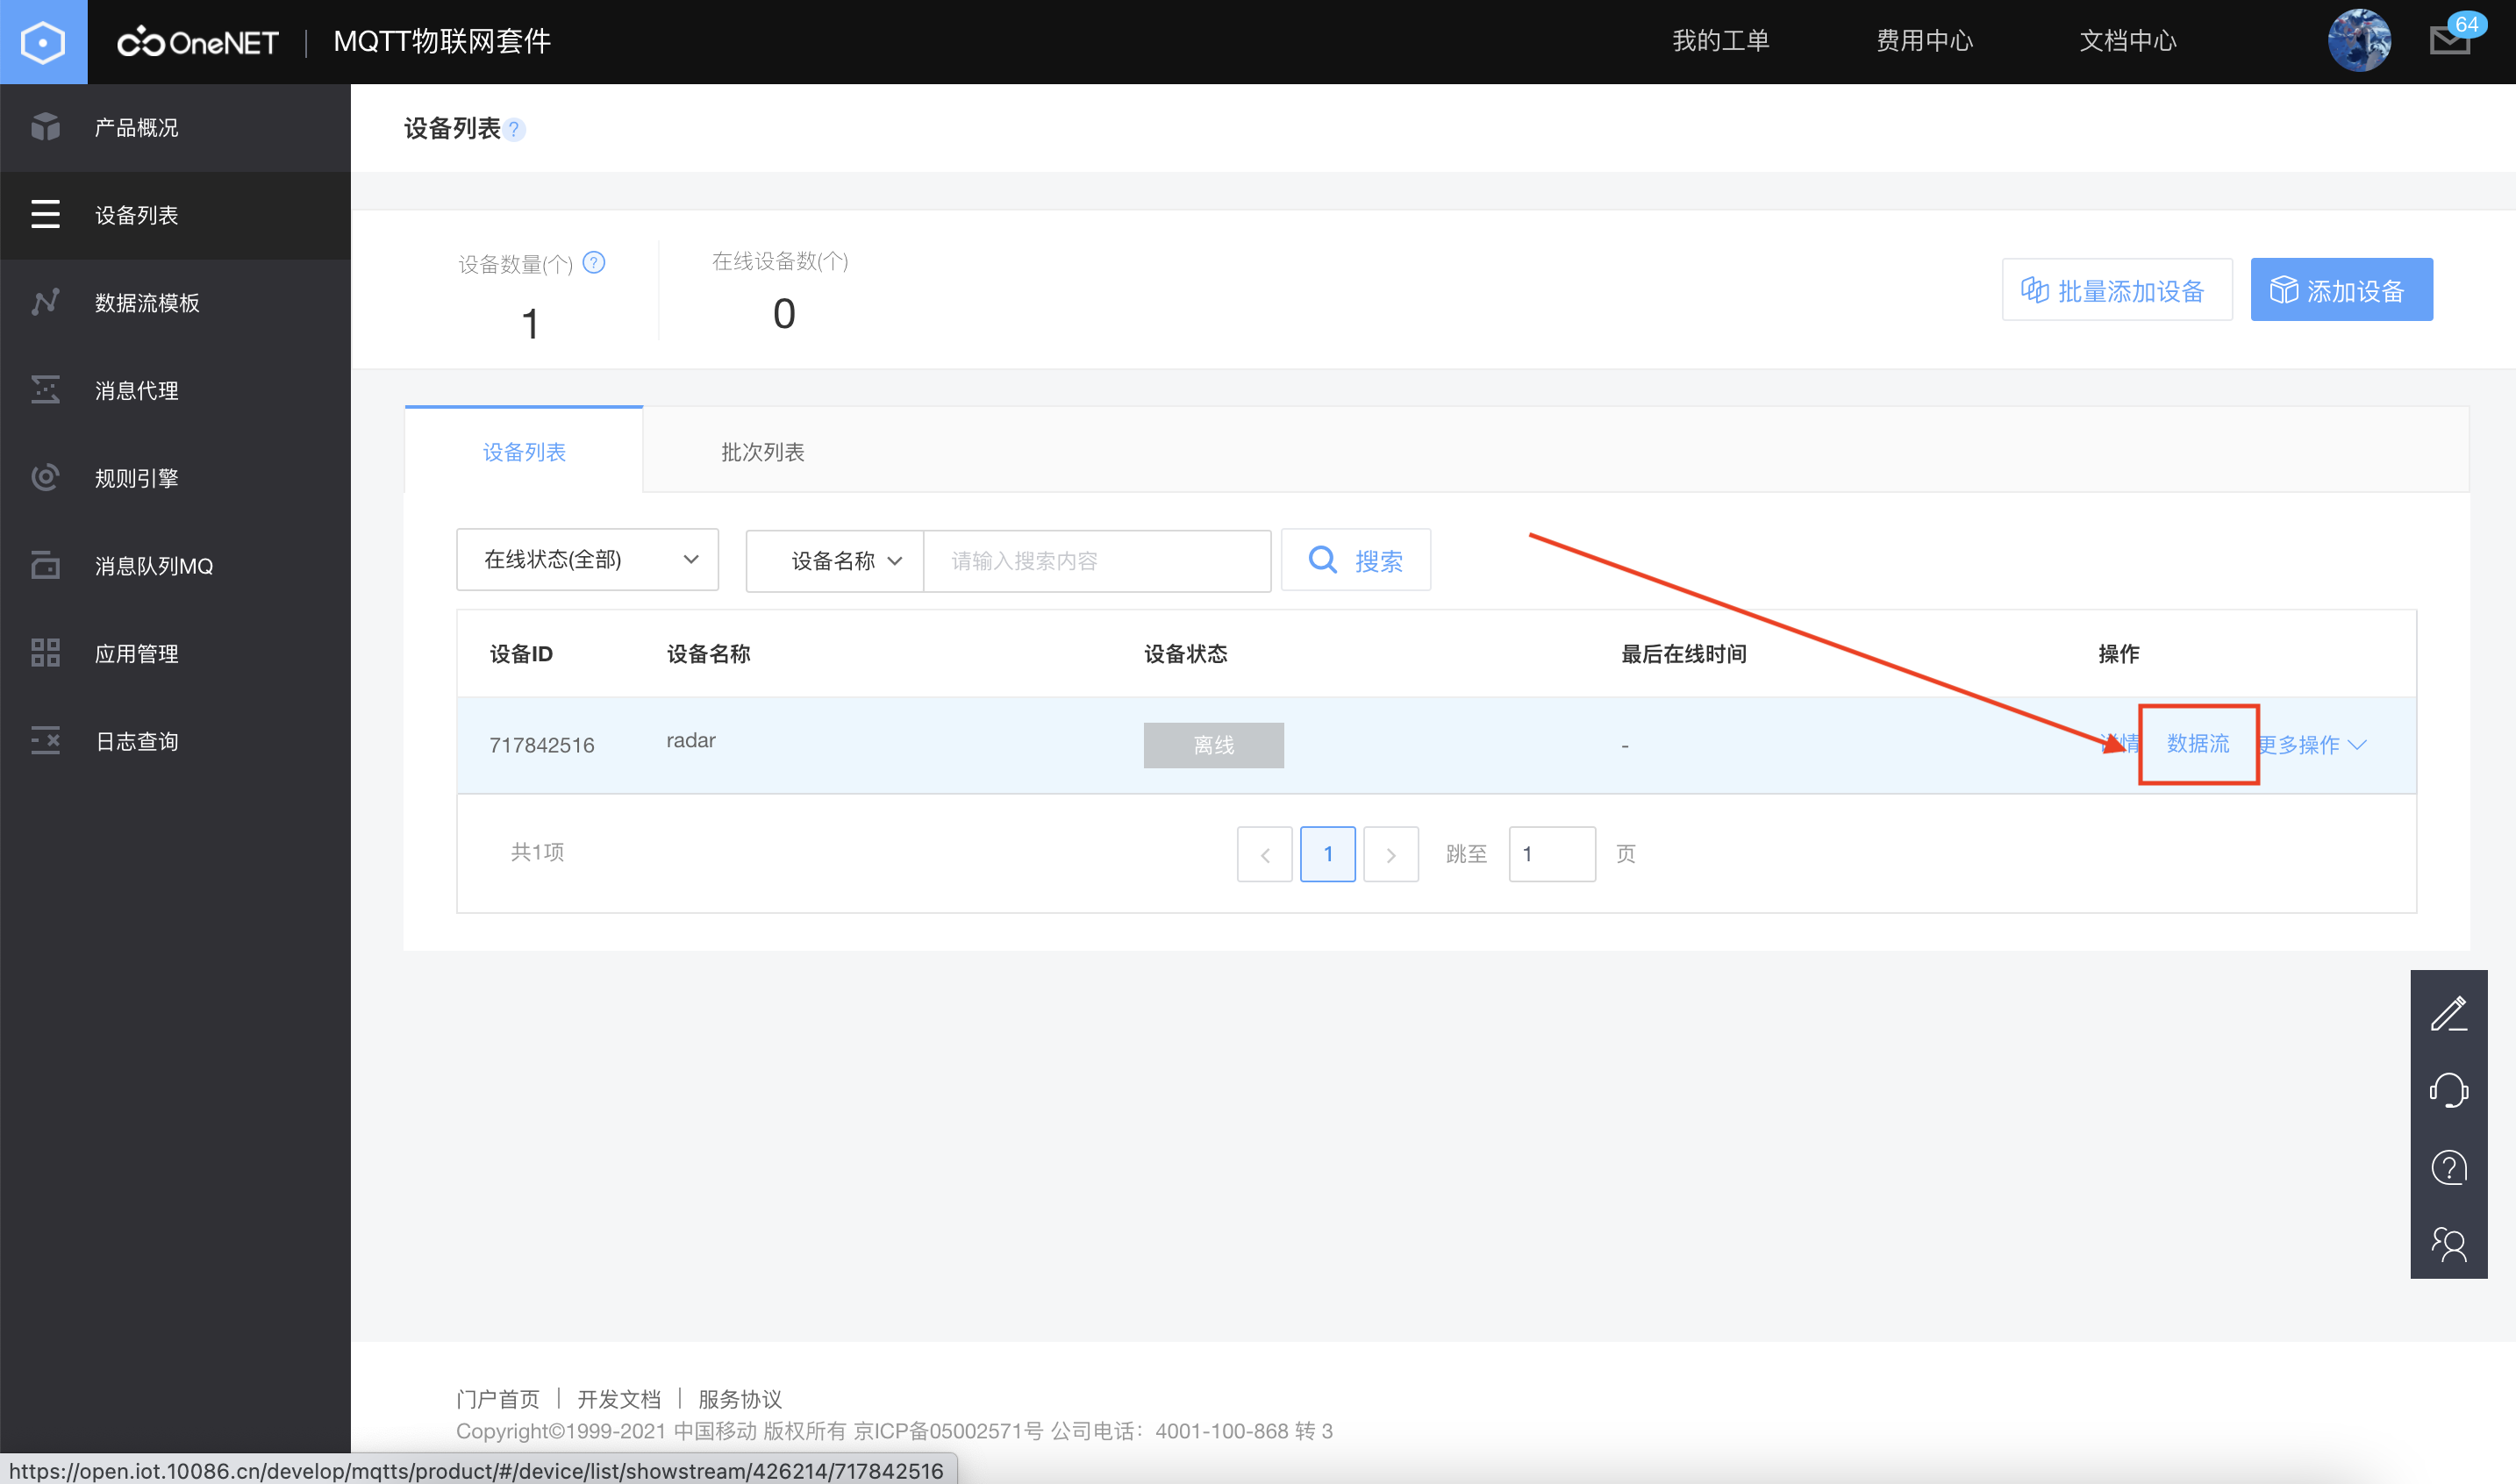
Step 2:
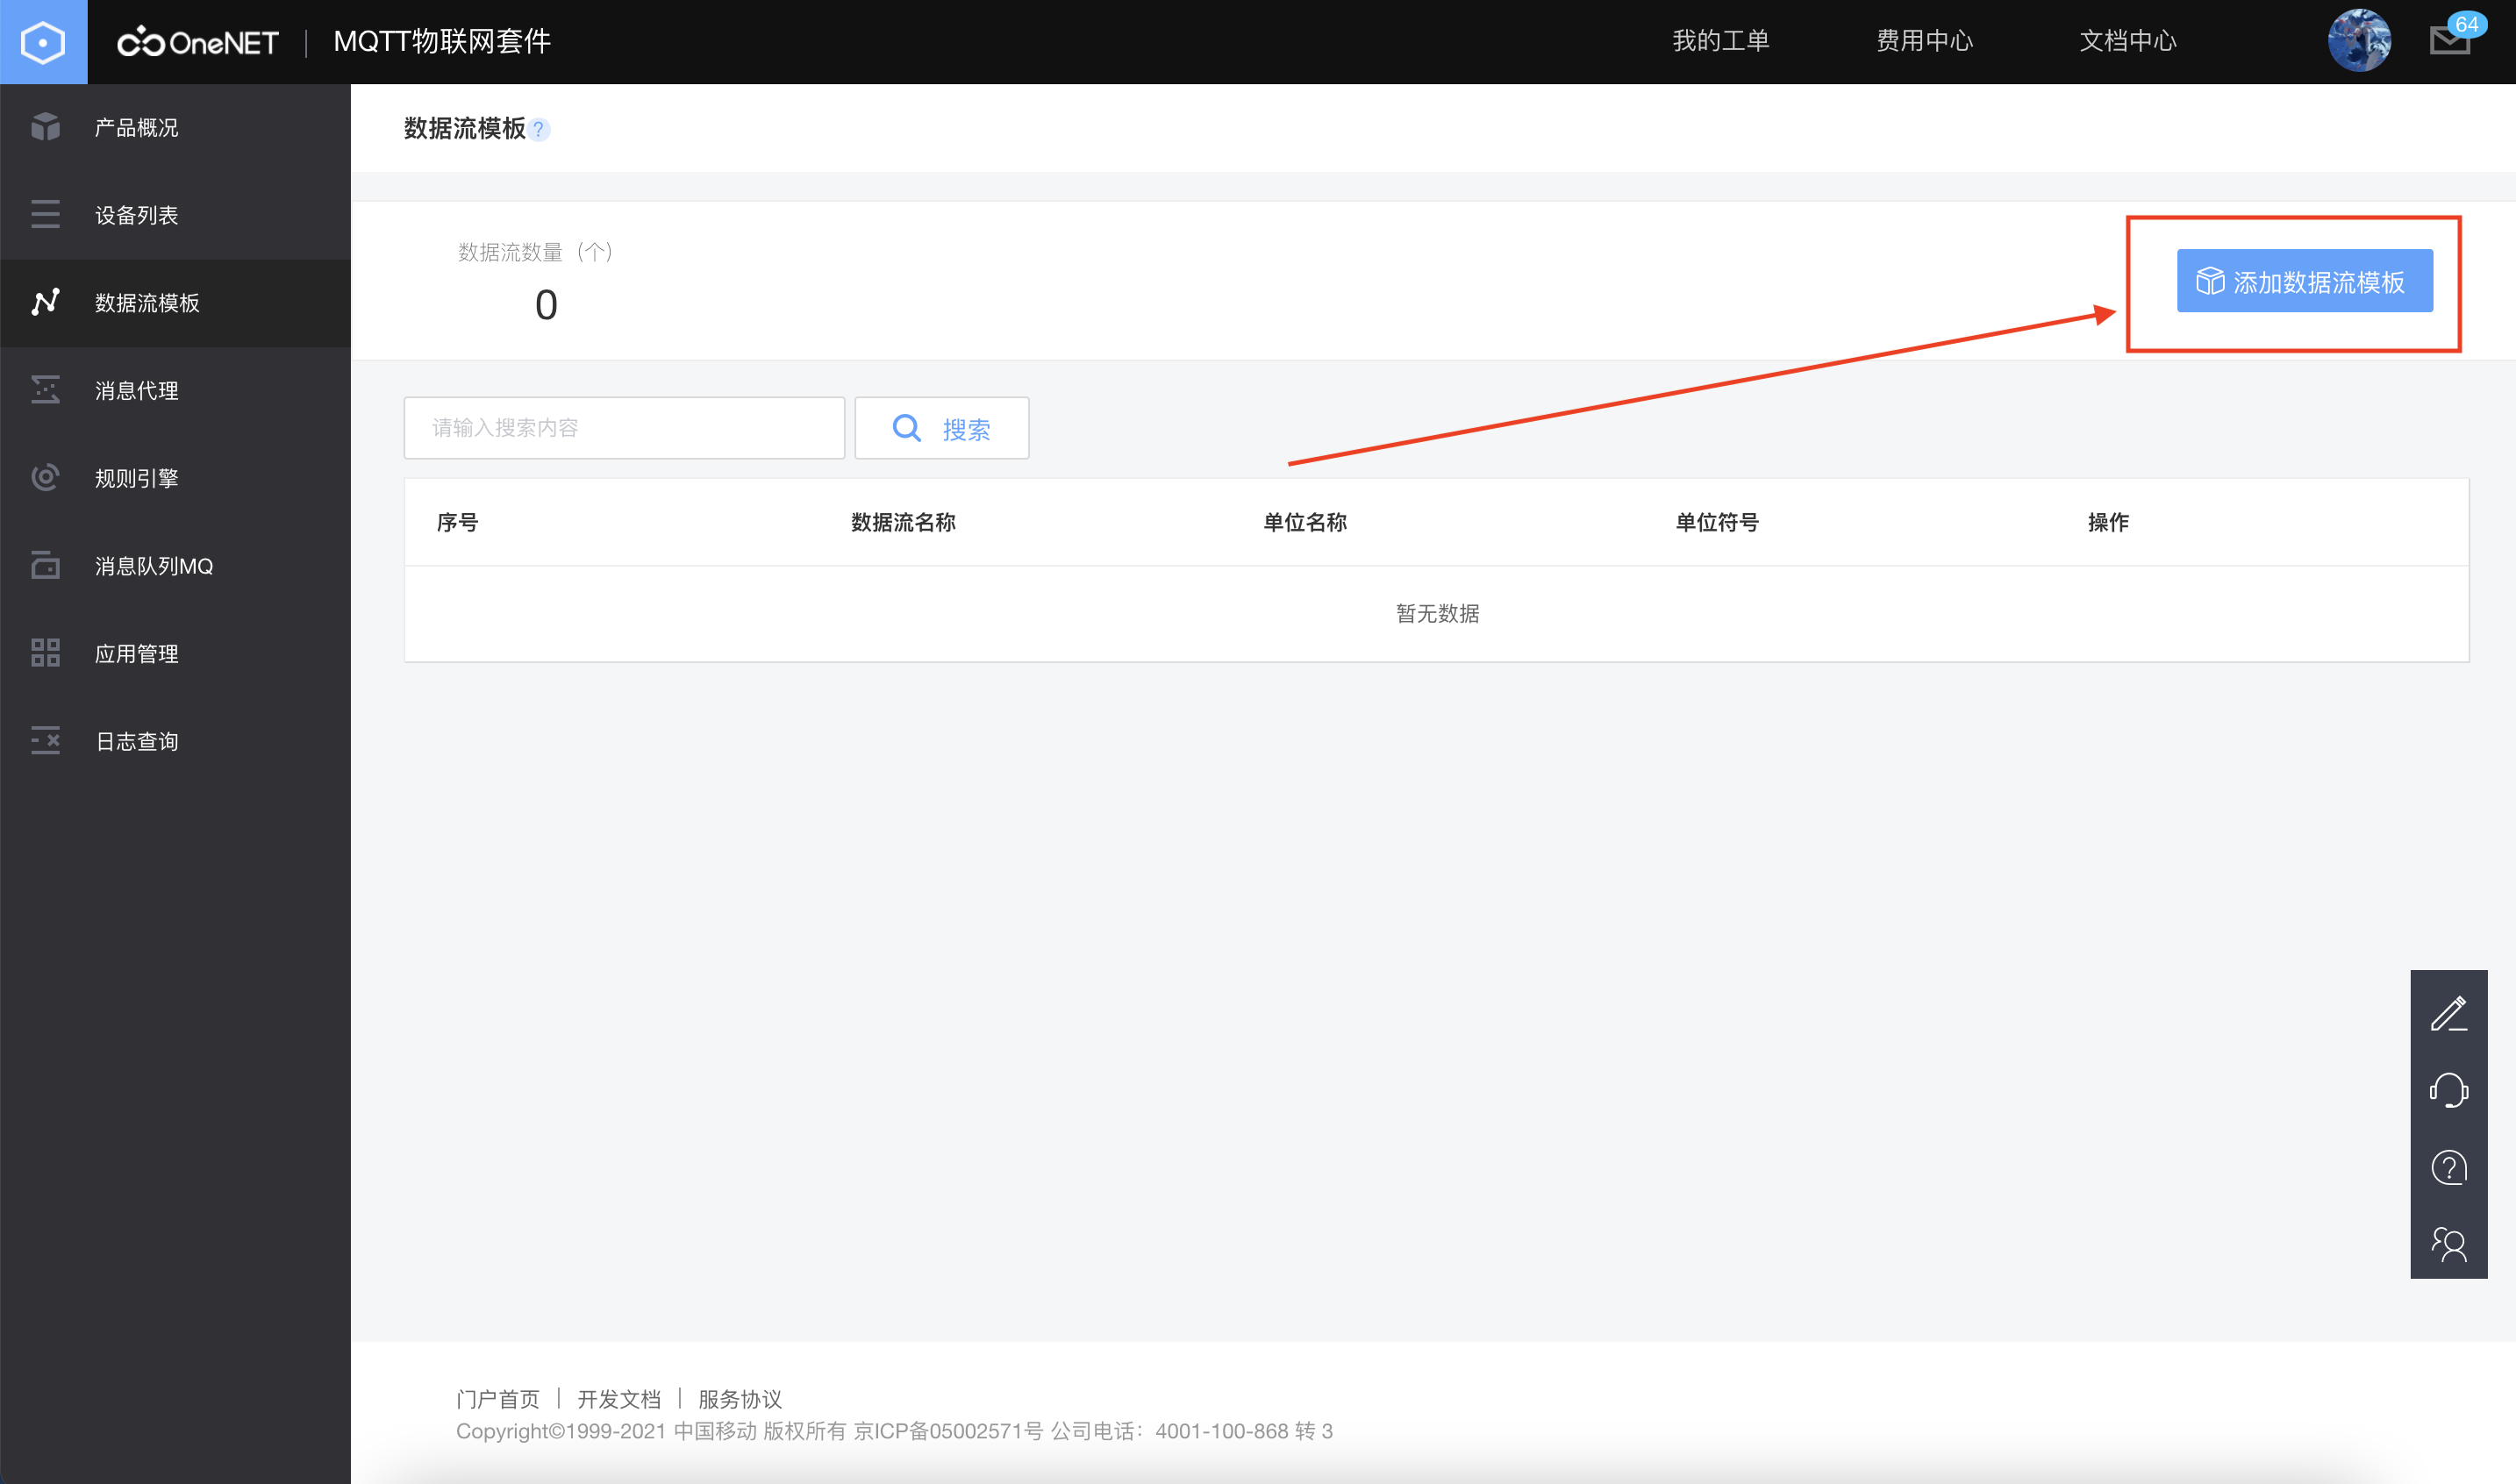
Step 3:
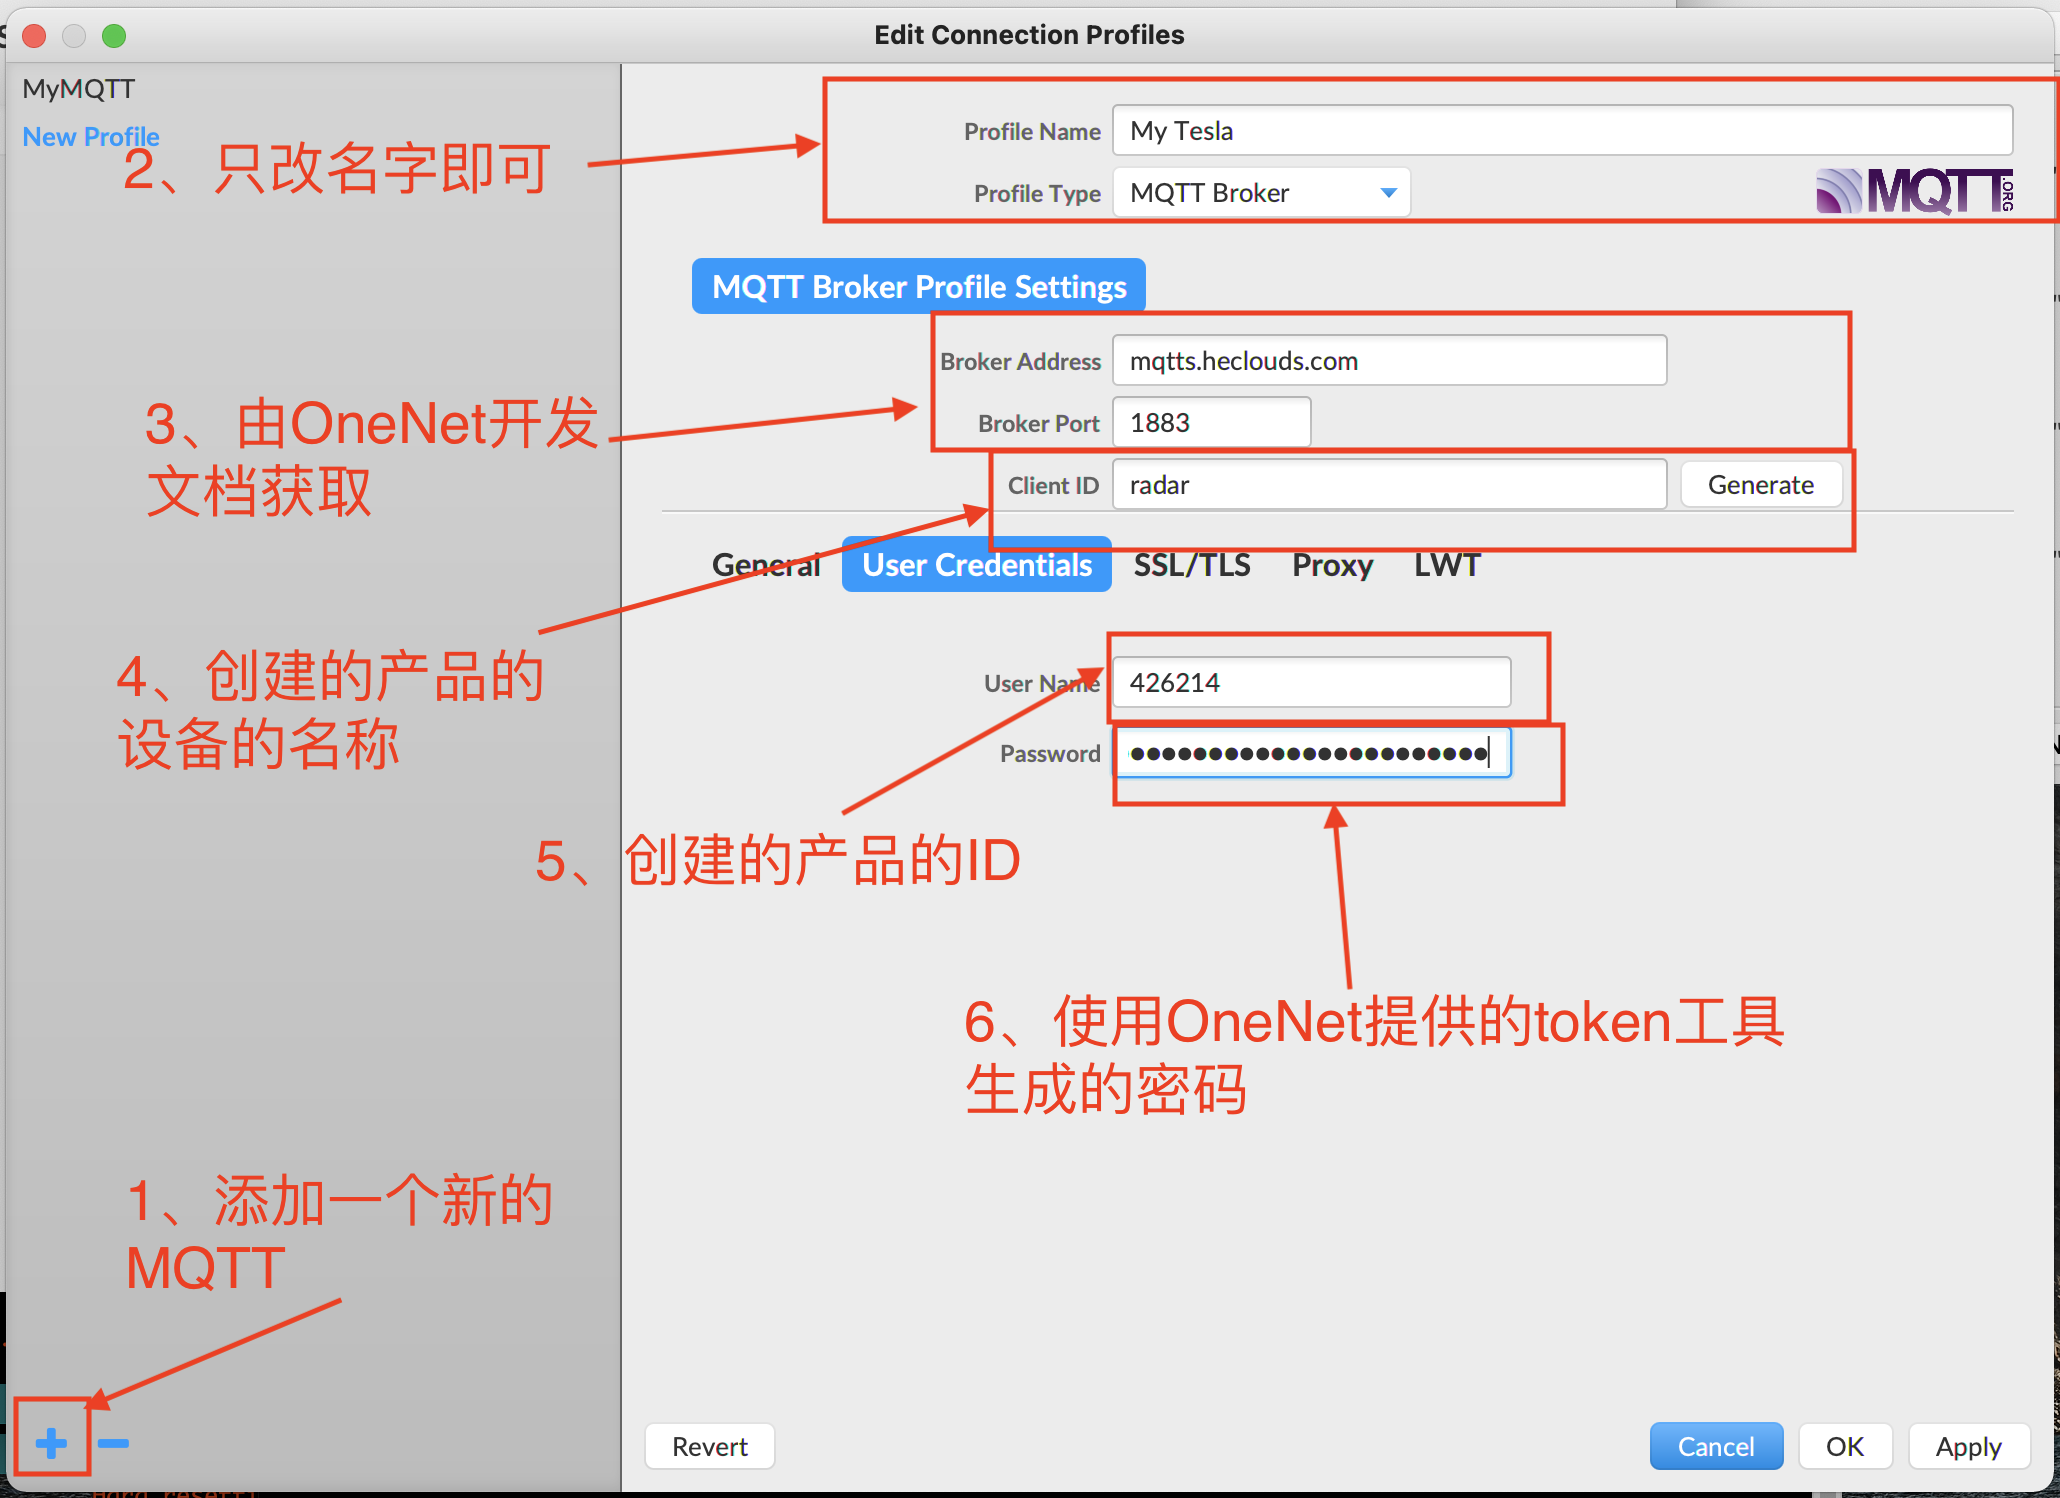
2, Test MQTT using MQTT software provided by OnetNet
Software download address, OneNet official website: https://open.iot.10086.cn/doc/mqtt/book/get-start/connect.html
After opening MQTT software:
Step 1:
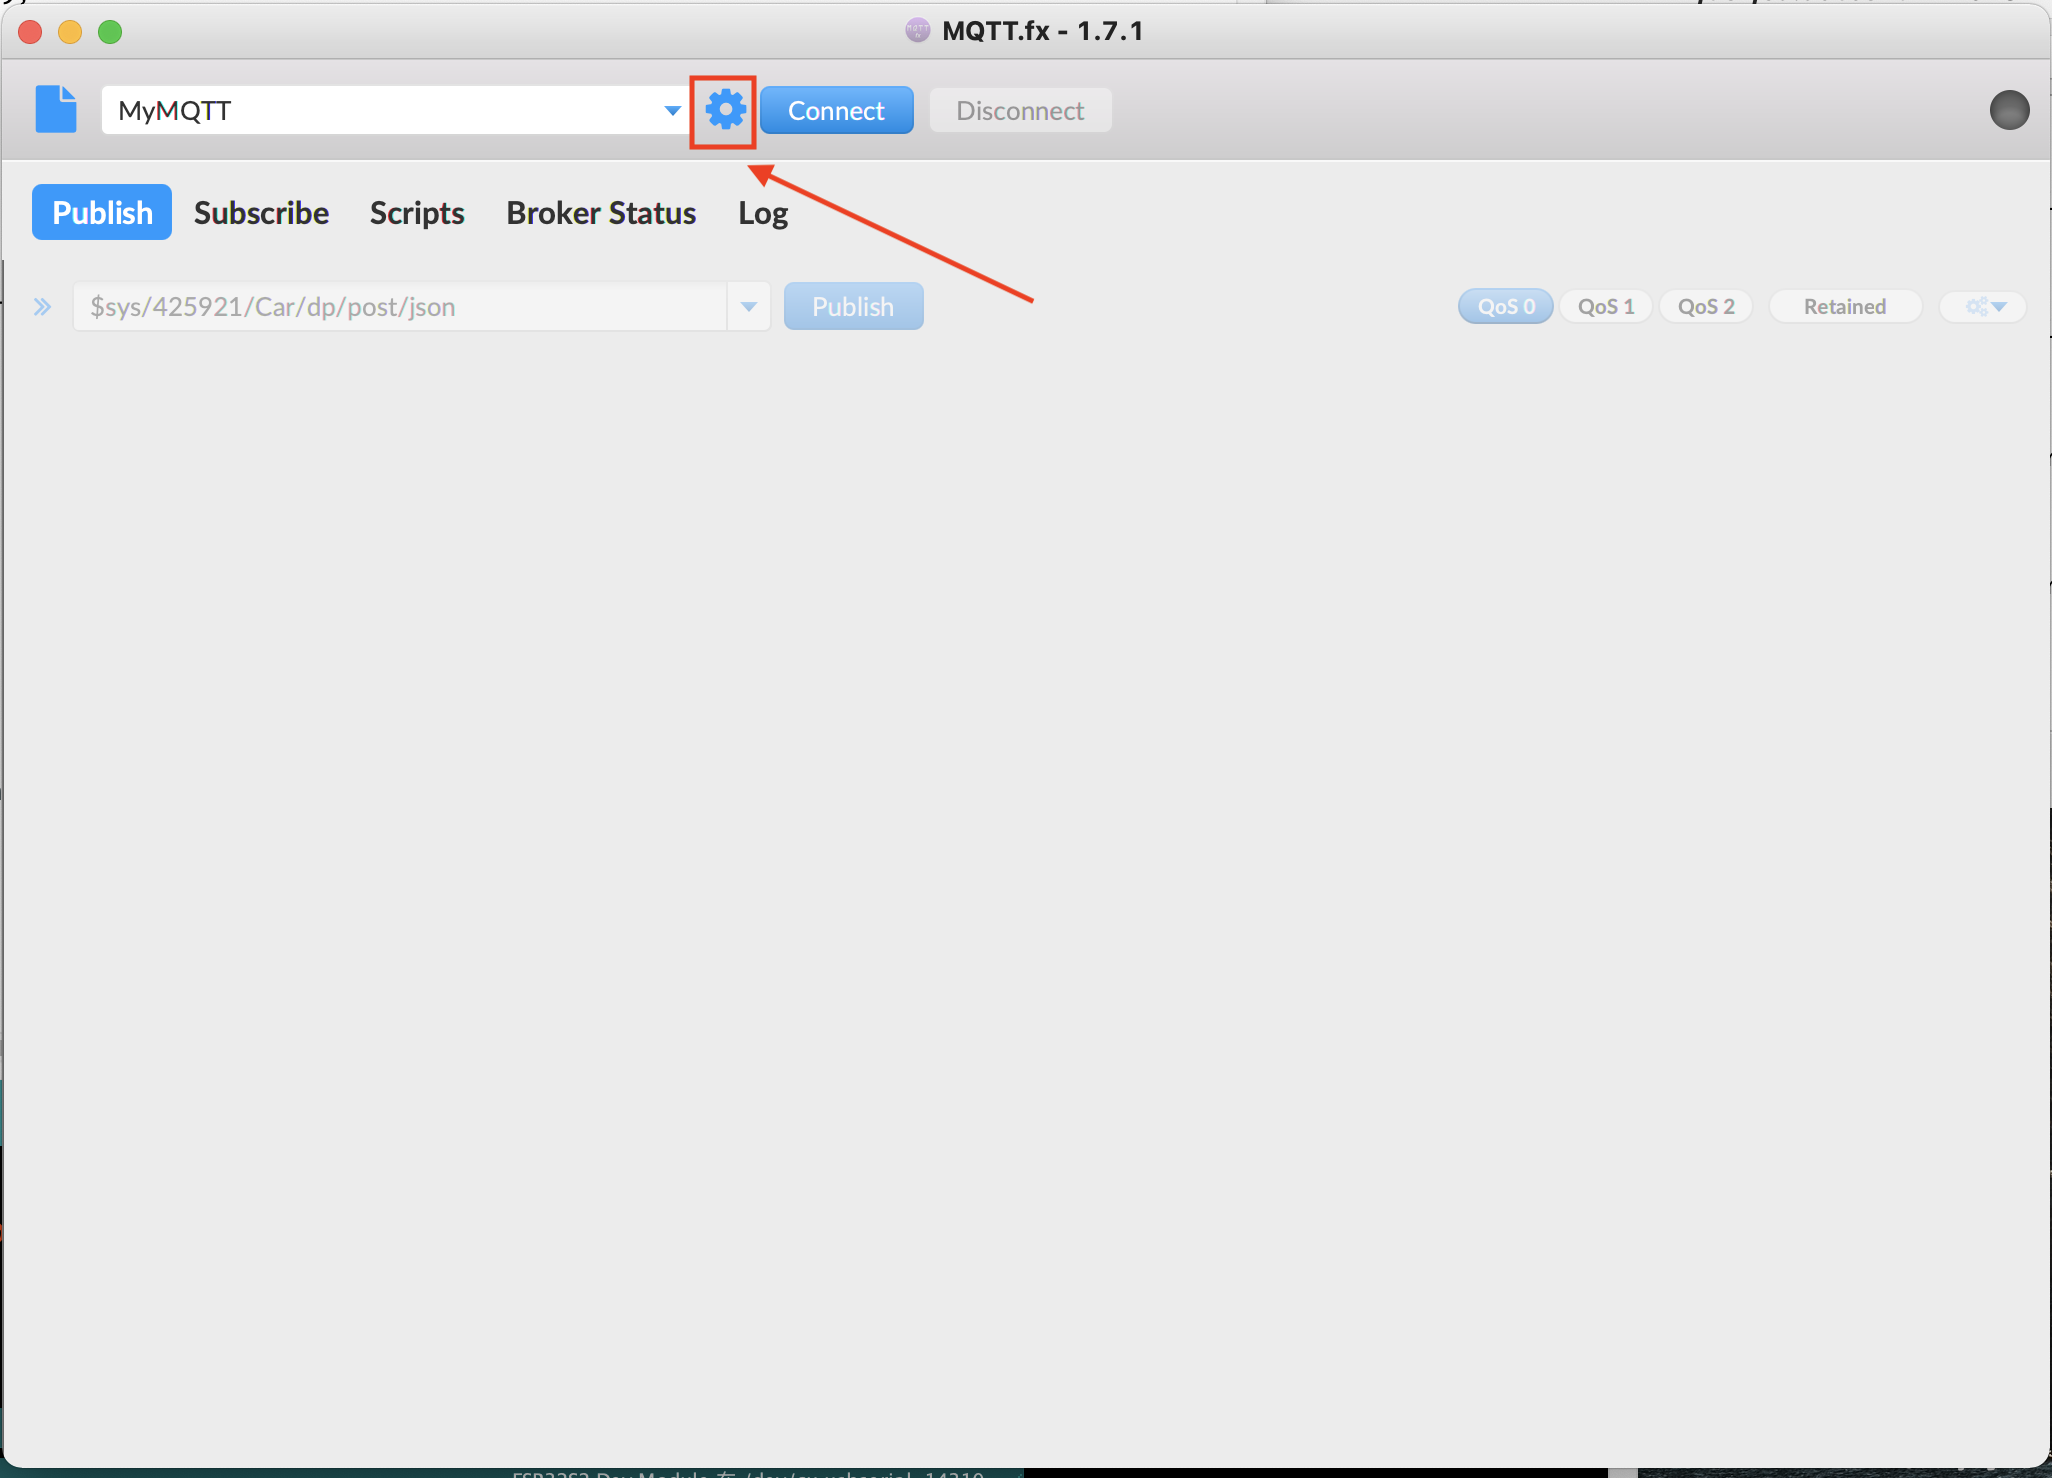
Step 2: configure MQTT.
The following websites must be viewed:
Configuration of MQTT address and port number: (I choose non encrypted interface here)
https://open.iot.10086.cn/doc/mqtt/book/device-develop/manual.html
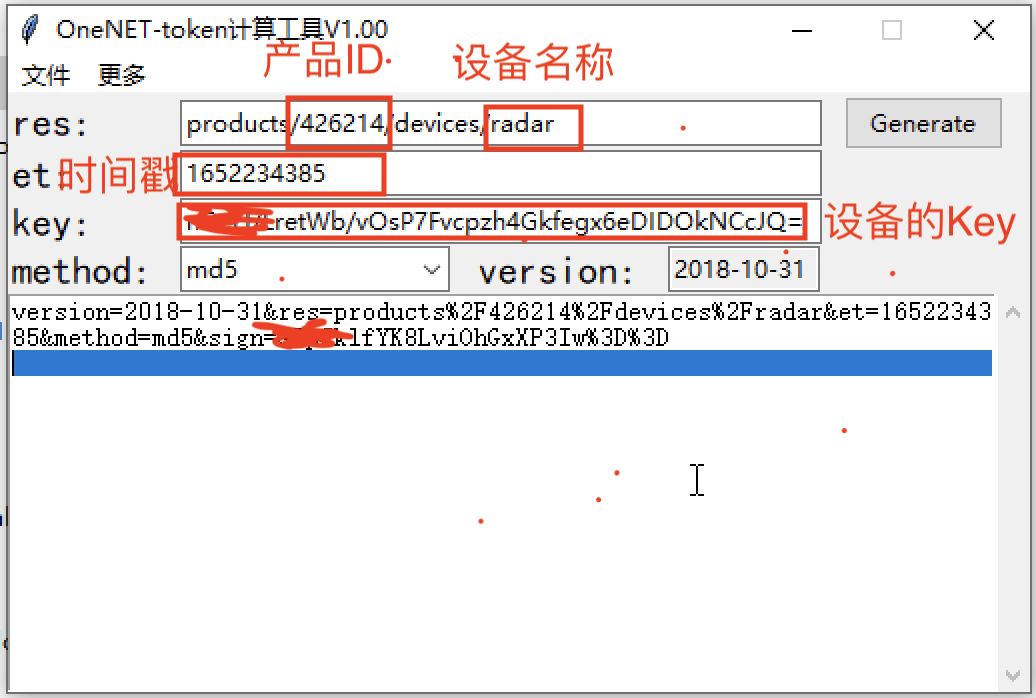
Detailed explanation of token algorithm: https://open.iot.10086.cn/doc/mqtt/book/manual/auth/token.html
token algorithm tool and usage:
https://open.iot.10086.cn/doc/mqtt/book/manual/auth/tool.html
unix timestamp conversion tool:
https://tool.lu/timestamp/
Note: the time stamp used must be greater than the current time, otherwise a password error will be prompted, resulting in failure to connect.
Example of token key generation:
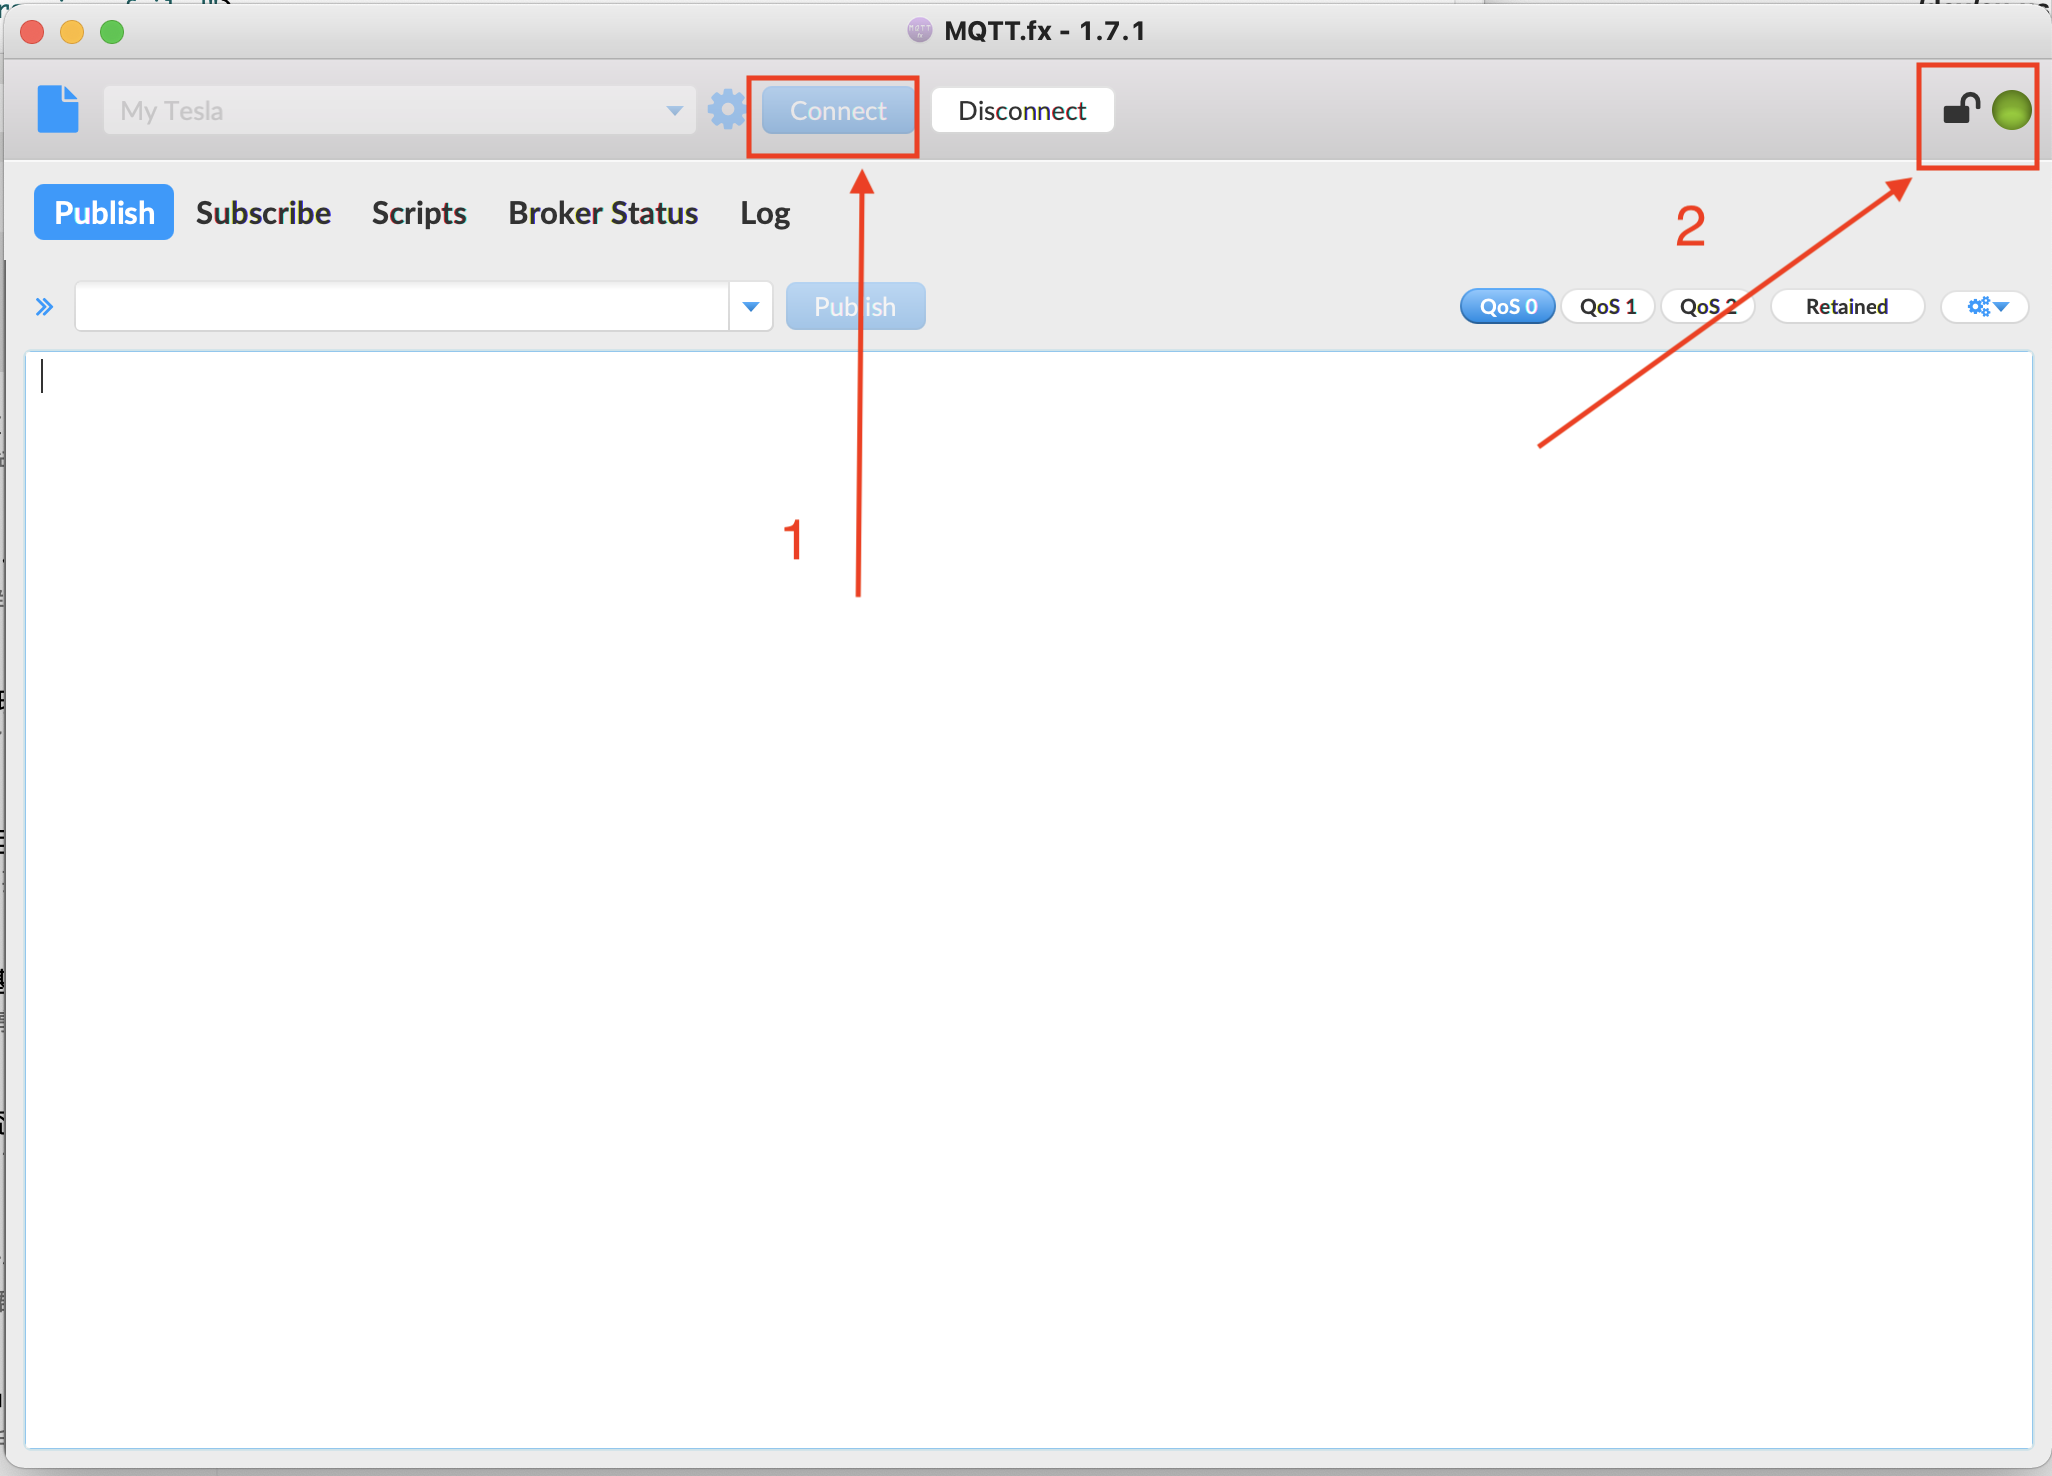
After the above steps are completed:
Click Connect enough to connect successfully!
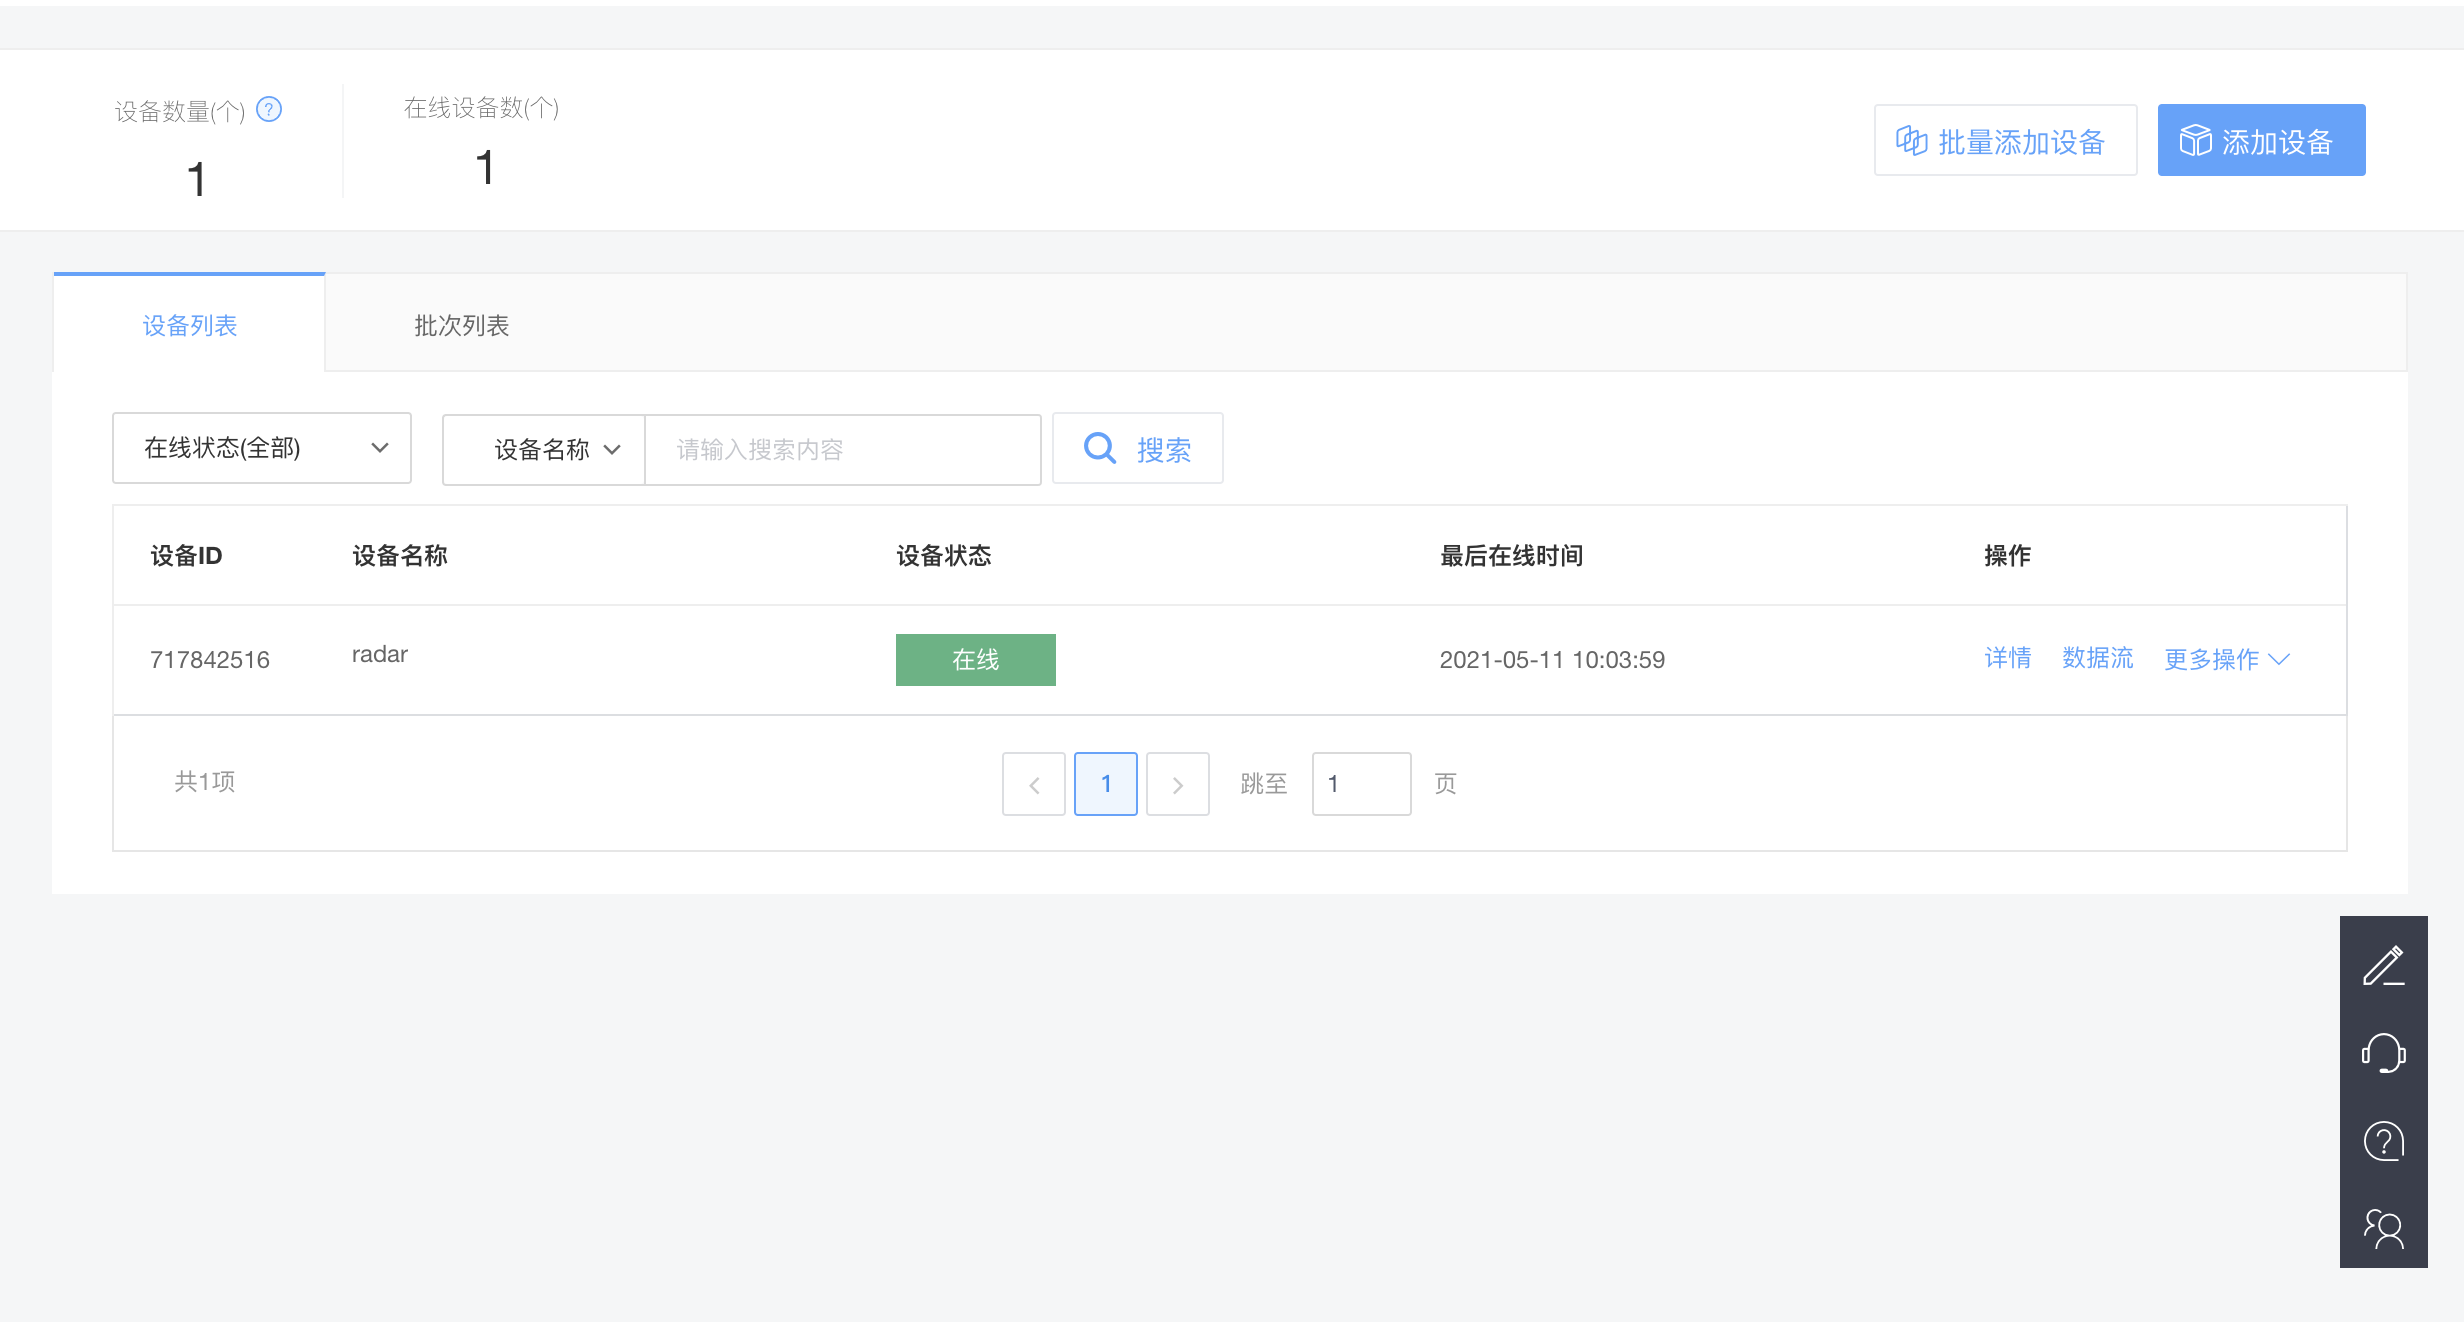
View device on OneNet, online:
3, Send data to OneNet using MQTT
Refer to the official website, MQTT protocol specification: https://open.iot.10086.cn/doc/mqtt/book/device-develop/protocol.html
Refer to the official website, data point topic cluster:
https://open.iot.10086.cn/doc/mqtt/book/device-develop/topics/dp-topics.html
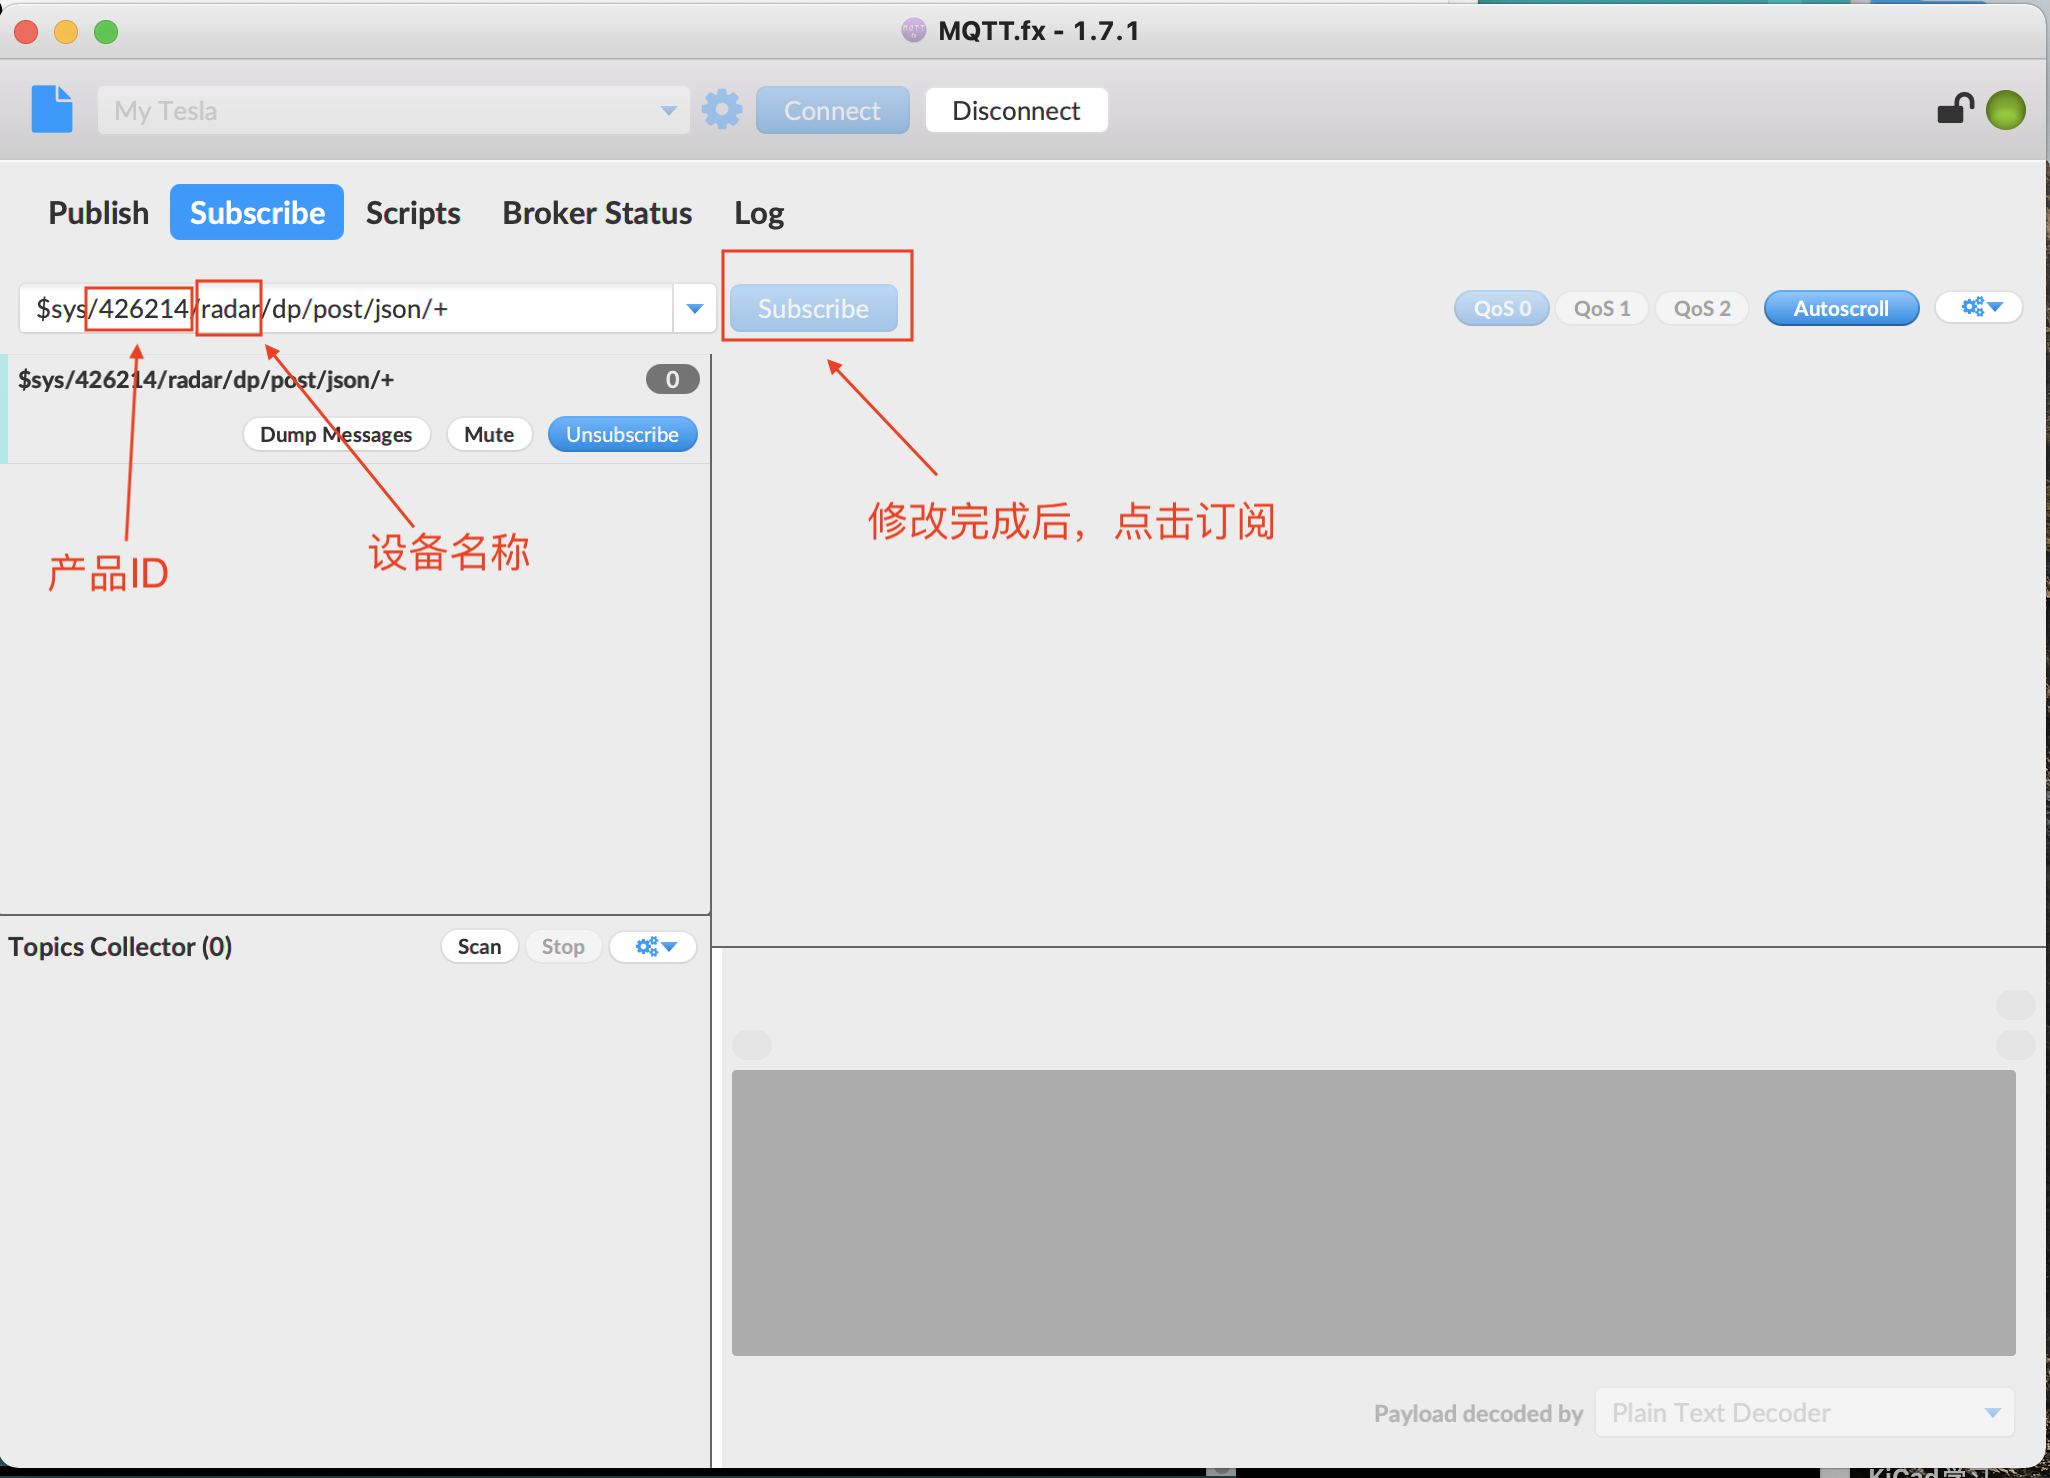
Step 1: first subscribe to the "report results of subscription equipment data points";
Pay attention to modifying the product ID and device name. Other OneNet cannot be modified at present.
Step 2: release information;
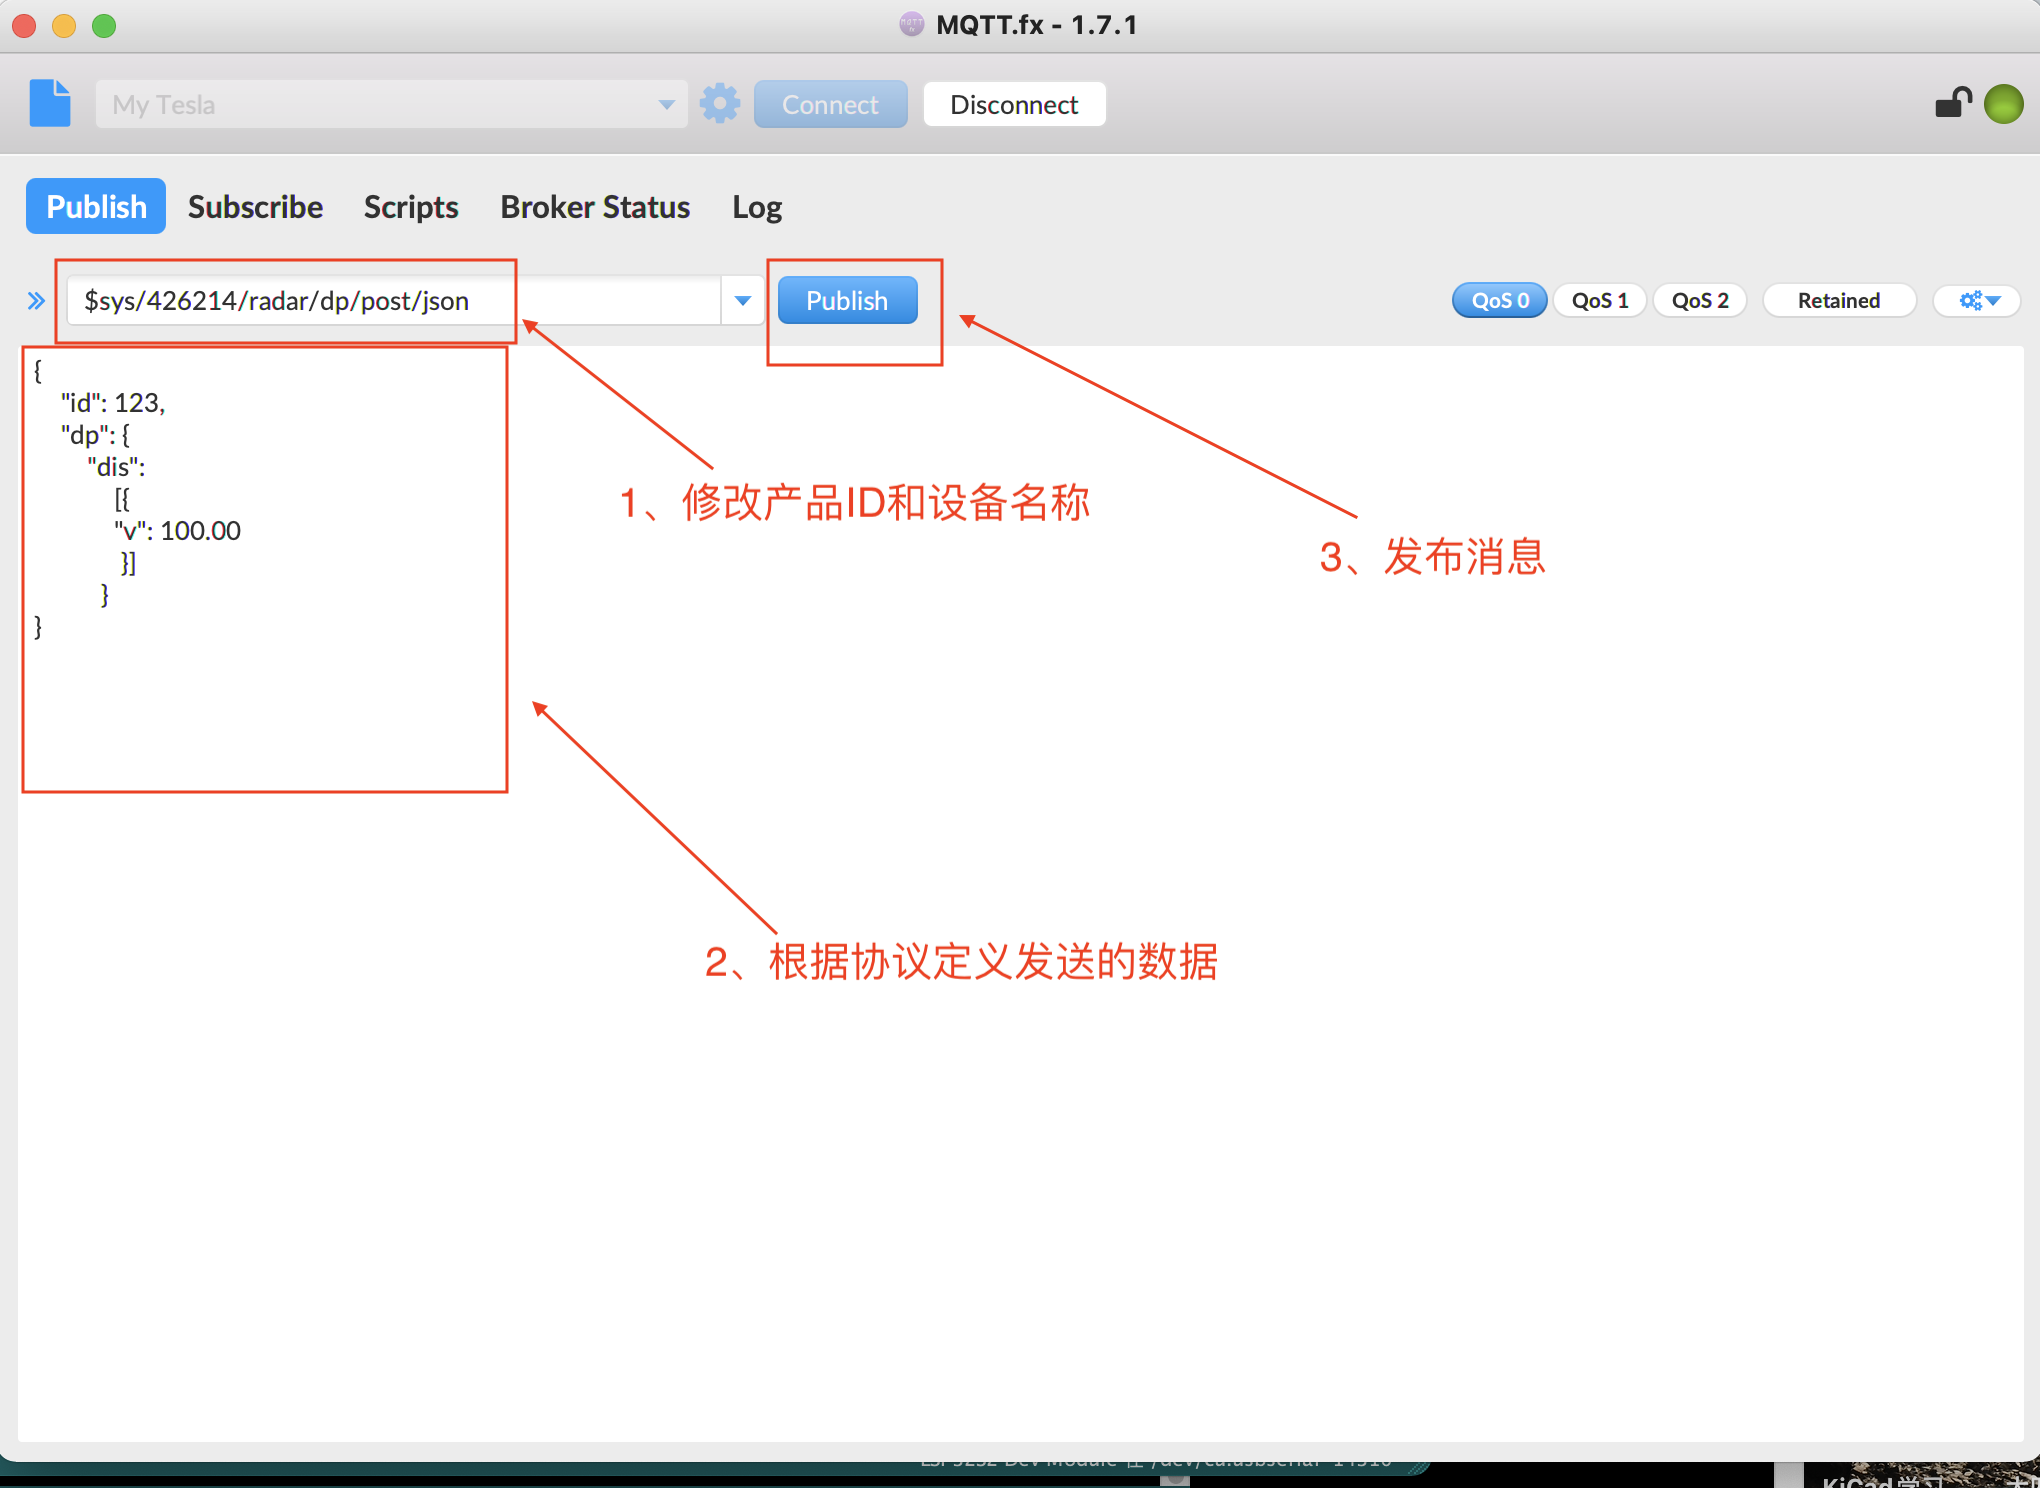
The rules for publishing messages are as follows:
id: you can change it at will.
dp: cannot be changed.
dis: the name of the data stream defined in OneNet products.
v: It cannot be changed, and the data behind it can be changed.
{
    "id": 123,
    "dp": {
        "dis":
            [{
            "v": 100.00
             }]
          }
}
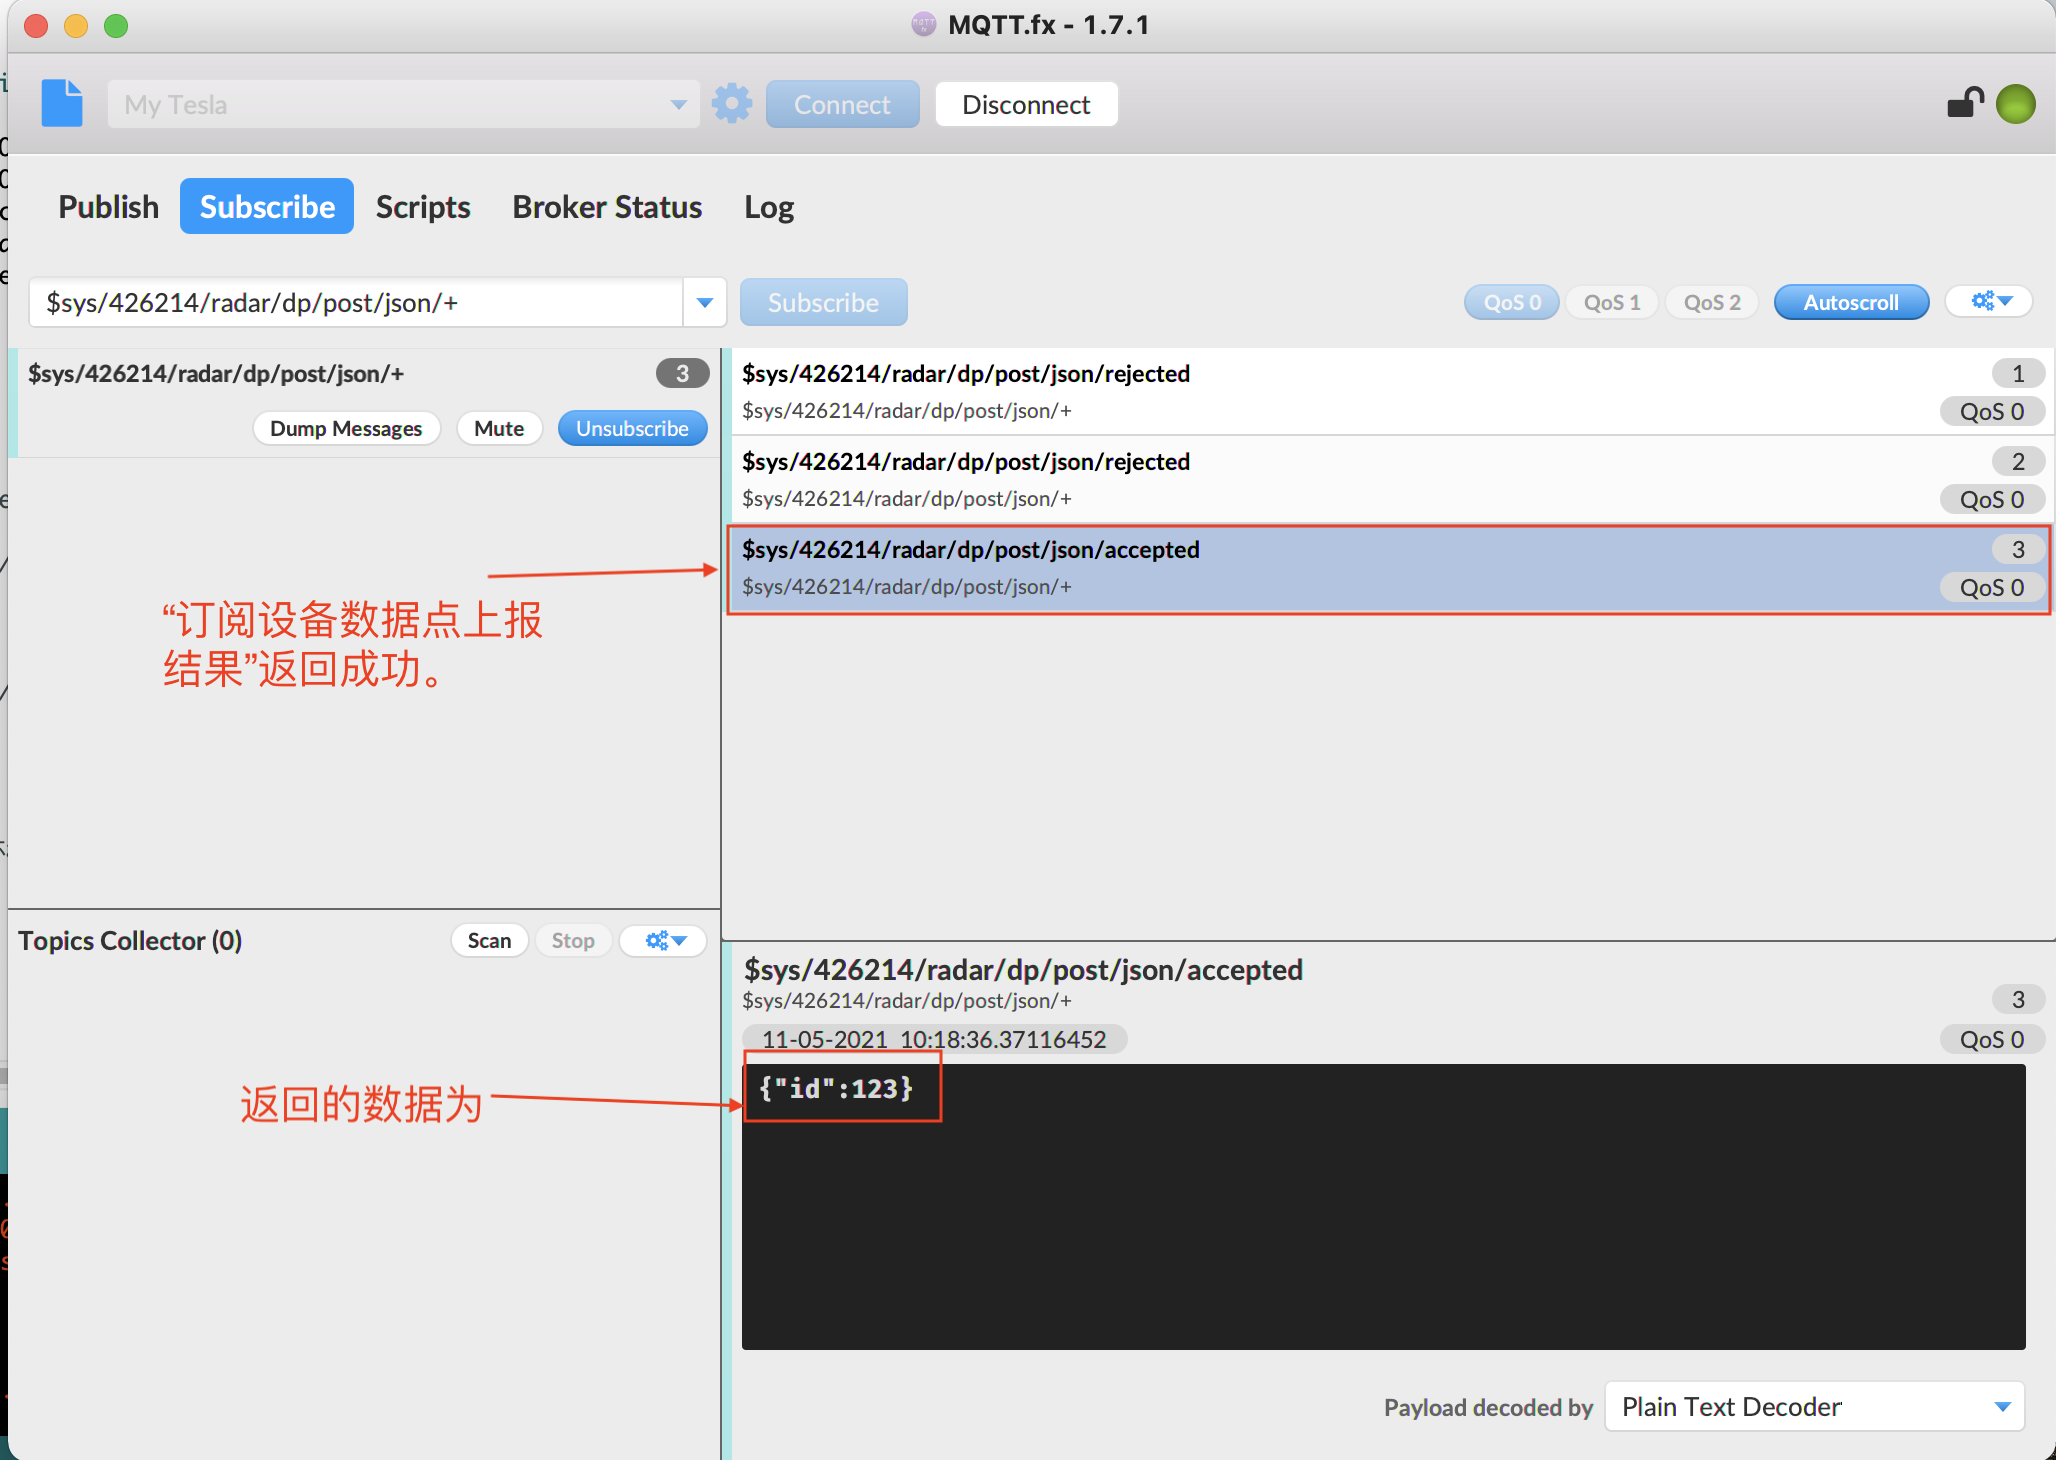
View subscription messages:
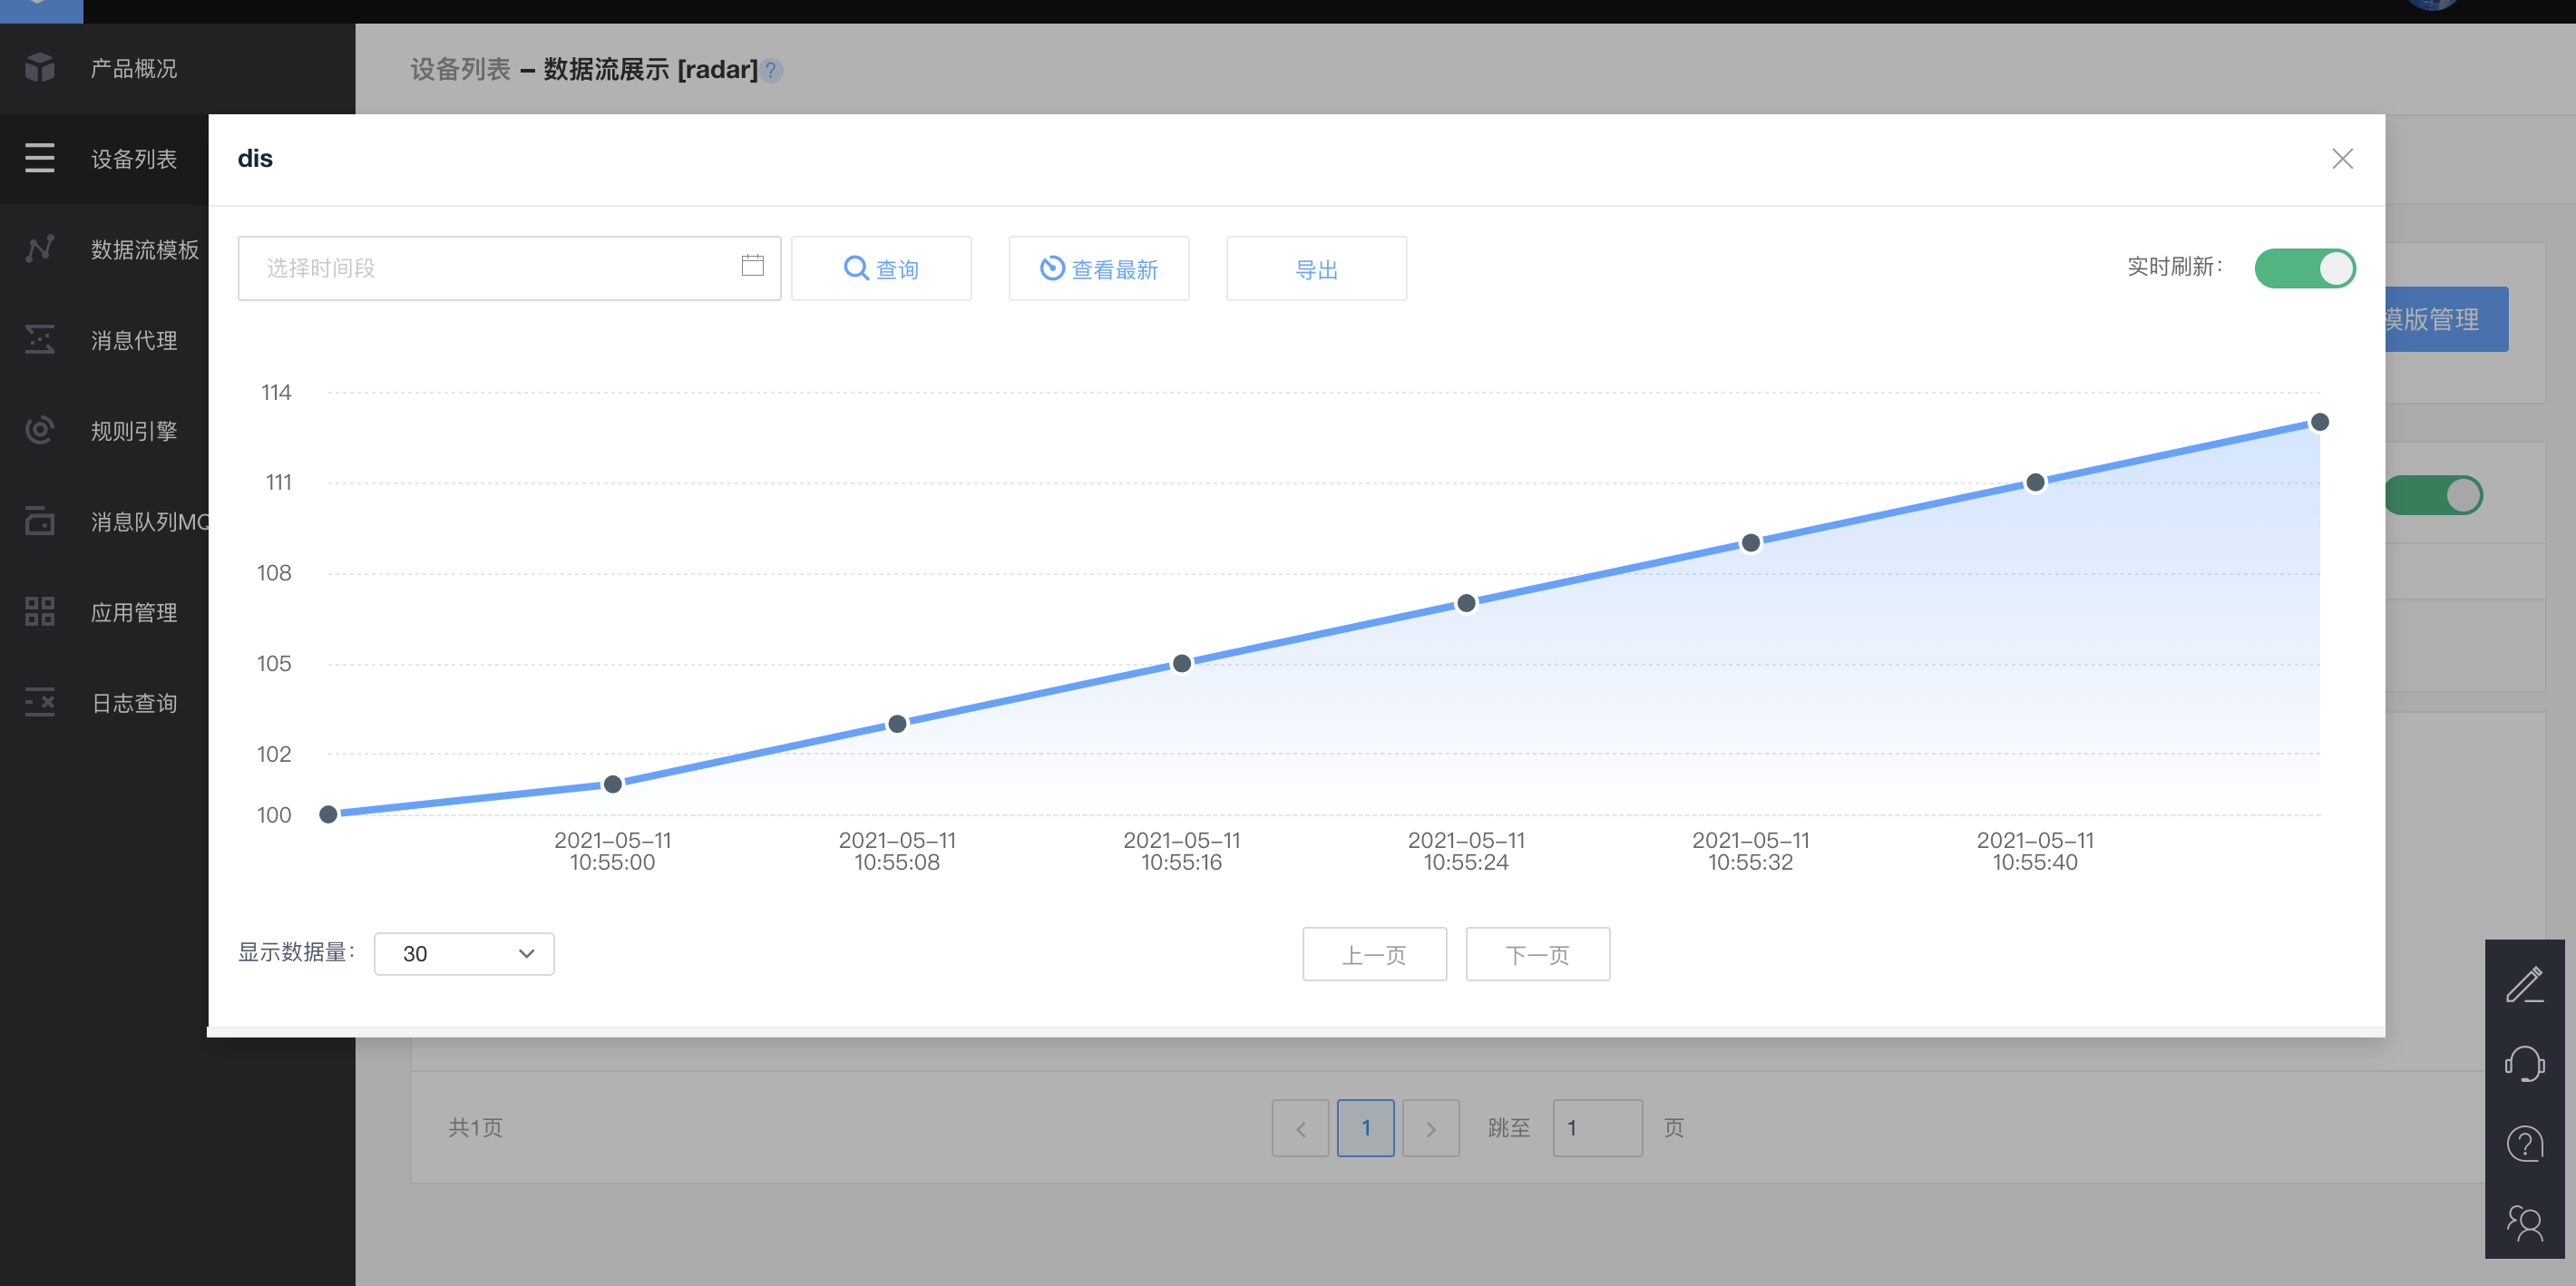
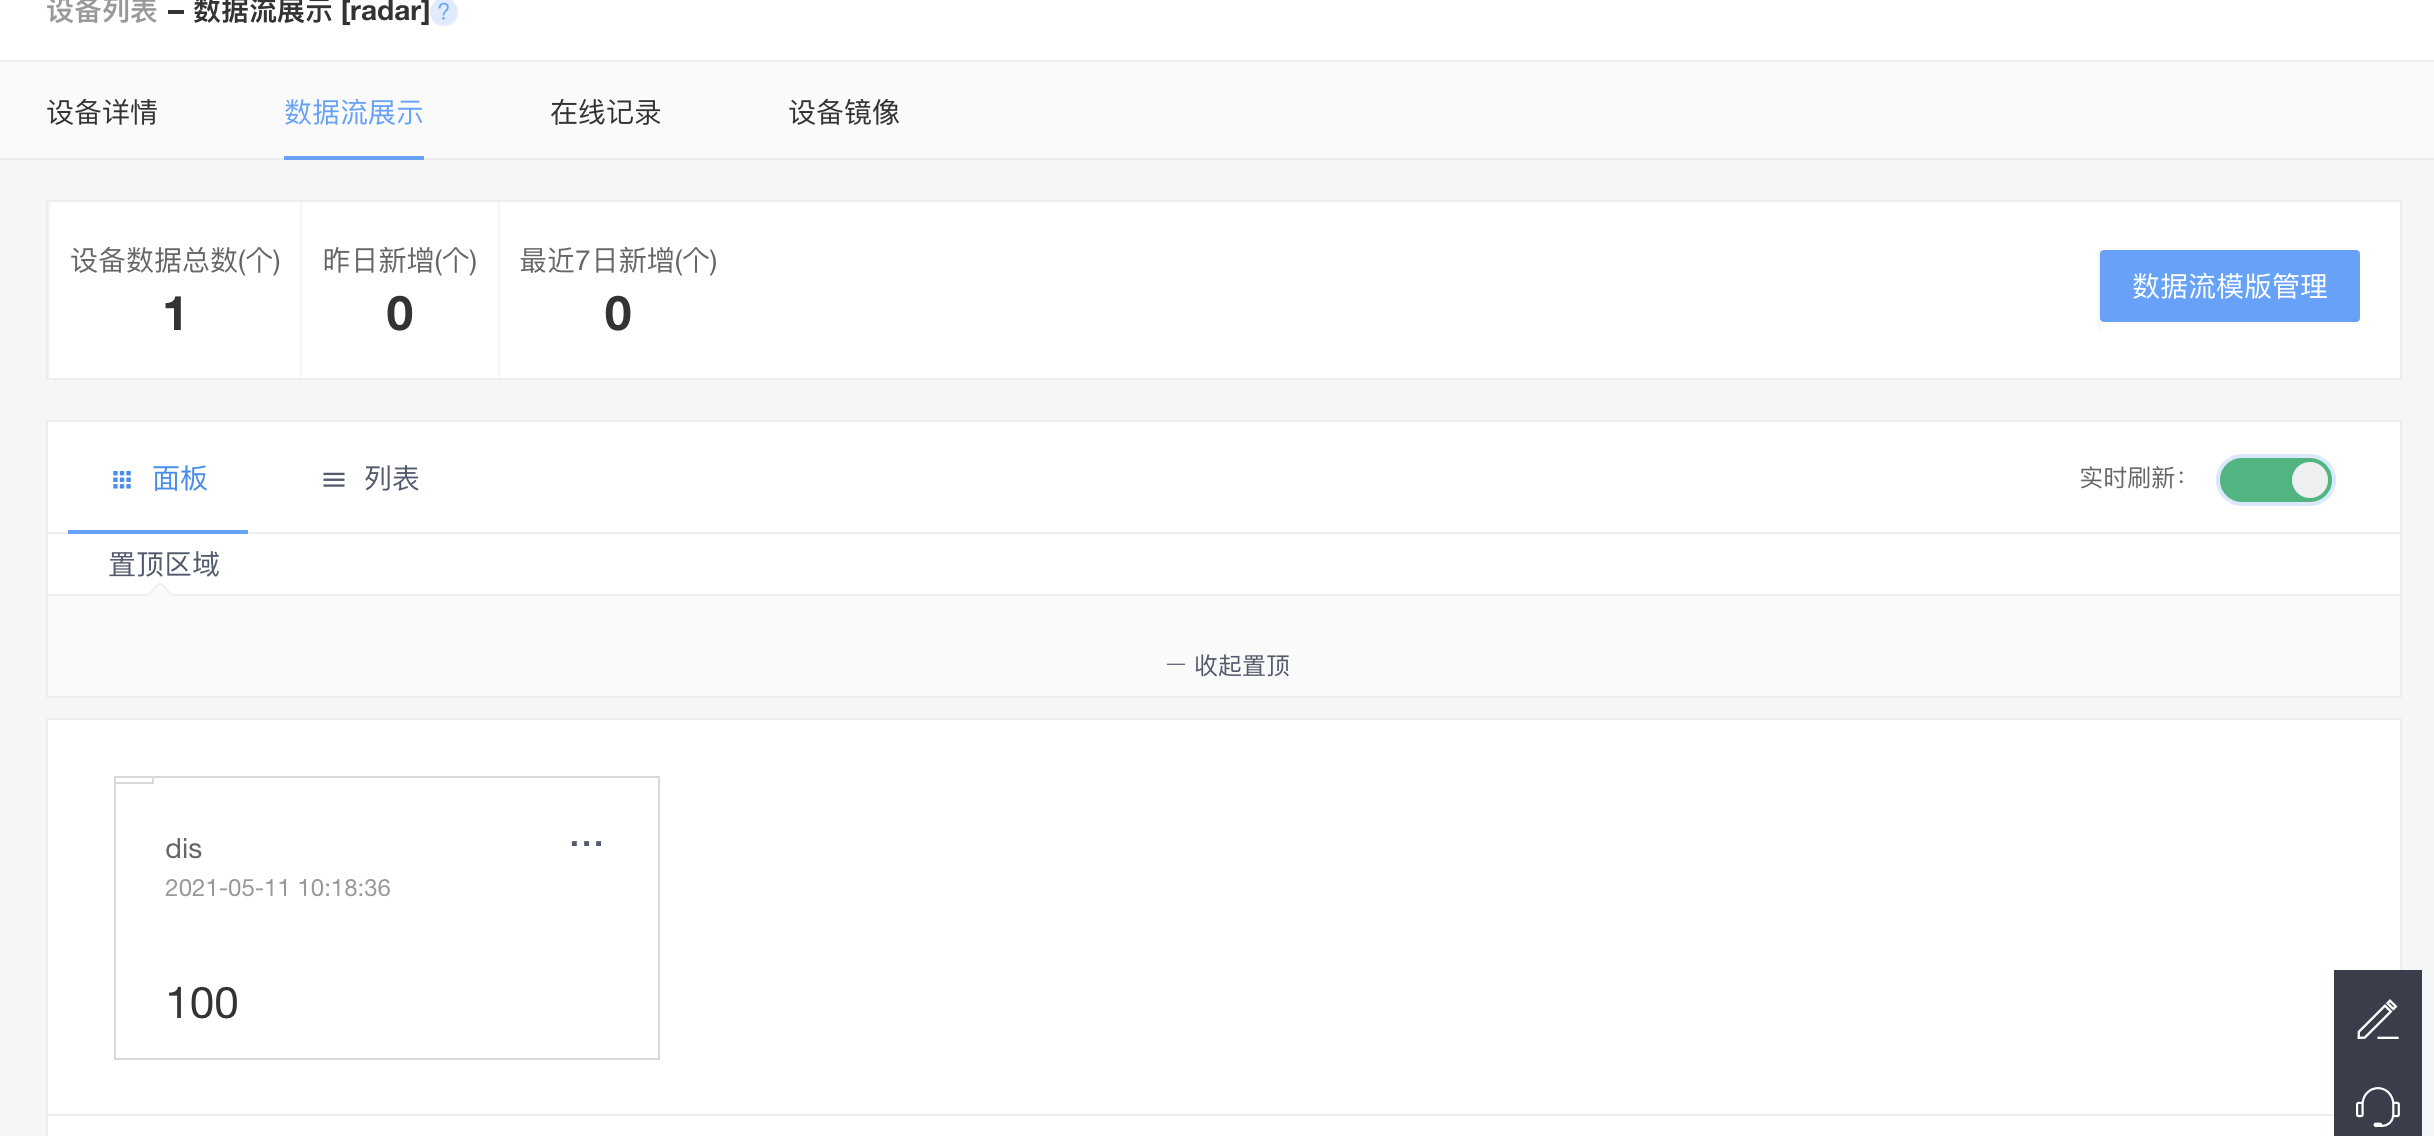
View the sent data on the cloud platform:
4, Connect onenet mqtt using ESP32
In fact, after using the above code, it is a successful process.
Note that this ESP32 does not burn any firmware. If you have written less firmware before, please wipe it out before using it.
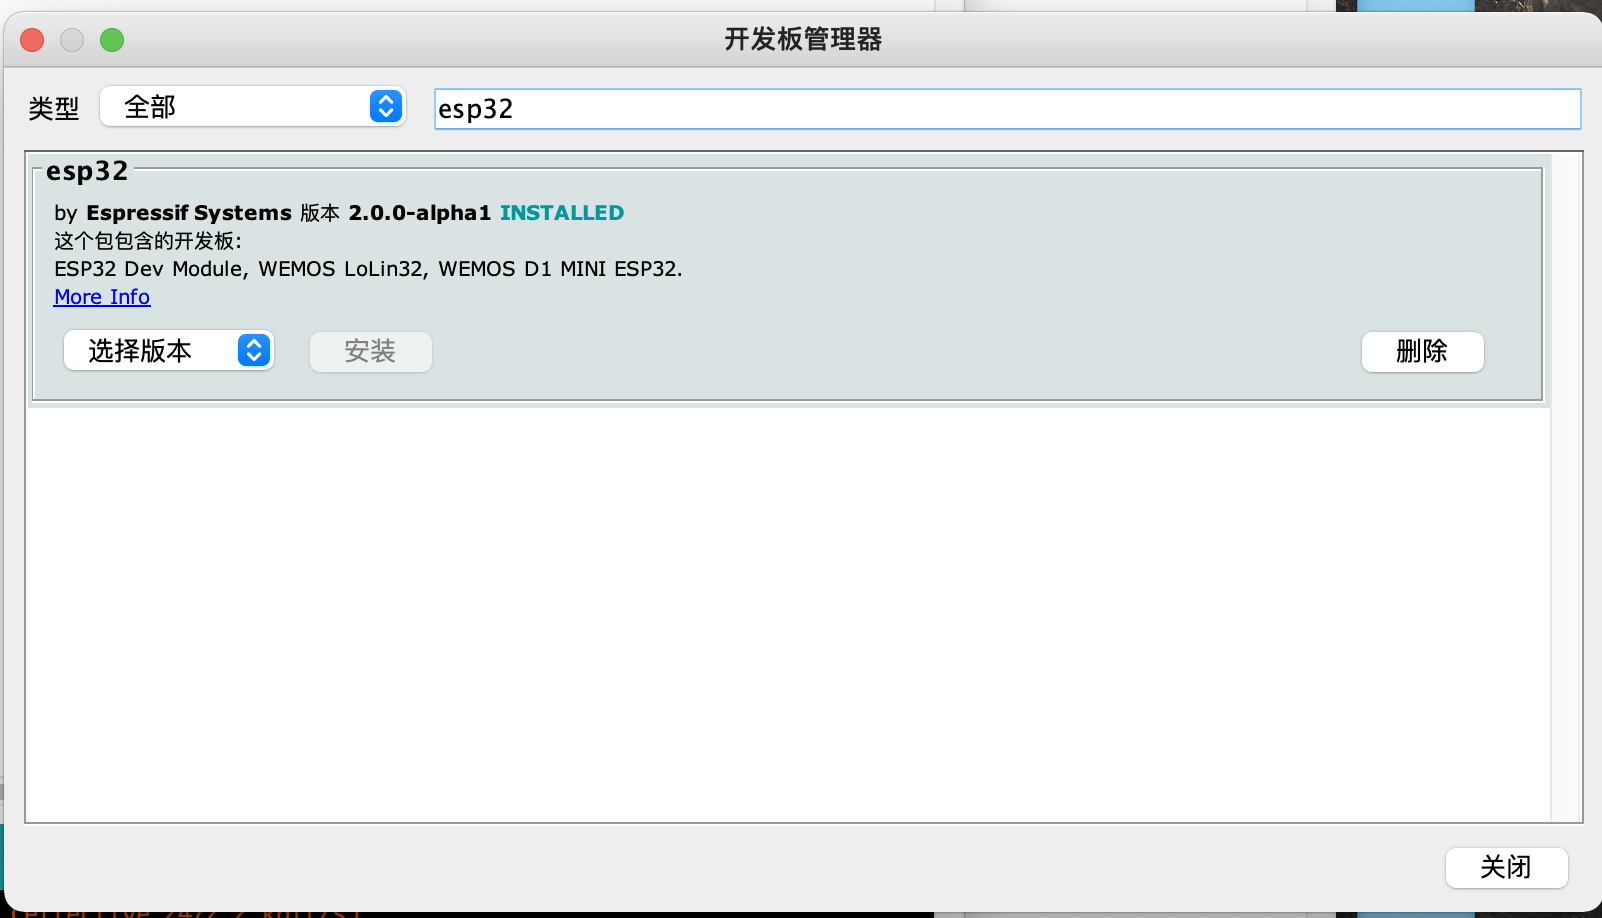
1. Construction of esp32 Arduino ide development environment
Arduino IDE Download:
https://www.arduino.cc/en/software
Add the following to the development version management website of Arduino IDE: https://raw.githubusercontent.com/espressif/arduino-esp32/gh-pages/package_esp32_dev_index.json
After that, you can download it in the development manager. Install the source code without ladder.
I won't repeat it here.
2. Code implementation
Go directly to the code:
reference resources: https://blog.csdn.net/finedayforu/article/details/111517908
#include <Arduino.h>
#include "WiFi.h"
#include "PubSubClient.h"
#include "Ticker.h"
//#include "uFire_SHT20.h"
#include "ArduinoJson.h"

//uFire_SHT20 sht20;

const char* ssid = "NET502";              //wifi name
const char* password = "502502502";      //wifi password
const char* mqtt_server = "mqtts.heclouds.com"; //The IP address of onenet mqtts heclouds. com 183.230.40.96
const int port = 1883;                    //Port number

#define mqtt_pubid "426214" / / product ID
#define mqtt_devid "radar" / / device name
//Authentication information
#define mqtt_ Password "version = 2018-10-31 & res = products% 2f426214% 2fdevices% 2fradar & ET = 1552234385 & method = MD5 & sign = gzpcklfyk8lviohgxxp3iw% 3D% 3D" / / authentication information

WiFiClient espClient;           //Create a WIFI connection client
PubSubClient client(espClient); // Create a PubSub client and pass in the created WIFI client
Ticker tim1;                    //Timer, used to upload data circularly
Ticker tim2;                    //Timer, used to upload data circularly
float temp;
float humi;
float dis;

//Data uploaded by post device
#define ONENET_TOPIC_PROP_POST "$sys/" mqtt_pubid "/" mqtt_devid "/dp/post/json" //"$sys/" mqtt_pubid "/" mqtt_devid "/thing/property/post"
//Receive and distribute attribute setting subject
#define ONENET_TOPIC_PROP_SET  "$sys/" mqtt_pubid "/" mqtt_devid "/dp/post/json/+" //"$sys/" mqtt_pubid "/" mqtt_devid "/thing/property/set"
//Receive the reply subject with successfully set distribution attribute
#define ONENET_TOPIC_PROP_SET_REPLY "$sys/" mqtt_pubid "/" mqtt_devid "/dp/post/accepted" //"$sys/" mqtt_pubid "/" mqtt_devid "/thing/property/set_reply"

//Receive device property get command subject
#define ONENET_TOPIC_PROP_GET "$sys/" mqtt_pubid "/" mqtt_devid "/cmd/request/+" //"$sys/" mqtt_pubid "/" mqtt_devid "/thing/property/get"
//Receive the reply subject of the successful command from the device attribute
#define ONENET_TOPIC_PROP_GET_REPLY "$sys/" mqtt_pubid "/" mqtt_devid "/cmd/response/+/+" //"$sys/" mqtt_pubid "/" mqtt_devid "/thing/property/get_reply"

//This is the template used for post uploading data
#define ONENET_POST_BODY_FORMAT "{\"id\":%d,\"dp\":%s}"
//#define ONENET_POST_BODY_FORMAT
int postMsgId = 0; //How many records have been post ed


//Connect WIFI correlation function
void setupWifi()
{
  delay(10);
  Serial.println("connect WIFI");
  WiFi.begin(ssid, password);
  while (!WiFi.isConnected())
  {
    Serial.print(".");
    delay(500);
  }
  Serial.println("OK");
  Serial.println("Wifi connected!");
  Serial.println("IP address: ");
  Serial.println(WiFi.localIP());

}


//Send simulated temperature and humidity data to the subject
void sendTempAndHumi()
{
  if (client.connected())
  {
    //Splice out the json string first
    char param[82];
    char jsonBuf[178];
    //sprintf(param, "{ \"temp\":[{\"v\":%.2f}],\"humi\":[{\"v\":%.2f}] }", temp, humi); // We write the data to be uploaded in param
    sprintf(param, "{ \"dis\":[{\"v\":%.2f}] }", dis); //We write the data to be uploaded in param
    postMsgId += 1;
    sprintf(jsonBuf, ONENET_POST_BODY_FORMAT, postMsgId, param);
    //Then publish the post message from the mqtt client
    if (client.publish(ONENET_TOPIC_PROP_POST, jsonBuf))
    {
      Serial.print("Post message to cloud: ");
      Serial.println(jsonBuf);
    }
    else
    {
      Serial.println("Publish message to cloud failed!");
    }
  }

}


//Reconnection function. If the client is disconnected, it can be reconnected through this function
void clientReconnect()
{
  while (!client.connected()) //Reconnect the client
  {
    Serial.println("reconnect MQTT...");
    if ( client.connect(mqtt_devid, mqtt_pubid, mqtt_password) )
    {
      Serial.println("connected");
    }
    else
    {
      Serial.println("failed");
      Serial.println(client.state());
      Serial.println("try again in 5 sec");
      delay(5000);
    }
  }
}


void callback(char *topic, byte *payload, unsigned int length)
{
  Serial.println("message rev:");
  Serial.println(topic);
  for (size_t i = 0; i < length; i++)
  {
    Serial.print((char)payload[i]);
  }
  Serial.println();

  if (strstr(topic, ONENET_TOPIC_PROP_SET))
  {
    DynamicJsonDocument doc(100);
    DeserializationError error = deserializeJson(doc, payload);
    if (error)
    {
      Serial.println("parse json failed");
      return;
    }
    JsonObject setAlinkMsgObj = doc.as<JsonObject>();
    serializeJsonPretty(setAlinkMsgObj, Serial);
    String str = setAlinkMsgObj["id"];
    Serial.println(str);
    char sendbuf[100];
    sprintf(sendbuf, "{\"id\": \"%s\",\"code\":200,\"msg\":\"success\"}", str.c_str());
    Serial.println(sendbuf);
    client.publish(ONENET_TOPIC_PROP_SET_REPLY, sendbuf);
  }
  if (strstr(topic, ONENET_TOPIC_PROP_GET))
  {
    DynamicJsonDocument doc(100);
    DeserializationError error = deserializeJson(doc, payload);
    if (error)
    {
      Serial.println("parse json failed");
      return;
    }
    JsonObject setAlinkMsgObj = doc.as<JsonObject>();
    serializeJsonPretty(setAlinkMsgObj, Serial);
    String str = setAlinkMsgObj["id"];
    Serial.println(str);
    char sendbuf[100];
    //sprintf(sendbuf, "{\"id\": \"%s\",\"code\":200,\"msg\":\"success\",\"data\":{\"temp\":%.2f,\"humi\":%.2f}}", str.c_str(), temp, humi);
    sprintf(sendbuf, "{\"id\": \"%s\",\"code\":200,\"msg\":\"success\",\"data\":{\"dis\":%.2f }}", str.c_str(), temp);
    Serial.println(sendbuf);
    client.publish(ONENET_TOPIC_PROP_GET_REPLY, sendbuf);
  }
}


void update_date(void)
{
  temp++;
  humi++;
  dis++;
  }


void setup() {
  // put your setup code here, to run once:


  Serial.begin(115200); //Initialize serial port
  //Wire.begin();
  //sht20.begin();
  delay(3000);
  setupWifi();                                           //Call function to connect WIFI
  client.setServer(mqtt_server, port);                   //Set the server to which the client connects, connect to the Onenet server, and use port 1883
  delay(2000);
  Serial.println("setServer Init!");
  //client.setCallback(callback);
  client.connect(mqtt_devid, mqtt_pubid, mqtt_password); //The client connects to the specified device of the specified product Enter authentication information at the same time
  delay(2000);
  Serial.println("connect Init!");

  if (client.connected())
  {
    Serial.println("OneNet is connected!"); //Judge whether the following are connected
  }
  client.subscribe(ONENET_TOPIC_PROP_SET);
  client.subscribe(ONENET_TOPIC_PROP_GET);
  client.setCallback(callback);
  tim1.attach(8, sendTempAndHumi); //Regularly call the send data function sendTempAndHumi every 20 seconds
  tim2.attach(4, update_date);
  temp =10;
  humi =20;
  dis = 100;
}
int count = 0;

void loop() {
  // put your main code here, to run repeatedly:

  if (!WiFi.isConnected()) //First, check whether WIFI is still connected
  {
    setupWifi();
  }
  if (!client.connected()) //If the client is not connected to ONENET, reconnect
  {
    clientReconnect();
    delay(100);
  }
  client.loop(); //Client loop detection


}
3. Realization effect
Arduino IDE serial port reads data:
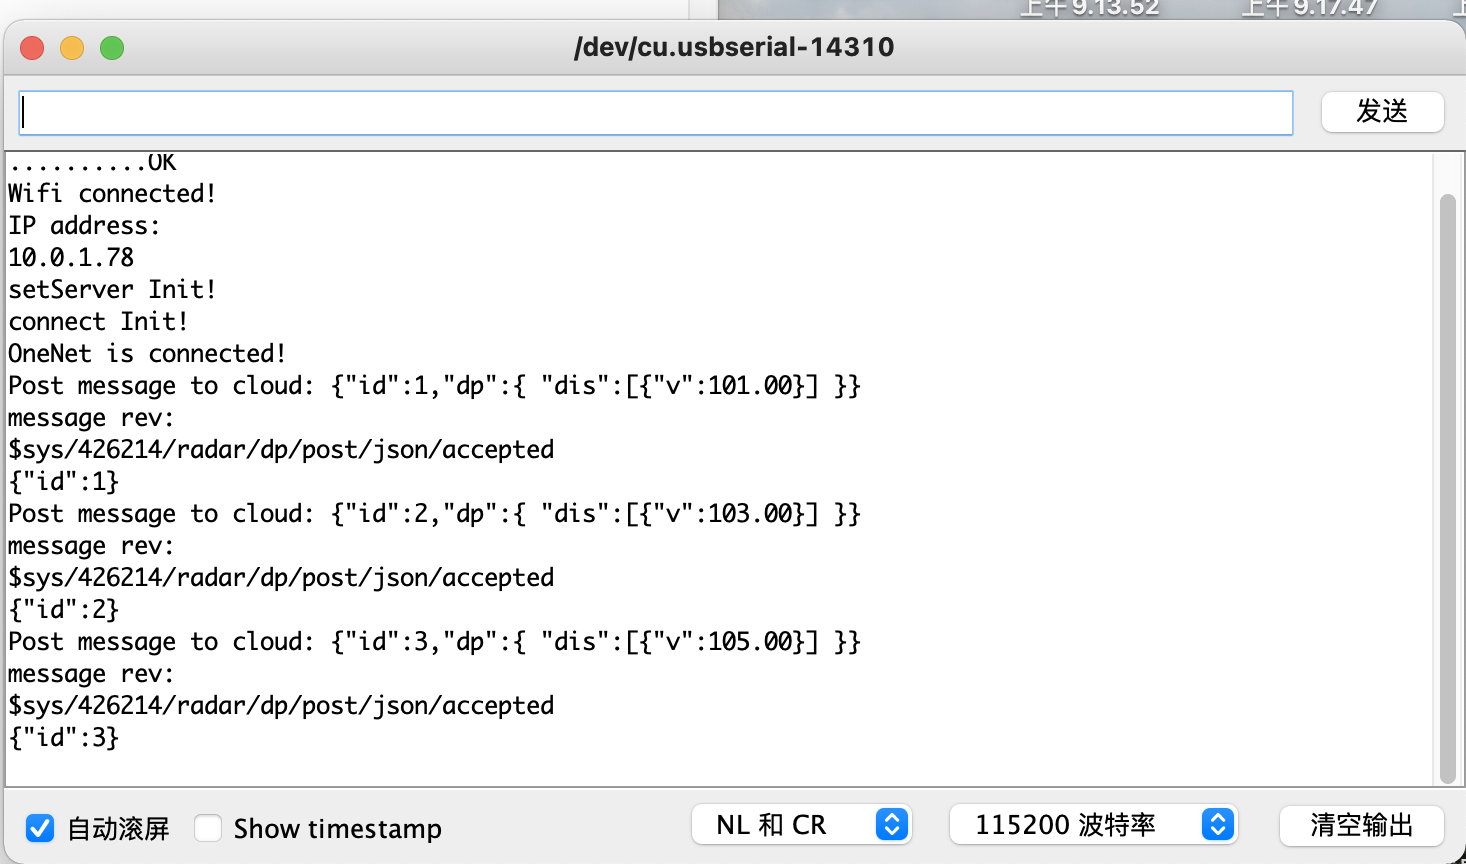
Data received by cloud platform: