Chapter 1 Configuring the esp-idf Development Environment
Link to the official esp32 Programming Guide
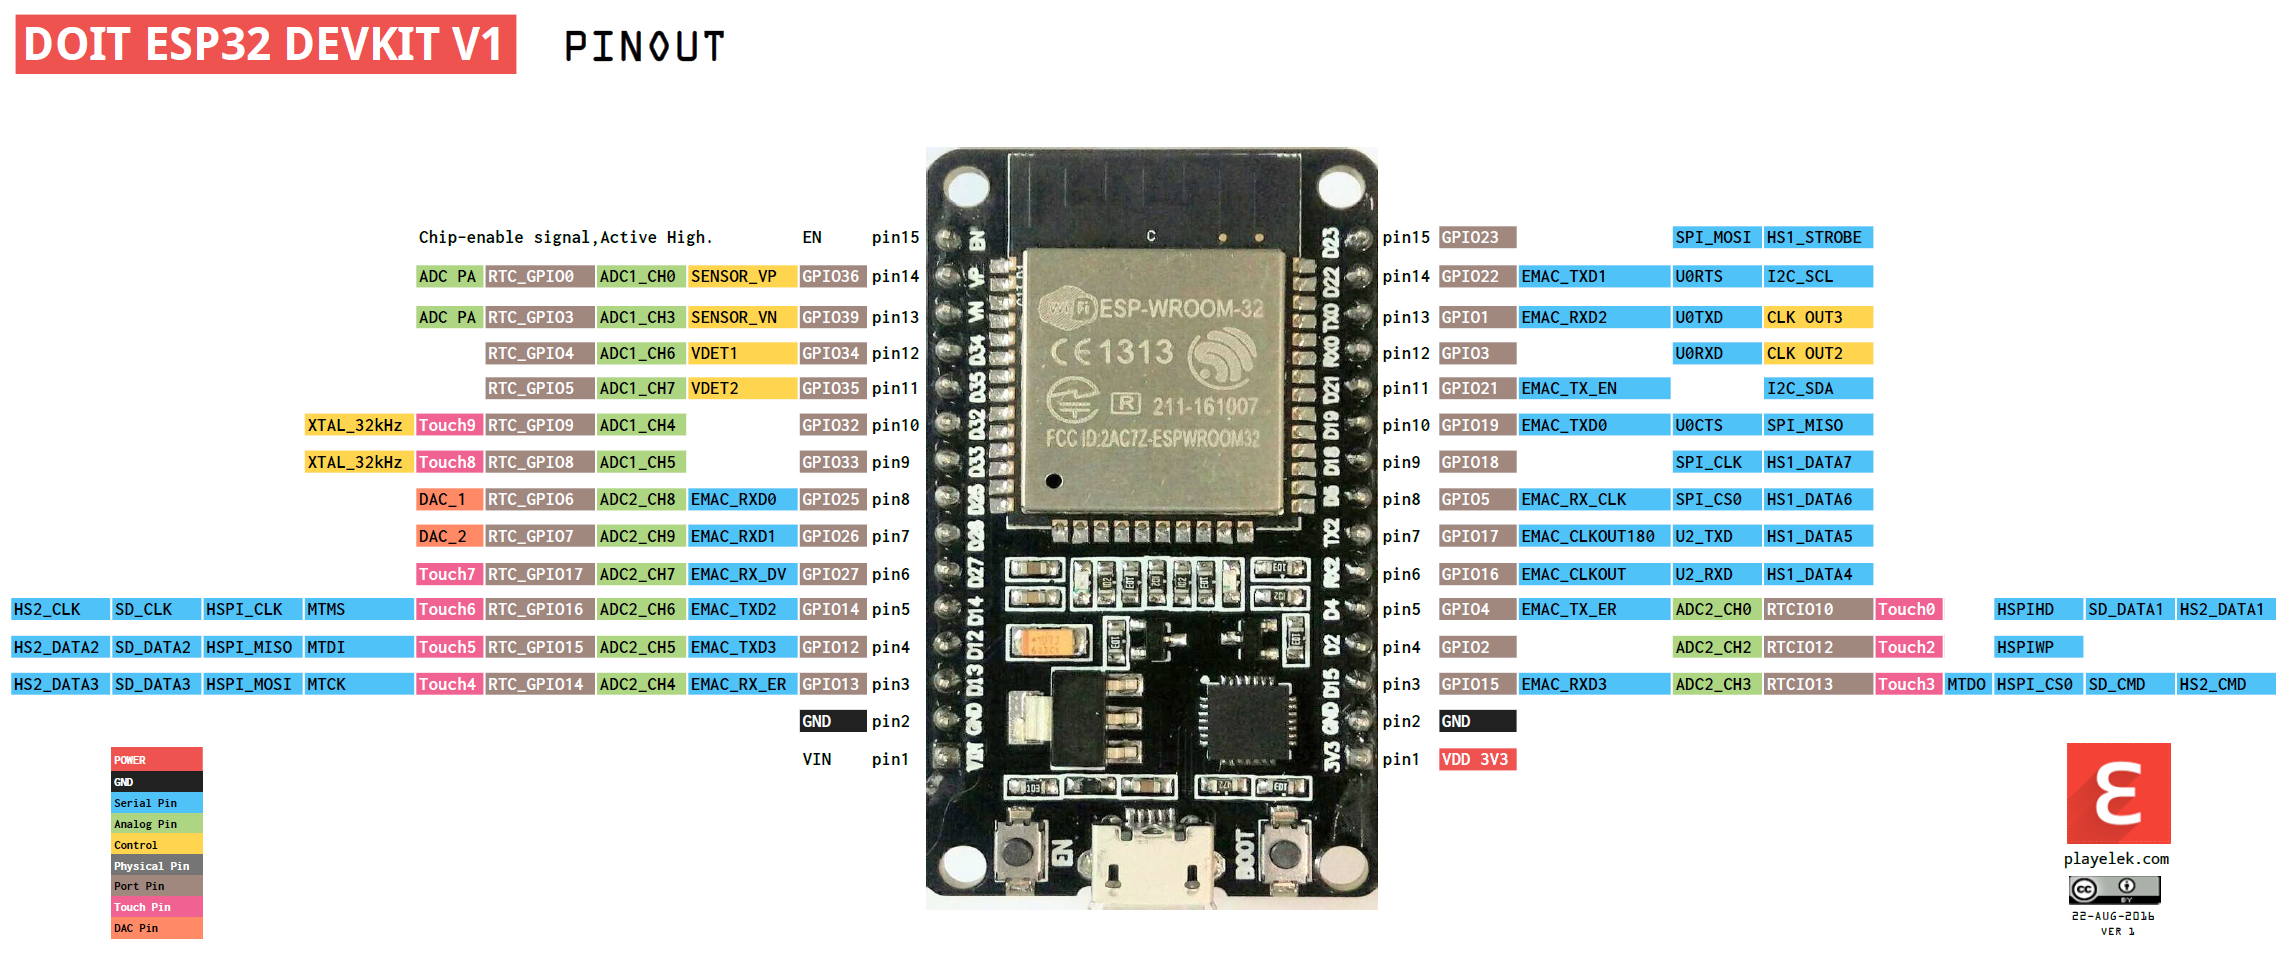
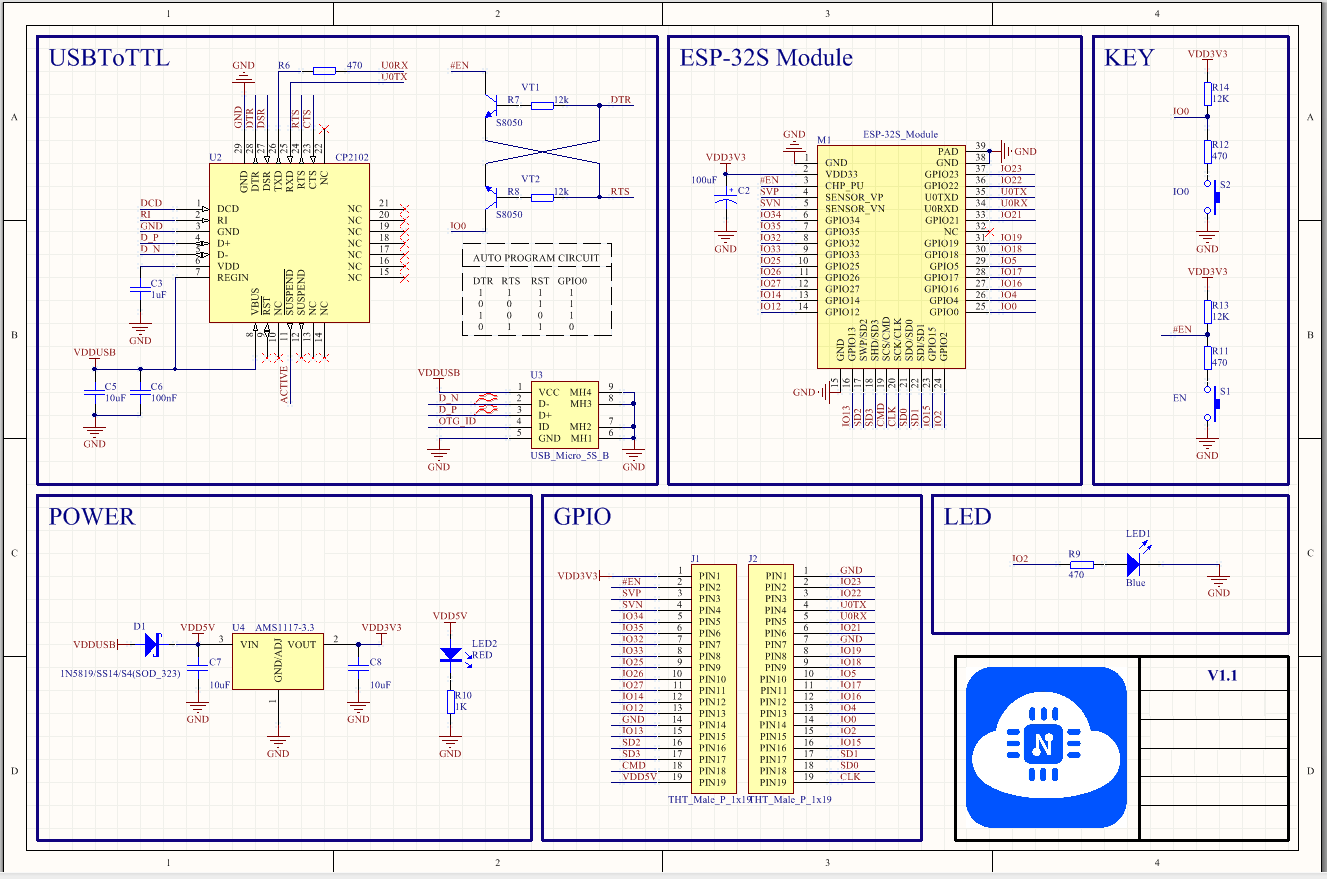
The author uses esp32 development board
Step 0 Brainless Copy Configuration
Ubuntu System Selection
When choosing a Ubuntu system, try to choose Ubuntu version 14 or higher.
Because some of the tools in Lexin's official SDK are implemented in Python, it is experimented that when Ubuntu version 14 is configured, there will be some dependencies which cause configuration troubles. Select a higher version of Ubuntu.
This article uses Ubuntu 20, and Ubuntu 16 has been configured with colleagues
Anencephalic Configuration
The following brainless copies are executed in the linux terminal window. (preferably one line at a time)
If there are no problems, you don't need to look at the first to fourth steps. If there is a problem, go to Step 1 to Step 4 to see if there is a corresponding method.
# Upgrade Source
sudo apt-get upgrade
# Update Source
sudo apt-get update
# Download software required by esp-idf
sudo apt-get install git wget flex bison gperf python3 python3-pip python3-setuptools cmake ninja-build ccache libffi-dev libssl-dev dfu-util libusb-1.0-0
# Download esp-idf to ~/esp/by default
mkdir ~/esp/
cd ~/esp/
# Download esp-idf Library
git clone https://gitee.com/EspressifSystems/esp-idf.git
# Download the tool library for esp-idf
git clone https://gitee.com/EspressifSystems/esp-gitee-tools.git
cd ~/esp/esp-idf
# Update submodule
$HOME/esp/esp-gitee-tools/submodule-update.sh
# Download tools required for compilation
$HOME/esp/esp-gitee-tools/install.sh
# Setting environment variables
. $HOME/esp/esp-idf/export.sh
Brainless Build helloworld Project
cd ~/esp
cp -r ~/esp/esp-idf/examples/get-started/hello_world .
cd ~/esp/hello_world
idf.py set-target esp32
idf.py menuconfig # Quit by q
idf.py build
# On the virtual machine where the board connects to the computer, press the en key on ESp-32
sudo chown xuen /dev/ttyUSB0 # Here xuen is my username, change it to your own
idf.py -p /dev/ttyUSB0 -b 460800 flash
idf.py -p /dev/ttyUSB0 monitor
Step 1 Installation Preparation (Linux)
The following packages are required to compile ESP-IDF
1. git (Version Control Software) 2. wget (Download File Tool) 3. flex (Lexical Analysis Tools) 4. bison (Generator of Parser)
5. gperf (Performance Test Tool) 6. python3 (python3) 7. python3-pip (Python Download Tools) 8. python3-setuptools (setuptools Modular)
9. cmake (Cross-platform Compilation Tool) 10. ninja-build (Small build system) 11. ccache (High Speed Compilation Tool) 12. libffi-dev (Allow code written in one language to call code in another language)
13. libssl-dev (OpenSSL A branch of the cryptographic software library) 14. dfu-util (pc host end usb dfu Implementation of protocol) 15. libusb
The command is as follows
sudo apt-get install git wget flex bison gperf python3 python3-pip python3-setuptools cmake ninja-build ccache libffi-dev libssl-dev dfu-util libusb-1.0-0
In case of failure to install
1. Update Source
sudo apt-get update
2. upgrade
sudo apt-get upgrade
Version issues
cmake Installation required CMake 3.5 Versions and above
python Installation required Python 3.6 And above
Step 2 Getting esp-idf
Official Installation (Discard Too Hard to Download)
mkdir -p ~/esp
cd ~/esp
git clone --recursive https://github.com/espressif/esp-idf.git
git installation is difficult to succeed, so use a domestic gitee image
git clone https://gitee.com/EspressifSystems/esp-idf.git
Note: There is no need to take the download submodule parameter - recursive. Download by ourselves
Step 3 Download Submodule
# Download Submodule
git clone https://gitee.com/EspressifSystems/esp-gitee-tools.git
# Update Submodule submodules
cd ~/esp/esp-idf
$HOME/esp/esp-gitee-tools/submodule-update.sh
# Installation Tools
cd ~/esp/esp-idf
$HOME/esp/esp-gitee-tools/install.sh
Successful installation with the following prompts
All done! You can now run:
  . /home/xuen/esp/esp-idf/export.sh
The following problems occurred:
1. file does not exist
/home/xuen/esp/esp-gitee-tools/tools/tools.json does not exist!
A: Switch esp-idf Run under directory esp-gitee-tools/install.sh Script!!!
2. Can't find python file
Installing ESP-IDF tools
/usr/bin/env: 'python': No such file or directory
 A: Will python3 Link as python. implement sudo ln -s /usr/bin/python3 /usr/bin/python
3. Compilation unsuccessful
Installing ESP-IDF tools
  File "/home/tianmao/esp/esp-idf/tools/idf_tools.py", line 1524
    info(f'Skipping the download of {constraint_path} because it was downloaded recently. If you believe '                                        ^
SyntaxError: invalid syntax
 A: Python3 Possible link error.
which python3
 take python3 Real path links to/usr/bin/python
Install tools and other ways to update submodules
# Installation Tool Method 1
cd ~/esp/esp-gitee-tools
export EGT_PATH=$(pwd)
cd ~/esp/esp-idf
$EGT_PATH/install.sh

# Installation Tool Method 2
cd ~/esp/esp-gitee-tools
./install.sh ~/esp/esp32-sdk/esp-idf

# Update submodules method 1
cd ~/esp/esp-gitee-tools
export EGT_PATH=$(pwd)
cd ~/esp/esp-idf
$EGT_PATH/submodule-update.sh

# Update submodules method 2
cd ~/esp/esp-gitee-tools
./submodule-update.sh ~/esp/esp32-sdk/esp-idf
Step 4 Setting up environment variables
# Method 1: Add with esp-idf script
cd ~/esp/esp-idf
. $HOME/esp/esp-idf/export.sh
# Method 2: Add it yourself (there may be other problems such as incomplete additions)
vim ~/.bashrc
 Add at the end of the open file
export IDF_PATH=~/esp/esp-idf
# Restart Terminal or Refresh Profile
source ~/.bashrc
The following indicates successful installation
Done! You can now compile ESP-IDF projects.
Go to the project directory and run:
  idf.py build
Chapter II Creation of Projects and Compilation and Operation
Step 1 Copy the helloword routine
Using sep-idf/examples/get-start/hello_ World starts the first experiment
cd ~/esp/
cp -r ~/esp/esp-idf/examples/get-started/hello_world .
Step 2 Connect Devices
Please connect your ESP32 development board to your PC
Permission issues/dev/ttyUSB0
Use some Linux Version Direction ESP32 When burning firmware, it may appear Failed to open port /dev/ttyUSB0 Error message.
1. Add users to Linux Dialout group
sudo usermod -a -G dialout $USER
Step 3 Configuration
cd ~/esp/hello_world
idf.py set-target esp32
idf.py menuconfig
If the run fails
# Update Submodule submodules
cd ~/esp/esp-idf
$HOME/esp/esp-gitee-tools/submodule-update.sh
# Installation Tools
cd ~/esp/esp-idf
$HOME/esp/esp-gitee-tools/install.sh
# Setting environment variables
cd ~/esp/esp-idf
. $HOME/esp/esp-idf/export.sh
cd ~/esp/hello_world
Step 4 Compile the project
idf.py build
Running the above command compiles the application and all ESP-IDF components, then generates the bootloader, partition table, and application binaries.
$ idf.py build
Running cmake in directory /path/to/hello_world/build
Executing "cmake -G Ninja --warn-uninitialized /path/to/hello_world"...
Warn about uninitialized values.
-- Found Git:/usr/bin/git (found version "2.17.0")
-- Building empty aws_iot component due to configuration
-- Component names: ...
-- Component paths: ...

... (more lines of build system output)

[527/527] Generating hello_world.bin
esptool.py v2.3.1

Project build complete. To flash, run this command:
../../../components/esptool_py/esptool/esptool.py -p (PORT) -b 921600 write_flash --flash_mode dio --flash_size detect --flash_freq 40m 0x10000 build/hello_world.bin  build 0x1000 build/bootloader/bootloader.bin 0x8000 build/partition_table/partition-table.bin
or run 'idf.py -p PORT flash'
Step 5 Burning to Equipment
idf.py -p /dev/ttyUSB0 -b 460800 flash
Step 6 Monitor
sudo chown xuen /dev/ttyUSB0
# Monitor provided with esp-idf
idf.py -p /dev/ttyUSB0 -b 460800 flash
idf.py -p /dev/ttyUSB0 monitor
# Exit esp-idf monitor
Ctrl + ]
# Use picocom monitor
sudo apt-get install picocom
picocom -b 115200 /dev/ttyUSB0
# Exit picocom
Ctrl + a after Ctrl + Q
About picocom
You can set an alias, such as
alias pc='picocom -b 115200 /dev/ttyUSB0'
This is entered at the terminal sudo pc You can open the terminal now
Chapter II Debugging the Functions of the Starting Board
1. LED
cd ~/esp/
cp -r ~/esp/esp-idf/examples/get-started/blink .
cd ~/esp/blink
idf.py set-target esp32
idf.py menuconfig
idf.py build
idf.py -p /dev/ttyUSB0 -b 460800 flash
Question 1: CONFIG_BLINK_GPIO is always 5, bright is D5
idf.py menuconfig
 Choice Example Configuration
 Choice Blink GPIO number
 Change to 2
Chapter 3 Connecting Tmall Elves
Based on SDK development of native Ali Living Internet of Things platform, supporting ESP8266/ESP32
Ali Lifestyle Internet of Things Platform Creation Project - >Click to login to Lifestyle Internet of Things Control Platform
SDK preparation
cd ~/esp/esp-idf/
git checkout v4.2
# 1. Compile the ali-smartliving-device-sdk-c Library
cd ali-smartliving-device-sdk-c
make reconfig (Choice SDK platform)
make menuconfig (Select related feature configurations,No modification is required by default,This step can be omitted)
make (Generate related header and library files)
# Compile demo examples
cd ~/esp/esp-ali-smartliving/examples/solutions/smart_light/
make defconfig
make menuconfig
# Generate final bin
make -j8
# Connection board
make erase_flash
make flash
Burning Ternary
Erase_ NVS partitions need to be burned again after flash
# Single bin Generation
cd ~/esp/esp-ali-smartliving/config/mass_mfg
# Generate corresponding NVS partitions
$IDF_PATH/components/nvs_flash/nvs_partition_generator/nvs_partition_gen.py generate my_single_mfg_config.csv my_single_mfg.bin 0x4000
# Use the esptool tool to burn the generated NVS partition containing the secret key into the corresponding sector. For the partitions provided by default in example, esp32 and esp8266 will be burned to different partitions, where the default burning address of esp32 is 0x210000 and the default burning address of esp8266 is 0x100000.
# Connection board
$IDF_PATH/components/esptool_py/esptool/esptool.py write_flash 0x210000 my_single_mfg.bin
Question 1: make failed when compiling ali-smartliving-device-sdk-c Library
# Update Submodule submodules
cd ~/esp/esp-idf
$HOME/esp/esp-gitee-tools/submodule-update.sh
# Installation Tools
cd ~/esp/esp-idf
$HOME/esp/esp-gitee-tools/install.sh
# Setting environment variables
cd ~/esp/esp-idf
. $HOME/esp/esp-idf/export.sh
Question 2: Following the official steps will cause errors because of IDF v4. python's command format changed on 0
The official steps are as follows
$IDF_PATH/components/nvs_flash/nvs_partition_generator/nvs_partition_gen.py --input my_single_mfg_config.csv --output my_single_mfg.bin --size 0x4000
$IDF_PATH/components/nvs_flash/nvs_partition_generator/nvs_partition_gen.py generate my_single_mfg_config.csv my_single_mfg.bin 0x4000

Failures are shown below
usage: nvs_partition_gen.py [-h] {generate,generate-key,encrypt,decrypt} ...
nvs_partition_gen.py: error: argument command: invalid choice: 'my_single_mfg_config.csv' (choose from 'generate', 'generate-key', 'encrypt', 'decrypt')

Success is shown below
Creating NVS binary with version: V2 - Multipage Blob Support Enabled
Created NVS binary: ===> /home/xuen/esp/esp-ali-smartliving/config/mass_mfg/my_single_mfg.bin
Knowing Article: Building ESP8266_with Lexin Domestic Mirror RTOS_ SDK Development Environment
Good study