1, MQTT protocol
1. MQTT protocol can provide real-time and reliable message service for connecting remote devices with very little code and limited bandwidth.
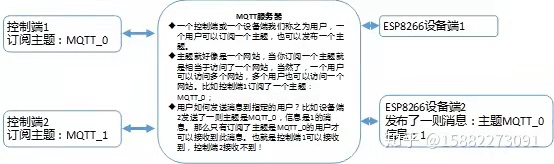
2. Use publish / subscribe message mode to provide one to many message publishing and decouple applications.
Message transmission that masks the payload content.
Use TCP/IP to provide network connection.
3. The implementation of MQTT protocol requires client-side and server-side communication. In the communication process, there are three identities in MQTT protocol: publisher, Broker (server) and subscriber. Among them, both the publisher and subscriber of the message are clients, the message agent is the server, and the message publisher can be subscribers at the same time.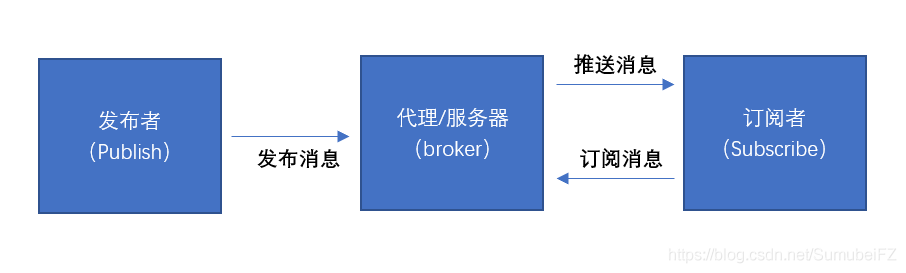
4. The messages transmitted by MQTT are divided into two parts: Topic and payload:
(1) Topic can be understood as the type of message. After subscribing, the subscriber will receive the message content (payload) of the topic.
(2) payload, which can be understood as the content of the message, refers to the specific content to be used by the subscriber.
2, Taking ESP8266 as an example, wifi is used to control the led switch
1. Download arduino, build a development environment, and download mqttx software
arduino network disk link: https://pan.baidu.com/s/17JssunSXxiyJYVaCRy7Mng
Extraction code: qtzs
mqttx software link: https://pan.baidu.com/s/10OlkgaQaYIwpxcIj4abD-w
Extraction code: qtzs
2. Make sure the light is normal: upload the following code, and if the light is on, it will be OK.
int relayInput =LED_BUILTIN;     //D4
int led= 4;                      //Define pin code

void setup(){
  pinMode(relayInput,OUTPUT);    //The initialization pin is a library
  pinMode(led,OUTPUT);           //Sets the output mode of the pin
}

void loop(){
  digitalWrite(relayInput,LOW);  //Repeated operation
}
3. The switch of the lamp is controlled by outputting on/off
(1) Upload code
#include <ESP8266WiFi.h>
#include <PubSubClient.h>

// GPIO 5 D1
//#define LED 2
uint8_t LED = 2;
//WiFi hotspot is used here, which is easy to turn on the mobile phone hotspot
const char *ssid = "111"; // Enter your WiFi name
const char *password = "12345678";  // Enter WiFi password

// MQTT Broker (connect to MQTT agent)
const char *mqtt_broker = "broker.emqx.io";//1. The agent name is the same as the name created in MTQQX
const char *topic = "esp8266/led";//2. Subject name, which is the same as the name created in MTQQX
const char *mqtt_username = "emqx";
const char *mqtt_password = "public";
const int mqtt_port = 1883;//3. The name is the same as that created in MTQQX
//All three of them use the default proxy of MTQQ

WiFiClient espClient;
PubSubClient client(espClient);

void setup() {
    // Set software serial baud to 115200;
    Serial.begin(115200);
    //LED initial
    pinMode(LED, OUTPUT);
    digitalWrite(LED, HIGH);
    // connecting to a WiFi network
    WiFi.begin(ssid, password);
    while (WiFi.status() != WL_CONNECTED) {
        delay(500);
        Serial.println("Connecting to WiFi..");//Window monitor shows wifi connection
    }
    Serial.println("Connected to the WiFi network");//Prompt wifi connection success
    //connecting to a mqtt broker
    client.setServer(mqtt_broker, mqtt_port);
    client.setCallback(callback);
    while (!client.connected()) {
        String client_id = "esp8266-client-";
        client_id += String(WiFi.macAddress());
        Serial.println("Connecting to public emqx mqtt broker.....");//Prompt connecting to server
        if (client.connect(client_id.c_str())) {
            Serial.println("Public emqx mqtt broker connected");//Prompt successful connection to server
        } else {
            Serial.print("failed with state ");//Prompt connection failure
            Serial.print(client.state());
            delay(2000);
        }
    }
    // publish and subscribe
    client.publish(topic, "hello emqx");
    client.subscribe(topic);
}

void callback(char *topic, byte *payload, unsigned int length) {
    Serial.print("Message arrived in topic: ");//Represents mqttx and device subscriptions
    Serial.println(topic);
    Serial.print("Message:");//Send message to agent
    String message;
    for (int i = 0; i < length; i++) {
        message = message + (char) payload[i];  // convert *byte to string
    }
    Serial.print(message);//Judge the information content. If it is on, turn on the light and off the light
    if (message == "on") { digitalWrite(LED, LOW); }   // LED on
    if (message == "off") { digitalWrite(LED, HIGH); } // LED off
    Serial.println();
    Serial.println
(2) View the contents displayed by the channeling monitor after uploading
Connected to the WiFi network: indicates that the wifi connection is successful
Public emqx mqtt broker connected: indicates a successful connection to the server
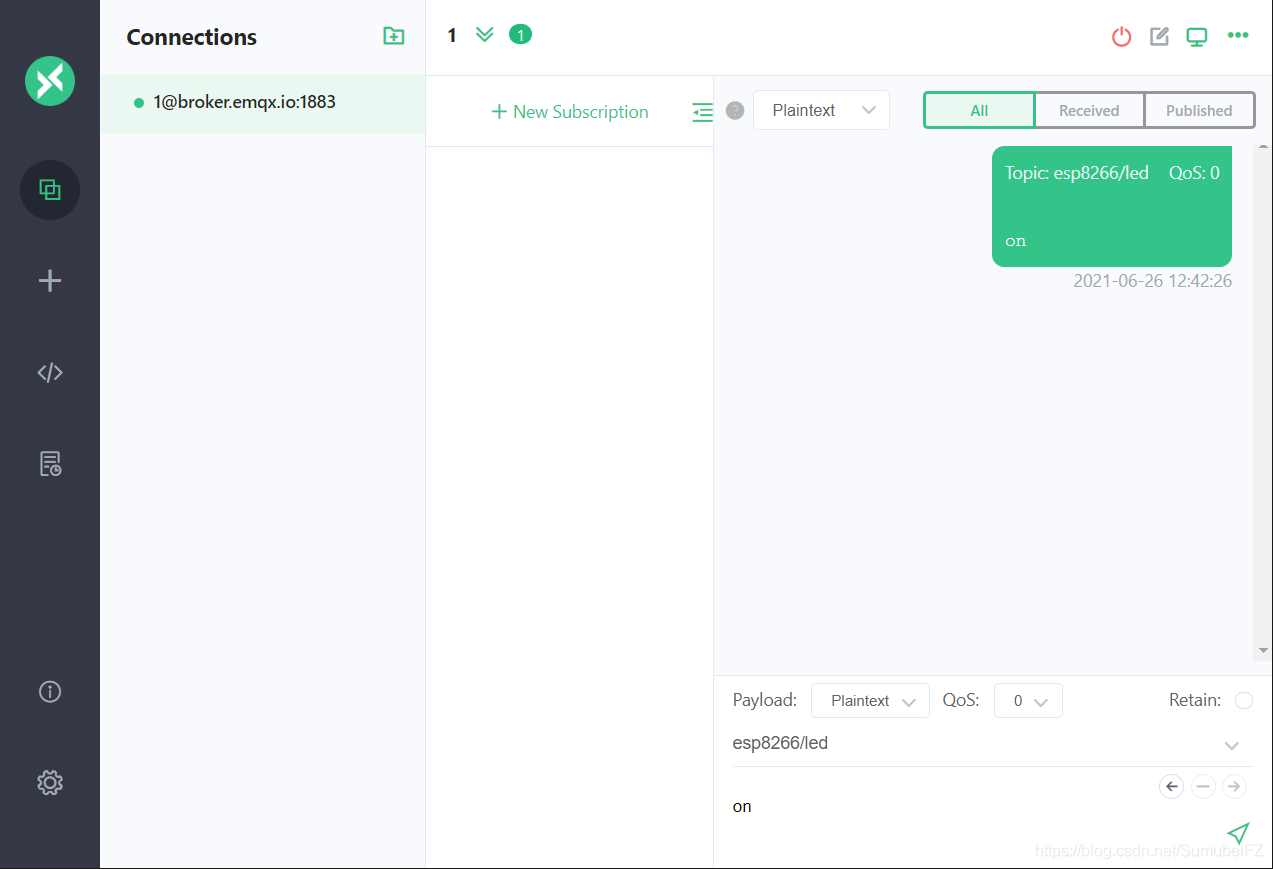
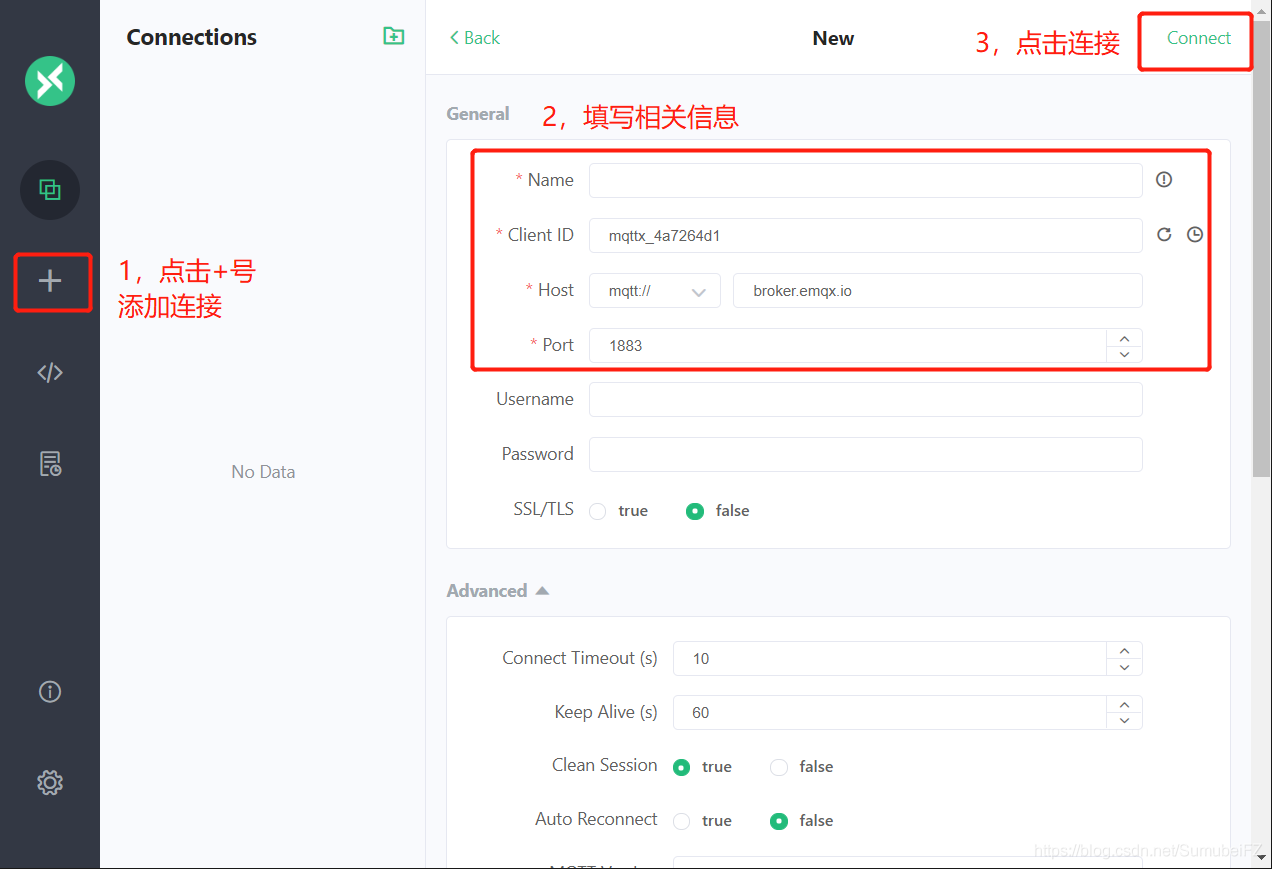
(3) Open mqttx software
First click the "+" sign to add the network
Content: name, Client ID, any
Host and Port are the same as the above codes (usually by default)
Finally, click Connect to create a connection
Check that "message arrived in topic: esp8266 / led" exists in the channeling monitor
Indicates that the mqttx controller and server (proxy / mqttx) subscribe successfully
(4) After creation, send on/off in the message box, and the led light will be on/off