ES7.4.1 construction
ES adopts 7.4.1 uniformly Version 1
Docker image deployment of ES
The installation of Docker will not be repeated here
Single node deployment
-
vi docker-compose-es-single-node.yml
version: "2"
services:
  es-single-node:
	image: elasticsearch:7.4.1
	container_name: es-single-node
	environment:
	  - node.name=es-single-node
	  - cluster.name=es-cluster
	  - cluster.initial_master_nodes=es-single-node
	  - discovery.seed_hosts=es-single-node
	  - discovery.zen.minimum_master_nodes=1
	  - node.master=true
	  - node.data=true
	  - http.port=9200
	  - transport.tcp.port=9300
	  - http.cors.enabled=true
	  - http.cors.allow-origin="*"
	  - "ES_JAVA_OPTS=-Xms128m -Xmx128m"
	ports:
	  - 9210:9200
	  - 9310:9300
-
docker-compose -f docker-compose-es-single-node.yml up -d (this step can also be completed with docker's interface management tool portal)
Multi node deployment
Here is a demonstration of the configuration of two master and two data nodes. You can add and delete nodes according to the rules
-
vi docker-compose-2master2data.yml
version: "2"
services:
  master01:
	image: elasticsearch:7.4.1
	container_name: master01
	environment:
	  - node.name=master01
	  - cluster.name=es-cluster
	  - cluster.initial_master_nodes=master01,master02
	  - discovery.seed_hosts=master01,master02,data01,data02
	  - discovery.zen.minimum_master_nodes=2
	  - node.master=true
	  - node.data=false
	  - http.port=9200
	  - transport.tcp.port=9300
	  - http.cors.enabled=true
	  - http.cors.allow-origin="*"
	  - "ES_JAVA_OPTS=-Xms128m -Xmx128m"
	ports:
	  - 9200:9200
	  - 9300:9300
  master02:
	image: elasticsearch:7.4.1
	container_name: master02
	environment:
	  - node.name=master02
	  - cluster.name=es-cluster
	  - cluster.initial_master_nodes=master01,master02
	  - discovery.seed_hosts=master01,master02,data01,data02
	  - discovery.zen.minimum_master_nodes=2
	  - node.master=true
	  - node.data=false
	  - http.port=9200
	  - transport.tcp.port=9300
	  - http.cors.enabled=true
	  - http.cors.allow-origin="*"
	  - "ES_JAVA_OPTS=-Xms128m -Xmx128m"
	ulimits:
	  memlock:
		soft: -1
		hard: -1
	ports:
	  - 9201:9200
	  - 9301:9300
  data01:
	image: elasticsearch:7.4.1
	container_name: data01
	environment:
	  - node.name=data01
	  - cluster.name=es-cluster
	  - cluster.initial_master_nodes=master01,master02
	  - discovery.seed_hosts=master01,master02,data01,data02
	  - discovery.zen.minimum_master_nodes=2
	  - node.master=false
	  - node.data=true
	  - http.port=9200
	  - transport.tcp.port=9300
	  - http.cors.enabled=true
	  - http.cors.allow-origin="*"
	  - "ES_JAVA_OPTS=-Xms128m -Xmx128m"
	ulimits:
	  memlock:
		soft: -1
		hard: -1
	ports:
	  - 9202:9200
	  - 9302:9300
  data02:
	image: elasticsearch:7.4.1
	container_name: data02
	environment:
	  - node.name=data02
	  - cluster.name=es-cluster
	  - cluster.initial_master_nodes=master01,master02
	  - discovery.seed_hosts=master01,master02,data01,data02
	  - discovery.zen.minimum_master_nodes=2
	  - node.master=false
	  - node.data=true
	  - http.port=9200
	  - transport.tcp.port=9300
	  - http.cors.enabled=true
	  - http.cors.allow-origin="*"
	  - "ES_JAVA_OPTS=-Xms128m -Xmx128m"
	ulimits:
	  memlock:
		soft: -1
		hard: -1
	ports:
	  - 9203:9200
	  - 9303:9300
  kibana:
	image: kibana:7.4.1
	environment:
	  - ELASTICSEARCH_HOSTS=["http://master01:9200","http://master02:9200","http://data01:9200","http://data02:9200"]
	ports:
	  - 5601:5601
-
docker-compose -f docker-compose-2master2data.yml up -d
Centos deployment
Single node deployment
- Download ES7 4.1 install the file to the server and unzip it to / usr/share/elasticsearch directory, and then execute it by root user:
echo "* soft nofile 125536" >> /etc/security/limits.conf
echo "* hard nofile 125536" >> /etc/security/limits.conf
echo "* soft nproc 8096" >> /etc/security/limits.conf
echo "* hard nproc 8096" >> /etc/security/limits.conf
echo "* soft memlock unlimited" >> /etc/security/limits.conf
echo "* hard memlock unlimited" >> /etc/security/limits.conf

echo "vm.max_map_count=522144" >> /etc/sysctl.conf
sysctl -p

adduser elastic
chown -R elastic:elastic /usr/share/elasticsearch
- Modify elasticsearch YML, please refer to the following configuration
# Both configurations write the ip address of the master node
cluster.initial_master_nodes: ["192.168.1.55"]
discovery.seed_hosts: ["192.168.1.55"]

# Node name, and the other two nodes are node IP
# The node name starts with node - and ends with the current node IP
node.name: master192.168.1.55

discovery.zen.minimum_master_nodes: 1

# Specify whether the node is eligible to be elected as a master node. The default is true. es is that the first machine in the default cluster is a master. If the machine hangs, the master will be re elected
node.master: true

# Allow this node to store data (enabled by default)
node.data: true

# Bound ip address
network.host: 0.0.0.0

# The name of the cluster
cluster.name: xxxxx-dssa

# Storage path of index data
path.data: data

# Storage path of log file
path.logs: logs

# Snapshot warehouse Path
path.repo: ["/opt/xxxxx/backups/es_repo","/opt/xxxxx/backups/rsyslog-audit","/opt/xxxxx/backups/rsyslog-firewall","/opt/xxxxx/backups/rsyslog-desens","/opt/xxxxx/backups/rsyslog-encrypt"]

# The formal deployment needs to be set to true to lock the memory. Because memory swapping to disk is fatal to server performance, the efficiency of es will be reduced when the jvm starts swapping, so it is necessary to ensure that it does not swap
bootstrap.memory_lock: true

# Set the http port of external service. The default value is 9200
http.port: 9200

# Set the tcp port for interaction between nodes. The default is 9300
transport.tcp.port: 9300

# If there is not enough memory, the system memory will be used for system cache (memory management mechanism of linux) because of the elastic search reference file.
# Because the system cache is released slowly, this process is very long, which may make your node GC very frequently, resulting in cluster instability.
# It is recommended that bootstrap Mlockall set to true
# This parameter is in 7.4 1 invalid
# bootstrap.mlockall: true

# Turn on cross domain access
http.cors.enabled: true
http.cors.allow-origin: "*"
- Modify JVM Options. Generally, the Xms Xmx memory is configured to be half of the available memory
- Try starting the observation log to see if there is a problem
su elastic
cd /usr/share/elasticsearch
bin/elasticsearch    Front desk execution
bin/elasticsearch    Background execution,You need to go to the configured log directory to view the logs
- Power on
- vi /usr/lib/systemd/system/elasticsearch.service enter the following:
[Unit]
Description=elasticsearch service

[Service]
User=elastic
ExecStart=/usr/share/elasticsearch/bin/elasticsearch

[Install]
WantedBy=multi-user.target
- systemctl enable elasticsearch
- systemctl restart elasticsearch (restart es)
Multi node deployment
As like as two peas, the deployment of multiple nodes is almost the same as that of single nodes.
The following configurations are generally modified:
cluster.initial_master_nodes: ["master01","master02"]
discovery.seed_hosts: ["master01","master02","data01","data02"]

node.name: Node name

# The calculation formula is as follows: the number of master candidate nodes / 2 + 1. If the setting is not appropriate, there may be brain fissure
discovery.zen.minimum_master_nodes: 2

# Specify whether the node is eligible to be elected as a master node. The default is true. es is that the first machine in the default cluster is a master. If the machine hangs, the master will be re elected
node.master: true

# Allow this node to store data (enabled by default)
node.data: true
ESRally deployment and testing
esrally is an official tool provided by es to test the performance of ES
Official website: https://esrally.readthedocs.io/en/stable/quickstart.html
esrally installation
Direct pull docker Just mirror:

1. modify host File, add the following configuration
172.16.1.201 prod.docker
172.16.1.201 dev.docker

2. modify docker Configuration file, add the following configuration:
 { "insecure-registries": ["prod.docker:8085", "dev.docker:8085"] }

3. Pull docker esrally image
docker pull dev.docker:8085/elastic/rally:2.0.0

4. Perform test
docker run --rm -i -v /opt/esrally:/opt/esrally dev.docker:8085/elastic/rally:2.0.0  --pipeline=benchmark-only --track-path=/opt/esrally --target-hosts=192.168.1.55:9200

Preparing es the index template for
Several es index templates used in our production environment have been prepared in tfs, which can be modified according to their own conditions

Since the index template is in yml format, it needs to be converted to json format: by modifying index SH and execute index SH to complete the json conversion.
index.sh has completed two actions (which can be deleted according to its own situation):
-Convert yml to json
-Connect es create index
Prepare test data
Tools for generating test data have also been prepared in tfs

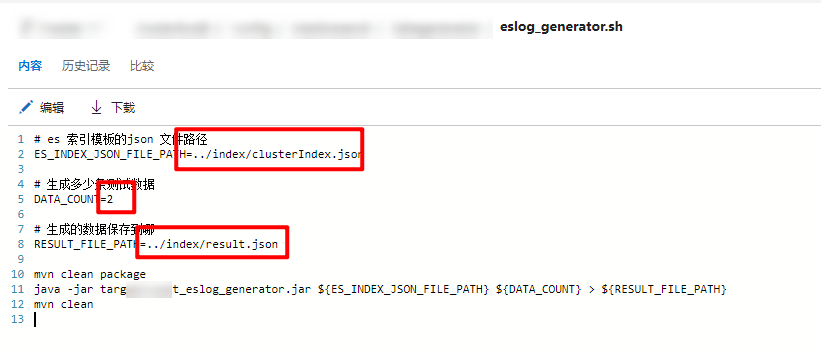
You only need to modify the eslog_ generator. The three parameters in SH can produce test data according to the index template
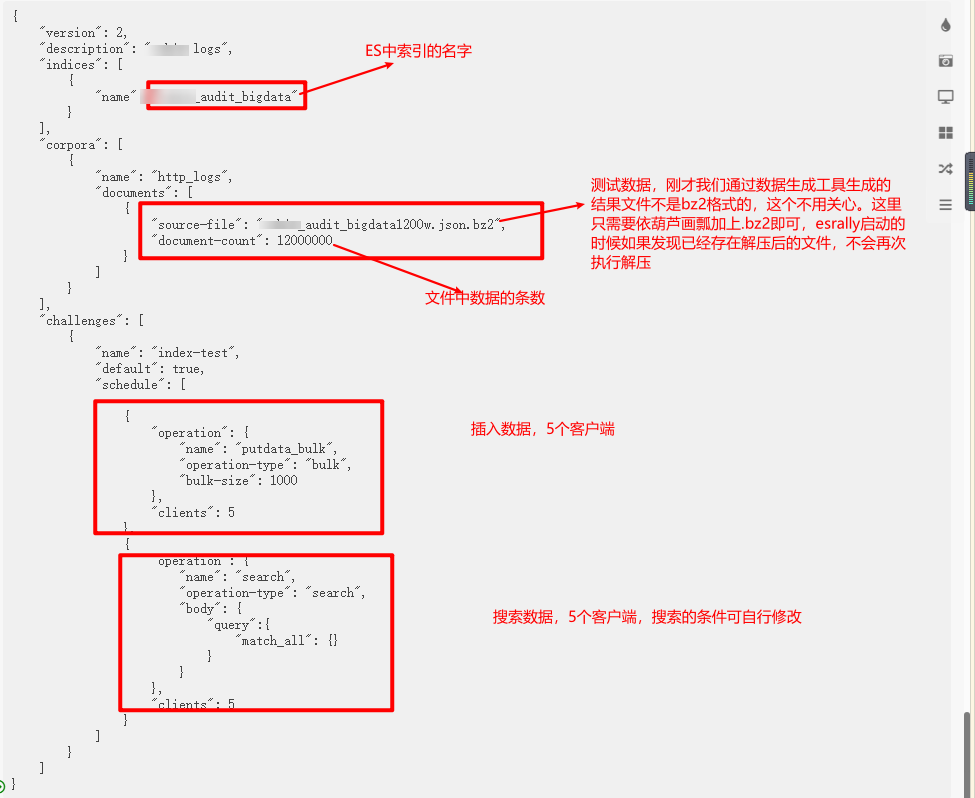
Edit track JSON file
This file is required for esrally. Please refer to:
{
    "version": 2,
    "description": "xxxxx logs",
    "indices": [
        {
            "name": "xxxxx_audit_bigdata"
        }
    ],
    "corpora": [
        {
            "name": "http_logs",
            "documents": [
                {
                    "source-file": "xxxxx_audit_bigdata1200w.json.bz2",
                    "document-count": 12000000,
					"uncompressed-bytes": 30760
                }
            ]
        }
    ],
    "challenges": [
        {
            "name": "index-test",
            "default": true,
            "schedule": [

              	{
                    "operation": {
                        "name": "putdata_bulk",
                        "operation-type": "bulk",
                        "bulk-size": 1000
                    },
                    "clients": 5
                },
                {
                    "operation": {
                        "name": "search",
                        "operation-type": "search",
                        "body": {
                            "query":{
                                "match_all": {}
                            }
                        }
                    },
                    "clients": 5
                }
            ]
        }
    ]
}

implement
track. The JSON file and the generated data file should be placed in the same directory. Assuming / opt/esrally/track, execute
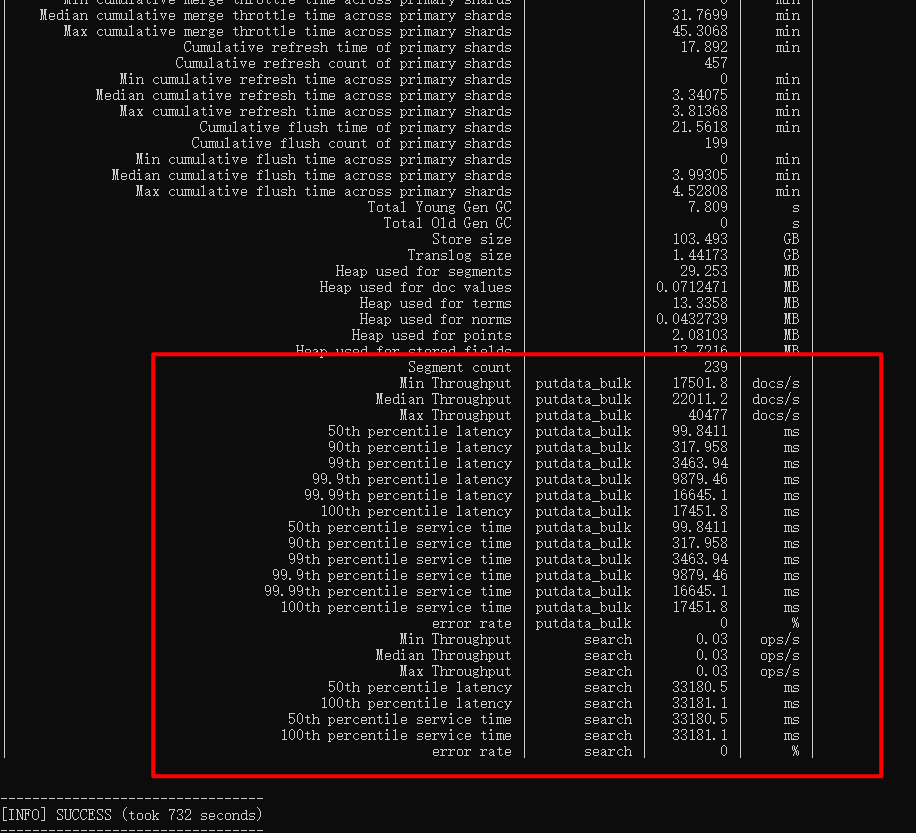
esrally race --pipeline=benchmark-only --track-path=/opt/esrally/track --target-hosts=esip:9200
After execution, the following result will be output
