When wechat develops H5 pages, it often develops the interface effect based on WeUI or JQuery WeUI. Because I like to use JQuery on the Web interface of Asp.net, I prefer to use JQuery Weii, this essay combines the official case and the experience summary of the actual development process of the project, analyzes and summarizes the interface controls designed in the H5 page development process one by one, in order to provide useful reference for everyone in the H5 page development process.
1. Resource reference
WeUI : https://github.com/Tencent/weui
WeUI for work: Weii for work (enterprise wechat version)
jQuery WeUI: http://jqweui.com/
In general, we can use the latter Jquery WeUI to quickly develop relevant page effects by combining some icons for pages and H5 page templates.

2. Use of interface controls
1) Use of text controls
Text control is the most commonly used interface control in our actual project. Text control generally includes the conventional Input single text box type and TextArea multi text box type.
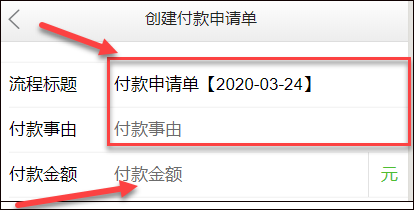
For text box entry, the prompt title can be placed on the left side, and if there is suffix information, it can be placed on the right side, as shown below.
Its definition of HTML code is mainly to set the layout and style.
<input id="Title" name="Title" class="weui-input" type="text" placeholder="Process title" required>
The complete HTML code with the layout is shown below.
<div class="weui-cells weui-cells_form">
    <div class="weui-cell">
        <div class="weui-cell__hd"><label class="weui-label">Process title</label></div>
        <div class="weui-cell__bd">
            <input id="Title" name="Title" class="weui-input" type="text" placeholder="Process title" required>
        </div>
    </div>
    <div class="weui-cell">
        <div class="weui-cell__hd"><label class="weui-label">Payment reason</label></div>
        <div class="weui-cell__bd">
            <input id="Reason" name="Reason" class="weui-input" type="text" placeholder="Payment reason" required>
        </div>
    </div>
    <div class="weui-cell weui-cell_vcode">
        <div class="weui-cell__hd"><label class="weui-label">Payment amount</label></div>
        <div class="weui-cell__bd">
            <input id="PayAmount" name="PayAmount" type="number" class="weui-input" placeholder="Payment amount" required />
        </div>
        <div class="weui-cell__ft"><span class="weui-vcode-btn">element</span></div>
    </div>
Among them, weui cells is the beginning of defining cell blocks, and weui cell is the beginning of a row, while weui cell \\\\\\\\\\. The layout of other controls is also handled in this way.
The most basic and important thing to use a control is how to get and set the value of the corresponding control through JS.
The text box is relatively simple and follows the general practice. The JS code to get the value is as follows:
var Title = $("#Title").val();
If we need to judge whether the value is empty to prompt the user before saving the data, we can use the following JS code.
            var Title = $("#Title").val();
            if (!Title || Title == '') {
                $.toast('Form title cannot be empty', "forbidden");
                $("#Title").focus();
                return false;
            }
If we need to check related controls uniformly, we can write a function to carry out unified check prompt processing.
        //Check whether the input of the interface meets the requirements
        function CheckData() {
            var Title = $("#Title").val();
            if (!Title || Title == '') {
                $.toast('Form title cannot be empty', "forbidden");
                $("#Title").focus();
                return false;
            }
            var Reason = $("#Reason").val();
            if (!Reason || Reason == '') {
                $.toast('Payment reason cannot be blank', "forbidden");
                $("#Reason").focus();
                return false;
            }
            var PayAmount = $("#PayAmount").val();
            if (!PayAmount || PayAmount == '') {
                $.toast('Payment amount cannot be empty', "forbidden");
                $("#PayAmount").focus();
                return false;
            }
            return true;
        }

        //Save form
        function Save() {
            if (!CheckData()) {
                return;
            }
            var flowUser = $("#FlowUser").val();
            if (!flowUser || flowUser == '') {
                $.toast('Please select process handler', "forbidden");
                $("#FlowUser").focus();
                return;
            }
            //Submit information and upload pictures
            submitCallback();
        }
If we need to assign the value of the control through JS, it is shown below.
$("ාTitle").val(info.Title); / / application form title
If we can get the corresponding data through Ajax, the operation of assigning the data to the control display on the interface is as follows.
//If it is from an existing application form, load the information
$.getJSON("/Qyh5Flow/FindApplyById?id=" + applyid, function (info) {
    if (info != null) {
        $("#Title").val(info.Title);//Application form title
        $("#Apply_ID").val(info.ID);//Change to existing ID
    }
});
This is how we normally value and assign values to controls. Most of the controls are similar to this. Therefore, this section will focus on the general processing methods.
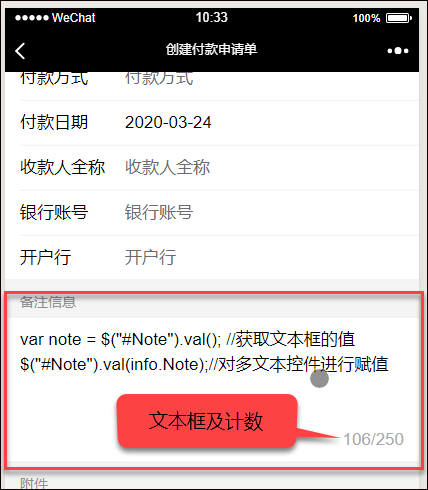
2. Multi text box control and text box count processing
For the multi text control, generally on the interface, we define it by the following code. Unlike regular single text styles, we use the weui textarea style here.
<textarea id="Note" name="Note" class="weui-textarea" placeholder="Remarks information" rows="3" style="height:100px"></textarea>
The assignment and value of text box are the same as that of ordinary single text control, as shown below.
var note = $("#Note").val(); //Get the value of the text box
Or assignment processing
$("ාNote").val(info.Note); / / assign value to multi text control
For multi text box controls, we usually add a character count to the text box, as shown in the following interface.
The HTML definition code for this section is shown below.
<div class="weui-cells__title">
    //Remarks information
</div>
<div class="weui-cells">
    <div class="weui-cell">
        <div class="weui-cell__bd">
            <textarea id="Note" name="Note" class="weui-textarea" placeholder="Remarks information" rows="3" style="height:100px"></textarea>
            <div class="weui-textarea-counter"><span>0</span>/250</div>
        </div>
    </div>
</div>
We note that a layer with the style of "weui textarea counter" is added below it. We have no ID defined. We are going to use this style to locate and display the character information of multiple text boxes.
This weui textarea counter DIV layer is a class = "weui textarea counter" DIV layer under the parent DIV layer of the text box control. Therefore, we can query and search through the DOM to avoid ID positioning.
During page initialization, we bind an input property change event to this text box, so that when the content of the text box changes, we can count the text box in real time, as shown in the JS code below.
//Dynamic display of binding words
$('#Note').bind('input propertychange', function () {
    var fizeNum = $(this).val().length;//Get the number of input words
    if (fizeNum > 250) {//If more than 250
        var char = $(this).val();
        char = char.substr(0, 250);//Intercept string (top 200)
        $(this).val(char);
        fizeNum = 250;
    }
    var countText = `${fizeNum}/250`;
    $(this).parent().find('.weui-textarea-counter').html(countText);
});
When the content of the text box changes, we can find the corresponding layer of text box count through DOM element search such as $(this). Parent(). Find ('. Weui textarea counter'), and then set its HTML or text to display.
For positioning a control by style, it's a general and flexible approach, and there are many such processes later.
If we need to find a corresponding style element under a DIV layer, we can use the same method, as shown in the following code.
$("#DispatchReadAction .promotion-sku .sku-default").addClass("active");
$("#DispatchReadAction .promotion-sku li").unbind("click");//Unbind last operation
$("#DispatchReadAction .promotion-sku li").click(function () {
    //Click event handling code...........
});
3) Drop down list controls (single and multiple)
A drop-down list control, usually used to bind multiple options so that one or more values can be selected. These list values are either fixed or obtained dynamically from the database. Dynamic processing is generally routine.
The processing of single selection and multi selection drop-down list is almost the same, but the setting properties are different.
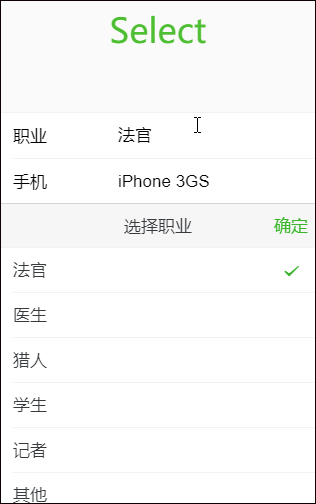
Let's take a look at the effect of the default radio drop-down list control. The official case is shown below.
The HTML of the initialization interface is the same as the normal text box style.
      <div class="weui-cell">
        <div class="weui-cell__hd"><label for="name" class="weui-label">Occupation</label></div>
        <div class="weui-cell__bd">
          <input class="weui-input" id="job" type="text" value="">
        </div>
      </div>
However, JS code is different. The code of JS initialization drop-down list is as follows.
$("#job").select({
  title: "Choice of occupation",
  items: ["Judge", "Doctor", "Hunter", "Student", "Reporter", "Other"]
});
The above is a fixed list. In general, we need to bind the drop-down list dynamically according to the database information.
For example, for payment method, if we use fixed list method, JS initialization code is as follows.
var payType = ["Bank card", "cash", "WeChat"];
$("#PayType").select({
    title: "Choose payment method",
    items: payType,
    //onChange: onChangeDept,
    //onClose: onClose,
    //onOpen: onOpen
});
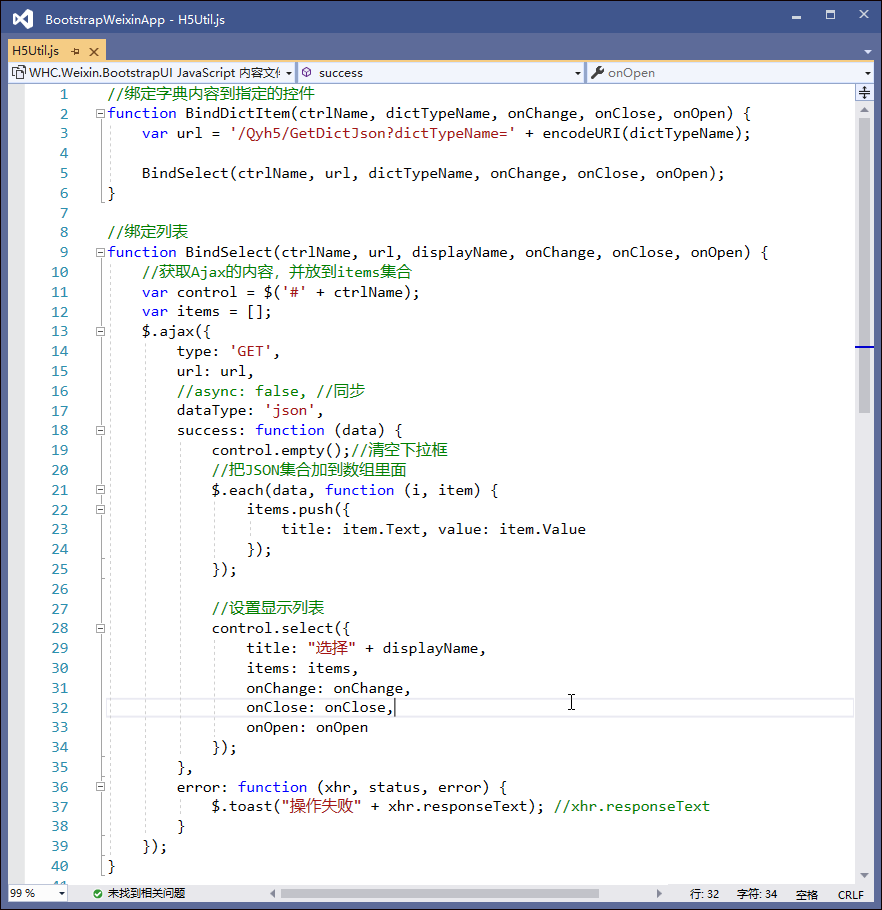
If database dictionary is adopted, we can bind through a custom function.
BindDictItem("PayType", "Payment method");//Bound dictionary
This BindDictItem is a general dictionary acquisition method defined by us. It binds the value of the drop-down list through the dictionary type. Here, Ajax is mainly used to request data, and then traverse the data to add it to the collection to bind the interface control.
If we want more flexible processing, we can also customize a function for processing, as shown in the following code, with the same effect.
//Select process handler
var flowUsers = [];
var url = '/qyh5flow/GetCorpUser';
$.getJSON(url, function (data) {
    $.each(data, function (i, item) {
        flowUsers.push({
            title: item.name, value: item.userid
        });
    });
    $("#FlowUser").select({
        title: "Select process handler",
        items: flowUsers,
    });
});
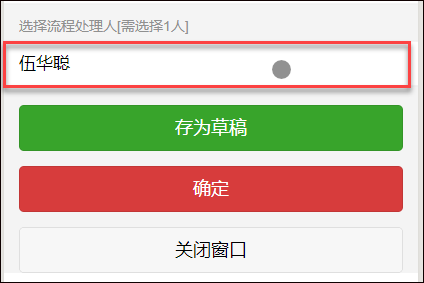
We have noticed that in the bound list, each item has a definition of title and value. This is the two properties of text and value. We usually display the text property on the interface. If we need to get the later value (generally the ID of a certain content), how can we get it.
If we get the content by the normal way, as shown below.
var flowUser = $("#FlowUser").val(); //Get the text of the list
Then you will find that what we get is the text value of the list, not the ID value we need to get. If we need to get the ID value, we can use the following properties to get it.
var flowuserId = $("#FlowUser").attr("data-values");//Get the value of the list
By default, the value of the list is single choice. If we need to set multiple choices, just initialize the list control and specify multi as true.
For example, if we need to countersign in a process, we need to select multiple countersigned process processors, as shown below.
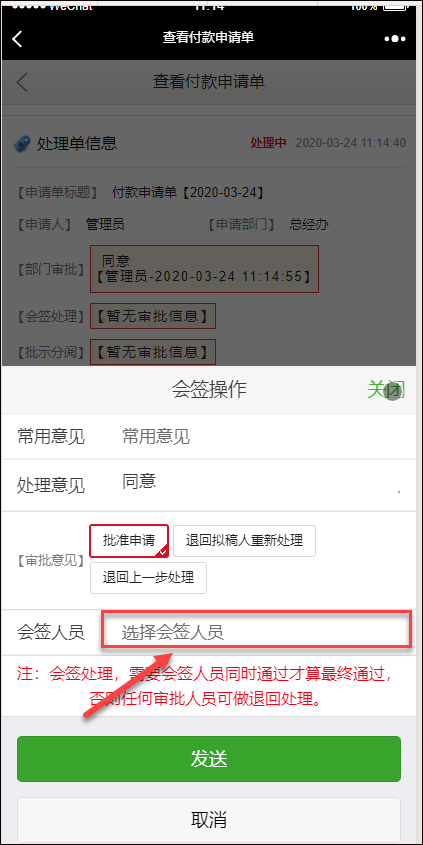
Then you need to set multiple personnel
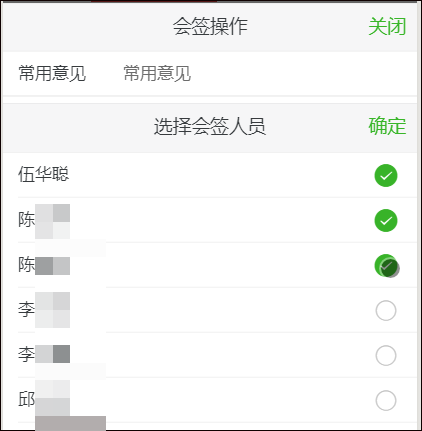
//Process user
var flowUsers = [];
var url = '/qyh5flow/GetCorpUser';
$.getJSON(url, function (data) {
    $.each(data, function (i, item) {
        flowUsers.push({
            title: item.name, value: item.userid
        });
    });
    $("#txtSelectSignUser").select({
        title: "Select countersigner",
        items: flowUsers,
        multi: true,
        //min: 2,
        //max: 3,
    });
});
4) Date control
Date control is also a very common control for information entry. Generally, we need a default date for some forms, which allows users to modify settings.
JQuery WeUI provides two different controls, Calender and datetimePicker, which are specific to different occasions. Generally speaking, I prefer to use datetimePicker, which is more convenient to select dates.
Let's take a look at Calender's date control first.
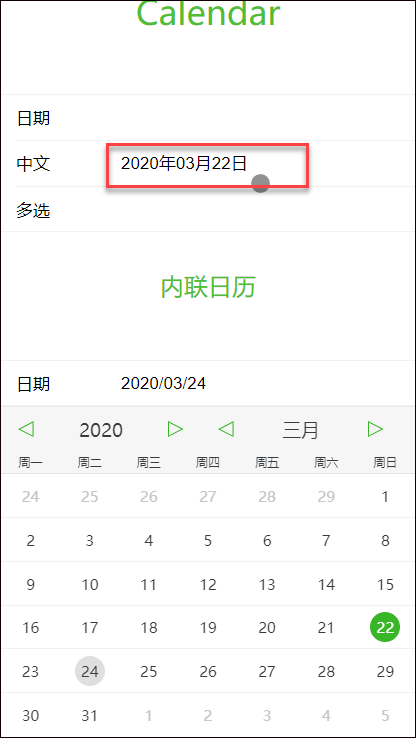
Its definition is similar to normal processing, as shown in the HTML code below.
      <div class="weui-cell">
        <div class="weui-cell__hd"><label for="date" class="weui-label">date</label></div>
        <div class="weui-cell__bd">
          <input class="weui-input" id="date" type="text">
        </div>
      </div>
Its JS initialization code is shown below.
$("#date").calendar({
onChange: function (p, values, displayValues) {
console.log(values, displayValues);
}
});
var currentDate = '2020-03-22';
console.log(currentDate);
$("#date2").calendar({
value: [currentDate],
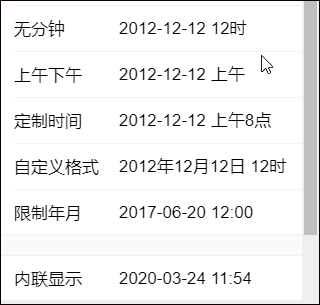
dateFormat: 'yyyy year mm month dd day' // When customizing the format, you cannot pass the input Of value Attribute assignment '2016 December 12, 2010' To define the initial value, which will result in an error if the initial value cannot be resolved. Can only pass js Set in value And it needs to be assigned according to the standard form( yyyy-mm-dd Or time stamp)
});
$("#date2").val(currentDate);
For the datetimePicker control, this also provides a variety of display effects.
For example, for our common approval documents, sometimes you need to select the default current date for users to modify and adjust.
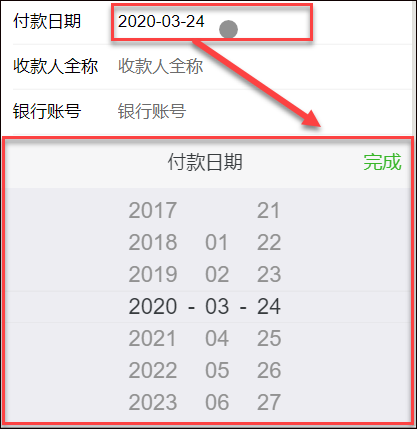
The assignment operation of datetimePicker control is different from Calender. In addition to setting the value through val() function, you need to set the value of each column. Otherwise, the display is abnormal. The datetimePicker control is still a picker selection list control.
For example, for the payment date in the above interface, our initialization code is as follows.
//Payment date setting
$("#PayDate").datetimePicker({
    title: 'Date of payment',
    times: function () { return []; },
    parse: function (str) {
        return str.split("-");
    },
    onChange: function (picker, values, displayValues) {
        console.log(values);
    }
});
var payDate = GetCurrentDate();//Get current date
$("#PayDate").val(payDate);//Set display value
//Open date MM DD YY to display each column of setting date
var b = payDate.split("-");
$("#PayDate").picker("setValue", [b[0], b[1], b[2]]);
The GetCurrentDate function is a function that we often use to get the date and time of course. Please post it for reference.
//Get date get date+String of time
function GetCurrentDate(hasTime) {
    var d = new Date();
    var year = d.getFullYear();
    var month = change(d.getMonth() + 1);
    var day = change(d.getDate());
    var hour = change(d.getHours());
    var minute = change(d.getMinutes());
    var second = change(d.getSeconds());

    function change(t) {
        if (t < 10) {
            return "0" + t;
        } else {
            return t;
        }
    }

    var time = year + '-' + month + '-' + day;
    if (hasTime) {
        time += ' ' + hour + ':' + minute + ':' + second;
    }

    return time;
}
5) Provincial and urban cascade treatment
Provincial and city level cascading operation, strictly speaking, is also a selection list similar to date time picker control, and also provides multi column operation.
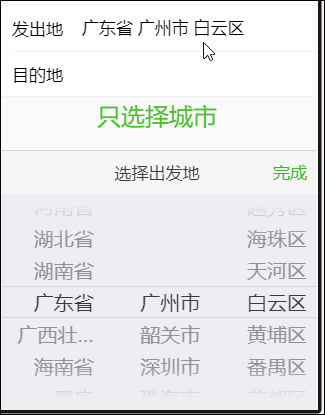
The address selector needs to introduce additional JS files:
<script type="text/javascript" src="js/city-picker.js" charset="utf-8"></script>
For the address selection control in provincial and urban areas, you can set the property showDistrict to enable the column of whether to display the area.
HTML code definition code is similar to other controls.
<div class="weui-cell">
    <div class="weui-cell__hd"><label class="weui-label">Native place</label></div>
    <div class="weui-cell__bd">
        <input class="weui-input" id="NativePlace" type="text" placeholder="Native place">
    </div>
</div>
The initialization code for JS is shown below.
$("#NativePlace").cityPicker({
    title: "Choosing native place",
    showDistrict: false,
    onChange: function (picker, values, displayValues) {
        //console.log(values, displayValues);
    }
});
6) Radio and check boxes
Both the radio box and the check box are generally selected. The basic styles of these two controls are also defined in WeUI. In general, they can be used by reference.
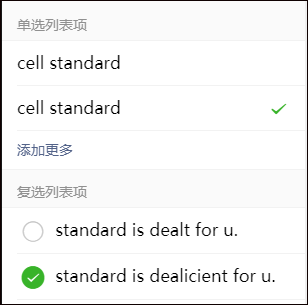
The above definition code is shown below.
    <div class="weui-cells__title">Radio list item</div>
    <div class="weui-cells weui-cells_radio">
      <label class="weui-cell weui-check__label" for="x11">
        <div class="weui-cell__bd">
          <p>cell standard</p>
        </div>
        <div class="weui-cell__ft">
          <input type="radio" class="weui-check" name="radio1" id="x11">
          <span class="weui-icon-checked"></span>
        </div>
      </label>
      <label class="weui-cell weui-check__label" for="x12">

        <div class="weui-cell__bd">
          <p>cell standard</p>
        </div>
        <div class="weui-cell__ft">
          <input type="radio" name="radio1" class="weui-check" id="x12" checked="checked">
          <span class="weui-icon-checked"></span>
        </div>
      </label>
      <a href="javascript:void(0);" class="weui-cell weui-cell_link">
        <div class="weui-cell__bd">Add more</div>
      </a>
    </div>
    <div class="weui-cells__title">Check list item</div>
    <div class="weui-cells weui-cells_checkbox">
      <label class="weui-cell weui-check__label" for="s11">
        <div class="weui-cell__hd">
          <input type="checkbox" class="weui-check" name="checkbox1" id="s11" checked="checked">
          <i class="weui-icon-checked"></i>
        </div>
        <div class="weui-cell__bd">
          <p>standard is dealt for u.</p>
        </div>
      </label>
      <label class="weui-cell weui-check__label" for="s12">
        <div class="weui-cell__hd">
          <input type="checkbox" name="checkbox1" class="weui-check" id="s12">
          <i class="weui-icon-checked"></i>
        </div>
        <div class="weui-cell__bd">
          <p>standard is dealicient for u.</p>
        </div>
      </label>
      <a href="javascript:void(0);" class="weui-cell weui-cell_link">
        <div class="weui-cell__bd">Add more</div>
      </a>
    </div>
Radio box and check box are mainly the differences between the styles defined on the block and between weui cells radio and weui cells checkbox.
Or use a switch like interface.
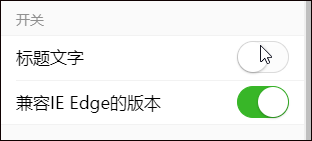
The definition code is shown below.
    <div class="weui-cells__title">switch</div>
    <div class="weui-cells weui-cells_form">
      <div class="weui-cell weui-cell_switch">
        <div class="weui-cell__bd">Caption text</div>
        <div class="weui-cell__ft">
          <input class="weui-switch" type="checkbox">
        </div>
      </div>
      <div class="weui-cell weui-cell_switch">
        <div class="weui-cell__bd">compatible IE Edge Version</div>
        <div class="weui-cell__ft">
          <label for="switchCP" class="weui-switch-cp">
            <input id="switchCP" class="weui-switch-cp__input" type="checkbox" checked="checked">
            <div class="weui-switch-cp__box"></div>
          </label>
        </div>
      </div>
    </div>
This style, weui cell switch and weui switch, defines the style of the switch.
In addition to the above two standards, when we need to select options for shopping or process application forms, we all involve multiple scenarios in which we choose one of them. The radio box in WeUI takes up too much content in the interface, which is not ideal. We should choose in a more compact way.
Similar to the following effect, it is the selection scene we often use in practice.
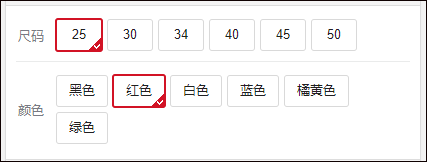
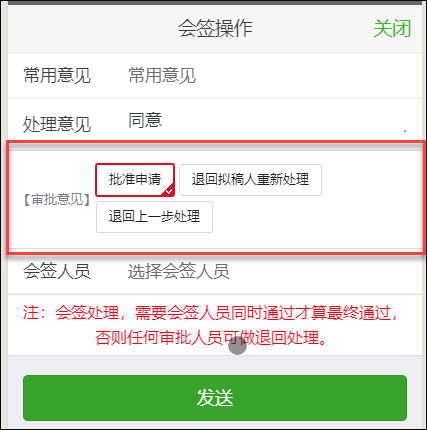
Following this example, when we select approval opinions in the process application form, it will be more beautiful.
So how to deal with the above code? Let's take a look at the HTML definition code
<div class="wy-media-box2 weui-media-box_text" style="margin:0;">
    <div class="weui-media-box_appmsg">
        <div class="wy-media-box__title"><span class="promotion-label-tit">[Approval comments]</span></div>
        <div class="weui-media-box__bd">
            <div class="promotion-sku clear">
                <ul>
                    <li class="sku-default"><a href="javascript:;">Application for approval</a></li>
                    <li><a href="javascript:;">Return to drafter for reprocessing</a></li>
                    <li><a href="javascript:;">Return to the previous step</a></li>
                </ul>
            </div>
        </div>
    </div>
</div>
Here, in order to operate flexibly, we use the way of style definition for processing, which I introduced in the multi text counter. When we click the style, we can switch the state.
When we look at the corresponding li element click, the JS code triggered is as follows (since we only handle it when the DIV layer pops up, to avoid repeated binding, we need to unbind the event before using: unbind("click").
//Option change
$("#DispatchReadAction .promotion-sku .sku-default").addClass("active");
$("#DispatchReadAction .promotion-sku li").unbind("click");//Unbind last operation
$("#DispatchReadAction .promotion-sku li").click(function () {
    $(this).addClass("active").siblings("li").removeClass("active");
    var action = $(this).text();
    console.log(action); //test
    //console.log($("#Dispatchsignaction. Promotion SKU. Active "). Text()); / / test the selected value

    //................
});
Among them, DispatchReadAction is the positioning mode of DIV layer. Promotion SKU. SKU default and promotion SKU Li are the filtering and selection of styles to facilitate the selection of corresponding elements for operation; while siblings is a traversal processing, similar to $. each processing mode.
This operation is mainly to remove all selected (style active) states, and then reset the currently selected element to selected (style active).
We can set the selected color and effect of this active style through the style.

In this way, we can achieve the effect we said before
If we need to get the content of the selected option, we can get it through the style selector
var action = $("#DispatchSignAction .promotion-sku .active").text();
6) Picture upload and Preview
When uploading a form for an actual project, it is often necessary to use attachments to upload. Generally, there are many uploaded picture files, and the pictures often need preview management. If the editing interface of existing records is maintained, the existing pictures can also be deleted.
Then it involves several problems: picture upload, picture preview, picture delete.
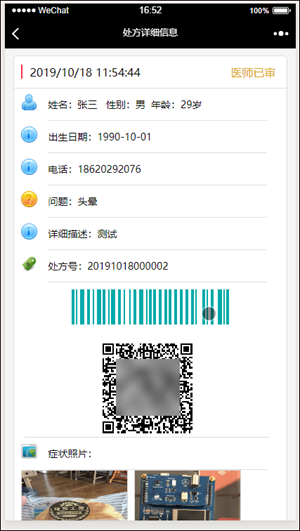
For example, in the process form, the interface to upload the attachment image is shown below.

Click the + symbol to upload more than one picture, and select the picture to preview the local picture thumbnail immediately, and click the picture thumbnail to preview the large picture of the picture, as shown below.

There are pictures in the dustbin at the bottom corner, which are used to delete pictures (if it has been uploaded, it is necessary to delete the database, if it is just added, remove the local collection).
So how to achieve such a processing effect? These are also divided into the definition of the interface and the processing operation of JS code. The upload file also involves the storage and processing of attachments by the server's background code.
In the image preview layer, we put the following definitions in HTML.
    <!--Picture preview layer-->
    <div class="weui-gallery" id="gallery">
        <span class="weui-gallery__img" id="galleryImg" style="width:auto"></span>
        <div class="weui-gallery__opr">
            <a href="javascript:" class="weui-gallery__del">
                <i class="weui-icon-delete weui-icon_gallery-delete"></i>
            </a>
        </div>
    </div>
The normal HTML code of the image attachment interface is as follows.
<div class="weui-cells__title">Enclosure</div>
<div class="weui-cells weui-cells_form">
    <div class="weui-cell">
        <div class="weui-cell__bd weui-cell_primary">
            <div class="weui-uploader">
                <!--Preview a list of pictures-->
                <ul class="weui-uploader__files" id="imgAttach">
                </ul>
                <div class="weui-uploader__input-box">
                    <!--Upload image attachment control-->
                    <input id="uploaderAttach" class="weui-uploader__input" type="file" accept="image/*" multiple="">
                </div>
            </div>
        </div>
    </div>
</div>
We put a ul interface element near the uploaded image, which is used to carry the thumbnail display of the image file. The definition ID is imgatach.
The following JS code is the normal image upload display thumbnail, click the thumbnail to preview the image, delete the image processing operation and so on. In general, we can directly copy it to the HTML interface.
    <script>
        $(function () {
            //Initialization
            initImage();//Initialize picture deletion
        });

        //Set of files and pictures
        var fileAttach = new Array();
        function initImage() {
            //Preview thumbnail template
            var tmpl = '<li class="weui-uploader__file" style="background-image:url(#url#)"></li>',
                $gallery = $("#gallery"),
                $galleryImg = $("#galleryImg"),

                $uploaderAttach = $("#uploaderAttach"),
                $imgAttach = $("#imgAttach");

            //Upload pictures and add thumbnails
            $uploaderAttach.on("change", function (e) {
                var src, url = window.URL || window.webkitURL || window.mozURL,
                    files = e.target.files;

                for (var i = 0, len = files.length; i < len; ++i) {
                    var file = files[i];
                    fileAttach.push(file);//Join set

                    if (url) {
                        src = url.createObjectURL(file);
                    } else {
                        src = e.target.result;
                    }
                    $imgAttach.append($(tmpl.replace('#url#', src)));
                }
            });

            var index; //Picture number
            var category;//That category
            var imgid;//picture ID
            //Picture thumbnail element Click to show picture preview view
            $imgAttach.on("click", "li", function () {
                index = $(this).index();
                category = "payment";
                imgid = $(this).attr("id");
                $galleryImg.attr("style", this.getAttribute("style"));
                $gallery.fadeIn(100);
            });

            //Preview interface Click to exit
            $gallery.on("click", function () {
                $gallery.fadeOut(100);
            });

            //Delete pictures(Process according to category and serial number)
            $(".weui-gallery__del").click(function () {
                console.log(index + ',' + category + ',' + imgid);//Record display

                //If it is a picture on the server, remove it after confirmation
                if (imgid != undefined && imgid != '') {
                    $.confirm("Are you sure you want to permanently delete this picture?", "Permanently delete?", function () {
                        var url = "/QYH5/DeleteAttachment";
                        var postData = {
                            id: imgid.replace(/img_/, '') //control id Remove prefix as real attachment ID
                        };

                        $.post(url, postData, function (json) {
                            //Transferred meaning JSON As object
                            var data = $.parseJSON(json);
                            if (data.Success) {
                                $.toptip("Delete successfully!", 'success');

                                //Find the corresponding control on the interface ID,Remove controls
                                RemoveImg();
                            }
                            else {
                                $.toast("operation failed:" + data.ErrorMessage, "forbidden");
                            }
                        });
                    });
                } else {
                    RemoveImg(); //Quick removal of ordinary pictures
                };
            });

            //Remove pictures of corresponding categories
            function RemoveImg() {
                if (category == "payment") {
                    $imgAttach.find("li").eq(index).remove();
                    fileSick.splice(index, 1);
                } else {
                    console.log("No corresponding type");
                    //$imgPres.find("li").eq(index).remove();
                    //filePres.splice(index, 1);
                }
            };
        };
    </script>
The above code mainly deals with the image processing in the case of new content. In general, it also needs to include the image preview in the case of editing existing records. For the existing image list, we list it in the database and display it in the thumbnail.
The following JS code deals with the image thumbnail binding in the editing situation. It is mainly noted that we define an ID rule here, and maintain a certain rule with the corresponding ID of the attachment in the background database.
//Dynamic image binding
$.getJSON("/Qyh5Flow/GetImageList2?attachGuid=" + info.AttachGUID, function (data) {
    $.each(data, function (i, item) {
        $("#imgAttach").append(`<img class='weui-uploader__file' src='${item.Text}' id='img_${item.Value}'/>`);
    });
});
When deleting the background attachment, we need to resolve the corresponding ID, as shown below.
var postData = {
    id: imgid.replace(/img_/, '') //control id Remove prefix as real attachment ID
};
In general, our image attachments can be submitted along with other contents of the form. However, because the regular text content and attachment content are processed together, we need to introduce FormData to store complex objects, so that we can receive various parameters and attachment file information in the background.
//Submit information and upload pictures
function submitCallback() {
    var formData = new FormData();//Construct a FormData Store complex objects
    formData.append("ID", $("#ID").val());
    formData.append("Reason", $("#Reason").val());
    //.........Omit other content

    //Add attached picture
    for (var i = 0; i < fileAttach.length; i++){
        formData.append("attach_" + i, fileAttach[i]);
    };
The file set of fileAttach is the file set we joined.
With these contents, we will uniformly process and save all the input text and attachment information of the interface.
//Submit form data and files
var url = "/qyH5Flow/PaymentSave?userid=@ViewBag.userid";
$.ajax({
    url: url,
    type: 'post',
    processData: false,
    contentType: false,
    data: formData,
    success: function (json) {
        //Transferred meaning JSON As object
        var data = $.parseJSON(json);
        if (data.Success) {
            $.toast("Saved successfully. Please go to the list interface to view later.");
        }
        else {
            $.toast("Save failed:" + data.ErrorMessage, "forbidden");
        }
    }
});
Because of the use of FormData of mixed complex objects, when we submit asynchronously, we need to set processData: false to process.
The above is the interface code part of the front-end HTML+JS. To complete the upload of the attachment, the background code is also required to process the attachment.
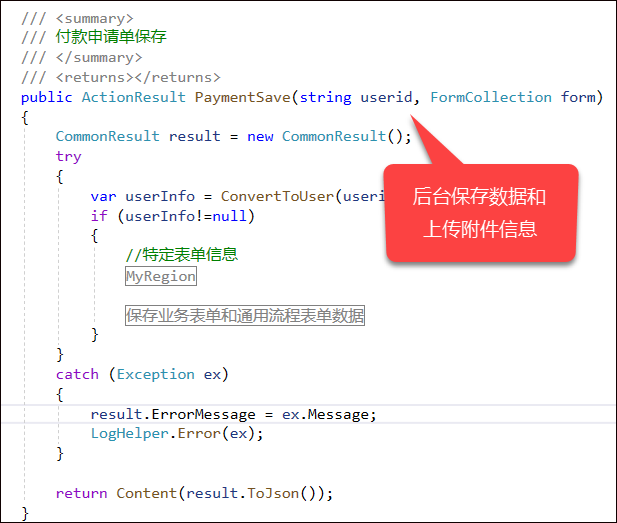
We use an independent function to save the attachment.
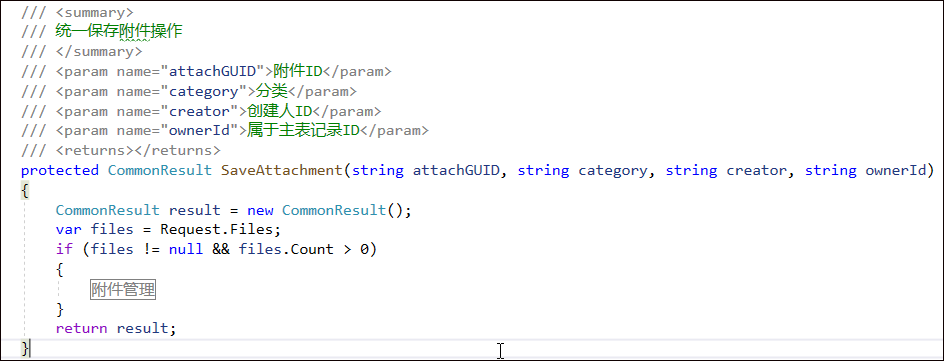
In fact, the background only needs to be obtained through the object of Request.Files, and then through the processing of our database and files, we can upload the attachments. We will not go into details here.
Due to the length, our next essay will continue to introduce various operations of wechat in developing H5 page controls.