Conceptual understanding
Vertex Buffer Objects (VBO)
Vertex buffer object VBO is a memory buffer opened up in the memory space of the graphics card, which is used to store various attribute information of vertices, such as vertex coordinates, vertex normal vector, vertex color data, etc. During rendering, various attribute data of vertices can be taken directly from VBO. Because VBO is in video memory rather than memory, there is no need to transfer data from CPU, so the processing efficiency is higher.
Therefore, it can be understood that VBO is a storage area in video memory, which can maintain a large amount of vertex attribute information. And many vbos can be opened up. Each VBO has its unique identification ID in OpenGL. This ID corresponds to the video memory address of the specific VBO. Through this ID, the data in the specific VBO can be accessed
Vertex array object (VAO)
VBO saves the vertex attribute information of a model. All the vertex information needs to be bound before drawing the model every time. When the amount of data is large, it becomes very troublesome to repeat this action. VAO can store all these configurations in one object. Each time you draw a model, you only need to bind the VAO object.
VAO is a state combination that saves all vertex data attributes. It stores the format of vertex data and the reference of VBO objects required by vertex data. VAO itself does not store the relevant attribute data of vertices. This information is stored in VBO. VAO is equivalent to a reference to many vbos and combines some vbos as an object for unified management.
- Basic painting process: OpenGL initialization, vertex input, data processing, shader calculation and rendering
- Draw triangles in VAO/VBO
OpenGL initialization: including initializing GLFW, creating windows, initializing GLAD, and creating viewports.
// initialization GLFW
glfwInit();
glfwWindowHint(GLFW_CONTEXT_VERSION_MAJOR, 3);
glfwWindowHint(GLFW_CONTEXT_VERSION_MINOR, 3);
glfwWindowHint(GLFW_OPENGL_PROFILE, GLFW_OPENGL_CORE_PROFILE);
glfwWindowHint(GLFW_OPENGL_FORWARD_COMPAT, GL_TRUE);
glfwWindowHint(GLFW_RESIZABLE, FALSE);
// create a window(Width, height, window name)
auto window = glfwCreateWindow(screen_width, screen_height, "Triangle",
nullptr, nullptr);
if (window == nullptr) {
std::cout << "Failed to Create OpenGL Context" << std::endl;
glfwTerminate();
return -1;
}
glfwMakeContextCurrent(window);
// initialization GLAD,load OpenGL Function pointer address
if (!gladLoadGLLoader((GLADloadproc)glfwGetProcAddress))
{
 std::cout << "Failed to initialize GLAD" << std::endl;
 return -1;
}
// Specifies the current viewport size(The first two parameters are the position of the lower left corner, and the last two parameters are the width and height of the rendering window)
glViewport(0, 0, screen_width, screen_height);
Vertex input: give the vertex data of the triangle, and do some processing on the data (including generating bound VAO, VBO and attribute settings), and finally unbind it
// Vertex data of triangle
const float triangle[] = {
// ---- position ----
 -0.5f, -0.5f, 0.0f, // Lower left
 0.5f, -0.5f, 0.0f, // lower right
 0.0f, 0.5f, 0.0f // Right up
};
Data processing: VAO VBO
The VBO created can be used to save different types of vertex data, After creation, you need to bind the VBO specified by the assigned ID. for vertex data of the same type, only one VBO can be bound at a time. The binding operation is implemented through glBindBuffer. The first parameter specifies the data type of binding, which can be one of GL_ARRAY_BUFFER, GL_ELEMENT_ARRAY_BUFFER, GL_PIXEL_PACK_BUFFER or GL_PIXEL_UNPACK_BUFFER.
Next, call glBufferData to transfer the user-defined data to the currently bound video memory buffer.
// Generate and bind VBO
GLuint vertex_buffer_object;
glGenBuffers(1, &vertex_buffer_object);
glBindBuffer(GL_ARRAY_BUFFER, vertex_buffer_object);
// Binds vertex data to the current default buffer
glBufferData(GL_ARRAY_BUFFER, sizeof(triangle), triangle,
GL_STATIC_DRAW);
// Generate and bind VAO
//After VAO binding, all subsequent VBO configurations are part of this VAO object. It can be said that VBO is binding to vertex attribute information, and VAO is binding to many vbos.

GLuint vertex_array_object;
glGenVertexArrays(1, &vertex_array_object);
glBindVertexArray(vertex_array_object);
Data processing: vertex data interpretation
After sending to GPU, we also need to tell OpenGL how to interpret these vertex data. So we use the glVertexAttribPointer function to tell OpenGL how to interpret these vertex data.
// Set vertex attribute pointer
glVertexAttribPointer(0, 3, GL_FLOAT, GL_FALSE, 3 * sizeof(float),
(void*)0);
glEnableVertexAttribArray(0)
The first parameter of this function is the position value of the vertex shader we will use later. 3 represents that the vertex attribute is a three component vector. The third parameter represents the type of our vertex. The fourth parameter is whether we want the data to be standardized, that is, mapped to 0-1. The fifth parameter is called step size, which represents the interval between continuous vertex attributes, Because we only have vertex positions here, we set the step size to this, indicating that the next group of data is after 3 float s. The last one is the data offset. Here, our position attribute is at the beginning of the array, so it is 0. Due to the limitation of parameter type, we need to cast it.
The following Enable function indicates that we have enabled the channel of 0, which is closed by default, so we want to Enable it here.
// Unbound VAO and VBO
glBindVertexArray(0);
glBindBuffer(GL_ARRAY_BUFFER, 0);
After setting the property pointer, we need to unbind VAO and VBO here. So, we can think about why we need to unbind VAO and VBO here? One reason is that binding VAO after prevention will affect the current VAO. Another reason is that in order to make the code more flexible and standardized, we will bind VAO again when rendering is needed. We have stored vertex data on the GPU of the graphics card through VAO and VBO. Next, we will create vertex and fragment shaders to really process these data. Here we will give the source code of the shader, then generate and compile the shader, finally link the vertex and fragment shaders to a shader program, use this shader program in the later rendering process, and finally delete the previous shader.
Vertex shader and clip shader
At this time, the shader source code written in GLSL language.
The two paragraphs we give here are the source code of vertex shader and fragment shader respectively. This is written in GLSL language, and the GLSL language looks similar to the style of C language, which is easy to understand. Let's look at the vertex shader first. The first line indicates that we use opengl3 The second line is the position value we mentioned earlier. Part of the Main function is to directly output our previous vertex data to a built-in variable GL defined by GLSL_ In position, this is the output of our vertex shader, that is, we do nothing here, just take the vertex position as the output of the vertex shader.
// Vertex shader source code
const char *vertex_shader_source =
 "#version 330 core\n"
 "layout (location = 0) in vec3 aPos;\n"
 "void main()\n"
 "{\n"
 " gl_Position = vec4(aPos, 1.0);\n"
 "}\n\0";
Next is the fragment shader. The first two lines are similar. out here represents the output variable, just as in before represents the input variable. Then, the four component vector here is the triangle we saw before. It is a four component RGBA. Then we can also change it, and the color of the triangle we output will change.
// Fragment shader source code
const char *fragment_shader_source =
 "#version 330 core\n"
 "out vec4 FragColor;\n"
 "void main()\n"
 "{\n"
 " FragColor = vec4(1.0f, 0.5f, 0.2f, 1.0f);\n"
 "}\n\0";
With the source code of vertex and fragment shaders, we also need to generate and compile shaders. Here, our husband becomes a vertex shader, attaches the previous source code and compiles it. Then we test it here to see if it is compiled successfully. If it is not compiled successfully, we print error messages. The same is true for the same clip shader. 6 finally, we link vertex and fragment shaders to a shader program, so that we only need to call one shader program during rendering. Similarly, here we check whether the link is successful. Finally, delete the vertex and clip shaders. Because in the later rendering, we only need to use the shader program we linked before, and we don't need to use vertex and fragment shaders anymore.
// Generate and compile shaders
// Vertex Shader
int vertex_shader = glCreateShader(GL_VERTEX_SHADER);
glShaderSource(vertex_shader, 1, &vertex_shader_source, NULL);
glCompileShader(vertex_shader);
int success;
char info_log[512];
// Check whether the shader compiles successfully. If the compilation fails, print the error message
glGetShaderiv(vertex_shader, GL_COMPILE_STATUS, &success);
if (!success)
{
glGetShaderInfoLog(vertex_shader, 512, NULL, info_log);
std::cout << "ERROR::SHADER::VERTEX::COMPILATION_FAILED\n"
<< info_log << std::endl;
}
// Generate and compile shaders
// Fragment Shader
int fragment_shader = glCreateShader(GL_FRAGMENT_SHADER);
glShaderSource(fragment_shader, 1, &fragment_shader_source,
NULL);
glCompileShader(fragment_shader);
// Check whether the shader compiles successfully. If the compilation fails, print the error message
glGetShaderiv(fragment_shader, GL_COMPILE_STATUS, &success);
if (!success)
{
glGetShaderInfoLog(fragment_shader, 512, NULL, info_log);
std::cout <<
"ERROR::SHADER::FRAGMENT::COMPILATION_FAILED\n" << info_log
<< std::endl;
}
// Link vertex and clip shaders to a shader program, int shader_program = glCreateProgram(); glAttachShader(shader_program, vertex_shader); glAttachShader(shader_program, fragment_shader); glLinkProgram(shader_program); // Check whether the shader is successfully linked. If the link fails, print the error message glgetprogramiv (shader_program, gl_link_status, & Success); if (!success) { glGetProgramInfoLog(shader_program, 512, NULL, info_log); std::cout << "ERROR::SHADER::PROGRAM::LINKING_FAILED\n" << info_log << std::endl; }
// Delete shader
glDeleteShader(vertex_shader);
glDeleteShader(fragment_shader);
Render
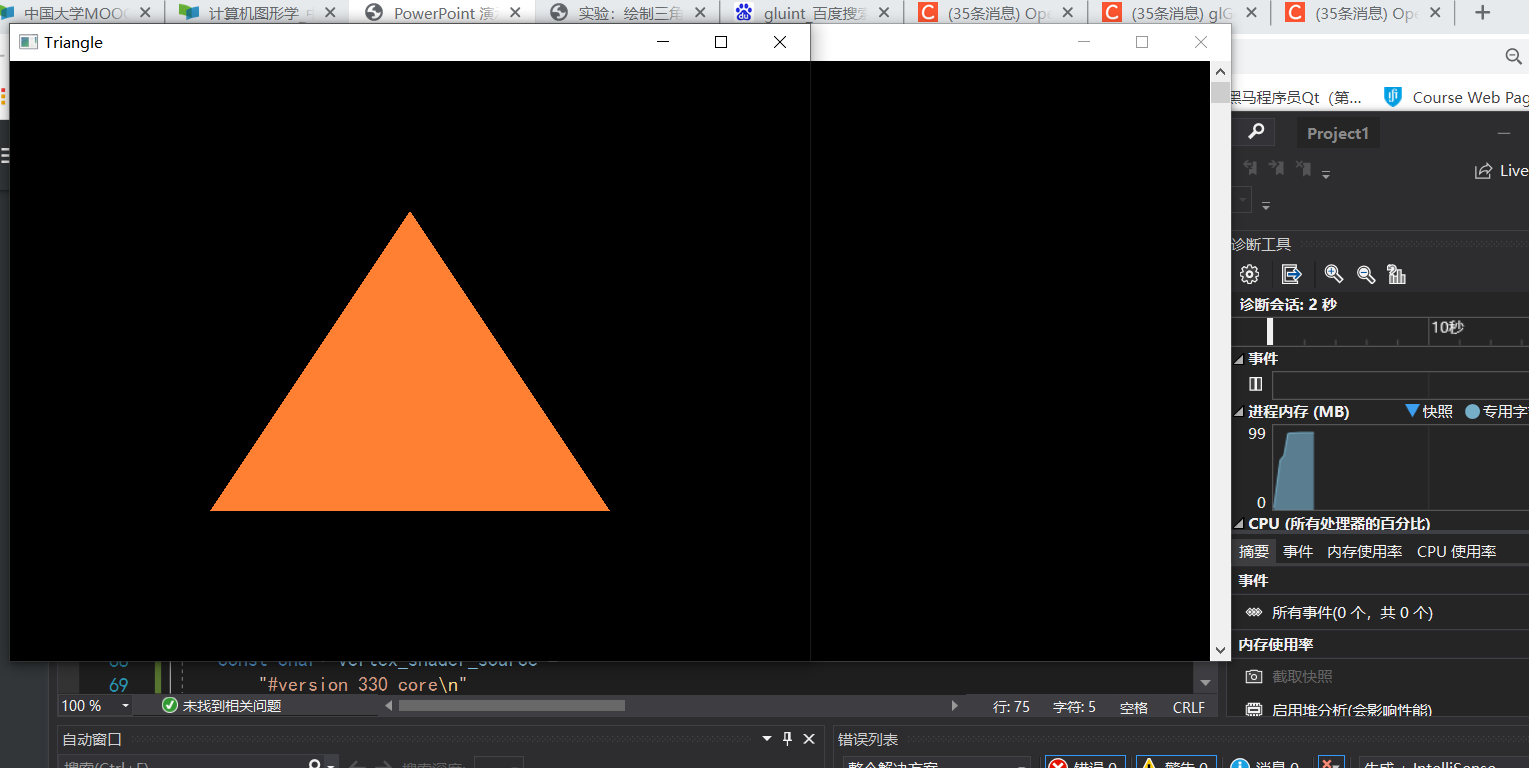
Next, we enter our rendering stage. When the window is not closed, we always render. First, we empty the color buffer. We use the black background color to empty the screen color buffer. Of course, we can change the color here. Next, we use our previously linked shader program and VAO to draw triangles. In fact, as long as we draw triangles, it is glDrawArrays. The first parameter here indicates that we want to draw triangles, the second parameter indicates the starting index value of our vertex array, and the third parameter indicates the number of vertices we want to draw. When we draw triangles, we want to draw three vertices. Unbind after drawing. Finally, we will exchange buffers. Here we use a double buffer method. The front buffer saves the output image, and the rendering instructions are carried out in the rear buffer. After the instructions are executed, we will exchange the front and rear buffers, and finally we will detect whether some callback functions are triggered.
while (!glfwWindowShouldClose(window)) {
// Clear color buffer
glClearColor(0.0f, 0.0f, 0.0f, 1.0f);
glClear(GL_COLOR_BUFFER_BIT);
// Using shader programs
glUseProgram(shader_program);
// Draw triangle
glBindVertexArray(vertex_array_object); // binding VAO
glDrawArrays(GL_TRIANGLES, 0, 3); // Draw triangle
glBindVertexArray(0); // Unbind
// Swap buffers and check for trigger events(Such as keyboard input, mouse movement, etc.)
glfwSwapBuffers(window);
glfwPollEvents();
}
After our window closes, we will do some remedial work, including deleting the VAO and VBO we created before, and calling the function of GLFW to clean up all resources and exit the program. The whole process of drawing triangles ends here.
experimental result