Experiment 3.1: text file operation
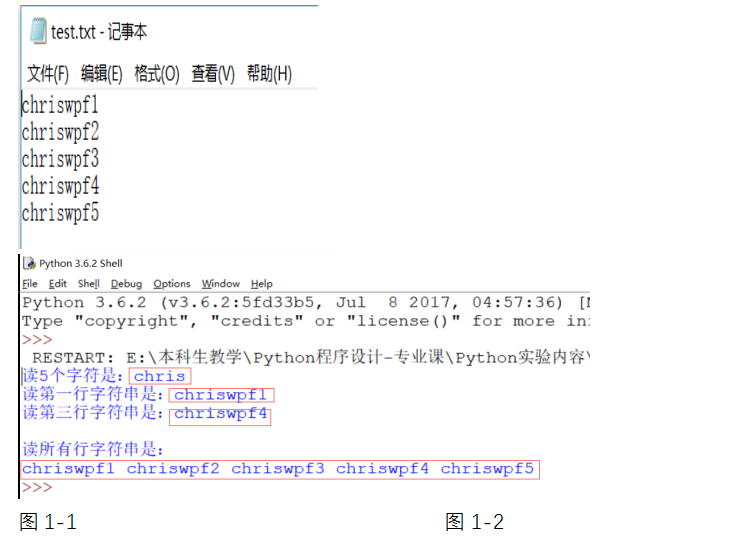
Title Description: create a new program called test Txt file, stored in the directory where the code file is located, and open the file. Then write the contents as shown in Figure 1-1 to the file. Finally, read 5 characters, read the first line of string, read the third line of string, and read all strings. As shown in Figure 1-2.
Tip: use the file operation functions open(), write(), read(), readline(), readlines(), seek(), tell(), close().
f = open("test.txt", "w+")
for i in range(1, 6):
    f.write("chriswpf"+str(i)+"\n")

f.close()

f = open("test.txt", "r")
print("Reading five characters is:"+f.read(5))
f.seek(0)
print("Read a line of string is:"+f.readline())
f.seek(f.tell()*2)
print(("Read the third line of string:"+f.readline()))
f.seek(0)
print("Read all line strings are:")
list = f.readlines()
for line in list:
    print(line[:-1], end=' ')
f.close()
Experiment 3.2: CSV file operation
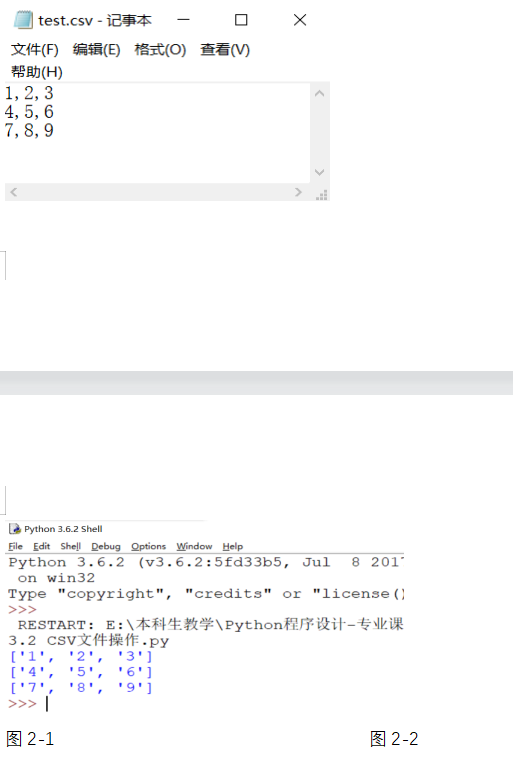
Title Description: create a new program called test CSV file, stored in the directory where the code file is located, and open the file. Then write the contents as shown in Figure 2-1 to the file. Finally, read all file data, as shown in Figure 2-2.
Tip: import csv #csv is a built-in module and can be used directly
import csv
list = [[1, 2, 3], [4, 5, 6], [7, 8, 9]]
f = open(r'test.csv', 'w+', newline='')
cw=csv.writer(f, dialect='excel')
len = len(list)
for i in range(0,len):
    cw.writerow(list[i])
f.close()
cr = csv.reader(open(r"test.csv",encoding="utf-8"))
for row in cr:
    print(row)
Experiment 3.3: Excel file operation
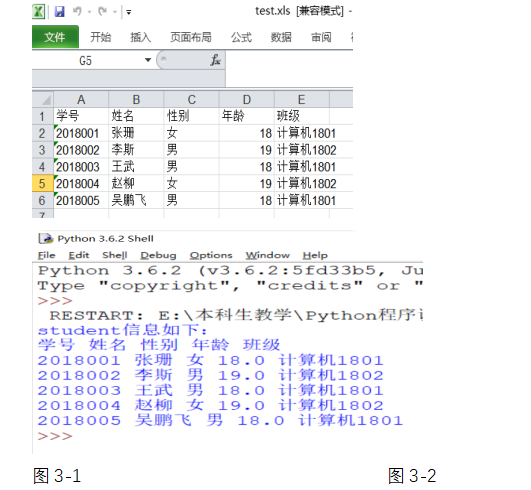
Program description: create a new topic named test Xls file, stored in the directory where the code file is located, and open the file. Then write the contents shown in Figure 3-1 to the file through the xlwt module. Finally, read all file data through xlrd module, as shown in Figure 3-2.
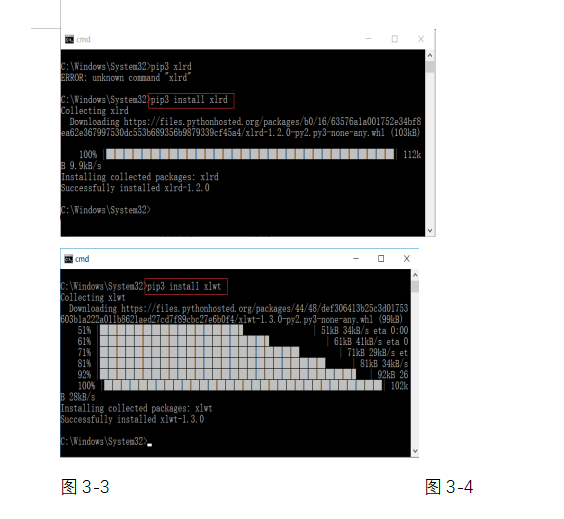
Tip: install xlrd read module, as shown in Figure 3-3, and install xlwt write module, as shown in Figure 3-4.
import xlwt
import xlrd
book = xlwt.Workbook(encoding="utf-8")
sheet = book.add_sheet('sheet_test')
sheet.write(0,0,'Student number')
sheet.write(0,1,'full name')
sheet.write(0,2,'Age')
sheet.write(0,3,'class')
sheet.write(1,0,'2018001')
sheet.write(2,0,'2018002')
sheet.write(3,0,'2018003')
sheet.write(4,0,'2018004')
sheet.write(5,0,'2018005')
sheet.write(1,1,'Zhang Shan')
sheet.write(2,1,'LISS')
sheet.write(3,1,'Wang Bin')
sheet.write(4,1,'Zhao Liu')
sheet.write(5,1,'Dream of')
sheet.write(1,2,'female')
sheet.write(2,2,'male')
sheet.write(3,2,'male')
sheet.write(4,2,'female')
sheet.write(5,2,'male')
sheet.write(1,3,'18')
sheet.write(2,3,'19')
sheet.write(3,3,'19')
sheet.write(4,3,'18')
sheet.write(5,3,'17')
sheet.write(1,4,'Computer 2002')
sheet.write(2,4,'Computer 2002')
sheet.write(3,4,'Computer 2002')
sheet.write(4,4,'Computer 2002')
sheet.write(5,4,'Computer 2002')

book.save(r'test.xls')

wb = xlrd.open_workbook(r"test.xls")
print("student The information is as follows:")
for s in wb.sheets():
    for i in range(s.nrows):
        print(s.row(i)[0].value,end=' ')
        print(s.row(i)[1].value,end=' ')
        print(s.row(i)[2].value,end=' ')
        print(s.row(i)[3].value,end=' ')
        print(s.row(i)[4].value,end=' ')
        print()
Experiment 3.4: Word file operation
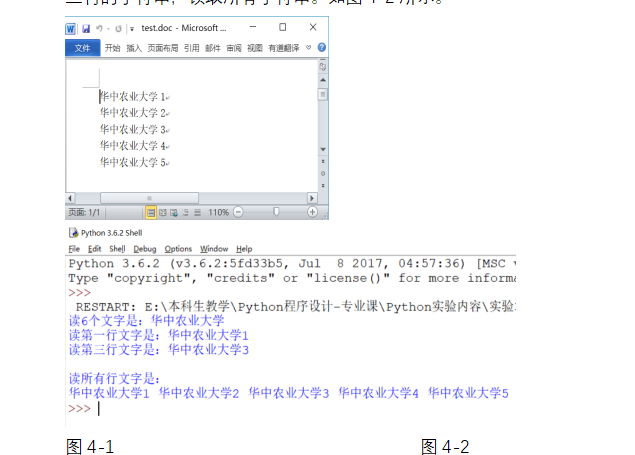
Title Description: create a new program called test Doc file, stored in the directory where the code file is located, and open the file. Then write the contents as shown in Figure 4-1 to the file. Finally, read 5 characters, read the first line of string, read the third line of string, and read all strings. As shown in Figure 4-2.
Tip: use the file operation functions open(), write(), read(), readline(), readlines(), seek(), tell(), close().
f = open("test.doc", "w+")
for i in range(0, 4):
    f.write("hzau"+str(i+1)+'\n')

f.close()
f = open("test.doc", 'r')
print("Read six words:"+f.read(6))
f.seek(0)
print("Read the first line:"+f.readline())
f.seek(f.tell()*2)
print("Read the third line:"+f.readline())
f.seek(0)
print("Read all lines of text:")
list = f.readlines()
for s in list:
    print(s[:-1], end=' ')

f.close()
Experiment 3.5: SQLite database creation
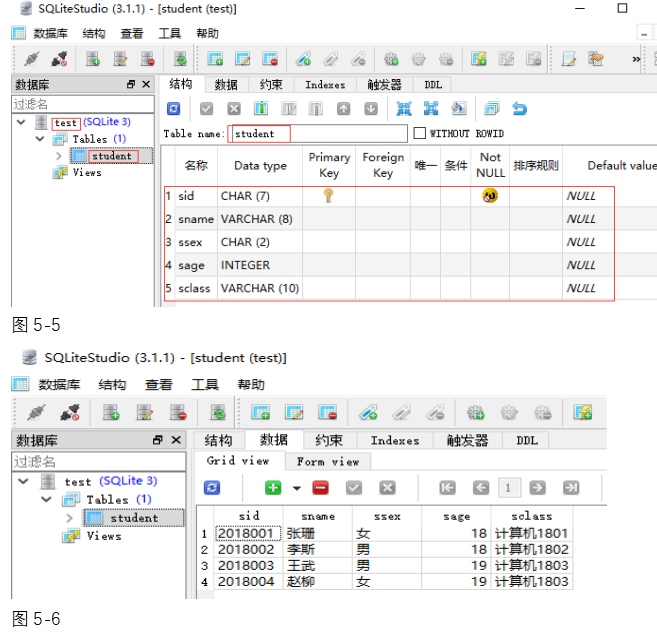
Topic Description: create a test database test DB, the database contains a student table, which contains five fields: student number sid, name sname, gender ssex, age sage and class sclass.
Tips:
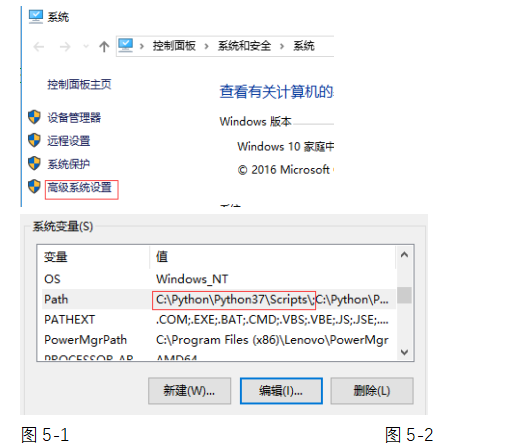
(1) Step 1: set the PATH value of the system environment variable. First, download the SQLite database tool file sqlite3.0 from the SQLite website exe. (or directly provided by the teacher), SQLite3 Exe to the Scripts subdirectory of the python installation directory (e.g. C: \ Python \ Python 37 \ Scripts \, note that the python installation directories of different machines are different), then set the system environment variable PATH and add a value to the complete subdirectory. As shown in the red boxes in Figure 5-1 and Figure 5-2.
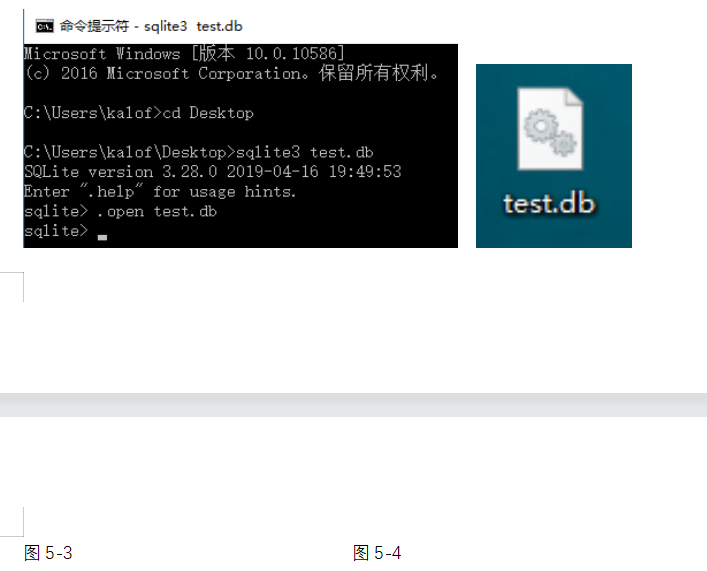
(2) Step 2: create a test DB database file
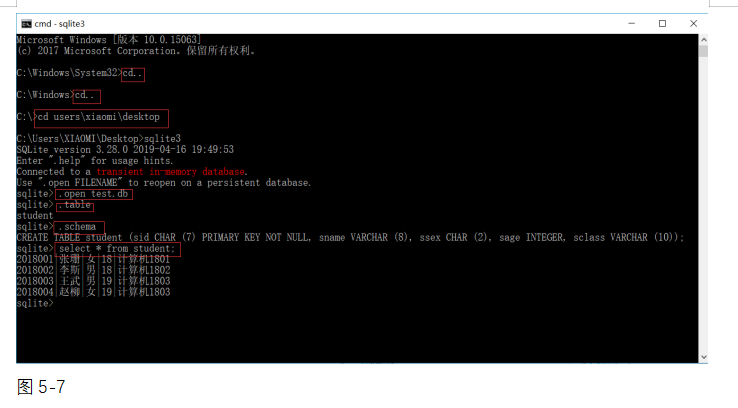
Enter the cmd command prompt program, enter the "cd Desktop" command to enter the desktop directory (e.g. C:\Users\kalof\Desktop \), and enter sqlite3 test in turn as shown in Figure 5-3 DB and open test.db two commands, and a test is created on the desktop DB data file, as shown in Figure 5-4. (Note: the command to exit sqlite3 is "Ctrl + Z")
(3) Step 3: create a data table named student. Get SQLite database creation tool sqlitestudio exe. (directly provided by the teacher), open sqlitestudio Exe, connect to test.exe on the desktop DB, and then establish the student table, establish five field values as shown in Figure 5-5 and figure 5-6 respectively, and enter four student basic information records. Test to this database DB is established, which provides the basis for Python to operate SQLite database for the next experiment 3.6.
(4) Step 4: view student data table information
Click the "cmd command prompt" program to enter the "cmd command prompt" program interface, as shown in Figure 5-7. Name it by cd and enter test The desktop directory where the DB database file is located (e.g. C:\Users\XIAOMI\Desktop), enter the "sqlite3" command to start the SQLite program, and at the SQLite prompt "SQLite >", enter " open test.db "open test DB database, enter ". Table" to view the data table student in the current test database, enter ". schema" to view the structure of the current student table, and enter "select * from student;" View the student information table, as shown in the figure. (Note: the English colon at the end of SQL language cannot be omitted, otherwise the SQL execution will make an error.)
Experiment 3.6: SQLite database operation
Topic Description: on the basis of experiment 3.5, complete the data addition, deletion, modification and query operations respectively.
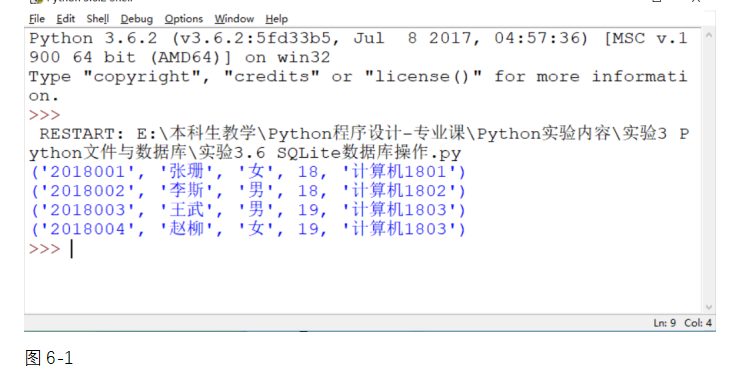
Tip: the corresponding data operation functions are realized through SQL statements insert, delete, update and select. The test results of Python operating SQLite database program code are shown in Figure 6-1 below.
import sqlite3
co = sqlite3.connect(r"test.db")
cu = co.cursor()
#INSERT
cu.execute(
    "INSERT INTO Course(sid,sname,ssex,sage,sclass) VALUES ('2020007','muddled','male','17','Computer 2002')")
#SELECT
cursor = cu.execute("SELECT sid,sname,ssex,sage,sclass from Course")
for row in cursor:
    print ("sid= ",row[0])
    print("sname=",row[1])
    print("ssex=",row[2])
    print("sage=",row[3])
    print("sclass=",row[4])

#UPDATE
cu.execute("UPDATE Course set sage=20 where sid = 1")

co.commit()  # Submit data
#Print
cursor = cu.execute("SELECT sid,sname,ssex,sage,sclass from Course")
for row in cursor:
    print ("sid= ",row[0])
    print("sname=",row[1])
    print("ssex=",row[2])
    print("sage=",row[3])
    print("sclass=",row[4])
#Delete
cu.execute("DELETE form Course where sid=2;")
co.commit()
#Print
cursor = cu.execute("SELECT sid,sname,ssex,sage,sclass from Course")
for row in cursor:
    print ("sid= ",row[0])
    print("sname=",row[1])
    print("ssex=",row[2])
    print("sage=",row[3])
    print("sclass=",row[4])
cu.close()
co.close()
Experiment 3.7: MySQL database creation
Topic Description: create a test database test DB, the database contains a teacher table, which contains six fields: teaching staff number tid, name tname, gender tsex, age tage, professional title ttitle and department tdept.
Tips:
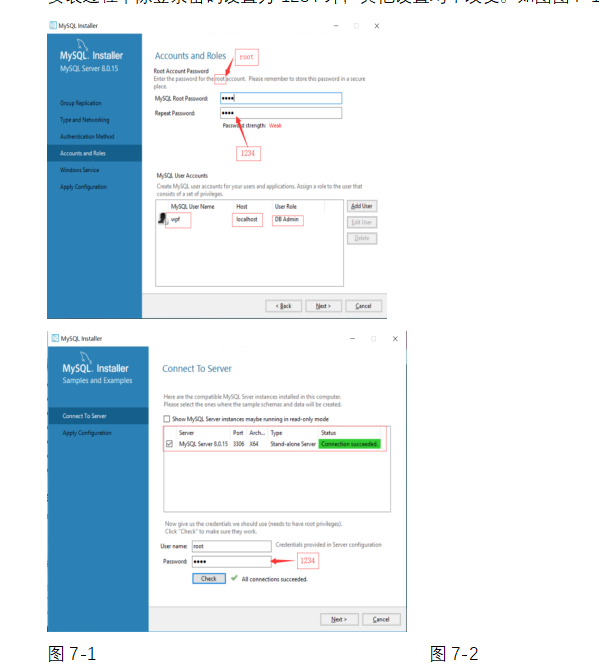
(1) Step 1: install MySQL database toolkit. First, download the MySQL database tool installation file mysql-installer-community-8.0.15.0 from the MySQL website msi. (or directly provided by the teacher), double-click to install the file. During the installation process, except that the login password is set to "1234", other settings will not be changed. As shown in figures 7-1 and 7-2.
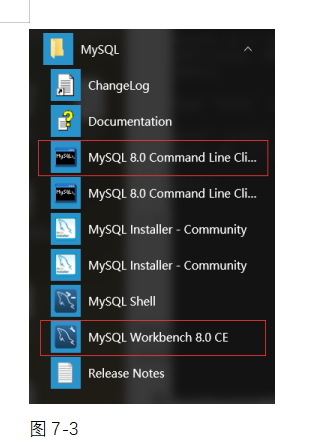
After the installation of "Next", MySQL menu items as shown in the following figure will appear in the "start" menu of Windows10 system. The two items marked in red are database directory creation and database and table structure viewing tools. As shown in Figure 7-3.
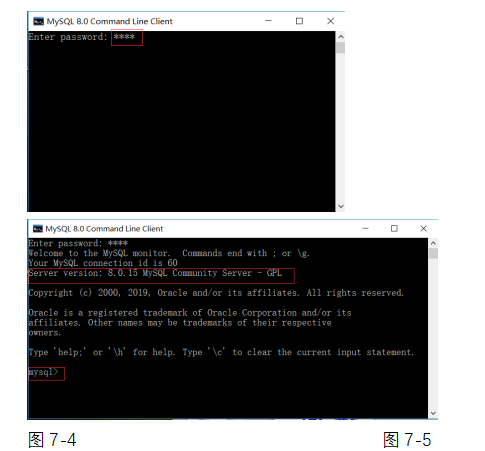
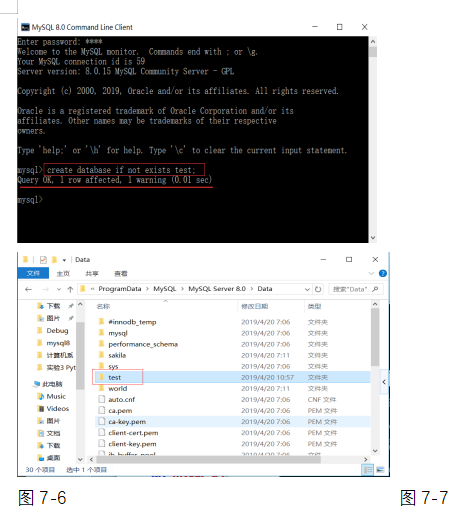
(2) Step 2: create a database directory named test. Click "MySQL 8.0 Command Line Client" to enter the initial program interface, as shown in Figure 7-4 below. Enter the password "1234" (the password here is the login password set when installing MySQL database tool files in the previous step), and press enter to enter the MySQL startup interface. When the "MySQL >" prompt appears, as shown in Figure 7-5, MySQL startup is successful. Then enter the create database command "create database if not exists test;", Press enter to display "Query Ok,...", as shown in Figure 7-6, indicating that the database directory is successfully established. Finally, enter the directory where the MySQL database file is located, and its path is "C:\ProgramData\MySQL\MySQL Server 8.0\Data \". Under this directory, you can see the new file named test, as shown in Figure 7-7. At this time, the test database directory is established. (Note: the command to exit MySQL process is "\ quit")
(3) Step 3: create a data table named teacher
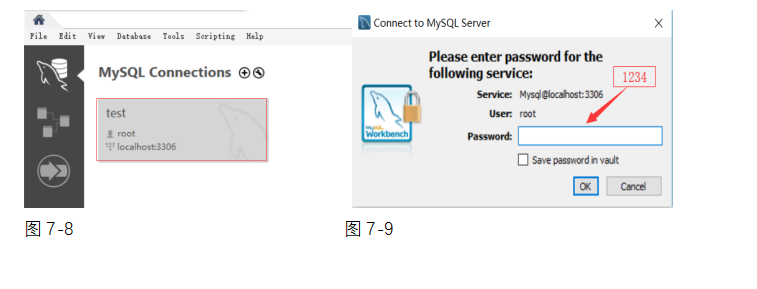
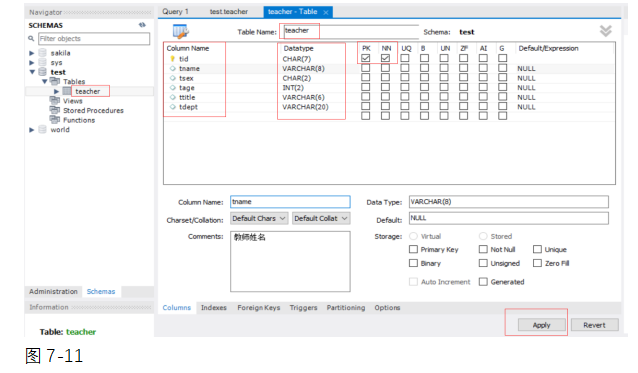
Click the "MySQL Workbench 8.0 CE" visualization tool to enter the initial program interface, as shown in Figure 7-8 below. Double click the red area to pop up the "Connect to MySQL Server" dialog box, as shown in Figure 7-9. Enter the password "1234", enter the MySQL Workbench visualization workbench, and click the "Schema" option, You can see the "test" Database (note that Schema in MySQL is equivalent to Database, that is, Database), as shown in Figure 7-10. Double click "test" to expand the four items "Tables", "View", "Stored Procedures" and "Functions". Click "table", right-click "Create Table", establish "teacher" data table and its six field values as shown in Figure 7-11 and 7-12 respectively, click "Apply" to complete the creation of "teacher" table, and finally enter five teacher basic information records. This Database test has been established to provide the basis for Python to operate MySQL Database for the next experiment 3.8.

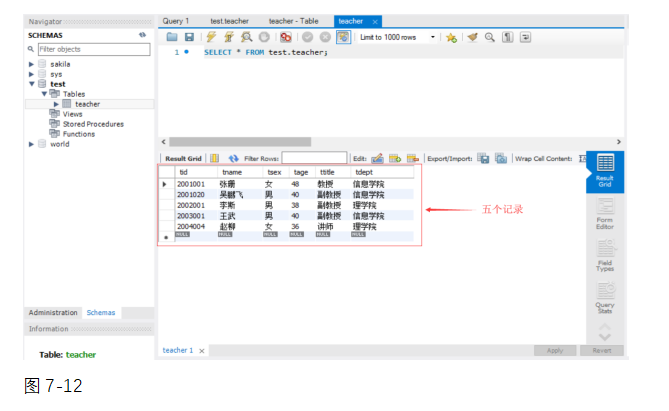
(4) Step 4: view the information of the teacher data table
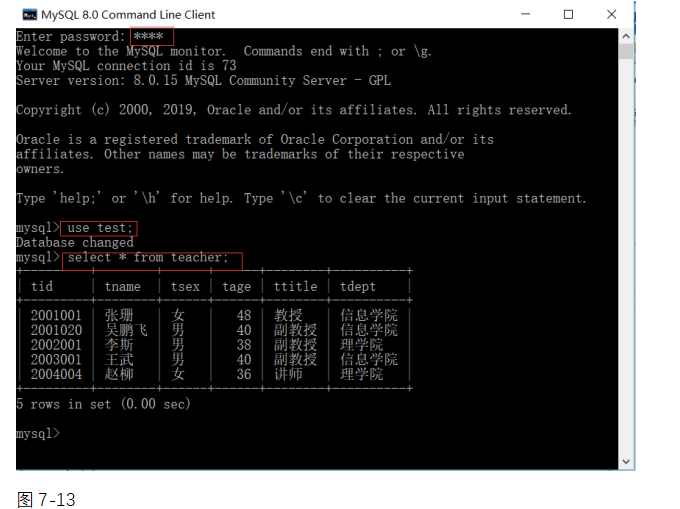
Click "MySQL 8.0 Command Line Client", enter the password "1234", press enter to start mysql, and enter "use test" at the "MySQL >" command prompt Open the database and enter "select * from teacher;" View the basic information table of teachers, as shown in Figure 7-13. (Note: the English colon at the end of SQL language cannot be omitted, otherwise the SQL execution will make an error.)
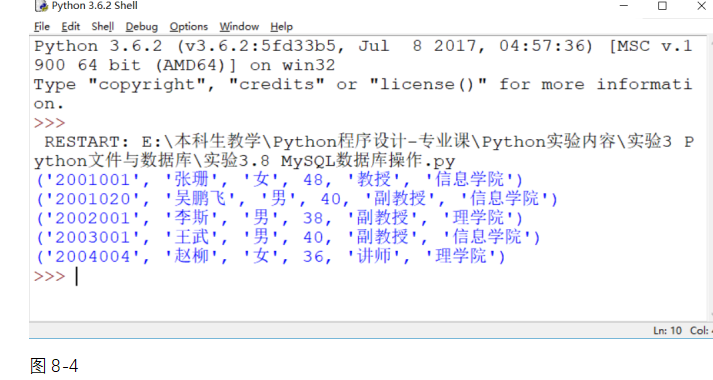
Experiment 3.8: MySQL database operation
Title Description: on the basis of experiment 3.8, complete the data addition, deletion, modification and query operations respectively.
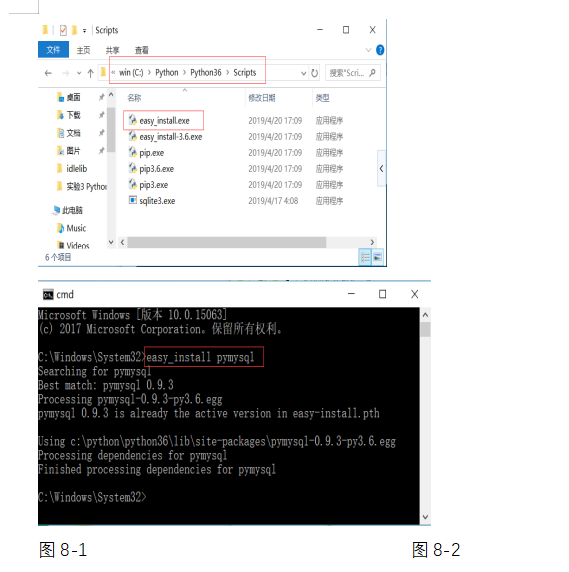
Tip: the corresponding data operation functions are realized through SQL statements insert, delete, update and select. The method of installing pymysql module is shown in Figure 8-1 and 8-2 below.
(1) Set the environment variable Path. Create two new values, such as "C: \ Python \ Python 36 \" and "C: \ Python \ Python 36 \ Scripts \". Then confirm whether the toolkit file easy exists in Scripts, a subdirectory of the python installation directory_ install. exe.
(2) Install the pymysql module. Enter the "cmd" program and run the command "easy_install pymysql". The installed pymysql module file is pymysql-0.9.3-py3 6. Egg, stored in the path "C: \ Python \ python36 \ lib \ site packages \".
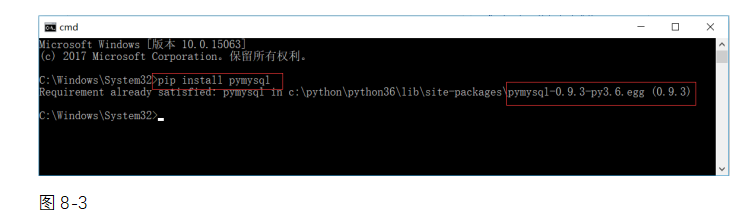
(3) If the Python program makes an error in calling the pymysql database operation function, consider using the pip3 install pymysql command or pip install pymysql command to install the pymysql module. Until the test is successful. As shown in Figure 8-3
(4) The test results of Python operating MySQL data program code are shown in the figure below. As shown in Figure 8-4.
import pymysql

def get_conn():
    conn = pymysql.connect('localhost','root', 'meng520dawn', 'test1',charset="utf-8")
    return conn

def insert_many(sql, args):
    conn = get_conn()
    cur = conn.cursor()
    result = cur.executemany(query=sql, args=args)
    print(result)
    conn.commit()
    cur.close()
    conn.close()
def update(sql,args):
    conn = get_conn()
    cur = conn.cursor()
    result = cur.execute(sql,args)
    print(result)
    conn.commit()
    cur.close()
    conn.close()

def delete(sql,args):
    conn = get_conn()
    cur = conn.cursor()
    result = cur.execute(sql,args)
    print(result)
    conn.commit()
    cur.close()
    conn.close()

def query(sql,args):
    conn = get_conn()
    cur = conn.cursor()
    cur.execute(sql,args)
    results = cur.fetchall()
    print(type(results))  # Returns the < class' tuple '> tuple type

    for row in results:
        print(row)
        id = row[0]
        name = row[1]
        age = row[2]
        print('id: ' + str(id) + '  name: ' + name + '  age: ' + str(age))
        pass

    conn.commit()
    cur.close()
    conn.close()


if __name__ == '__main__':
    sql = 'insert into test_student_table VALUES (%s,%s,%s)'
    args = [(3, 'li', 11), (4, 'sun', 12), (5, 'zhao', 13)]
    insert_many(sql,args)
    sql = 'UPDATE test_student_table SET NAME=%s WHERE id = %s;'
    args = ('zhangsan', 1)
    update(sql, args)
    sql = 'DELETE FROM test_student_table WHERE id = %s;'
    args = (1,) # tuple writing of single element
    delete(sql,args)
    sql = 'SELECT  * FROM test_student_table;'
    query(sql,None)