Some time ago, due to the competition, I didn't have time to write a blog. Now I can finally make up an article. I always wanted to learn some knowledge of NDK development, but I didn't start it. There was an opportunity for NDK related projects. I consulted some materials and recorded some experience and methods I learned here.
In fact, there is another purpose of writing this blog. In the process of searching NDK related learning materials, most of them are developed based on eclipse, so they are somewhat outdated. Now Google recommends using Android studio + cmake for NDK development, so I want to update some knowledge for everyone's learning and reference.
First, let's talk about the development tools and versions
AndroidStudio 2.3.3
NDK 15.1.4
CMake 3.6.4
Genymotion  simulator
1, Introduction to related concepts
1 . What is NDK
NDK is a tool set that allows developers to embed components written in local code in Android applications. Android applications run in the Dalvik virtual machine. NDK allows developers to use local code languages (such as C and C + +) to realize some functions of applications.
The above is an official introduction. Generally speaking, it is a set of tools that help us use C/C + + to complete specific functions in Android applications.
2 . Application scenarios of NDK
It doesn't mean that we should use NDK to develop Android functions in any scenario. Because NDK development increases the development difficulty of the project to a certain extent, we should comprehensively consider various factors and conditions and select NDK to develop Android specific functions in specific scenarios. Here are some scenarios where NDK is applicable.
1 . Important core code protection. because java Layer code is easy to decompile, and C/C++Code disassembly is very difficult, so for important code, you can use C/C++To write, Android Just call it.

2 . Android A third party is required in the C/C++Library. Due to many excellent third-party libraries(such as FFmpeg)All use C/C++If we want to use them, we must pass NDK The way to operate.

3 . It is convenient for code transplantation. For example, we have some core common components(For example, wechat is open-source Mars),You may need to write a set of code to run on multiple platforms(Like in Android and iOS Share a library on),Then you need to choose NDK The way.

4 . For audio and video processing, image processing, which requires a large amount of computation and pursues performance, it also needs to be used NDK.
3 . What is cross compilation
Generally speaking, cross compilation is to produce executable code on one platform on another. For example, we develop drivers for some hardware on the computer, and the final compiled code needs to be used on the hardware. In addition, we compile the C/C + + code into the corresponding library on the computer, and then use it on ARM, x86, mips and other platforms. NDK provides us with cross compilation tools to help us generate the C/C + + code we write into the libraries required by various platforms.
4 . What is jni
The full name of JNI is Java Native Interface, which allows Java language to call other languages and interact with them according to certain rules.
The implementation process of jni is as follows:
*Write java code (. java) -- > * * compile to generate bytecode file (. class) -- > * * generate C header file (. h) -- > * * write jni implementation code (. c) -- > * * compile to link library (. so)
5 . What is a link library
Link library can be simply understood as function library, which is the product generated by the compilation of our C/C + + code for our java to call. At the same time, it is divided into dynamic link library and static link library.
Dynamic link library: the required library is loaded only when the program is running, so the control is flexible and the volume of the whole executable file is small.
Static link library: in the link phase of the program, the referenced code is also packaged in the final executable file. The advantage of this is that it can no longer rely on the environment and is easy to transplant, but it will make the executable file larger. The static link library in Android is a documents.
6 . What is CMake
CMake is an open source cross platform automated construction system, which is implemented through cmakelists Txt to declare the build behavior and control the whole compilation process. We will use it to cooperate with Gradle for related development in the next NDK development.
2, Configure NDK development environment
As the saying goes, if you want to do a good job, you must first sharpen your tools. Next, let's configure some tools we need to use in the process of developing NDK.
1 . Install NDK
Open Android studio, find SDK Tools in the place shown in the figure, check NDK, LLDB and CMake, then click Apply, wait for the download and installation to complete, and then configure the basic development environment.
Install NDK
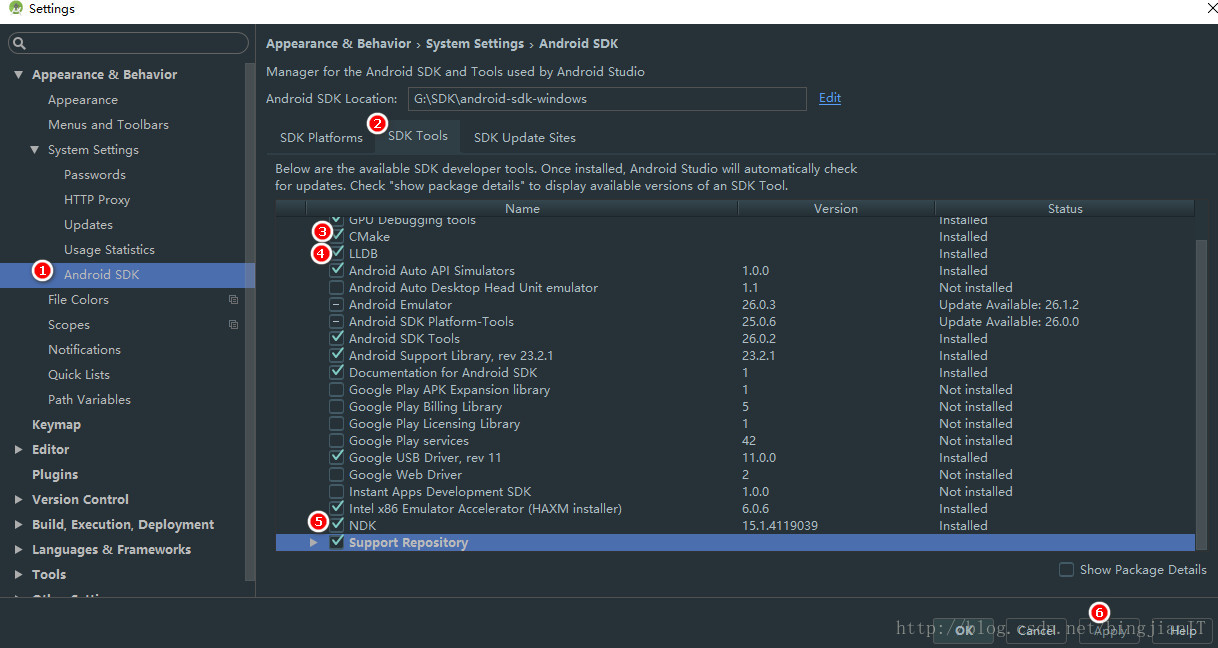
Installed tools NDK and CMake As described above, LLDB It is a product under development NDK The debugger in the process will not be introduced in this blog.
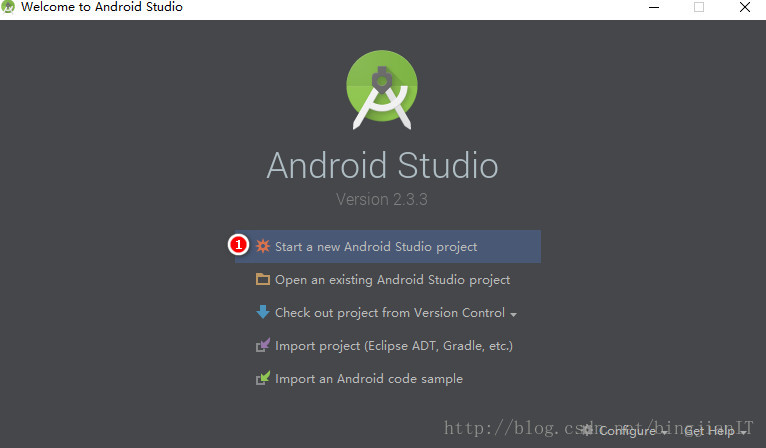
After completing the above steps, we can start our first NDK program.
3, Create the first NDK program
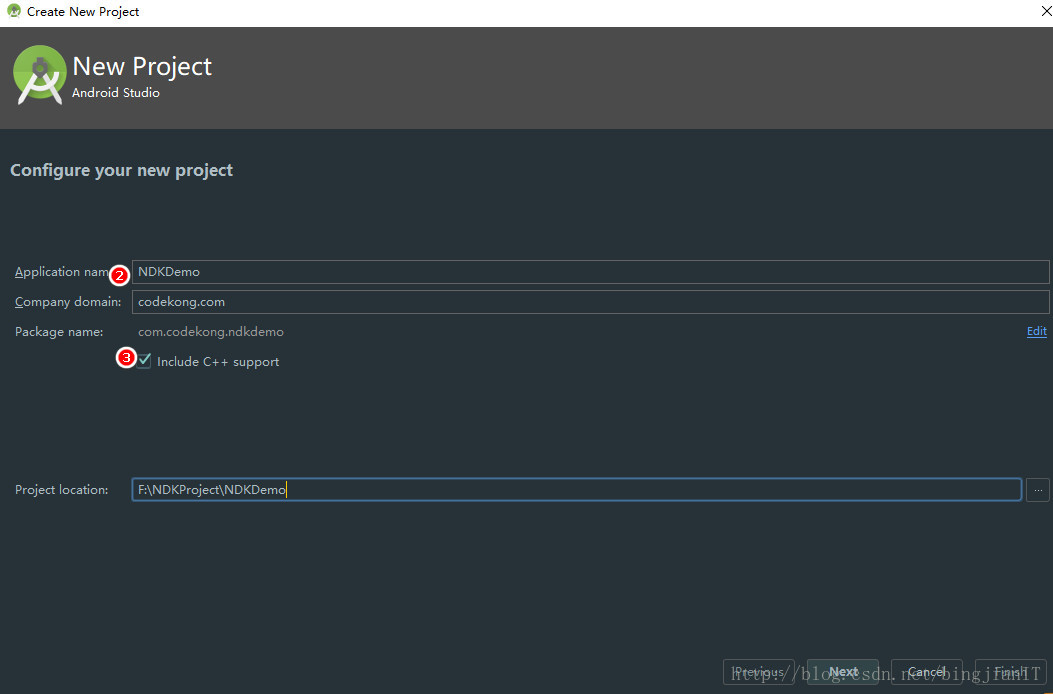
Next, I will explain the new step by adding sequence numbers to the diagram.
1 . Create a new project, fill in the basic information, and remember to check Include C++ support, so that AndroidStudio can generate some default configurations for us.
New project 1
New project 2
2 . The next few steps are to select the default settings
3 . To the last step, as shown in the figure, select Toolchain Default for C++ Standard, and the others remain unchanged.
New project 3

explain:
(a) C++ Standard lets us choose the C + + standard. We use the default CMake setting
(b) Exceptions Support is to add exception handling in C + +. If it is selected, Android Studio will
Add the - fexceptions flag to the module level build In the cppFlags of the Gradle file, Gradle passes it to CMake.
(c) If runtime type information support is enabled to support RTTI, please select this check box. If checked, Android Studio will add the - frtti flag to the module level build In the cppFlags of the Gradle file, Gradle passes it to CMake.
The new project is shown in the figure
New project
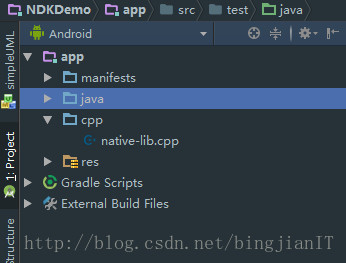
Let's take a look at what Android studio has done for us in this default project:
(1) A new CPP folder is created in the app module to place our C/C + + files. The default file here is native lib cpp
native-lib.cpp file content:
#include <jni.h>
#include <string>

extern "C"
JNIEXPORT jstring JNICALL
Java_com_codekong_ndkdemo_MainActivity_stringFromJNI(
        JNIEnv *env,
        jobject /* this */) {
    std::string hello = "Hello from C++";
    return env->NewStringUTF(hello.c_str());
}
The above code first introduces the fixed header file JNI h. Then, the header file needed in the code is introduced. As for the subsequent return string, we will talk about it later. Now we only need to know that it returns the string Hello from C + +.
The above extern "C" tells the compiler to compile the following code according to the rules of C language
(2) A new cmakelists is created under the app module Txt file is used to define some build behavior
CMakeLists.txt file content:
# For more information about using CMake with Android Studio, read the
# documentation: https://d.android.com/studio/projects/add-native-code.html

# Sets the minimum version of CMake required to build the native library.

cmake_minimum_required(VERSION 3.4.1)

# Creates and names a library, sets it as either STATIC
# or SHARED, and provides the relative paths to its source code.
# You can define multiple libraries, and CMake builds them for you.
# Gradle automatically packages shared libraries with your APK.

add_library( # Sets the name of the library.
             native-lib

             # Sets the library as a shared library.
             SHARED

             # Provides a relative path to your source file(s).
             src/main/cpp/native-lib.cpp )

# Searches for a specified prebuilt library and stores the path as a
# variable. Because CMake includes system libraries in the search path by
# default, you only need to specify the name of the public NDK library
# you want to add. CMake verifies that the library exists before
# completing its build.

find_library( # Sets the name of the path variable.
              log-lib

              # Specifies the name of the NDK library that
              # you want CMake to locate.
              log )

# Specifies libraries CMake should link to your target library. You
# can link multiple libraries, such as libraries you define in this
# build script, prebuilt third-party libraries, or system libraries.

target_link_libraries( # Specifies the target library.
                       native-lib

                       # Links the target library to the log library
                       # included in the NDK.
                       ${log-lib} )
The above contents are annotated, but the most core ones are also a few sentences, which are introduced below:
cmake_minimum_required(VERSION 3.4.1) is used to set the minimum cmake version we need when compiling the local library. Android studio generates it automatically, and we hardly need to manage it ourselves.
add_library( # Sets the name of the library.
             native-lib

             # Sets the library as a shared library.
             SHARED

             # Provides a relative path to your source file(s).
             src/main/cpp/native-lib.cpp )
add_library is used to set the name of the local library generated by compilation as native lib. SHARED means that the dynamic link library is generated by compilation (this concept has been mentioned earlier), Src / main / CPP / native lib CPP represents the path of the file involved in compilation, where multiple file paths can be written.
find_library is used to add some libraries that we need to rely on when compiling our local libraries. Since cmake already knows the path of the system library, we only specify to use the log library here, and then alias the log library log lib for later reference. The log library here is the library that we need to log during later debugging, which is provided by NDK.
target_link_libraries is to associate our own libraries with some third-party libraries or system libraries. Here, we associate our own native lib libraries with log libraries.
(3) In the build.exe corresponding to the app module Some configurations have been added to the gradle file, as follows:
apply plugin: 'com.android.application'

android {
    compileSdkVersion 25
    buildToolsVersion "25.0.3"
    defaultConfig {
        applicationId "com.codekong.ndkdemo"
        minSdkVersion 15
        targetSdkVersion 25
        versionCode 1
        versionName "1.0"
        testInstrumentationRunner "android.support.test.runner.AndroidJUnitRunner"
        externalNativeBuild {
            cmake {
                cppFlags ""
            }
        }
    }
    buildTypes {
        release {
            minifyEnabled false
            proguardFiles getDefaultProguardFile('proguard-android.txt'), 'proguard-rules.pro'
        }
    }
    externalNativeBuild {
        cmake {
            path "CMakeLists.txt"
        }
    }
}

dependencies {
    compile fileTree(dir: 'libs', include: ['*.jar'])
    androidTestCompile('com.android.support.test.espresso:espresso-core:2.2.2', {
        exclude group: 'com.android.support', module: 'support-annotations'
    })
    compile 'com.android.support:appcompat-v7:25.3.1'
    compile 'com.android.support.constraint:constraint-layout:1.0.2'
    testCompile 'junit:junit:4.12'
}
There are two main changes:
(a) The external native build tag is added within the braces of android
externalNativeBuild {
    cmake {
        cppFlags ""
    }
}
The content in cppFlags here is empty. In fact, this is the configuration we mentioned in step (3) when creating a new project. If we check exception support and RTTI support, there will be relevant configuration information here.
(b) Use externalNativeBuild to specify cmakelists Txt file, due to build Gradle files and cmakelists Txt files are in the same directory, so write the file name directly here.
externalNativeBuild {
    cmake {
        path "CMakeLists.txt"
    }
}
(4) Finally in mainactivity In the java file, we can see the function calling process as follows:
public class MainActivity extends AppCompatActivity {

    // Used to load the 'native-lib' library on application startup.
    static {
        System.loadLibrary("native-lib");
    }

    @Override
    protected void onCreate(Bundle savedInstanceState) {
        super.onCreate(savedInstanceState);
        setContentView(R.layout.activity_main);

        // Example of a call to a native method
        TextView tv = (TextView) findViewById(R.id.sample_text);
        tv.setText(stringFromJNI());
    }

    /**
     * A native method that is implemented by the 'native-lib' native library,
     * which is packaged with this application.
     */
    public native String stringFromJNI();
}
We can see that there are three steps:
(a) A local method stringFromJNI() is declared using the native keyword
(b) Use the loadLibrary() method to load the dynamic link library generated by our compilation. Note here that although the name of the dynamic link library generated by us is libnative lib so, but here we only need to write native lib, that is, we are in cmakelists Txt file, where the Lib prefix and so suffix is added for us by the system.
(c) We put a TextView in the layout file, and then put the string returned by the function into the TextView.
Let's compare the native method we declared with the function name of the c + + code generated by our ndk:
//The name of the native method we declared
public native String stringFromJNI();

//The c + + method name generated by ndk for us
JNIEXPORT jstring JNICALL
Java_com_codekong_ndkdemo_MainActivity_stringFromJNI(JNIEnv *env, jobject /* this */)
We see that the method name generated by ndk is based on Java_ Package name is in the form of class name and method name. In fact, this method name is generated with the help of javah.
Note: for the newly created project, you can click build - > make project in the menu bar to compile the project first, and then you can see the generated dynamic link library under < project Directory > \ app \ build \ intermediates \ cmake \ debug \ obj \ armeabi. Since we did not specify what platform so libraries we need to generate, the system helped us generate libraries for each platform and put them under the corresponding folders.
Well, the above is the analysis of the first project we created using Android studio. After understanding the above, we basically understand the general steps of NDK development.
4, Functions commonly used in NDK development
Above, we just looked at the code generated by Android studio for us. We haven't written a line of code by ourselves. Let's start writing code by ourselves. Now let's create a new project by ourselves, mainly learning about string operation and array operation in NDK.
1 . The process of creating a new project has been described in step 3. Creating the first NDK program in the previous step, and will not be repeated here.
2 . Delete the native lib.lib automatically generated by the project for us cpp file, and then create a new Hello lib At this time, Android studio will remind us that this file is not in cmakelists Txt file, so let's change the file as follows:
cmake_minimum_required(VERSION 3.4.1)

add_library(hello-lib
            SHARED
            src/main/cpp/hello-lib.c )

find_library(log-lib
             log )

target_link_libraries(hello-lib
                      ${log-lib} )
Here we put our new Hello lib The path of C is added to cmakelists Txt file, and also associates the log library with our library. Other specific information has been mentioned earlier.
3 . We are at mainactivity A TextView is placed in the layout file corresponding to the java file, and is displayed in mainactivity Get it in Java.
package com.codekong.ndkdemo;

import android.support.v7.app.AppCompatActivity;
import android.os.Bundle;
import android.widget.TextView;

public class MainActivity extends AppCompatActivity {
    @Override
    protected void onCreate(Bundle savedInstanceState) {
        super.onCreate(savedInstanceState);
        setContentView(R.layout.activity_main);

        TextView tv = (TextView) findViewById(R.id.sample_text);
    }
}
4 . Then we are at mainactivity Write a native function sayHelloWorld() in the java file, set the returned string to TextView, and then use loadLibrary to load our custom library.
package com.codekong.ndkdemo;

import android.support.v7.app.AppCompatActivity;
import android.os.Bundle;
import android.widget.TextView;

public class MainActivity extends AppCompatActivity {

    // Used to load the 'native-lib' library on application startup.
    static {
        System.loadLibrary("hello-lib");
    }

    @Override
    protected void onCreate(Bundle savedInstanceState) {
        super.onCreate(savedInstanceState);
        setContentView(R.layout.activity_main);

        TextView tv = (TextView) findViewById(R.id.sample_text);
        //Set the return value to TextView
        tv.setText(sayHelloWorld());
    }

    //Custom native function
    public native String sayHelloWorld();
}
5 . It's time to witness the strength of Android studio. We press and hold Alt+Enter on the sayHelloWorld() function we declared, and the C + + code will be generated automatically. However, there is a problem here. For the first generation, Android studio will create a jni folder, and then create Hello lib C file, and automatically generate the corresponding C code, but because we are in cmakelists Txt is Src / main / CPP / Hello lib c. So let's directly use our Src / main / jni / Hello lib Copy the code in C to Src / main / CPP / Hello lib C, and delete the jni directory. hello-lib. The contents in C are as follows:
#include <jni.h>

JNIEXPORT jstring JNICALL
Java_com_codekong_ndkdemo_MainActivity_sayHelloWorld(JNIEnv *env, jobject instance) {

    return (*env)->NewStringUTF(env, "Hello World");
}
In the above code, we get the pointer to the jni environment, then call the NewStringUTF() method to import the env pointer and the string we need.
Run the program and you can see Hello World displayed on the interface.
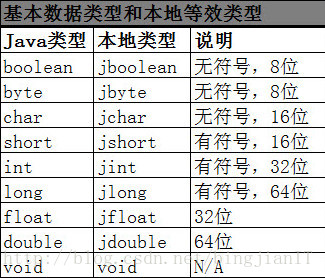
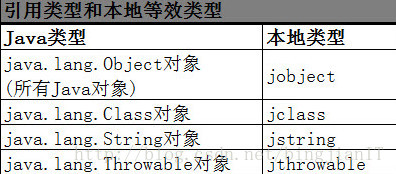
Let's start by looking at the correspondence between types in java and native types:
Basic data type
reference type
Array type
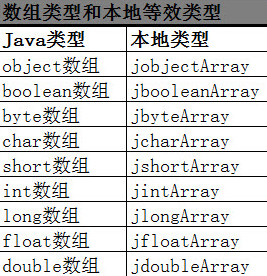
It can be seen that the type correspondence above is very clear. In fact, we are in JNI The above definition can be seen in the H file.
Let's talk about the use of strings and arrays
(1) Use of strings
In fact, the new project above has demonstrated the example of returning a string, using (* Env) - > newString UTF (Env, "Hello world"); You can return the string result. Let's see how to handle the string passed in by Java. Write the string passed in from Java to the file through jni.
(a) Add the following code to the Mainactivity
public native void writeFile(String filePath);
(b) In Hello lib The following code is generated in C
JNIEXPORT void JNICALL
Java_com_codekong_ndkdemo_MainActivity_writeFile(JNIEnv *env, jobject instance, jstring filePath_) {
    const char *filePath = (*env)->GetStringUTFChars(env, filePath_, 0);
    (*env)->ReleaseStringUTFChars(env, filePath_, filePath);
}
The above is the code generated by Android studio. You can see that it mainly uses (* Env) - > getstringutfchars (Env, filepath_0); To convert the string passed in from java into the char pointer of C language, and finally use (* Env) - > releasestringutfchars (Env, filepath_, filepath); Release the space pointed to by our pointer.
(c) On this basis, we can write a small example of writing to a file. The code is as follows:
JNIEXPORT void JNICALL
Java_com_codekong_ndkdemo_MainActivity_writeFile(JNIEnv *env, jobject instance, jstring filePath_) {
    const char *filePath = (*env)->GetStringUTFChars(env, filePath_, 0);

    FILE *file = fopen(filePath, "a+");

    char data[] = "I am a boy";
    int count = fwrite(data, strlen(data), 1, file);
    if (file != NULL) {
        fclose(file);
    }
    (*env)->ReleaseStringUTFChars(env, filePath_, filePath);
}
Remember to add header file for the above code
#include <jni.h>
#include <stdio.h>
#include <string.h>
(d) Also remember in Android mainfest Add file read and write permissions to the XML file, and then in mainactivity Calling native method in Java
static {
    System.loadLibrary("hello-lib");
}

@Override
protected void onCreate(Bundle savedInstanceState) {
    super.onCreate(savedInstanceState);
    setContentView(R.layout.activity_main);

    String filePath = "/mnt/sdcard/boys.txt";
    Toast.makeText(MainActivity.this, filePath, Toast.LENGTH_SHORT).show();
    updateFile(filePath);
}
Note: since I use the Genymotion simulator here, writing the file path in that way means the root directory of the file manager.
Running the above program, you can find boys. Com in the root directory of the file manager Txt and find the string we wrote.
(2) Use of arrays
Now let's see how we use arrays in jni.
There are two main methods for array operation (we still use the Hello lib. C file we just tested here):
(a) Directly manipulate array pointers.
Let's now look at mainactivity Java and hello lib Code in C file
public class MainActivity extends AppCompatActivity {
    private static final String TAG = "MainActivity";

    @Override
    protected void onCreate(Bundle savedInstanceState) {
        super.onCreate(savedInstanceState);
        setContentView(R.layout.activity_main);

        int[] testData = new int[]{1, 2, 3, 4, 5};
        for (int i = 0; i < testData.length; i++) {
            Log.d(TAG, "testData: origin " + testData[i]);
        }
        //test
        operationArray(testData);

        for (int i = 0; i < testData.length; i++) {
            Log.d(TAG, "testData: after " + testData[i]);
        }
        //Declaration method
        public native void operationArray(int[] args);
        static {
            //Loading and warehousing
            System.loadLibrary("hello-lib");
        }
}
After the above code is written, we still use the Alt+Enter shortcut to generate our c language code, as follows:
JNIEXPORT void JNICALL
Java_com_codekong_ndkdemo_MainActivity_operationArray(JNIEnv *env, jobject instance,
                                                      jintArray args_) {
    //Get array pointer
    jint *args = (*env)->GetIntArrayElements(env, args_, NULL);
    //Get array length
    jint len = (*env)->GetArrayLength(env, args_);
    int i = 0;
    for (; i < len; ++i) {
        ++args[i];
    }
    //release
    (*env)->ReleaseIntArrayElements(env, args_, args, 0);
}
End result: each element in the array is incremented by 1
The above is actually very easy to understand. You can check the notes.
(b) Copy the incoming array first, and then copy the data back to the original array after the operation
This time it's the same as the above, but we have changed a way to operate arrays in C + +
//Declare our local method, and the rest of the code is consistent with the above
public native void operationArray2(int[] args);

int[] testData2 = new int[]{1, 2, 3, 4, 5};
for (int i = 0; i < testData2.length; i++) {
    Log.d(TAG, "testData2: origin " + testData2[i]);
}

operationArray2(testData2);
for (int i = 0; i < testData2.length; i++) {
    Log.d(TAG, "testData2: afetr " + testData2[i]);
}
JNIEXPORT void JNICALL
Java_com_codekong_ndkdemo_MainActivity_operationArray2(JNIEnv *env, jobject instance,
                                                       jintArray args_) {
    //Declare an array of native layers to copy the original array
    jint nativeArray[5];
    //Copy the passed in jintArray array to nativeArray
    (*env)->GetIntArrayRegion(env, args_, 0, 5, nativeArray);
    int i = 0;
    for (; i < 5; ++i) {
        //Add 5 to each element
        nativeArray[i] += 5;
    }

    //Copy the results of the operation back to jintArray
    (*env)->SetIntArrayRegion(env, args_, 0, 5, nativeArray);
}
End result: add 5 to each element in the array
Note: the return value of the above two methods is void, that is to say, our changes to the array eventually change the value of the original array.
5, NDK custom configuration
Now let's talk about the most common configuration methods in NDK. Here are also records for your future reference
1 . Add multiple C/C + + files participating in compilation
First of all, we found that our above examples all involve a C + + file, so our actual project cannot have only one C + + file, so we must first change cmakelists Txt file, as follows:
add_library( HelloNDK
             SHARED
             src/main/cpp/HelloNDK.c
             src/main/cpp/HelloJNI.c)
It's simple and clear, but it should be noted here that you must pay attention to the current cmakelists when writing the path Txt in the project. The above path is relative to cmakelists Txt.
2 . We want to compile multiple so libraries
You will find that we write above because there is only one cmakelists Txt file, so we will compile all C/C + + files into one so library, which is very inappropriate. Here we try to learn how to compile multiple so libraries.
Put the structure diagram of my project folder first:
Folder structure
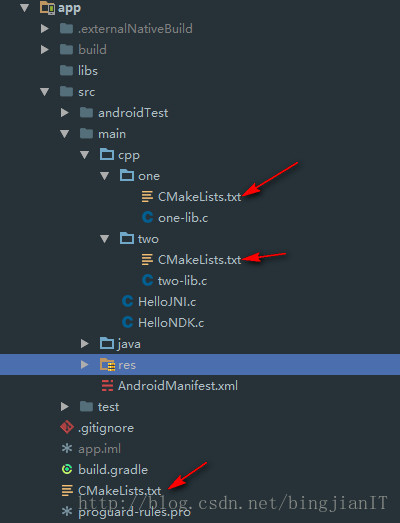
Then look at each of our cmakelists Txt file is written:
Cmakelists. In the one folder Txt file contents:
ADD_LIBRARY(one-lib SHARED one-lib.c)

target_link_libraries(one-lib log)
Cmakelists. In the two folder Txt file contents:
ADD_LIBRARY(two-lib SHARED two-lib.c)

target_link_libraries(two-lib log)
Cmakelists. In the app directory Txt file
# Sets the minimum version of CMake required to build the native library.

cmake_minimum_required(VERSION 3.4.1)

add_library( HelloNDK
             SHARED
             src/main/cpp/HelloNDK.c
             src/main/cpp/HelloJNI.c)
find_library( # Sets the name of the path variable.
              log-lib
              # Specifies the name of the NDK library that
              # you want CMake to locate.
              log )
target_link_libraries(HelloNDK log)
ADD_SUBDIRECTORY(src/main/cpp/one)
ADD_SUBDIRECTORY(src/main/cpp/two)
Through the above configuration, we can see that cmakelists The configuration of TXT file supports inheritance, so we only write the configuration of different special configuration items in the sub configuration file, and finally configure the path of the sub configuration file in the top-level file. Now compile the project, and we will see the generated dynamic link library under < project Directory > \ app \ build \ intermediates \ cmake \ debug \ obj \ armeabi. And three dynamic link libraries
3 . Change the directory generated by the dynamic link library
Did we find that the path of the so Library above is too deep and difficult to find? It's OK. It can be configured. We only need to set it in the cmakelists on the top level Txt file, just add the following sentence
#Set the path of the last output of the generated so dynamic library
set(CMAKE_LIBRARY_OUTPUT_DIRECTORY ${PROJECT_SOURCE_DIR}/src/main/jniLibs/${ANDROID_ABI})
Then we can see the jniLibs directory under app/src/main, where we can see the folders and files of our dynamic link library (the default path of the system is directly configured here. If other paths are configured, we need to specify jinLibs.srcDirs = ['newDir '] in the gradle file).
6, NDK error debugging
In the process of development, we will inevitably encounter bug s. What should we do? Log. Let's talk about the posture of log playing and log viewing.
1 . log in C/C + + files
(1) Adding header files to C/C + + files
#include <android/log.h>
The above is the header file of the print log, which must be added
(2) Add macro definition and TAG for print log
//log definition
#Define LOG "jnilog" / / this is the TAG of the user-defined LOG
#define  LOGD(...)  __android_log_print(ANDROID_LOG_DEBUG,LOG,__VA_ARGS__) //  Define logd type
#define  LOGI(...)  __android_log_print(ANDROID_LOG_INFO,LOG,__VA_ARGS__) //  Define logi type
#define  LOGW(...)  __android_log_print(ANDROID_LOG_WARN,LOG,__VA_ARGS__) //  Define logw type
#define LOGE(...)  __android_log_print(ANDROID_LOG_ERROR,LOG,__VA_ARGS__) //  Define loge type
#define LOGF(...)  __android_log_print(ANDROID_LOG_FATAL,LOG,__VA_ARGS__) //  Define logf type
The above log level corresponds to the log in Android.
(3) After the above two steps, we can print the log
int len = 5;
LOGE("I am log %d", len);
Now we can see our printed logs in logcat.
2 . View error message
First, we write an error manually. We find a function in the above C file and write the following code:
int * p = NULL;
*p = 100;
The above is a null pointer exception. We run the program and find that it crashes. Then we check the console. There is only the following line of information:
libc: Fatal signal 11 (SIGSEGV), code 1, fault addr 0x0 in tid 17481
I can't understand the above information at all. Well, this is not obvious. Let's learn how to make the above information clear
We need the ndk stack tool, which is in our ndk root directory. It can help us convert the above information into more understandable and detailed error reporting information. Let's see how to do it:
(1) Open the command line in Android studio and enter ADB logcat > log txt
In the above sentence, we use the adb command to capture the log and write it to the log Txt file, and then we can see log.txt in the root directory of the project Txt file
(2) Log Txt open and see the error message as follows:
F/libc    (17481): Fatal signal 11 (SIGSEGV), code 1, fault addr 0x0 in tid 17481 (dekong.ndkdemo1)

I/DEBUG   (   67): *** *** *** *** *** *** *** *** *** *** *** *** *** *** *** ***

I/DEBUG   (   67): Build fingerprint: 'generic/vbox86p/vbox86p:5.0/LRX21M/genymotion08251046:userdebug/test-keys'

I/DEBUG   (   67): Revision: '0'

I/DEBUG   (   67): ABI: 'x86'

I/DEBUG   (   67): pid: 17481, tid: 17481, name: dekong.ndkdemo1  >>> com.codekong.ndkdemo1 <<<

I/DEBUG   (   67): signal 11 (SIGSEGV), code 1 (SEGV_MAPERR), fault addr 0x0

I/DEBUG   (   67):     eax 00000000  ebx f3494fcc  ecx ffa881a0  edx 00000000

I/DEBUG   (   67):     esi f434e2b0  edi 00000000

I/DEBUG   (   67):     xcs 00000023  xds 0000002b  xes 0000002b  xfs 00000007  xss 0000002b

I/DEBUG   (   67):     eip f3492a06  ebp ffa88318  esp ffa88280  flags 00210246

I/DEBUG   (   67):

I/DEBUG   (   67): backtrace:

I/DEBUG   (   67):     #00 pc 00000a06  /data/app/com.codekong.ndkdemo1-2/lib/x86/libHelloNDK.so (Java_com_codekong_ndkdemo1_MainActivity_updateFile+150)

I/DEBUG   (   67):     #01 pc 0026e27b  /data/dalvik-cache/x86/data@app@com.codekong.ndkdemo1-2@base.apk@classes.dex

I/DEBUG   (   67):     #02 pc 9770ee7d  <unknown>

I/DEBUG   (   67):     #03 pc a4016838  <unknown>

I/DEBUG   (   67):

I/DEBUG   (   67): Tombstone written to: /data/tombstones/tombstone_05
Now we still can't understand the error message, so we need to use NDK stack to convert:
(3) Continue to enter the following command on the command line in Android studio (before that, we must add the path of NDK stack to the environment variable so that we can use it directly on the command line)
ndk-stack -sym app/build/intermediates/cmake/debug/obj/x86 -dump ./log.txt
The parameter after - sym above is the path of your corresponding platform (I am Genymotion simulator, x86 platform). If you change the path according to the above steps, you need to write the changed path. The parameter after - dump is the log obtained in the previous step Txt file. The execution results are as follows:
********** Crash dump: **********
Build fingerprint: 'generic/vbox86p/vbox86p:5.0/LRX21M/genymotion08251046:userdebug/test-keys'
pid: 17481, tid: 17481, name: dekong.ndkdemo1  >>> com.codekong.ndkdemo1 <<<
signal 11 (SIGSEGV), code 1 (SEGV_MAPERR), fault addr 0x0
Stack frame I/DEBUG   (   67):     #00 pc 00000a06  /data/app/com.codekong.ndkdemo1-2/lib/x86/libHelloNDK.so (Java_com_codekon
g_ndkdemo1_MainActivity_updateFile+150): Routine Java_com_codekong_ndkdemo1_MainActivity_updateFile at F:\AndroidFirstCode\NDK
Demo1\app\src\main\cpp/HelloJNI.c:32
Stack frame I/DEBUG   (   67):     #01 pc 0026e27b  /data/dalvik-cache/x86/data@app@com.codekong.ndkdemo1-2@base.apk@classes.d
ex
Stack frame I/DEBUG   (   67):     #02 pc 9770ee7d  <unknown>: Unable to open symbol file app/build/intermediates/cmake/debug/
obj/x86/<unknown>. Error (22): Invalid argument
Stack frame I/DEBUG   (   67):     #03 pc a4016838  <unknown>: Unable to open symbol file app/build/intermediates/cmake/debug/
obj/x86/<unknown>. Error (22): Invalid argument
Crash dump is completed
Especially the above sentence:
g_ndkdemo1_MainActivity_updateFile+150): Routine Java_com_codekong_ndkdemo1_MainActivity_updateFile at F:\AndroidFirstCode\NDK
Demo1\app\src\main\cpp/HelloJNI.c:32
It accurately points out the number of lines where the error occurred, which is convenient for us to locate the error.
Well, the above is a brief introduction to the debugging skills.
7, Postscript
Finally, I've finished writing. There are a lot of contents this time, but they are all simple introductory knowledge. I've just come into contact. I hope to deepen my understanding through summary and write to help people in need. I sincerely hope I can help others. Don't spray. Give more advice on mistakes.
Reproduced at: https://www.jianshu.com/p/dc2c57070f0f