Using private data in Fabric
This tutorial will demonstrate how to use collections to store and retrieve private data on authorized Peer nodes in the blockchain network.
This tutorial requires that you have mastered private data storage and how to use it. For more information, see private data.
annotation
This tutorial uses the new chain code lifecycle operations in Fabric-2.0. If you want to use private data in previous versions, see v1 Version 4 tutorial using private data in Fabric< https://hyperledger-Fabric.readthedocs.io/en/release-1.4/private_data_tutorial.html >__.
- Create a JSON file for the collection definition
- Use chain code API to read and write private data
- Install and define a chain code with a collection
- Store private data
- Authorizing nodes to query private data
- Unauthorized node to query private data
- Clear private data
- Use private data index
- Other resources
This tutorial will use the marble private data sample in the Fabric Building Your First Network (BYFN) tutorial network to demonstrate how to create, deploy, and use a private data set. You should first complete the fabric installation, binary, and Docker images.
Create a JSON file for the collection definition
The first step in using private data in a channel is to define a collection to determine access to private data.
The definition of this set describes who can save data, how many nodes the data should be distributed to, how many nodes are needed for data distribution, and the saving time of private data in the private database. After that, we will show the interface of chain code: PutPrivateData and GetPrivateData map the collection to private data to ensure its security.
The collection definition consists of the following attributes:
- Name: the name of the collection.
- policy: defines which Peer nodes in an organization can store collection data.
- requiredPeerCount: the number of nodes to distribute private data, which is one of the conditions for successful chain code endorsement.
- maxPeerCount: the amount of data that the current endorsement node will attempt to distribute to other nodes for data redundancy. If the current endorsement node fails, other redundant nodes can undertake the task of private data query.
- blockToLive: for very sensitive information, such as price or personal information, this value represents the time that the library can save in the private database. The data will be saved in blockToLive blocks in the private database, and then it will be cleared. If you want to keep it permanently, set this value to 0.
- memberOnlyRead: when set to true, the node will automatically force clients in the member organizations defined in the collection to have only read-only permissions on private data.
To illustrate the usage of private data, the marble private data example contains two private data collection definitions: collectionMarbles and collectionMarblePrivateDetails. The policy property in the collectionMarbles definition allows all members of the channel (Org1 and Org2) to save private data in a private database. The collectionMarbles privatedetails collection allows only members of Org1 to save private data in their private database.
For more information about the policy attribute, see endorsement policy.
// collections_config.json

[
  {
       "name": "collectionMarbles",
       "policy": "OR('Org1MSP.member', 'Org2MSP.member')",
       "requiredPeerCount": 0,
       "maxPeerCount": 3,
       "blockToLive":1000000,
       "memberOnlyRead": true
  },

  {
       "name": "collectionMarblePrivateDetails",
       "policy": "OR('Org1MSP.member')",
       "requiredPeerCount": 0,
       "maxPeerCount": 3,
       "blockToLive":3,
       "memberOnlyRead": true
  }
]
The data protected by these policies will be mapped in the chain code, which will be explained in the second half of this tutorial.
When the chain code is submitted to the channel using the peer lifecycle chaincode commit command, the collection definition file will also be deployed to the channel. See Section 3 below for more information.
Use chain code API to read and write private data
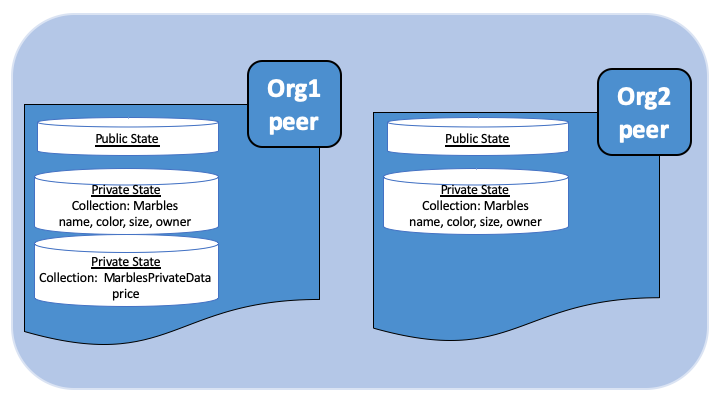
Next, you will understand the privatization of data in the channel by building data definitions in the chain code. The marble private data example splits the private data into two data definitions for Data permission control.
// Peers in Org1 and Org2 will have this private data in a side database
type marble struct {
  ObjectType string `json:"docType"`
  Name       string `json:"name"`
  Color      string `json:"color"`
  Size       int    `json:"size"`
  Owner      string `json:"owner"`
}

// Only peers in Org1 will have this private data in a side database
type marblePrivateDetails struct {
  ObjectType string `json:"docType"`
  Name       string `json:"name"`
  Price      int    `json:"price"`
}
Access to private data will follow the following policies:
- All members in the name, color, size, and owner channels are visible (Org1 and Org2)
- price is only visible to members in Org1
There are two different private data definitions in the marble example. These data and the collection policy of restricting access rights will be controlled by the chain code interface. Specifically, you need to use GetPrivateData() and PutPrivateData() interfaces to read and write private data with collection definitions. You can find them here.
The following figure illustrates the private data model used in the marble private data example.
Read collection data
Use the chain code API GetPrivateData() to access private data in the database. GetPrivateData() has two parameters, collection name and data key. Again, collectionMarbles allows members of Org1 and Org2 to save private data in the side database, and collectionMarblePrivateDetails only allows Org1 to save private data in the side database. For details about the implementation of the interface, please see the marble private data method:
- readMarble is used to query the name, color, size and owner attributes
- readMarblePrivateDetails is used to query the price attribute
In the following tutorial, these two methods will be used when querying the database with the peer command.
Write private data
Use the chain code interface PutPrivateData() to save private data to the private database. The interface requires a collection name. Since the marble private data example contains two different private data sets, this interface will be called twice in the chain code:
- Use collection marbles to write private data name, color, size, and owner.
- Use collectionMarblePrivateDetails to write private data price.
For example, in the initMarble method fragment of the chain code, PutPrivateData() is called twice, once for each private data.
// ==== Create marble object, marshal to JSON, and save to state ====
      marble := &marble{
              ObjectType: "marble",
              Name:       marbleInput.Name,
              Color:      marbleInput.Color,
              Size:       marbleInput.Size,
              Owner:      marbleInput.Owner,
      }
      marbleJSONasBytes, err := json.Marshal(marble)
      if err != nil {
              return shim.Error(err.Error())
      }

      // === Save marble to state ===
      err = stub.PutPrivateData("collectionMarbles", marbleInput.Name, marbleJSONasBytes)
      if err != nil {
              return shim.Error(err.Error())
      }

      // ==== Create marble private details object with price, marshal to JSON, and save to state ====
      marblePrivateDetails := &marblePrivateDetails{
              ObjectType: "marblePrivateDetails",
              Name:       marbleInput.Name,
              Price:      marbleInput.Price,
      }
      marblePrivateDetailsBytes, err := json.Marshal(marblePrivateDetails)
      if err != nil {
              return shim.Error(err.Error())
      }
      err = stub.PutPrivateData("collectionMarblePrivateDetails", marbleInput.Name, marblePrivateDetailsBytes)
      if err != nil {
              return shim.Error(err.Error())
      }
To sum up, in the above collection The policy defined in JSON allows all members in Org1 and Org2 to store and trade private data name, color, size and owner in their private database. However, only members in Org1 can store and trade price.
Another advantage of data privatization is that when using a collection, only the hash value of the private data will pass through the sorting node, and the data itself will not participate in the sorting. This ensures the confidentiality of private data to sorting nodes.
Start network
Now we're going to use some commands on how to use private data.
Try it yourself
Before installing, defining, and using the marble private data sample chain code, we need to start the Fabric test network. In order for you to use this tutorial correctly, we will start from a known initialization state. The next command will stop all running Docker containers on your host and clear the previously generated components. So we run the following command to clear the previous environment.
cd fabric-samples/test-network
./network.sh down
If you haven't run this tutorial before, you need to download the dependencies required by the chain code before we deploy the chain code. Run the following command:
cd ../chaincode/marbles02_private/go
GO111MODULE=on go mod vendor
cd ../../../test-network
If you have run this tutorial before, you also need to delete the Docker container of the previous marbles private data link code. Run the following command:
docker rm -f $(docker ps -a | awk '($2 ~ /dev-peer.*.marblesp.*/) {print $1}')
docker rmi -f $(docker images | awk '($1 ~ /dev-peer.*.marblesp.*/) {print $3}')
In the test network directory, you can start the Fabric test network using CouchDB with the following command:
./network.sh up createChannel -s couchdb
This command will deploy a Fabric network, including a channel named mychannel and two organizations (each with a Peer node). The Peer node will use CouchDB as the state database. Private data sets can be used with the default LevelDB and CouchDB. We choose CouchDB to demonstrate how to use the index of private data.
annotation
In order to ensure the normal operation of private data sets, it is necessary to correctly configure the gossip communication between organizations. Please refer to the document "mission data propagation Protocol". Special attention should be paid to the chapter "anchor peers". This tutorial does not focus on the mission, which has been configured in the test network. However, when we configure the channel, whether the anchor node of the mission is configured correctly affects the normal operation of the private dataset.
Install and define a chain code with a collection
The client application interacts with the blockchain ledger through the chain code. Therefore, we need to install chain codes on each node and use them to execute and endorse our transactions. However, before we interact with the chain code, the members in the channel need to agree on the definition of the chain code to establish the governance of the chain code, including the definition of the private data set of the chain. We will use the commands: peer lifecycle chaincode package, install, and define the chain code on the channel.
The chain code needs to be packaged before being installed to the Peer node. We can use the Peer lifecycle chain package command to package the marble chain code.
The test network consists of two organizations, Org1 and Org2, each with a node. Therefore, the chain code package should be installed on two nodes:
- peer0.org1.example.com
- peer0.org2.example.com
After the chain code is packaged, we can use the peer lifecycle chain install command to install the marble chain code on each node.
Try it yourself
If you have successfully started the test network, copy and paste the following environment variables into your CLI to interact with the test network as an Org1 administrator. Make sure you are in the test network directory.
export PATH=${PWD}/../bin:$PATH
export FABRIC_CFG_PATH=$PWD/../config/
export CORE_PEER_TLS_ENABLED=true
export CORE_PEER_LOCALMSPID="Org1MSP"
export CORE_PEER_TLS_ROOTCERT_FILE=${PWD}/organizations/peerOrganizations/org1.example.com/peers/peer0.org1.example.com/tls/ca.crt
export CORE_PEER_MSPCONFIGPATH=${PWD}/organizations/peerOrganizations/org1.example.com/users/Admin@org1.example.com/msp
export CORE_PEER_ADDRESS=localhost:7051
- Pack the marble private data link code with the following command.
peer lifecycle chaincode package marblesp.tar.gz --path ../chaincode/marbles02_private/go/ --lang golang --label marblespv1
This command will generate a chain code package file marblesp tar. gz.
- Use the following command on node peer0 org1. example. Com.
peer lifecycle chaincode install marblesp.tar.gz
After successful installation, the chain code ID will be returned, similar to the following response:
2019-04-22 19:09:04.336 UTC [cli.lifecycle.chaincode] submitInstallProposal -> INFO 001 Installed remotely: response:<status:200 payload:"\nKmarblespv1:57f5353b2568b79cb5384b5a8458519a47186efc4fcadb98280f5eae6d59c1cd\022\nmarblespv1" >
2019-04-22 19:09:04.336 UTC [cli.lifecycle.chaincode] submitInstallProposal -> INFO 002 Chaincode code package identifier: marblespv1:57f5353b2568b79cb5384b5a8458519a47186efc4fcadb98280f5eae6d59c1cd
- Now switch to the Org2 administrator in the CLI. Copy and paste the following code into your command line window and run it:
export CORE_PEER_LOCALMSPID="Org2MSP"
export CORE_PEER_TLS_ROOTCERT_FILE=${PWD}/organizations/peerOrganizations/org2.example.com/peers/peer0.org2.example.com/tls/ca.crt
export CORE_PEER_MSPCONFIGPATH=${PWD}/organizations/peerOrganizations/org2.example.com/users/Admin@org2.example.com/msp
export CORE_PEER_ADDRESS=localhost:9051
- Install the chain code on the node of Org2 with the following command:
peer lifecycle chaincode install marblesp.tar.gz
Approval chain code definition
If members in each channel want to use chain code, they need to approve chain code definitions for their organization. Since both organizations in this tutorial need to use chain code, we need to use peer lifecycle chain code approveformyorg to approve chain code definitions for Org1 and Org2. The chain code definition also contains the definition of private data sets, which are all in marbles 02_ In the private example. We will use the -- collections config parameter to indicate the path of the private dataset JSON file.
Try it yourself
Run the following command in the test network directory to define the approval chain code for Org1 and Org2.
- Use the following command to query the ID of the chain code package installed on the node.
peer lifecycle chaincode queryinstalled
This command will return the same chain code package ID as the installation command, and you will see the following output information:
Installed chaincodes on peer:
Package ID: marblespv1:f8c8e06bfc27771028c4bbc3564341887881e29b92a844c66c30bac0ff83966e, Label: marblespv1
- Declare the package ID as an environment variable. Paste the package ID returned by the peer lifecycle chain queryinstalled command into the command below. The package ID is different among different users, so your ID may be different from that in this tutorial, so you need to use the package ID returned from your terminal to complete this step.
export CC_PACKAGE_ID=marblespv1:f8c8e06bfc27771028c4bbc3564341887881e29b92a844c66c30bac0ff83966e
- To ensure that we are running the CLI as Org1. Copy and paste the following information into the node container and execute:
export CORE_PEER_LOCALMSPID="Org1MSP"
export CORE_PEER_TLS_ROOTCERT_FILE=${PWD}/organizations/peerOrganizations/org1.example.com/peers/peer0.org1.example.com/tls/ca.crt
export CORE_PEER_MSPCONFIGPATH=${PWD}/organizations/peerOrganizations/org1.example.com/users/Admin@org1.example.com/msp
export CORE_PEER_ADDRESS=localhost:7051
- Approve the marble private data link code definition of Org1 with the following command. This command contains the path to a collection file. export
ORDERER_CA=${PWD}/organizations/ordererOrganizations/example.com/orderers/orderer.example.com/msp/tlscacerts/tlsca.example.com-cert.pem
peer lifecycle chaincode approveformyorg -o localhost:7050 --ordererTLSHostnameOverride orderer.example.com --channelID mychannel --name marblesp --version 1.0 --collections-config ../chaincode/marbles02_private/collections_config.json --signature-policy "OR('Org1MSP.member','Org2MSP.member')" --package-id $CC_PACKAGE_ID --sequence 1 --tls --cafile $ORDERER_CA
After the command is successfully completed, you will receive a return message similar to the following:
2020-01-03 17:26:55.022 EST [chaincodeCmd] ClientWait -> INFO 001 txid [06c9e86ca68422661e09c15b8e6c23004710ea280efda4bf54d501e655bafa9b] committed with status (VALID) at
- Convert the CLI to Org2. Copy and paste the following information into the node container and execute:
export CORE_PEER_LOCALMSPID="Org2MSP"
export CORE_PEER_TLS_ROOTCERT_FILE=${PWD}/organizations/peerOrganizations/org2.example.com/peers/peer0.org2.example.com/tls/ca.crt
export CORE_PEER_MSPCONFIGPATH=${PWD}/organizations/peerOrganizations/org2.example.com/users/Admin@org2.example.com/msp
export CORE_PEER_ADDRESS=localhost:9051
- Now you can define the following for Org2 approval chain code:
peer lifecycle chaincode approveformyorg -o localhost:7050 --ordererTLSHostnameOverride orderer.example.com --channelID mychannel --name marblesp --version 1.0 --collections-config ../chaincode/marbles02_private/collections_config.json --signature-policy "OR('Org1MSP.member','Org2MSP.member')" --package-id $CC_PACKAGE_ID --sequence 1 --tls --cafile $ORDERER_CA
Submit chain code definition
When most members of an organization approve the chain code definition, the organization can submit the chain code definition to the channel.
Use the peer lifecycle chaincode commit command to submit the chain code definition. This command will also deploy the private data collection to the channel.
After the chain code definition is submitted to the channel, we can use the chain code. Because the marble private data example contains an initialization method, we need to use the peer chaincode invoke command to call the Init() method before calling other methods in the chain code.
Try it yourself
Run the following command to submit the marble private data example chain code definition to the mychannel channel channel.
Try it yourself
 export ORDERER_CA=${PWD}/organizations/ordererOrganizations/example.com/orderers/orderer.example.com/msp/tlscacerts/tlsca.example.com-cert.pem
   export ORG1_CA=${PWD}/organizations/peerOrganizations/org1.example.com/peers/peer0.org1.example.com/tls/ca.crt
   export ORG2_CA=${PWD}/organizations/peerOrganizations/org2.example.com/peers/peer0.org2.example.com/tls/ca.crt
   peer lifecycle chaincode commit -o localhost:7050 --ordererTLSHostnameOverride orderer.example.com --channelID mychannel --name marblesp --version 1.0 --sequence 1 --collections-config ../chaincode/marbles02_private/collections_config.json --signature-policy "OR('Org1MSP.member','Org2MSP.member')" --tls --cafile $ORDERER_CA --peerAddresses localhost:7051 --tlsRootCertFiles $ORG1_CA --peerAddresses localhost:9051 --tlsRootCertFiles $ORG2_CA
After the submission is successful, you will see the following output information:
2020-01-06 16:24:46.104 EST [chaincodeCmd] ClientWait -> INFO 001 txid [4a0d0f5da43eb64f7cbfd72ea8a8df18c328fb250cb346077d91166d86d62d46] committed with status (VALID) at localhost:9051
2020-01-06 16:24:46.184 EST [chaincodeCmd] ClientWait -> INFO 002 txid [4a0d0f5da43eb64f7cbfd72ea8a8df18c328fb250cb346077d91166d86d62d46] committed with status (VALID) at localhost:7051
Store private data
Members of Org1 have been authorized to use all private data in the marble private data example for transactions, switch back to the Org1 node and submit a request to add a marble:
Try it yourself
In the test network directory of CLI, copy and paste the following command:
export CORE_PEER_LOCALMSPID="Org1MSP"
export CORE_PEER_TLS_ROOTCERT_FILE=${PWD}/organizations/peerOrganizations/org1.example.com/peers/peer0.org1.example.com/tls/ca.crt
export CORE_PEER_MSPCONFIGPATH=${PWD}/organizations/peerOrganizations/org1.example.com/users/Admin@org1.example.com/msp
export CORE_PEER_ADDRESS=localhost:7051
Calling the initMarble method will create a marble with private data. The marble name is marble1, the owner is tom, the color is blue, the size is 35 and the price is 99. Again, the private data price will be stored separately from the private data name, owner, color and size. Therefore, the initMarble method will call the PutPrivateData() interface twice to store private data. Also note that the -- transient parameter is used when passing private data. As a transient input, it will not be recorded in the transaction, so as to ensure the privacy of the data. Transient data is transmitted in binary, so Base64 encoding must be used in CLI. We set an environment variable to get the base64 encoded value, and use the tr command to remove the line break added by the linux base64 command.
export MARBLE=$(echo -n "{\"name\":\"marble1\",\"color\":\"blue\",\"size\":35,\"owner\":\"tom\",\"price\":99}" | base64 | tr -d \\n)
peer chaincode invoke -o localhost:7050 --ordererTLSHostnameOverride orderer.example.com --tls --cafile ${PWD}/organizations/ordererOrganizations/example.com/orderers/orderer.example.com/msp/tlscacerts/tlsca.example.com-cert.pem -C mychannel -n marblesp -c '{"Args":["InitMarble"]}' --transient "{\"marble\":\"$MARBLE\"}"
You will see output results similar to the following:
[chaincodeCmd] chaincodeInvokeOrQuery->INFO 001 Chaincode invoke successful. result: status:200
Authorizing nodes to query private data
Our set definition allows all members of Org1 and Org2 to save name, color, size and owner private data in their side database, but only members of Org1 can save price private data in their side database. As an authorized Org1 node, we can query two private data sets.
The first query command calls the readMarble method and passes collectionMarbles as a parameter.
// ===============================================
// readMarble - read a marble from chaincode state
// ===============================================

func (t *SimpleChaincode) readMarble(stub shim.ChaincodeStubInterface, args []string) pb.Response {
     var name, jsonResp string
     var err error
     if len(args) != 1 {
             return shim.Error("Incorrect number of arguments. Expecting name of the marble to query")
     }

     name = args[0]
     valAsbytes, err := stub.GetPrivateData("collectionMarbles", name) //get the marble from chaincode state

     if err != nil {
             jsonResp = "{\"Error\":\"Failed to get state for " + name + "\"}"
             return shim.Error(jsonResp)
     } else if valAsbytes == nil {
             jsonResp = "{\"Error\":\"Marble does not exist: " + name + "\"}"
             return shim.Error(jsonResp)
     }

     return shim.Success(valAsbytes)
}
The second query command calls the readMarblePrivateDetails method and passes collectionMarblePrivateDetails as a parameter.
// ===============================================
// readMarblePrivateDetails - read a marble private details from chaincode state
// ===============================================

func (t *SimpleChaincode) readMarblePrivateDetails(stub shim.ChaincodeStubInterface, args []string) pb.Response {
     var name, jsonResp string
     var err error

     if len(args) != 1 {
             return shim.Error("Incorrect number of arguments. Expecting name of the marble to query")
     }

     name = args[0]
     valAsbytes, err := stub.GetPrivateData("collectionMarblePrivateDetails", name) //get the marble private details from chaincode state

     if err != nil {
             jsonResp = "{\"Error\":\"Failed to get private details for " + name + ": " + err.Error() + "\"}"
             return shim.Error(jsonResp)
     } else if valAsbytes == nil {
             jsonResp = "{\"Error\":\"Marble private details does not exist: " + name + "\"}"
             return shim.Error(jsonResp)
     }
     return shim.Success(valAsbytes)
}
Now Try it yourself
Use the members of Org1 to query the private data name, color, size and owner of marble1. Note that since the query operation will not leave a record on the ledger, it is not necessary to pass in the marble name in a transient manner.
peer chaincode query -C mychannel -n marblesp -c '{"Args":["ReadMarble","marble1"]}'
You will see the following output results:
{"color":"blue","docType":"marble","name":"marble1","owner":"tom","size":35}
Query for the price private data of marble1 as a member of Org1.
peer chaincode query -C mychannel -n marblesp -c '{"Args":["ReadMarblePrivateDetails","marble1"]}'
You will see the following output results:
{"docType":"marblePrivateDetails","name":"marble1","price":99}
Unauthorized node to query private data
Now we will switch to the members of org2. Org2 stores private data name, color, size and owner in the side database, but does not store the price data of marbles. Let's query two private data sets at the same time.
Switch to Org2's node
Run the following command to operate as an Org2 administrator and query the Org2 node:
Try it yourself
export CORE_PEER_LOCALMSPID="Org2MSP"
export CORE_PEER_TLS_ROOTCERT_FILE=${PWD}/organizations/peerOrganizations/org2.example.com/peers/peer0.org2.example.com/tls/ca.crt
export CORE_PEER_MSPCONFIGPATH=${PWD}/organizations/peerOrganizations/org2.example.com/users/Admin@org2.example.com/msp
export CORE_PEER_ADDRESS=localhost:9051
Try it yourself
Query Org2 authorized private data
The node of Org2 should have access to the first private dataset (name, color, size and owner). You can use the readMarble() method, which uses the collectionMarbles parameter.
Try it yourself
peer chaincode query -C mychannel -n marblesp -c '{"Args":["ReadMarble","marble1"]}'
You will see output results similar to the following:
{"docType":"marble","name":"marble1","color":"blue","size":35,"owner":"tom"}
Query Org2 unauthorized private data
There is no price data in the side database of Org2 node. When you try to query this data, it will return the hash value of the corresponding key in the public state, but it will not return the private state.
Try it yourself
peer chaincode query -C mychannel -n marblesp -c '{"Args":["ReadMarblePrivateDetails","marble1"]}'
You will see output results similar to the following:
Error: endorsement failure during query. response: status:500
message:"{\"Error\":\"Failed to get private details for marble1:
GET_STATE failed: transaction ID: d9c437d862de66755076aeebe79e7727791981606ae1cb685642c93f102b03e5:
tx creator does not have read access permission on privatedata in chaincodeName:marblesp collectionName: collectionMarblePrivateDetails\"}"
Members of Org2 will only see the public hash of private data.
Clear private data
For some cases, private data only needs to be saved in the ledger and copied in the database under the chain. We can "clear" the data after passing a certain number of blocks, and only save the hash of the data as the evidence that the transaction cannot be tampered with.
Private data may contain private or confidential information, such as the price data in our example, which the trading partner does not want other organizations in the channel to know. Moreover, it has a limited life cycle and can be cleared after a fixed number of blocks according to the blockToLive property in the collection definition.
The blockToLive value defined in our collectionMarblePrivateDetails is 3, indicating that the data will be saved in the side database for three blocks, and then it will be cleared. Put all the contents together. Recall the private data set collectionMarblePrivateDetails bound with private data price. In the function initMarble(), when PutPrivateData() API is called and the parameter collectionMarblePrivateDetails is passed.
We will add blocks to the chain, Then, let's take a look at the process of clearing the price information by executing four new transactions (creating a new marble and then transferring three marbles). In the process of adding a new transaction, four new blocks will be added to the chain. After the fourth transaction is completed (after the third marble is transferred), we will verify whether the private price data has been cleared.
Try it yourself
Use the following command to switch to Org1. Copy and paste the following set of commands to the node container and execute:
export CORE_PEER_LOCALMSPID="Org1MSP"
export CORE_PEER_TLS_ROOTCERT_FILE=${PWD}/organizations/peerOrganizations/org1.example.com/peers/peer0.org1.example.com/tls/ca.crt
export CORE_PEER_MSPCONFIGPATH=${PWD}/organizations/peerOrganizations/org1.example.com/users/Admin@org1.example.com/msp
export CORE_PEER_ADDRESS=localhost:7051
Open a new terminal window and view the private data log on this node by running the following command. Note the current block height.
docker logs peer0.org1.example.com 2>&1 | grep -i -a -E 'private|pvt|privdata'
Go back to the node container and use the following command to query the price data of marble1 (the query will not generate a new transaction).
peer chaincode query -C mychannel -n marblesp -c '{"Args":["ReadMarblePrivateDetails","marble1"]}'
You will see results similar to the following:
{"docType":"marblePrivateDetails","name":"marble1","price":99}
The price data still exists on the private database.
Execute the following command to create a new marble2. This transaction will create a new block in the chain.
export MARBLE=$(echo -n "{\"name\":\"marble2\",\"color\":\"blue\",\"size\":35,\"owner\":\"tom\",\"price\":99}" | base64 | tr -d \\n)
peer chaincode invoke -o localhost:7050 --ordererTLSHostnameOverride orderer.example.com --tls --cafile ${PWD}/organizations/ordererOrganizations/example.com/orderers/orderer.example.com/msp/tlscacerts/tlsca.example.com-cert.pem -C mychannel -n marblesp -c '{"Args":["InitMarble"]}' --transient "{\"marble\":\"$MARBLE\"}"
Switch back to the terminal window again and view the private data log of the node. You will see that the block height has increased by 1.
docker logs peer0.org1.example.com 2>&1 | grep -i -a -E 'private|pvt|privdata'
Return to the node container and run the following command to query the price data of marble1:
peer chaincode query -C mychannel -n marblesp -c '{"Args":["ReadMarblePrivateDetails","marble1"]}'
The private data has not been cleared, and the query results have not changed:
{"docType":"marblePrivateDetails","name":"marble1","price":99}
Run the following command to transfer marble2 to "joe". This transaction will add a second block to the chain.
export MARBLE_OWNER=$(echo -n "{\"name\":\"marble2\",\"owner\":\"joe\"}" | base64 | tr -d \\n)
peer chaincode invoke -o localhost:7050 --ordererTLSHostnameOverride orderer.example.com --tls --cafile ${PWD}/organizations/ordererOrganizations/example.com/orderers/orderer.example.com/msp/tlscacerts/tlsca.example.com-cert.pem -C mychannel -n marblesp -c '{"Args":["TransferMarble"]}' --transient "{\"marble_owner\":\"$MARBLE_OWNER\"}"
Switch back to the terminal window again and view the private data log of the node. You will see that the block height has increased by 1.
docker logs peer0.org1.example.com 2>&1 | grep -i -a -E 'private|pvt|privdata'
Return to the node container and run the following command again to query the price data of marble1:
peer chaincode query -C mychannel -n marblesp -c '{"Args":["ReadMarblePrivateDetails","marble1"]}'
You can still see the price.
{"docType":"marblePrivateDetails","name":"marble1","price":99}
Run the following command to transfer marble2 to "tom". This transaction will add a third block to the chain.
export MARBLE_OWNER=$(echo -n "{\"name\":\"marble2\",\"owner\":\"tom\"}" | base64 | tr -d \\n)
peer chaincode invoke -o localhost:7050 --ordererTLSHostnameOverride orderer.example.com --tls --cafile ${PWD}/organizations/ordererOrganizations/example.com/orderers/orderer.example.com/msp/tlscacerts/tlsca.example.com-cert.pem -C mychannel -n marblesp -c '{"Args":["TransferMarble"]}' --transient "{\"marble_owner\":\"$MARBLE_OWNER\"}"
Switch back to the terminal window again and view the private data log of the node. You will see that the block height has increased by 1.
docker logs peer0.org1.example.com 2>&1 | grep -i -a -E 'private|pvt|privdata'
Return to the node container and run the following command again to query the price data of marble1:
peer chaincode query -C mychannel -n marblesp -c '{"Args":["ReadMarblePrivateDetails","marble1"]}'
You can still see the price data.
{"docType":"marblePrivateDetails","name":"marble1","price":99}
Finally, run the following command to transfer marble2 to "jerry". This transaction will add a fourth block to the chain. After this transaction, price private data will be cleared.
export MARBLE_OWNER=$(echo -n "{\"name\":\"marble2\",\"owner\":\"jerry\"}" | base64 | tr -d \\n)
peer chaincode invoke -o localhost:7050 --ordererTLSHostnameOverride orderer.example.com --tls --cafile ${PWD}/organizations/ordererOrganizations/example.com/orderers/orderer.example.com/msp/tlscacerts/tlsca.example.com-cert.pem -C mychannel -n marblesp -c '{"Args":["TransferMarble"]}' --transient "{\"marble_owner\":\"$MARBLE_OWNER\"}"
Switch back to the terminal window again and view the private data log of the node. You will see that the block height has increased by 1.
docker logs peer0.org1.example.com 2>&1 | grep -i -a -E 'private|pvt|privdata'
Return to the node container and run the following command again to query the price data of marble1:
peer chaincode query -C mychannel -n marblesp -c '{"Args":["ReadMarblePrivateDetails","marble1"]}'
Because the price data has been cleared, you can't query it. You should see results similar to the following:
Error: endorsement failure during query. response: status:500
message:"{\"Error\":\"Marble private details does not exist: marble1\"}"
Use private data index
You can use the index meta-inf / statedb / CouchDB / collections / < collection in the package chain code directory_ Name > / indexes directory, which also uses indexes for private data sets. Here is an example of an available index.
When deploying the chain code in the production environment, it is recommended to define all indexes in the chain code directory, so that when the chain code is installed and initialized on the node in the channel, it can be automatically deployed as a unit. When -- collections config is used to identify the JSON file path of the private dataset, the relevant indexes will be deployed automatically when the channel chain code is initialized.
Other resources
Here is an additional private data learning tool video.
annotation
This video uses an older version of the lifecycle model to install private data sets.