1. Introduction to fastdfs
FastDFS is an open source distributed file system. It manages files. Its functions include file storage, file synchronization and file synchronization
Access (file upload, file download) and so on, which solves the problems of mass storage and load balancing. It is especially suitable for online service with document as carrier
Services, such as photo album website, video website, etc.
FastDFS server has two roles: tracker and storage node. The tracker is mainly used for scheduling
Access plays a role of load balancing. The storage node stores files and completes all the functions of file management: storage, synchronization and providing access interface.
FastDFS also manages the meta data of files. The so-called meta data of a file is the related attributes of the file, which are represented by key value pairs
value pair), for example: width=1024, where key is width and value is 1024. The file meta data belongs to the file
Sex list, which can contain multiple key value pairs. The FastDFS system structure is shown in the following figure:
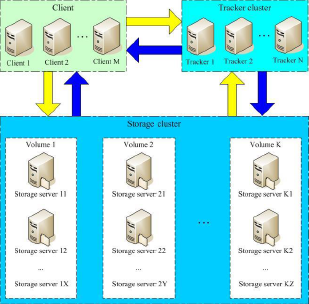
Both the tracker and the storage node can consist of one or more servers.
Servers in the tracker and storage nodes can be added or offline at any time without affecting online services. All servers in the tracker are peer-to-peer, which can be increased or decreased at any time according to the pressure of the server.
In order to support large capacity, storage nodes (servers) adopt the organization mode of volume (or grouping).
The storage system consists of one or more volumes. The files between volumes are independent of each other. The file capacity of all volumes is the file capacity of the whole storage system.
A volume can be composed of one or more storage servers. The files in the storage servers under a volume are the same. Multiple storage servers in the volume play the role of redundant backup and load balancing.
When the system automatically switches the newly added file to the existing server after the synchronization is completed.
When the storage space is insufficient or running out, you can add volumes dynamically. Just add one or more servers and configure them as a new volume, which expands the capacity of the storage system.
File identification in FastDFS is divided into two parts: volume name and file name, both of which are indispensable.
2. Related terms
Tracker Server: a tracking server, which is mainly used for scheduling and load balancing in access. Record the status of the storage server, which is the hub connecting the Client and the storage server.
Storage Server: Storage Server. Files and meta data are saved to the Storage Server
Group: a group, also known as a volume. The files on the servers in the same group are identical
File identification: includes two parts: group name and file name (including path)
meta data: file related attributes, Key Value Pair method, such as width = 1024, height = 768
3. Synchronization mechanism
- Storage servers in the same group are peer-to-peer, and file upload, deletion and other operations can be carried out on any storage server;
- File synchronization is only conducted between storage server s in the same group. push mode is adopted, that is, the source server is synchronized to the target server;
- Only the source data needs to be synchronized, and the backup data does not need to be synchronized again, otherwise it will form a loop;
- An exception to the second rule above is that when a new storage server is added, the existing storage server synchronizes all the existing data (including source data and backup data) to the new server.
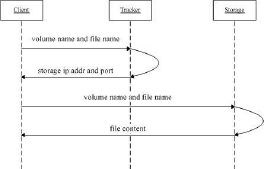
4. FastDFS upload file interaction process
-
The client asks about the storage uploaded by the tracker, and no additional parameters are required;
-
The tracker returns an available storage;
-
client communicates directly with storage to complete file upload.
The client initiates the file transfer action of FastDFS by connecting to the designated end of a Tracker Server
The Tracker Server decides which Storage Server to choose according to the information it has so far, and then
The address and other information of the Storage Server are returned to the client, and then the client connects to the Storage Server through these information,
Transfer the file to be uploaded to the Storage Server.
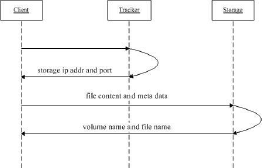
5. FastDFS download file interaction process
-
The client asks the tracker to download the storage of the file. The parameter is the file ID (volume name and file name);
-
The tracker returns an available storage;
-
client communicates directly with storage to complete file download.
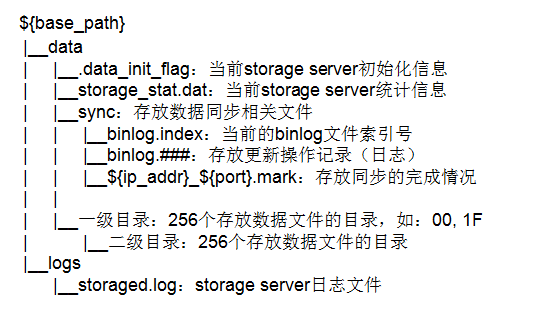
6. Runtime directory structure
6.1 Tracker server
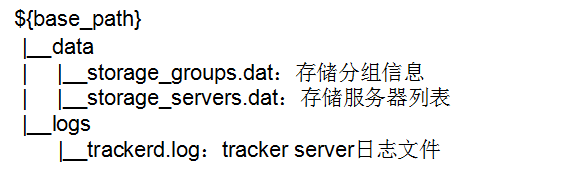
6.2 Storage server
7. Online resources
8. Single node installation mode
The Tracker server and the Storage server perform the same operation
8.1 dependent packages required for compilation and installation
[root@localhost ~]# yum install make cmake gcc gcc-c++
8.2 installing libfastcommon
-
Upload or download libfastcommon master Zip to / usr/local/src directory
-
decompression
[root@localhost ~]# cd /usr/local/src
[root@localhost src]# unzip libfastcommon-master.zip
[root@localhost src]# cd libfastcommon-master
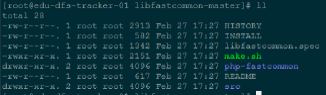
- Compilation and installation
[root@localhost libfastcommon-master]# ./make.sh
[root@localhost libfastcommon-master]# ./make.sh install
libfastcommon is installed by default to:
/usr/lib64/libfastcommon.so
/usr/lib64/libfdfsclient.so
- Because the Lib directory set by FastDFS main program is / usr/local/lib, you need to create a soft link
ln -s /usr/lib64/libfastcommon.so /usr/local/lib/libfastcommon.so
ln -s /usr/lib64/libfastcommon.so /usr/lib/libfastcommon.so
ln -s /usr/lib64/libfdfsclient.so /usr/local/lib/libfdfsclient.so
ln -s /usr/lib64/libfdfsclient.so /usr/lib/libfdfsclient.so
8.3 installing FastDFS
- Upload or download the FastDFS source package (FastDFS_v5.05.tar.gz) to the / usr/local/src directory
- decompression
# cd /usr/local/src/
# tar -zxvf FastDFS_v5.05.tar.gz
# cd FastDFS
- Compile and install (make sure libfastcommon is successfully installed before compiling)
# ./make.sh
# ./make.sh install
The default installation method is adopted. The corresponding files and directories after installation are as follows:
A. Service script in:
/etc/init.d/fdfs_storaged
/etc/init.d/fdfs_tracker
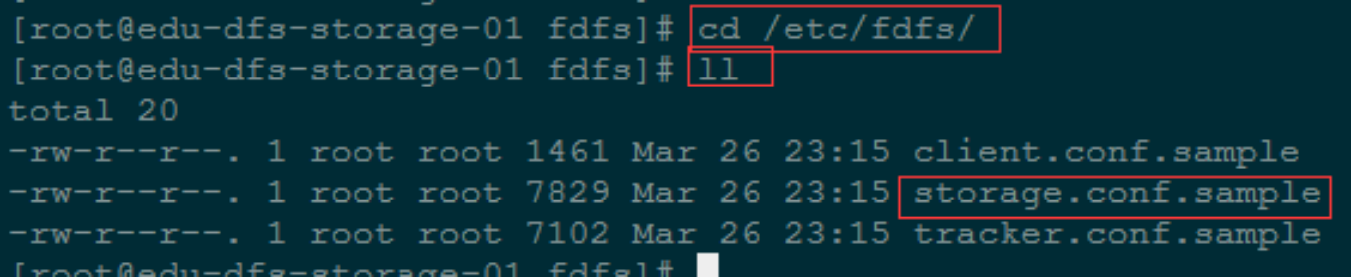
B. Configuration file (sample configuration file):
/etc/fdfs/client.conf.sample
/etc/fdfs/storage.conf.sample
/etc/fdfs/tracker.conf.sample
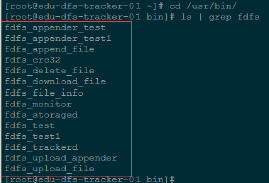
C. Command tool in / usr/bin / Directory:
fdfs_appender_test
fdfs_appender_test1
fdfs_append_file
fdfs_crc32
fdfs_delete_file
fdfs_download_file
fdfs_file_info
fdfs_monitor
fdfs_storagedfdfs_test
fdfs_test1
fdfs_trackerd
fdfs_upload_appender
fdfs_upload_file
stop.sh
restart.sh
-
Because the bin directory set by the FastDFS service script is / usr/local/bin, but the actual command is installed in / usr/bin, which can be accessed
/The user/bin directory uses the following commands to view the commands related to fdfs:
# cd /usr/bin/
# ls | grep fdfs
Therefore, you need to modify the corresponding command path in the FastDFS service script, that is, / etc / init d/fdfs_ storaged
And / etc / init d/fdfs_ / usr/local/bin in the two scripts of tracker is modified to / usr/bin:
# vi fdfs_trackerd
Use the find replace command for unified modification (vi/vim command):
%s+/usr/local/bin+/usr/bin
# vi fdfs_storaged
Use the find replace command to modify uniformly:
%s+/usr/local/bin+/usr/bin
8.4 configure tracker
-
Copy the FastDFS tracker sample configuration file and rename it
# cd /etc/fdfs/

# cp tracker.conf.sample tracker.conf
- To edit a tracker profile:
# vi /etc/fdfs/tracker.conf
Amend the following:
disabled=false
port=22122
base_path=/fastdfs/tracker
Other parameters remain the default configuration.
- Create basic data directory (refer to the configuration of basic directory base_path)
mkdir -p /fastdfs/tracker
- Open the tracker port in the firewall (22122 set)
firewall-cmd --zone=public --add-port=22122/tcp --permanent
firewall-cmd --reload
firewall-cmd --list-prots #Check whether the port is opened successfully
Setting mode under CentOS6 (iptables firewall mode)
vi /etc/sysconfig/iptables
#Add the following port line:
-A INPUT -m state --state NEW -m tcp -p tcp --dport 22122 -j ACCEPT
 Restart firewall:
service iptables restart
- Start Tracker tracking server
/etc/init.d/fdfs_trackerd start
After successful startup for the first time, data and logs directories will be created in / fastdfs/tracker directory
Check whether FastDFS Tracker has started successfully:
ps -ef | grep fdfs

- Turn off the Tracker tracking server
/etc/init.d/fdfs_trackerd stop
-
Set FastDFS tracker startup:
vi /etc/rc.d/rc.local
Add the following:
/etc/init.d/fdfs_trackerd start
8.5 configuration memory
-
Copy the FastDFS storage sample configuration file and rename:
cd /etc/fdfs/
# cp storage.conf.sample storage.conf
-
Edit storage sample configuration file
# vi /etc/fdfs/storage.conf
Amend the following:
disabled=false
port=23000
base_path=/fastdfs/storage
store_path0=/fastdfs/storage
tracker_server=192.168.4.121:22122 #Tracking server address and port
http.server_port=8888
Other parameters remain the default configuration.
-
Create basic data directory (refer to basic directory base_path configuration)
mkdir -p /fastdfs/storage
-
Open storage port in firewall (23000 by default)
firewall-cmd --zone=public --add-port=23000/tcp --permanent
firewall-cmd --reload
firewall-cmd --list-ports #Check whether the port is opened successfully
Setting mode under CentOS6 (iptables firewall mode)
vi /etc/sysconfig/iptables
#Add the following port line:
-A INPUT -m state --state NEW -m tcp -p tcp --dport 23000 -j ACCEPT
 Restart firewall:
service iptables restart
-
Start the Storage server
# /etc/init.d/fdfs_storaged start
After successful startup for the first time, data and logs directories will be created in / fastdfs/tracker directory
Check whether FastDFS Tracker has started successfully:
ps -ef | grep fdfs

-
Shut down the Storage server
/etc/init.d/fdfs_storaged stop
-
Set the FastDFS storage server to boot
# vi /etc/rc.d/rc.local
Add the following line:
/etc/init.d/fdfs_storaged start
9. File upload test
-
Modify the client configuration file in the Tracker server
cp /etc/fdfs/client.conf.sample /etc/fdfs/client.conf
vi /etc/fdfs/client.conf
base_path=/fastdfs/tracker
tracker_server=192.168.4.121:22122
-
Execute the file upload command:
# /usr/bin/fdfs_upload_file /etc/fdfs/client.conf /usr/local/src/FastDFS_v5.05.tar.gz
Return ID No.: group1 / M00 / 00 / 00 / wkgefvuynyeab7xfaavfol7fju4 tar. gz
If the above file ID can be returned, it indicates that the file has been uploaded successfully.
10. Install nginx on each storage node
-
Function description of fastdfs nginx module
FastDFS adopt Tracker The server,Place files in Storage Server storage, but the same group of storage servers need to enter file replication, which has the problem of synchronization delay. hypothesis Tracker The server uploaded the file to 192.168.4.125,Files uploaded successfully ID Has been returned to the client. here FastDFS The storage cluster mechanism will synchronize this file to the same storage group 192.168.4.126,When the file has not been copied, if the client uses this file ID At 192.168.4.126 Fetch file,There will be an error that the file cannot be accessed. and fastdfs-nginx-module You can redirect files and connect to the source server to fetch files,Avoid file inaccessibility errors caused by client replication delays.
(the extracted fastdfs nginx module is used during nginx installation)
-
Upload fastdfs nginx module_ v1. 16.tar. GZ to / usr/local/src
-
Perform decompression
cd /usr/local/src/
tar -zxvf fastdfs-nginx-module_v1.16.tar.gz
-
Modify the config configuration file of fastdfs nginx module
# cd fastdfs-nginx-module/src
# vi config
CORE_INCS="$CORE_INCS /usr/local/include/fastdfs /usr/local/include/fastcommon/"
Amend to read:
CORE_INCS="$CORE_INCS /usr/include/fastdfs /usr/include/fastcommon/"
(Note: this path modification is very important, otherwise nginx (errors will be reported during compilation)
-
Upload Nginx(nginx-1.6.2.tar.gz) to / usr/local/src directory
-
Install dependent packages required to compile Nginx
yum install gcc gcc-c++ make automake autoconf libtool pcre* zlib openssl openssl-devel
-
Compile and install Nginx (add fastdfs Nginx module)
cd /usr/local/src/
tar -zxvf nginx-1.6.2.tar.gz
cd nginx-1.6.2
./configure --add-module=/usr/local/src/fastdfs-nginx-module/src
make && make install
-
Copy the configuration file in the fastdfs nginx module source code to the / etc/fdfs directory and modify it
cp /usr/local/src/fastdfs-nginx-module/src/mod_fastdfs.conf /etc/fdfs/
vi /etc/fdfs/mod_fastdfs.conf

Modify the following configuration:
connect_timeout=10
base_path=/tmp
tracker_server=192.168.4.121:22122
storage_server_port=23000
group_name=group1
url_have_group_name = true
store_path0=/fastdfs/storage
-
Copy some configuration files of FastDFS to / etc/fdfs directory
cd /usr/local/src/FastDFS/conf
cp http.conf mime.types /etc/fdfs/
-
Create a soft connection under the / fastdfs/storage file storage directory and link it to the directory where the data is actually stored
ln -s /fastdfs/storage/data/ /fastdfs/storage/data/M00
-
Configure Nginx
Simple version nginx configuration example:
user root;
worker_processes 1;
events {
	worker_connections 1024;
}
http {
	include mime.types;
	default_type application/octet-stream;
	sendfile on;
	keepalive_timeout 65;
	server {
		listen 8888;
		server_name localhost;
		location ~/group([0-9])/M00 {
			#alias /fastdfs/storage/data;
			ngx_fastdfs_module;
		}
		error_page 500 502 503 504 /50x.html;
		location = /50x.html {
			root html;
		}
	}
}
Note and Description:
A,8888 The port value is to be associated with/etc/fdfs/storage.conf Medium http.server_port=8888 Corresponding, because http.server_port The default is 8888,If you want to change it to 80, you should modify it accordingly. B,Storage There are multiple correspondences group In case of, access path band group Name, such as/group1/M00/00/00/xxx, Corresponding Nginx Configured as: location ~/group([0-9])/M00 { ngx_fastdfs_module; } C,If 404 error is found during downloading, the nginx.conf first line user nobody Change to user root Restart after -
Open the 8888 port of Nginx in the firewall
firewall-cmd --zone=public --add-port=8888/tcp --permanent
firewall-cmd --reload
firewall-cmd --list-ports #Check whether the port is opened successfully
Setting mode under CentOS6 (iptables firewall mode)
vi /etc/sysconfig/iptables
#Add the following port line:
-A INPUT -m state --state NEW -m tcp -p tcp --dport 8888 -j ACCEPT
 Restart firewall:
service iptables restart
-
Start Nginx
/usr/local/nginx/sbin/nginx
(the command to restart Nginx is: / usr/local/nginx/sbin/nginx -s reload)
-
Access the files uploaded during the test through the browser
http://192.168.4.125:8888/group1/M00/00/00/wKgEfVUYNYeAb7XFAAVFOL7FJU4.tar.gz
Note: never use the kill -9 command to forcibly kill the FastDFS process, otherwise binlog data may be lost