In this paper, the original reprint has been appropriately modified through the deployment guide.
1, Prepare
1. Hardware
Prepare at least a 12 core CPU, 24G memory, 1T hard disk (preferably SSD) and a network with no less than 10MB to access the Internet. (it's better to meet the above conditions, otherwise even if there is no problem with the installation, it may not run).
2. Software
Xshell and VMware Workstation 16 Pro, download addresses of these two software: https://pan.baidu.com/s/1j6j4n4TMlxxvtSFb-r_G5A Extraction code: 52bv
Centos, download address:
http://vault.centos.org/7.5.1804/isos/x86_64/CentOS-7-x86_64-DVD-1804.iso
2, Installing VMWare virtual machines
Download and install the VMWare software from the network disk address I gave, and activate it by yourself. If you have any questions, ask Du Niang.
After installation, click "edit → virtual network editor", as shown below:
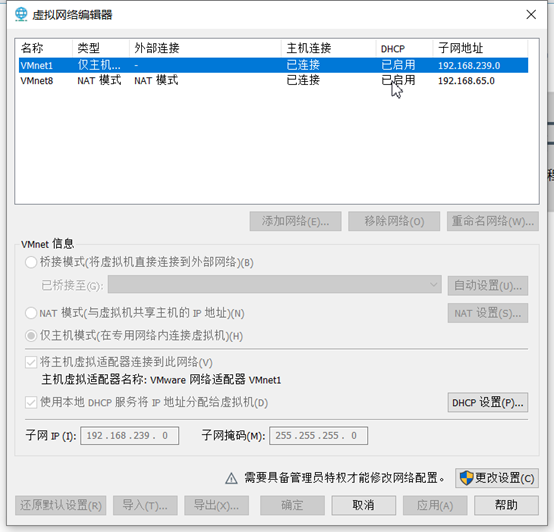
Find gateway
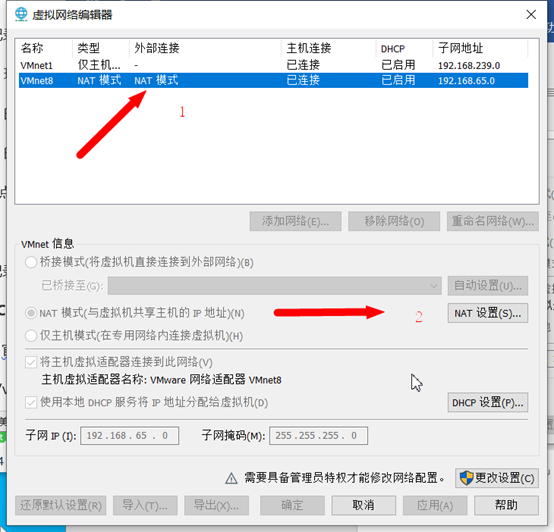
Select VMnet8 and click NAT settings.
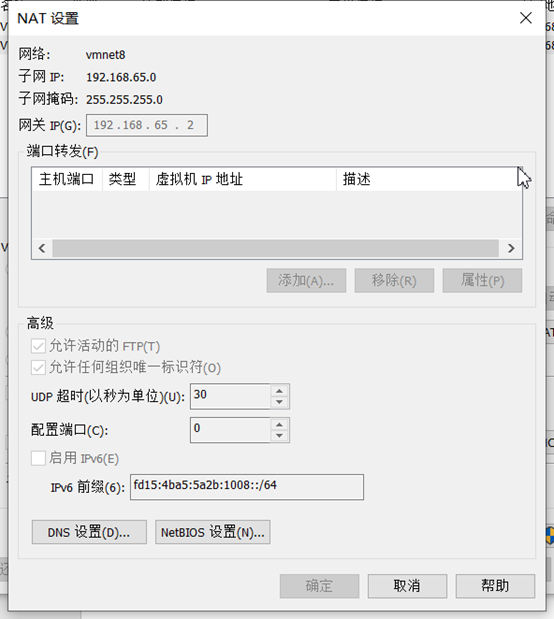
Find the gateway here: 192.168.65.2 remember this gateway, which will be used when configuring the network later.
3, CentOS installation
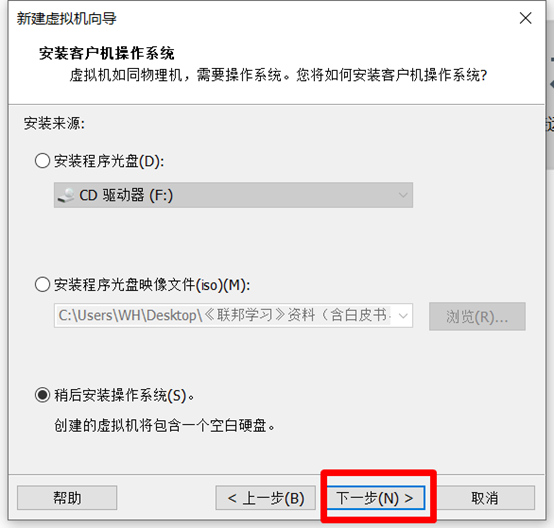
Open vwmare software and click create new virtual machine

Select typical (recommended) and then next.

Select next“
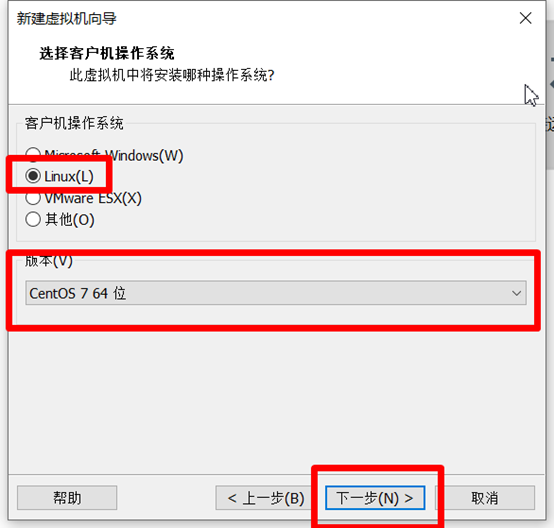
As shown in the figure below, select Linux, Centos7 64 bit, and then select next“
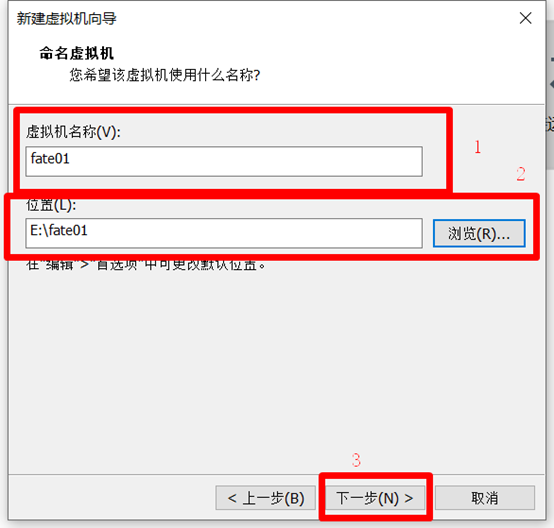
Name the virtual machine. The first virtual machine is named "fate01" and the second virtual machine is named "fate02".
Then select the installation path and install it on the drive letter with large space. Then select next
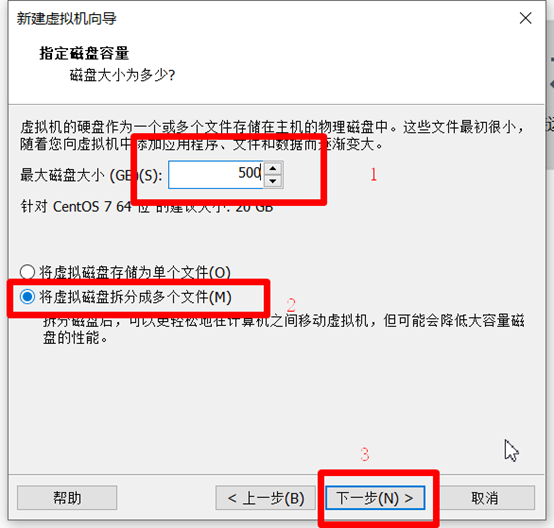
Set the maximum disk size to "500G", select "split disk into multiple files", and then select "next"
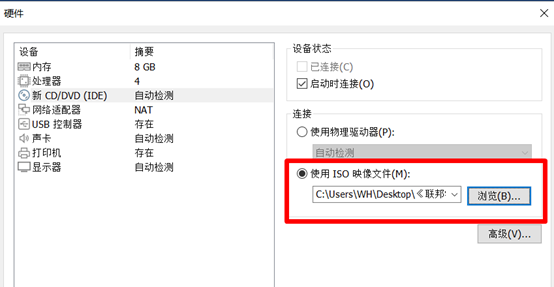
Select custom hardware, as shown below:
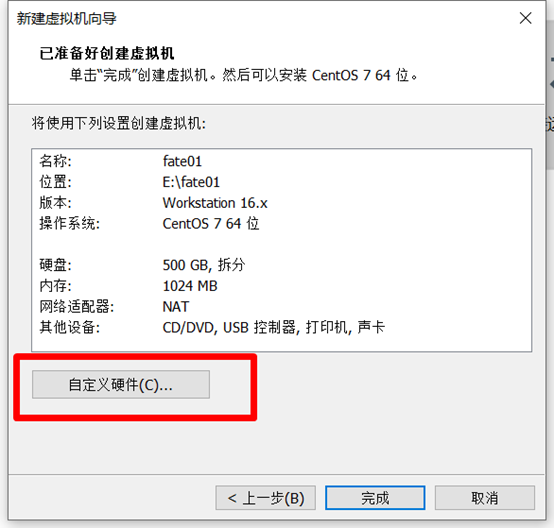
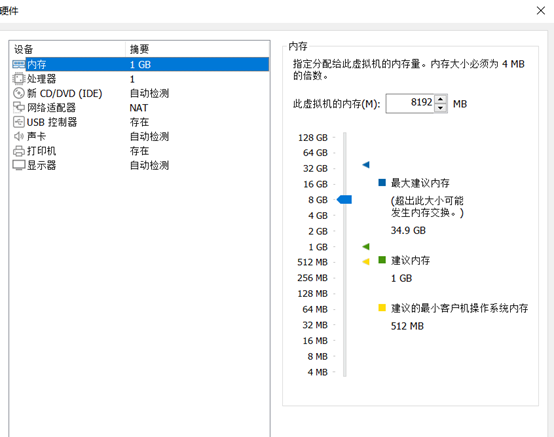
Then set the memory to 8G, the number of processors to 1, and the number of cores per processor to 4. In the "new CD/DCD(IDE)" option, set the path of the "CentOS-7-x86_64-DVD-1804.iso" file. After completing the above settings, select close.
(Deployment Guide configuration: 8 core /16GB memory / 500GB hard disk / 10M bandwidth)

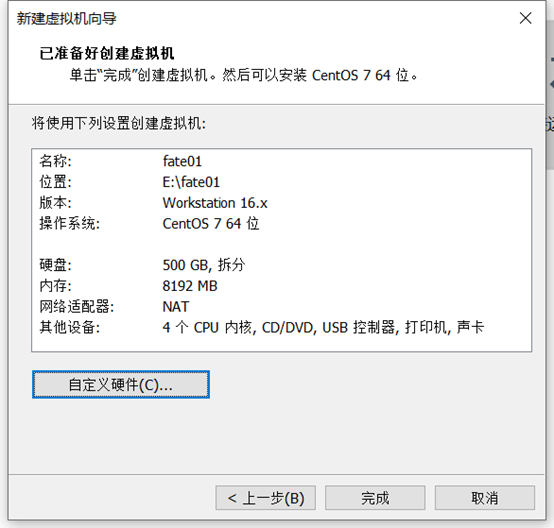
Then we can see the configuration of the virtual machine. If there is no problem, select "finish" and wait for the virtual machine installation to end.
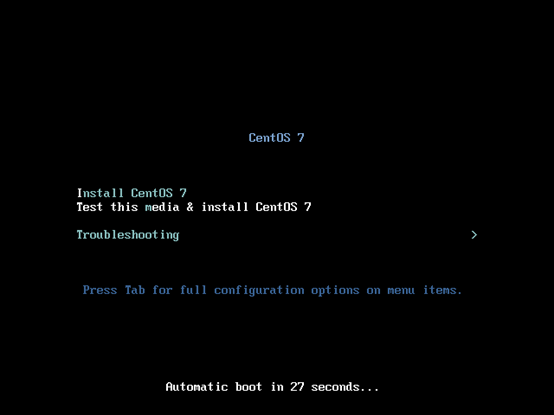
The following figure shows that the installation is complete. Select "start this virtual machine" and you can see the installation page of Centos7.

Select Install CentOS 7 and press Enter.
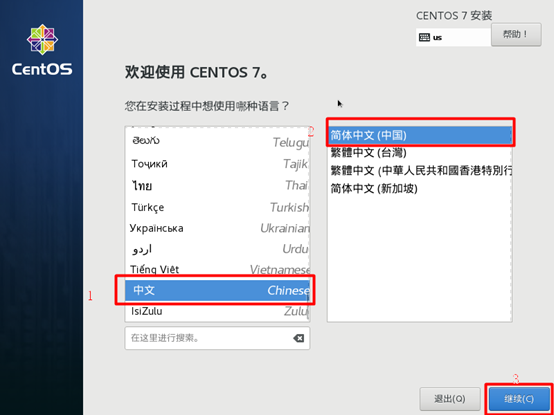
Show the following screen, select "Chinese", select "simplified Chinese (China)" on the right, and then select "continue".
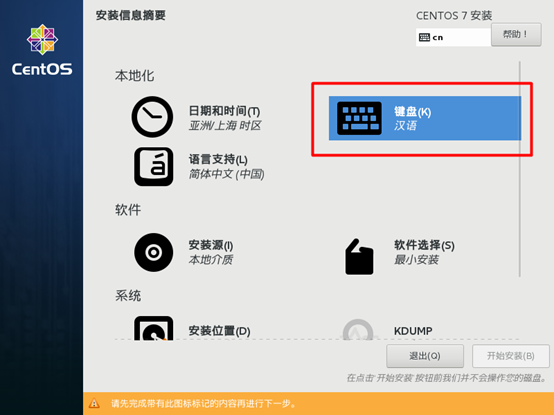
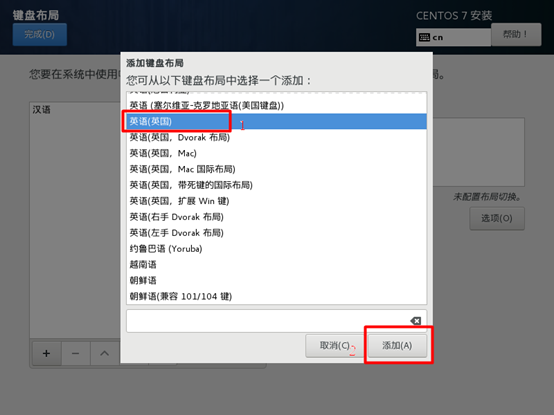
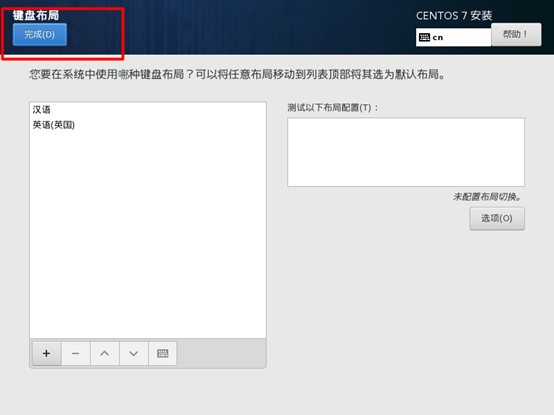
Select "keyboard", click "+", select "English (UK)", then click "add", and then select "finish".
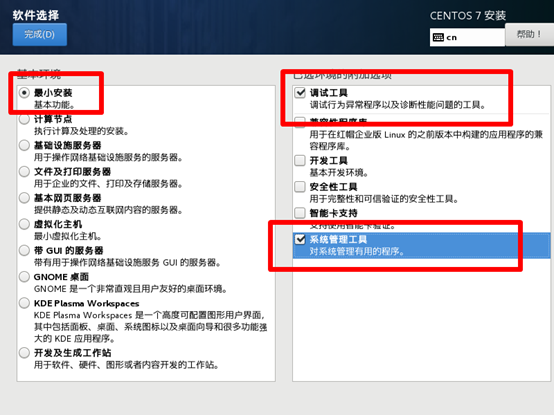
Next, click "software selection". Select "minimum installation" on the left and "debugging tool" and "system management tool" on the right. Then select finish.
(I installed GNOME desktop)

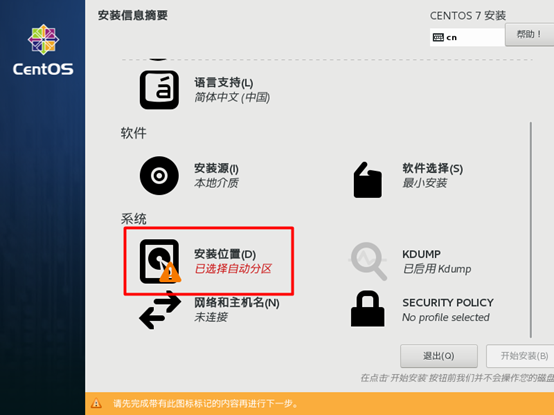
Set the installation location, then select I want to configure the partition, and then select finish.

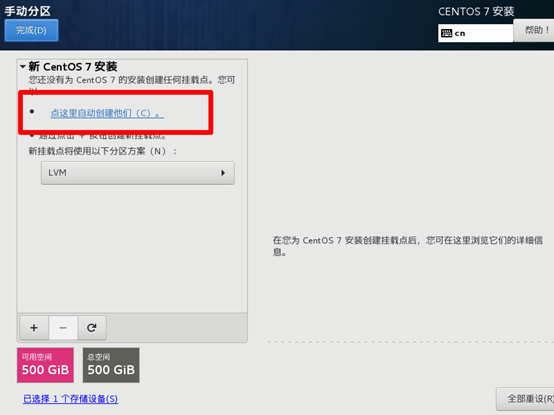
Then the following screen appears and select "click here to create them automatically"
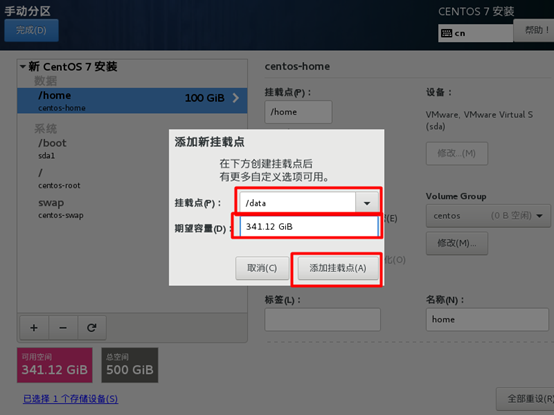
Select "home", set the expected capacity to 100GiB, and then click "+"
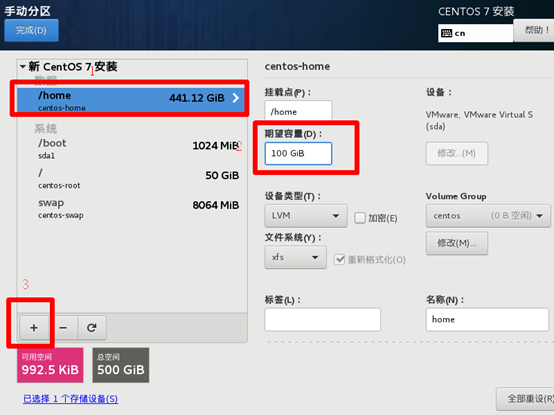
Add a new mount point "/ data" with a capacity of "341.12GiB", and then click "add mount point".
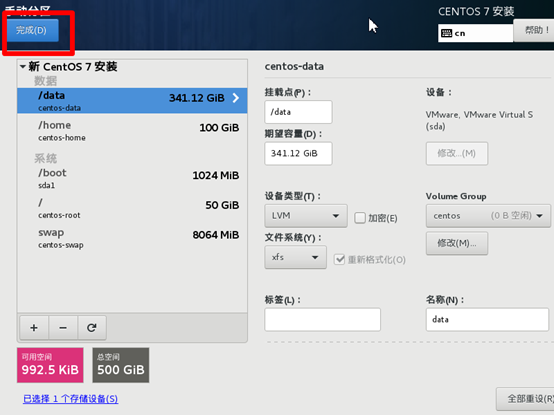
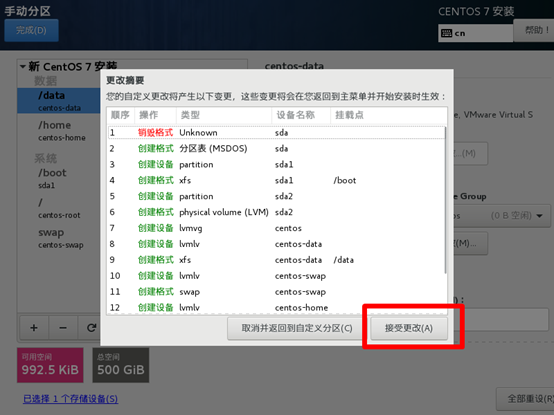
Then click finish and select accept changes
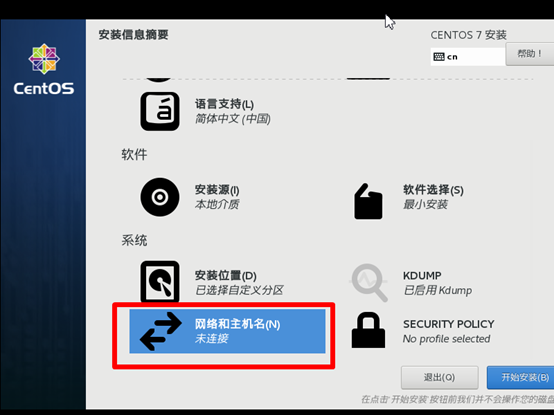
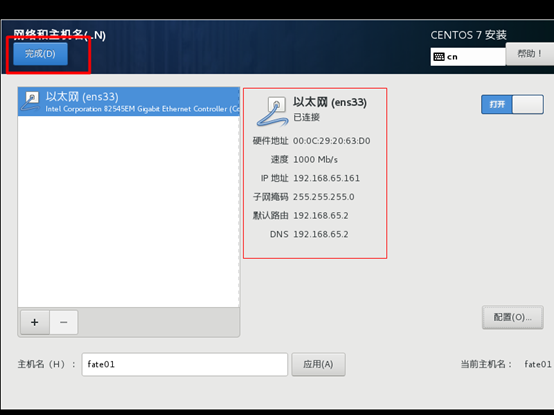
Click "network and host name"
Ethernet, select "open", set the host name to "fate01", click "application", and then select "configuration".

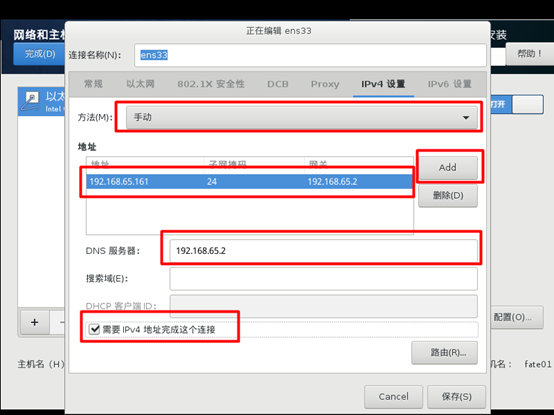
Click "IPv4 settings", set the method to "manual", and click "Add" to Add the IP address, as shown in the figure below. The IP address is "192.168.0.1", and the IP address of the other is set to 192.168.0.2. The subnet mask and gateway are the same, set to "24" and "192.168.65.2" respectively (this gateway we mentioned earlier). Set the DNS server to "192.168.65.2", and check "IPv4 address is required to complete this connection".
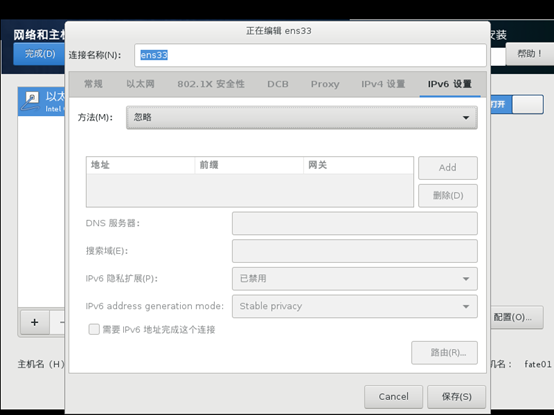
Click "IPv6 settings" and select "ignore" as the method. Then select save.
Then observe whether the IP settings are correct. If there is no problem, select finish.
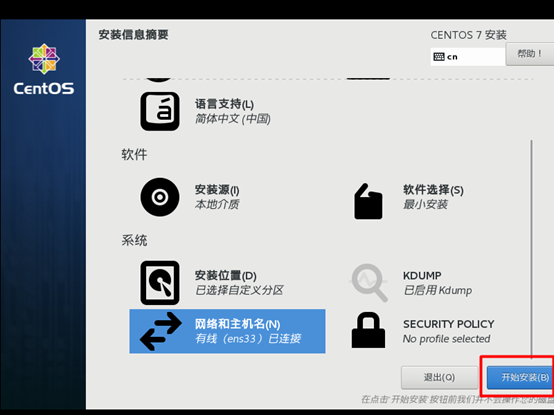
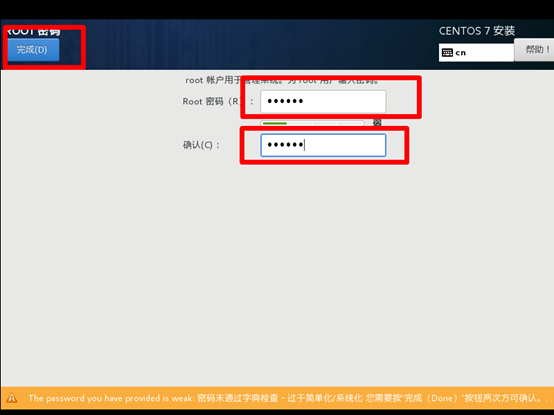
After completing the above settings, select "start installation". Then set the root password.
Set the password to "123456", then click "finish" and wait for the installation to complete.
After installation, click "restart".
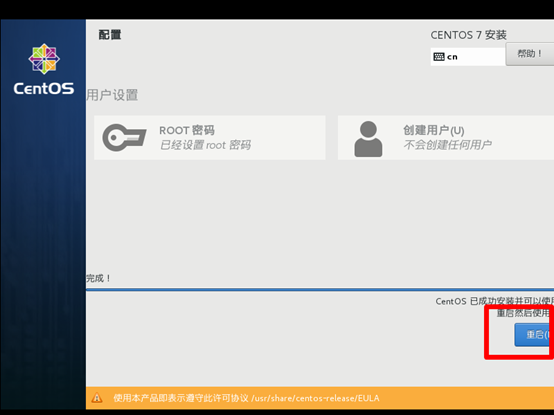
After restart, the following screen will appear. Enter "root" and password "123456" to log in to the root account.

The installation steps of the other virtual machine are the same as those of the first one, except that the name is "fate02" and the IP address is "192.168.0.2".
After installation, install xshell and log in with xshell. Personally, I think it is more convenient to execute commands with xshell.
(I like to use visual desktop)
4, Fat AllInOne deployment cluster
1. Server configuration
| The server | |
|---|---|
| quantity | 1 or 2 |
| to configure | 8 core /16GB memory / 500GB hard disk / 10M bandwidth |
| operating system | CentOS linux 7.2 and above / Ubuntu 18.04 |
| Dependent package | (installed automatically on deployment) |
| user | User: app, owner: apps (APP user can sudo su root without password) |
| file system | 1. Mount 500g hard disk in / data directory; 2. Create the / data / projects directory, which belongs to app:apps |
2. Cluster planning
| party | host name | IP address | operating system | Install software | service |
|---|---|---|---|---|---|
| PartyA | VM_0_1_centos | 192.168.0.1 | CentOS 7.2/Ubuntu 18.04 | fate,eggroll,mysql | fate_flow,fateboard,clustermanager,nodemanager,rollsite,mysql |
| PartyB | VM_0_2_centos | 192.168.0.2 | CentOS 7.2/Ubuntu 18.04 | fate,eggroll,mysql | fate_flow,fateboard,clustermanager,nodemanager,rollsite,mysql |
Architecture diagram:
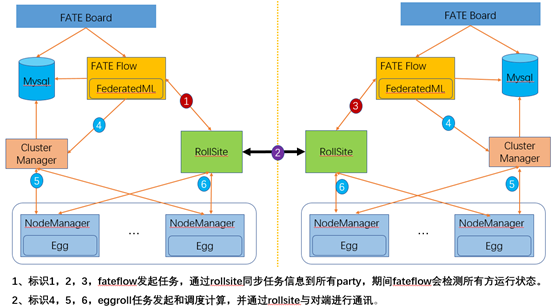
3. Component description
| software product | assembly | port | explain |
|---|---|---|---|
| fate | fate_flow | 9360;9380 | Joint learning task pipeline management module |
| fate | fateboard | 8080 | Joint learning process visualization module |
| eggroll | clustermanager | 4670 | cluster manager manages clusters |
| eggroll | nodemanager | 4671 | node manager manages the resources of each machine |
| eggroll | rollsite | 9370 | Cross site or cross party communication components are equivalent to proxy+federation in previous versions |
| mysql | mysql | 3306 | Data storage, clustermanager and fateflow dependencies |
4. Basic environment configuration
4.1 hostname configuration
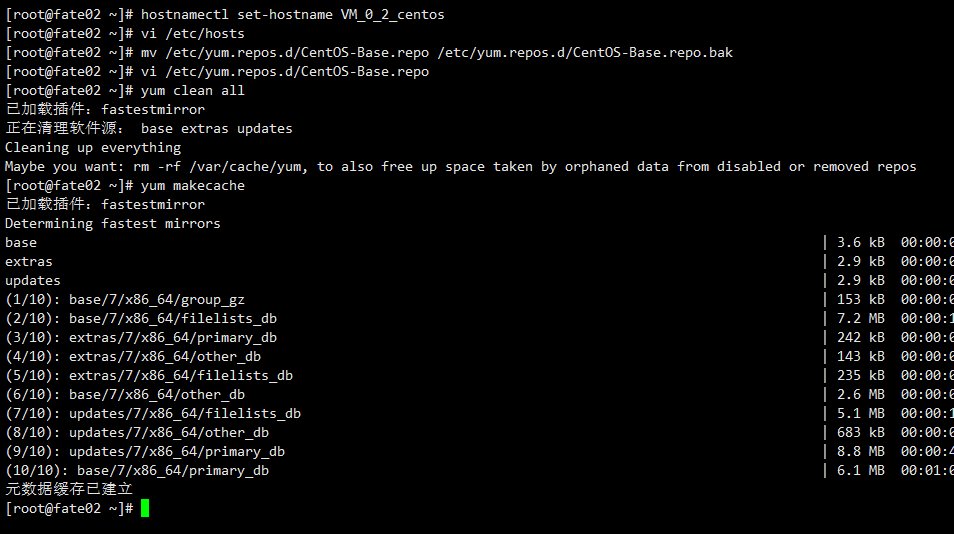
1) Modify host name
Execute under 192.168.0.1 root user:
hostnamectl set-hostname VM_0_1_centos
Execute under 192.168.0.2 root user:
hostnamectl set-hostname VM_0_2_centos
2) Join host mapping
Execute under the root user of the target server (192.168.0.1 192.168.0.2):
vi /etc/hosts
Add content
192.168.0.1 VM_0_1_centos
192.168.0.2 VM_0_2_centos
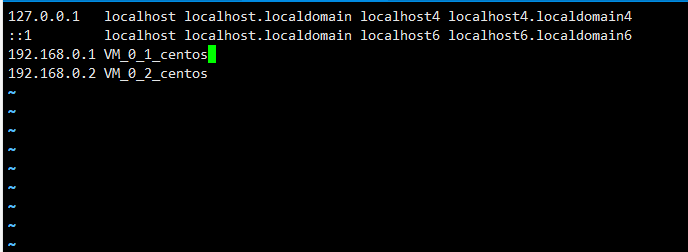
After adding, log in again.
su root
4.2 close selinux
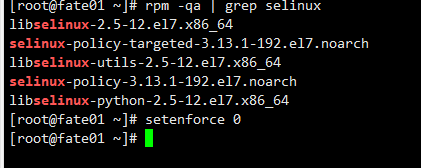
Execute under the root user of the target server (192.168.0.1 192.168.0.2):
Confirm that selinux is installed
centos system execution:
rpm -qa | grep selinux
ubuntu system execution: apt list --installed | grep selinux
If selinux is installed:
setenforce 0
4.3 configuring yum warehouse
Execute under the root user of the target server (192.168.0.1 192.168.0.2):
1) Back up CentOS base Repo file
mv /etc/yum.repos.d/CentOS-Base.repo /etc/yum.repos.d/CentOS-Base.repo.bak

2) Modify yum warehouse configuration
vi /etc/yum.repos.d/CentOS-Base.repo
add to:
# CentOS-Base.repo
#
# The mirror system uses the connecting IP address of the client and the
# update status of each mirror to pick mirrors that are updated to and
# geographically close to the client.  You should use this for CentOS updates
# unless you are manually picking other mirrors.
#
# If the mirrorlist= does not work for you, as a fall back you can try the
# remarked out baseurl= line instead.
#
#

[base]
name=CentOS-$releasever - Base
baseurl=https://mirrors.tuna.tsinghua.edu.cn/centos/$releasever/os/$basearch/
#mirrorlist=http://mirrorlist.centos.org/?release=$releasever&arch=$basearch&repo=os
gpgcheck=1
gpgkey=file:///etc/pki/rpm-gpg/RPM-GPG-KEY-CentOS-7

#released updates
[updates]
name=CentOS-$releasever - Updates
baseurl=https://mirrors.tuna.tsinghua.edu.cn/centos/$releasever/updates/$basearch/
#mirrorlist=http://mirrorlist.centos.org/?release=$releasever&arch=$basearch&repo=updates
gpgcheck=1
gpgkey=file:///etc/pki/rpm-gpg/RPM-GPG-KEY-CentOS-7

#additional packages that may be useful
[extras]
name=CentOS-$releasever - Extras
baseurl=https://mirrors.tuna.tsinghua.edu.cn/centos/$releasever/extras/$basearch/
#mirrorlist=http://mirrorlist.centos.org/?release=$releasever&arch=$basearch&repo=extras
gpgcheck=1
gpgkey=file:///etc/pki/rpm-gpg/RPM-GPG-KEY-CentOS-7

#additional packages that extend functionality of existing packages
[centosplus]
name=CentOS-$releasever - Plus
baseurl=https://mirrors.tuna.tsinghua.edu.cn/centos/$releasever/centosplus/$basearch/
#mirrorlist=http://mirrorlist.centos.org/?release=$releasever&arch=$basearch&repo=centosplus
gpgcheck=1
enabled=0
gpgkey=file:///etc/pki/rpm-gpg/RPM-GPG-KEY-CentOS-7
3) Make the new warehouse configuration effective
yum clean all
yum makecache
4.4 modifying Linux system parameters
Execute under the root user of the target server (192.168.0.1 192.168.0.2):
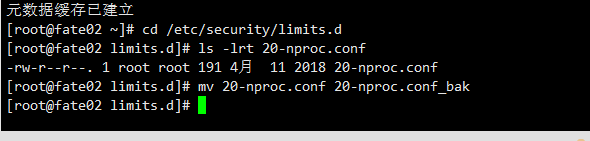
1) Clean up 20 nproc Conf file
cd /etc/security/limits.d
ls -lrt 20-nproc.conf
If present:
mv 20-nproc.conf 20-nproc.conf_bak
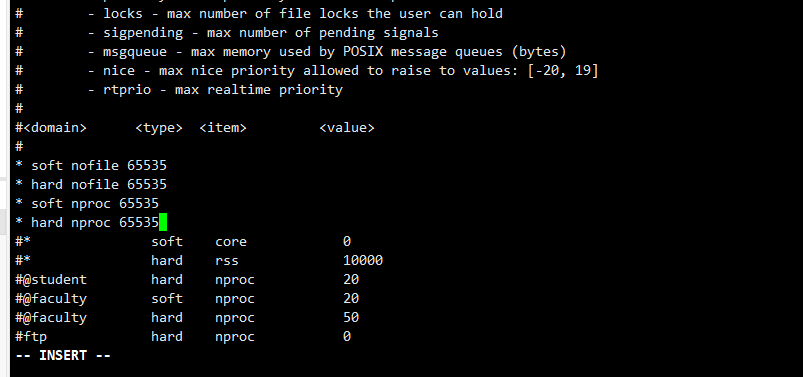
2) Modify limits Conf file
vim /etc/security/limits.conf
add to:
* soft nofile 65535
* hard nofile 65535
* soft nproc 65535
* hard nproc 65535
Log in again to see if it takes effect
su root
ulimit -a
4.5 modify system mysql configuration
mv /etc/my.cnf /etc/my.cnf_bak

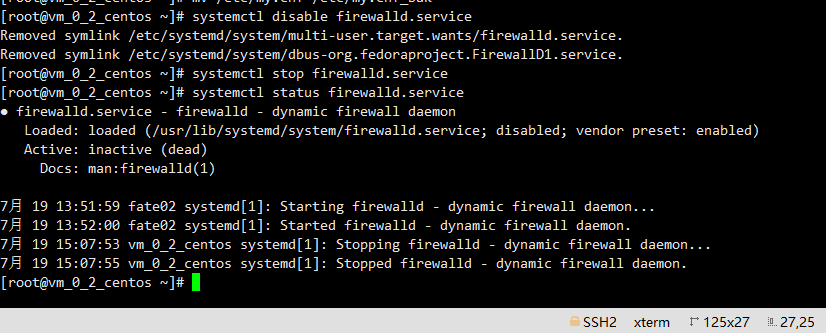
4.6 turn off firewall (optional)
Execute under the root user of the target server (192.168.0.1 192.168.0.2)
In case of Centos system:
systemctl disable firewalld.service
systemctl stop firewalld.service
systemctl status firewalld.service
In case of Ubuntu system:
ufw disable
ufw status
4.7 software environment initialization
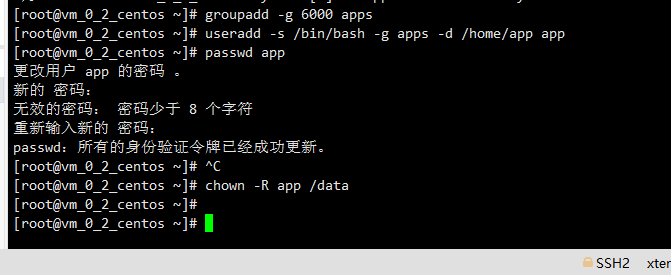
1) Create user
Execute under the root user of the target server (192.168.0.1 192.168.0.2)
groupadd -g 6000 apps
useradd -s /bin/bash -g apps -d /home/app app
passwd app
Input password:
2) Configure sudo
Execute under the root user of the target server (192.168.0.1 192.168.0.2)
vim /etc/sudoers.d/app
add to:
app ALL=(ALL) ALL
app ALL=(ALL) NOPASSWD: ALL
Defaults !env_reset

Add write permission to sudoers file
chmod u+w /etc/sudoers
Edit sudoers file
vi /etc/sudoers
Append under root ALL=(ALL) ALL:
root    ALL=(ALL)       NOPASSWD: ALL
app     ALL=(ALL)       ALL
app     ALL=(ALL)       NOPASSWD: ALL
Delete write permission to sudoers file
chmod u-w /etc/sudoers

3) Configure ssh non secret login
① Configure self privacy
Execute under the app user of the target server (192.168.0.1 192.168.0.2)
VM in virtual machine_ 0_ 1_ Execute as app user in home directory on CentOS
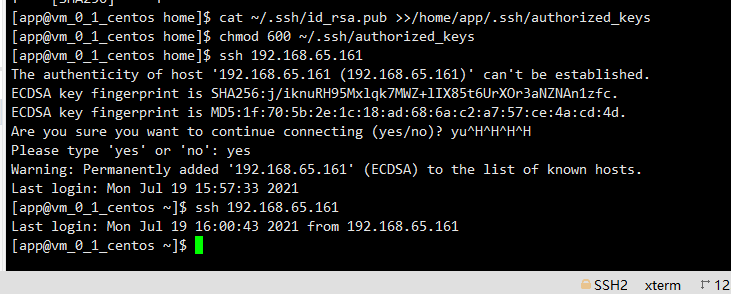
su app
ssh-keygen -t rsa
cat ~/.ssh/id_rsa.pub >>/home/app/.ssh/authorized_keys
chmod 600 ~/.ssh/authorized_keys
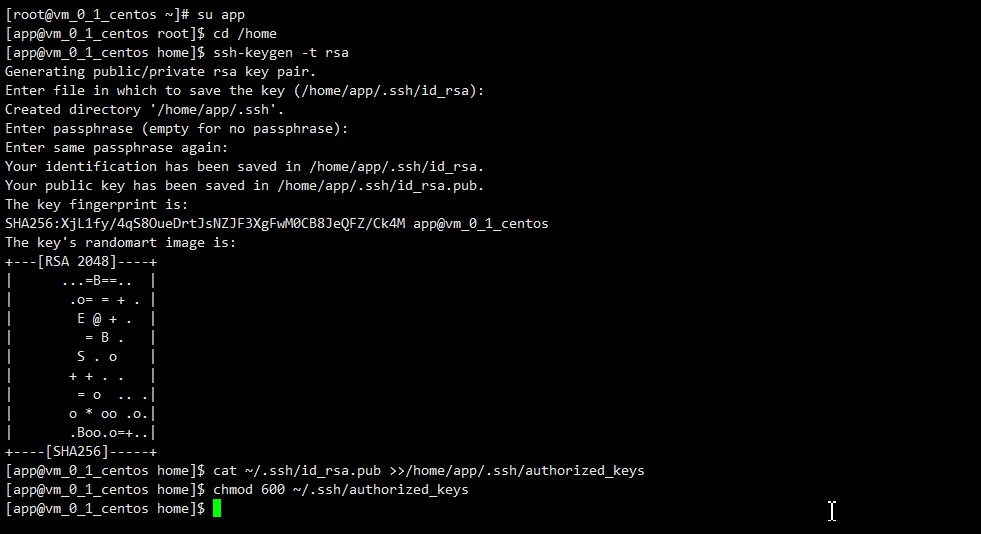
Use ssh 192.168.0.1 command to test. You need to confirm yes for the first time, and then you can log in as successful without password.
In VM_ 0_ 2_ Perform the same steps on CentOS to configure the VM_0_2_centos's own password free login.
② Configure VM_0_1_centos password free login VM_0_2_centos
In VM_ 0_ 1_ Execute under CentOS app user
scp ~/.ssh/authorized_keys app@192.168.0.2:/home/app/.ssh
Input VM_0_2_centos app password
In VM_ 0_ 2_ Execute under CentOS app user
cat ~/.ssh/id_rsa.pub >> /home/app/.ssh/authorized_keys
scp ~/.ssh/authorized_keys app@192.168.0.1:/home/app/.ssh
Input VM_0_1_centos app password completes file transfer.
In VM_ 0_ 1_ Execute under CentOS app user
ssh 192.168.0.2
You should be able to log in to fate02 without a password.
Here we have completed the configuration of the environment.
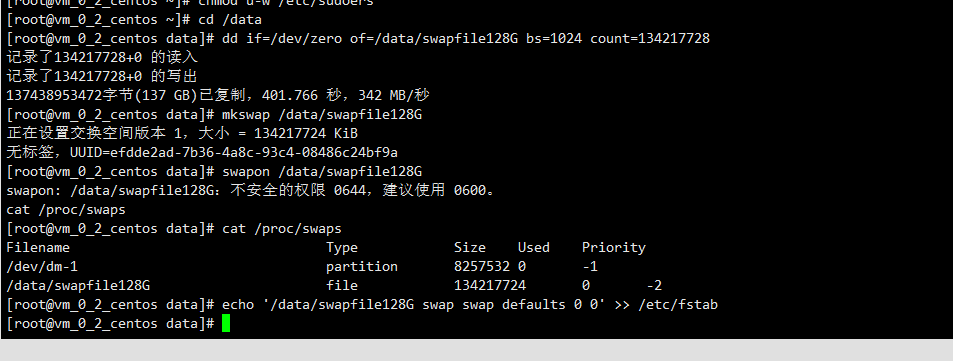
4.6 adding virtual memory
Target server (192.168.0.1 192.168.0.2 192.168.0.3)
When the production environment is used, 128G virtual memory needs to be added due to memory calculation. Before execution, check whether the storage space is sufficient.
Created manually and executed by root:
cd /data
dd if=/dev/zero of=/data/swapfile128G bs=1024 count=134217728
mkswap /data/swapfile128G
swapon /data/swapfile128G
cat /proc/swaps
echo '/data/swapfile128G swap swap defaults 0 0' >> /etc/fstab
check
cat /proc/swaps

Filename                                Type            Size    Used    Priority
/data/swapfile32G_1                     file            33554428        0       -1
/data/swapfile32G_2                     file            33554428        0       -2
/data/swapfile32G_3                     file            33554428        0       -3
/data/swapfile32G_4                     file            33554428        0       -4

free -m
              total        used        free      shared  buff/cache   available
Mem:          15715        6885          91         254        8739        8461
Swap:        131071           0      131071
5. Project deployment
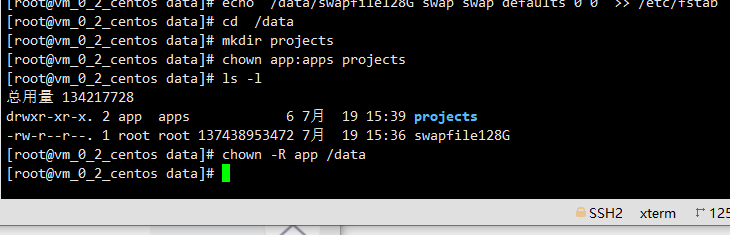
Note: the installation directory of this guide defaults to / data/projects /, and the execution user is app. It can be modified according to the actual situation during installation.
Set projects directory
Execute under the root user of the target server (192.168.0.1 192.168.0.2)
cd /data
mkdir projects
chown app:apps projects
ls -l
chown -R app /data
5.1 obtaining items
Execute under the app user of the target server (192.168.0.1 with external network environment)
Enter the / data/projects / directory of the execution node and execute:
cd /data/projects/
wget https://webank-ai-1251170195.cos.ap-guangzhou.myqcloud.com/fate_cluster_install_1.6.0_release-c7-u18.tar.gz
tar xzf fate_cluster_install_1.6.0_release-c7-u18.tar.gz
5.2 pre deployment inspection
Execute under the app user of the target server (192.168.0.1 192.168.0.2)
Put the check script fat cluster install / tools install / check SH copy from 192.168.0.1 to 192.168.0.2
#Execute the check script on the 192.168.0.1 and 192.168.0.2 servers, respectively
sh ./check.sh

#Confirm that the app user has configured sudo
#The size of virtual memory shall not be less than 128G. If it does not meet the requirements, it shall be reset by referring to chapter 4.6
#The number of file handles shall not be less than 65535. If it does not meet the requirements, it shall be reset by referring to chapter 4.3
#The number of user processes shall not be less than 64000. If it does not meet the requirements, it shall be reset by referring to chapter 4.3
#Confirm that there is no fat process and port conflict before deployment
#Confirm / etc / my Whether CNF exists and needs mv; Confirm whether the / data/projects/fate directory exists. If so, back up the fate directory mv.
5.3 modification and example of configuration file
Execute under the app user of the target server (192.168.0.1)
Modify the configuration file fat cluster install / AllInOne / conf / setup conf.
vi fate-cluster-install/allInone/conf/setup.conf
Configuration file setup Conf Description:
| Configuration item | Configuration item value | explain |
|---|---|---|
| roles | Default: "host" "guest" | Deployed roles include HOST end and guess end |
| version | Default: 1.5.1 | Fat version number |
| pbase | Default: / data/projects | Project root directory |
| lbase | Default: / data/logs | Keep the default and do not modify it |
| ssh_user | Default: app | The user who ssh connects to the target machine is also the owner of the deployed file |
| ssh_group | Default: apps | The user group of the ssh connection target is also the group of the deployed file |
| ssh_port | Default: 22, modified according to the actual situation | ssh connection port. Confirm the port before deployment, otherwise a connection error will be reported |
| eggroll_dbname | Default: eggroll_meta | DB name of eggroll connection |
| fate_flow_dbname | Default: fat_ flow | fate_flow, fateboard and other connected DB names |
| mysql_admin_pass | default | mysql administrator (root) password |
| redis_pass | default | redis password, not used yet |
| mysql_user | Default: fat | Application connection account of msyql |
| mysql_port | Default: 3306, modified according to the actual situation | Port on which msql service listens |
| host_id | Default: 10000, modified according to the implementation plan | party id of the HOST side. |
| host_ip | 192.168.0.1 | HOST ip |
| host_mysql_ip | Default and host_ip consistent | HOST mysql ip |
| host_mysql_pass | default | Application connection account of HOST msyql |
| guest_id | Default: 9999, modified according to the implementation plan | party id of guess end |
| guest_ip | 192.168.0.2 | ip address of guess end |
| guest_mysql_ip | Default and guest_ip consistent | mysql ip on guess side |
| guest_mysql_pass | default | Application connection account msyql of guess |
| dbmodules | Default: "mysql" | List of deployment modules of DB components, such as mysql |
| basemodules | Default: "tools" "base" "java" "python" "eggroll" "fat" | List of deployment modules of non DB components, such as "tools", "base", "java", "python", "eggroll" and "fat" |
| fateflow_grpc_port | Default: 9360 | fateflow grpc service port |
| fateflow_http_port | Default: 9380 | fateflow http service port |
| fateboard_port | Default: 8080 | fateboard service port |
| rollsite_port | Default: 9370 | rollsite service port |
| clustermanager_port | Default: 4670 | clustermanager service port |
| nodemanager_port | Default: 4671 | nodemanager service port |
1) Two hosts partyA+partyB are deployed simultaneously**
#to install role
roles=( "host" "guest" )

version="1.6.0"
#project base
pbase="/data/projects"
#log directory
lbase="/data/logs"

#user who connects dest machine by ssh
ssh_user="app"
ssh_group="apps"
#ssh port
ssh_port=22

#eggroll_db name
eggroll_dbname="eggroll_meta"
#fate_flow_db name
fate_flow_dbname="fate_flow"

#mysql init root password
mysql_admin_pass="fate_dev"

#redis passwd
redis_pass=""

#mysql user
mysql_user="fate"
#mysql port
mysql_port="3306"

#host party id
host_id="10000"
#host ip
host_ip="192.168.0.1"
#host mysql ip
host_mysql_ip="${host_ip}"
host_mysql_pass="fate_deV2999"

#guest party id
guest_id="9999"
#guest ip
guest_ip="192.168.0.2"
#guest mysql ip
guest_mysql_ip="${guest_ip}"
guest_mysql_pass="fate_deV2999"

#db module lists
dbmodules=( "mysql" )

#base module lists
basemodules=( "tools" "base" "java" "python" "eggroll" "fate" )

fateflow_grpc_port=9360
fateflow_http_port=9380
fateboard_port=8080

rollsite_port=9370
clustermanager_port=4670
nodemanager_port=4671
2) Deploy only one party
#to install role
roles=( "host" )

version="1.6.0"
#project base
pbase="/data/projects"
#log directory
lbase="/data/logs"

#user who connects dest machine by ssh
ssh_user="app"
ssh_group="apps"
#ssh port
ssh_port=22

#eggroll_db name
eggroll_dbname="eggroll_meta"
#fate_flow_db name
fate_flow_dbname="fate_flow"

#mysql init root password
mysql_admin_pass="fate_dev"

#redis passwd
redis_pass=""

#mysql user
mysql_user="fate"
#mysql port
mysql_port="3306"

#host party id
host_id="10000"
#host ip
host_ip="192.168.0.1"
#host mysql ip
host_mysql_ip="${host_ip}"
host_mysql_pass="fate_deV2999"

#guest party id
guest_id=""
#guest ip
guest_ip=""
#guest mysql ip
guest_mysql_ip="${guest_ip}"
guest_mysql_pass=""

#db module lists
dbmodules=( "mysql" )

#base module lists
basemodules=( "tools" "base" "java" "python" "eggroll" "fate" )

fateflow_grpc_port=9360
fateflow_http_port=9380
fateboard_port=8080

rollsite_port=9370
clustermanager_port=4670
nodemanager_port=4671
5.4 deployment
Modify setup according to the above configuration meaning After the configuration item corresponding to the conf file, execute the deployment script in the fast cluster install / AllInOne Directory:
cd fate-cluster-install/allInone
nohup sh ./deploy.sh > logs/boot.log 2>&1 &
The deployment log is output in the fast cluster install / AllInOne / logs directory. Check whether there are errors in real time:
tail -f ./logs/deploy.log (After deployment, just check it.)
tail -f ./logs/deploy-guest.log (Real time printing GUEST End deployment)
tail -f ./logs/deploy-mysql-guest.log  (Real time printing GUEST end mysql Deployment of)
tail -f ./logs/deploy-host.log    (Real time printing HOST End deployment)
tail -f ./logs/deploy-mysql-host.log    (Real time printing HOST end mysql Deployment of)
deploy. The following contents appear in the log, indicating that the installation is complete
init over
deploy guest mysql 172.16.132.190 over
deploy guest 172.16.132.190 over
deploy host mysql 172.16.132.189 over
deploy host 172.16.132.189 over
5.5 problem location
1) eggroll log
/data/projects/fate/eggroll/logs/eggroll/bootstrap.clustermanager.err
/data/projects/fate/eggroll/logs/eggroll/clustermanager.jvm.err.log
/data/projects/fate/eggroll/logs/eggroll/nodemanager.jvm.err.log
/data/projects/fate/eggroll/logs/eggroll/bootstrap.nodemanager.err
/data/projects/fate/eggroll/logs/eggroll/bootstrap.rollsite.err
/data/projects/fate/eggroll/logs/eggroll/rollsite.jvm.err.log
2) fateflow log
/data/projects/fate/python/logs/fate_flow/
3) fateboard log
/data/projects/fate/fateboard/logs
6. Test
6.1 Toy_example deployment validation
You need to set three parameters for this test: guest_partyid,host_partyid,work_mode.
6.1.1 unilateral test
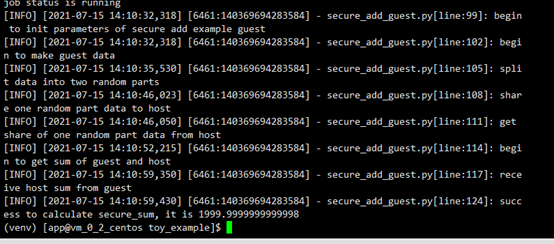
1) 192.168.0.1, guest_partyid and host_ Party ID is set to 10000:
source /data/projects/fate/bin/init_env.sh
cd /data/projects/fate/examples/toy_example/
python run_toy_example.py 10000 10000 1
Similar results indicate success:
"2020-04-28 18:26:20,789 - secure_add_guest.py[line:126] - INFO: success to calculate secure_sum, it is 1999.9999999999998"
Tip: if max cores per job is 1, please modify job parameters gives an error message, you need to modify the file toy in the current directory_ example_ Parameter task in conf.json_ Cores is 1
2) 192.168.0.2, guest_partyid and host_ Party ID is set to 9999:
source /data/projects/fate/bin/init_env.sh
cd /data/projects/fate/examples/toy_example/
python run_toy_example.py 9999 9999 1
Similar results indicate success:
"2020-04-28 18:26:20,789 - secure_add_guest.py[line:126] - INFO: success to calculate secure_sum, it is 1999.9999999999998"
6.1.2 bilateral test
Select 9999 as the guest party and execute on 192.168.0.2:
source /data/projects/fate/bin/init_env.sh
cd /data/projects/fate/examples/toy_example/
python run_toy_example.py 9999 10000 1
Similar results indicate success:
"2020-04-28 18:26:20,789 - secure_add_guest.py[line:126] - INFO: success to calculate secure_sum, it is 1999.9999999999998"

6.2 minimization test
6.2.1 upload preset data:
Execute on 192.168.0.1 and 192.168.0.2 respectively:
source /data/projects/fate/bin/init_env.sh
cd /data/projects/fate/examples/scripts/
python upload_default_data.py -m 1
6.2.2 quick mode:
Please ensure that both guest and host have uploaded preset data through the given script.
In the fast mode, the minimized test script will use a relatively small data set, that is, the brew data set containing 569 data.
Select 9999 as the guest party and execute on 192.168.0.2:
source /data/projects/fate/bin/init_env.sh
cd /data/projects/fate/examples/min_test_task/
#Unilateral test
python run_task.py -m 1 -gid 9999 -hid 9999 -aid 9999 -f fast
#Bilateral test
python run_task.py -m 1 -gid 9999 -hid 10000 -aid 10000 -f fast
Other parameters that may be useful include:
- -f: File type used "Fast" stands for the fast dataset, and "normal" stands for the default credit dataset
- –add_sbt: if it is set to 1, the securebooost task will be started after running lr. If it is set to 0, the securebooost task will not be started. If this parameter is not set, the system defaults to 1.
If the word "success" is displayed in the result after a few minutes, it indicates that the operation has been run successfully. If "FAILED" or the program is stuck, it means that the test has FAILED.
6.2.3 normal mode:
Just replace "fast" with "normal" in the command, and the rest is the same as quick mode.
6.3 Fateboard testing
Fateboard is a Web service. If the fateboard service is started successfully, you can access http://192.168.0.1:8080 and http://192.168.0.2:8080 To view the task information. If there is a firewall, it needs to be opened.

7. System operation and maintenance
7.1 service management
Execute under the app user of the target server (192.168.0.1 192.168.0.2)
7.1.1 Eggroll service management
source /data/projects/fate/bin/init_env.sh
cd /data/projects/fate/eggroll
Start / close / view / restart all:
sh ./bin/eggroll.sh all start/stop/status/restart
Start / close / view / restart a single module (optional: cluster manager, nodemanager, rollsite):
sh ./bin/eggroll.sh clustermanager start/stop/status/restart
7.1.2 Fate service management
- Start / close / view / restart fate_flow service
source /data/projects/fate/bin/init_env.sh
cd /data/projects/fate/python/fate_flow
sh service.sh start|stop|status|restart
If you start modules one by one, you need to start eggroll first and then fateflow. Fateflow depends on the startup of eggroll.
- Start / shut down / restart the fateboard service
cd /data/projects/fate/fateboard
sh service.sh start|stop|status|restart
7.1.3 Mysql service management
Start / close / view / restart mysql service
cd /data/projects/fate/common/mysql/mysql-8.0.13
sh ./service.sh start|stop|status|restart
7.2 viewing processes and ports
Execute under the app user of the target server (192.168.0.1 192.168.0.2)
7.2.1 viewing process
#Check whether the process is started according to the deployment plan
ps -ef | grep -i clustermanager
ps -ef | grep -i nodemanager
ps -ef | grep -i rollsite
ps -ef | grep -i fate_flow_server.py
ps -ef | grep -i fateboard
7.2.2 viewing process ports
#Check whether the process port exists according to the deployment plan
#clustermanager
netstat -tlnp | grep 4670
#nodemanager
netstat -tlnp | grep 4671
#rollsite
netstat -tlnp | grep 9370
#fate_flow_server
netstat -tlnp | grep 9360
#fateboard
netstat -tlnp | grep 8080
7.3 service log
| service | Log path |
|---|---|
| eggroll | /data/projects/fate/eggroll/logs |
| fate_ Flow & task log | /data/projects/fate/python/logs |
| fateboard | /data/projects/fate/fateboard/logs |
| mysql | /data/logs/mysql/ |
8. Appendix
8.1 Eggroll parameter tuning
Assuming that the number of cpu cores is C, the number of nodemanagers is n, and the number of tasks to be run simultaneously is p, then:
egg_num=eggroll.session.processors.per.node = c * 0.8 / p
Partitions (number of roll pair partitions) = egg_num * n
You can specify the parameters used by the job through job parameters in job conf:
- egg_num: configure task_cores or configure eggroll_ Processors in run_ per_ Node parameter
- Partitions: configure computing_partitions
For more information about job submission configuration, refer to dsl_conf_v2_setting_guide_zh
--------
Copyright notice: This is the original article of CSDN blogger "AI Hao", which follows the CC 4.0 BY-SA copyright agreement. Please attach the original source link and this notice for reprint.
Original link: https://blog.csdn.net/hhhhhhhhhhwwwwwwwwww/article/details/118894462