@datetime: 2021/06/14
@author: shenhao
Note: if a chapter is marked with skip, its sub chapters need to be skipped.
FFmpeg hardware is accelerated and NVIDIA codec is used in the code
All steps in this article come from NVIDIA official documents , and with reference to the practice summary and practice of major netizens. In addition, this article only introduces the installation under the general platform, and does not involve the specific platform. If necessary, please refer to NVIDIA official documents.
Please indicate the source of reprint.
preface
Generally, ffmpeg on windows has integrated NVDIA codec, but in order to be used in the code, ffmpeg needs to be recompiled. It is not recommended to compile on windows because it is very troublesome. And not suitable for novice compilation. This paper introduces * * ffmpeg hardware acceleration scheme * * under three different platforms, and how to use GPU acceleration in the code. At first, I wanted to use windows first because it was easy to test, but later I found that I didn't have enough memory under the windows platform to complete the compilation (my memory is 16G, and the minimum required memory is not known yet). In addition, when using the pre compiled ffmpeg test, I found that the graphics card doesn't support the encoding and decoding of h265, So keep reporting no devices found or codec not support. Later, I used virtual machines, but I found that NVIDIA's graphics card driver does not support virtual machine delivery (at present). So Windows users make sure they have enough memory. In addition, it is important. Both linux and windows users should ensure whether CUDA is supported and whether the corresponding codec is supported. So to sum up, first ensure the following points.
-
If the environment is in a virtual machine and you want to refer to this document. Then you don't have to go on.
-
If the environment is under windows and the memory is greater than 16G, proceed cautiously if < = 16G.
-
Determine whether your graphics card supports CUDA
-
Determine whether the graphics card supports h264265 codec or other codec formats, so as to avoid eliminating the problem of the device first if the test is found to be wrong after compilation.
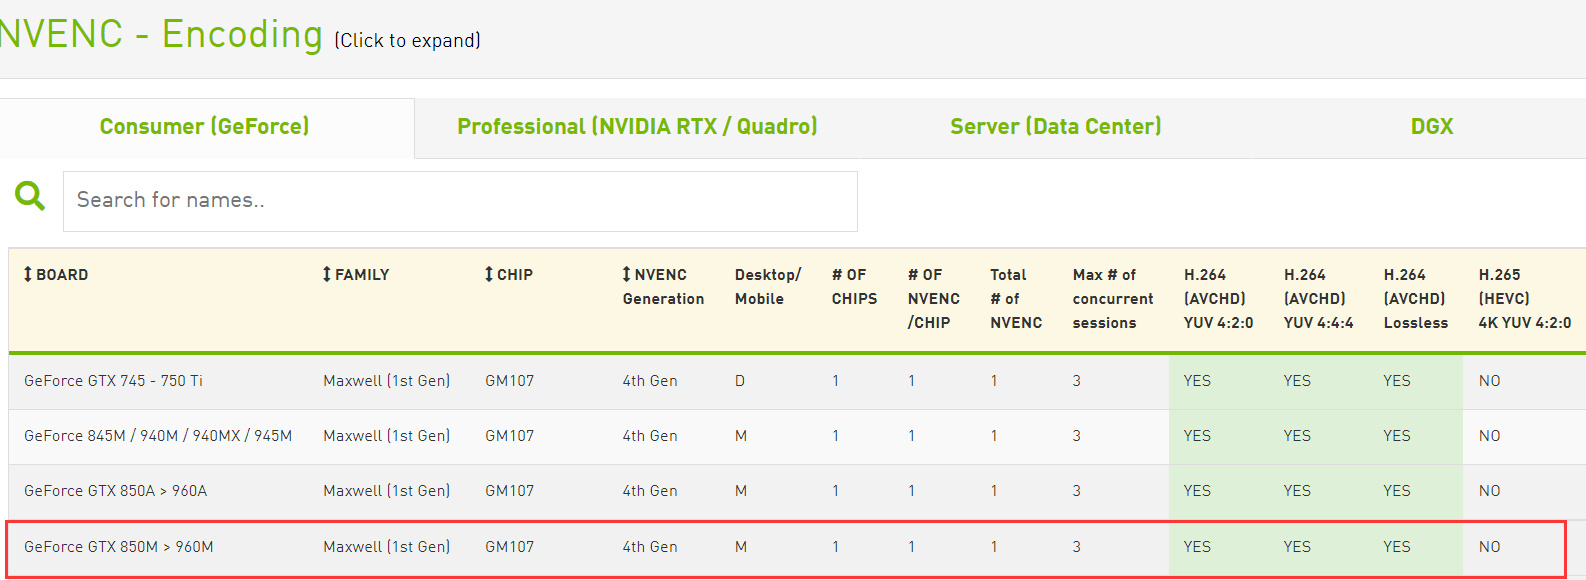

For example, if the graphics card of my notebook is 860m, h265 coding is not supported.
In addition:
-
The Windows compilation in this article uses Visual Studio 2019, but does not introduce the installation of visual studio 2019.
-
Compiling tool chains such as make and cmake are not introduced.
-
The pexports tool and PKG config tool used in this paper.
CUDA brief introduction
CUDA ® NVIDIA ® The parallel computing platform and programming model of the invention. By taking advantage of the powerful function of graphics processing unit (GPU), it can significantly improve the computing performance. Note that it is just an architecture.
1.Windows
1.1 preparation
1.1.1 installation of Msys2
Msys2 is required to compile FFmpeg in windows. (msys2 is simply compatible with posix under windows. In other words, it can use make & & make install, etc.)
-
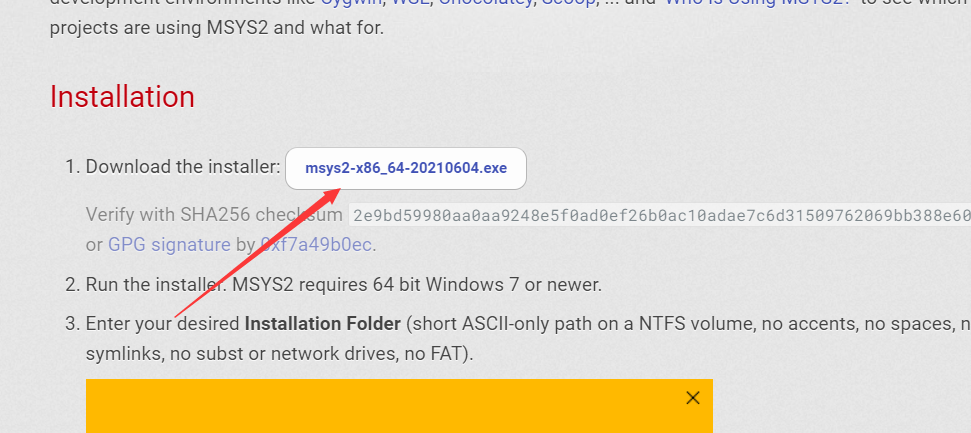
Install Msys2 according to the official instructions
-
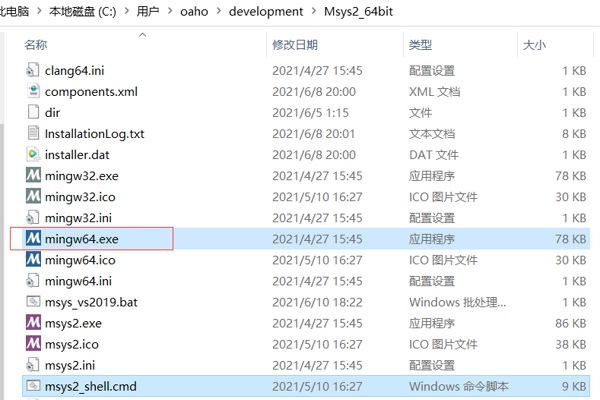
Enter the Msys2 directory and open msys2_shell.cmd
-
Enter the following command
#to update
pacman -Syu
#Install related tools
pacman -S make pkg-config diffutils yasm
#Installing gcc for mingw64 and mingw32
pacman -S mingw-w64-i686-nasm mingw-w64-i686-gcc mingw-w64-i686-SDL2 	mingw-w64_x86_64-gcc
#Installing the nasm assembler
pacman -S nasm
1.1.2 compiling libx264 (skippable)
The purpose of this step is to prevent some machines from using CUDA without NVDIA graphics card, so as a candidate, CPU coding can be used
- Download x264 source code
git clone https://code.videolan.org/videolan/x264.git
- Open mingw64.0 in the Msys2 directory exe
-
cd to libx264 source code directory (Note: there must be configure and makefile in the current directory)
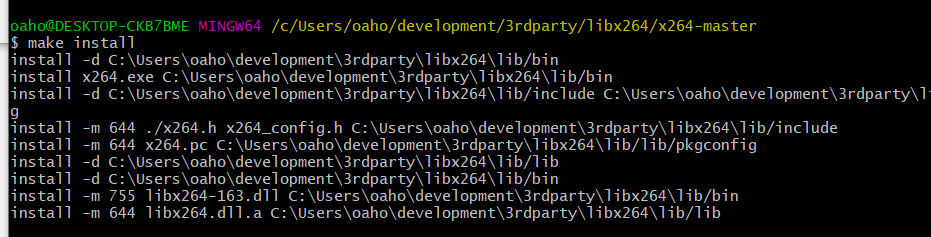
#Note that the following is a 64 bit compilation
#prefix can switch to another path

./configure --host=x86_64-w64-mingw32 --enable-shared --prefix="C:\\"
make && make install
Successful installation is shown in
1.1.2.1 using pexports
pexports can generate dll into lib mapping file under windows
After downloading, open cmd and enter pexport Exe directory
#Note: the numbers after libx264 can be modified according to the specific situation.
pexport.exe "x264 Source code path"/libx264-163.dll > libx264.def
At this time, there will be libx264 in the pexport directory Def generation
1.1.2.2 Developer Cmd Prompt using Visual Studio
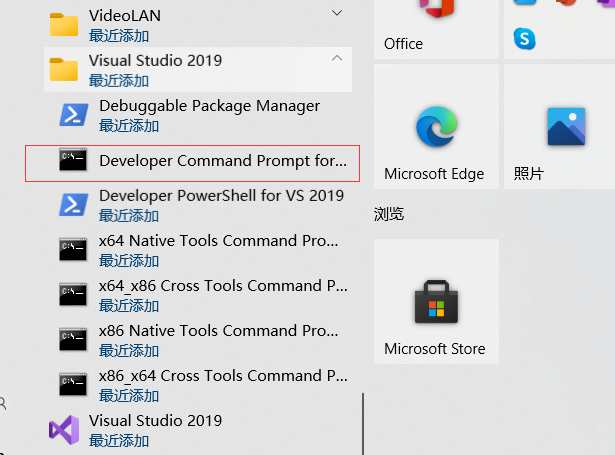
Open it and cd it to the pexport directory (that is, the directory where libx264.def is located)
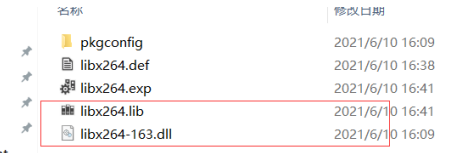
LIB /machine:x64 /DEF:libx264.def
The lib file is generated. Note that this is the lib file of the dynamic library. You need to copy libx264-163 together DLL to folder.
1.1.3 compiling libx265 (skippable)
cmake is required to compile libx265. Download it yourself.
The compilation of cmake is relatively simple.
-
Clone code
https://github.com/videolan/x265/releases
-
Enter the source subdirectory of the source code directory
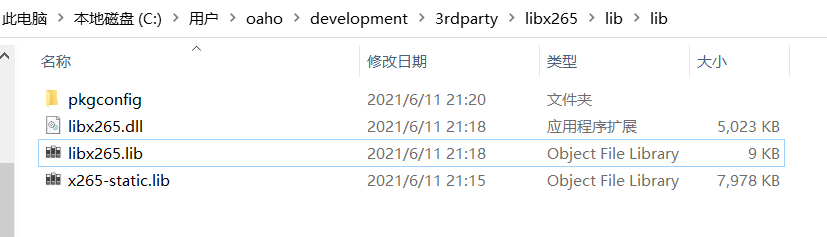
#Specify x64
cmake -Bbuild -A=x64
#Release
cmake --build build --config Release
cd build
cmake --install . --prefix="prefix path "
Note: you can also not specify – prefix, but cmd should be run with administrator privileges, because the default installation path is under Programs Files
As shown in the figure, static library and dynamic library are generated respectively
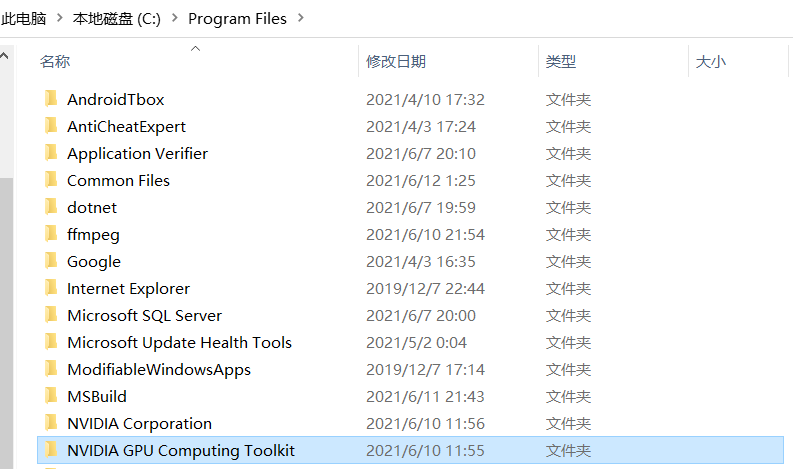
1.1.4 installing CUDA Toolkit
CUDA Toolkit Download . Select windows platform.
After downloading, it will be in this directory. There are include and lib in this directory
1.2 official start of compilation
- Pull ffnvcodec source code
git clone https://git.videolan.org/git/ffmpeg/nv-codec-headers.git
- Pull FFmpeg source code
git clone https://git.ffmpeg.org/ffmpeg.git
- Create a file named NV in the directory of FFmpeg source code_ SDK folder, copy C:\Program Files\NVIDIA GPU Computing Toolkit \ CUDA \ V11 All header files in 0 \ include and library files in C:\Program Files\NVIDIA GPU Computing Toolkit \ CUDA \ V11 0 \ lib \ x64 to nv_sdk folder.
- Start Visual Studio x64 Native Tools Command Prompt. From Visual Studio x64 Native Tools Command Prompt, run MinGW64.0 in the msys2 installation folder Exe to start the MinGW64 environment. Install the necessary packages in the MinGW64 environment.

#The following operations are on the mingw64 command line (opened by vs native tools)
pacman -S diffutils make pkg-config yasm
#Add cl.exe and link.exe of vc Path where exe is located
export PATH="/c/Users/oaho/development/visual studio/2019/Community/VC/Tools/MSVC/14.29.30037/bin/Hostx64/x64":$PATH
#Add cuda sdk directory
export PATH="/c/Program Files/NVIDIA GPU Computing Toolkit/CUDA/v11.0/bin/":$PATH
- Enter the source code directory of ffnvcodec (previously cloned)
make install PREFIX=/usr
- Enter FFmpeg source code directory
./configure --enable-nonfree --enable-shared --enable-cuda-sdk --enable-libnpp --toolchain=msvc --extra-cflags="-I../nv_sdk" --extra-ldflags="-libpath:../nv_sdk"
--prefix="Installation path"
Note: if you want to add x264 and x265 codecs. You can add the header file paths of x264 and x265 (separated by spaces) in -- extra cflags, and of course, you can also add the library path in -- extra ldflags
- make && make install
Compiling is very memory intensive
This completes the compilation.
2. Linux (CentOS 7.9) and unbuntu20 04 installation
2.1 Linux
There are two installation methods in Linux. The first is normal installation (CentOS 7.9 demonstrates normal installation), and the second is runfile installation. Ubuntu20.04, use runfile to install. Let's briefly talk about runfile installation and normal installation. Runfile installation is simpler and more versatile. However, if it is installed on a specific platform, it needs to be installed on a common platform.
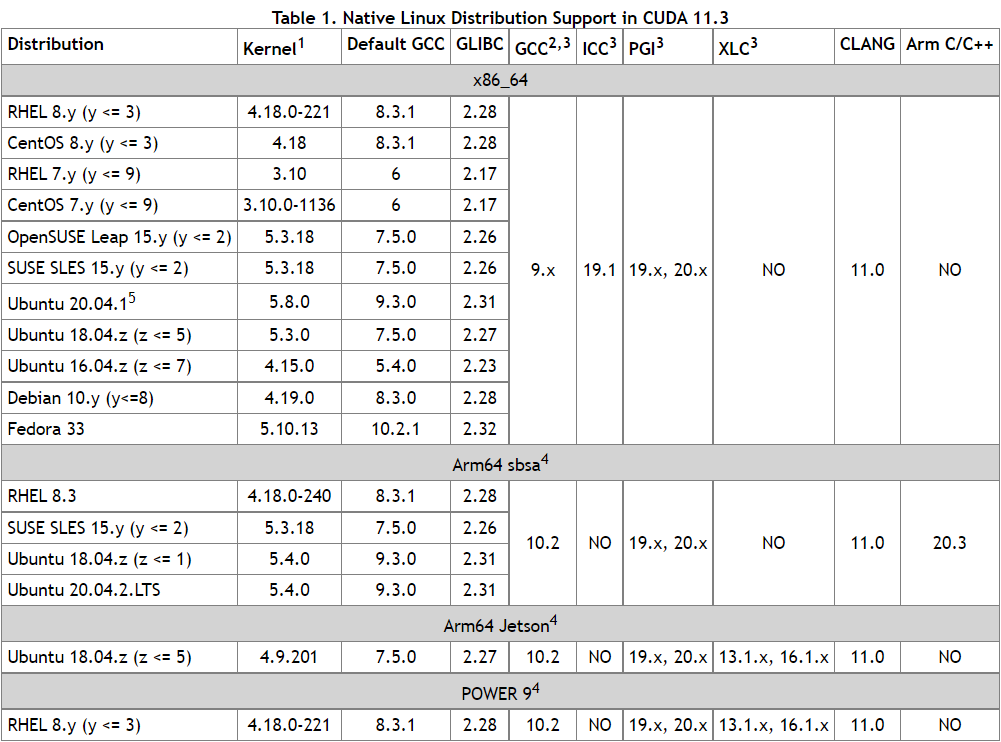
**Note: the following pre installation kernel requirements must follow the limitations given in the following table** For details, please refer to Description of system kernel requirements . Please also refer to NVIDIA official documents
Kernel supported versions
2.1.1 preparation before installation
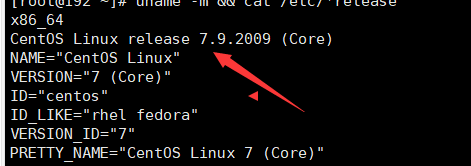
- Determine the version of your current system
uname -m && cat /etc/*release
- Confirm whether gcc is installed. If not, install gcc
#gcc version must be more than 6. Compare with the above table.
yum install gcc
- View kernel version
#For cuda11 3. The kernel of centos 7.9 Release must be 3.10.0-1136
uname -r
- Install kernel header files and development kits
yum install kernel-devel-$(uname -r) kernel-headers-$(uname -r)
2.1.2 installation of CUDA
#(1) Before installing, delete the old to prevent conflicts
sudo /usr/local/cuda-X.Y/bin/cuda-uninstaller
sudo /usr/bin/nvidia-uninstall

wget https://developer.download.nvidia.com/compute/cuda/11.3.1/local_installers/cuda-repo-rhel7-11-3-local-11.3.1_465.19.01-1.x86_64.rpm

#See if the output is 028fd3c6c0c3e6c392f053afa52ce2f1
#If not, the download is incomplete and needs to be downloaded again
md5sum cuda-repo-rhel7-11-3-local-11.3.1_465.19.01-1.x86_64.rpm
#(2) Download drivers and libraries
yum install https://dl.fedoraproject.org/pub/epel/epel-release-latest-7.noarch.rpm
yum install subscription-manager
#This step is for the subsequent SDL2 dependency
yum install libX*
yum -y install yum-utils
#The driver depends on /etc/X11/xorg.conf Automatically generated in xorg.conf Documents. If there are custom built #xorg.conf File, this feature will be disabled and the driver may not run. Delete existing xorg.conf File, or #/etc/X11/xorg.conf.d/00-nvidia. Add the contents of conf to xorg.com Conf file.

#Install the previously installed rpm
rpm --install cuda-repo-rhel7-11-3-local-11.3.1_465.19.01-1.x86_64.rpm

#(3) Add additional dependencies
#You may need to join the yum agent here, or the download will be slow
sudo yum-config-manager --add-repo https://developer.download.nvidia.com/compute/cuda/repos/rhel7/x86_64/cuda-rhel7.repo
#(4) Clear yum cache
sudo yum clean expire-cache
#(5) Install CUDA
sudo yum install nvidia-driver-latest-dkms
sudo yum install cuda
sudo yum install cuda-drivers
At this step, users of CentOS7 should jump to [2.3 verify successful installation] (#2.3 verify successful installation)
2.2 Ubuntu20.04
2.2.1 preparation before installation
- Install dependent Libraries
sudo apt-get install gcc
sudo apt-get install linux-headers-$(uname -r)
-
Disable Nouveau driver
- Create / etc / modprobe d/blacklist-nouveau. Conf, add the following contents to the file
blacklist nouveau
options nouveau modset=0
- Regenerate kernel files
sudo update-initramfs -u
-
Restart as runlevel 3
Here's how to start runlevel 3. Restart the computer and press E in the Ubuntu selection interface. Find the splash word, followed by nomodeset Finally, add 3 at the end of this line. Then press F10 After re entering the system
runlevel
#If N 3 is displayed, it is successful
Note: if you cannot enter the graphical interface after restart, it means success. If you enter the graphical interface, it means failure and try again.
If you cannot enter the command line, press Ctrl + Alt + F1
#Verify that you enter this command line. If there is no output, it indicates that the disabling is successful
lsmod | grep nouveau
2.2.2 installation of CUDA
wget https://developer.download.nvidia.com/compute/cuda/11.3.1/local_installers/cuda_11.3.1_465.19.01_linux.run
sudo sh cuda_11.3.1_465.19.01_linux.run  --no-opengl-libs --run-nvidia-xconfig
After successful installation, the path is in / usr/local/cuda-11.3
2.3 verify successful installation
-
View driver version
cat /proc/driver/nvidia/version
-
Mount NVIDIA device
modprobe nvidia
-
Enter the / dev directory to ensure the execution permission of nvdia * devices
chmod 666 nvidia*
-
Execute command detection
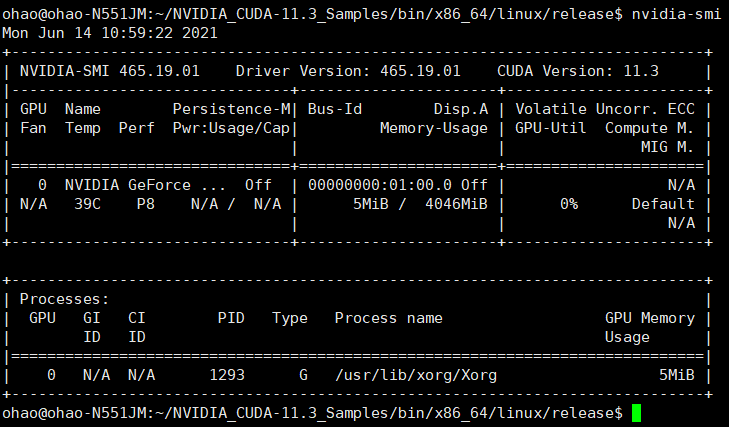
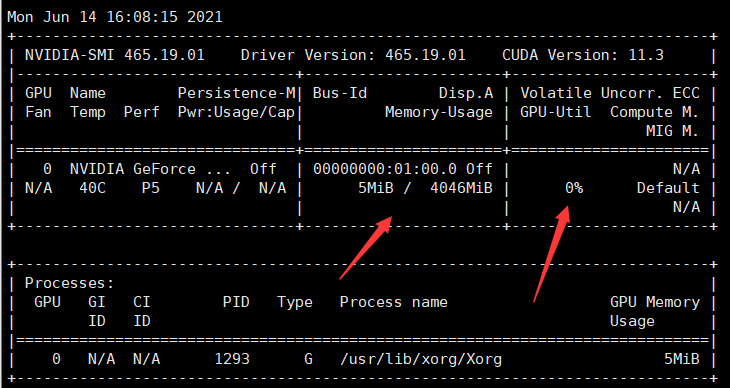
nvidia-smi
If the following displays, the driver installation is successful
If a prompt similar to the following appears. The driver installation failed
NVIDIA-SMI has failed because it couldn't communicate with the NVIDIA driver. Make sure that the latest NVIDIA driver is installed and running.
-
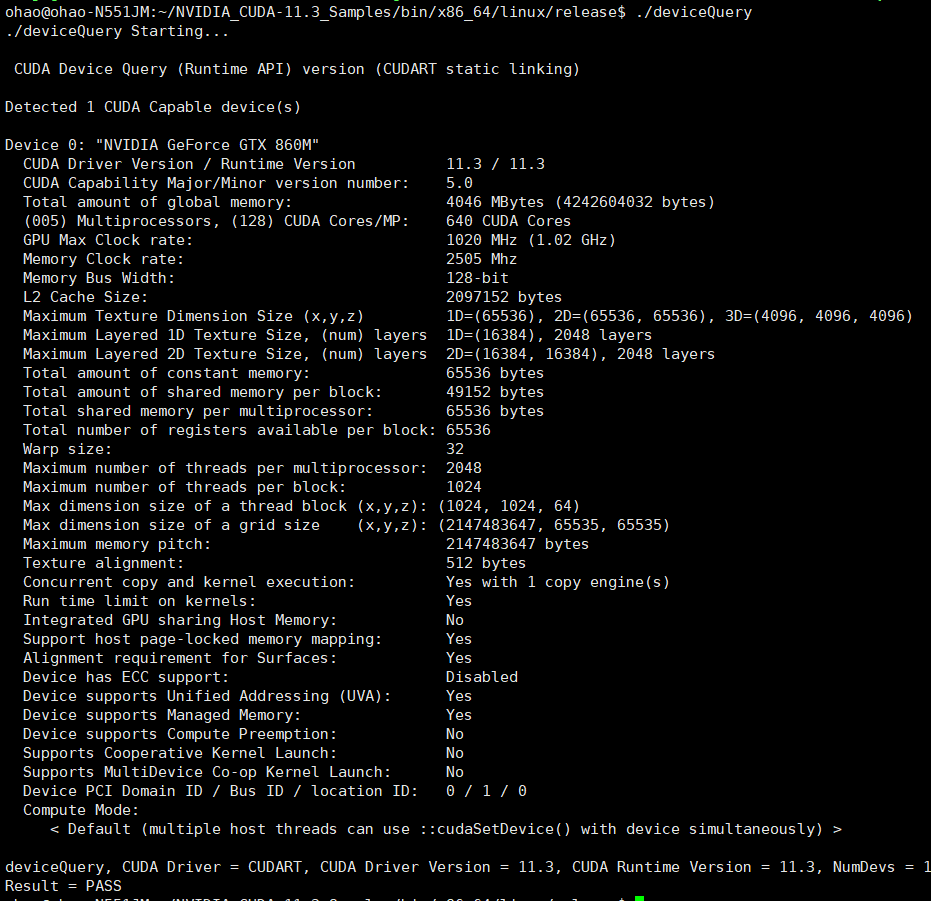
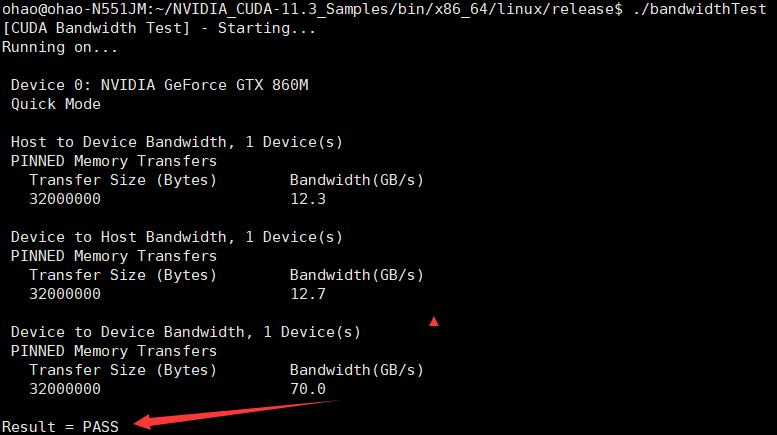
Run test
NVIDIA will appear in the user's home directory after successful installation_ CUDA-11.3_ Samples / folder, make after cd (compilation time is very long), enter the bin folder of the same directory and run/ deviceQuery and BandwidthTest. If successful, there will be a similar display.
2.4 start compilation
- Pull ffnvcodec and install it
git clone https://git.videolan.org/git/ffmpeg/nv-codec-headers.git
cd nv-codec-headers && sudo make install
- Pull ffmpeg
git clone https://git.ffmpeg.org/ffmpeg.git ffmpeg/
- Install required libraries
sudo apt-get install build-essential yasm cmake libtool libc6 libc6-dev unzip wget libnuma1 libnuma-dev
- to configure
./configure --enable-nonfree -–enable-cuda-sdk –enable-libnpp --extra-cflags=-I/usr/local/cuda/include --extra-ldflags=-L/usr/local/cuda/lib64
Here you can add the previously compiled x264 library according to your choice
- Compilation and installation
make && make install
2.1.1 compiling sdl2 (skippable)
./configure && make && make install
2.1.2 compile x264 (skip)
git clone https://code.videolan.org/videolan/x264.git
cd x264 && ./configure --disable-asm --prefix=/usr/local/x264 --enable-shared && make && make install && sudo ldconfig
#Add PKG config
export PKG_CONFIG_PATH=/usr/local/x264/lib/pkgconfig:${PKG_CONFIG_PATH}
2.1.3 compiling FFmpeg
- Install ffnvcodec
git clone https://git.videolan.org/git/ffmpeg/nv-codec-headers.git
- Pull FFmpeg source code
git clone https://git.ffmpeg.org/ffmpeg.git ffmpeg/
- Install dependent libraries and tools
yum install -y build-essential yasm cmake libtool libc6 libc6-dev unzip wget libnuma1 libnuma-dev
- Add the binary directory of cuda to the environment variable and PKG config
export PATH=/usr/local/cuda-11.3/bin${PATH:+:${PATH}}
#Note that if PKG_ CONFIG_ Path is empty, so you don't need to add ": ${PKG_CONFIG_PATH}"
export PKG_CONFIG_PATH=/usr/local/lib/pkgconfig:${PKG_CONFIG_PATH}
#Verify ffnvcodec version
pkg-config --modversion ffnvcodec
- Enter the ffmpeg source code directory and configure it
./configure --enable-nonfree -–enable-cuda-sdk –enable-libnpp --extra-cflags=-I/usr/local/cuda/include --extra-ldflags=-L/usr/local/cuda/lib64 --prefix=/root/ffmpeg-lib-cuda
Note: the paths of lib and include need to be changed here
- install
make && make install
Note: you can use make -j8 to increase compilation speed
- Configuration after installation (optional)
Note: if the installation prefix is configured, a soft link needs to be established
Note: if x264 is dynamically linked, you need to add the dynamic library path

2.5 complete compilation
Enter the following command to view the codec of H264 or H265
ffmpeg -codecs | grep nvenc
After success, it is shown in the figure below
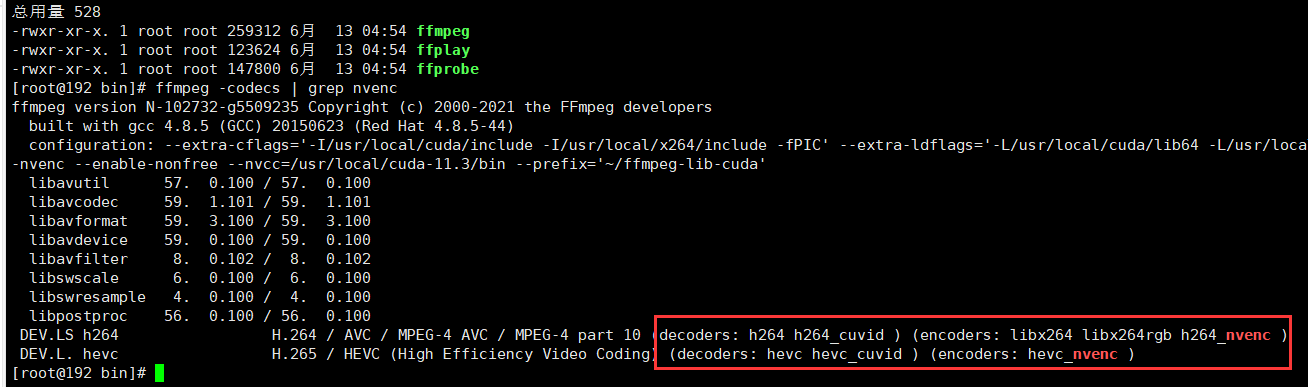
- nvenc_***: Encoder of nvdia
- *_ cuvid: nvdia decoder
3. NVIDIA codec test
3.1 using NVIDIA codec for ffmpeg
Note here that you should determine whether your graphics card supports these codes.
- h265 coding test
ffmpeg -s 1920x1080 -pix_fmt yuv420p -i BQTerrace_1920x1080_60.yuv -vcodec hevc_nvenc -r 60 -y 2_60.265
ffmpeg -s 1920x1080 -pix_fmt yuv420p -i BQTerrace_1920x1080_60.yuv -vcodec hevc_nvenc -r 30 -y 2_30.265
- h264 coding test
ffmpeg -s 1920x1080 -pix_fmt yuv420p -i BQTerrace_1920x1080_60.yuv -vcodec h264_nvenc -r 60 -y 2_60.264
ffmpeg -s 1920x1080 -pix_fmt yuv420p -i BQTerrace_1920x1080_60.yuv -vcodec h264_nvenc -r 30 -y 2_30.264
- h264 to h265
ffmpeg -i 1_60.264 -vcodec hevc_nvenc -r 60 -y 2_60_264to265.265
ffmpeg -i 1_30.264 -vcodec hevc_nvenc -r 30 -y 2_30_264to265.265
- h265 to h264
ffmpeg -i 1_60.265 -vcodec h264_nvenc -r 60 -y 2_60_265to264.264
ffmpeg -i 1_30.265 -vcodec h264_nvenc -r 30 -y 2_30_265to264.264
3.2 GPU usage view
watch -n 1 nvidia-smi
4. NVIDIA codec is used in the code
When using FFmpeg API, AVCodec codec can be changed to:
#Encoder using nvidia 264
av_find_encoder_by_name("h264_nvenc");
#Encoder using nvidia 265
av_find_encoder_by_name("hevc_nvenc");
FAQ
-
When compiling on windows platform, ffmpeg compilation log: invalid option, – extra ldflags will be ignored
-The adaptability of L option under windows is not very friendly. Use - libpath:: "path"
-
[h264_nvenc @ 0x5649bab0c500] 10 bit encode not supported
This coding is not supported by the graphics card. reference Video card codec support list
-
[h264_nvenc @ 0x5649bab0c500] No capable devices found
This can happen in many ways
- The drive is not installed properly
- The graphics card does not support this encoding
-
After disabling nouveau, the restart screen of Ubuntu will be black. And then the screen will be black
Restore nouveau drive
When using the API, the AVCodec codec can be changed to:
#Encoder using nvidia 264
av_find_encoder_by_name("h264_nvenc");
#Encoder using nvidia 265
av_find_encoder_by_name("hevc_nvenc");
FAQ
-
When compiling on windows platform, ffmpeg compilation log: invalid option, – extra ldflags will be ignored
-"The path of - lib:: is not suitable for windows"
-
[h264_nvenc @ 0x5649bab0c500] 10 bit encode not supported
This coding is not supported by the graphics card. reference Video card codec support list
-
[h264_nvenc @ 0x5649bab0c500] No capable devices found
This can happen in many ways
- The drive is not installed properly
- The graphics card does not support this encoding
-
After disabling nouveau, the restart screen of Ubuntu will be black. And then the screen will be black
Restore nouveau drive