Original text: https://circuitdigest.com/microcontroller-projects/arduino-fire-fighting-robot-code
Fire fighting robot based on Arduino
Pass by** Aswinth Raj **December 20, 2017

According to the National Criminal Records Bureau (NCRB), more than 1.2 million deaths have been caused by fire accidents in India from 2010 to 2014. Even though many preventive measures have been taken for fire accidents, these natural / man-made disasters do occur from time to time. In case of fire, we are forced to use unsafe human resources in order to rescue personnel and put out the fire. With the progress of technology, especially robot With the development of technology, it is possible to use robots instead of people to put out fire. This will improve the efficiency of firefighters and prevent them from risking their lives. Today, we will use Arduino to build a fire robot, which will automatically sense the fire and start the water pump
In this project, we will learn how to use Arduino to build a simple robot that can move towards the fire and pump water around it to put out the fire. This is a very simple robot, which can teach us the basic concepts of robot technology. With the following basic knowledge, you can build more complex robots. So let's start
Materials required:
- Arduino UNO
- Fire sensor or flame sensor (3)
- Servo motor (SG90)
- L293D motor driver module
- Micro DC submersible pump
- Small bread board
- Robot chassis with motor (2) and wheel (2) (any type)
- A small can
- Connecting line
Purchase all the above required Arduino fire robot components.
Working philosophy of fire robot:
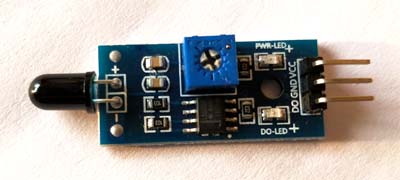
The main brain of the project is Arduino, but in order to sense the fire, we used the fire sensor module (fire sensor) as shown below.

As you can see, these sensors have infrared receivers (photodiodes) for detecting fires. How is this possible? When the fire burns, it emits a small amount of infrared light, which will be received by the IR receiver on the sensor module. Then, we use the operational amplifier to check the voltage change at both ends of the IR receiver, so that when a fire is detected, the output of the output pin (DO) is 0V (LOW), and if there is no fire, the output of the output pin is 5V (high).
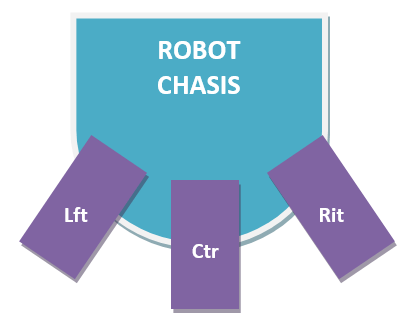
Therefore, we put three such sensors in three directions of the robot to sense which direction the fire burns.

We can detect the direction of fire by driving our motor through L293D module, so that the motor can move near the fire. When there is a fire, we must put out the fire with water. Using a small container, we can carry water, a 5V pump is also placed in the container, and the whole container is placed on the top of the servo motor, so that we can control the direction of water spraying. Now let's continue the connection
Circuit diagram:
The complete circuit diagram of the fire robot is shown below

Check whether all the above programs are connected properly, and then you can continue to check whether all the programs are connected properly. Both methods of connection are very simple, and you should be able to connect correctly.
Depending on the mechanical mobile phone case you use, you may not be able to use the same type of container as I use. In this case, please use your own creativity to set up the pump system. However, the code will remain unchanged. I put the pump in a small aluminum can (cold drink can) and pour water into it. Then I assembled the whole jar on the top of the servo motor to control the direction of the water. After assembly, my robot looks like this.


Glue the servo motor to the bottom of the container and fix it with the nut as you can see. We can simply place the container on the top of the motor and trigger the pump in it to pump the water to the outside through the pipe. The server can then be used to rotate the entire container to control the direction of the water.
Programming Arduino:
Once the hardware is ready, you can upload Arduino code to perform certain operations. The complete program is at the end of this page. However, I have further explained some important details here.
As we all know, the fire sensor will output high level in case of fire and low level in case of fire. Therefore, if there is any fire, we must continue to check these sensors. If there is no fire, keep the motor stopped by raising all pins, as shown below
    if(digitalRead(Left_S)== 1 && digitalRead(Right_S)== 1 && digitalRead(Forward_S)== 1)//If no fire is detected, all sensors are zero
    {
    //Don't move the robot
    digitalWrite(LM1,HIGH);
    digitalWrite(LM2,HIGH);
    digitalWrite(RM1,HIGH);
    digitalWrite(RM2,HIGH);
    }
Similarly, in case of fire, we can ask the robot to move in this direction by rotating the corresponding motor. Once there is a fire, the left and right sensors will not detect the fire because it will stand directly in front of the fire. Now, we use a variable called "fire", which will perform the function of preventing fire.
 else if (digitalRead(Forward_S) ==0) //If Fire is straight ahead
    {
    //Move the robot forward
    digitalWrite(LM1, HIGH);
    digitalWrite(LM2, LOW);
    digitalWrite(RM1, HIGH);
    digitalWrite(RM2, LOW);
    fire = true;
    }
Once the variable fire becomes true, the arduino code of the fire robot will execute put_off_fire function until the fire is extinguished. This is done using the following code.
     while(fire == true)
     {
      put_off_fire();
     }
On put_ off_ Inside fire(), we only need to stop the robot by setting all pins to high level. Then turn on the pump and push the water out of the container. At the same time, we can also use the servo motor to rotate the container to distribute the water evenly throughout the container. This is done using the following code
void put_off_fire()
{
     delay (500);
    digitalWrite(LM1, HIGH);
    digitalWrite(LM2, HIGH);
    digitalWrite(RM1, HIGH);
    digitalWrite(RM2, HIGH);
   digitalWrite(pump, HIGH); delay(500);
    for (pos = 50; pos <= 130; pos += 1) {
    myservo.write(pos);
    delay(10);
  }
 for (pos = 130; pos >= 50; pos -= 1) {
    myservo.write(pos);
    delay(10);
  }
  digitalWrite(pump,LOW);
  myservo.write(90);
    fire=false;
}
Work of fire robot:
It is recommended to check the output of the robot step by step instead of running together for the first time. You can install the robot on the servo motor and check whether it can successfully follow the fire. Then, you can check whether the pump and servo motor are working properly. Once everything is working properly, you can run the following program and enjoy all the work of the fireman robot.

See the video below for the complete working principle of the robot. The maximum distance that a fire can be detected depends on the size of the fire, which is relatively small for small matchsticks. You can also use the potentiometer on the top of the module to control the sensitivity of the robot. I've used mobile power to power the robot. You can use batteries or even 12V batteries to power it.
I hope you understand the project and enjoy building something similar. If you have any problems building this version, please use the comments section below to post your requirements or use the forum for technical assistance.
View our Robotics, To find more great DIY robots.
/*------ Arduino Fire Fighting Robot Code----- */

#include <Servo.h>
Servo myservo;

int pos = 0;
boolean fire = false;

/*-------defining Inputs------*/
#define Left_S 9      // left sensor
#define Right_S 10      // right sensor
#define Forward_S 8 //forward sensor

/*-------defining Outputs------*/
#define LM1 2       // left motor
#define LM2 3       // left motor
#define RM1 4       // right motor
#define RM2 5       // right motor
#define pump 6

void setup()
{
  pinMode(Left_S, INPUT);
  pinMode(Right_S, INPUT);
  pinMode(Forward_S, INPUT);
  pinMode(LM1, OUTPUT);
  pinMode(LM2, OUTPUT);
  pinMode(RM1, OUTPUT);
  pinMode(RM2, OUTPUT);
  pinMode(pump, OUTPUT);

  myservo.attach(11);
  myservo.write(90);
}

void put_off_fire()
{
    delay (500);

    digitalWrite(LM1, HIGH);
    digitalWrite(LM2, HIGH);
    digitalWrite(RM1, HIGH);
    digitalWrite(RM2, HIGH);

   digitalWrite(pump, HIGH); delay(500);

    for (pos = 50; pos <= 130; pos += 1) {
    myservo.write(pos);
    delay(10);
  }
  for (pos = 130; pos >= 50; pos -= 1) {
    myservo.write(pos);
    delay(10);
  }

  digitalWrite(pump,LOW);
  myservo.write(90);

  fire=false;
}

void loop()
{
   myservo.write(90); //Sweep_Servo();

    if (digitalRead(Left_S) ==1 && digitalRead(Right_S)==1 && digitalRead(Forward_S) ==1) //If Fire not detected all sensors are zero
    {
    //Do not move the robot
    digitalWrite(LM1, HIGH);
    digitalWrite(LM2, HIGH);
    digitalWrite(RM1, HIGH);
    digitalWrite(RM2, HIGH);
    }

    else if (digitalRead(Forward_S) ==0) //If Fire is straight ahead
    {
    //Move the robot forward
    digitalWrite(LM1, HIGH);
    digitalWrite(LM2, LOW);
    digitalWrite(RM1, HIGH);
    digitalWrite(RM2, LOW);
    fire = true;
    }

    else if (digitalRead(Left_S) ==0) //If Fire is to the left
    {
    //Move the robot left
    digitalWrite(LM1, HIGH);
    digitalWrite(LM2, LOW);
    digitalWrite(RM1, HIGH);
    digitalWrite(RM2, HIGH);
    }

    else if (digitalRead(Right_S) ==0) //If Fire is to the right
    {
    //Move the robot right
    digitalWrite(LM1, HIGH);
    digitalWrite(LM2, HIGH);
    digitalWrite(RM1, HIGH);
    digitalWrite(RM2, LOW);
    }

delay(300); //Slow down the speed of robot

     while (fire == true)
     {
      put_off_fire();
     }
}