Flutter is a cross platform development of the mobile terminal. A set of code can be run on Android and iOS systems respectively, which can save development time and efficiency. At this stage, flutter is still in the stage of continuous development and updating, and can not fully adapt to multiple systems, especially calling some native functions, such as photo album, camera, address book, etc. At this time, it is necessary to call fluent and iOS or Android for hybrid development. The mixed development of flutter can be roughly divided into two scenarios. One is to take flutter as the main project to remove the function of using original sound, and the other is to embed flutter as a small module into the project based on native sound.
I Fluent calls native functions
Take the camera and battery as an example to introduce the native function called by the fluent
1.1. Camera
Some applications may need to use mobile devices to take photos or select photos in photo albums. The official plug-in provided by FLUENT is image_picker
1.1.1. Add dependency
Add to image_ Picker dependency: https://pub.dev/packages/image_picker
dependencies:
  image_picker: ^0.6.5
1.1.2. Platform configuration
For iOS platform, if you want to access photo albums or cameras, you need to obtain the user's permission:
- Still modify info Plist file: / IOS / Runner / info plist
- Add access to album: Privacy - Photo Library Usage Description
- Add access to the camera: Privacy - Camera Usage Description

1.1.3. code implementation
image_ The core code of picker is the pickImage method:
- You can input data source, picture size, quality, front and rear cameras, etc
- Data source is a required parameter: ImageSource enumeration type
- Camera: camera
- gallery: photo album
import 'package:flutter/material.dart';
import 'dart:io';
import 'package:image_picker/image_picker.dart';

class HYCameraScreen extends StatefulWidget {
  static const String routeName = "/camera";

  @override
  _HYCameraScreenState createState() => _HYCameraScreenState();
}

class _HYCameraScreenState extends State<HYCameraScreen> {
  File _image;

  @override
  Widget build(BuildContext context) {
    return Scaffold(
      appBar: AppBar(
        title: Text("Camera"),
      ),
      body: Center(
        child: Column(
          mainAxisAlignment: MainAxisAlignment.center,
          children: <Widget>[
            _image == null ? Text("No pictures selected"): Image.file(_image),
            RaisedButton(
              child: Text("Select photos"),
              onPressed: _pickImage,
            )
          ],
        ),
      ),
    );
  }

  void _pickImage() async {
    File image = await ImagePicker.pickImage(source: ImageSource.gallery);
    setState(() {
      _image = image;
    });
  }
}
1.2. Battery information
For some native information, if there is no good plug-in, we can obtain information through platform channels.
1.2.1. Introduction to platform channel
How does the platform channel work?
- Messages are transmitted between the client (UI) and the host (platform) using platform channels;
- Messages and responses are delivered asynchronously to ensure that the user interface can maintain response;
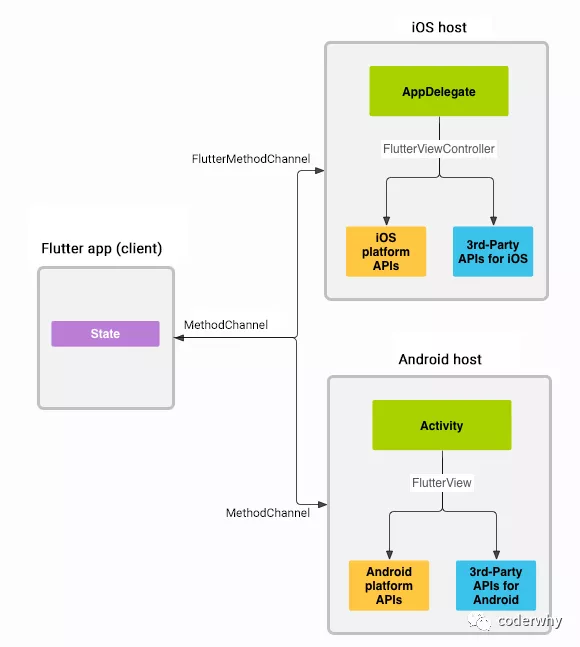
The calling process is as follows:
- 1. The client (fluent side) sends the message corresponding to the method call
- 2. The platform (iOS, Android) receives the method and returns the result;
- The iOS end responds through the FlutterMethodChannel;
- The Android end responds through the MethodChannel;
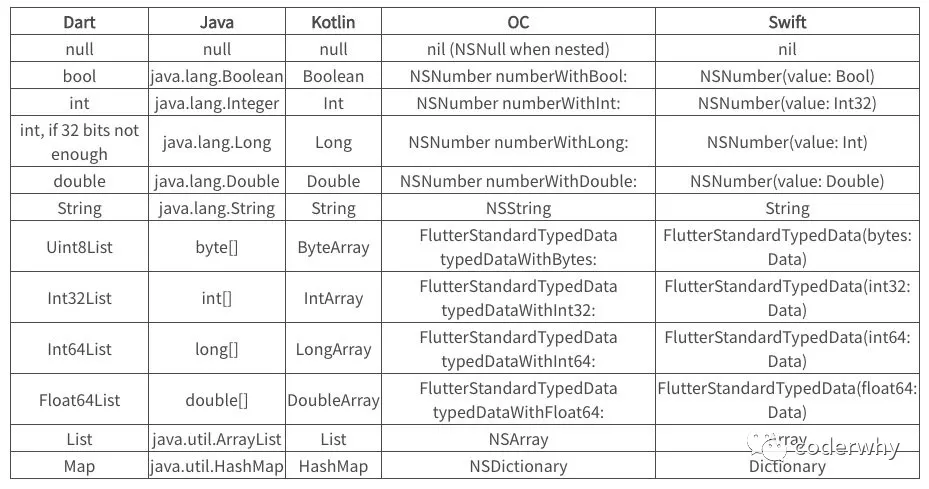
Correspondence of data types on fluent, iOS and Android:
1.2.2. Create test project
Here we create a project to obtain battery power information, and obtain the corresponding information through iOS and Android native codes respectively:
Creation method 1: default creation method
Currently, the Flutter project is created by default. The corresponding iOS programming language is Swift and the corresponding Android programming language is kotlin
flutter create batterylevel
Creation method 2: specify the programming language
If we want to specify the programming language, for example, the iOS programming language is Objective-C and the Android programming language is Java
flutter create -i objc -a java batterylevel2
1.2.3. Write Dart code
In Dart code, we need to create a MethodChannel object:
- When creating this object, you need to pass in a name, which is the name that distinguishes multiple communications
- You can send messages to the corresponding platform for communication by calling the invokeMethod of the object
- This call is an asynchronous operation. You need to get the result through await then callback
import 'package:flutter/material.dart';
import 'package:flutter/services.dart';

void main() => runApp(MyApp());


class MyApp extends StatelessWidget {
  @override
  Widget build(BuildContext context) {
    return MaterialApp(
      title: 'Flutter Demo',
      theme: ThemeData(
          primarySwatch: Colors.blue, splashColor: Colors.transparent),
      home: HYBatteryScreen(),
    );
  }
}

class HYBatteryScreen extends StatefulWidget {
  static const String routeName = "/battery";

  @override
  _HYBatteryScreenState createState() => _HYBatteryScreenState();
}

class _HYBatteryScreenState extends State<HYBatteryScreen> {
  // Core code 1:
  static const platform = const MethodChannel("dzq.com/battery");
  int _result = 0;

  @override
  Widget build(BuildContext context) {
    return Scaffold(
      appBar: AppBar(
        title: Text("Battery"),
      ),
      body: Center(
        child: Column(
          children: <Widget>[
            Text("Current battery information: $_result"),
            RaisedButton(
              child: Text("Get battery information"),
              onPressed: getBatteryInfo,
            )
          ],
        ),
      ),
    );
  }

  void getBatteryInfo() async {
    // Core code 2
    final int result = await platform.invokeMethod("getBatteryInfo");
    setState(() {
      _result = result;
    });
  }
}
When we pass the platform Invokemethod: when calling the corresponding platform method, its operation needs to be implemented on the corresponding platform:
- iOS can be implemented through Objective-C or Swift
- Android can be implemented in Java or Kotlin
1.2.4. Writing iOS code
1.2.4.1. Swift code implementation
The operation steps related to the code are as follows:
- 1. Get the fluterviewcontroller (which is the default controller of the application)
- 2. Get methodchannel
- Note: Here we need to get the information according to the name when we created it
- 3. Listen for method calls (the incoming callback function will be called)
- How to get information in iOS
- If it is not obtained, an exception is returned to the fluent end
- Callback the result to the fluent end through result
- 3.1. Judge whether it is a call to getBatteryInfo, and tell the Flutter that the corresponding method is not implemented
- 3.2. If the method of getBatteryInfo is called, the callback is implemented through another encapsulated method
-
import UIKit
import Flutter

@UIApplicationMain
@objc class AppDelegate: FlutterAppDelegate {
  override func application(
    _ application: UIApplication,
    didFinishLaunchingWithOptions launchOptions: [UIApplication.LaunchOptionsKey: Any]?
  ) -> Bool {

    // 1.obtain FlutterViewController(Is the default for the application Controller)
    let controller : FlutterViewController = window?.rootViewController as! FlutterViewController

    // 2.obtain MethodChannel(Method channel)
    let batteryChannel = FlutterMethodChannel(name: "coderwhy.com/battery",
                                              binaryMessenger: controller.binaryMessenger)

    // 3.Listen for method calls(The incoming callback function is called)
    batteryChannel.setMethodCallHandler({
      [weak self] (call: FlutterMethodCall, result: FlutterResult) -> Void in
      // 3.1.Judge whether it is getBatteryInfo Call of,inform Flutter The client does not implement the corresponding method
      guard call.method == "getBatteryInfo" else {
        result(FlutterMethodNotImplemented)
        return
      }
      // 3.2.If you call getBatteryInfo Method of, Then implement the callback through another encapsulated method
      self?.receiveBatteryLevel(result: result)
    })

    GeneratedPluginRegistrant.register(with: self)
    return super.application(application, didFinishLaunchingWithOptions: launchOptions)
  }

  private func receiveBatteryLevel(result: FlutterResult) {
    // 1.iOS How to get information in
    let device = UIDevice.current
    device.isBatteryMonitoringEnabled = true

    // 2.If not obtained,Then return to Flutter There is an exception at the end
    if device.batteryState == UIDevice.BatteryState.unknown {
      result(FlutterError(code: "UNAVAILABLE",
                          message: "Battery info unavailable",
                          details: nil))
    } else {
      // 3.adopt result Callback results to Flutter end
      result(Int(device.batteryLevel * 100))
    }
  }
}
- Not found 'shutter'
1,Clean up first
flutter clean

2,Loading plug-ins
flutter pub get

3,compile ios
flutter build ios

If the third step can't be solved, go straight to the following
4,hold flutter project->build->ios Drag the following two directories to ios->Flutter Under the directory
 Specific steps
as Right click to open build->ios->App.framework Directory, in the folder App.framework and Flutter.framework Drag to xcode of Flutter Directory and import
1.2.5. Writing Android code
1.2.5.1. Kotlin code implementation
The implementation idea is consistent with the above, but Kotlin is used to implement:
- You can refer to the notes
import androidx.annotation.NonNull
import io.flutter.embedding.android.FlutterActivity
import io.flutter.embedding.engine.FlutterEngine
import io.flutter.plugin.common.MethodChannel

import android.content.Context
import android.content.ContextWrapper
import android.content.Intent
import android.content.IntentFilter
import android.os.BatteryManager
import android.os.Build.VERSION
import android.os.Build.VERSION_CODES

class MainActivity: FlutterActivity() {
    private val CHANNEL = "coderwhy.com/battery"

    override fun configureFlutterEngine(@NonNull flutterEngine: FlutterEngine) {
        // 1.establish MethodChannel object
        val methodChannel = MethodChannel(flutterEngine.dartExecutor.binaryMessenger, CHANNEL)

        // 2.Add callback to call method
        methodChannel.setMethodCallHandler {
            // Note: this method is invoked on the main thread.
            call, result ->
            // 2.1.If the method called is getBatteryInfo,Then perform normally
            if (call.method == "getBatteryInfo") {
                // 2.1.1.Call another custom method to retrieve the information
                val batteryLevel = getBatteryLevel()

                // 2.1.2. Judge whether it is obtained normally
                if (batteryLevel != -1) {
                    // Get returned results
                    result.success(batteryLevel)
                } else {
                    // Get throw exception not found
                    result.error("UNAVAILABLE", "Battery level not available.", null)
                }
            } else {
                // 2.2.If the method called is getBatteryInfo,Then perform normally
                result.notImplemented()
            }
        }
    }

    private fun getBatteryLevel(): Int {
        val batteryLevel: Int
        if (VERSION.SDK_INT >= VERSION_CODES.LOLLIPOP) {
            val batteryManager = getSystemService(Context.BATTERY_SERVICE) as BatteryManager
            batteryLevel = batteryManager.getIntProperty(BatteryManager.BATTERY_PROPERTY_CAPACITY)
        } else {
            val intent = ContextWrapper(applicationContext).registerReceiver(null, IntentFilter(Intent.ACTION_BATTERY_CHANGED))
            batteryLevel = intent!!.getIntExtra(BatteryManager.EXTRA_LEVEL, -1) * 100 / intent.getIntExtra(BatteryManager.EXTRA_SCALE, -1)
        }

        return batteryLevel
    }
}
II Embed original project
First of all, let's make it clear that the original intention of FLUENT is not to develop with other platforms, but to build a complete cross platform application.
However, in the actual development, it is unrealistic for the original project to completely use fluent for reconstruction. For the original project, we are more likely to adopt the method of mixed development.
2.1. Creating a Flutter module
For the original projects requiring mixed development, fluent can be inherited into the existing projects as a library or module.
- The module is introduced into your Android or iOS application to render part of the UI or shared Dart code using fluent.
- In fluent v1 12, the basic scenarios added to existing applications have been supported, and each application can integrate a full screen Flutter instance at the same time.
However, some scenarios are still limited:
- Running multiple instances of Flutter or running Flutter locally on the screen may lead to unpredictable behavior;
- The ability to use fluent in the background mode is still under development (not supported at present);
- It is not supported to package the Flutter library into another sharable library or package multiple Flutter libraries into the same application;
- The implementation of the application on the Android platform is based on the FlutterPlugin API. Some plug-ins that do not support FlutterPlugin may have unpredictable behavior.
Creating a shutter module
flutter create --template module my_flutter
After the module is created, it can be opened, developed and run through Android Studio or VSCode;
The directory structure is as follows:
- Different from previous projects, iOS and Android projects are hidden files, and we usually don't open them separately to run;
- Their function is to compile the fluent module and then inherit it into the existing project;
my_flutter/
├── .ios/
├── .android/
├── lib/
│   └── main.dart
├── test/
└── pubspec.yaml
2.2. Embedded iOS project
There are many ways to embed into existing iOS projects:
- You can use CocoaPods dependency management and the installed fluent SDK;
- You can also manually compile the fluent engine, your dart code and all the fluent plugins into a framework, manually integrate them into your application with Xcode, and update the compilation settings;
At present, almost all iOS projects have been managed by cocoapods, so the first cocoapods method is recommended;
We build an iOS project that needs to be inherited in the following way:
1. For testing, we create a default iOS project here: just use Xcode to create it
2. Add the project to CocoaPods for management
- CocoaPods needs to be installed on your computer
Initialize CocoaPods:
pod init
Dependencies for installing CocoaPods:
pod install
Compile Podfile file:
# Uncomment the next line to define a global platform for your project
# platform :ios, '9.0'

# Add the path where the module is located
flutter_application_path = '../my_flutter'
load File.join(flutter_application_path, '.ios', 'Flutter', 'podhelper.rb')

target 'ios_my_test' do
  # Comment the next line if you don't want to use dynamic frameworks
  use_frameworks!

  # Installing the Flutter module
  install_all_flutter_pods(flutter_application_path)

  # Pods for ios_my_test

end
Re execute the dependency of installing CocoaPods:
pod install
2.2.1. Swift code
In order to display the Flutter page in existing iOS applications, you need to start the} Flutter Engine and} fluterviewcontroller.
It is generally recommended to preheat a "long-lived" FlutterEngine for our application:
- We will create a FlutterEngine in the app delegate launched by the application and expose it to the outside world as an attribute
import UIKit
import FlutterPluginRegistrant

@UIApplicationMain
class AppDelegate: UIResponder, UIApplicationDelegate {
   // 1.Create a FlutterEngine object
    lazy var flutterEngine = FlutterEngine(name: "my flutter engine")

    func application(_ application: UIApplication, didFinishLaunchingWithOptions launchOptions: [UIApplication.LaunchOptionsKey: Any]?) -> Bool {
       // 2.start-up flutterEngine
        flutterEngine.run()
        return true
    }
}
In the started ViewController, create a UIButton, and click this Button to pop up the FlutterViewController
import UIKit
import Flutter

class ViewController: UIViewController {

    override func viewDidLoad() {
        super.viewDidLoad()

       // 1.Create a button
        let button = UIButton(type: UIButton.ButtonType.custom)
        button.addTarget(self, action: #selector(showFlutter), for: .touchUpInside)
        button.setTitle("Show Flutter", for: .normal)
        button.frame = CGRect(x: 80, y: 210, width: 160, height: 40)
        button.backgroundColor = UIColor.blue
        self.view.addSubview(button)
    }

    @objc func showFlutter() {
        // 2.establish FlutterViewController Object (need to get first) flutterEngine)
        let flutterEngine = (UIApplication.shared.delegate as! AppDelegate).flutterEngine;
        let flutterViewController = FlutterViewController(engine: flutterEngine, nibName: nil, bundle: nil);
        navigationController?.pushViewController(flutterViewController, animated: true);
    }
}
We can also omit the pre created FlutterEngine: This is not recommended because there may be a significant delay before the first pin image is rendered.
2.3. Embedded Android project
There are many ways to embed into existing Android projects:
- Compile as AAR file (Android Archive)
- Compile it into aar through fluent and add relevant dependencies
- It depends on the source code of the module and is configured in gradle
Here we use the second method
1. Create an Android test project using Android Studio
2. Add related dependencies
Modify settings in Android project Gradle file:
include ':app'                                     // assumed existing content
setBinding(new Binding([gradle: this]))                                 // new
evaluate(new File(                                                      // new
  settingsDir.parentFile,                                               // new
  'my_flutter/.android/include_flutter.groovy'                          // new
))
In addition, we need to build. 0 in the Android project Add dependencies to gradle:
dependencies {
  implementation project(':flutter')
}
When compiling the code, the following errors may occur:
- This is because interface methods have only been supported since Java 8
- The Flutter Android engine uses the new features of Java 8

Solution: by setting the build.exe of Android project The gradle configuration is compiled using java 8:
 compileOptions {
    sourceCompatibility 1.8
    targetCompatibility 1.8
  }
Next, let's try to add a screen of fluent to the Android application
Flutter provides a fluteractivity to show the flutter interface. In the Android application, we need to register the fluteractivity first:
- At androidmanifest Register in XML
<activity
  android:name="io.flutter.embedding.android.FlutterActivity"
  android:theme="@style/AppTheme"
  android:configChanges="orientation|keyboardHidden|keyboard|screenSize|locale|layoutDirection|fontScale|screenLayout|density|uiMode"
  android:hardwareAccelerated="true"
  android:windowSoftInputMode="adjustResize"
  />
2.3.1. Java code
package com.coderwhy.testandroid;
import androidx.appcompat.app.AppCompatActivity;
import android.os.Bundle;
import io.flutter.embedding.android.FlutterActivity;

public class MainActivity extends AppCompatActivity {
    @Override
    protected void onCreate(Bundle savedInstanceState) {
        super.onCreate(savedInstanceState);
//        setContentView(R.layout.activity_main);
        startActivity(
            FlutterActivity.createDefaultIntent(this)
        );
    }
}
You can also pass in the default route when creating
package com.coderwhy.testandroid;
import androidx.appcompat.app.AppCompatActivity;
import android.os.Bundle;
import io.flutter.embedding.android.FlutterActivity;

public class MainActivity extends AppCompatActivity {
    @Override
    protected void onCreate(Bundle savedInstanceState) {
        super.onCreate(savedInstanceState);
//        setContentView(R.layout.activity_main);
        startActivity(
          FlutterActivity
          .withNewEngine()
          .initialRoute("/my_route")
          .build(currentActivity)
        );
    }
}
2.3.2. Kotlin code
package com.coderwhy.test_demo_a_k

import androidx.appcompat.app.AppCompatActivity
import android.os.Bundle
import io.flutter.embedding.android.FlutterActivity

class MainActivity : AppCompatActivity() {
    override fun onCreate(savedInstanceState: Bundle?) {
        super.onCreate(savedInstanceState)
//        setContentView(R.layout.activity_main)
        startActivity(
            FlutterActivity.createDefaultIntent(this)
        )
    }
}

You can also specify a route at creation time

package com.coderwhy.test_demo_a_k

import androidx.appcompat.app.AppCompatActivity
import android.os.Bundle
import io.flutter.embedding.android.FlutterActivity

class MainActivity : AppCompatActivity() {
    override fun onCreate(savedInstanceState: Bundle?) {
        super.onCreate(savedInstanceState)
//        setContentView(R.layout.activity_main)
        startActivity(
            FlutterActivity
                .withNewEngine()
                .initialRoute("/my_route")
                .build(this)
        );
    }
}
III Flutter module commissioning
Once you inherit the fluent module into your project and run the fluent engine or UI using the API of the fluent platform, you can build your own Android or iOS project like ordinary Android or iOS
However, Flutter has a great advantage in its rapid development, that is, hot reload.
How can we use hot reload to speed up our debugging speed corresponding to the fluent module?
- You can use the shuttle attach
# --app-id Which application is specified
# -d Yes, specify which device to connect
flutter attach --app-id com.coderwhy.ios-my-test -d 3D7A877C-B0DD-4871-8D6E-0C5263B986CD