Before the text begins, let's organize the data, and all the data in Firebase's real-time database is stored as Json objects. We can think of this database as a cloud managed Json tree, which, unlike the SQL database, has no tables or records. When we add data to the Json tree, it becomes a node in the existing Json structure.
Although Firebase real-time databases allow for up to 32 layers of nested data, when we extract data from a location in the database, we also retrieve all child nodes. In addition, when we grant a user read and write access to a node in the database, we also grant access to all data under that node to that user.
In Firebase real-time database, the best way of data structure is to flatten the data structure, and the data is split into different paths (also known as de-normalization), which can be downloaded effectively through different calls as needed. Even if the list contains tens of thousands of records, it can be extracted and displayed separately to ensure timely UI response and speed.
{
    "users": {
        "1380001": {
            "email": "xingmi@163.com",
            "name": "Xiao Ming",
            "password": "123456",
            "phone": "1380001"
        },
        "1380002": {
            "..": ".."
        },
        "1380003": {
            "..": ".."
        }
    },
    "chats": {
        "1380001": {
            "1380002": {
                "name": "Xiaohong",
                "phone": "1380002",
                "messages": "13800011380002",
                "lastMessage": "There seems to be something wrong with the circuit!",
                "timestamp": 1459361875666,
                "activate": "true"
            },
            "1380003": {
                "name": "Xiaogang",
                "phone": "1380003",
                "messages": "13800011380003",
                "lastMessage": "When problems are found, some people connect the ground wire with the fire wire.",
                "timestamp": 1459361875666,
                "activate": "false"
            }
        },
        "1380002": {
            "..": ".."
        },
        "1380003": {
            "..": ".."
        }
    },
    "messages": {
        "13800011380002": {
            "Ph6dARrtdEAUY5PDL2gt": {
                "name": "Xiaohong",
                "message": "There seems to be something wrong with the circuit!"
            },
            "x415NpxFZM2CJiBRMCcL": {
                "..": ".."
            }
        },
        "13800011380003": {
            "..": ".."
        },
        "13800031380002": {
            "..": ".."
        }
    }
}
In our application, the user profile is located in the "/users" path. Now there is the account'/ users/1380001', which retrieves all sessions under'/ chats/1380001', and reads all chat messages in'/ messages'through the value of'/ chats/1380001/messages'.
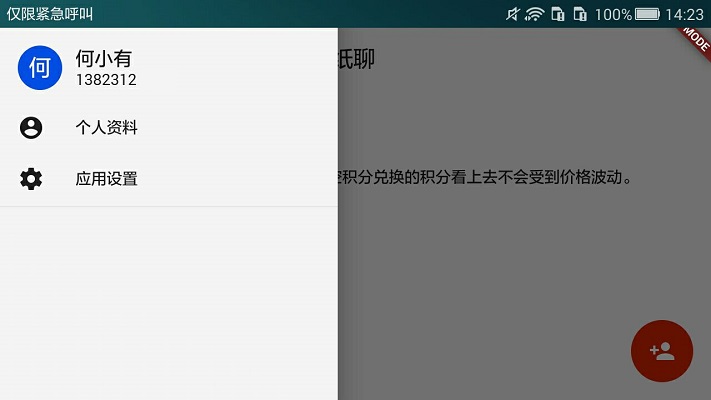
In the previous article, we implemented the basic UI of the chat list screen. In this text, we will specifically implement the function of adding sessions. The specific implementation is that when the user clicks the Add button at the bottom right, it will enter the add session screen, so we need to create a new add_session.dart file in the / lib directory, and add the following code.
import 'package:flutter/material.dart';
import 'package:firebase_database/firebase_database.dart';
import 'dart:async';
import 'prompt_wait.dart';

class AddSession extends StatefulWidget {
  AddSession(this.myPhone);
  final String myPhone;

  @override
  State createState() => new _AddSessionState(myPhone);
}

class _AddSessionState extends State<AddSession> {
  _AddSessionState(this._myPhone);
  final String _myPhone;

  @override
  Widget build(BuildContext context) {
    return new SimpleDialog(title: new Text("Adding Sessions"), children: <Widget>[
      new Text("Here are some related controls");
    ]);
  }
}
After adding the add_session.dart file, we need to associate the Add button in the chat list screen with the add session screen. Modify the group_chat_list.dart file and add the following code. After the user clicks the button, it jumps to the Add Session screen. This passes the mobile phone number of the current account to the add session screen so that we can access the data node of the corresponding account to add or modify the data.
//...
import 'add_session.dart';
//...
class _GroupChatListState extends State<GroupChatList> {
  //...
  void _floatingButtonCallback() {
    showDialog<Null>(
        context: context, barrierDismissible: false, child: new AddSession(phone));
  }
  //...
  Widget build(BuildContext context) {
  //...
    return new Scaffold(
        //...
        floatingActionButton: new FloatingActionButton(
            backgroundColor: Colors.orange[800],
            elevation: 0.0,
            onPressed: _floatingButtonCallback,
            child: new Icon(Icons.person_add)));
  }
}
Back in the add_session.dart file, add a _findUser method to the _AddSessionState to find out whether the user exists or not. If it exists, save the user's mobile phone number and name to display the search results to the user.
class _AddSessionState extends State<AddSession> {
//...
final usersReference = FirebaseDatabase.instance.reference().child('users');
String _searchUsername = "";
String _searchPhone = "";
//...
Future<int> _findUser(String phone) async {
return await usersReference
.child(phone)
.once()
.then((DataSnapshot onValue) {
if (onValue.value != null) {
_searchUsername = onValue.value["name"];
_searchPhone = onValue.value["phone"];
return 1;
} else {
return 0;
}
});
}
//...
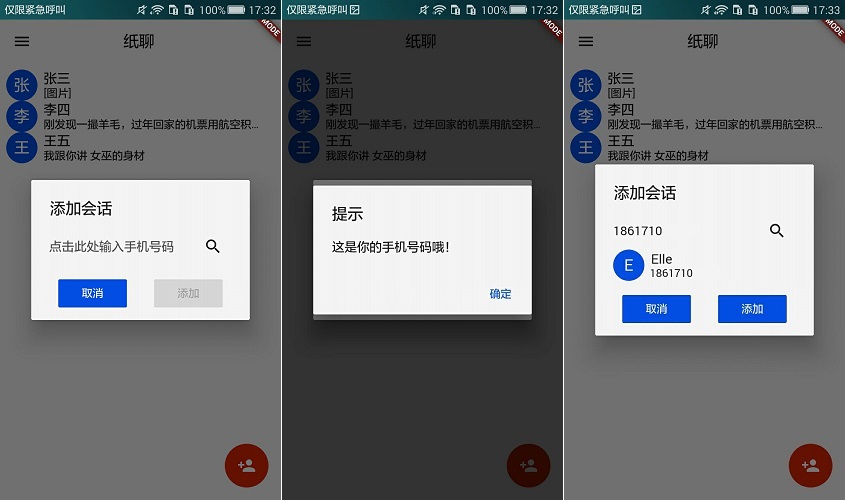
}We also need to deal with the user clicking on the search button, add a _handleFind method in _AddSessionState to determine whether the user entered the phone number in the correct format, determine that there is no format problem, then call the _findUser method above, find the account of the phone number in the database, and finally do the corresponding operation according to the returned results.
class _AddSessionState extends State<AddSession> {
  //...
  final TextEditingController _phoneController = new TextEditingController();
  //...
  void _handleFind() {
    FocusScope.of(context).requestFocus(new FocusNode());
    if (_phoneController.text.isEmpty) {
      showMessage(context, "Mobile phone number can not be empty!");
      return;
    } else if (_phoneController.text.trim() == widget.myPhone) {
      showMessage(context, "This is your mobile phone number.");
      return;
    } else if (_phoneController.text.trim().length < 7 ||
        _phoneController.text.trim().length > 12) {
      showMessage(context, "The format of mobile phone number is incorrect!");
      return;
    }
    showDialog<int>(
            context: context,
            barrierDismissible: false,
            child: new ShowAwait(_findUser(_phoneController.text)))
        .then((int onValue) {
      if (onValue == 0) {
        showMessage(context, "This user does not exist!");
      } else if (onValue == 1) {
        setState(() {});
      }
    });
  }
  //...
}
Now we add the mobile phone number input box and search button in the build method, and set the click event of the search button to the _handleFind method above. Once a user clicks the search button, he first determines the format of the mobile phone number, and then searches for the user and saves the user information.
class _AddSessionState extends State<AddSession> {
  //...
  @override
  Widget build(BuildContext context) {
    return new SimpleDialog(title: new Text("Adding Sessions"), children: <Widget>[
      new Container(
          margin: const EdgeInsets.symmetric(horizontal: 23.0),
          child: new Row(
            children: <Widget>[
              new Flexible(
                  child: new TextField(
                controller: _phoneController,
                keyboardType: TextInputType.phone,
                decoration:
                    new InputDecoration.collapsed(hintText: 'Click here to enter your cell phone number'),
              )),
              new IconButton(
                  icon: new Icon(Icons.search),
                  onPressed: () {
                    _handleFind();
                  }),
            ],
          )),
    ]);
  }
}
In the above code, if the mobile phone number is a real account, we will save the account information, so we also need to show the search account information to the user. Add a custom control that displays user information in the build method.
class _AddSessionState extends State<AddSession> {
  //...
  @override
  Widget build(BuildContext context) {
    return new SimpleDialog(title: new Text("Adding Sessions"), children: <Widget>[
      //...
      _searchUsername == ""
          ? new Text("")
          : new Container(
              margin: const EdgeInsets.symmetric(horizontal: 23.0),
              child: new Row(
                children: <Widget>[
                  new CircleAvatar(
                      child: new Text(_searchUsername[0]),
                      backgroundColor: Theme.of(context).buttonColor),
                  new Flexible(
                      child: new Column(
                    crossAxisAlignment: CrossAxisAlignment.start,
                    children: <Widget>[
                      new Text(
                        "  " + _searchUsername,
                        textScaleFactor: 1.2,
                        overflow: TextOverflow.ellipsis,
                      ),
                      new Text("  " + _searchPhone)
                    ],
                  ))
                ],
              )),
    ]);
  }
}
We add a _addSession method in _AddSessionState to add a session record under "/ chats/$user /". Before adding, we need to determine whether the record already exists. If it already exists, it means that the session has been added. Then we can judge the active value of the record. If it is true, it means that the session exists in the chat list of the current user. Otherwise, it means that the user has deleted the session.
class _AddSessionState extends State<AddSession> {
  //...
  final chatsReference = FirebaseDatabase.instance.reference().child('chats');
  //...
  Future<int> _addSession() async {
    return await chatsReference
        .child('$_myPhone/$_searchPhone')
        .once()
        .then((DataSnapshot onValue) {
      if (onValue.value == null) {
        chatsReference.child('$_myPhone/$_searchPhone').set({
          "name": _searchUsername,
          "phone": _searchPhone,
          "messages": "$_myPhone$_searchPhone",
          "lastMessage": "Let's talk together.",
          "activate": "true"
        });
        return 1;
      } else {
        if (onValue.value["activate"] == true) {
          print("Jump to the corresponding chat window");
          return 0;
        } else {
          print("Remove previous records and create a new record");
          return 2;
        }
      }
    });
  }
  //...
}
Now add an event that handles the user clicking on the add button, and add a _handleAppend method in _AddSessionState to get the return value of the _addSession method and do the corresponding operation. The process of adding is not yet complete, we will write it after we finish the chat list screen.
class _AddSessionState extends State<AddSession> {
  //...
  void _handleAppend() {
    showDialog<int>(
        context: context,
        barrierDismissible: false,
        child: new ShowAwait(_addSession())).then((int onValue) {
      if (onValue == 1) {
        print("Session Creation Successful, Return to Chat List Screen");
      }
    });
  }
  //...
}
Finally, we add a cancel button and an add button in the build method. The add button is not clickable until the user has searched for a friend, but clickable only after the search for a friend.
class _AddSessionState extends State<AddSession> {
  //...
  @override
  Widget build(BuildContext context) {
    return new SimpleDialog(title: new Text("Adding Sessions"), children: <Widget>[
      //...
      new Container(
          margin: const EdgeInsets.only(top: 18.0),
          child: new Row(
            mainAxisAlignment: MainAxisAlignment.spaceEvenly,
            children: <Widget>[
              new RaisedButton(
                elevation: 0.0,
                onPressed: () {
                  Navigator.of(context).pop();
                },
                colorBrightness: Brightness.dark,
                child: const Text('cancel'),
              ),
              new RaisedButton(
                elevation: 0.0,
                onPressed: _searchUsername == "" ? null : _handleAppend,
                colorBrightness:
                    _searchUsername == "" ? Brightness.light : Brightness.dark,
                child: const Text('Add to'),
              ),
            ],
          ))
    ]);
  }
}
You can view it directly on GitHub add_session.dart file Code.