Basic use of form
What is a form
The form is mainly responsible for the data collection function in the web page. The < form > tag in HTML is used to collect the information input by the user, and submit the collected information to the server for processing through the submission operation of the < form > tag.
Form components
<from>
	<input type = "text" name = "email_or_mobile" />
    <input type = "password" name = "password" />
    <input type = "checkbox" name = "remember_me" checked />
    <button type = "submit" >Submit</button>
</from>
The form consists of three parts:
- Form label
- Form field: contains text box, password box, hidden field, multi line text box, check box, radio box, drop-down selection box, file upload box, etc.
- Form button
Attributes of the < form > tag
The < form > tag is used to collect data, and the attribute of the < form > tag is used to specify how to send the collected information to the server.
| attribute | value | describe |
|---|---|---|
| action | URL address | Specify where to send the form data when submitting the form |
| method | get or post | Specify how to submit form data to the action URL |
| enctype | application/x-www-form-urlencoded multipart/form-data text/plain |
Specify how to encode form data before sending it |
| target | _____blank _____self _____parent _____top framename |
Specify where to open the action URL |
action
The action attribute is used to specify where to send the form data when submitting the form.
The value of the action attribute should be a URL address provided by the back end, which is specifically responsible for receiving the data submitted by the form.
When the < from > form does not specify the action attribute value, the default value of action is the URL address of the current page.
Note: after submitting the form, the page will immediately jump to the URL address specified in the action attribute
target
The target attribute is used to specify where to open the action URL.
It has five optional values. By default, the value of target is_ self, which means to open the action URL in the same framework.
| value | describe |
|---|---|
| _blank | Opens in a new window. |
| _self | Default. Open in the same frame. |
| _parent | Open in parent frameset. (rarely used) |
| _top | Opens in the entire window. (rarely used) |
| framename | Opens in the specified frame. (rarely used) |
method
The method attribute is used to specify how to submit the form data to the action URL.
It has two optional values: get and post.
By default, the value of method is get, which means that the form data is submitted to the action URL in the form of URL address.
be careful:
The get method is suitable for submitting a small amount of simple data.
post mode is suitable for submitting a large number of complex data or data including file upload.
In actual development, the post submission method of < form > form is used most, and get is rarely used. For example, form operations such as login, registration and adding data all need to submit forms in the form of post.
enctype
The enctype attribute is used to specify how to encode data before sending the form.
There are three optional values. By default, the value of enctype is application/x-www-form-urlencoded, which means that all characters are encoded before sending.
| value | describe |
|---|---|
| application/x-www-form-urlencoded | Encode all characters before sending (default) |
| multipart/form-data | No character encoding. This value must be used when using a form that contains a file upload control. |
| text/plain | Spaces are converted to a "+" plus sign, but special characters are not encoded. (rarely used) |
be careful:
When the operation of file upload is involved, the value of enctype must be set to multipart / form data
If the submission of the form does not involve the upload operation, you can directly set the value of enctype to application/x-www-form-urlencoded
Synchronous submission of forms and its disadvantages
What is synchronous submission of forms
Click the submit button to trigger the form submission operation, so as to make the page Jump to the action URL, which is called synchronous submission of the form.
Disadvantages of form synchronous submission
- < form > after the form is submitted synchronously, the whole page will jump to the address pointed to by the action URL. The user experience is very poor.
- After the < form > form is submitted synchronously, the status and data before the page will be lost.
Solve the shortcomings of form synchronous submission
Solution: the form is only responsible for collecting data, and Ajax is responsible for submitting the data to the server
Submit form data through Ajax
Listen for form submission events
In jQuery, you can listen to form submission events in the following two ways:
$('#form').submit(function(e){
    alert('Listening to the submission event of the form')
})

$('#form').on('submit',function(e){
    alert('Listening to the submission event of the form')
})
Block default form submission behavior
When the supervisor hears the submission event of the form, he can call the event of the event object Preventdefault() function to prevent form submission and page Jump:
$('#form').submit(function(e){
    //Prevent form submission and page Jump
    e.preventDefault()
})

$('#form').on('submit',function(e){
    //Prevent form submission and page Jump
    e.preventDefault()
})
Quickly get the data in the form
serialize() function
In order to simplify the data acquisition operation in the form, jQuery provides the serialize() function, and its syntax format is as follows:
$(selector).serialize()
The advantage of the serialize() function: you can get all the data in the form at one time
Example of serialize() function
<form id="form">
	<input type = "text" name = "username" />
    <input type = "password" name = "password" />
    <button type = "submit" >Submit</button>
</form>
$('#form').serialize()
// Result of call:
// Username = value of username & password = value of password
Note: when using the serialize() function to quickly obtain form data, you must add the name attribute to each form element
Basic concepts of template engine
Problems encountered when rendering UI structure
var rows=[]
$.each(res.data,function (i,item){ //Circular splicing string
	rows.push('<li class="list-group-item">'+item.content+'<span class="badge cmt-date">Comment time:'+item.time+'</span><span class="badge cmt-date">Commented by:'+item.username+'</span></li>')
})
$('#cmt-list').empty().append(rows.join('') / / UI structure of rendering list
The above code renders the UI structure in the form of string splicing.
If the UI structure is complex, you need to pay special attention to the nesting before quotation marks when splicing strings. And once the requirements change, it is also very troublesome to modify them.
What is a template engine
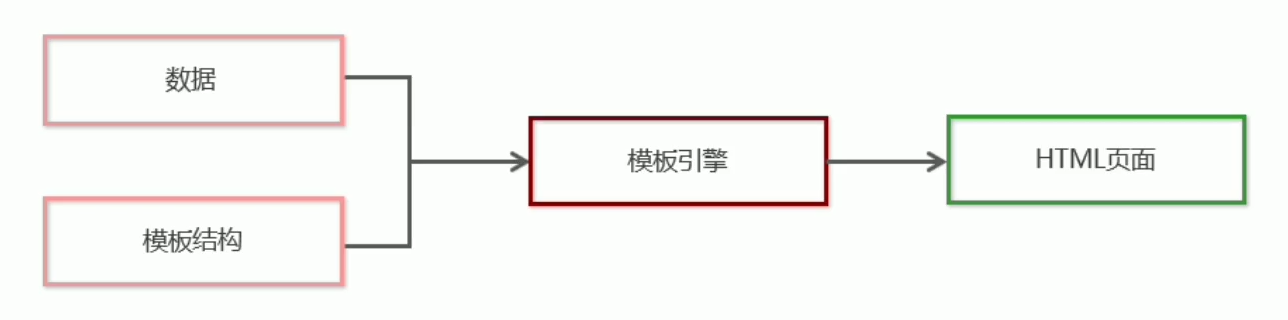
The template engine can automatically generate a complete HTML page according to the template structure and data specified by the programmer
Benefits of template engine
- The string splicing operation is reduced
- Make the code structure clearer
- Make code easier to read and maintain
Art template template engine
Art template is a simple and super fast template engine. The home page of the Chinese official website is art-template (aui.github.io)
Installation of art template
Access in browser Install - Art template (AUI. GitHub. IO)
After finding the download link, right-click and select Save as to download the art template locally and load it onto the web page through the < script > tag.
Basic use of art template template engine
Render UI structure in traditional way
<body>
	<div id="title"></div>
    <div>full name:<span id="name"></span></div>
 	<div>Age:<span id="age"></span></div>
    <div>member:<span id="isVIP"></span></div>
    <div>Registration time:<span id="regTime"></span></div>
	<div>
        Hobbies:
        <ul id="hobby">
            <li>Hobby 1</li>
            <li>Hobby 2</li>
        </ul>
    </div>


<script>
var data = {
    title:'<h3>User information</h3>',
    name:'zs',
    age:20,
    isVIP:true,
    regTime:new Date(),
    hobby:['having dinner','having dinner','having dinner']
}

$(function(){
    $('#name').html(data.name)
    $('#title').html(data.title)
    $('#age').html(data.age)
    $('#isVIP').html(data.isVIP)
    $('#regTime').html(data.regTime)

    var rows = []
    $.each(data.hobby,function(i,item){
        rows.push('<li>'+item+'</li>')
    })
    $('#hobby').html(rows.join(''))
})
</script>
</body>
Steps for using art template
- Import art template
- Define data
- Define template
- Call the template function
- Render HTML structure
<!DOCTYPE html>
<html lang="en">
<head>
    <meta charset="UTF-8">
    <title>Title</title>
    <!--1. Import template engine-->
    <!--stay windows Global, one more function called template('Templated Id',Data objects to render)-->
    <script src="../public/js/template-web.js"></script>
    <script src="../public/js/jquery.js"></script>
</head>
<body>

<div id="container"></div>

<!--3. Define template-->
<!--3.1 Templated HTML Structure, must be defined to script in-->
<script type="text/html" id="tpl-user">
    <h1>{{name}}</h1>
</script>

<script>
    //2. Define the data to be rendered
    var data = { name:'zs'}

    //4. Call the template function
    var htmlStr = template('tpl-user',data)
    console.log(htmlStr)
    //5. Render HTML structure
    $('#container').html(htmlStr)
</script>
</body>
</html>
Art template standard syntax
What is standard grammar
Art template provides {}} this syntax format. Variable output or circular array can be performed in {}}. This {}} syntax is called standard syntax in art template.
Standard syntax - output
{{value}}
{{obj.key}}
{{obj['key']}}
{{a?b:c}}
{{a||b}}
{{a + b}}
In {}} syntax, you can output variables, object attributes, ternary expressions, logic or, addition, subtraction, multiplication and division and other expressions.
Standard syntax - original output
{{@ value}}
If the value value to be output contains the HTML tag structure, the original output syntax needs to be used to ensure that the HTML tag is rendered normally.
Standard syntax - conditional output
If you want to realize conditional output, you can use if... else if... / if in {} to output on demand.
{{if value}} On demand output {{/if}}

{{if vl}} On demand output {{else if v2}} On demand output {{/if}}
Standard syntax - Filters
The essence of filter is a function processing function
{{value|filterName}}
The filter syntax is similar to the pipeline operator, with the previous output as the next input.
The basic syntax for defining filters is as follows:
template.defaults.imports.filterName = function(value){/*return Processing results*/}
<div>Registration time:{{regTime|dateFormat}}</div>
Define a formatted filter dateFormat as follows:
template.defaults.imports.dateFormat = function(date){
    var y = date.getFullYear()
    var m = date.getMonth() + 1
    var d = date.getDate()

    return y + '-' + m + '-' + d //Note: the filter must return a value at the end
}
Implementation principle of template engine
Regular and string operations
Basic grammar
The exec() function is used to match regular expressions in a string.
If there is a matching value in the string, the matching value is returned; otherwise, null is returned.
RegExpObject.exec(string)
The example code is as follows:
var str = 'hello'
var pattern = /o/
// Output results ["o",index:4,input:"hello",groups:undefined]
console.log(pattern.exec(str))
grouping
The content contained in () in the regular expression represents a group. You can extract the content you want by grouping. Example:
var str = '<div> I am{{name}} </div>'
var pattern = /{{([a-zA-Z]+)}}/

var patternResult = pattern.exec(str)
console.log(patternResult)
//Get name related grouping information
//["{name}}", "name", index: 7, input: "< div > I am {name}} < / div >", groups: undefined]
replace function of string
The replace() function is used to replace some characters with others in the string. The syntax format is as follows:
var result = '123456'.replace('123','abc') // The value of the obtained result is the string 'abc456'
Example:
var str = '<div>I am{{name}}</div>'
var pattern = /{{([a-zA-Z]+)}}/

var patternResult = pattern.exec(str)
str = str.replace(patternResult[0],patternResult[1])
//The return value of the replace function is the new string after replacement
//Output content: < div > I'm name < / div >
console.log(str)
replace multiple times
var str = '<div>{{name}}this year{{age}}Years old</div>'
var pattern = /{{\s*([a-zA-Z]+)\s*}}/

var patternResult = pattern.exec(str)
str = str.replace(patternResult[0],patternResult[1])
console.log(str)//Output < div > name is {{age}} years old this year < / div >

patternResult = pattern.exec(str)
str = str.replace(patternResult[0],patternResult[1])
console.log(str)// Output < div > name is years old this year < / div >

patternResult = pattern.exec(str)
console.log(patternResult)// Output null
Using while loop replace
var str = '<div>{{name}}this year{{age}}Years old</div>'
var pattern = /{{\s*([a-zA-Z]+)\s*}}/

var patternResult = null
while(patternResult = pattern.exec(str)){
    str = str.replace(patternResult[0],patternResult[1])
}
console.log(str) //Output < div > name is years old this year < / div >
replace with true
var data = {name:'zhangsan',age:20}
var str = '<div>{{name}}this year{{age}}Years old</div>'
var pattern = /{{\s*([a-zA-Z]+)\s*}}/

var patternResult = null
while(patternResult = pattern.exec(str)){
    str = str.replace(patternResult[0],data[patternResult[1]])
}
console.log(str)