form based on front-end HTML
1: Form form
1.form function
Forms are used to transfer data to the server to enable users to Web Server interaction

Forms can contain input Series of labels, such as text fields, check boxes, radio boxes, submit buttons, and so on.

Forms can also contain textarea,select,fieldset and label label.

form form :Get the user's data and send it to the back end(Server)
eg:Website login, registration, verification code, etc...
| attribute | describe |
|---|---|
| accept-charset | Specifies the character set used in the submitted form (default: page character set). |
| action | Specify the address (URL) (submission page) to which to submit the form. |
| autocomplete | Specifies that the browser should automatically complete the form (default: on). |
| enctype | Specify the code of the submitted data (default: URL encoded). |
| method | Specifies the HTTP method used when submitting the form (default: GET). |
| name | Specify the name that identifies the form (for DOM: document.forms.name). |
| novalidate | Specifies that the browser does not validate the form. |
| target | Specify the target of the address in the action attribute (default: _self). |
2. Form elements
Basic concepts:
HTML Form is HTML For the more complex part of the element, the form is often combined with scripts, dynamic pages, data processing and other functions, so it is a very important content for making dynamic websites.
Forms are generally used to collect user input information
 How forms work:
When browsing a web page with forms, visitors can fill in the necessary information and then press a button to submit. This information through Internet Deliver to the server.
The special program on the server processes these data. If there is an error, it will return an error message and ask to correct the error. When the data is complete and correct, the server will feed back a completed input information.
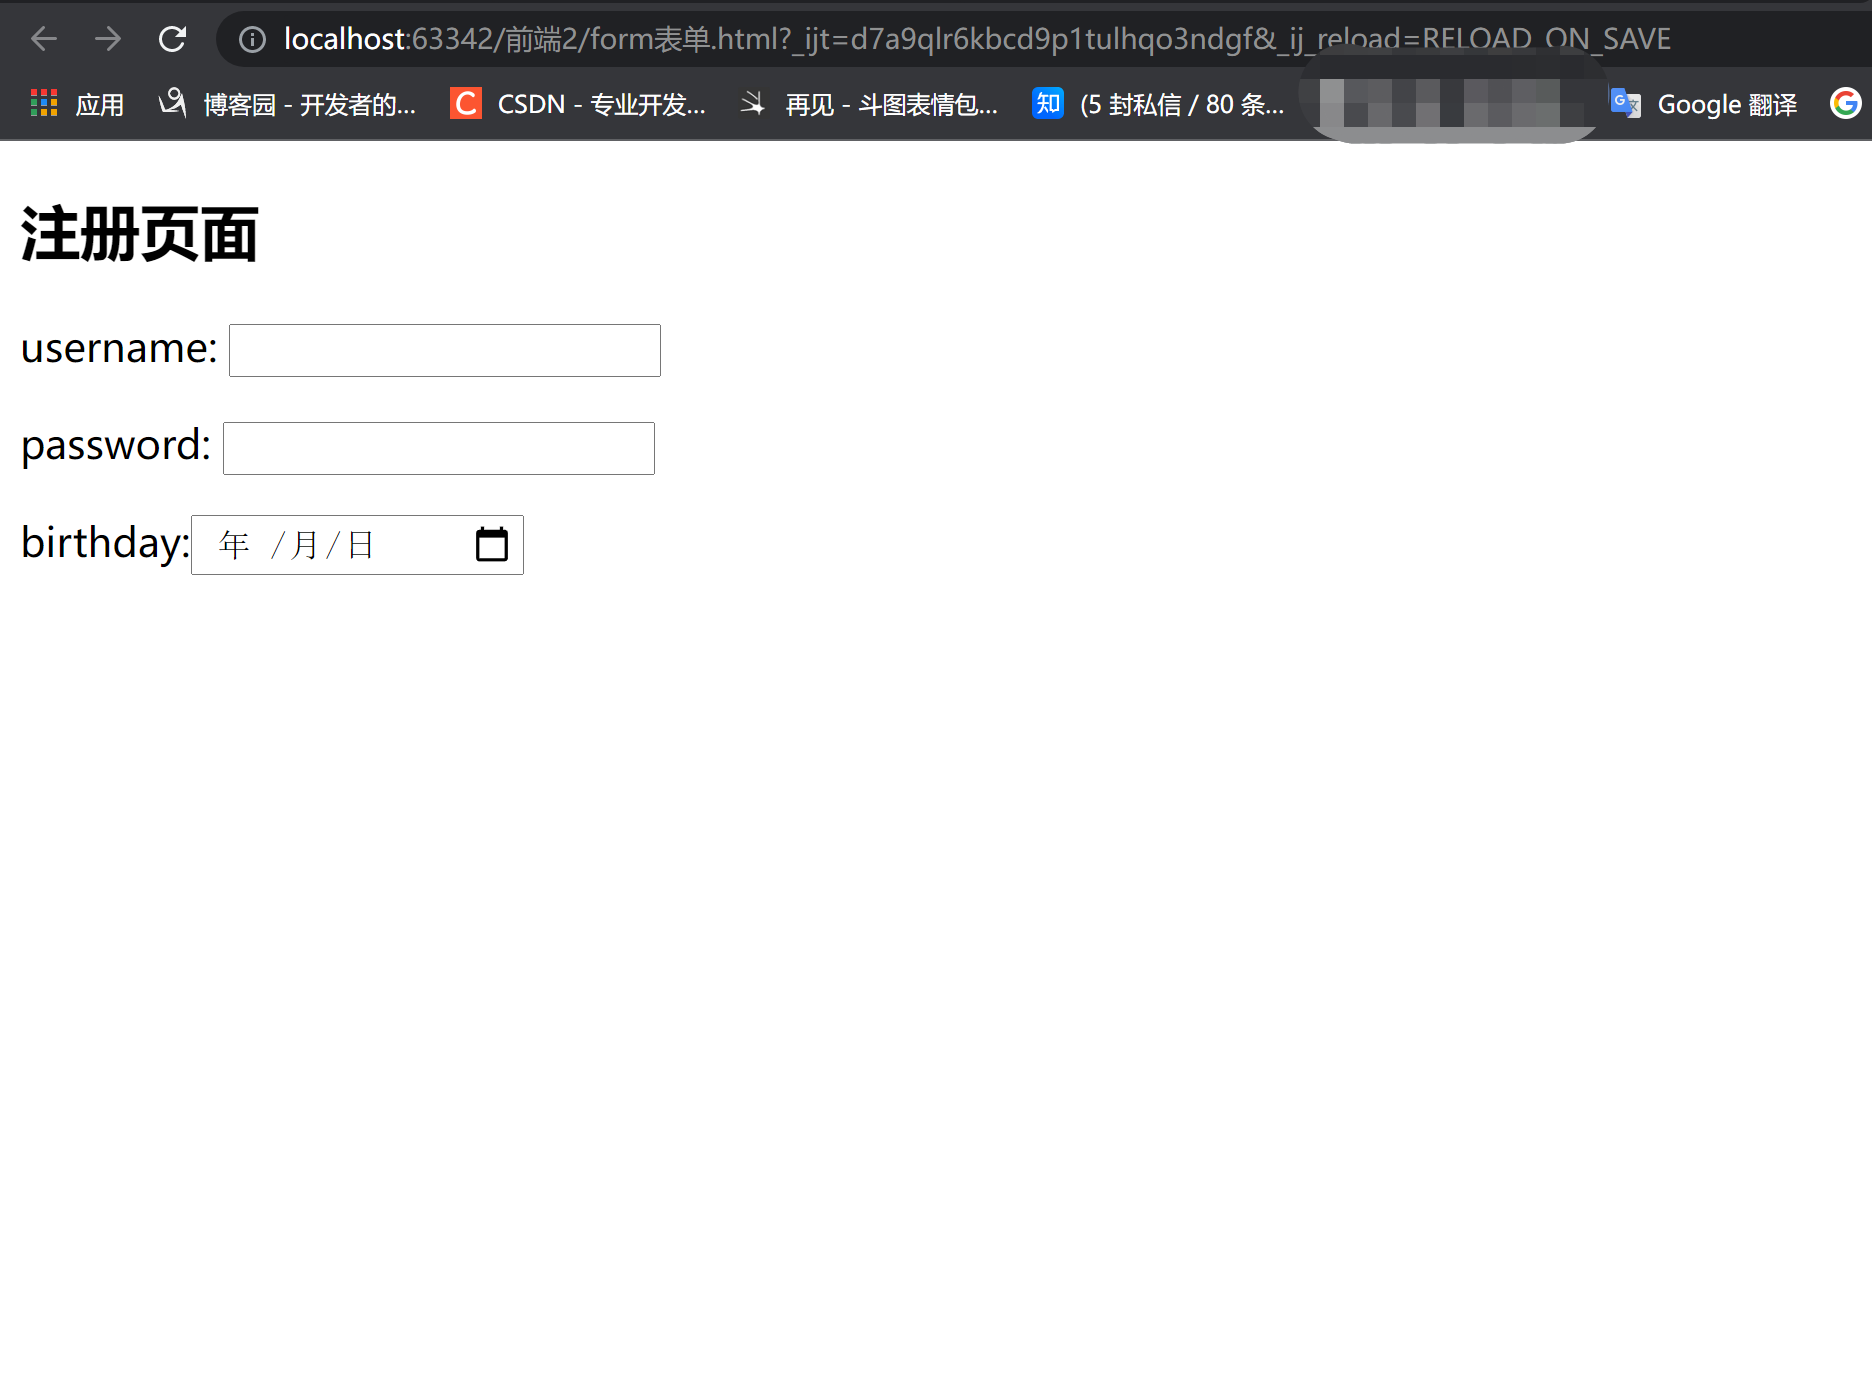
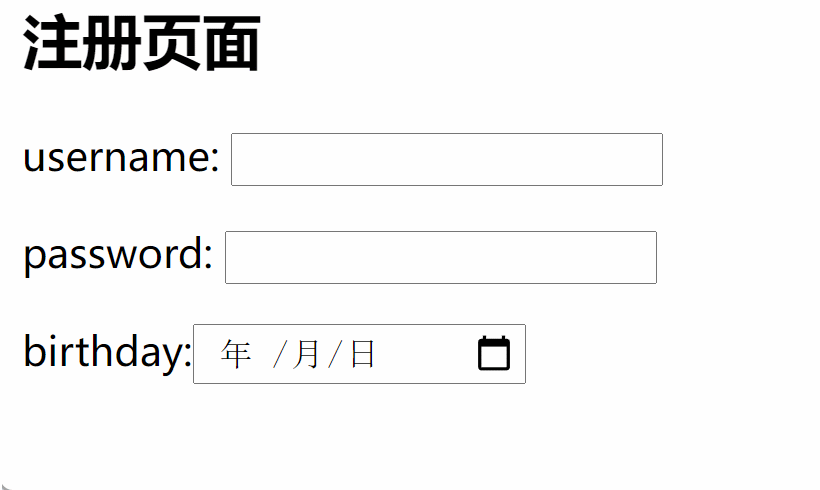
2: form construction (registration page)
- Easy registration page
<h2>Registration page</h2>
<form action="">

    <p>   <!--<lable package input And bind id>-->
        <label for="d1">username:</label>
        <!--<User registration box>-->
        <input type="text" id="d1">
    </p>
    <p>   <!--<User registration password>-->
        <label for="d2">password:</label>
        <input type="password" id="d2">
    </p>  <!--<Calendar display>-->
    <p>birthday:<input type="date"></p>
1. There will be a yellow shadow problem when writing input
- resolvent
Write directly input Yellow shadows appear because input Need to combine lable Use together

Mode 1:lable package input And bind id
   <label for='input label id value'>input label</label>

Mode 2:label And input Appear alone and bind id
<label for="d1">username:</label>
   <input type="text" id="d1">
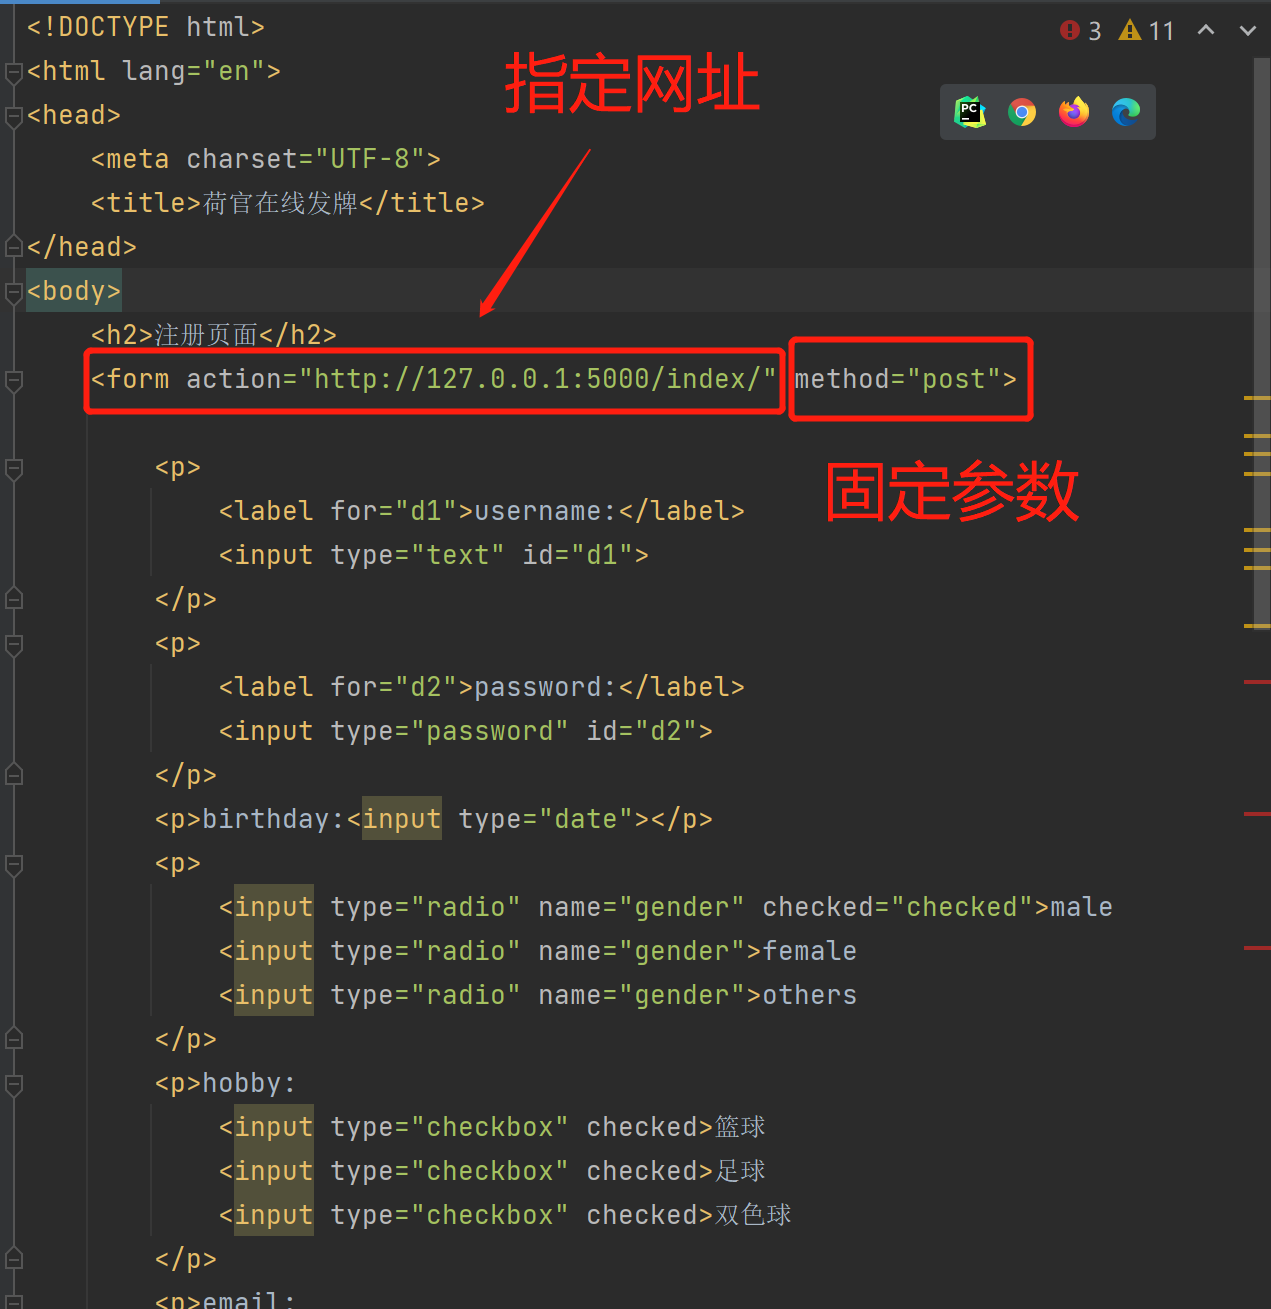
3: Full version, front-end code (registration page)
</head>
<body>

    <h2>Registration page</h2>
    <form action="">
        <p>
            <label for="d1">username:</label>
            <input type="text" id="d1">
        </p>
        <p>
            <label for="d2">password:</label>
            <input type="password" id="d2">
        </p>
        <p>birthday:<input type="date"></p>
        <p>
            <input type="radio" name="gender" checked="checked">male
            <input type="radio" name="gender">female
            <input type="radio" name="gender">others
        </p>
        <p>hobby:
            <input type="checkbox" checked>Basketball
            <input type="checkbox" checked>Football
            <input type="checkbox" checked>Two color ball
        </p>
        <p>email:
            <input type="email">
        </p>
        <p>province
            <select name="" id="">
                <option value="">Beijing</option>
                <option value="">Shenzhen</option>
                <option value="">Shanghai</option>
            </select>
        </p>
        <p>Star
            <select name="" id="">
                <option value="">Aoi Sora</option>
                <option value="">Teacher Ming</option>
                <option value="">Third class teacher</option>
            </select>
        </p>
        <p>info:
            <textarea name="" id="" cols="30" rows="10"></textarea>
        </p>
        <p>file:
            <input type="file">
        </p>
        <p>files:
            <input type="file" multiple>
        </p>
        <p>
            <input type="submit" value="register">
            <input type="button" value="help">
            <input type="reset" value="Reset">
        </p>
    </form>

</body>
</html>

4: Introduction to type attribute
- The most commonly used tag for obtaining user data is the input tag, which is an inline tag
1.input(type attribute)
<input> The element will change according to different type Attribute, changing into multiple forms.
adopt type Different transformations of parameters have different manifestations
| type attribute | Form of expression |
|---|---|
| text | Plain text |
| password | Password display |
| date | Calendar display |
| radio | Radio > > >: multiple option labels need the same name attribute to be able to (radio) |
| checked='checked' | (selected by default) checked='checked 'needs to be configured additionally. When the attribute name is equal to the attribute value, it can be abbreviated as checked |
| checkbox | Multiple selection > > >: the checked attribute is also selected by default |
| Mailbox format | |
| file | Upload file > > >: only a single file is supported by default. If you need to upload multiple files at one time, you need to configure multiple |
| select | Labels are drop-down box options, and each option is an option label. By default, it is single choice or multiple choice |
| multiple | Drop down box multiple selection |
| textarea | Tag profile (multi line text) to obtain large text content |
| submit | Submit button > > >: click the action of starting to submit data (Registration) (the prompt information of the button group can be customized through the value attribute. If it is not customized, different browsers may display different prompt information, especially the submit button) |
| button | Ordinary button > > >: there is no function to bind (JS) (the prompt information of the button group can be customized through the value attribute. If it is not customized, different browsers may display different prompt information, especially the submit button) |
| reset | Reset button (the prompt information of the button group can be customized through the value attribute. If it is not customized, different browsers may display different prompt information, especially the submit button) |
5: form submit data
- Method 1
The data submission address is provided by form Tabular action Parameters to control
action="URL"
Do not write, submit to the address of the current page by default
- Method 2
method="Data submission method"
There are many ways to submit data, which are ignored here(Subsequent framework updates)
get post put delete patch...
- Method 3
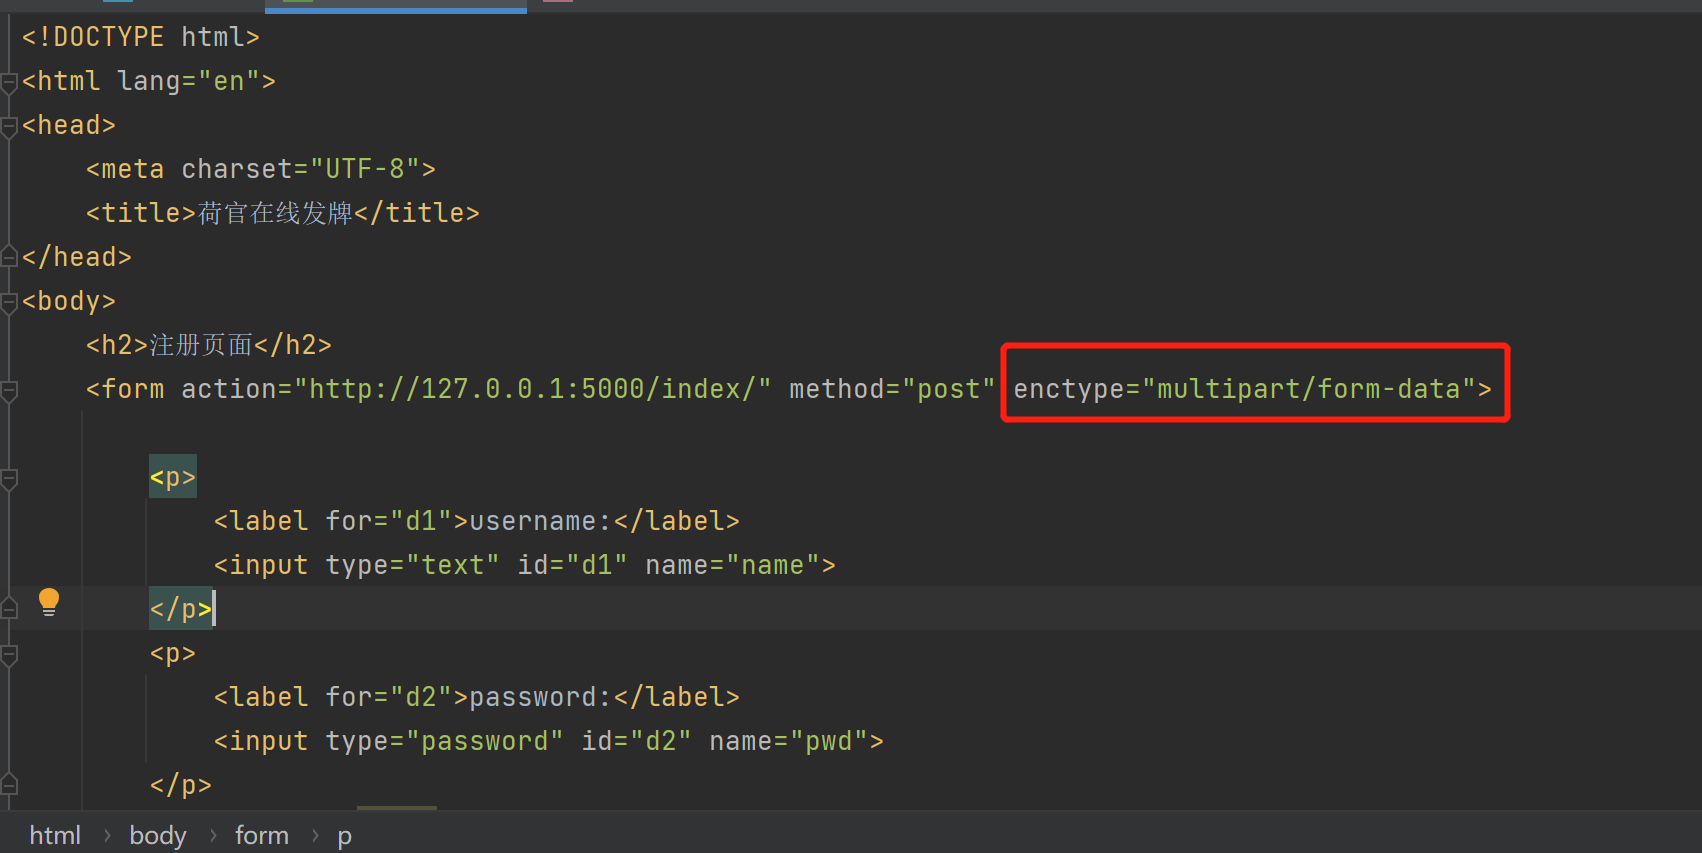
form If the form contains files when submitting data, you need to specify two fixed parameters
method='post'
enctype="multipart/form-data"
6: Front and rear end interaction
- Just look at the effect
- Back end framework TCP server
with flask Frame as an example>>>:Third party framework pip3 install flask
1. Build a simple server
from flask import Flask,request

app = Flask(__name__)

@app.route('/index/', methods=['GET', 'POST'])
def index():
    print(request.form)
    print(request.form)
    return 'flask The frame is so simple'
app.run()
2. Front end setting (submit data URL parameters)
    form If the form contains files when submitting data, you need to specify two fixed parameters
    method='post'

    <form action="http://127.0.0.1:5000/index/" method="post">
3. Website test
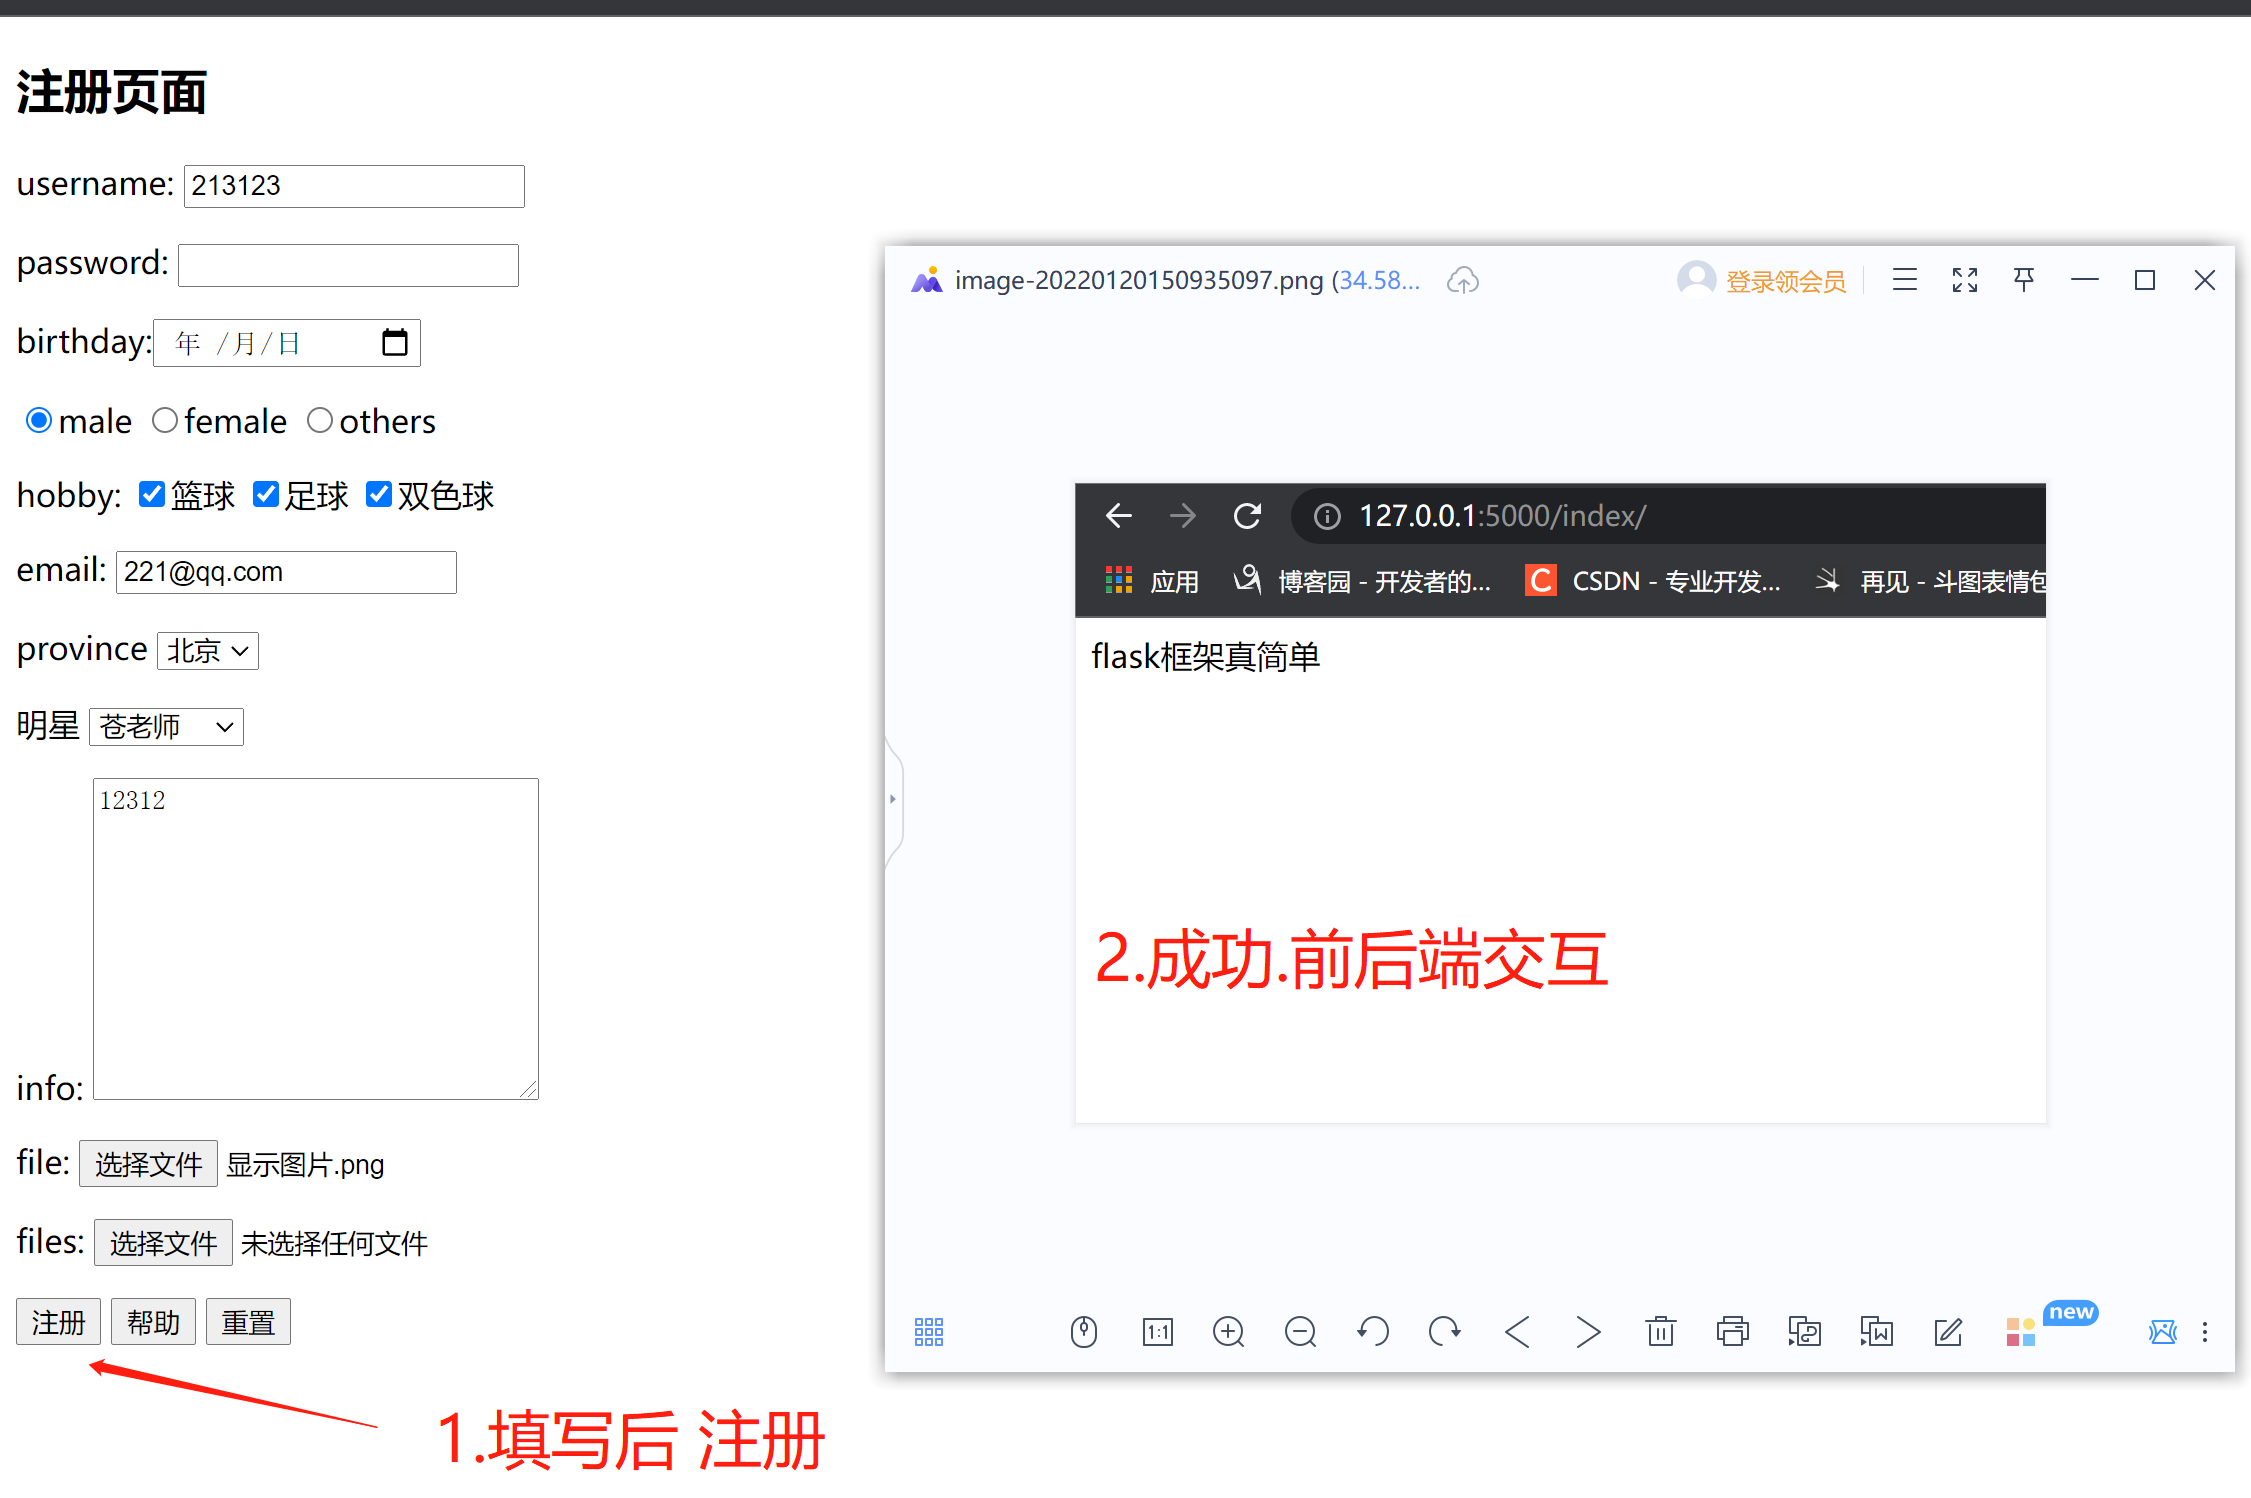
4. Server (back end)
The test server receives client data and does not display user data
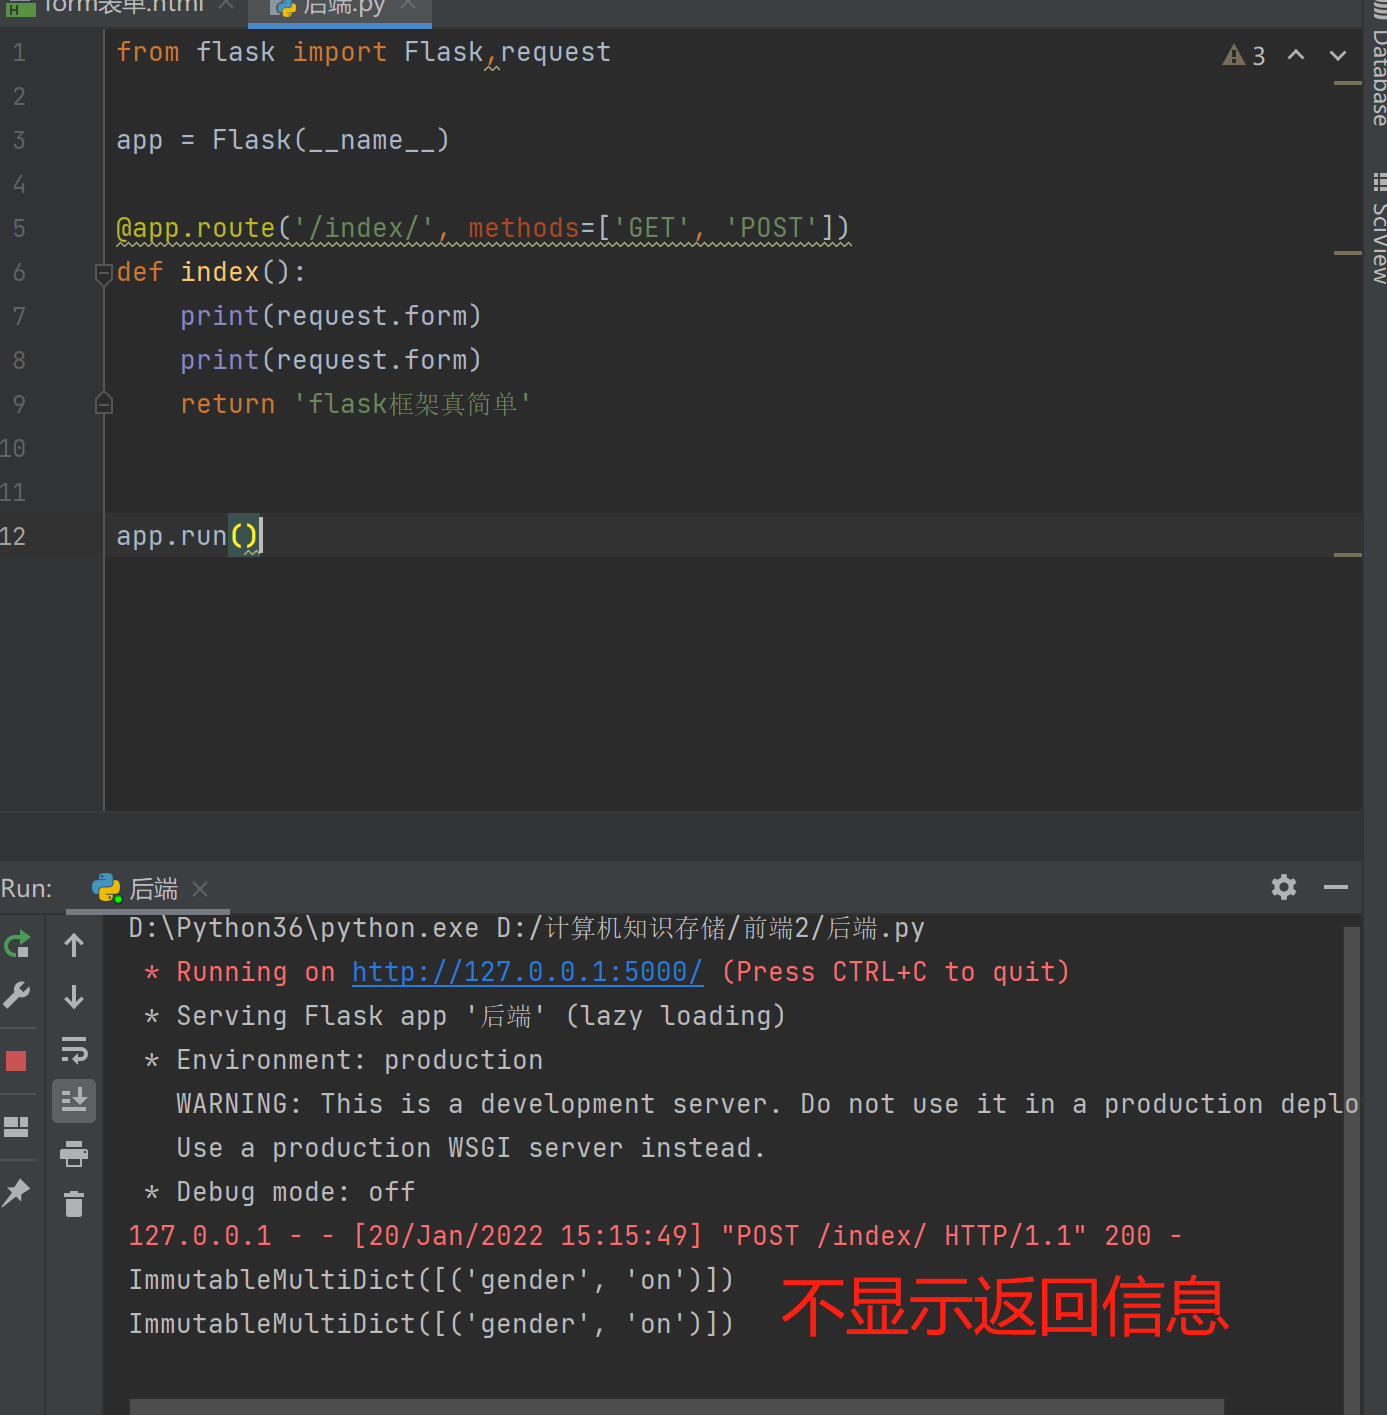
5. Reason why the server does not display client data
1.The front end obtains the user data through the tag and sends it to the back end name attribute
 Equivalent to a dictionary key

2.The data entered by the user is stored in the label value Property is equivalent to a dictionary value
 If you need to add a label name and value To send user data to the back end
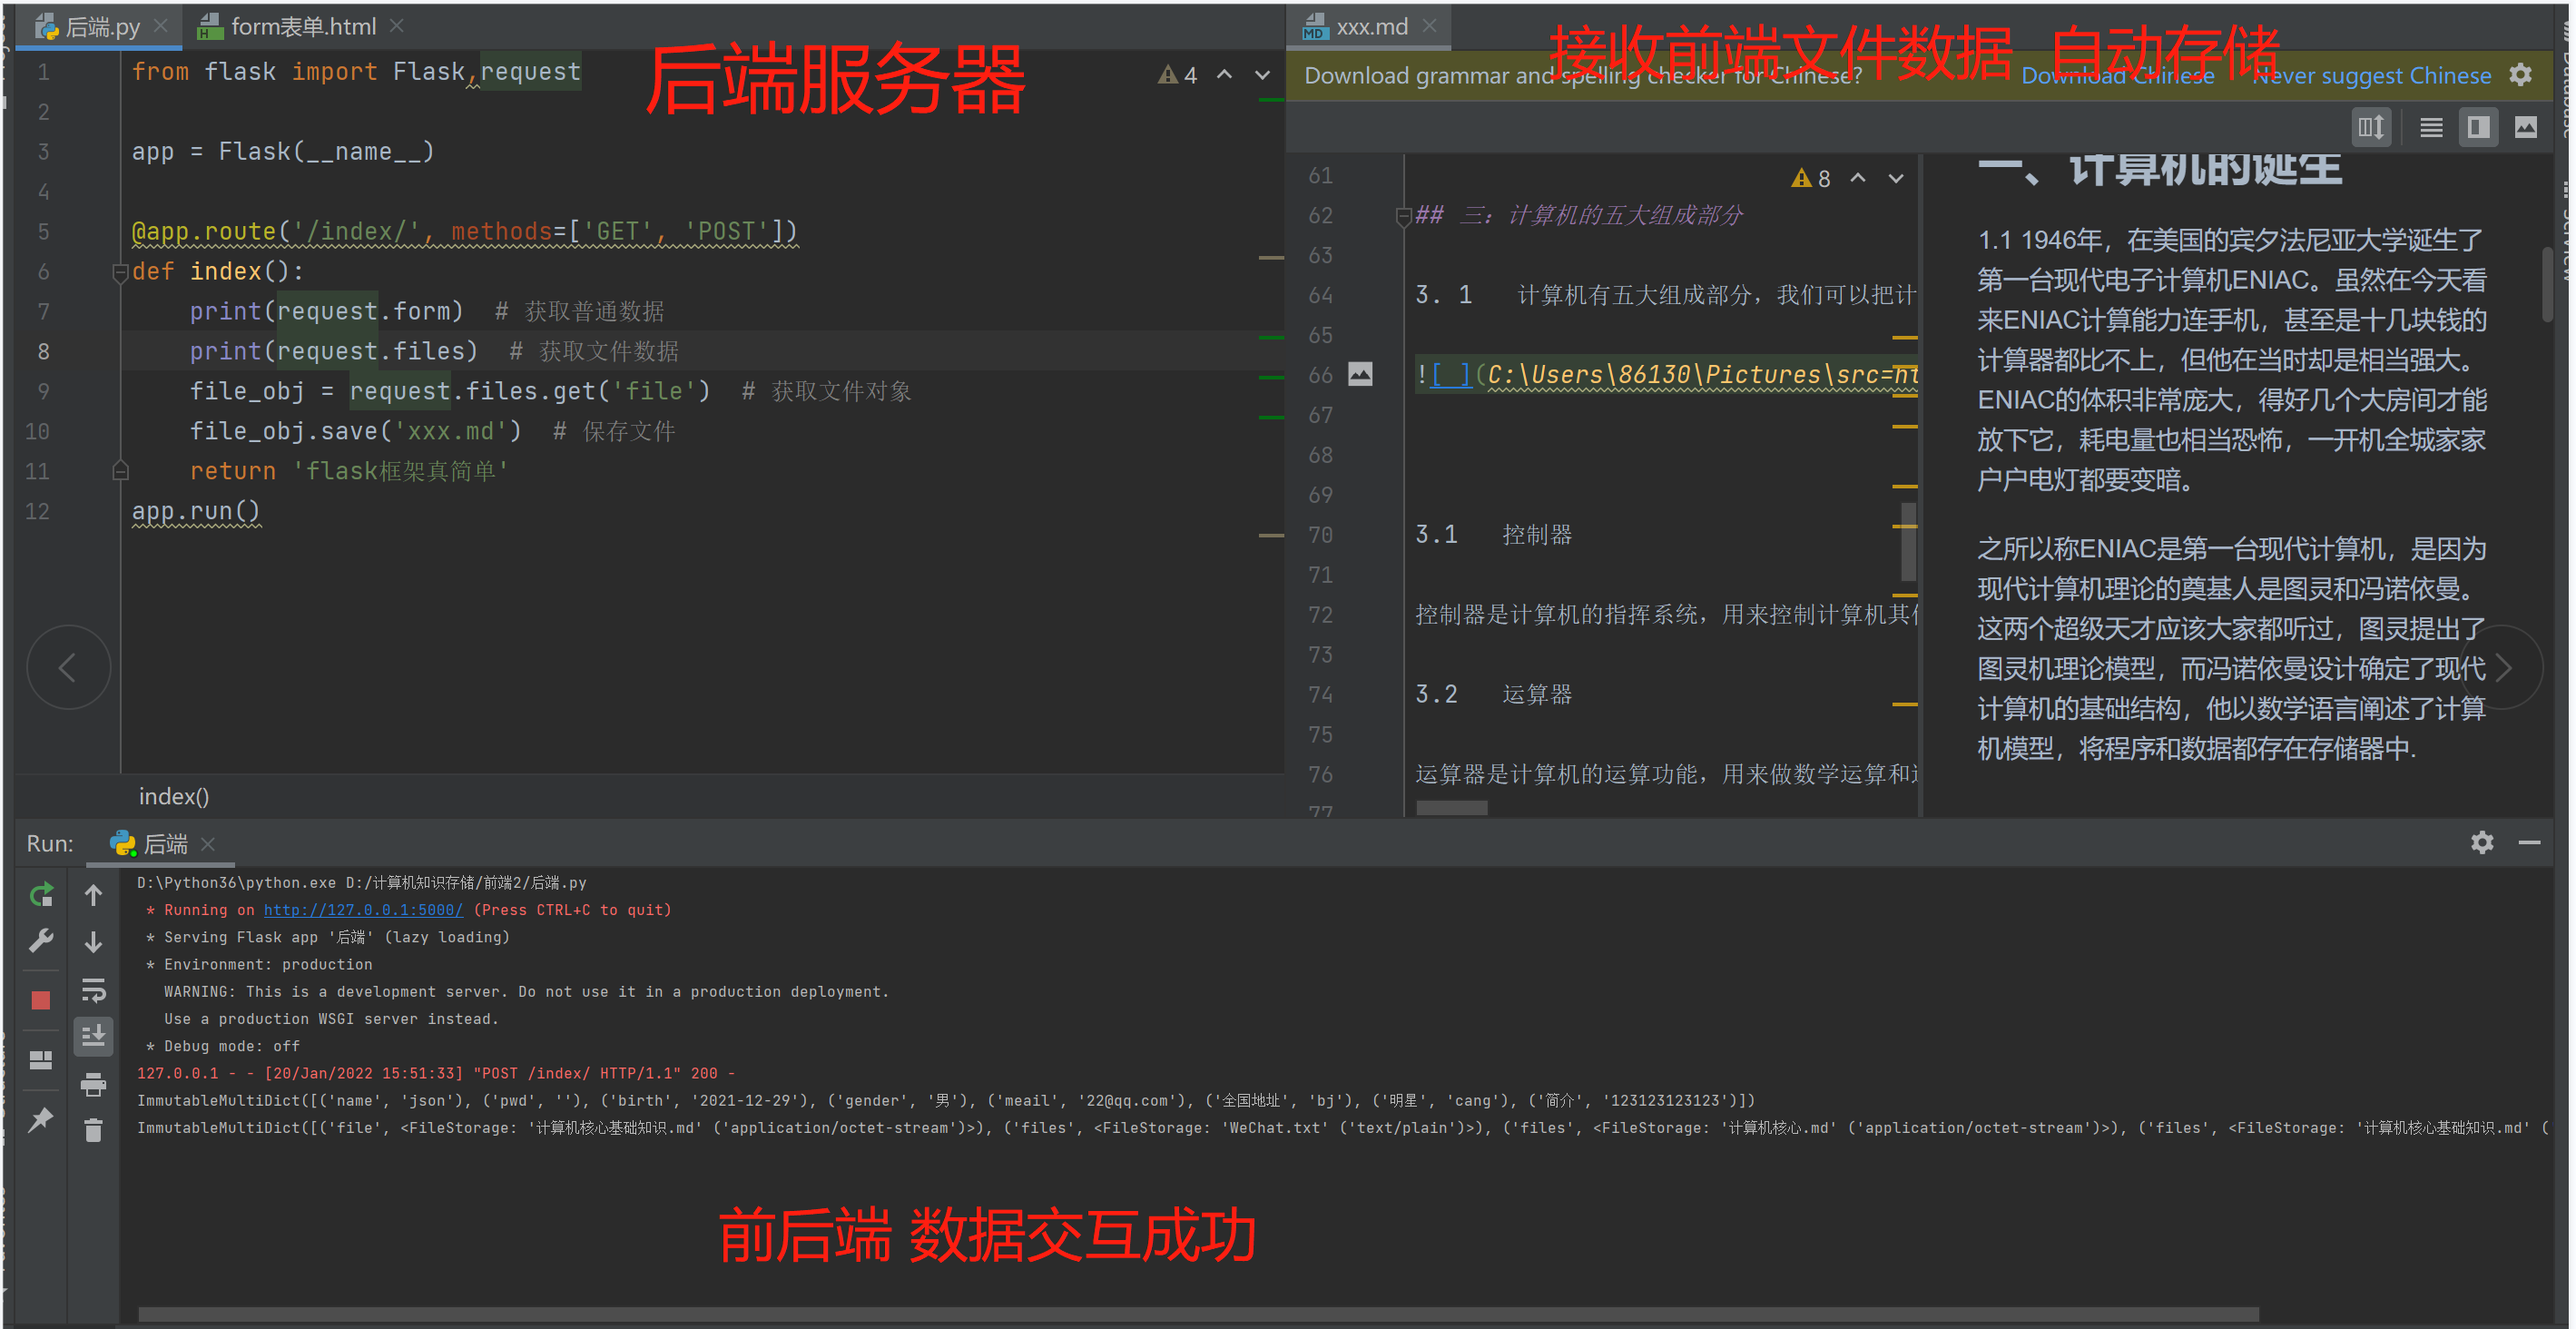
7: Full version front and back end interaction
- Server
from flask import Flask,request
app = Flask(__name__)
@app.route('/index/',methods=['GET','POST'])
def index():
    print(request.form)  # Get common data
    print(request.files)  # Get file data
    file_obj = request.files.get('file')  # Get file object
    file_obj.save('xxx.md')  # Save file
    return 'flask The frame is so simple'
app.run()
PYTHON Copy full screen
1. Front end solutions
The data entered by the front-end user will be stored in the label value Attribute
Equivalent to a dictionary value If it is an optional label, it needs to be added by itself name and value
k:v Key value pairs can send user data to the back end

2.form If you include a file, you need to specify two fixed parameters
enctype="multipart/form-data"
- front end
</head>
<body>
    <h2>Registration page</h2>
    <form action="http://127.0.0.1:5000/index/" method="post" enctype="multipart/form-data">

        <p>
            <label for="d1">username:</label>
            <input type="text" id="d1" name="name">
        </p>
        <p>
            <label for="d2">password:</label>
            <input type="password" id="d2" name="pwd">
        </p>
        <p>birthday:<input type="date" name="birth"></p>
        <p>
            <input type="radio" name="gender" checked="checked" value="male">male
            <input type="radio" name="gender" value="female">female
            <input type="radio" name="gender" value="other">others
        </p>
        <p>hobby:
            <input type="checkbox" checked value="basketball">Basketball
            <input type="checkbox" checked value="football">Football
            <input type="checkbox" checked value="doublecolorball">Two color ball
        </p>
        <p>email:
            <input type="email" name="meail">
        </p>
        <p>province
            <select name="National address" id="">
                <option value="bj">Beijing</option>
                <option value="sz">Shenzhen</option>
                <option value="sh">Shanghai</option>
            </select>
        </p>
        <p>Star
            <select name="Star" id="">
                <option value="cang">Aoi Sora</option>
                <option value="ming">Teacher Ming</option>
                <option value="sanshang">Third class teacher</option>
            </select>
        </p>
        <p>info:
            <textarea name="brief introduction" id="" cols="30" rows="10"></textarea>
        </p>
        <p>file:
            <input type="file" name="files">
        </p>
        <p>files:
            <input type="file" multiple name="files">
        </p>
        <p>
            <input type="submit" value="register">
            <input type="button" value="help">
            <input type="reset" value="Reset">
        </p>
    </form>
</body>
</html>
2. Website registration test (front and back end interaction test)