When the project uses docker on a large scale, the problem of container communication arises. To solve the problem of container communication, you must first understand a lot of knowledge about the network. Docker, as the most popular lightweight container technology, has many commendable functions, such as docker image management. However, docker also has many imperfections. The network is the weak part of docker. Therefore, it is necessary for us to deeply understand docker's network knowledge to meet higher network requirements.
1, Network mode
After installing Docker, three networks will be created by default, which can be accessed through docker network ls see.

Before learning Docker network, it is necessary for us to understand what these network modes mean
| Network mode | brief introduction |
| bridge | Assign and set IP for each container, and connect the container to one docker0 Virtual bridge, the default is this mode. |
| host | The container will not virtualize its own network card, configure its own IP, etc., but use the IP and port of the host. |
| none | The container has an independent Network namespace, but it does not have any network settings, such as assigning veth pair, bridge connection, IP, etc |
| container | The newly created container will not create its own network card and configure its own IP, but share IP, port range, etc. with a specified container |
1.1 bridge network mode
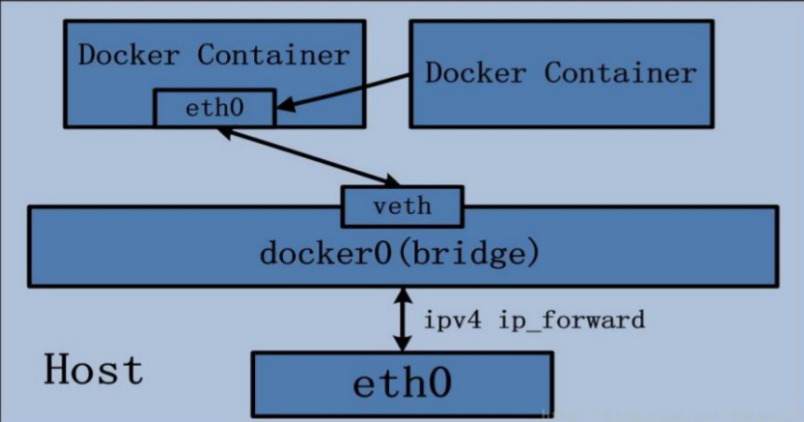
In this mode, the docker daemon creates a virtual Ethernet bridge docker0, the newly created container will be automatically bridged to this interface, and any network card attached to it can automatically forward data packets.
By default, the daemon creates a pair of peer-to-peer virtual device interfaces veth pair, set one of the interfaces to the container eth0 Interface (the network card of the container), and another interface is placed in the namespace of the host to be similar vethxxx This name connects all containers on the host to this internal network.
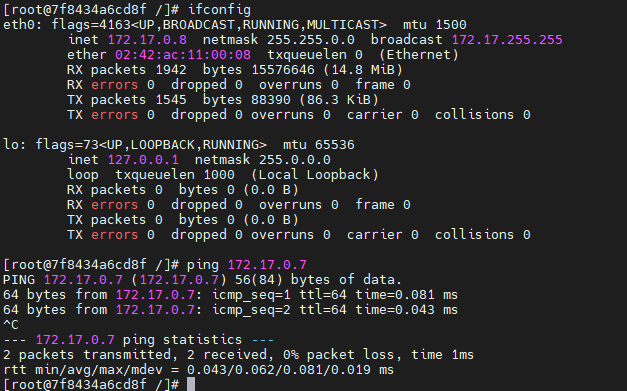
For example, I run one based on busybox Mirror built container bbox01, view ip addr:
busybox It is called embedded Linux The Swiss Army knife integrates many small ones unix The general functions under the are integrated into a small executable file.

Then the host passes through ip addr The view information is as follows:
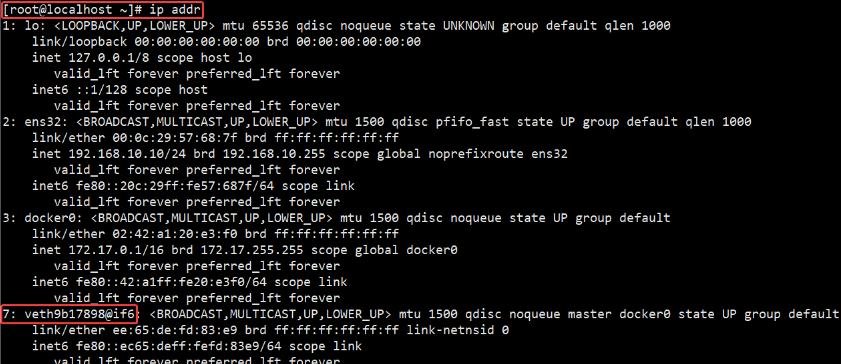
Through the above comparison, it can be found that the above statement is confirmed: the daemon will create a pair of peer-to-peer virtual device interfaces veth pair, set one of the interfaces to the container eth0 Interface (the network card of the container), and another interface is placed in the namespace of the host to be similar vethxxx Such a name.
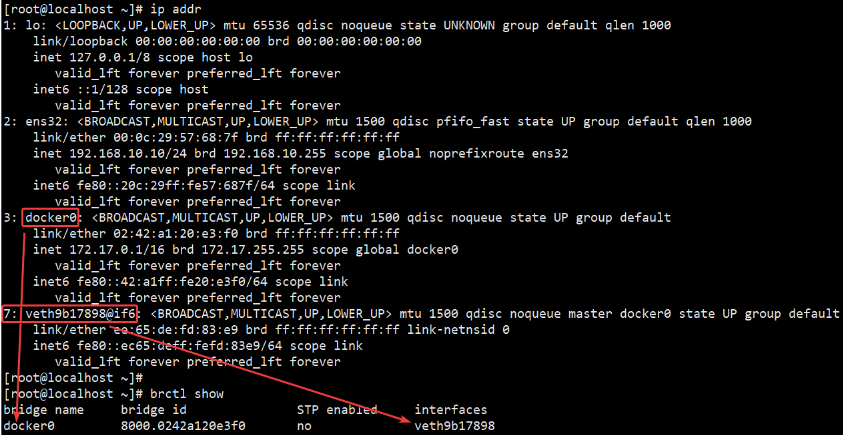
At the same time, the daemon will also be from the bridge docker0 Assign an IP address and subnet to the container in the private address space of, and set the IP address of docker0 as the default gateway of the container. It can also be installed yum install -y bridge-utils Later, through brctl show Command to view Bridge Information
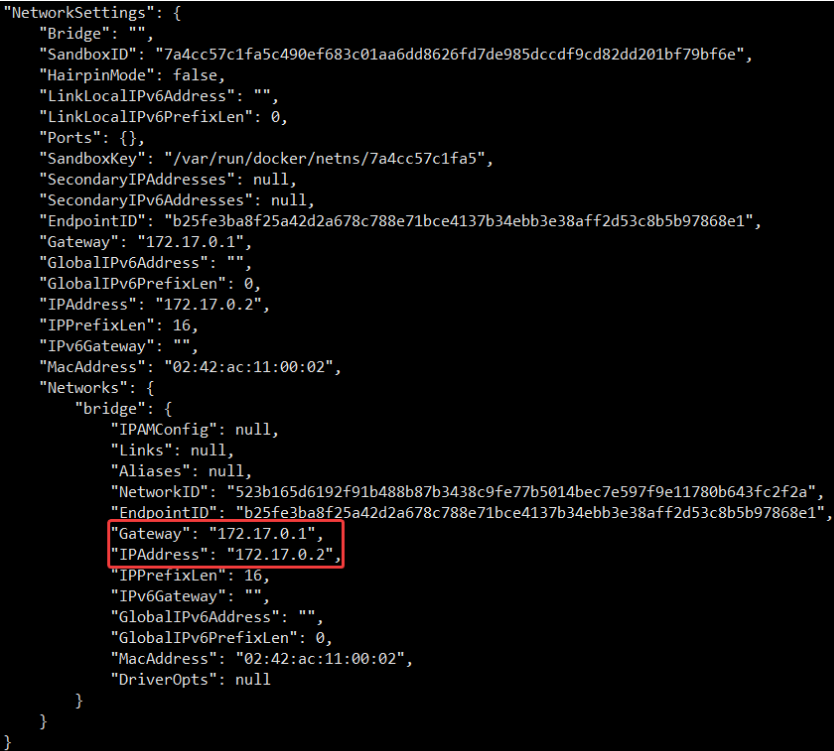
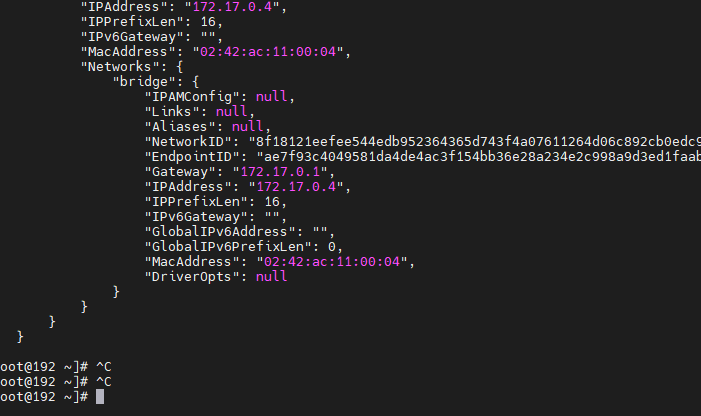
For the IP address and Gateway information of each container, we can docker inspect container name | ID To view, in NetworkSettings You can see the details in the node.
We can pass docker network inspect bridge View all bridge Container in network mode, in Containers You can see the container name in the node.
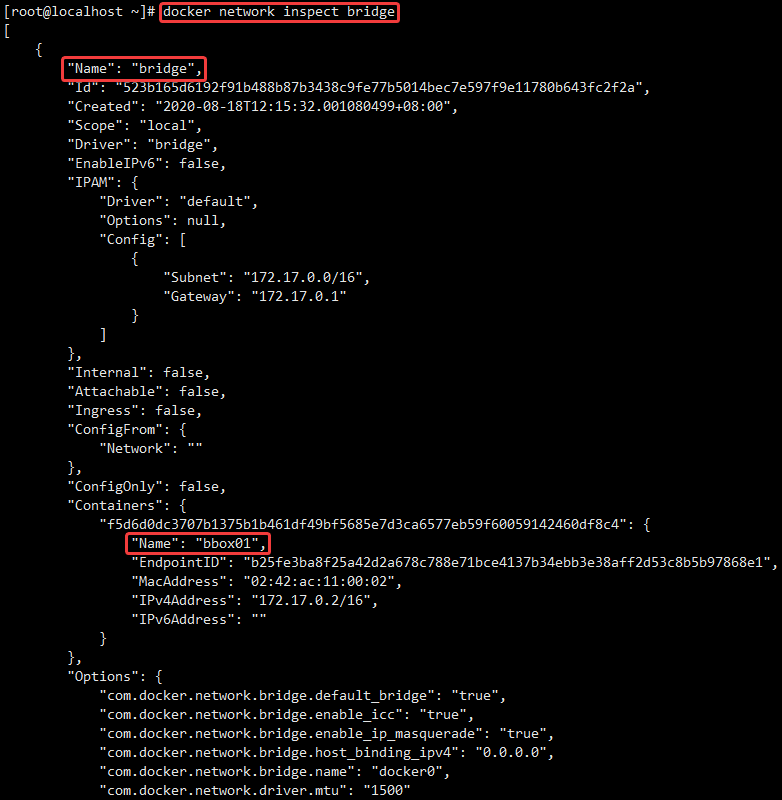
about bridge The use of network mode only needs to pass parameters when creating a container --net bridge perhaps --network bridge Of course, this is also the default network mode used to create containers, that is, this parameter can be omitted.
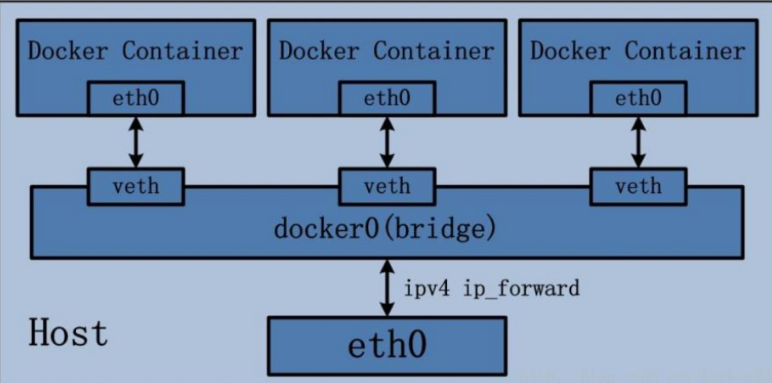
The main implementation steps of Bridge bridging mode are as follows:
- Docker Daemon uses veth pair technology to create a pair of peer-to-peer virtual network interface devices on the host, assuming veth0 and veth1. and
The characteristics of veth pair technology can ensure that no matter which veth receives the network message, it will transmit the message to the other party. - Docker Daemon attaches veth0 to the docker0 bridge created by Docker Daemon. Ensure that the network message of the host can be sent to veth0;
- Docker Daemon adds veth1 to the namespace to which the Docker Container belongs and is renamed eth0. In this way, if the network message of the host is sent to veth0, it will be immediately received by eth0 of the Container, so as to realize the connectivity between the host and the Docker Container network; At the same time, it also ensures that Docker Container uses eth0 alone to realize the isolation of Container network environment.
1.2. host network mode
- The host network mode requires parameters when creating a container -- net host perhaps -- network host appoint;
- Docker Container with host network mode can directly use the IP address of the host to communicate with the outside world. If eth0 of the host is a public IP, the container also has this public IP. At the same time, the service port in the container can also use the port of the host without additional NAT conversion;
- The host network mode allows the container to share the host network stack. The advantage is that the external host communicates directly with the container, but the container network lacks isolation.
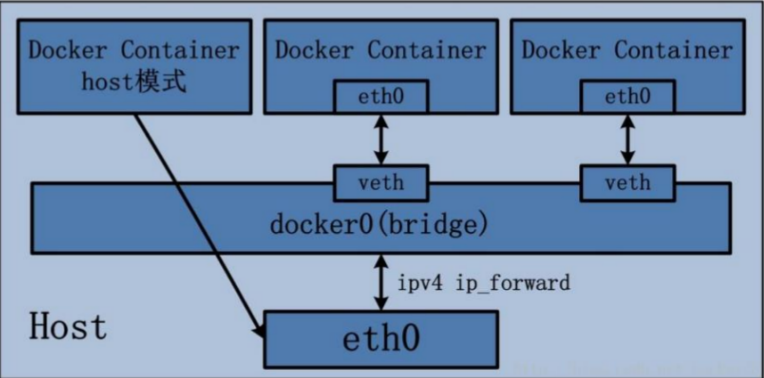
For example, I'm based on host Network mode creates a busybox Mirror built container bbox02, view ip addr:
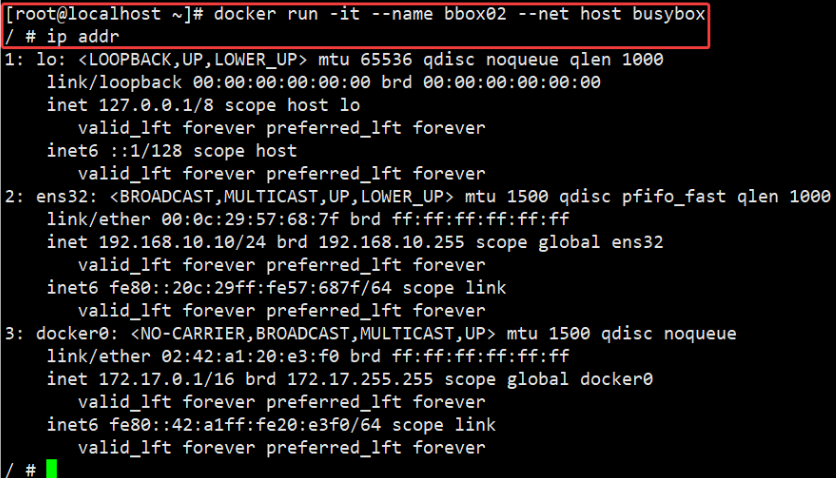
Then the host passes through ip addr The view information is as follows:
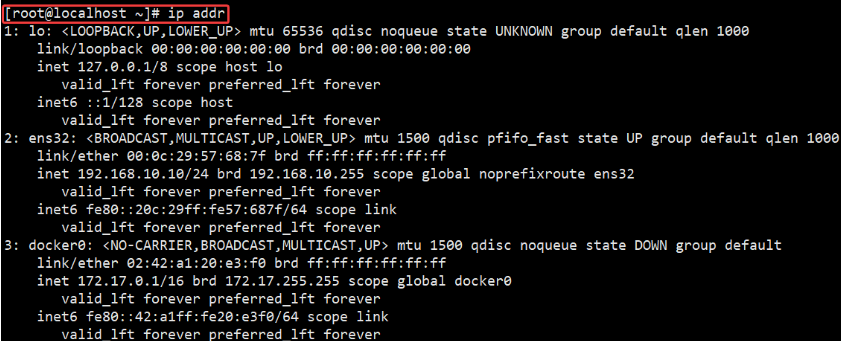
Yes, as like as two peas, you can see that the information is exactly the same. I am sure I have no wrong picture, no letter, and then look down. We can pass docker network inspect host View all host Container in network mode, in Containers You can see the container name in the node
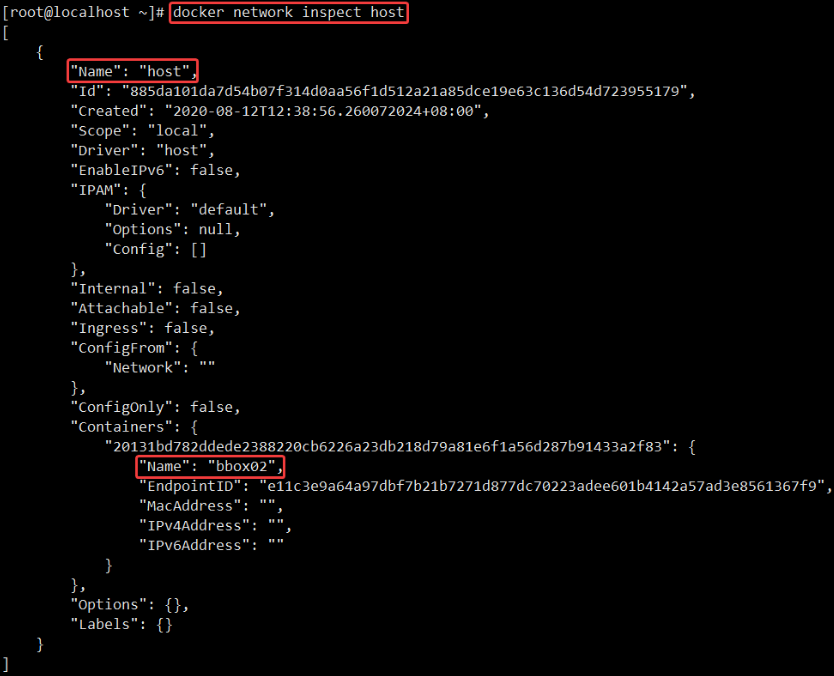
1.3. none network mode
- None network mode means that the network function is disabled. Only lo interface is short for local, which represents 127.0.0.1, that is, localhost local loopback interface. Pass parameters when creating a container -- net none perhaps -- network none appoint;
- The none network mode does not create any network environment for the Docker Container. Only loopback network devices can be used inside the container, and there will be no other network resources. It can be said that none mode makes few network settings for dock container, but as the saying goes, "less is more". In the absence of network configuration, as a Docker developer, you can do unlimited network customization development on this basis. This also happens to reflect the openness of Docker design concept.
For example, I'm based on none Network mode creates a busybox Mirror built container bbox03, view ip addr:

We can pass docker network inspect none View all none Container in network mode, in Containers You can see the container name in the node.
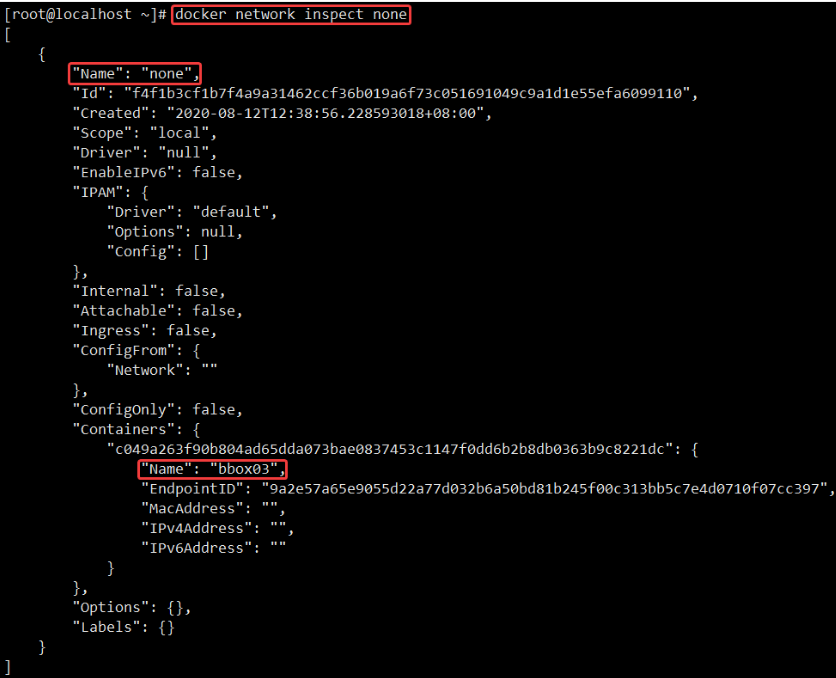
1.4. container network mode
- Container network mode is a special network mode in Docker. Pass parameters when creating a container -- net container: name and ID of the container that has been run perhaps -- network container: name and ID of the running container appoint;
- The Docker container in this mode will share a network stack, so that the two containers can communicate efficiently and quickly using localhost.
Container network mode means that the newly created container will not create its own network card and configure its own IP, but share IP and port range with a specified container. Similarly, the two containers are isolated except for the same network aspects, such as file system and process list.
For example, I'm based on containers bbox01 Created container Network mode container bbox04, view ip addr:

Container bbox01 of ip addr The information is as follows:

Host ip addr The information is as follows:
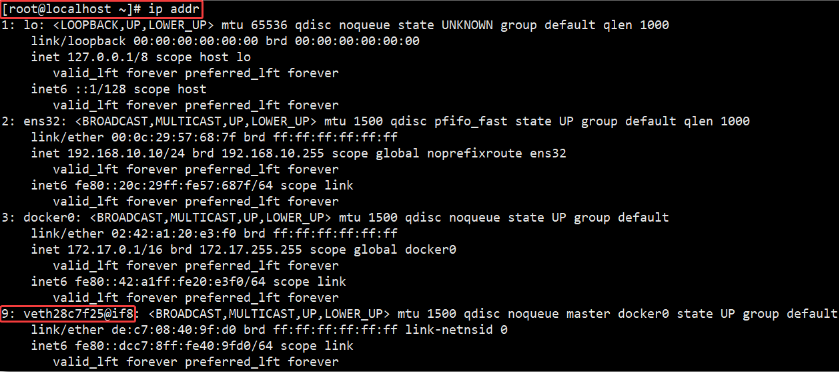
Through the above tests, it can be found that the Docker daemon only creates a pair of peer-to-peer virtual device interfaces to connect the bbox01 container and the host, while the bbox04 container directly uses the network card information of the bbox01 container.
At this time, if you stop the bbox01 container, you will find that only the lo interface is left in the bbox04 container.

After the bbox01 container is restarted, the bbox04 container is restarted, and the network card information can be obtained again.

2, Custom network
#View network list
docker network ls

#View container ip
docker run -itd nginx:latest /bin/bash #Run container
ce0eb6f2ce5c237e2d75d22c2841ff86763d9294be97c8f6bdc9e6311cce8234
docker ps -a #View container list
docker inspect ce0eb6f2ce5c #View the container information, where you can see the ip address of the container
2.1. Assign container address
[root@192 ~]# docker run -itd --name nginx-1 --network bridge --ip 172.17.0.10 nginx:latest /bin/bash
docker: Error response from daemon: Conflict. The container name "/nginx-1" is already in use by container "4e9aaf7ca4be7d288b82b0969e8709c9456fbffa80f04cb48bab8a1d16833d03". You have to remove (or rename) that container to be able to reuse that name.
See 'docker run --help'.
#Error when opening container
[root@192 ~]# docker ps -a
CONTAINER ID   IMAGE                                                    COMMAND                  CREATED             STATUS                           PORTS                                   NAMES
4e9aaf7ca4be   nginx:latest                                             "/docker-entrypoint...."   3 minutes ago       Created                                                                  nginx-1
ce0eb6f2ce5c   nginx:latest                                             "/docker-entrypoint...."   13 minutes ago      Up 13 minutes                    80/tcp                                  elastic_wing
0ee4e0bf35e0   centos                                                   "/sbin/init"             About an hour ago   Up About an hour                                                         test3
bd61aee15323   centos:7                                                 "/usr/bin/bash -c 'w..."   About an hour ago   Up About an hour                                                         elegant_tharp
f3470979d06c   centos:7                                                 "/usr/bin/bash -c ls..."   About an hour ago   Exited (0) About an hour ago                                             charming_mclean
b7ebbe9f86ed   nginx:latest                                             "/docker-entrypoint...."   About an hour ago   Exited (137) About an hour ago                                           practical_euclid
0e1a125a745f   hello-world                                              "/hello"                 2 hours ago         Exited (0) 2 hours ago                                                   nervous_dijkstra
f55edaa9324d   goharbor/nginx-photon:v1.9.3                             "nginx -g 'daemon of..."   3 days ago          Up 3 days (healthy)              0.0.0.0:80->8080/tcp, :::80->8080/tcp   nginx
b8cf7697435c   goharbor/harbor-jobservice:v1.9.3                        "/harbor/harbor_jobs..."   3 days ago          Up 3 days (healthy)                                                      harbor-jobservice
5bc124360b25   goharbor/harbor-core:v1.9.3                              "/harbor/harbor_core"    3 days ago          Up 3 days (healthy)                                                      harbor-core
d1b0830d24a5   goharbor/harbor-registryctl:v1.9.3                       "/harbor/start.sh"       3 days ago          Up 3 days (healthy)                                                      registryctl
42ff18163705   goharbor/registry-photon:v2.7.1-patch-2819-2553-v1.9.3   "/entrypoint.sh /etc..."   3 days ago          Up 3 days (healthy)              5000/tcp                                registry
e1df062fce2d   goharbor/harbor-db:v1.9.3                                "/docker-entrypoint...."   3 days ago          Up 3 days (healthy)              5432/tcp                                harbor-db
1ce0178ad138   goharbor/harbor-portal:v1.9.3                            "nginx -g 'daemon of..."   3 days ago          Up 3 days (healthy)              8080/tcp                                harbor-portal
1709cce283ba   goharbor/redis-photon:v1.9.3                             "redis-server /etc/r..."   3 days ago          Up 3 days (healthy)              6379/tcp                                redis
2bd4cbb41d85   goharbor/harbor-log:v1.9.3                               "/bin/sh -c /usr/loc..."   3 days ago          Up 3 days (healthy)              127.0.0.1:1514->10514/tcp               harbor-log
[root@192 ~]#
2.2. You can fix the ip through a custom network
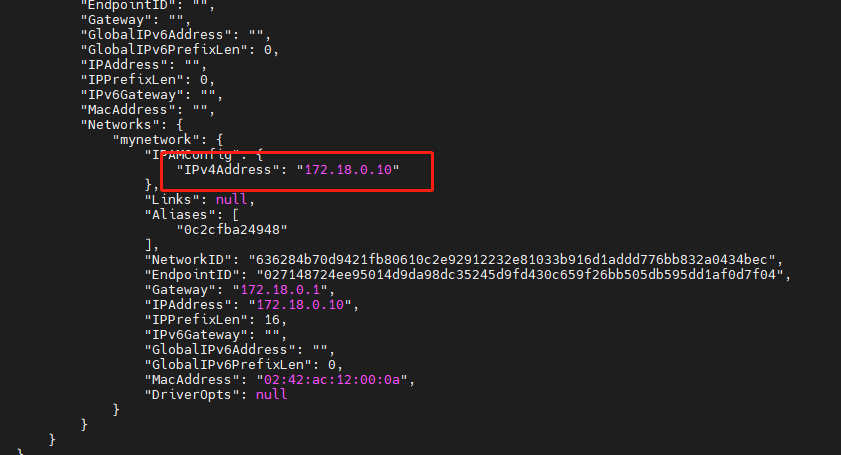
[root@192 ~]# docker network create --subnet=172.18.0.0/16 mynetwork  #Specifies to create a subnet segment using the default bridge mode
636284b70d9421fb80610c2e92912232e81033b916d1addd776bb832a0434bec

#Specify ip
[root@192 ~]# docker run -itd --name nginx-2 --net mynetwork --ip 172.18.0.10 nginx:latest /bin/bash
0c2cfba24948cb948f6b7d1182459261405a311b68114bbbd6c6c62dda5c1222
[root@192 ~]#
ps: customize the network before specifying the container
[root@192 ~]# docker inspect nginx-2
2.3 exposed ports
[root@192 ~]# docker run -itd -p 555:80 nginx /bin/bash
a403fae4f065f7e8624e6bb4f256b5b098603c0a44a367bf0742e568fdefb6a5

[root@192 ~]# docker exec a403fae4f065 nginx
2021/09/04 18:26:52 [notice] 8#8: using the "epoll" event method
2021/09/04 18:26:52 [notice] 8#8: nginx/1.21.1
2021/09/04 18:26:52 [notice] 8#8: built by gcc 8.3.0 (Debian 8.3.0-6)
2021/09/04 18:26:52 [notice] 8#8: OS: Linux 3.10.0-957.el7.x86_64
2021/09/04 18:26:52 [notice] 8#8: getrlimit(RLIMIT_NOFILE): 1048576:1048576
2021/09/04 18:26:52 [notice] 15#15: start worker processes
2021/09/04 18:26:52 [notice] 15#15: start worker process 16
2021/09/04 18:26:52 [notice] 15#15: start worker process 17
2021/09/04 18:26:52 [notice] 15#15: start worker process 18
2021/09/04 18:26:52 [notice] 15#15: start worker process 19
[root@192 ~]#

[root@192 ~]# docker run -itd -P nginx /bin/bash
a06cc91e8648dba234f8ecb3a089523ff43e4b764bc636ddad12659bf006c708
[root@192 ~]#


2.4, Execute command in container
[root@192 ~]# docker create -it centos:7 /bin/bash
[root@192 ~]# docker start f8980b1f0154
f8980b1f0154
[root@192 ~]# docker exec -it f8980b1f0154 /bin/bash
#Unable to execute command found
[root@192 ~]# docker run -itd --name centos-systemd --privileged=true centos:7 /sbin/init #Specify privilege container
[root@192 ~]# docker exec -it ff3f87d9d6b6 /bin/bash
[root@ff3f87d9d6b6 /]# yum install -y httpd
[root@ff3f87d9d6b6 /]# systemctl status httpd
● httpd.service - The Apache HTTP Server
   Loaded: loaded (/usr/lib/systemd/system/httpd.service; disabled; vendor preset: disabled)
   Active: inactive (dead)
     Docs: man:httpd(8)
           man:apachectl(8)
3, Docker data volume
3.1 data volume
- A data volume is a special directory used by a container and is located in the container. The directory of the host can be mounted on the data volume, the modification of the data volume can be seen immediately, and updating the data will not affect the image, so as to realize the migration of data between the host and the container. The use of data volumes is similar to the mount operation on directories under Linux.
Create data volume
docker run -d -v /data1 -v /data2 --name web httpd:centos
 Mount the host directory as a data volume
docker run -d -v /var/www:/data1 --name web-1 httpd:centos
example:
docker pull centos
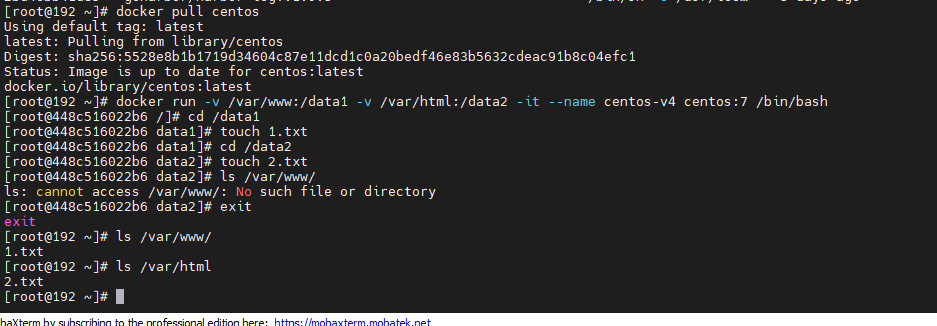
docker run -v /var/www:/data1 -v /var/html:/data2 -it --name centos-v4 centos:7 /bin/bash	##The host directory / var/www mounts / data1 in the container and / var/html mounts / data2 in the container
cd /data1
touch 1.txt
cd /data2
touch 2.txt
ls /var/www/		##Return to the host for viewing
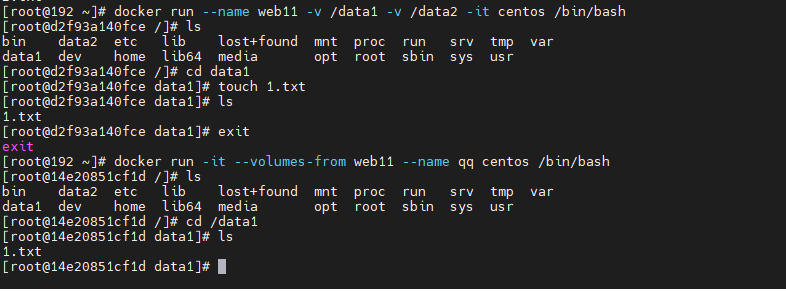
3.2. Data volume container
- If you need to share some data between containers, the easiest way is to use data volume containers. The data volume container is an ordinary container that provides data volumes for other containers to mount.
①: Data volume container
docker run --name web11 -v /data1 -v /data2 -it centos /bin/bash 	##Create data1 volume, data2 volume
②: New container mount data volume container web100
docker run -it --volumes-from web11 --name qq centos /bin/bash	 ##Allow a container, specify that the volume comes from web11, and the new container name qq
3.3. Container interconnection (using centos image)
docker run -itd -P --name webb centos /bin/bash 		##Create and run the container named web1, and the port number is automatically mapped
docker run -itd -P --name web2 --link webb:webb centos /bin/bash	##Create and run a container named web2, link to web1 and communicate with it
	--link: Open the tunnel
yum -y install net-tools	##Tools for downloading ifconfig
 verification:
enter web2 container ping webb


