Virtual Machine Creation Flowchart for opensatck
Four services and component functions of openstack
1. Some concepts of keystone certification service
1)User:
Users using openstack
2)Role:
Add a user to a role and give the user permission to operate
3)Tenant:
A collection of resources owned by a person, project, or organization, with multiple users under a tenant, which can be divided into user privileges to use the resources in the tenant
4)TOken:
A password, password, keystone authentication returns the token password to the browser, that is, to log on without a secret key for a period of time, similar to a cookie
 Session is maintained, but different from cookies, cookies record browser login information and cannot assign user access rights; token stores user authentication information.
Related to user privileges.
2. Components and functions of the glass mirror service
1)glance-api
Receive Delete, Upload and Read of Mirrors
2)glance-registry
Responsible for interacting with the mysql database for storing and retrieving mirrored metadata and two tables image tables for storing mirrored information in the database
 And image-property tables
 Image table: The format, size, and other information used to store the image file
 image-property table: used to store customization information for mirror files
3)image-store
The interface to save and read a mirror is just an interface
4) Attention
The glance service does not need to configure message queues, but configures keystone authentication and database
3.nova configures the components and functions of virtual machine services (one of the earliest components of openstack)
1)nova-api
Receive and respond to external requests and send received requests to other service components via message queues
2)nova-compute
To create a virtual machine, the kvm module is called by libvirt to create a virtual machine. nova is divided into control and computing nodes, and between Nova
 Message queue for communication
3)nova-schdule
Is the physical machine used to schedule the creation of virtual machines
4)nova-palcement-api
Monitor the inventory and usage of providers, such as tracking and calculating the usage of node resource storage pools, ip allocation, etc., and cooperate with schdule to schedule physical machines
5)nova-conductor
The Middleware in which a compute node accesses a database, that is, when nova-compute needs to obtain or update instance information in the database, it does not directly access the database.
Accessing the database through a conductor requires scaling the conductor horizontally, but not on computing nodes, when in a larger cluster environment
6)nova-novncproxy
VNC Agent, which displays the interface of the virtual machine operation terminal
7)nova-medata-api
Receive metadata requests for virtual machines
4. Some components and functions of the neutron network service (formerly called nova-network, renamed netron)
1) divided into self-service and provider networks
Self-service network: You can create your own network and use a virtual router to connect to an external network. This type of network is rarely used
 Provider Network: The virtual machine network bridges to the physical machine network and must be in the same network segment as the physical machine. Most choose this network type
2)neutron-server
Provide openstack's network API to the outside world, receive requests, and call plug-ins
3)plugin
Processing requests received by neutron-server Maintains logical network state and calls agent to process requests
4)neutron-linuxbridge-agent
Processing plugin requests to ensure network providers implement various network functions
5) Message Queue
neutron-server, agent, plugin communicate and call through message queue
6) Network Providers
Provides virtual or physical network devices such as linux-bridge, physical switches that support neutron services,
Its network, subnet, port, route and other information are stored in the database
2. Environment preparation (centos7.2 version for all nodes)
1.controll-node control node
1) Network Card
            eth0:192.168.1.10/24
            eth1:192.168.23.100/24
2) Required packages:
            python-openstackclient  #Client connection package for openstack
            python2-PyMySQL #Connect Database Package
            mariadb #Client for mysql database connection test
            python-memcached   #Connect memcached packets
            openstack-keystone   #Certification Service Pack
            httpd
            mod_wsgi  #httpd module package
            openstack-glance  #Mirror Service Pack
            openstack-nova-api #Receive and respond to external request packages
            openstack-nova-conductor
            openstack-nova-console
            openstack-nova-novncproxy
            openstack-nova-scheduler
            openstack-nova-placement-api
            openstack-neutron
            openstack-neutron-ml2  #Two-tier module plug-in
            openstack-neutron-linuxbridge
            ebtables
            openstack-dashboard
2.compute-node compute node
1) Network Card
     eth0:192.168.1.10/24
     eth1:192.168.23.201/24
2) Required packages:
     python-openstackclient
     openstack-nova-compute
     openstack-neutron-linuxbridge
     ebtables
     ipset
3.mysql-node database node
1) Network Card
eth0:192.168.1.41/24
2) Required packages:
     python-openstackclient
     mariadb
     mariadb-server
     rabbitmq-server
     memcached
4. Functions that must be turned off and turned on before the experiment to avoid the failure of the experiment.
1) Firewall to disable
2) NetworkManager to disable: will result in the inability of bond and bridged network cards to take effect
3) selinux must be disabled: may cause network problems
4) Turn on chrony clock synchronization to keep all nodes in time synchronization, so as to avoid the error caused by the control node not finding the computing node and making the experiment impossible.
3. Building process of openstack (l ocata version of openstack)
1. Prepare the openstack repository and install some packages
1) Install the openstack repository in control-node and compute-node, respectively
~]#yum install centos-release-openstack-ocata -y
2) Install the openstack client on all nodes:
~]#yum install python-openstackclient -y
3) Control-node control node installs database connection packages:
Package used to connect memcached data
~]#yum install  python-memcached -y
 Package used to connect mysql database
~]#yum install python2-PyMySQL -y
Install mysql database client for remote test connection
~]#yum install mariadb -y
4) mysql-node installs MySQL database, message queue, memcached, etc.
Install mysql database:
     ~]#yum install mariadb mariadb-server -y
Configure the configuration file for the mysql database:
     ~]#vim/etc/my.cnf.d/openstack.cnf
    [mysqld]
    bind-address = 192.168.1.41
 default-storage-engine = innodb
 innodb_file_per_table = on
 max_connections = 4096
 collation-server = utf8_general_ci
 character-set-server = utf8
 ............
 ~]#vim/etc/my.cnf
 ......
 [mysqld]
 bind-address = 192.168.1.41
 ......
Start the mysql service:
systemctl enable mariadb.service && systemctl start mariadb.service
Ensure database security by executing database security installation commands, removing anonymous users and passwordless logins
~]#mysql_secure_installation
Install message queue rabbitmq:
~]# yum install rabbitmq-server -y
 ~]#systemctl enable rabbitmq-server.service  && systemctl start rabbitmq-server.service
~]#rabbitmqctl add_user openstack openstack #add openstack user
 ~]#rabbitmqctl set_permissions openstack'. *''. *''. *'#Allow read and write permissions
 Install the memcached database:
~]#yum install memcached -y
~]#vim /etc/sysconfig/memcached
     OPTIONS="-l 127.0.0.1,::1,192.168.1.41"
~]#systemctl enable memcached.service && systemctl start memcached.service
2. Deployment of certification service keystone
1) mysql-node creates keystone database and keystone authorized user
MariaDB [(none)]> CREATE DATABASE keystone;
MariaDB [(none)]> GRANT ALL PRIVILEGES ON keystone.* TO 'keystone'@'%'  IDENTIFIED BY 'keystone'
2) controll-node installs packages related to certification services and configures certification service profiles
~]#yum install openstack-keystone httpd mod_wsgi -y
 ~]# vim /etc/keystone/keystone.conf
    [database]
    # ...
 connection = mysql+pymysql://keystone:keystone@192.168.1.41/keystone #Indicates the connected database
[token]
# ...
provider = fernet
3) control-node executes some initialization commands for keystone
~]#su -s /bin/sh -c "keystone-manage db_sync" keystone  #Synchronize data to database
~]# keystone-manage fernet_setup --keystone-user keystone --keystone-group keystone Initializes fernet
~]#keystone-manage credential_setup --keystone-user keystone --keystone-group keystone #Initialization Certificate
//Boot to start the keystone service:
~]#keystone-manage bootstrap --bootstrap-password keystone --bootstrap-admin-url http://192.168.23.100:35357/v3/ --bootstrap-internal-url http://192.168.23.100:5000/v3/ --bootstrap-public-url http://192.168.23.100:5000/v3/ --bootstrap-region-id RegionOne
//Edit the httpd configuration file:
~]#vim /etc/httpd/conf/httpd.conf
ServerName 192.168.23.100
//Create soft connections:
~]# ln -s /usr/share/keystone/wsgi-keystone.conf /etc/httpd/conf.d/
//Start the http service:
~]#systemctl enable httpd.service && systemctl start httpd.service
//Declare openstack administrator account and password, etc.
~]#export OS_USERNAME=admin
~]# export OS_PASSWORD=keystone
~]# export OS_PROJECT_NAME=admin
~]# export OS_USER_DOMAIN_NAME=Default
~]# export OS_PROJECT_DOMAIN_NAME=Default
~]# export OS_AUTH_URL=http://192.168.23.100:35357/v3
~]# export OS_IDENTITY_API_VERSION=3
4) Create domain name, project, etc. in control-node
Create a service project:
~]#openstack project create --domain default --description "Service Project" service
 Create a demo project:
~]#openstack project create --domain default --description "Demo Project" demo
 Create a demo user:
~]#openstack user create --domain default --password-prompt demo
 Create a user role:
~]#openstack role create user
 Add demo users to the demo project and grant the user role permissions:
~]#openstack role add --project demo --user demo user
 Edit the keystone-paste.ini configuration file and remove the following [....]admin_token_auth option in section, do not enable temporary accounts for security
~]#vim /etc/keystone/keystone-paste.ini
remove 'admin_token_auth' from the [pipeline:public_api],[pipeline:admin_api], and [pipeline:api_v3] sections.
Reset the set variable secret key, system authentication url variable:
~]#unset OS_AUTH_URL OS_PASSWORD
 The admin user requests an authentication password and enters the administrator key to access it:
~]#openstack --os-auth-url http://192.168.23.100:35357/v3 --os-project-domain-name default --os-user-domain-name default --os-project-name admin --os-username admin token issue
 The demo user requests an authentication password and enters the demo user key when accessing:
~]#openstack --os-auth-url http://192.168.23.100:5000/v3 --os-project-domain-name default --os-user-domain-name default --os-project-name demo --os-username demo token issue
5) Create user authorization scripts in control-node for next access to the service
admin User authorization script:
~]#vim admin-openrc
export OS_PROJECT_DOMAIN_NAME=Default
export OS_USER_DOMAIN_NAME=Default
export OS_PROJECT_NAME=admin
export OS_USERNAME=admin
export OS_PASSWORD=keystone
export OS_AUTH_URL=http://192.168.23.100:35357/v3
export OS_IDENTITY_API_VERSION=3
export OS_IMAGE_API_VERSION=2
~]#chmod +x /data/admin-openrc
demo User authorization script:
~]#vim /data/demo-openrc
export OS_PROJECT_DOMAIN_NAME=Default
export OS_USER_DOMAIN_NAME=Default
export OS_PROJECT_NAME=demo
export OS_USERNAME=demo
export OS_PASSWORD=demo
export OS_AUTH_URL=http://192.168.23.100:5000/v3
export OS_IDENTITY_API_VERSION=3
export OS_IMAGE_API_VERSION=2
~]#chmd +x /data/demo-openrc
//Execute admin to collect script test access
~]#. admin-openrc
~]#openstack token issue
3. Glasce Mirror Service Deployment
1) Create a glance database and glance authorized users on mysql-node:
MariaDB [(none)]> CREATE DATABASE glance;
MariaDB [(none)]> GRANT ALL PRIVILEGES ON glance.* TO 'glance'@'%'  IDENTIFIED BY 'glance';
2) control-node executes glass service related commands
Execute the admin authorization script to access as admin:
~]#. admin-openrc
 Create glance users:
~]#openstack user create --domain default --password-prompt glance
 Give the glance user admin administrator privileges:
~]#openstack role add --project service --user glance admin
 Create a service named image
~]#openstack service create --name glance --description "OpenStack Image" image
 Create endpoint
 ~]#openstack endpoint create--region RegionOne image public http://192.168.23.100:9292 #public endpoint
 ~]#openstack endpoint create--region RegionOne image internal http://192.168.23.100:9292 #private endpoint
 ~]#openstack endpoint create--region RegionOne image admin http://192.168.23.100:9292 #Manage endpoint
3) controll-node installs the glances mirror service related packages and configures the glances configuration file
~]#yum install openstack-glance -y
~]#vim /etc/glance/glance-api.conf
[database]
# ...
connection = mysql+pymysql://glance:glance@192.168.1.41/glance #Specify the database to connect to

[keystone_authtoken]
# ...
auth_uri = http://192.168.23.100:5000
auth_url = http://192.168.23.100:35357
memcached_servers = 192.168.1.41:11211  #Specify the memcached database service
auth_type = password
project_domain_name = default
user_domain_name = default
project_name = service
username = glance #User name of glass service
password = glance #User name password for glance service

[paste_deploy]
# ...
flavor = keystone

[glance_store]
# ...
stores = file,http
default_store = file
filesystem_store_datadir = /var/lib/glance/images/   #Path to mirror file

~]#vim /etc/glance/glance-registry.conf
[database]
# ...
connection = mysql+pymysql://glance:glance@192.168.1.41/glance #Specify glance database

[keystone_authtoken]
# ...
auth_uri = http://192.168.23.100:5000
auth_url = http://192.168.23.100:35357
memcached_servers = 192.168.1.41:11211
auth_type = password
project_domain_name = default
user_domain_name = default
project_name = service
username = glance
password = glance

[paste_deploy]
# ...
flavor = keystone
//Generate table files to the glance database in mysql:
~]# su -s /bin/sh -c "glance-manage db_sync" glance
//Start glance's many related services:
~]# systemctl enable openstack-glance-api.service  openstack-glance-registry.service
~]#systemctl start openstack-glance-api.service openstack-glance-registry.service
//Execute admin rights script:
 ~]#. admin-openrc
//Download the cirros image file:
~]# wget http://download.cirros-cloud.net/0.3.5/cirros-0.3.5-x86_64-disk.img
//Load the mirror file into the glass service:
~]# openstack image create "cirros" --file cirros-0.3.5-x86_64-disk.img --disk-format qcow2 --container-format bare --public
//To see if the service was added successfully:
~]#openstack image list
4. Deployment of Nova services
1) Create a nova-related database and authorized Nova users on mysql-node
MariaDB [(none)]> CREATE DATABASE nova_api;
MariaDB [(none)]> CREATE DATABASE nova;
MariaDB [(none)]> CREATE DATABASE nova_cell0;

MariaDB [(none)]> GRANT ALL PRIVILEGES ON nova_api.* TO 'nova'@'%' \
    IDENTIFIED BY 'nova123456';
MariaDB [(none)]> GRANT ALL PRIVILEGES ON nova.* TO 'nova'@'%' \
    IDENTIFIED BY 'nova123456';
MariaDB [(none)]> GRANT ALL PRIVILEGES ON nova_cell0.* TO 'nova'@'%' \
    IDENTIFIED BY 'nova123456';
2) controll-node executes commands related to the nova service
 Execute admin authorization script:
~]#. admin-openrc
 Create nova user:
~]#openstack user create --domain default --password-prompt nova
 Grant admin privileges to nova user:
~]#openstack role add --project service --user nova admin
 Create a service named cpmpute
~]#openstack service create --name nova --description "OpenStack Compute" compute
 Create enpoint:
~]#openstack endpoint create--region RegionOne compute public http://192.168.23.100:8774/v2.1 #public endpoint
 ~]#openstack endpoint create--region RegionOne compute internal http://192.168.23.100:8774/v2.1 #private endpoint
 ~]#openstack endpoint create --region RegionOne compute admin http://192.168.23.100:8774/v2.1 #Manage endpoints
 Create placement user:
~]#openstack user create --domain default --password-prompt placement
 Grant admin privileges to placement users
~]#openstack role add --project service --user placement admin
 Create a service named placement service
~]# openstack service create --name placement --description "Placement API" placement
 Create endpoint:
~]#openstack endpoint create--region RegionOne placement public http://192.168.23.100:8778 #public endpoint
 ~]#openstack endpoint create--region RegionOne placement internal http://192.168.23.100:8778 #private endpoint
 ~]#openstack endpoint create --region RegionOne placement admin http://192.168.23.100:8778 #Manage endpoint
3) Install nova-related packages in the control-node and configure the Nova configuration file
~]#yum install openstack-nova-api openstack-nova-conductor openstack-nova-console openstack-nova-novncproxy openstack-nova-scheduler openstack-nova-placement-api -y

 ~]#vim /etc/nova/nova.conf
[api_database]
# ...
connection = mysql+pymysql://nova:nova123456@192.168.1.41/nova_api #Specify nova_api data

[database]
# ...
connection = mysql+pymysql://nova:nova123456@192.168.1.41/nova #Specify Nova database

[DEFAULT]
# ...
enabled_apis = osapi_compute,metadata
transport_url = rabbit://openstack:openstack@192.168.1.41 #Specify message queue
my_ip = 192.168.23.100   Manage Nodes ip,Can not be enabled
use_neutron = True
firewall_driver = nova.virt.firewall.NoopFirewallDriver  #Disable computing firewall

[api]
# ...
auth_strategy = keystone

[keystone_authtoken]
# ...
auth_uri = http://192.168.23.100:5000
auth_url = http://192.168.23.100:35357
memcached_servers =192.168.1.41:11211 #Specify memcached database
auth_type = password
project_domain_name = default
user_domain_name = default
project_name = service
username = nova  #User name of nova service
password = nova123456 #User name password for nova service

[vnc]
enabled = true
# ...
vncserver_listen = $my_ip  #Specify vnc's listening address
vncserver_proxyclient_address = $my_ip #Specify vnc proxy address

[glance]
# ...
api_servers = http://192.168.23.100:9292

[oslo_concurrency]
# ...
lock_path = /var/lib/nova/tmp  #Specify Lock Directory

[placement]
# ...
os_region_name = RegionOne
project_domain_name = Default
project_name = service
auth_type = password
user_domain_name = Default
auth_url = http://192.168.23.100:35357/v3
username = placement
password = placement

~]#vim /etc/httpd/conf.d/00-nova-placement-api.conf
<Directory /usr/bin>
     <IfVersion >= 2.4>
            Require all granted
     </IfVersion>
     <IfVersion < 2.4>
            Order allow,deny
            Allow from all
     </IfVersion>
</Directory>
//Restart the httd service:
~]#systemctl restart httpd
4) After configuring, execute the import data command on the control-node and start all services of nova
Import nova's tabular data into the database corresponding to Nova in mysql:
~]#su -s /bin/sh -c "nova-manage api_db sync" nova
~]#su -s /bin/sh -c "nova-manage cell_v2 map_cell0" nova
~]#su -s /bin/sh -c "nova-manage cell_v2 create_cell --name=cell1 --verbose" nova
~]#su -s /bin/sh -c "nova-manage db sync" nova
 Query cell unit:
~]#nova-manage cell_v2 list_cells
 Start all nova related services:
~]#systemctl enable openstack-nova-api.service openstack-nova-consoleauth.service openstack-nova-scheduler.service openstack-nova-conductor.service openstack-nova-novncproxy.service
~]#systemctl start openstack-nova-api.service openstack-nova-consoleauth.service openstack-nova-scheduler.service  openstack-nova-conductor.service openstack-nova-novncproxy.service
5) Deploy nova service in compute-node
Computing Node Installation nova Service related packages and configuration nova Profiles for services:
~]#yum install openstack-nova-compute -y
~]#vim /etc/nova/nova.conf
[DEFAULT]
# ...
enabled_apis = osapi_compute,metadata
transport_url = rabbit://openstack:openstack@192.168.1.41
my_ip = 192.168.23.201   #Compute Node

[api]
# ...
auth_strategy = keystone

[keystone_authtoken]
# ...
auth_uri = http://192.168.23.100:5000
auth_url = http://192.168.23.100:35357
memcached_servers = 192.168.1.41:11211
auth_type = password
project_domain_name = default
user_domain_name = default
project_name = service
username = nova
password = nova123456

[vnc]
# ...
enabled = True
vncserver_listen = 0.0.0.0
vncserver_proxyclient_address = $my_ip
novncproxy_base_url = http://192.168.23.100:6080/vnc_auto.html

[glance]
# ...
api_servers = http://192.168.23.100:9292

[oslo_concurrency]
# ...
lock_path = /var/lib/nova/tmp

[placement]:
# ...
os_region_name = RegionOne
project_domain_name = Default
project_name = service
auth_type = password
user_domain_name = Default
auth_url = http://192.168.23.100:35357/v3
username = placement
password = placement
//Check to see if your computing node supports hardware for the virtual machine and returns a value of 1 or greater
~]#egrep -c '(vmx|svm)' /proc/cpuinfo
//If your computing node does not support virtual machine hardware acceleration, you need to configure the option libvirt
~]#vim /etc/nova/nova.conf
[libvirt]
# ...
virt_type = qemu
6) Start the nova service after compute-node has completed the above configuration
~]#systemctl enable libvirtd.service openstack-nova-compute.service
~]#systemctl start libvirtd.service openstack-nova-compute.service
 Note Be careful
If the nova-compute service fails to start, check /var/log/nova/nova-compute.log.
The error message AMQP server on controller:5672 is unreachable likely indicates that the firewall
 on the controller node is preventing access to port 5672.
Configure the firewall to open port 5672 on the controller node and restart nova-compute service on the compute node.
//Execute admin authorization script:
~]#. admin-openrc
//View the status of the hypervisor:
~]# openstack hypervisor list
//Query the computing host and add it to the cell library:
~]#su -s /bin/sh -c "nova-manage cell_v2 discover_hosts --verbose" nova
//If you need to add a new computing node, you need to run nova-manage cell_v2 discover_hosts on the primary node
//perhaps
~]#vim /etc/nova/nova.conf
[scheduler]
discover_hosts_in_cells_interval = 300   #Set the appropriate time interval
7) Check nova service on control-node after configuration is complete
~]#. admin-openrc
 List all computing services
~]#openstack compute service list
~]#openstack catalog list
 ~]#openstack image list
 Upgrade status check for nova service:
~]#nova-status upgrade check
5. Deployment of neutron network service
1) Create a neutron database and authorized users of the neutron service on mysql-node
MariaDB [(none)] CREATE DATABASE neutron;
MariaDB [(none)]> GRANT ALL PRIVILEGES ON neutron.* TO 'neutron'@'%' IDENTIFIED BY 'neutron';
2) Execute commands related to the neutron service on the control-node
Execute admin authorization script to execute command as admin
~]#. admin-openrc
 Create neutron user:
~]#openstack user create --domain default --password-prompt neutron
 Attribute neutron user to admin privilege
~]#openstack role add --project service --user neutron admin
 Create a network service named neutron of type network:
~]#openstack service create --name neutron --description "OpenStack Networking" network
 Create endpoint:
~]#openstack endpoint create--region RegionOne network public http://192.168.23.100:9696 #public endpoint
 ~]#openstack endpoint create--region RegionOne network internal http://192.168.23.100:9696 #private endpoint
 ~]#openstack endpoint create--region RegionOne network admin http://192.168.23.100:9696 #Manage endpoints
3) Install the relevant packages and configuration files for neutron service on the control-node (for example, a provider-network type here)
~]#yum install openstack-neutron openstack-neutron-ml2 openstack-neutron-linuxbridge ebtables -y

~]#vim /etc/neutron/neutron.conf
[database]
# ...
connection = mysql+pymysql://neutron:neutron123@192.168.1.41/neutron

[DEFAULT]
# ...
core_plugin = ml2
service_plugins =
transport_url = rabbit://openstack:openstack@192.168.1.41
auth_strategy = keystone
notify_nova_on_port_status_changes = true
notify_nova_on_port_data_changes = true

[keystone_authtoken]
# ...
auth_uri = http://192.168.23.100:5000
auth_url = http://192.168.23.100:35357
memcached_servers = 192.168.1.41:11211
auth_type = password
project_domain_name = default
user_domain_name = default
project_name = service
username = neutron
password = neutron

[nova]
# ...
auth_url = http://192.168.23.100:35357
auth_type = password
project_domain_name = default
user_domain_name = default
region_name = RegionOne
project_name = service
username = nova
password = nova

[oslo_concurrency]
# ...
lock_path = /var/lib/neutron/tmp

~]#vim /etc/neutron/plugins/ml2/ml2_conf.ini  #Module Layer 2 Profile
[ml2]
# ...
type_drivers = flat,vlan  #Enable flat (bridged network) and vlan (virtual local area network) respectively
tenant_network_types =        #Disable subnet creation for empty representation
mechanism_drivers = linuxbridge  #Mechanism driven as bridging
extension_drivers = port_security  #Open Extended Drive Port Security

[ml2_type_flat]
# ...
flat_networks = provider   #Specified virtual network name

[securitygroup]
# ...
enable_ipset = true

~]#vim /etc/neutron/plugins/ml2/linuxbridge_agent.ini
[linux_bridge]
physical_interface_mappings = provider:eth1  #The physical network card is mapped to eth1, where the fever provider is a virtual network name and must follow the flat_networks=specified above
//The virtual network names specified are the same

[vxlan]
enable_vxlan = false   #Disable vxlan technology to allow binary users to create their own networks

[securitygroup]   #Opening security groups restricts access rules for external hosts
# ...
enable_security_group = true
firewall_driver = neutron.agent.linux.iptables_firewall.IptablesFirewallDriver

~]#vim /etc/neutron/dhcp_agent.ini  #dhcp proxy service
[DEFAULT]
# ...
interface_driver = linuxbridge
dhcp_driver = neutron.agent.linux.dhcp.Dnsmasq
enable_isolated_metadata = true

~]#vim /etc/neutron/metadata_agent.ini
[DEFAULT]
# ...
nova_metadata_ip = 192.168.23.100
metadata_proxy_shared_secret = 123456

~]#vim /etc/nova/nova.conf
[neutron]
# ...
url = http://192.168.23.100:9696
auth_url = http://192.168.23.100:35357
auth_type = password
project_domain_name = default
user_domain_name = default
region_name = RegionOne
project_name = service
username = neutron
password = neutron
service_metadata_proxy = true
metadata_proxy_shared_secret = 123456
......
4) After configuration is complete, the database import of neutron network service is executed in the control-node to initialize and open all services of neutron
Network Initialization Script Soft Connection:
~]#ln -s /etc/neutron/plugins/ml2/ml2_conf.ini /etc/neutron/plugin.ini
Import neutron-generated tables into the neutron database in mysql:
~]#su -s /bin/sh -c "neutron-db-manage --config-file /etc/neutron/neutron.conf --config-file /etc/neutron/plugins/ml2/ml2_conf.ini upgrade head" neutron
 Restart the nova-api service:
~]#systemctl restart openstack-nova-api.service
 Start all services of the neutron network service:
~]#systemctl enable neutron-server.service neutron-linuxbridge-agent.service neutron-dhcp-agent.service neutron-metadata-agent.service
~]#systemctl start neutron-server.service  neutron-linuxbridge-agent.service neutron-dhcp-agent.service neutron-metadata-agent.service

Provider network mode works on the second tier without having to turn on these three tier services, which need to be turned on when using self-service network mode:
~]#systemctl enable neutron-l3-agent.service && systemctl start neutron-l3-agent.service
5) Deploy neutron service in compute-node
Install at Computing Node neutron Related packages and configurations for services neutron configuration file
~]#yum install openstack-neutron-linuxbridge ebtables ipset -y
~]#vim /etc/neutron/neutron.conf
//Comment out all connection options under [database]

[DEFAULT]
# ...
transport_url = rabbit://openstack:openstack@192.168.1.41
auth_strategy = keystone

[keystone_authtoken]
# ...
auth_uri = http://192.168.23.100:5000
auth_url = http://192.168.23.100:35357
memcached_servers = 192.168.1.41:11211
auth_type = password
project_domain_name = default
user_domain_name = default
project_name = service
username = neutron
password = neutron

[oslo_concurrency]
# ...
lock_path = /var/lib/neutron/tmp

//Select the same network options as control node s
~]#vim /etc/neutron/plugins/ml2/linuxbridge_agent.ini
[linux_bridge]
physical_interface_mappings = provider:eth1  #The virtual network card name provider here must be consistent with the control node

[vxlan]
enable_vxlan = false    #Also turn off VXlan

[securitygroup]
# ...
enable_security_group = true
firewall_driver = neutron.agent.linux.iptables_firewall.IptablesFirewallDriver
~]#vim /etc/nova/nova.conf
[neutron]
# ...
url = http://192.168.23.100:9696
auth_url = http://192.168.23.100:35357
auth_type = password
project_domain_name = default
user_domain_name = default
region_name = RegionOne
project_name = service
username = neutron
password = neutron
//Restart the nova service:
~]#systemctl restart openstack-nova-compute.service
//Start the neutron service on the calculation node:
 ~]#systemctl enable neutron-linuxbridge-agent.service && systemctl start neutron-linuxbridge-agent.service
6. Deploy the dashboard web accessor
1) The control-node is the configuration file for installing dashboard on and configuring dashboard
~]#yum install openstack-dashboard -y
~]#vim /etc/openstack-dashboard/local_settings
OPENSTACK_HOST = "192.168.23.100"  #Specify Host
ALLOWED_HOSTS = ['*,']  #Allow all hosts access to dashboard

SESSION_ENGINE = 'django.contrib.sessions.backends.cache' #

CACHES = {   #
        'default': {
                 'BACKEND': 'django.core.cache.backends.memcached.MemcachedCache',
                 'LOCATION': 'controller:11211',
        }
}

OPENSTACK_KEYSTONE_URL = "http://%s:5000/v3" % OPENSTACK_HOST #

OPENSTACK_KEYSTONE_MULTIDOMAIN_SUPPORT = True #

OPENSTACK_API_VERSIONS = {
        "identity": 3,
        "image": 2,
        "volume": 2,
}
OPENSTACK_KEYSTONE_DEFAULT_DOMAIN = "Default"  #

OPENSTACK_KEYSTONE_DEFAULT_ROLE = "user" #

OPENSTACK_NEUTRON_NETWORK = {    #
        'enable_router': False,
        'enable_quotas': False,
        'enable_ipv6': False,
        'enable_distributed_router': False,
        'enable_ha_router': False,
        'enable_lb': False,
        'enable_firewall': False,
        'enable_***': False,
        'enable_fip_topology_check': False,
}

TIME_ZONE = "Asia/Shanghai"  #time zone
//Restart httpd service and memcached service
~]# systemctl restart httpd.service memcached.service
dashboard Page Access Test: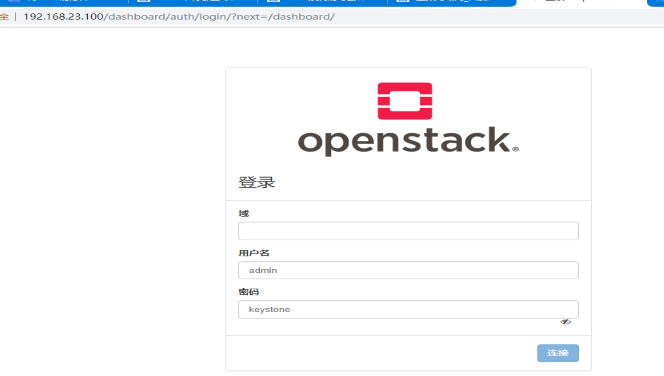
7. Create a virtual network
1) Execute admin rights script
~]#. admin-openrc
2) The name of the provider who creates a shared external network is provider, the network type is flat, and the network name is provider
~]#openstack network create --share --external --provider-physical-network provider --provider-network-type flat provider
3) Create a subnet named provider based on the provider virtual network with an address pool of 192.168.23.10-192.168.23.99 and a subnet range of 192.168.23.0/24
~]#openstack subnet create --network provider --allocation-pool start=192.168.23.10,end=192.168.23.99 --dns-nameserver 192.168.23.1 --gateway 192.168.23.1 --subnet-range 192.168.23.0/24 provider
8. Two ways to create a virtual machine instance
Method 1: Create directly on the web
1) Click Administrator to create an instance type first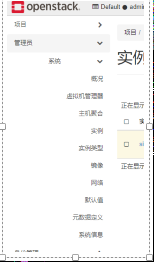
2) Select instance type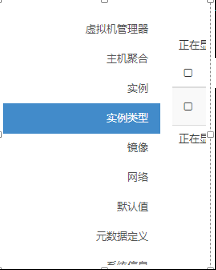
3) Click to create instance type
4) Fill in the virtual cpu number, memory, disk size and other information in the instance type, then click Create Instance Type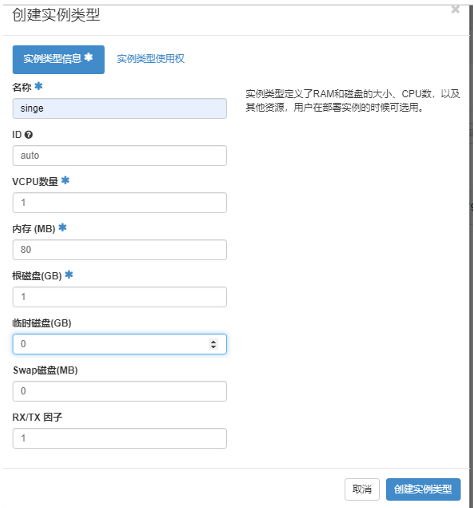
5) View the created instance type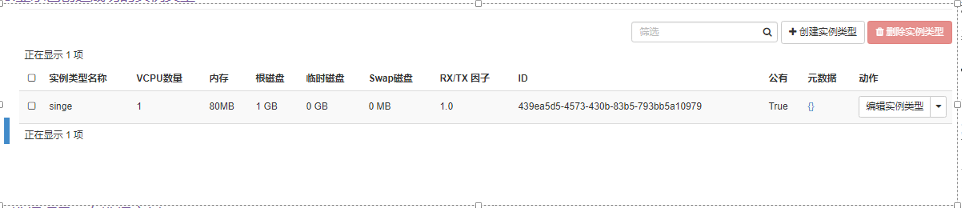
6) Select projects, select instances
7) Choose to create an instance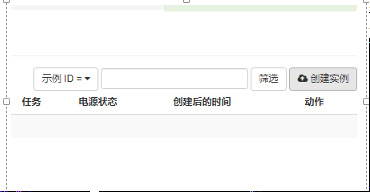
8) Fill in the name of the created virtual machine
9) Select mirror source cirrors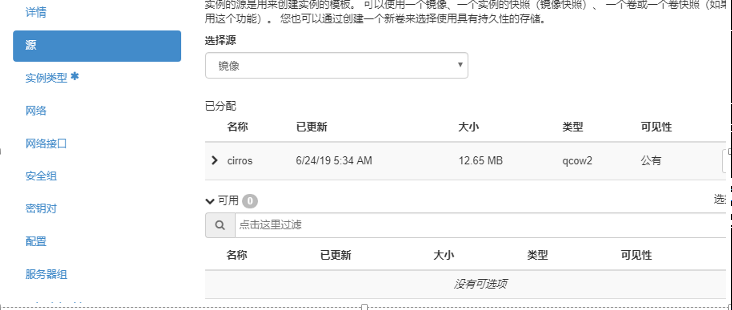
10) Select the type of instance you created and create it by clicking on the lower right corner 
11) Instances are being created, waiting to hatch, and about to finish 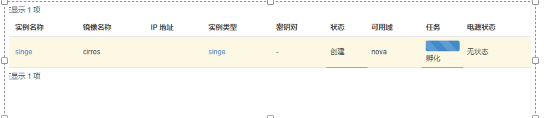
Method 2: Create virtual machine creation directly from the command line of the control node
1) Create Virtual Machine Command
~]#openstack server create --flavor m1.nano --image cirros --nic net-id=06a17cc8-57b8-4823-a6df-28da24061d8a --security-group default test-vm
2) Command Options Comments
    server create #Create a virtual machine instance
    --flavor  #The specified instance type is the configuration information for the number of virtual machine vcpu s created, memory size, disk size, etc.
    --nic net-id=Specified network Id Number, that is, the virtual machine is network-based
     --image Specified mirror name
    default test-vm #Specify the default virtual machine name as test-vm