Vue framework
Vue3 Foundation: front end engineering, webpack, plugin, loader, Source Map
Vue framework is the hottest front-end framework at present. In order to cooperate with springBoot framework to complete the construction of a complete project in the later stage, we have shared the knowledge of Vue, such as ES6 modularization, Promise, EventLoop, event loop [message queue], macro tasks and micro tasks; And the tool node with Vue installed is loaded in HBuilderX
Vue
For Vue framework, we must first understand front-end engineering and webpack, which has been downloaded to global before
Front end Engineering
When I didn't touch the front-end before, maybe many people think that as long as they know Html + CSS + JavaScript, they can develop, beautify the page and send Ajax requests by using bootStrap and JQuery, and render the template structure by using art + template template template engine; But in fact, front-end development should comply with:
- Modularization: modularization of js, css and other resources
- Componentization: reuse the existing UI structure, style and behavior
- Standardization: directory structure division, coding specification, interface specification, document specification, Git branch management
- Automation: automated construction, automated deployment, automated testing
Front end Engineering: in the development of enterprise level front-end projects, standardize and standardize the tools, technologies, processes and experience used in front-end development, and finally realize the previous standards
Front end engineering can make front-end development self-contained, covering all aspects of front-end projects from creation to deployment; The development efficiency of the front-end is improved to the greatest extent, and the cost of technology selection and coordination and communication between the front and rear ends is reduced
At present, the mainstream solutions are webpack and parcel. Here is a brief introduction to webpack
webpack
Introduction to webpack
webpack is a specific solution for front-end engineering
Provide optimized front-end engineering development support, code compression, processing, browser-side JavaScript compatibility and performance optimization; It makes the work focus on the realization of functions and improves the maintainability [Maven and Spring at the back end can reduce the workload]. Most of the projects are packaged and built based on webpack
Project creation instance: List interlaced color change
- To create a new project, npm init -y can initialize the package management file package JSON - here, directly create an empty project webpack in HBuilderX, and then run the command npm init -y to use ES6, so add type: module
{
  "name": "webpack",
  "version": "1.0.0",
  "description": "",
  "main": "index.js",
  "scripts": {
    "test": "echo \"Error: no test specified\" && exit 1"
  },
  "keywords": [],
  "author": "",
  "license": "ISC"
}
-
New src source directory
-
New SRC - > index HTML homepage and Src - > index JS script file
<!DOCTYPE html>
<html>
	<head>
		<meta charset="utf-8">
		<title></title>
        <script src="./index.js" type="text/javascript" charset="utf-8"></script>
	</head>
	<body>
		<ul>
			<li>This is the first one li</li>
			<li>This is the second li</li>
			<li>This is the third li</li>
			<li>This is the fourth li</li>
			<li>This is the fifth li</li>
		</ul>
	</body>
</html>

-----------------use npm Command introduction jquery-------------------Operate the above dom
-
Initialize the basic structure of the home page
-
Run npm install jquery -S to install JQuery
PS D:\HBuilderX\Web project\webpack> npm i jquery  -S

added 1 package in 2s
After importing the package, a node is used in the project_ Modules to store the downloaded and imported packages, so that you can use the default import and use the packages under this directory in other js files [so that there is no need to use script tags to link js scripts as originally]
- Import JQuery through ES6 modularization to realize list interlaced color change
//Import JQuery
import $ from 'jquery'
//Interlaced color change
$(function(){ //Automatically execute after the page is loaded -- equivalent to the load event
	//The selector selects the tag to modify the attribute, odd represents the cardinality, and ene belongs to filtering
	$('li:odd').css('backgroundColor','red')
	$('li:even').css('backgroundColor','green')
})
Error: unable to import module; This is because browsers are not compatible; webpack can solve these compatibility problems - automatically convert the code with compatibility problems into the code without compatibility, and then run it to the browser
Install the webpack for the project. Use the command to install two packages. It is only used during development, so it is - D
npm i webpack@5.5.1 webpack-cli@4.2.0 -D


PS D:\HBuilderX\Web project\webpack> npm i webpack@5.5.1 webpack-cli@4.2.0 -D
added 136 packages in 6s
Configure webpack in project
- In the root directory of the project, create a file named webpack.com config. Configuration file of webpack of JS
//Here we simply declare the configuration object
module.exports ={
	mode: 'development'  //The mode values include development and production, and dev is used in the development stage
}
- In package Add dev script in script [runnable Script] of JSON; Use npm run XX to run the script; npm run dev ; Dev here is arbitrary, but the value is webpack; Running the dev script will start the webpack and then read it config. JS to read configuration items and package the project
 "scripts": {
   //"Test": "echo error: no test specified & & Exit 1"
	"dev" : "webpack"
  },
After running npm run dev, the dist directory will be generated, which is shown as main js is the index before the webpack solution The new js file generated after js compatibility is reintroduced
above test It's best to delete it, because sometimes it may report an error

//There was a small problem here before
[webpack-cli] Error [ERR_REQUIRE_ESM]: require() of ES Module D:\HBuilderX\Web project\webpack\webpack.config.js from D:\HBuilderX\Web project\webpack\node_modules\webpack-cli\lib\groups\resolveConfig.js not supported.

This is because I joined before type : module ; Here to use require(),This is CommonJS,So delete it
You can intercept a short section of main JS take a look
/************************************************************************/
/******/ 	/* webpack/runtime/compat get default export */
/******/ 	(() => {
/******/ 		// getDefaultExport function for compatibility with non-harmony modules
/******/ 		__webpack_require__.n = (module) => {
/******/ 			var getter = module && module.__esModule ?
/******/ 				() => module['default'] :
/******/ 				() => module;
/******/ 			__webpack_require__.d(getter, { a: getter });
/******/ 			return getter;
/******/ 		};
/******/ 	})();
All js files have been processed here, and require is used to directly link this file to index HTML can solve the compatibility problem
<script src="../dist/main.js" type="text/javascript" charset="utf-8"></script>
After modifying the js file, if there is no hot update, you need to rerun the npm run dev command to execute the webpack
Optional value of module [in webpack.config.js]
webpack.config.js is the configuration file of webpack. After the webpack really starts to package and build, it will first read the configuration file, so as to package the project based on the given configuration; Webpack is based on node JS development tools, so the configuration file supports the use of node JS syntax for personalized configuration [CommonJS]
- development
It refers to the development environment, which will not compress the code and optimize the performance of the files generated by packaging, so the packaging speed is fast and suitable for use in the development stage
- production
The production environment will compress the code and optimize the performance of the files generated by packaging, so the packaging speed should be slower, which is suitable for use after the completion of project development
The default package entry file in webpack is SRC - > index js
The default output file path is dist - > main js
If you want to modify the default value, you need to change it in webpack config. JS configuration file. The syntax CommonJS of node is used here to introduce the path package: entry refers to the packaging entry, output refers to the packaging exit, and path and filename specify the path and name of the exit respectively
const path = require('path') //CommonJS introduces path package

module.exports ={
	mode: 'development',//The mode values include development and production, and dev is used in the development stage
	entry: path.join(__dirname,'./src/index.js'),
	output: {
		path: path.join(__dirname,'./dist'),
		filename: 'boundle.js'
	}
}
Path used Join to splice paths [because this is a relative path]
Front end relative path /. //
- No / is the resource path. As mentioned before, here and/ Is the same/ Both and resource paths indicate that the relative path is the directory path where the current file is located
- /It is a relative path. If it is a web project, it is the path before the project path, which is the port number level. Generally, it is the upper level directory of the project
- ... / means to return to the upper level directory, that is, the upper level directory of the directory where the previous file is located is the relative path
- ... /... / is another level, and so on
Here, delete the previous dist and re execute the command. It is found that the modification is successful
plugin in webpack
After the above code is modified each time, npm run dev must be re run to execute webpack. You can use plugin for hot update. You can expand the capability of webpack by installing and configuring third-party plug-ins
-
webpack-dev-server
-
Similar to node JS command nodemon, hot update; Whenever the source code is modified, webpack will automatically package and build the project
-
[- D represents recording it to the development node], run the command NPM I webpack dev- server@3.11.0 -D. After downloading, you need to configure it into the project
-
Configuration: modify package The dev command in JSON - > scripts, which was previously webpack, is executed directly without hot update
"dev": "webpack serve"


//After modification, run npm run dev to access real-time updates through the browser. Similar to nodemon, if an error is reported, use NPM I webpack cli - D to update and then use it


---------------------result-----------------------
PS D:\HBuilderX\Web project\webpack> npm run dev

> webpack@1.0.0 dev
> webpack serve

(node:552) [DEP0111] DeprecationWarning: Access to process.binding('http_parser') is deprecated.
(Use `node --trace-deprecation ...` to show where the warning was created)
× 「wds」:  Error: listen EACCES: permission denied 127.0.0.1:8080 ---- netstat Kill it
    at Server.setupListenHandle [as _listen2] (node:net:1313:21)
    at listenInCluster (node:net:1378:12)
    at GetAddrInfoReqWrap.doListen [as callback] (node:net:1516:7)
    at GetAddrInfoReqWrap.onlookup [as oncomplete] (node:dns:73:8) {
  code: 'EACCES',
  errno: -4092,
  syscall: 'listen',
  address: '127.0.0.1',
  port: 8080
}
It should be noted that webpack server will start a batch of real-time packaged HTTP servers, so check the packaging effect in http://localhost:8080 ; The effect here is the same as that of the previous nodemon mounting server; The port number may be occupied here. You can turn it off first
After opening this URL, the directory structure of the project appears, including dist, so click src to run index html; However, after direct modification, the browser does not change immediately, because the packaged files after configuring the plug-in are stored in the cache
Destination of packaged files
- Without configuring the webpack dev server, the files generated by webpack packaging are directly put on the physical disk [strictly follow the configuration in webpack.config.js and the specified path of the output node]
- After configuration, the files generated by packaging are stored in memory [no longer put in disk to improve the performance of real-time packaging output, because the speed of memory is faster] the files generated by webpack dev server into memory are placed in the root directory of the project by default and are virtual and invisible, which can be 8080 / bundle JS view a file
<!--So it needs to be modified here index.html The path of the reference in is no longer dist Instead, under the root directory of the project, use/Relative path, so/ ->The foreground path can represent the above web address -->
<script src="/boundle.js" type="text/javascript" charset="utf-8"></script>

Saving will automatically update the page nodemon
-
-
html-webpack-plugin
The HTML plug-in in webpack is similar to a template engine plug-in; You can customize the index through this plug-in HTML content
Install: use the command NPM I HTML webpack plugin - D to install directly to the latest version
Configuration: open webpack config. js
//1. Use commonJS syntax to import HTML webpack plugin package
const HtmlPlugin = require('html-webpack-plugin')

//2. Create an instance object of html plug-in
const htmlPlugin = new HtmlPlugin({
	template: './src/index.html',//Specify the storage path of the source file
	filename: './idex.html'  //Specify the storage path of the generated file
})

//In module In exports, add node plugins
plugins: [htmlPlugin]  //Make HtmlPlugin effective through the plugin node
Example: through the HTML webpack plugin plug-in, index. Under src Copy a copy of the HTML home page to the root directory, and you can index.html through template and filename Copy a copy of HTML to the root directory [browser memory] and copy the HTML plug-in to IDEX in the root directory HTML page, put in memory; And the bottom of the page is automatically injected with packaged bundles JS file, < script defer src = "boundary. JS" > < / script > so there is no need to inject manually
After real-time packaging is enabled, add an html plug-in to delete the dist directory because it no longer depends on the bundle under it JS file, but a virtual file in the temporary root directory
<!-- <script src="../dist/boundle.js" type="text/javascript" charset="utf-8"></script> -->
[you can end nodemon command by pressing CTRL + C twice, and cls command can clear the screen]
-
devserver node
On webpack config. JS configuration file, you can configure the webpack dev server plug-in more through the devServer node. Open specifies whether to open automatically, and host and port specify the port number; The configuration node is at the same level as the previous module,output, entry and plugins
devServer:{
		open: true,  //Represents whether to open automatically
		host: '127.0.0.1',  //Here is the string form
		port:8090  //In this way, there will be no occupation
	}
The settings here are the same as the nodemon configuration server in the previous ES6 instance; You need to reconfigure the server
loader in webpack
In actual development, webpack can only be packaged by default js suffix module, other non js at the end of the module, such as css cannot be processed. At this time, we need to use the loader loader to package
The role of loader loader: assist webpack to package and process the specified file module
- css loader: it can be packaged css related files
- less loader: it can be packaged less related documents
- Babel loader: it can package and handle Advanced JS syntax that webpack cannot handle
Calling process of loader:
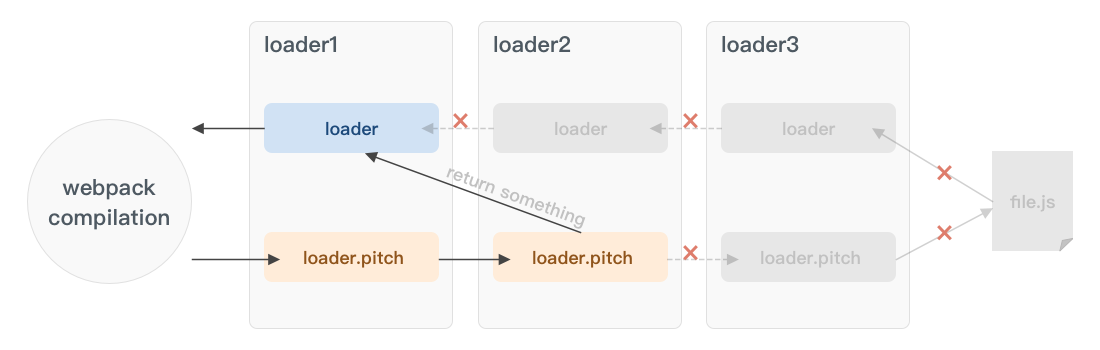
First judge the module to be processed. If it is JS, judge whether there is advanced JS syntax. If not, package it directly. Otherwise, judge whether to install and configure the relevant loader
In webpack, everything is a module; So any module such as css can be imported into js
Package css files
The above operation can be continued here HTML, add style to it, and create css folder under src directory,
Index HTML [remove the * in front of the list]
ul:{     ----> This is the wrong way to write. The selector should be followed directly{},add: stay firefox Warning in
	list-style: none;
}

--------------It's just a selector plus{style}---------------
ul{
	list-style: none;
}
To make this css file effective, link will be linked in as before. Now, according to the modular thinking, it will be directly imported into index JS
import './css/index.css' //Just execute, not use, so add the path directly
- Run the command - i-style-loader, css-loader-m-style-loader directly
- Configuration: in webpack config. In the modlue - > rules array in JS, add the loader rule. test and use specify the suffix and its loader respectively; Style loader before CSS loader
const path = require('path') //CommonJS introduces path package

//1. Use commonJS syntax to import HTML webpack plugin package
const HtmlPlugin = require('html-webpack-plugin')

//2. Create an instance object of html plug-in
const htmlPlugin = new HtmlPlugin({
	template: './src/index.html',//Specify the storage path of the source file
	filename: './index.html'  //Specify the storage path of the generated file
})

module.exports ={
	mode: 'development',//The mode values include development and production, and dev is used in the development stage
	entry: path.join(__dirname,'./src/index.js'),
	output: {
		path: path.join(__dirname,'./dist'),
		filename: 'boundle.js'
	},
	plugins: [htmlPlugin],  //Make HtmlPlugin effective through the plugin node
	devServer:{
		open: true,  //Represents whether to open automatically
		host: '127.0.0.1',
		port:8090  //In this way, there will be no occupation
	},
	module:{ //Matching rule identification of all third-party file modules
		rules:[ //Matching rules for file suffixes
			{test:/\.css/,use:['style.loader','css.loader']} //test is regular and the file is regular; use is the loader used
		]
	}
}
Restart the server and package after running
Can’t resolve ‘style. 'loader' problem
This is because we have installed a higher version of webpack, so the configuration syntax is not the same as before. In webpack 4 After XX, the loader must be specified in the form of object when configuring the loader, that is, use:[{loader:xxx},......]
module:{ //Matching rule identification of all third-party file modules
		rules:[ //Matching rules for file suffixes
			{ test: /\.css/, use: [{ loader: 'style-loader' }, { loader: 'css-loader' }] } //test is regular and the file is regular; use is the loader used
		]
	}
Here we need to note that loader must be preceded by loader:
Package and process less files
The less file can operate on the margin, padding and other locations, so let's beautify the previous list and create a new index under css Less file
html,body,ul{
	margin: 0;
	padding: 0;
	li{
		line-height: 35px;
		padding-left: 10px;
		font-size: 12px;
	}
}
Then in index Import the module 'import' into JS/ css/index. 'less', if you want to package, you still need to install and configure two loader s
Installation: NPM I less loader less - D
Configuration: {test: /. Less $/, use: [{loader: 'style loader'}, {loader: 'css loader'}, {loader: 'less loader'}]} / / use style and css instead of less. Less is a built-in dependency of less loader
Package the url related file url loader file loader in the stylesheet
Now create a new div with id box on the index to set Src / img / local Png as the background picture of the box
Normally, in index Under less, the div style will be edited
#box{
	width: 380px;
	height: 114px;
	background-color: yellow;
	background: url(../img/local.png);
}
You may need an appropriate loader to handle this file type jpg,.png ending file
Installation: NPM I URL loader file loader - D install two loaders
Configuration: {test: / \. Jpg|png|gif $/, use: [{loader: 'URL loader'}]} / / only URL loader is configured for the time being, and various suffixes of images are used|
Then run it again: but the background of div is part of the captured picture
URL loader parameter limit
In web pages, small images can be directly converted into base64 and loaded directly, and large images can be re requested, which can improve the performance of web page access. Selecting the size requires the URL loader parameter limit, and those less than or equal to base64. Limit is used to specify the size of the image, and the unit is byte
{ test: /\.jpg|png|gif$/,use:[{loader: 'url-loader?limit=207946'}]
After setting, you can view the picture again: url(data:image/png;base64 - > is changed to base64
Other methods of loader configuration
The loader can be configured in the form of object:
use:{
    loader:'url-loader' , //The loader property points to the called loader
    options:{
        limit:2229  //Specify parameter items through options
    }
}
High level syntax for packaging and processing js files
Webpack can only package and process part of the advanced js syntax. For the advanced js syntax that cannot be processed by webpack, you can only use Babel loader to assist in packaging; The latest version of webpack can handle
class Person{
	//Declare a static attribute for the Person class using static
	//This advanced syntax, webbal static, cannot be used
	static info = 'person info';
}
Babel loader contains three main packages, Babel loader, @ babel/core, @ Babel / plugin proposed class properties
Installation: NPM I Babel loader @ Babel / core @ Babel / plugin proposed class properties - D
Configuration: note that in addition to test and use, there is an exclude item: 'node'_ modules’; Babel loader only needs to process the js file written by the user, not node_ Download other package files under modules, which is fast
{
				test: /\.js$/,
				exclude:/node_modules/ ,  //Here is also regular
				use:{//To declare the plug-in, it is used to convert the high-level syntax. The following @ starts with the plug-in
					loader: 'babel-loader',
					options:{
						plugins:['@babel/plugin-proposal-class-properties']
					}
				}
			}
The above is an item of the rules array
Packaging and publishing
After the project is completed, use webpack to package and publish the project:
- In the development environment, the files generated by packaging are stored in memory, and the final generated files cannot be obtained
- In the development environment, the mode is development, and the code will not be compressed and performance optimized, so it needs to be packaged and released
Configure the packaging and publishing of webpack
Package before The dev command is configured under the scripts node under JSON, which represents development. When the project is completed, reconfigure the command build
'build': 'webpack --mode production' //There is no serve, so the server plug-in is not used. It is directly placed on the physical disk, and the webpack.com will be modified at the same time config. If the mode of JS is production, it will be compressed
The value of mode in config will be overwritten here
This uses the command npm run build
Unified location of generated files
The files generated directly are messy. To uniformly generate js files into the js directory, you need to configure them in output
//The generated location filename can be added with js level
output: {
		path: path.join(__dirname,'./dist'),
		filename: 'js/boundle.js'
	}
For image files generated to img directory, the URL loader needs to be configured. In addition to the original limit parameter, add an outputPath parameter to specify the path
{ test: /\.jpg|png|gif$/,use:{
				loader: 'url-loader',
				options:{
					limit:227946,
					outputPath:'image'
				}
				}}
Automatically clean up dist directory
In order to automatically clean up the dist directory for each package release, install the configuration plug-in clean webpack plugin NPM I XX - D
Installing and configuring this plug-in is the same as configuring the html plug-in before
const {CleanWebpackPlugin} = require('clean-webpack-plugin')
const cleanPlugin = new CleanWebpackPlugin()

//1. Use commonJS syntax to import HTML webpack plugin package
const HtmlPlugin = require('html-webpack-plugin')

//2. Create an instance object of html plug-in
const htmlPlugin = new HtmlPlugin({
	template: './src/index.html',//Specify the storage path of the source file
	filename: './index.html'  //Specify the storage path of the generated file
})

module.exports ={
	mode: 'development',//The mode values include development and production, and dev is used in the development stage
	entry: path.join(__dirname,'./src/index.js'),
	output: {
		path: path.join(__dirname,'./dist'),
		filename: 'js/boundle.js'
	},
	plugins: [htmlPlugin,cleanPlugin],  //Make HtmlPlugin effective through the plugin node
In the advanced packaging release, including packaging and generating reports, analyzing specific optimization bills, tree shaking, providing CDN loading for third-party libraries, configuring on-demand loading of components, enabling lazy loading of routes, and customizing the contents of the home page
Source Map
Problems encountered in the production environment: after the front-end projects are put into the production environment, the js files need to be compressed and confused, so as to reduce the volume and improve the loading efficiency, but there is a problem: the compressed code is not easy to debug
Source Map is an information file that stores the location information and the corresponding relationship between the location before and after code compression. With Source Map, when an error occurs, the error tool directly displays the source code instead of the converted code, which is convenient for later debugging
In the development environment, webpack turns on the Source Map function by default. When an error occurs, the console displays the location of the wrong line and locates the specific source code, but there are some problems by default. The default is the location of the code after production, and the number of lines is inconsistent
In webpack config JS file, which is at the same level as model
module.exports ={
	mode: 'development',//The mode values include development and production, and dev is used in the development stage
	devtool: 'eval-source-map',   -----------------------------------------Added configuration
	entry: path.join(__dirname,'./src/index.js'),
	output: {
		path: path.join(__dirname,'./dist'),
		filename: 'js/boundle.js'
	},
	plugins: [htmlPlugin,cleanPlugin],  //Make HtmlPlugin effective through the plugin node
	devServer:{
		open: true,  //Represents whether to open automatically
		host: '127.0.0.1',
		port:8090  //In this way, there will be no occupation
	},
	module:{ //Matching rule identification of all third-party file modules
		rules
After configuration, the number of rows is consistent
Source Map in production environment
In the production environment, omit the devtool option, and the final generated file does not contain the Source Map, which can prevent the disclosure of the original code through the Source Map. In this way, the dislocation of positioning is the confused code of transformation. If it is not good for debugging, it can be set as: only the number of lines is displayed, and the code is not exposed
devtool: 'nosources-source-map'
This is convenient for debugging and will not reveal the code
However, devtool: 'source map' can locate the source code. It has the same effect as the previous Eval source map of the development environment. It is very unsafe. Generally, it uses nosources or closes it directly 🎄