Description (read!me!please!!!):
① The purpose of this article is to explain that the attached code is fragment interception. Each fragment focuses on showing a function. Different fragments have omitted and overlapped parts. See GitHub for the complete project code 👌
② Pay attention to the code comments, which can be said to be relatively detailed (not blowing) 🙅)
catalog:
① Functional requirements
② Process Overview
③ Code introduction
Preface: some preparatory work
python basic knowledge supplement (with code description)
python related learning notes:
https://blog.csdn.net/zhuaishao_/category_11588953.html?spm=1001.2014.3001.5482
https://blog.csdn.net/zhuaishao_/category_11581861.html?spm=1001.2014.3001.5482
# Define a class
# class name
class Gun:
    # Initialization method in class: called automatically when instantiating the class
    def __init__(self,model,count):
        Gun.model = model
        Gun.count = count
    # Class, you can use the class name Method name call
    # The instance method in the class should contain the self variable, and self is the instance name
    def add_bullet(self,count_add):
        Gun.count = Gun.count + count_add
    def shoot(self):
        if Gun.count > 0:
            print('Bullet firing')
            Gun.count -= 1
        else:
            print("No bullets")

class Soldier:
    def __init__(self,name,gun):
        Soldier.name = name
        Soldier.gun = gun
    def __name__(self):
        return "rank-and-file soldiers%s Possession of firearms%s" %(Soldier.name,Soldier.gun)
    def fire(self):
        if Gun.count > 0:
            print('FireStarter')
            Gun.shoot(gun)
            print("Bullet remaining%d" %Gun.count)
        else:
            print('No bullets')
# Instantiate Gun class
gun = Gun("AK47",3)
# Output the storage address and other information of the instance
print(gun)

# Instantiate Soldier and pass in parameters
Xu = Soldier("More than three","AK47")
print(Xu)

# Use the class name to call the methods encapsulated in the class
Gun.add_bullet(gun,3)
Soldier.fire(Xu)

# Class attributes and class methods are attributes and methods defined for class objects
# Class properties and other class methods can be accessed directly in class methods;
# In addition to class methods, other methods defined in the class are instance methods

# Define a class with object as its parent (inherited from object)
class Tool(object):
    # Define class variable count
    count = 0
    # Modifier that defines a class method
    @classmethod
    # Class method parameters must contain cls
    def show_tool_count(cls):
        print("Number of tools included%d" %Tool.count)
    def __init__(self):
        Tool.count += 1

# During development, if you need to encapsulate a method in a class, this method:
# ① You need to access the instance property and define it as an instance method (with self as the first parameter)
# ② You need to access class properties and define them as class methods
# ③ If neither instance method nor class method needs access, it can be defined as a static method (without parameters)

class Dog(object):
    # Define as static method
    @staticmethod
    def run():
        print("Dog running")

# Use class name The method name calls a static method without creating an instance
Dog.run()

class Game(object):
    # Define class variables
    highest_score = 0
    # Define class methods
    @classmethod
    def show_score(cls):
        print("The highest score in history is%d" %cls.highest_score)
    def __init__(self,name):
        self.name = name
    def start_game(self):
        print("%s Start the game" %self.name)
    # Define static methods
    @staticmethod
    def help():
        print("Game Description")


# Calling static methods with class names
Game.help()
# Call class methods with class names
Game.show_score()
# Instantiate Game class
player = Game("Player 1")
# Call instance method with instance name
player.start_game()
Flash official reference documents: Welcome to Flask — Flask Documentation (2.0.x)
Official reference documents of websocket: websocket.org - Powered by Kaazing
redis official reference document: Welcome to redis-py's documentation! — redis-py dev documentation
PART1: functional requirements
Make an elderly help machine. When the user presses the help button, the device forwards different help information through enterprise wechat and displays the user's wechat message. The user replies to the message through wechat, which can be received and displayed by the help machine
Realize two-way communication between client (help machine) - client (mobile wechat)
PART2: Process Overview
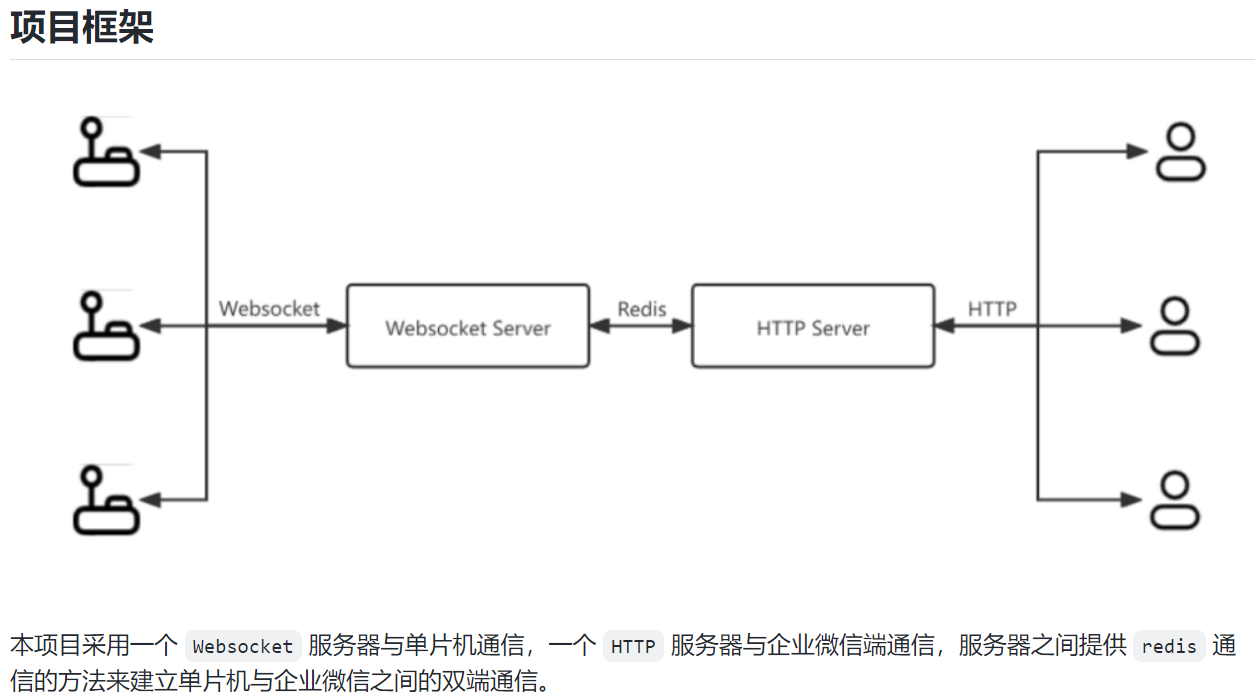
Functional logic completed in the first three steps:
Step 1: open enterprise wechat and create a new custom application for message transfer
Step 2: debugging
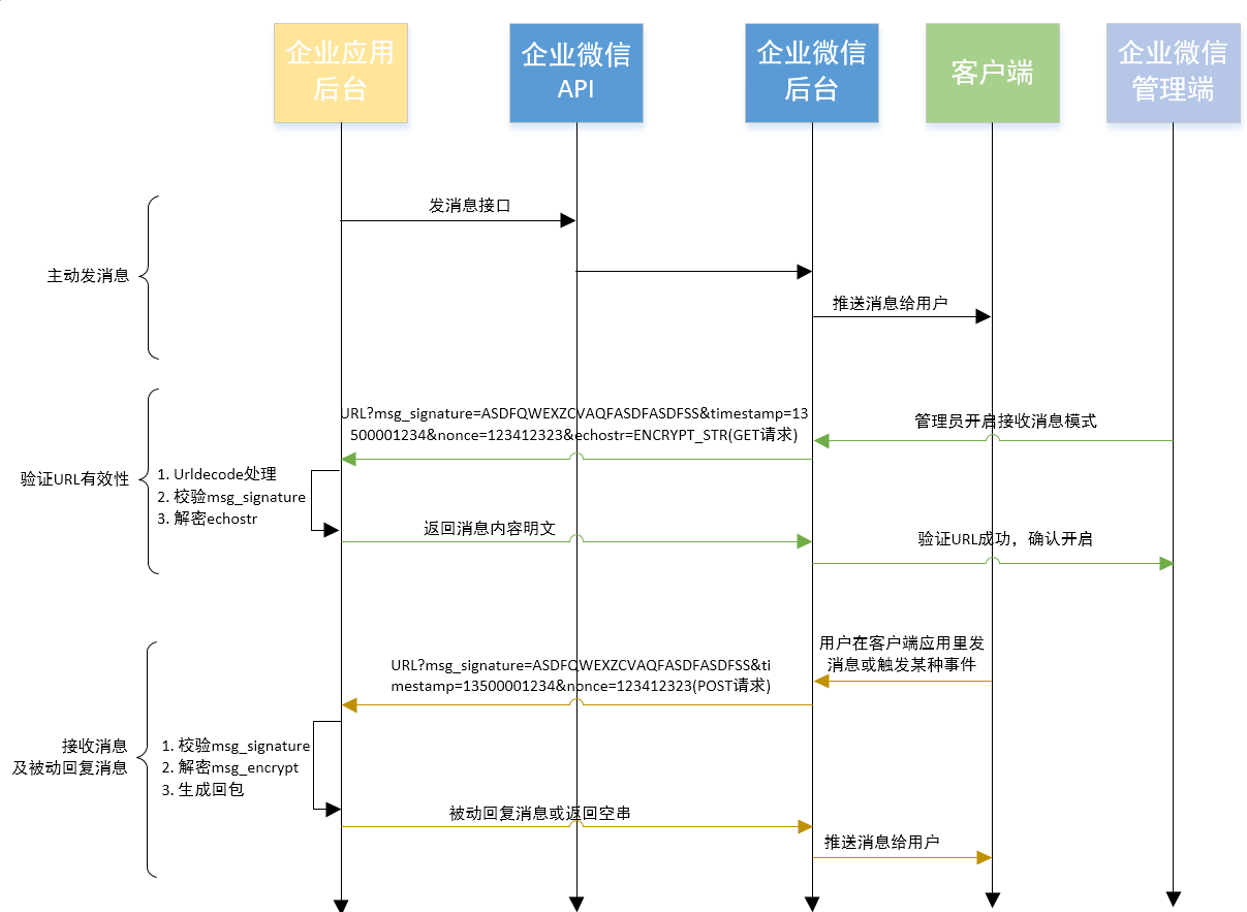
① Send an HTTP request to obtain the certificate for calling the enterprise wechat sending message API
② Use API to send HTTP request and verify the effectiveness of API
③ If the user successfully receives the message from the custom application, it proves that the sending message interface is available and can be further written into the code
Step 3: Verification
Verify the validity of the URL so that the background (server) of the custom application can receive the reply from the client
 Integration of the first three steps: sending and receiving messages of enterprise wechat custom application - actually realizes the communication between HTTP server and users
Step 4:
① Deploy the code written to redis in the server to realize the communication between servers
② Deploy the code written into websocket in the websocket server to realize the two-way communication from the server to the single chip microcomputer equipment
PART3: Code introduction
1.HTTP server code:
Basic configuration:
from flask import Flask, request, jsonify, make_response
import api
from WXBizMsgCrypt import WXBizMsgCrypt, ET
import redis
# Import module

app = Flask(__name__)
# Instantiate the flash class and create the project object

token = api.get_token()
my_crypt = WXBizMsgCrypt(api.receive_token, api.AESKey, api.corpid)
# Call the enterprise wechat api interface to obtain token, AESkey, corpid and other information

r = redis.Redis(host='redis', port=6379, db=0)
p = r.pubsub()
# Create redis pubsub object
# Redis provides two classes: redis and strictredis. Strictredis is used to implement most official commands
# Redis is a subclass of StrictRedis, which is used to use the old version backwards.
Initialization settings:

Function:
① Verify URL validity - callback request
@app.route('/', methods=["GET"])
# Register routing: when accessing the root directory of the domain name and using the GET request method, execute the following functions

def check():

# Enterprise wechat authentication SSL interface

    if request.method == 'GET':
        msg_signature = request.args.get('msg_signature')
        timestamp = request.args.get('timestamp')
        nonce = request.args.get('nonce')
        echostr = request.args.get('echostr')
        content = my_crypt.VerifyURL(msg_signature, timestamp, nonce, echostr)
        response = make_response(content)
        return response  # Package and reply the information required for the request callback to pass the verification
The main application is the request object representing the current request in flash, which stores all the information of an HTTP request
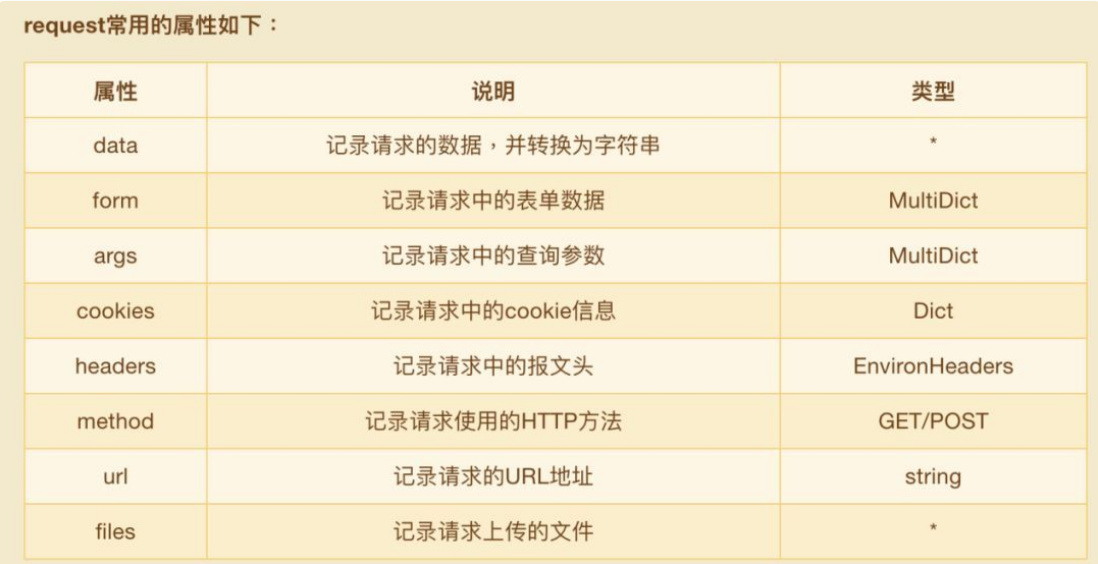
Form data: data that allows users to fill in the content through the form and submit it to the server
Query parameters: the parameters to be used by the function or method when the function method is used for query operation
Form and data are used to extract request body data through request Form can directly extract the data in the form format in the request body. It is an object like a dictionary; args is used to extract the parameters in the url
Flask -- form of request_ data_ Args usage_ Active smiling face blog - CSDN blog
② Receive user messages
@app.route('/', methods=["POST"])  # Register routing
def receive():

# Processing interface for enterprise wechat users to send messages

    if request.method == 'POST':
        msg_signature = request.args.get('msg_signature')
        timestamp = request.args.get('timestamp')
        nonce = request.args.get('nonce')
        _, xml_content = my_crypt.DecryptMsg(
            request.get_data(), msg_signature, timestamp, nonce)
        content = ET.fromstring(xml_content).find("Content")
        user = ET.fromstring(xml_content).find("FromUserName")
# Use the enterprise wechat encapsulation api to decode the message content and user name
        response = make_response(jsonify({'message': 'OK'}, 200))
# Returns a message indicating successful reception

        pass
# ...
        return response
③ redis subscription / broadcast message
@app.route('/', methods=["POST"])
def receive():
    pass
# ...
        r.publish('w2d-channel', user.text + ": " + content.text)
# The http server needs to send messages to the websocket server
# That is: broadcast messages to ① wechat to desk channel
        return response


def message_handler(message):
    api.send_message_all(message['data'].decode('utf-8'), token)
# @message: String -- message object from websocket server-side publish
# Display the received subscription message in the custom application background


if __name__ == "__main__":
    app.config['SERVER_NAME'] = 'chichibomm.com:6666'

    p.subscribe(**{'d2w-channel': message_handler})
# The http server needs to receive messages from the websocket server
# ② subscribe to the desk to wechat channel to message_handler function

    p.run_in_thread(sleep_time=0.001)
# A new process is opened to ensure that the subscription message is processed
# Multithreading

    app.run('0.0.0.0', debug=True, port=6666, ssl_context=(
        "/ssl/chichibomm.com.pem", "/ssl/chichibomm.com.key"))
# Configure the server port and ssl certificate of flash
Redis py has a PubSub target that can subscribe to channels and listen to new information
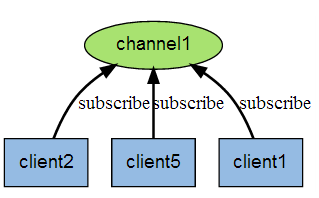
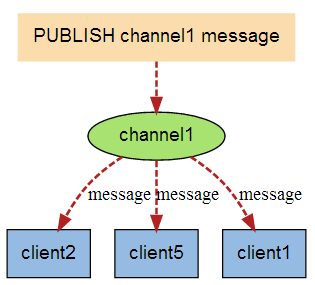
The method of creating a PubSub is as follows:
r = redis.StrictRedis(...)
p = r.pubsub()
After creating the PubSub instance, you can listen to the channel and mode.
p.subscribe('my-first-channel', 'my-second-channel', ...)
p.psubscribe('my-*', ...)
Redis publish / subscribe (pub/sub) is a message communication mode: the sender (pub) sends messages and the subscriber (sub) receives messages. Redis client can subscribe to any number of channels.
When we create a flash instance object (app), we can use app Config to view all configuration variables of this app
Official documentation: Configuration Handling — Flask Documentation (0.12.x)

SERVER_ Role of Name:
① Assist flash in generating absolute URLs outside the active request
② For subdomain support
Thread is a single sequential control process in a program. Running multiple threads to complete different work at the same time in a single program is called multithreading
The difference between thread and process is that the child process and parent process have different code and data space, while multiple threads share data space. Multithreading is mainly to save CPU time
2.websocket server code:
Basic configuration:
from websocket_server import WebsocketServer
import redis
# Import redis and websocket modules

r = redis.Redis(host='redis', port=6379, db=0)
p = r.pubsub()
# Connect to redis

server = WebsocketServer(host="0.0.0.0", port=2333)
# Create websocket object
websocket is a kind of communication protocol, which realizes full duplex network
signal communication
websocket provides three simple functions, onopen,onclose and onmessage, to monitor the opening, disconnection and message status of socket respectively.
The server needs to push messages to the client. The usual method is polling or long polling
Polling: it is to send http request to the server in every specific time (for example, every 2 seconds), and then the server returns the latest data to the user
for the first time http request----------Client: any messages?
---------------------Server side: no message
 The second time http request----------Client: any messages?
---------------------Server side: no message
 repeat http request....
Long polling: the client sends an http request to the server. If the server has no data, it will not return the data. Keep the http connection while waiting. Wait until the server has data, return the data, and then continue the request.
for the first time http request----------Client: any messages?
---------------------Server side: if the server has no message, it will not respond, and it will be maintained all the time http Connect, wait, wait.
---------------------Server side: if there is a message, it will be returned to the client side,
The second time http request----------Client: any messages?
---------------------Server side: if the server has no message, it will not respond, and it will be maintained all the time http Connect, wait, wait.
---------------------Server side: if there is a message, it will be returned to the client side,
Keep repeating http request....
Disadvantages:
① http connection must be established every time. The number of connections is too many, which occupies the server bandwidth and causes bandwidth waste
② It is not an unsolicited request sent by the server

Function:
① Judgment and response to connection:
# Define two function functions: connection success and disconnection
def new_client(client, server):
    """
    New event handler for help machine connection
    @client: websocket client object
    @server: websocket server object
    """

    print("Prompt when a new client connects:%s" % client['id'])
    r.publish('d2w-channel',"%s No. 1 help machine is connected" % client['id'])
    # Broadcast message to d2w channel


def client_left(client, server):
    """
    Event handler function for the disconnection of the help machine
    @client: websocket client object
    @server: websocket server object
    """

    r.publish('d2w-channel',"%s No. 1 help machine disconnected" % client['id'])
    # Broadcast message to d2w channel
② send messages to the server and process the received messages
def message_received(client, server, message):
    """
    Event handling function of help machine sending message to server
    @client: websocket client object
    @server: websocket server object
    @message: Message object sent
    """

    r.publish('d2w-channel',"%s Message sent by help machine No.:" % client['id'] + message)
    # Broadcast message to d2w channel

def message_handler(message):
    """
    Processing function of subscription message
    @message: String //Message object from HTTP server-side publish
    """

    server.send_message_to_all(message['data'].decode('utf-8'))
    # Broadcast the received messages to all helpers (websocket sends messages to all connections)
Program running:
if __name__ == '__main__':
    p.subscribe(**{'w2d-channel': message_handler})
    # Subscribe to wechat to desk channel to message_handler function

    server.set_fn_new_client(new_client)
    # There are new device connections (() is the defined device connection function)
    server.set_fn_client_left(client_left)
    # There is a device disconnection (() is the defined device disconnection function)
    server.set_fn_message_received(message_received)
    # Start listening for messages

    thread = p.run_in_thread(sleep_time=0.001)
    # A new process is opened to ensure that the subscription message is processed

    server.run_forever()
    # Continuous operation
Attachment: use of server-side docker
Docker, as a software containerized platform, allows developers to package applications together with their dependent environment into a container, and then easily publish and apply them to any platform.
Docker is widely used in automatic packaging and publishing of Web applications.
What is Docker and what can it do- Listening to the sea walk - blog Garden


version: '2'
services:
  http_server:
    build: ./http_server/.
    links:
      - redis
    ports:
      - 6666:6666
    networks:
      - helpdesk_network
    depends_on:
      - redis
    volumes:
      - /root/ssl:/ssl
  websocket_server:
    build: ./websocket_server/.
    links:
      - redis
    ports:
      - 2333:2333
    networks:
      - helpdesk_network
    depends_on:
      - redis
  redis:
    image: redis
    networks:
      - helpdesk_network
    expose:
      - 6379
networks:
  helpdesk_network: {}
3.MCU terminal code:
Most of the functions of MCU have been realized in the previous part. The following mainly expands the codes related to websocket service
Basic configuration:
① Wiring mode:
/*connection
 * SSD1309/OLED128X64---NODE MCU32/arduino iic
 * OLED VCC----------------3.3v
 * GND---------------------GND
 * OLED SCL----------------5
 * OLED SDA----------------18
 * Other-------------------NODE MCU32/arduino iic
 * Beep--------------------19
 * BUTTON_A----------------12
 * BUTTON_B----------------14
 * BUTTON_C----------------27
 * BUTTON_D----------------26
 */
② Import library:
// Arduino Architecture Library
#include <Arduino.h>
// Display driver library based on Arduino architecture
#include <U8g2lib.h>
// Multi button driver library based on Arduino architecture
#include <Button2.h>
// Buzzer driver library based on Arduino architecture
#include <EasyBuzzer.h>
// WIFI connection Library Based on Arduino architecture
#include <WiFi.h>
// Websocket protocol library based on Arduino architecture
#include <WebSocketsClient.h>
③ Encapsulate websocket service:
Attachment: connect WiFi by code instead of AT command
// Import library

// WIFI connection Library Based on Arduino architecture
#include <WiFi.h>

// Define relevant parameters

// 2.4G WiFi name
#define WIFI_SSID "luckin"
// Corresponding WiFi password
#define WIFI_PASS "20030708"
// Websocket server domain name / IP address
#define WEBSOCKET_SERVER "chichibomm.com"

// Secondary encapsulation WiFi connection function

char connect()
{
    // Call WiFi connection library to access WiFi
	WiFi.begin(WIFI_SSID, WIFI_PASS);
    Serial.print("Waiting for connection WIFI");

	int timeout_s = 30;

	// When WiFi is not connected and waiting for a long time, "..." is displayed
    // while condition judgment and operation: it is necessary to meet the & & front and rear conditions at the same time to execute the loop
    // timeout_s --: the timeout of each cycle decreases by 1
    // Waiting delay: delay(1000)*30
    while (WiFi.status() != WL_CONNECTED && timeout_s-- > 0)
	{
		delay(1000);
		Serial.print(".");
	}


    // The WiFi status is still not connected after the time delay is detected
	if (WiFi.status() != WL_CONNECTED)
	{
		Serial.print("Unable to connect, please check the password");
    	message = "Unable to connect, please check the password";
		return 0;
	}
    // It is detected that the WiFi status within the delay is successful connection
	else
	{
		Serial.println("WIFI Connection succeeded!");
    	message = "WIFI Connection succeeded!";
		Serial.print(WiFi.localIP());
		return 1;
	}
}
// Websocket protocol library based on Arduino architecture
#include <WebSocketsClient.h>

// Define Websocket service port
#define WEBSOCKET_PORT 2333
// Define Websocket method routing
#define WEBSOCKET_PATH "/"
// websocket event logic definition
// Define event handling functions
// Parameter WStype_t type to judge the connection status between websocket and server
void webSocketEvent(WStype_t type, uint8_t * payload, size_t length)
{
	// C language switch statement (different parallel conditions correspond to different processing methods)
    switch(type)
    {
        // Case 1: websocket failed to connect
        case WStype_DISCONNECTED:
			Serial.printf("Websocket Disconnect!\n");
			message = "Server Disconnected";
            // Call the encapsulated buzzer function
			ez_beep(2);
			break;
		// Case 2: websocket successfully connected
        case WStype_CONNECTED:
			Serial.printf("Websocket Connected to route:%s\n", payload);
			message = "Server connected";
			break;
        // Case 3: websocket receives a message from the server
		case WStype_TEXT:
			Serial.printf("Websocket Receive the message: %s\n", payload);
			message = String((const char*)payload);
			ez_beep(1);
			break;
	}

}
// Trying to connect to the server webSocket.begin(WEBSOCKET_SERVER, WEBSOCKET_PORT, WEBSOCKET_PATH); webSocket.setReconnectInterval(5000); webSocket.onEvent(webSocketEvent);
Main program display:
// When the button is pressed, the trigger logic is defined
void click(Button2 &btn)
{
	if (btn == buttonA)
	{
        // Single chip microcomputer display
		Serial.println("Key A Press");
        // Pass in the message parameter of the display function
		message = "I'm sick";
        // call
		ez_beep(1);
        // Use websocket to send the message "I'm sick" to the websocket server
		webSocket.sendTXT("I'm sick");
	}
    // ...
    pass
}