Only those who never look up to the stars will not fall into the pit—— Thales
1. Vue common modifiers
① , v-on modifier
- . stop - call event Stoppropagation(), which prevents bubbling up and clicking on the child will not trigger the click event of the parent.
- . prevent - call event Preventdefault(), blocking default events.
- . capture - event capture: in the capture phase, the event starts from the window, followed by the document object, to the element that triggers the event.
- . self - the callback is triggered only when the event is triggered from the element bound by the listener itself.
- . {keyCode | keyAlias} - the callback is triggered only when the event is triggered from a specific key.
- . native - listens for native events of the component root element.
- . once - only one callback is triggered.
- . left - (2.2.0) triggered only when the left mouse button is clicked.
- . right - (2.2.0) triggered only when the right mouse button is clicked.
- . middle - (2.2.0) triggered only when the middle mouse button is clicked.
- . passive - (2.3.0) add listener in {passive: true} mode
2. computed and watch
- computed: one data is affected by multiple data. It is cached based on its responsive dependency, and it will be re evaluated only when the relevant responsive dependency changes.
- watch: one data affects multiple data. When it is necessary to perform asynchronous or expensive operations when the data changes;
3. v-if and v-for in vue are not recommended to be used at the same time
The priority of v-if is higher than that of v-for. Using it together will cause great waste in performance, and the official website does not recommend us to do so. We can choose to use computed to filter out the items that do not need to be displayed in the list, or the two can act on different elements respectively.
    <div>
	<div v-for="(user,index) in activeUsers" :key="user.index" >
		{{ user.name }}
	</div>
</div>
data () {  // Data defined in business logic
    return {
      users,: [{
        name: '111111',
        isShow: true
      }, {
        name: '22222',
        isShow: false
      }]
    }
  }
  computed: {
	activeUsers: function () {
		return this.users.filter(function (user) {
			return user.isShow;//Returns an item with isShow=true and adds it to the activeUsers array
		})
	}
}
4. How and how do Vue components communicate?
Generally speaking, components can have the following relationships:
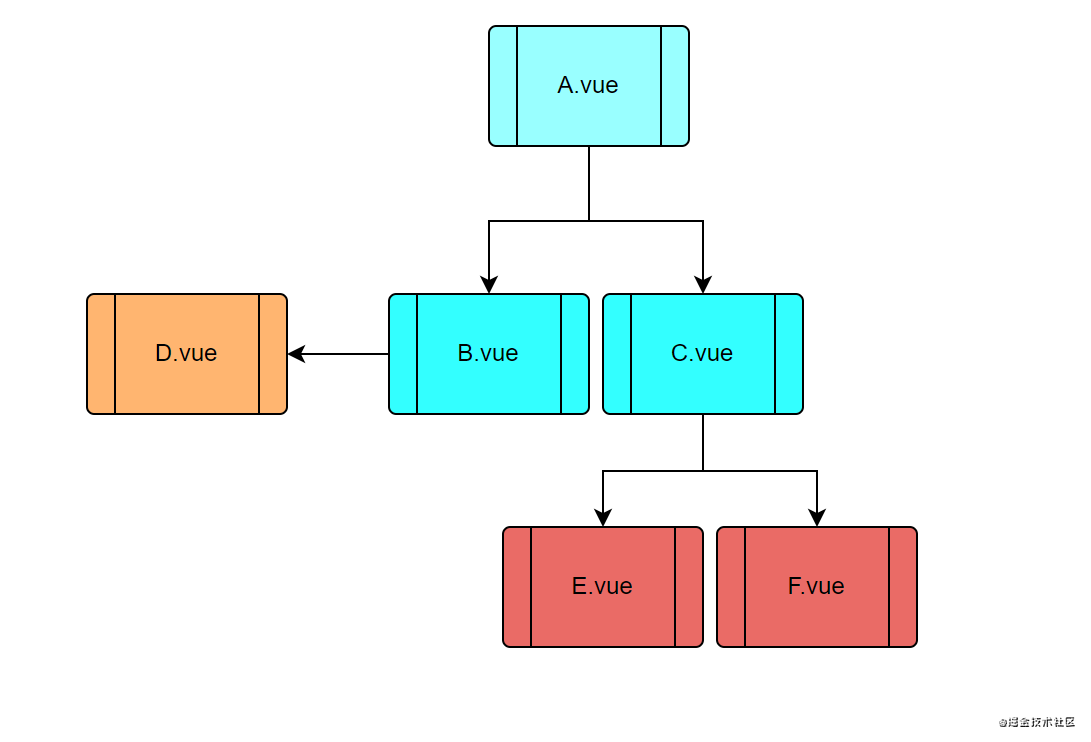
A and B, B and D, C and E\C and F are paternal, B and C are brotherly, and a and D, a and E, a and F are intergenerational (possibly multi generational). How to choose effective communication methods for different use scenarios? With the iteration of vue version, vue provides many communication modes between components. Here I summarize six communication modes between vue components for different scenarios:
① , props and $emit
Props and $emit are the most commonly used means of communication between parent and child components. The parent component passes down data to the child component through props; The child component triggers the event of the parent component through $emit, and can send data to the parent component through events. These two vue understand when they enter the door. There is no code demonstration here.
② , $on, $emit
This method uses an empty Vue instance as the central event bus to trigger and monitor events, and skillfully and lightly realizes the communication between any component, including parent-child, brother and alternate generation.
Take a chestnut
Suppose there are three sibling components, namely A, B and C components. How can C component obtain the data of A or B components
    <div id="itany">
    <my-a></my-a>
    <my-b></my-b>
    <my-c></my-c>
</div>
<template id="a">
  <div>
    <h3>A Components:{{name}}</h3>
    <button @click="send">Send data to C assembly</button>
  </div>
</template>
<template id="b">
  <div>
    <h3>B Components:{{age}}</h3>
    <button @click="send">Send array to C assembly</button>
  </div>
</template>
<template id="c">
  <div>
    <h3>C Components:{{name}},{{age}}</h3>
  </div>
</template>
<script>
var Event = new Vue();//Define an empty Vue instance
var A = {
    template: '#a',
    data() {
      return {
        name: 'tom'
      }
    },
    methods: {
      send() {
        Event.$emit('data-a', this.name);
      }
    }
}
var B = {
    template: '#b',
    data() {
      return {
        age: 20
      }
    },
    methods: {
      send() {
        Event.$emit('data-b', this.age);
      }
    }
}
var C = {
    template: '#c',
    data() {
      return {
        name: '',
        age: ""
      }
    },
    mounted() {//Execute after template compilation
     Event.$on('data-a',name => {
         this.name = name;//No new this will be generated inside the arrow function. If not = >, this refers to Event
     })
     Event.$on('data-b',age => {
         this.age = age;
     })
    }
}
var vm = new Vue({
    el: '#itany',
    components: {
      'my-a': A,
      'my-b': B,
      'my-c': C
    }
});
</script>
$on listens to the custom events data-a and data-b, because it is sometimes uncertain when the event will be triggered. It is usually monitored in the mounted or created hook.
③ $attrs, $listeners
This is vue2 Method provided by version 4
- $attrs: contains attribute bindings (except class and style) in the parent scope that are not recognized (and obtained) by prop. When a component does not declare any prop, the binding of all parent scopes (except class and style) will be included here, and the internal components can be passed in through v-bind="$attrs". Usually used in conjunction with the interitAttrs option.
- $listeners: contains the v-on event listeners in the parent scope (excluding the. native modifier). It can pass in internal components through v-on="$listeners".
④,provide/inject
This is vue2 API added in 2.0. This pair of options need to be used together. provide to allow an ancestor component to inject a dependency into all its descendants, no matter how deep the component level is, and it will always take effect when the upstream and downstream relationship is established, and then inject variables into the descendants through inject.
The provide / inject API mainly solves the communication problem between cross level components, but its usage scenario is mainly that sub components obtain the status of superior components, and a relationship between active provision and dependency injection is established between cross level components
⑤ , $parent / $children and ref
- ref: if it is used on an ordinary DOM element, the reference refers to the DOM element; If used on a child component, the reference points to the component instance
- $parent / $children: access parent / child instances
Both of them get component instances directly. After use, you can directly call component methods or access data.
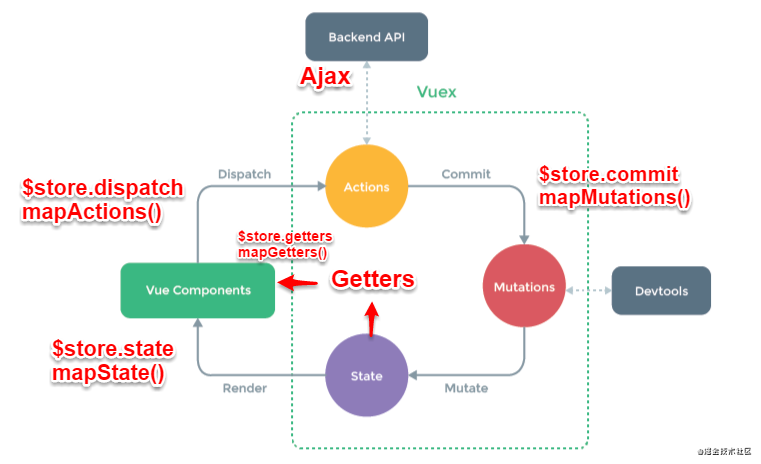
⑥,Vuex
Vuex is designed for Vue JS application development state management mode. The core of every vuex application is the store. "Store" is basically a container, which contains most of the states in your application.
Vuex's state storage is responsive. When Vue components read the state from the store, if the state in the store changes, the corresponding components will be updated efficiently accordingly.
The only way to change the state in the store is to explicitly commit the mutation. This makes it easy for us to track the changes of each state
5. Model V principle
v-model is essentially a syntax sugar, which can be regarded as the syntax sugar of value + input method. You can customize it through the prop and event attributes of the model attribute. The native v-model will generate different events and attributes according to different tags.
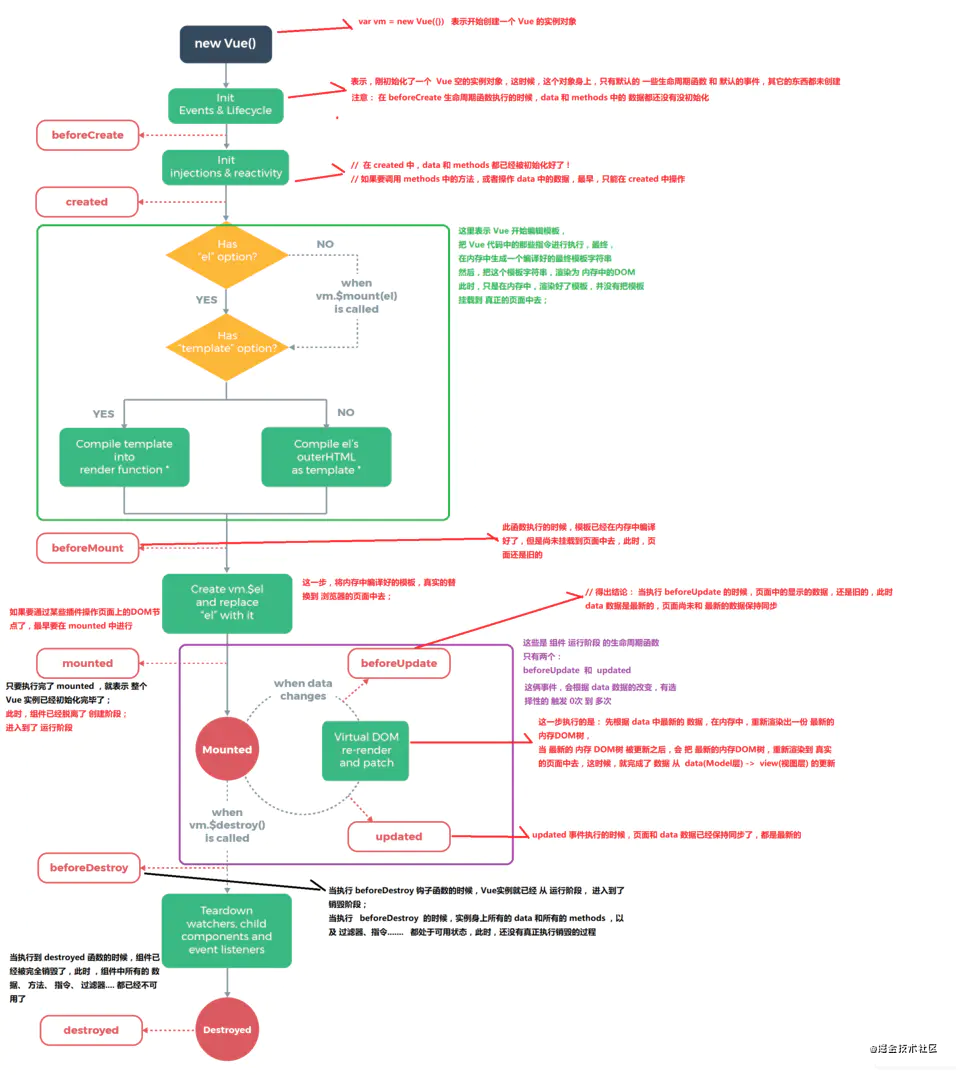
6. Vue component lifecycle
Vue starts from creating, initializing data, compiling templates, mounting DOM - > rendering, updating - > rendering, unloading and other processes. We call this the life cycle of Vue.
① . single component
| Hook function | describe |
|---|---|
| beforeCreate | At the current stage, data, methods, computed and watch data and methods cannot be accessed |
| created | The component instance has been completely created and the attributes are bound, but the real dom has not been generated and $el is not available yet |
| beforeMount | Called before the mount starts: the relevant render function is called for the first time |
| mounted | After the real Dom is mounted, the data is bound in both directions. You can access the Dom node and use the $refs attribute to operate the Dom |
| beforeUpdate | Occurs before the update, that is, the responsive data is updated, and the virtual dom is triggered before re rendering. You can change the data at the current stage without re rendering |
| updated | After the update is completed, the component Dom in the current stage has completed the update. It is important to avoid changing data during this period, as this may result in an infinite loop of updates |
| activited | Keep alive exclusive, called when the component is activated |
| deactivated | Keep alive exclusive, called when the component is destroyed |
| beforeDestroy | Before the instance is destroyed, the instance can be used at the current stage. We can finish the aftermath at this time, such as clearing the timer |
| destroyed | After the instance is destroyed, only the empty dom shell is left. The component has been disassembled, the data binding has been removed, the listener has been removed, and all sub instances have been destroyed |
② Parent and child components
The calling order of components is from parent to child, and the order of rendering is from child to parent.
The destruction of components is from parent to child, and the order of destruction is from child to parent.
The details are as follows:
- Load render pass: parent beforecreate -- > parent created -- > parent beforemount -- > child beforecreate -- > child created -- > child beforemount -- > child mounted -- > parent mounted
- Child component update process: parent BeforeUpdate -- > child BeforeUpdate -- > child updated -- > parent updated
- Parent component update process: parent BeforeUpdate -- > parent updated
- Destruction process: parent beforedestroy -- > child beforedestroy -- > child destroyed -- > parent destroyed
7. Custom directives
Hook function:
-
bind: called only once, when the instruction is bound to the element for the first time. Here you can perform one-time initialization settings
-
Inserted: called when the bound element is inserted into the parent node (only the parent node is guaranteed to exist, but it may not have been inserted into the document).
-
update: called when the VNode of the component is updated, but it may occur before its child VNode is updated.
Note: the value of the instruction may or may not have changed. However, you can ignore unnecessary templates by comparing the values before and after the update -
componentUpdated: the VNode and its sub VNode of the instruction component are updated after all updates.
-
unbind: called only once when the instruction is unbound from the element.
<template>
    <div>
    <!-- Basics -->
    <input class="form-control" type="text" v-focus="123" />
    </div>
</template>
<script>
    export default {
        data() {
             return {}
            },
        directives:{
                focus:{
                    // binding
                    bind(el,binding,vNode){
                        console.log('-------bind-------')
                        // console.log(el)
                        console.log(binding)
                    },
                    // Insert node
                    inserted(el,binding){
                        console.log('-------inserted-------')
                        // console.log(el)
                        // console.log(binding)
                        el.focus()
                            },
                    },
            }
    }
</script>
8. $nextTick principle
$nextTick performs a deferred callback after the end of the next DOM update cycle.
1. JS single thread
JS execution is single threaded and is based on event loops. The event cycle is roughly divided into the following steps:
① All synchronization tasks are executed on the main thread to form an execution context stack.
② Besides the main thread, there is also a "task queue". As long as the asynchronous task has the running result, an event is placed in the "task queue".
③ Once all synchronization tasks in the "execution stack" are executed, the system will read the "task queue" to see what events are in it. Those corresponding asynchronous tasks end the waiting state, enter the execution stack and start execution.
④ The main thread repeats the third step above.
2. Asynchronous update queue
Vue executes asynchronously when updating the DOM. As long as it listens for data changes, Vue will open a queue and buffer all data changes that occur in the same event loop.
If the same watcher is triggered multiple times, it will only be pushed into the queue once. This method of removing duplicate data during buffering is very important to avoid unnecessary calculations and DOM operations.
Then, in the next event loop "tick", Vue refreshes the queue and performs the actual (de duplicated) work.
Vue internally attempts to use native promise. Com for asynchronous queues Then, MutationObserver and setImmediate. If the execution environment does not support it, setTimeout(fn, 0) will be used instead.
9. What are dynamic components and asynchronous components?
① Dynamic components
<component v-bind:is="currentTabComponent"></component>
currentTabComponent can include the name of a registered component or the option object of a component. Here is an example from the official website:
    <!DOCTYPE html>
<html>
  <head>
    <title>Dynamic Components Example</title>
    <script src="https://unpkg.com/vue"></script>
    <style>
      .tab-button {
        padding: 6px 10px;
        border-top-left-radius: 3px;
        border-top-right-radius: 3px;
        border: 1px solid #ccc;
        cursor: pointer;
        background: #f0f0f0;
        margin-bottom: -1px;
        margin-right: -1px;
      }
      .tab-button:hover {
        background: #e0e0e0;
      }
      .tab-button.active {
        background: #e0e0e0;
      }
      .tab {
        border: 1px solid #ccc;
        padding: 10px;
      }
    </style>
  </head>
  <body>
    <div id="dynamic-component-demo" class="demo">
      <button
        v-for="tab in tabs"
        v-bind:key="tab"
        v-bind:class="['tab-button', { active: currentTab === tab }]"
        v-on:click="currentTab = tab"
      >
        {{ tab }}
      </button>

      <component v-bind:is="currentTabComponent" class="tab"></component>
    </div>

    <script>
      Vue.component("tab-home", {
        template: "<div>Home component</div>"
      });
      Vue.component("tab-posts", {
        template: "<div>Posts component</div>"
      });
      Vue.component("tab-archive", {
        template: "<div>Archive component</div>"
      });

      new Vue({
        el: "#dynamic-component-demo",
        data: {
          currentTab: "Home",
          tabs: ["Home", "Posts", "Archive"]
        },
        computed: {
          currentTabComponent: function() {
            return "tab-" + this.currentTab.toLowerCase();
          }
        }
      });
    </script>
  </body>
</html>
② Asynchronous component
That is, the components are loaded on demand. When the components are large and the business is complex, see the detailed analysis suggestions Official website
    new Vue({
  // ...
  components: {
    'my-component': () => import('./my-async-component')
  }
})
10. Talk about the use and principle of keep alive?
Keep alive is Vue JS built-in component, which can save the instance of inactive component in memory instead of directly destroying it. It is an abstract component, which will not be rendered to the real DOM or appear in the parent component chain.
Components wrapped by keep alive will be cached. Keep alive components provide include and exclude attributes for conditional caching, both of which can be represented by comma separated strings, regular expressions or arrays.
//The component name d componentA will be cached
<keep-alive include="componentA">
    <componentA></componentA>
    <componentB></componentB>
</keep-alive>

//Components name d componentA will not be cached.
<keep-alive exclude="componentA">
    <componentA></componentA>
    <componentB></componentB>
</keep-alive>
Life hook
Keep alive provides two life hooks, active and inactive.
Because keep alive saves the component in memory and does not destroy or rebuild it, it does not call the creted and other methods of the component. It is necessary to use the active and inactive hooks to judge whether the component is active. The specific implementation principle can be referred to Implementation principle of keep alive
11. mixins - > How do Vue components pull away from common logic?
Mixins: a very flexible way to distribute reusable functions in Vue components. The blend object can contain any component option. When a component uses a mixed object, all options of the mixed object will be mixed into the options of the component itself.
Disadvantages:
- The source of variables is not clear, which is not conducive to reading and maintenance
- Possible naming conflicts
- Mixins and components are prone to many to many relationships and have high complexity
Code demonstration:
    //mixin.js

<template>

</template>

<script>

   export default {
       name: 'mixin-test',
       components: {},
       props: {},
       data () {
           return {
               mixinData: 'mixin Variables in'
           }
       },
       methods: {
           mixinFunction () {
               return 'I am mixins Public methods inside'
           },
       },
       mounted () {
       },
       computed: {}
   }

//index. Vue imports this mixin JS file, and then use it through mixins: ['file name']
<template>
   <div>
       <div @click="handleMixin">call mixin method</div>
   </div>
</template>

<script>
   import MixinItem from './mixin'

   export default {
       name: 'mixin-test',
       props: {},
       mixins: [MixinItem],
       components: {},
       data () {
           return {}
       },
       methods: {
           handleMixin () {
               console.log('mixin-data=========', this.mixinData)
               let mixfun = this.mixinFunction()
               console.log('mixin-fun====>>>', mixfun)
           },
       },
       mounted () {
       },
       computed: {}
   }
12. Vuex principle
Vuex is designed for Vue JS application development state management mode. It uses centralized storage to manage the state of all components of the application, and uses corresponding rules to ensure that the state changes in a predictable way.
Its principle is shown in the figure below:
[the external chain picture transfer fails. The source station may have an anti-theft chain mechanism. It is recommended to save the picture and upload it directly (img-sbcwiatb-1621979298519)( https://p6-juejin.byteimg.com/tos-cn-i-k3u1fbpfcp/b765e19841114a4c81798b1854ab6f24 ~tplv-k3u1fbpfcp-watermark. image)]
The operation process is as follows: the user operates according to the View content, triggers the action through Dispatch, submits the change to update the state, and triggers the View update after the state update. This process follows the principle of one-way data flow.
Several concepts:
- State: an object that stores application status data. Similar to data in vue components, the value of state can be an object or a function that returns an object. Via store State access status data.
- getters: status data derived from state. It receives state as the first parameter and the second as an optional parameter. It is similar to calculated in the component. Derived data is processed after the data goes out of the door.
- mutations: submit a mutation to modify the state in the store (synchronous operation). Each mutation has a string event type and a callback function (handler). Modify the state in the callback function
Note: you cannot call the callback function of mutation directly. This function can only be called when the type of mutation is increment; The mutation must be synchronous; Set all properties during initialization in the store
- actions: similar to changes, submit and modify the state behavior to handle asynchronous tasks
Note: the submitted state is a mutation, not a direct modification. It can contain any asynchronous operation
- Modules: split the store into modules. Each module has its own state, mutation, action, getter, and even nested sub modules
13. Two modes of Vue router
First, the front-end routing is to match different url paths, parse, load different components, and then dynamically render the regional html content. Vue router has two modes: hash and history:
① , hash mode
The default mode of Vue router is hash mode: use the hash of the URL to simulate a complete URL. When # later hash changes, the browser will not send a request to the server. If the browser does not send a request, the page will not be refreshed. Each time the hash value changes, the hashchange event will be triggered. Through this event, we can know what changes have taken place in the hash value. Then we can listen to hashchange to update part of the page.
The principle behind the hash mode is the onhashchange event, which can be monitored on the window object:
    window.onhashchange = function(event){

    console.log(event.oldURL, event.newURL);
    let hash = location.hash.slice(1);
    document.body.style.color = hash;

}
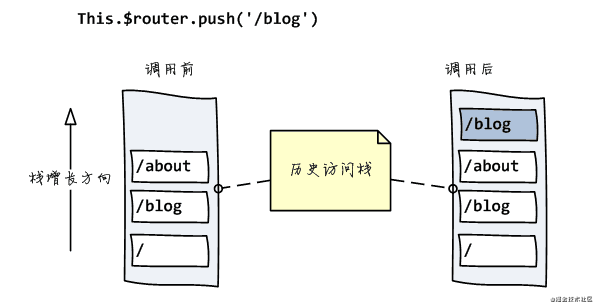
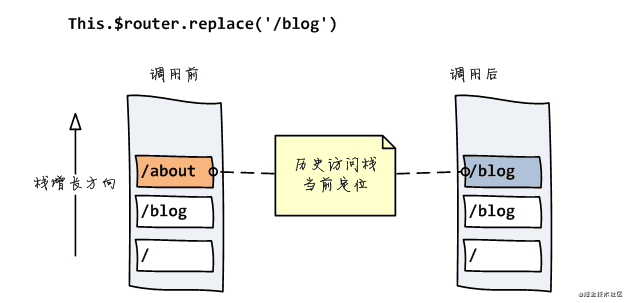
For the hash mode, a hashHistory object will be created. When accessing different routes, two things will happen:
HashHistory.push() adds the new route to the top of the stack of browser access history, and hashistory Replace() replaces the route to the top of the current stack
② history mode
It is mainly implemented using two APIs of HTML5, pushState() and replaceState(). pushState() can change the url address without sending a request. replaceState() can read the history stack and modify the browser record
window.history.pushState(stateObject, title, URL)
window.history.replaceState(stateObject, title, URL)
Switch history state
It includes three methods: back, forward and go, corresponding to the forward, back and go operations of the browser:
history.go(-2);//Back up twice
history.go(2);//Forward twice
history.back(); //back off
hsitory.forward(); //forward
③ The difference between the two
- In the previous hashchange, you can only change # the following URL fragment. The new URL set by pushState can be any URL with the same origin as the current URL.
- The history mode will modify the URL to be the same as the URL of the back-end of the normal request. If the back-end does not configure the routing processing corresponding to / user/id, a 404 error will be returned. When the user refreshes the page and other operations, the browser will send a request to the server, so this implementation needs the support of the server and needs to redirect all routes to the root page.
14,MVVM
MVVM(Model-View-ViewModel). The model layer represents the data model, the view represents the UI component, and the ViewModel is the bridge between the view and the model layer, which is responsible for the view display logic and monitoring the view changes.
When the user operates the View, the ViewModel will listen to the changes of the View and notify the corresponding methods in the Model to process the business logic and data. After the processing, the ViewModel will listen to and automatically ask the View to make corresponding updates. ViewModel can correspond to multiple views and has strong reusability
15. Vue responsive principle
Vue adopts data hijacking combined with publish subscribe mode through object Defineproperty to hijack the getter of each property. The setter publishes a message to the subscriber when the data changes, and triggers the listening callback of the response.
① . core implementation class:
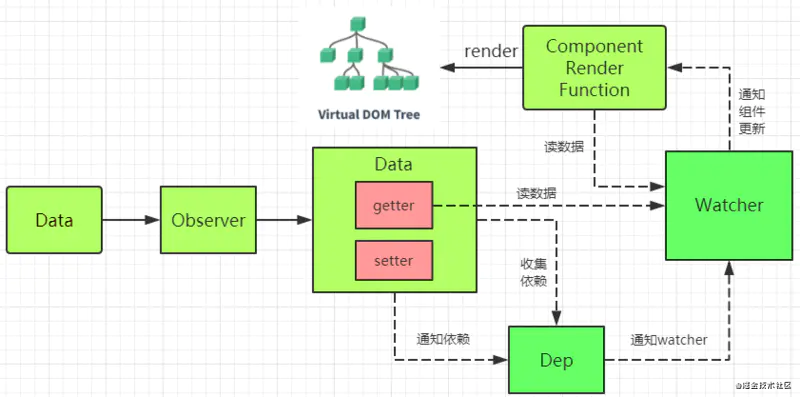
- Observer: its function is to add getter s and setter s to the properties of the object, which are used to collect and distribute updates by dependency
- Dep: used to collect the dependencies of the current responsive object. Each responsive object, including sub objects, has a dep instance (where sub is the watcher instance array). When the data changes, it will notify each watcher through dep.notify().
- Watcher: observer object. The instances are divided into render watcher, computed watcher and user watcher
Relationship between Watcher and Dep
Dep is instantiated in the watcher and subscribers are added to dep.subs. Dep traverses dep.subs through notify and notifies each watcher of updates.
② . dependency collection
- initState: when initializing the computed attribute, the computed watcher dependency collection is triggered
- In initState, the user watcher dependency collection is triggered when the listening attribute is initialized
- The process of render() triggers the dependency collection of render watcher
- When re render, VM When render() is executed again, the subscription of watcer in all subs will be removed and re assigned.
③ . distribution and update
- The data of the response is modified in the component to trigger the logic of the setter
- Call dep.notify()
- Traverse all subs (watcher instances) and call the update method of each watcher.
④ . principle
When creating a Vue instance, Vue will traverse the attributes of the data option and use object Defineproperty adds getters and setters to the property to hijack the reading of data (getters are used to rely on collection and setters are used to distribute updates), tracks the dependency internally, and notifies changes when the property is accessed and modified.
Each component instance will have a corresponding watcher instance, which will record all the dependent data attributes (dependency collection, calculated watcher and user watcher instances) during component rendering. When the dependency is changed later, the setter method will notify the watcher instance that depends on this data to recalculate (send updates), so as to make its associated components re render.
Object. Disadvantages of defineproperty
- Deep monitoring requires recursion to the end, with a large amount of one-time calculation
- Cannot listen for adding and deleting properties of reference type
- Unable to listen to the array natively. Special processing is required
Vue3.0 has brought an observer implementation based on Proxy, which provides reactivity tracking with full language coverage.
Let's take a look at the basic use of Proxy:
const proxyData = new Proxy(data, {
    get(target, key, receiver) {
        const result = Reflect.get(target, key, receiver)
        console. log( 'get' , key)
        return result //Return results
    },
    set(target, key, val, receiver) {
        const result = Reflect.set(target, key, val, receiver)
        console. log( 'set' , key, val)
        return result //Set successfully
    },
    deleteProperty(target, key) {
        const result = Reflect.deleteProperty(target, key)
        console. log( 'delete property', key)
        return result //Delete successfully
    }
})
⑤ . simple implementation of Observer
//Prepare data
const data = {
    name: 'Jake Zhang',
    age: 25,
    info: {
        school:'Hugong University' // Need deep monitoring
    },
    arr: ['a','b','c']
}
//update the view
function updateView () {
    console.log('update view')
}
// Redefine the attribute and listen
function defineReactive (target,key,value) {
    // Depth monitoring
    observer(value)
    // Core API
    Object.defineProperty (target,key,{
        get () {
            return value
        },
        set (newVal) {
            if (newVal !== value) {
                // Depth monitoring
                observer(newVal)
                // Set a new value. Value is always in the closure. After setting here, you can get the latest value again
                value = newVal
                // Trigger view update
                updateView()
            }
        }

    })
}
// Redefine array prototype
const oldArrayProperty = Array.prototype;
// Creating a new object prototype points to oldArrayProperty, and then expanding new methods will not affect the prototype, such as arrproto push = function(){} !==  arrProto.__ proto__. push()
const arrProto = Object.create(oldArrayProperty);
['push','pop','shift','unshift','splice'].forEach(methodName =>{
    arrProto[methodName] = function () {
        updateView() // update the view
        oldArrayProperty[methodName].call(this,...arguments)
    }
})
// Listening object properties
function observer (target) {
    if(target !== 'object' || target === null) {
        // Not an object or array
        return target
    }

    // Listener array
    if(Array.isArray(target)) {
        target.__proto__ = arrProto
    }
    // Redefine each attribute
    for(let key in target) {
        defineReactive (target,key,target[key])
    }
}

// Call listener function
observer(data)
data.name = 'Jake'
data.age = 20
data.info.school = 'Tsinghua University' // Depth monitoring
data.sex = 'man' // The new attribute cannot be monitored, so there is Vue set()
delete data.name // You can't listen to delete attributes, so there is Vue delete();
data.arr.push('e') // Listener array


//Then continue to implement Dep and Watcher. It won't be expanded here. If you need me, please comment and leave a message. I'll add it again
16. Virtual Dom, how to realize vdom
① Vdom: simulate the DOM structure with js, compare the old and new vdom, calculate the minimum change, and finally update the dom
<div id="virtual" class="container" title="one" data-index="0">
    <p style="font-size:20px">fictitious DOM tree</p>
</div>
//Use JS to simulate:
    var div = {
        tagName:'div',
        attrs:{
            className:'container',
            id:'virtual',
            title:'one',
            'data-index':'0'
        },
        children:[
                tagName:'p',
                attrs:{
                    style:'font-size:20px',
                },
                children:[
                    'fictitious DOM tree'
                ]
            }
        ]
    }
② Simple implementation using snabbdom
<!DOCTYPE html>
<html>

<head>

    <meta charset="UTF-8">
            <title></title>

    <!--introduce snabbdom of js-->

    <script src="https://cdn.bootcss.com/snabbdom/0.7.1/snabbdom.js"></script>

    <script src="https://cdn.bootcss.com/snabbdom/0.7.1/snabbdom-class.js"></script>

    <script src="https://cdn.bootcss.com/snabbdom/0.7.1/snabbdom-props.js"></script>

    <script src="https://cdn.bootcss.com/snabbdom/0.7.1/snabbdom-style.js"></script>

    <script src="https://cdn.bootcss.com/snabbdom/0.7.1/snabbdom-eventlisteners.js"></script>

    <script src="https://cdn.bootcss.com/snabbdom/0.7.1/h.js"></script>


</head>


<body>
    <div id="container">

    </div>
    <button id='c_button'>change</button>


    <script type="text/javascript">
        var snabbdom = window.snabbdom;

        //Defining the patch function to realize the core method of dom node update
        var patch = snabbdom.init([
            snabbdom_class,
            snabbdom_props,
            snabbdom_style,
            snabbdom_eventlisteners
        ]);

        var h = snabbdom.h; //Define h function

        var container = document.getElementById('container'); //Get the original DOM node of the page
        // Create a new virtual dom and create a virtual dom through the h function
        var vnode = h('ul#list', {}, [
            h('ul.item', {}, 'item1'),
            h('ul.item', {}, 'item2')
        ]);

        patch(container, vnode); //In the first rendering, vnode replaces the contents of the container node

        document.getElementById('c_button').addEventListener('click', function () {
            var newNode = h('ul#list', {}, [
                h('ul.item', {}, 'item1'),
                h('ul.item', {}, 'itemC'),
                h('ul.item', {}, 'itemB')
            ]);
            patch(vnode, newNode); //The new virtual DOM replaces the previous DOM element and only modifies the changed dom
        })
    </script>

</body>

</html>
17. diff algorithm of Vue
Although both vue and react adopt diff algorithm. However, DIF design is quite different. vue uses dependency collection and tracking, which can update components in a more fine-grained way, that is, bind and listen to each attribute used by the template, while react adopts a top-down update strategy, and each small change will generate a new vdom. No matter what dif algorithm is, the core is the same. Space is limited, here is only a brief introduction.
Vue's diff algorithm:
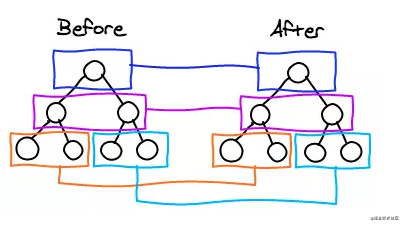
Feature 1: only the same level comparison, not cross level comparison
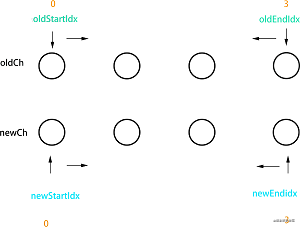
Feature 2: in the process of diff comparison, the loop closes from both sides to the middle
While comparing the head and tail nodes in the loop, set the tag index for the beginning and end nodes of the new and old node array, and move the index to the middle in the process of the loop, which can not only realize sorting, but also reduce the time complexity.
Role of key
Key is mainly used to efficiently update the virtual DOM list. The key value is used to judge VDOM
The unique basis of the element item. However, using key is not guaranteed to be 100% faster than not using it
Just as Vdom does not guarantee to operate faster than the native DOM, this is just a trade-off. If the rendering is a simple stateless list, such as the list rendering output that does not depend on the sub component state or temporary DOM state (e.g. form input value), the performance will be better without key, because the strategy of "updating in place" is adopted without key. If the order of data items is changed, Vue will not move DOM elements to match the order of data items, but update each element in place.
18. Vue template compilation
After Vue's template is compiled in $mount, it generates the virtual DOM through the compile method, parse, optimize and generate methods, and finally generates the render function. The virtual DOM updates the DOM through the diff algorithm.
The specific functions are as follows:
- parse function parsing template
- The optimize function optimizes static content
- The generate function creates a render function string
Please move the details Compiling Vue from source code template
19. Rendering and updating of components
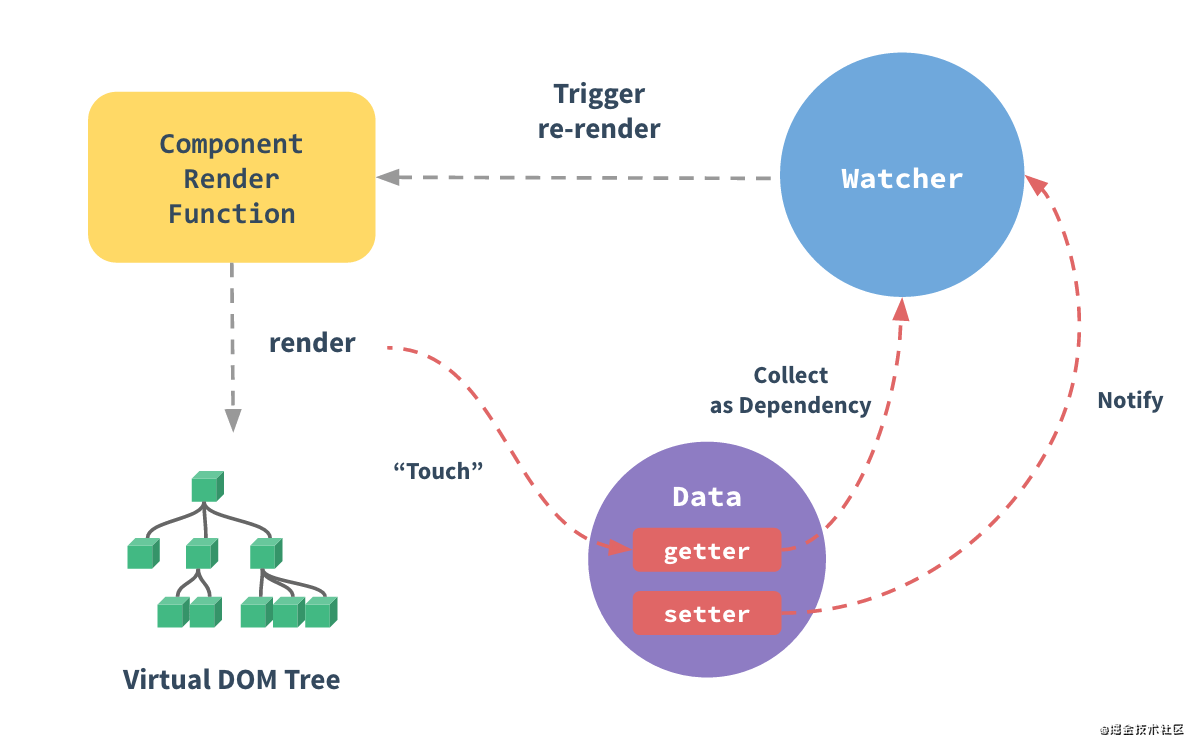
Starting from the yellow part, execute the render function to generate a virtual DOM tree. At this time, monitor the data changes. Once the data changes, trigger the setter function, notify the watcher, re execute the render function, and repeat the cycle. The details are as follows:
-
Parse the template into render function: compile the vue syntax into js syntax, and execute the compiler function of vue template compiler to obtain render
-
Trigger response: bind the variables used in the first rendering of the template to object In defineproperty(), listen to the getter and setter of the data property. The getter will be triggered when rendering for the first time.
-
Execute the render function to generate vnode
-
Update: modify the data, trigger the setter (previously monitored in the getter), and then re execute the render function to generate newVnode
20. Common optimization methods of Vue project
Coding phase
- Minimize the data in data. Getters and setter s will be added to the data in data, and the corresponding watcher s will be collected
- v-if and v-for cannot be used together
- Destruction of events
- The SPA page adopts the keep alive cache component
- key guarantees uniqueness
- Lazy loading and asynchronous components using routing
- Anti shake and throttling
- Third party modules are imported on demand
- Long list scrolls to visual area and loads dynamically
- Lazy loading of pictures
Packaging Optimization
- Compressed picture / code
- Tree Shaking/Scope Hoisting
- Loading third-party modules using cdn
- Extract CSS of components
- Multithreaded packaging happypack
- splitChunks extract public files
- sourceMap optimization
💕 After reading three things:
- Like | you can click - > collection - > Exit and finish it at one go, but don't forget to like it 🤭
- Pay attention, don't get lost next time 😘
- You can also go to GitHub Take all my article source files 🤗