Create a server to build an intranet penetration server
After the project is developed, how to create a new server and deploy the project to the server? This requires the installation of some basic tools, such as jdk, maven and Jenkins to realize automatic deployment; In addition, you can build some auxiliary tools, such as nexus(maven private warehouse). The price of the server is relatively high. Sometimes it is poor and can't afford to buy the server. You can choose to install the virtual machine on your own computer and deploy the project. You can use the holer intranet penetration tool to access the project deployed on the local virtual machine from the external network.
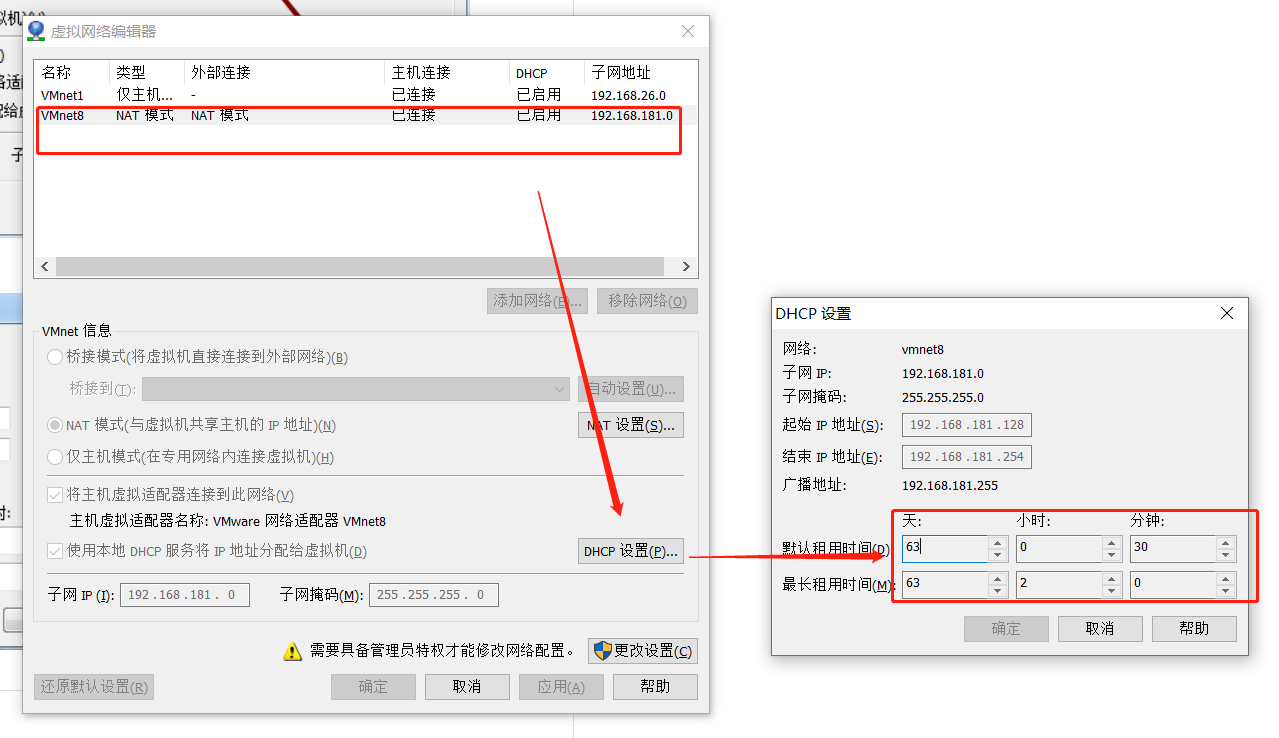
Solve the problem that the ip address of VMware virtual machine often changes
Firstly, after the virtual machine is created, the IP address of the virtual machine will often change, because the virtual machine is provided with IP allocation by Vmware8 virtual network card in NAT mode and Vmware1 in bridge mode. After the IP lease of the virtual machine expires, the IP will be automatically reassigned, resulting in the change of the IP address. The solution is as follows:
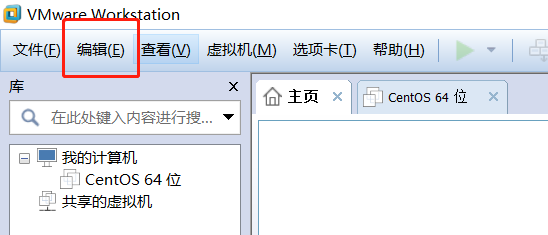
- Click the Edit button in the menu bar and select virtual network editor
- Select the connection mode in use, DHCP settings – > set the lease time longer, up to 63 days
Start the virtual machine, create the / work directory, and put the installation package and some projects in the / work directory
Install lrzsz
Detailed explanation of rz and sz commands in Linux
rz and sz are command line tools for ZModem file transfer between Linux/Unix and Windows. The advantage is that you don't need to open another sftp tool to log in and upload and download files.
sz: send the selected file to the local machine
rz: running this command will pop up a file selection window, where you can select files locally and upload them to the Linux server
Installation command:
yum install lrzsz
Send files from the server to the client:
sz filename
Upload files from the client to the server:
rz
Plug in installation
yum install vim
yum install wget
Install jdk
- Unzip jdk
tar -zxvf jdk-8u271-linux-x64.tar.gz
-
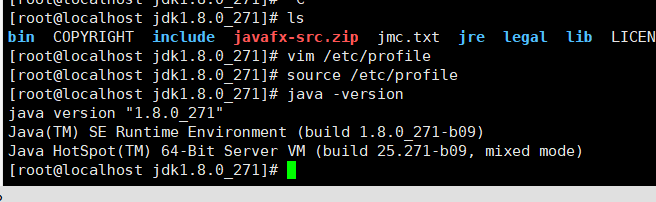
Configure environment variables and test
2.1 edit file / etc/profile
vi /etc/profile
2.2 insert the configuration content at the end
JAVA_HOME=/work/mySoft/jdk1.8.0_271
PATH=$JAVA_HOME/bin:$PATH
CLASSPATH=.:$JAVA_HOME/lib/dt.jar:$JAVA_HOME/lib/tools.jar
export JAVA_HOME
export PATH
export CLASSPATH
2.3 to make the environment variable effective, execute the following command
source /etc/profile
2.4 verification
java -version
Install maven
- Download maven
http://maven.apache.org/download.cgi
-
Run the rz command and save the maven installation package to the / work/mySoft directory
-
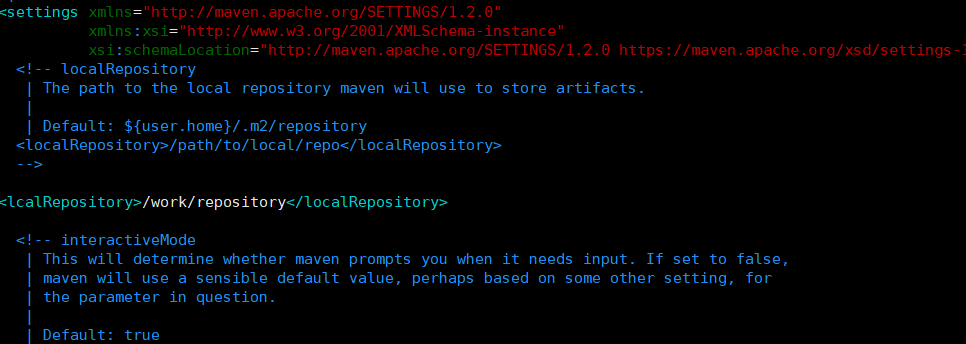
Unzip and create the warehouse directory / work/repository
tar -zxvf apache-maven-3.8.4-bin.tar.gz
mkdir repository
- Modify Maven local warehouse address
- Configure environment variables
vim /etc/profile
Add the following configuration below the file
export MAVEN_HOME=/work/mySoft/apache-maven-3.8.4
export PATH=${PATH}:${MAVEN_HOME}/bin
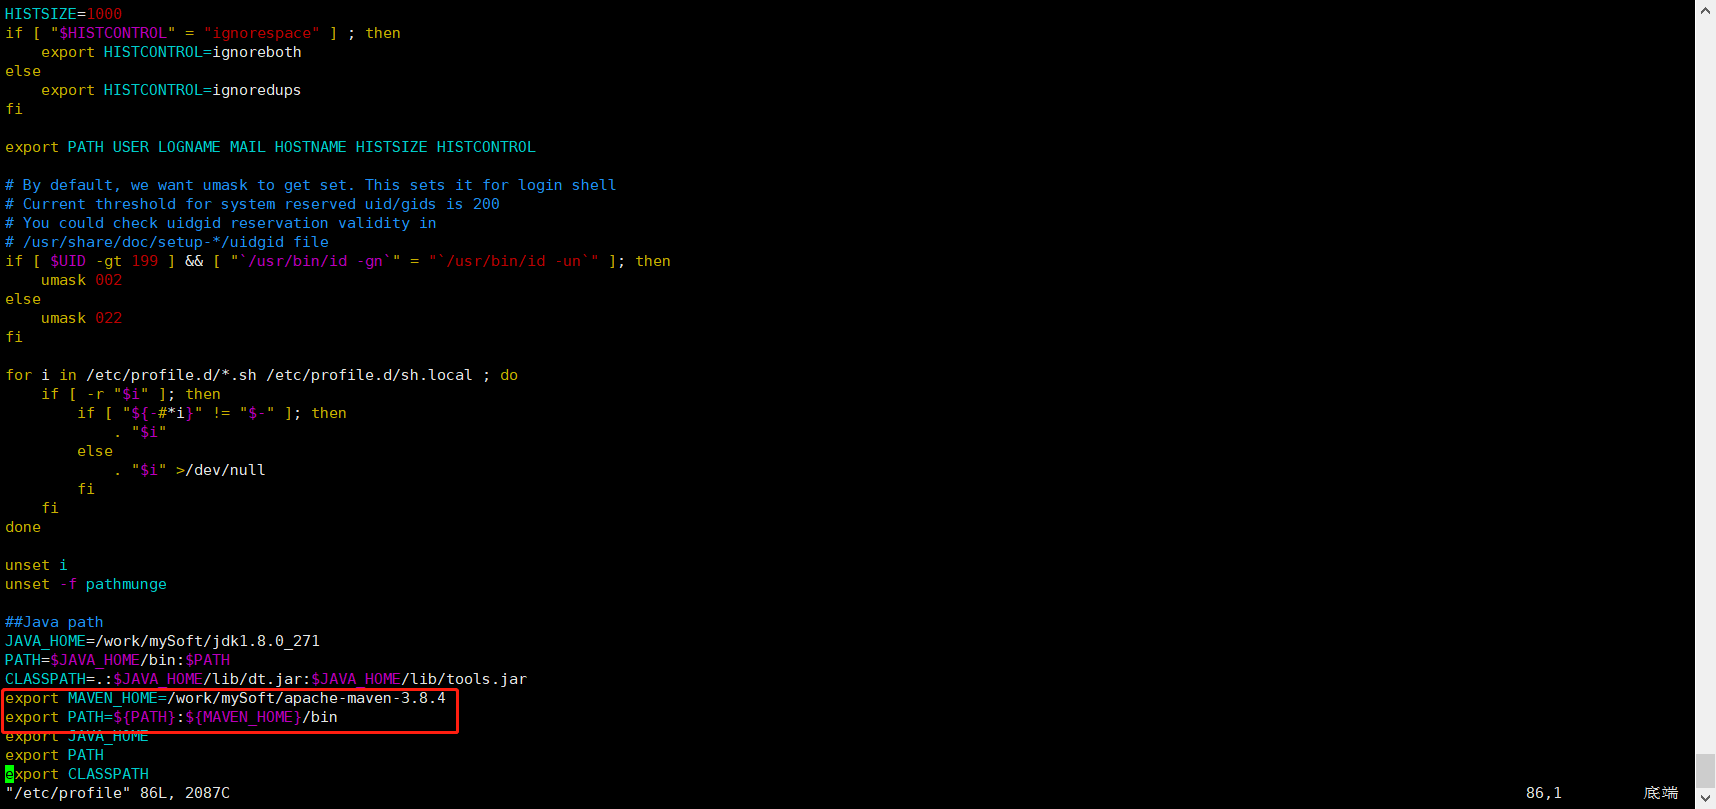
Use the source /etc/profile command to reload the / etc/profile file to make the modified content take effect in the current shell window. (permanently effective, restart the system or log off the user)
Execute the command mvn -v to check whether the configuration is successful

Install git
- On Linux, there is yum to install Git, which is very simple and requires only one line of command
yum -y install git
- yum is installed in / usr / libexec / git core directory

- git --version view version
Install nacos
decompression
tar -zxvf nacos-server-2.0.0-ALPHA.1.tar.gz
Enter the bin directory of nacos and start nacos
sh startup.sh -m standalone
vi ./nacos/logs/start.out You can view the startup log
Access after startup: http://192.168.40.133:8848/nacos , 192.168.40.133 is the address of Nacos server, and 8848 is the default port number of Nacos
If the page cannot be accessed, check the log to see what errors are reported in the log, and then solve them
If there is no error in the log, but it is still inaccessible, check whether the firewall is turned on
firewall-cmd --state,If the status is running,Then turn off the firewall

systemctl stop firewalld.service
After closing the firewall, visit the address of Nacos again. After successful access, you will enter the following page
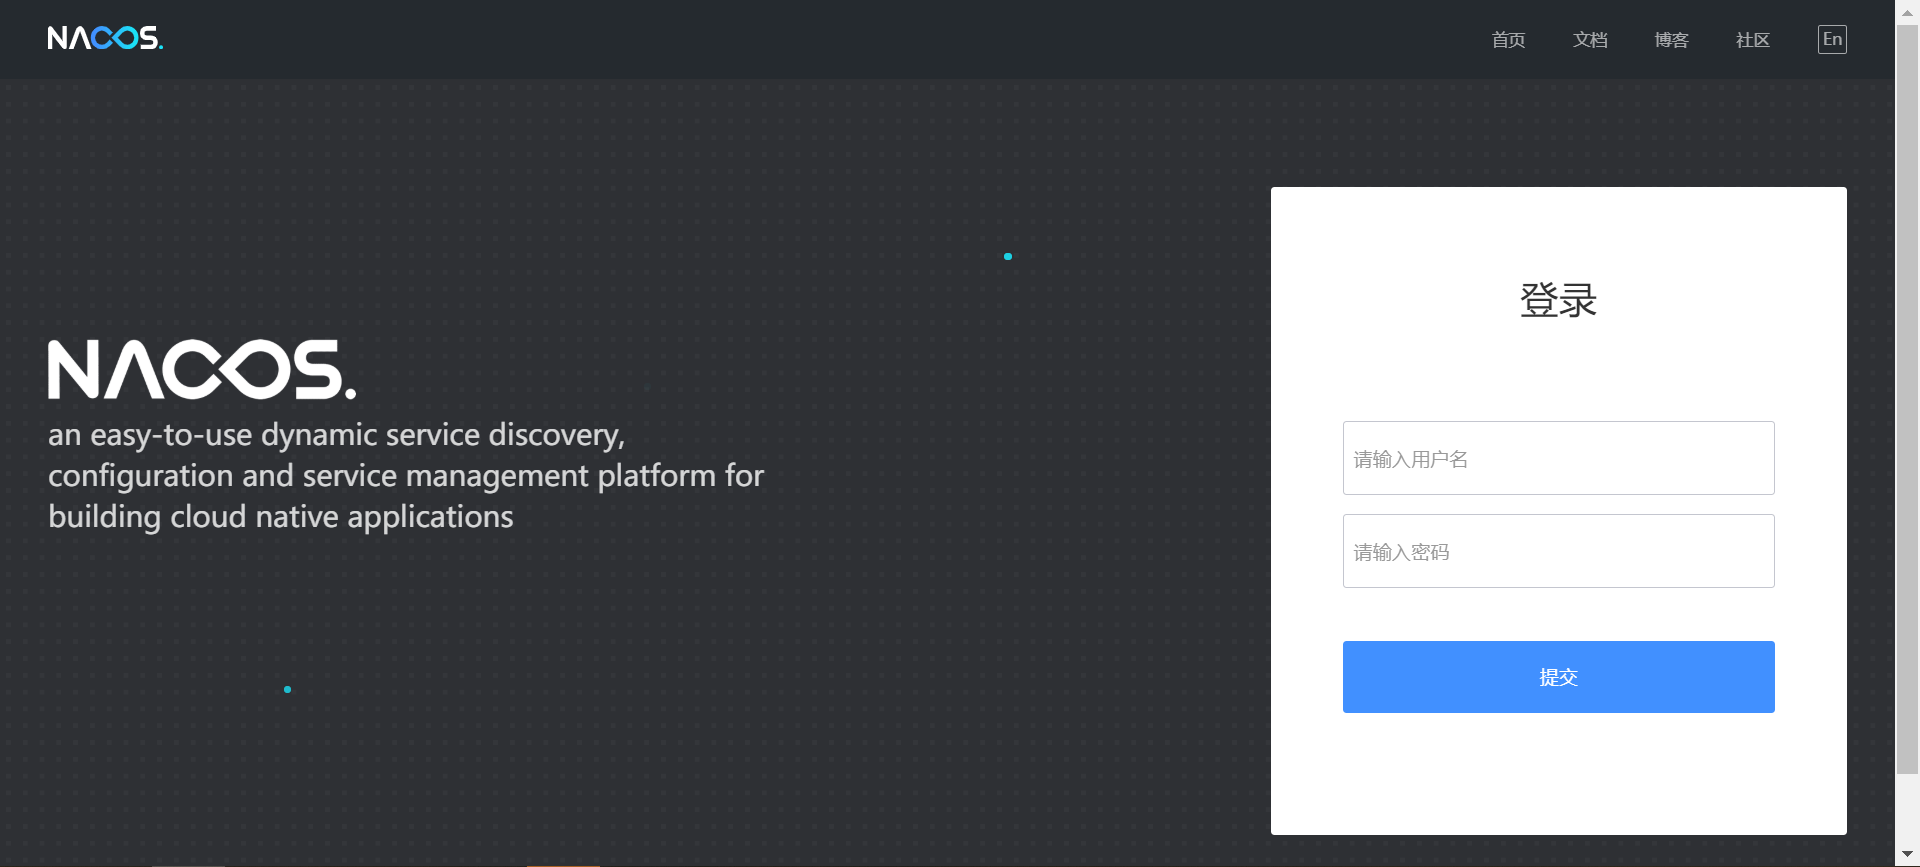
The initial account password is: Account: nacos; Password: nacos
The configuration of Nacos can be updated in real time without restarting the project
Install docker
Use the domestic daocloud one click installation command
curl -sSL https://get.daocloud.io/docker | sh
Start docker
systemctl start docker
Configure the image accelerator and restart docker after configuration
https://help.aliyun.com/document_detail/60750.html
docker installing mysql
docker run --name mysql -p 3306:3306 -e MYSQL_ROOT_PASSWORD=123456 -d mysql:5.7
docker run \
--name mysql \
-v /mysql/data:/var/lib/mysql \
-p 3306:3306 \
-e MYSQL_ROOT_PASSWORD=123456 \
-d mysql:5.7 \
--character-set-server=utf8mb4 \
--collation-server=utf8mb4_general_ci \
--lower_case_table_names=1 \
--skip-name-resolve=1 \
--max_connections=1000 \
--wait_timeout=31536000 \
--interactive_timeout=31536000 \
--default-time-zone='+8:00'
Build maven remote warehouse
- Install nexus
docker pull docker.io/sonatype/nexus3
mkdir -p /usr/local/nexus3/nexus-data
chown -R 200 /usr/local/nexus3/nexus-data
docker run -tid -p 8081:8081 --name nexus -e NEXUS_CONTEXT=nexus -v /usr/local/nexus3/nexus-data:/nexus-data  docker.io/sonatype/nexus3
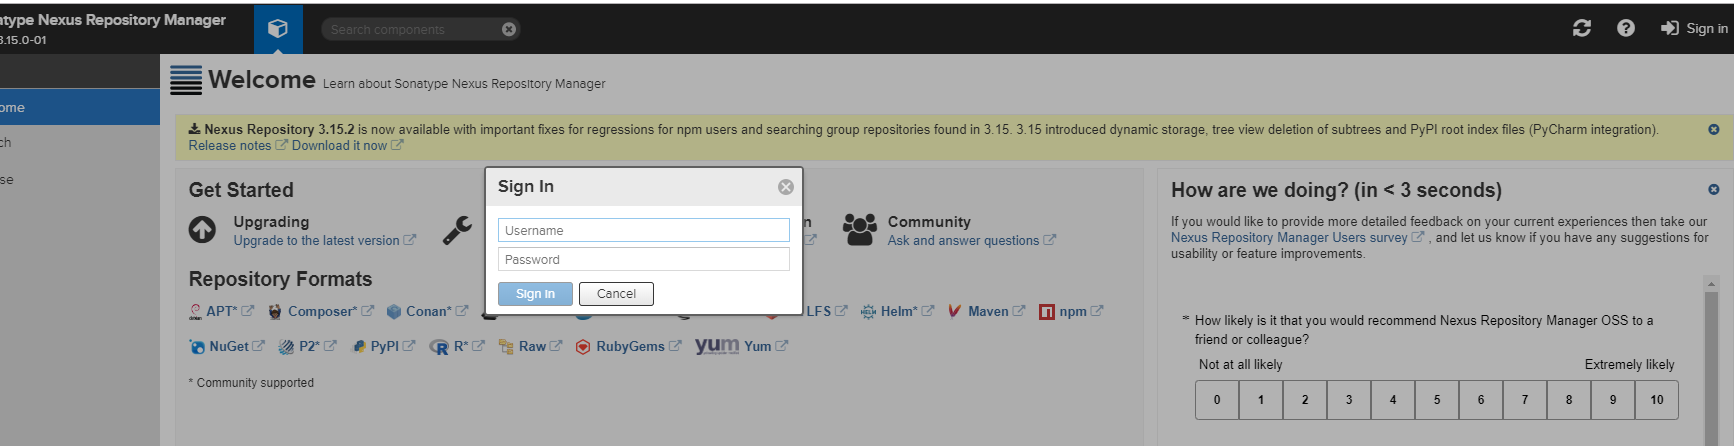
- Log in to nexus, the user name is admin, and the initial password is / usr / local / nexus3 / nexus data / Admin Password file
-
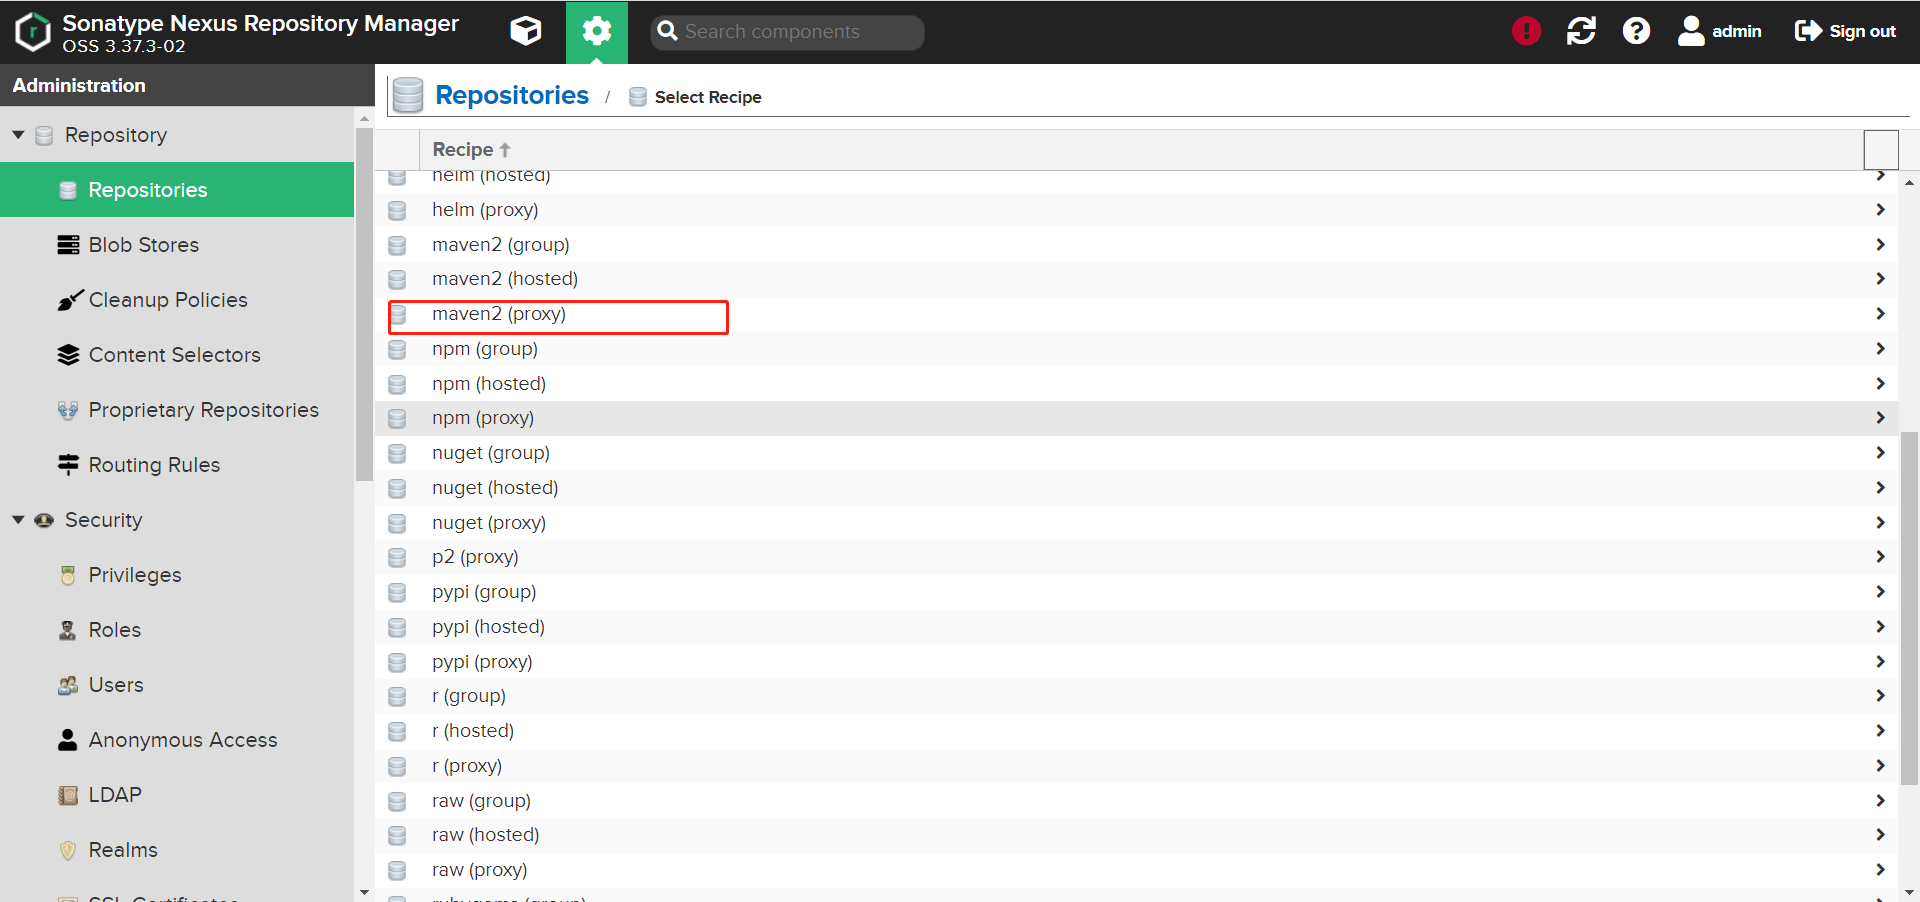
Enter the management interface and add agent source
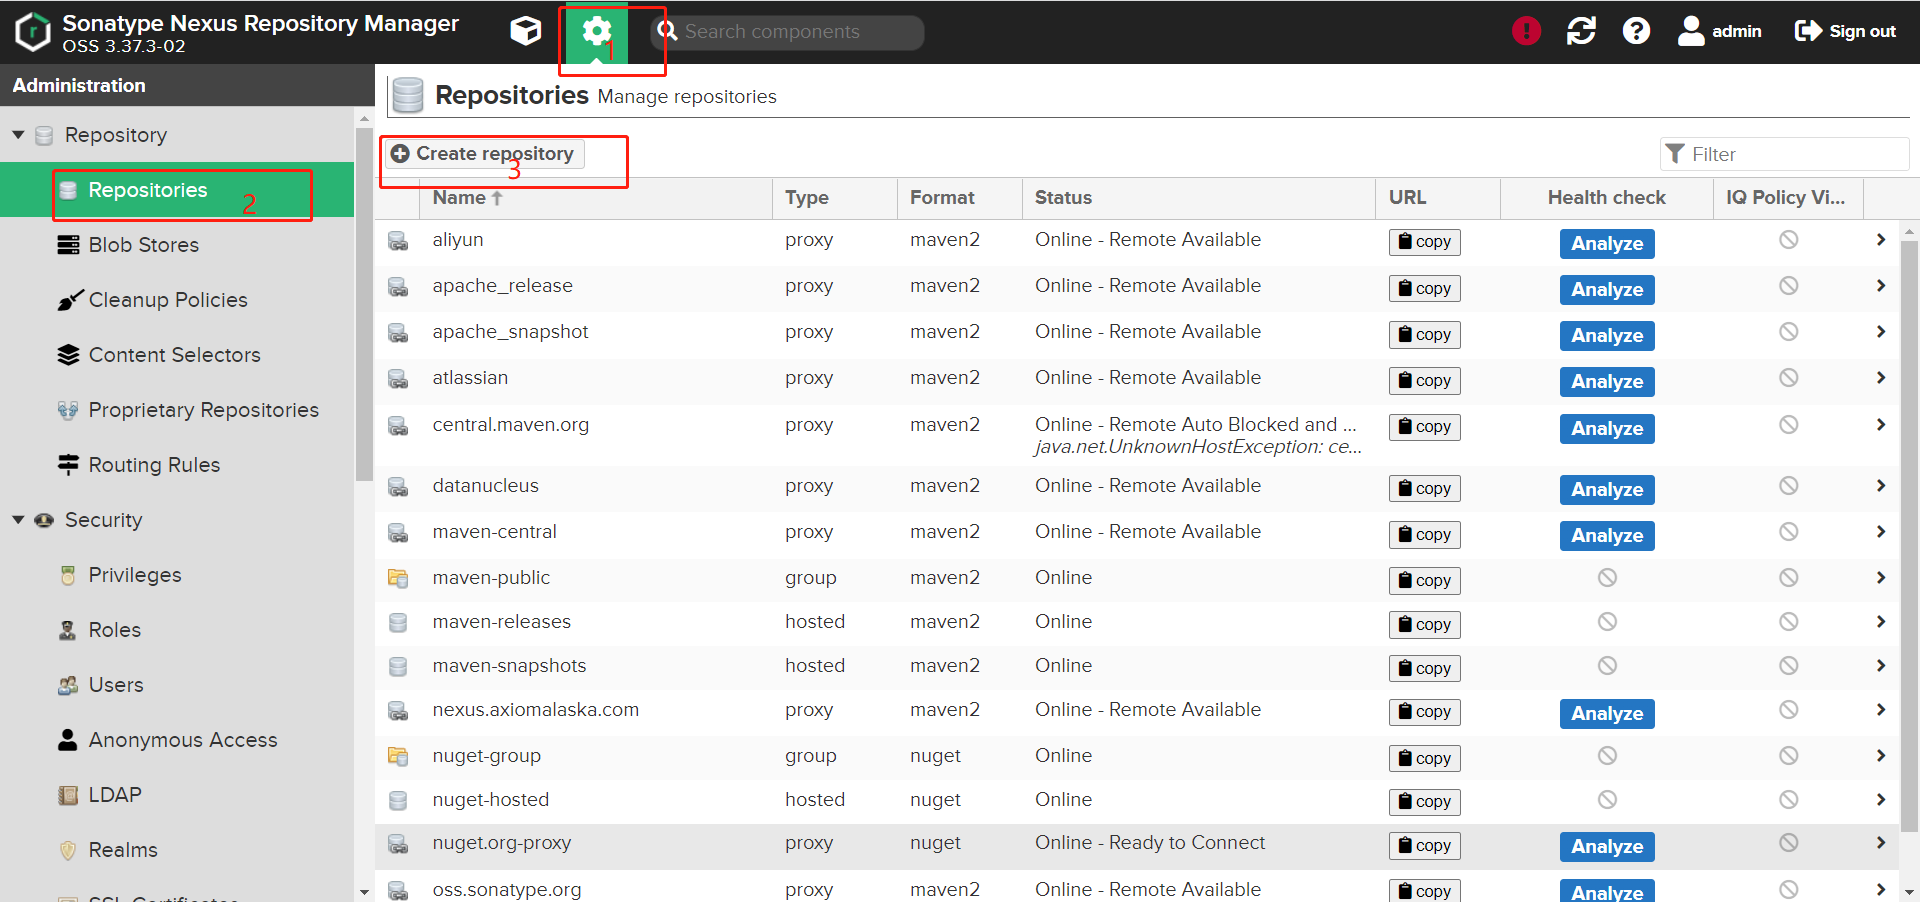
-
Select maven2(proxy)
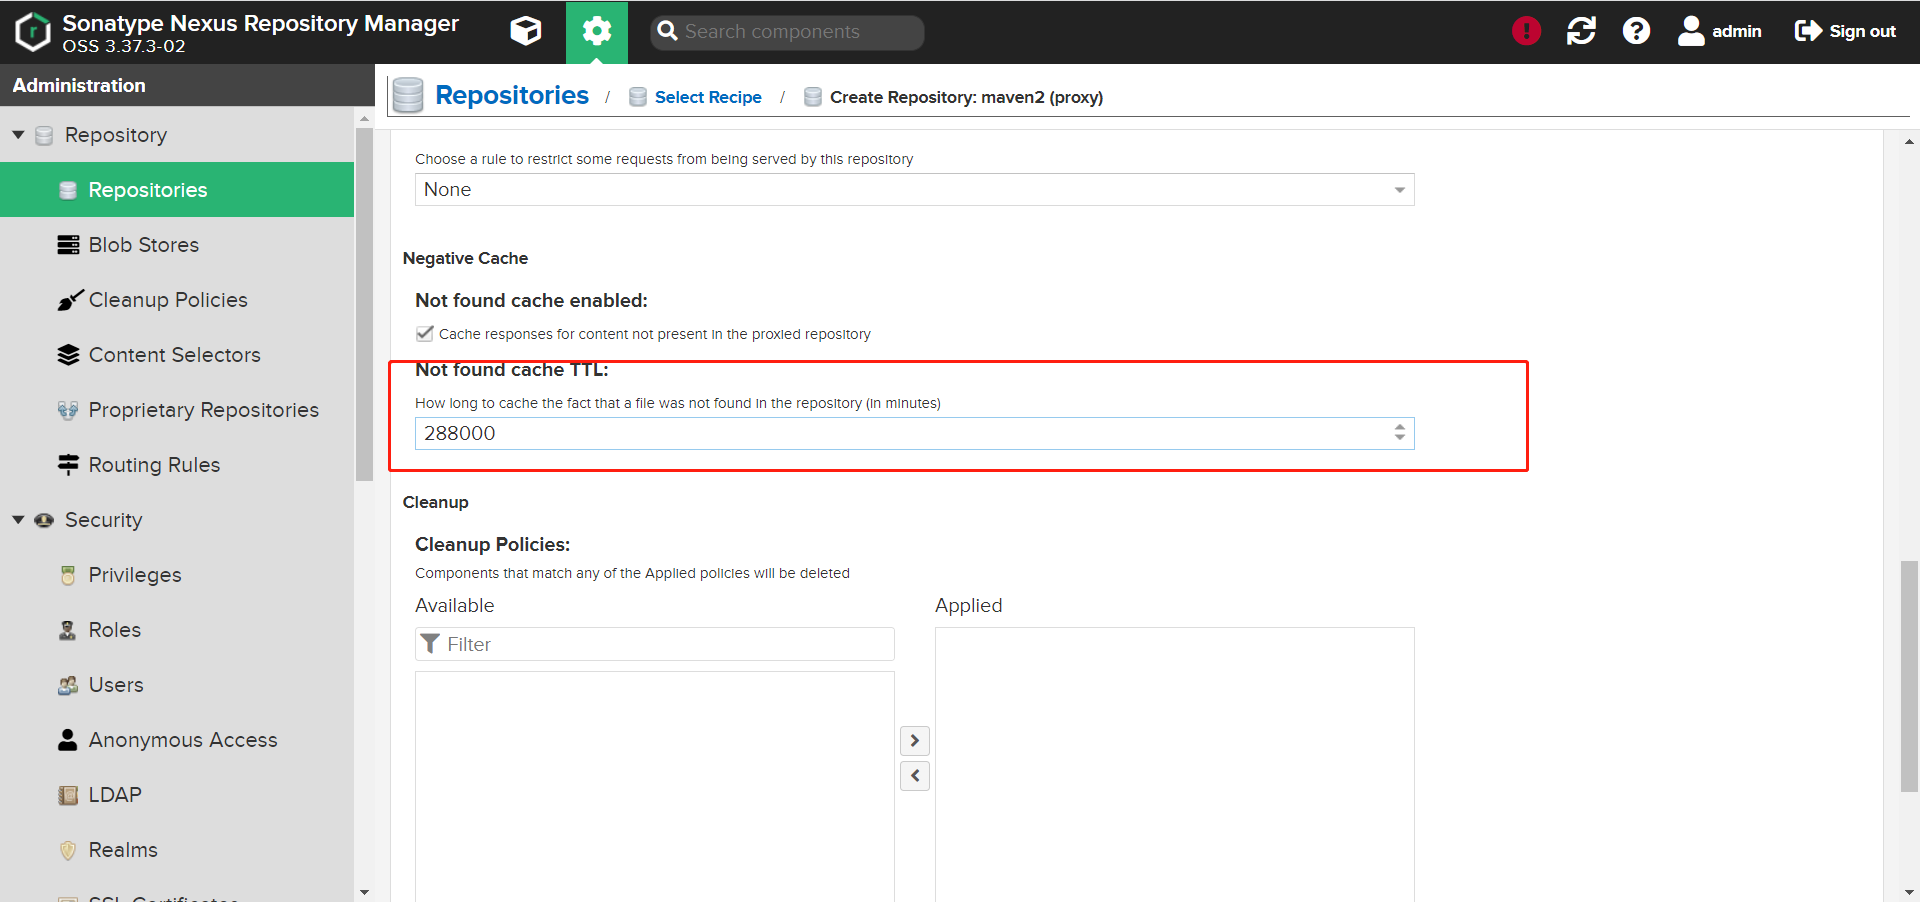
- Add agent (Cache is uniformly set to 288000 in 200 days)
5.1 add several common agents
1. aliyun
http://maven.aliyun.com/nexus/content/groups/public
2. apache_snapshot
https://repository.apache.org/content/repositories/snapshots/
3. apache_release
https://repository.apache.org/content/repositories/releases/
4. atlassian
https://maven.atlassian.com/content/repositories/atlassian-public/
5. central.maven.org
http://central.maven.org/maven2/
6. datanucleus
http://www.datanucleus.org/downloads/maven2
7. maven-central (It comes with after installation, and only needs to be set Cache (valid only)
https://repo1.maven.org/maven2/
8. nexus.axiomalaska.com
http://nexus.axiomalaska.com/nexus/content/repositories/public
9. oss.sonatype.org
https://oss.sonatype.org/content/repositories/snapshots
10.pentaho
https://public.nexus.pentaho.org/content/groups/omni/
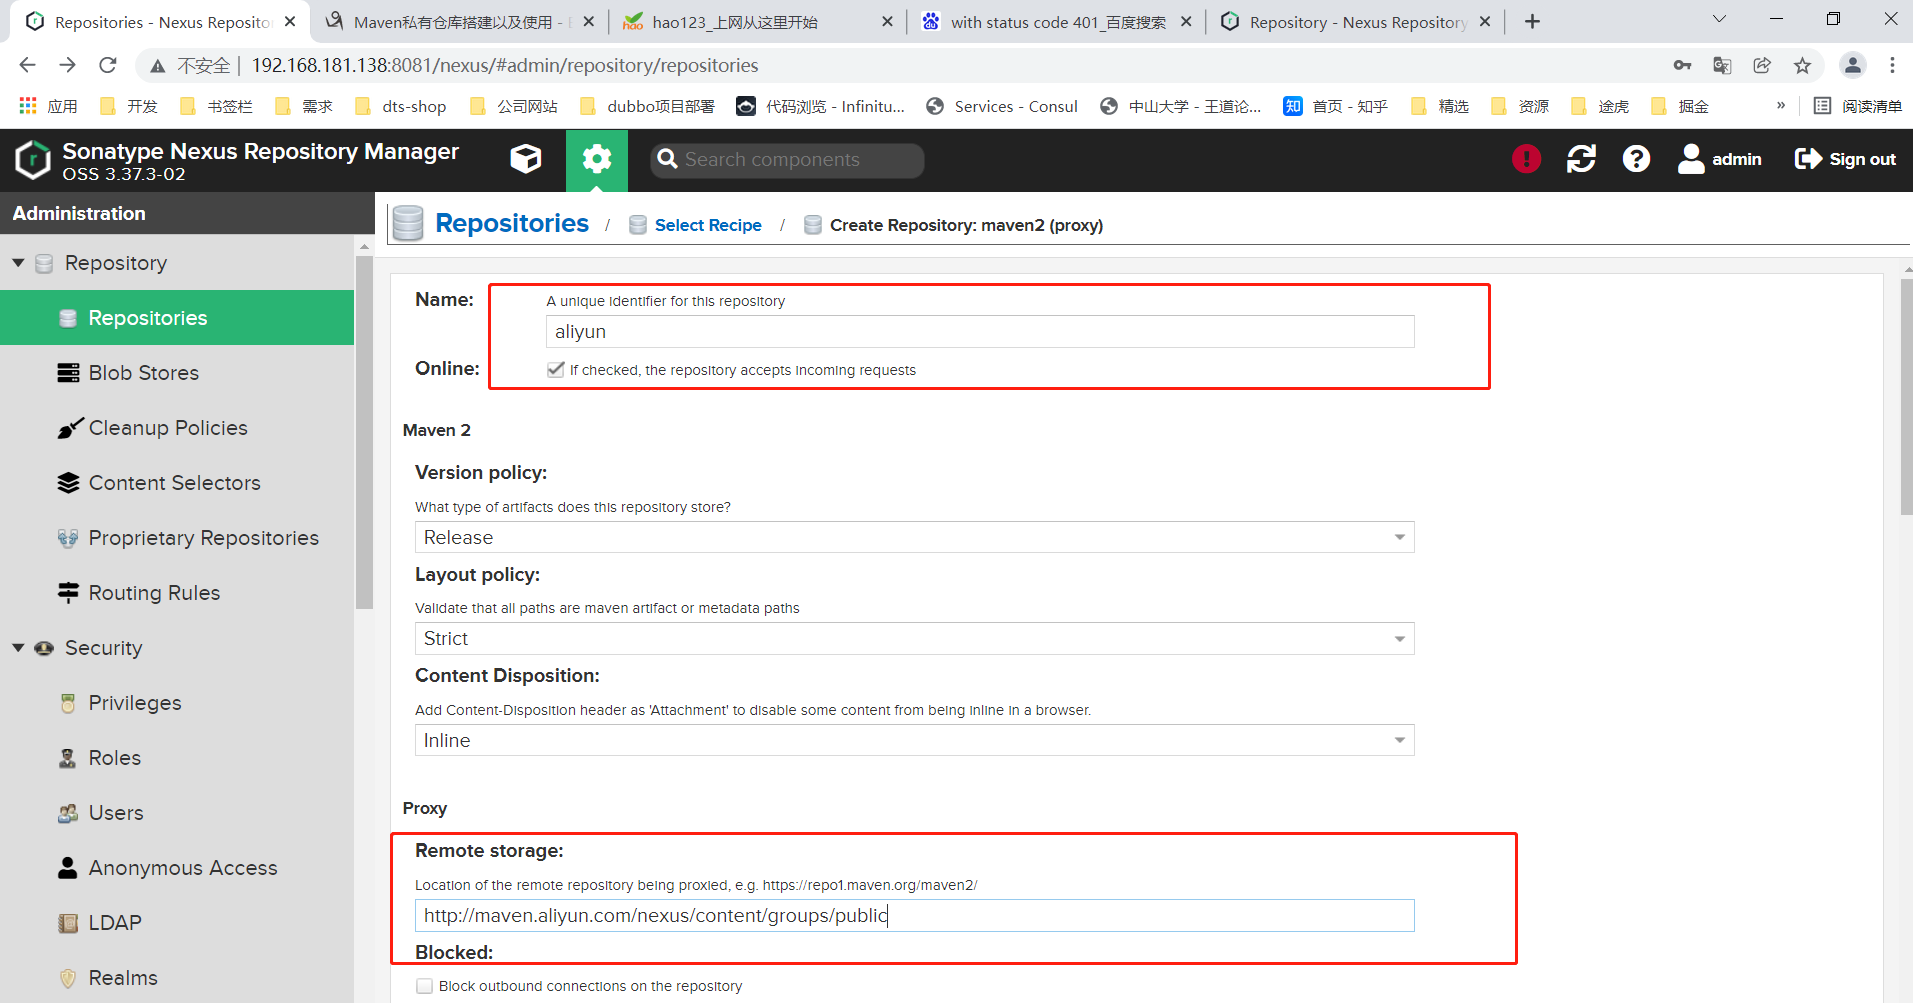
5.2 adding method, such as aliyun
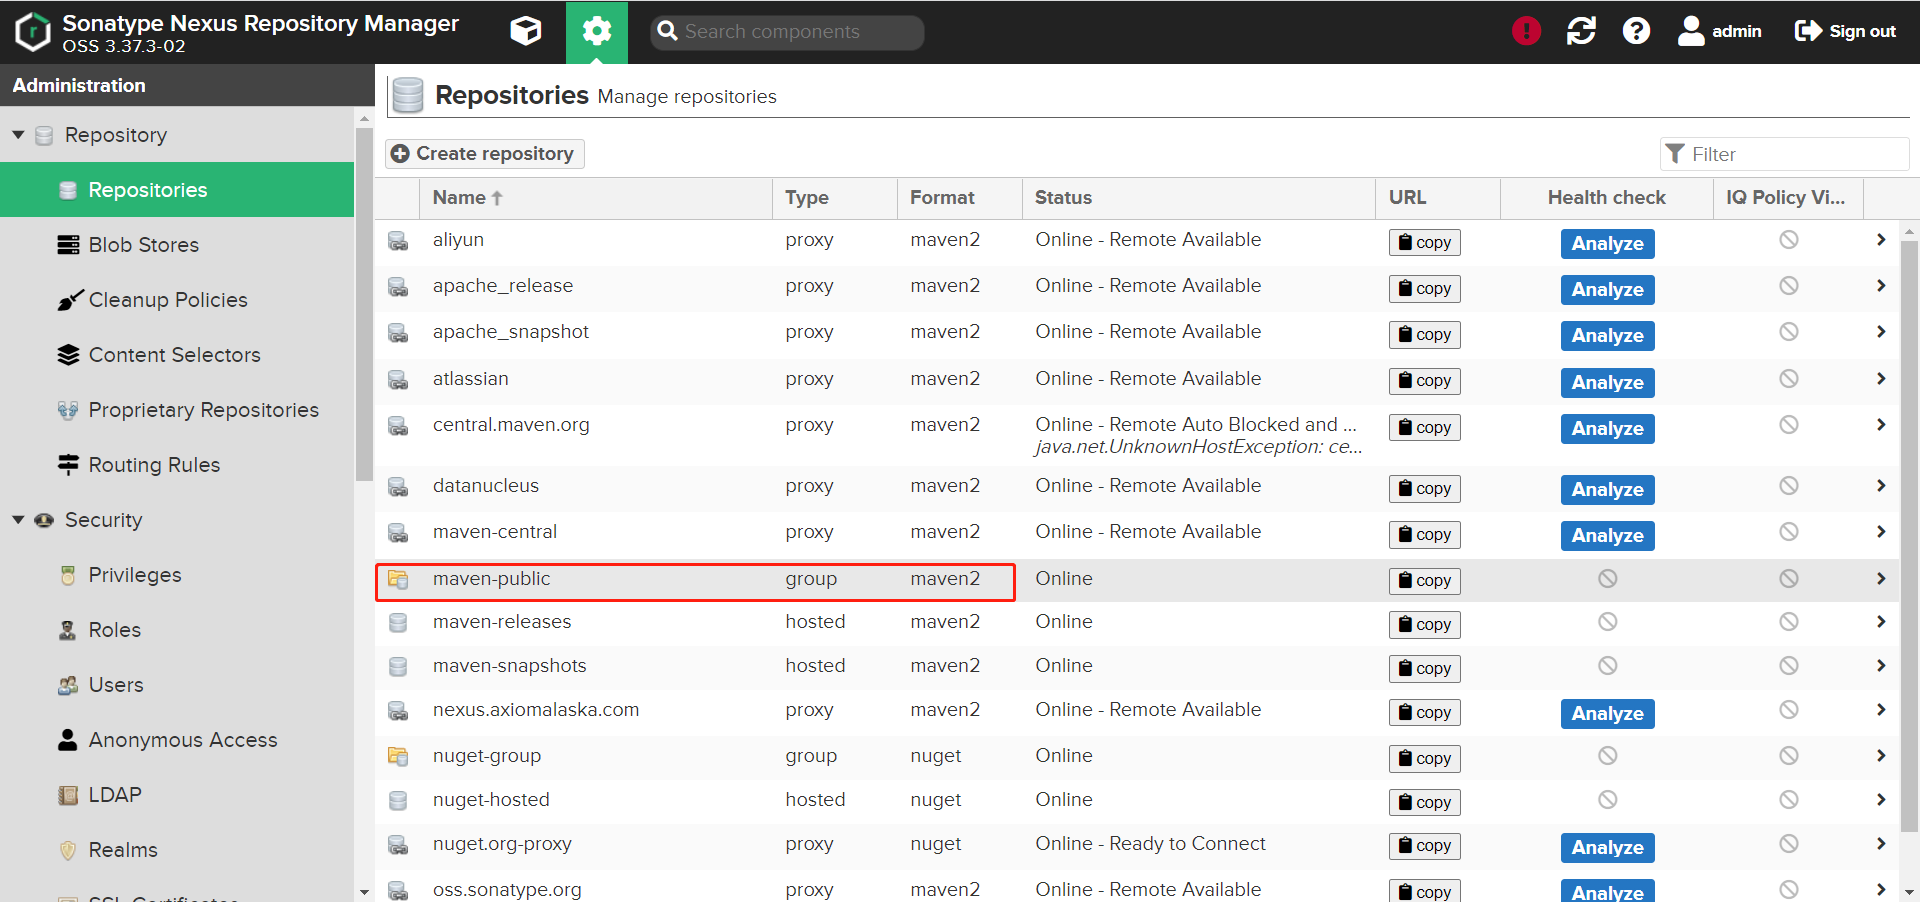
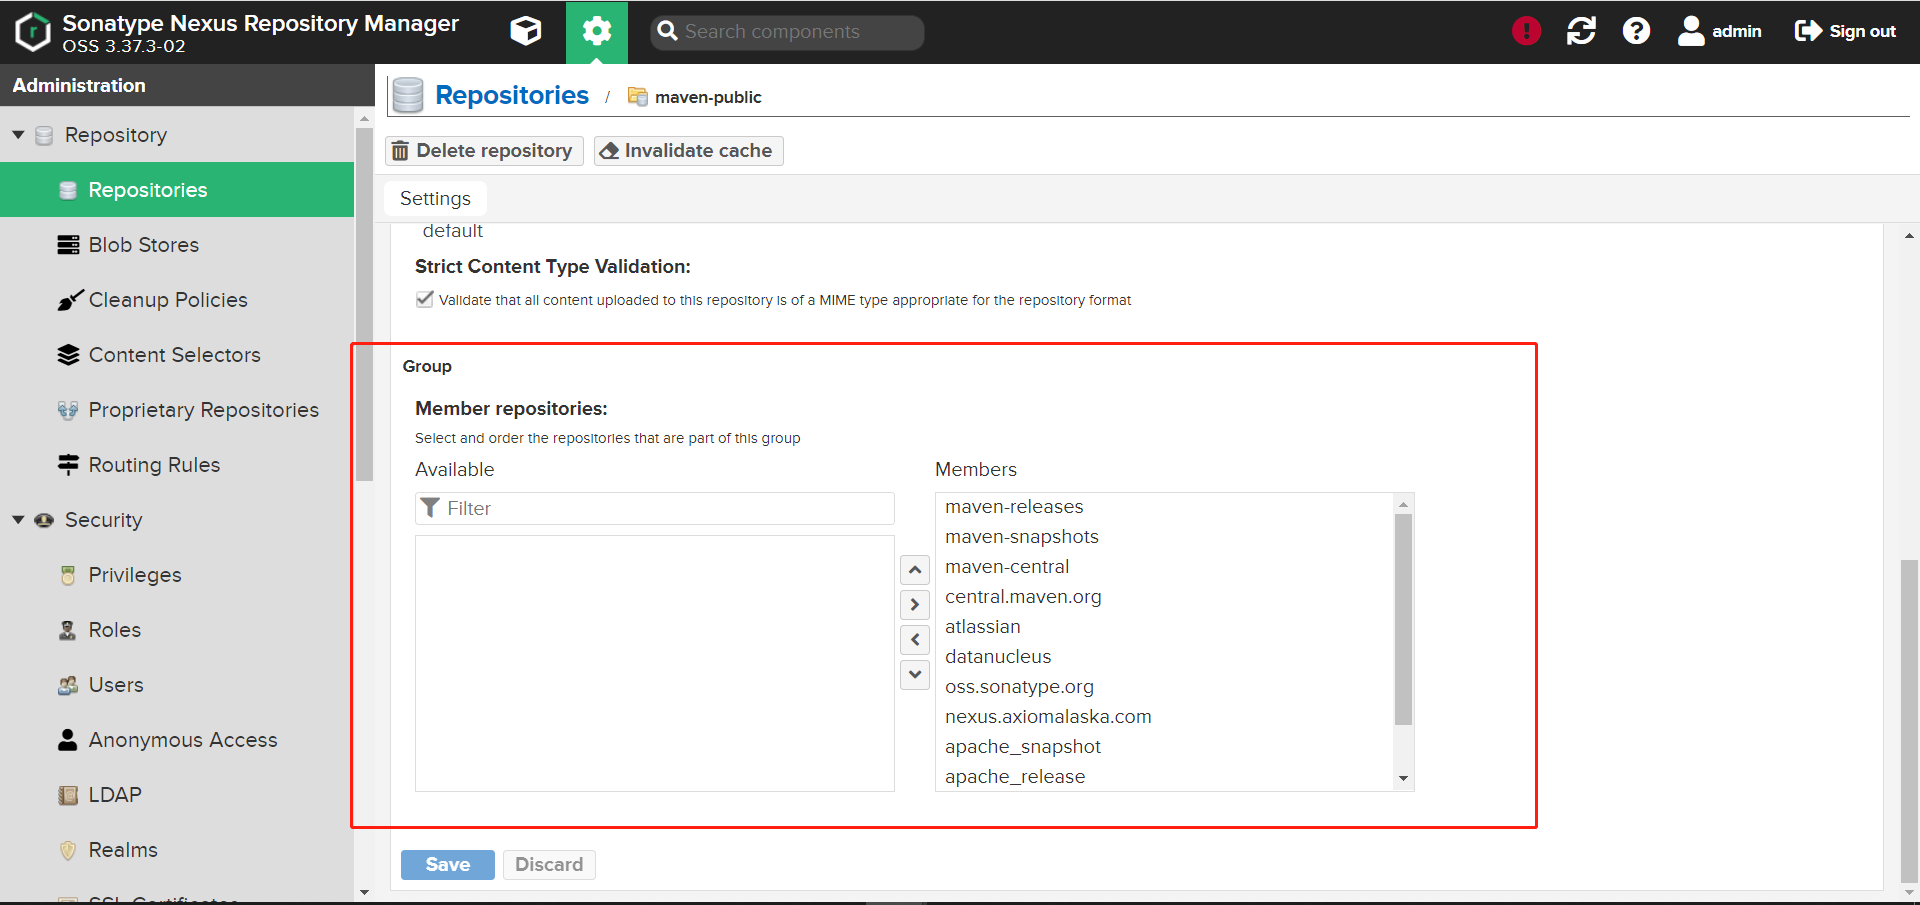
- Select configuration > repository, double-click Maven public, move the added agent to the Members on the right in the Group area, move it up to the top of Maven central, and click Save.
- setting. Find the < servers > < / servers > tag in the XML file, and configure the user name and password in this tag
	<server>
		<id>releases</id>
		<username>admin</username>
		<password>abc_123</password>
	</server>

	<server>
		<id>snapshots</id>
		<username>admin</username>
		<password>abc_123</password>
	</server>
- In the POM of the project Configure warehouse address in XML file
  <distributionManagement>
    <repository>
      <id>releases</id>
      <name>Nexus Release Repository</name>
      <url>http://192.168.181.138:8081/nexus/repository/maven-releases/</url>
    </repository>
    <snapshotRepository>
      <id>snapshots</id>
      <name>Nexus Snapshot Repository</name>
      <url>http://192.168.181.138:8081/nexus/repository/maven-snapshots/</url>
    </snapshotRepository>
  </distributionManagement>
Differences between snapshot and release versions
In the process of using maven, we often have many public libraries in an unstable state in the development stage, which need to be modified and released at any time. They may be released once a day, and even N times a day in case of bug s. We know that Maven's dependency management is based on version management. If the version number of an artifact is the same, Maven will not actively download it even if the components on our internal mirror server are newer than the local ones. If we do dependency management based on the officially released version in the development stage, we need to upgrade the version number of the component in case of this problem, which obviously does not meet the requirements and the actual situation. However, if it is based on the snapshot version, the problem will be solved spontaneously, and Maven has prepared all this for us.
maven will judge whether it is a SNAPSHOT version or an official version according to whether the module version number (version in pom file) contains - SNAPSHOT.
If snapshot version:
- When the package is released, MVN will be automatically released to the snapshot version library when it is deployed
- For modules that use the snapshot version, maven will automatically download the latest snapshot version from the mirror server when compiling and packaging directly without changing the version number.
In case of official release:
- When the package is released, MVN will be automatically released to the official version library when it is deployed,
- When using the official version of the module, without changing the version number, if the version of the module already exists locally during compilation and packaging, it will not take the initiative to download it from the mirror server.
Therefore, in the development stage, we can set the version of the public library as the snapshot version, while the dependent components reference the snapshot version for development. After the snapshot version of the public library is updated, we do not need to modify the pom file prompt version number to download the new version. Directly mvn executes the relevant compilation and packaging commands to download the latest snapshot library again, It also facilitates our development.
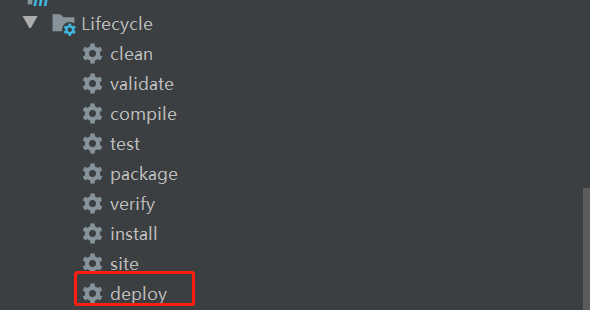
- Click deploy to push the package to maven warehouse
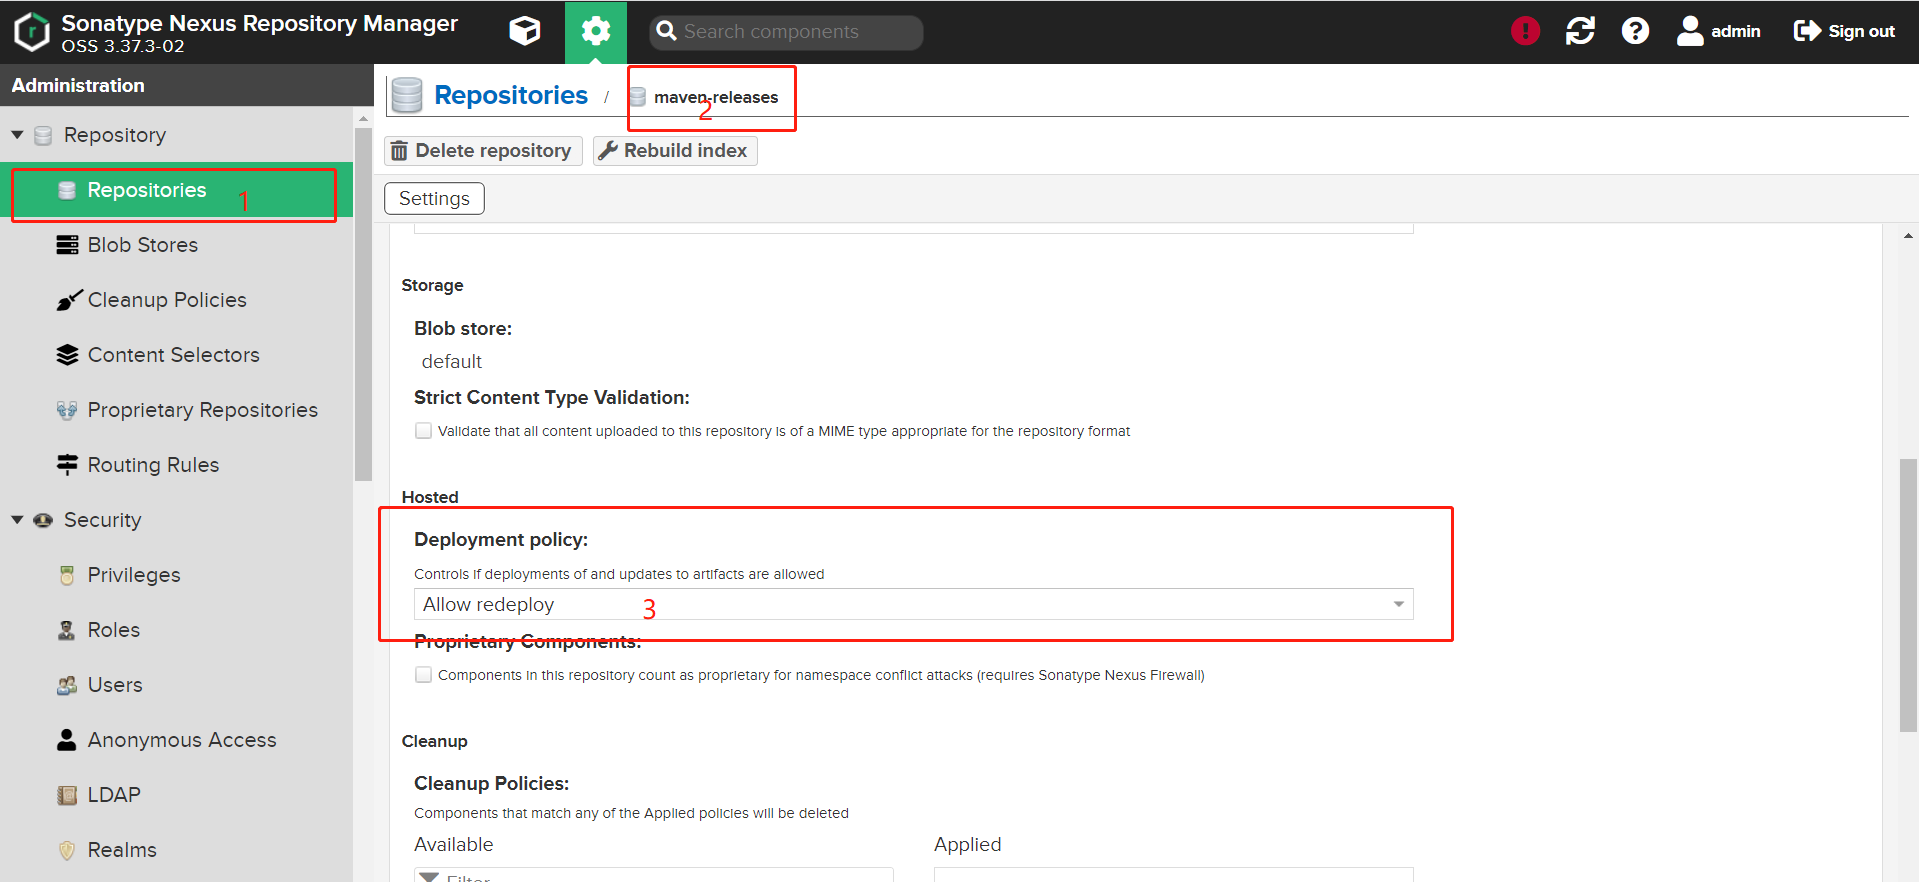
Question: deploy times 401, with status code 401
First, check whether the user name and password configured in setting are correct
If it is correct, check whether the corresponding repository is "Allow Redeploy". If not, set it to "Allow Redeploy"
For example, Maven release
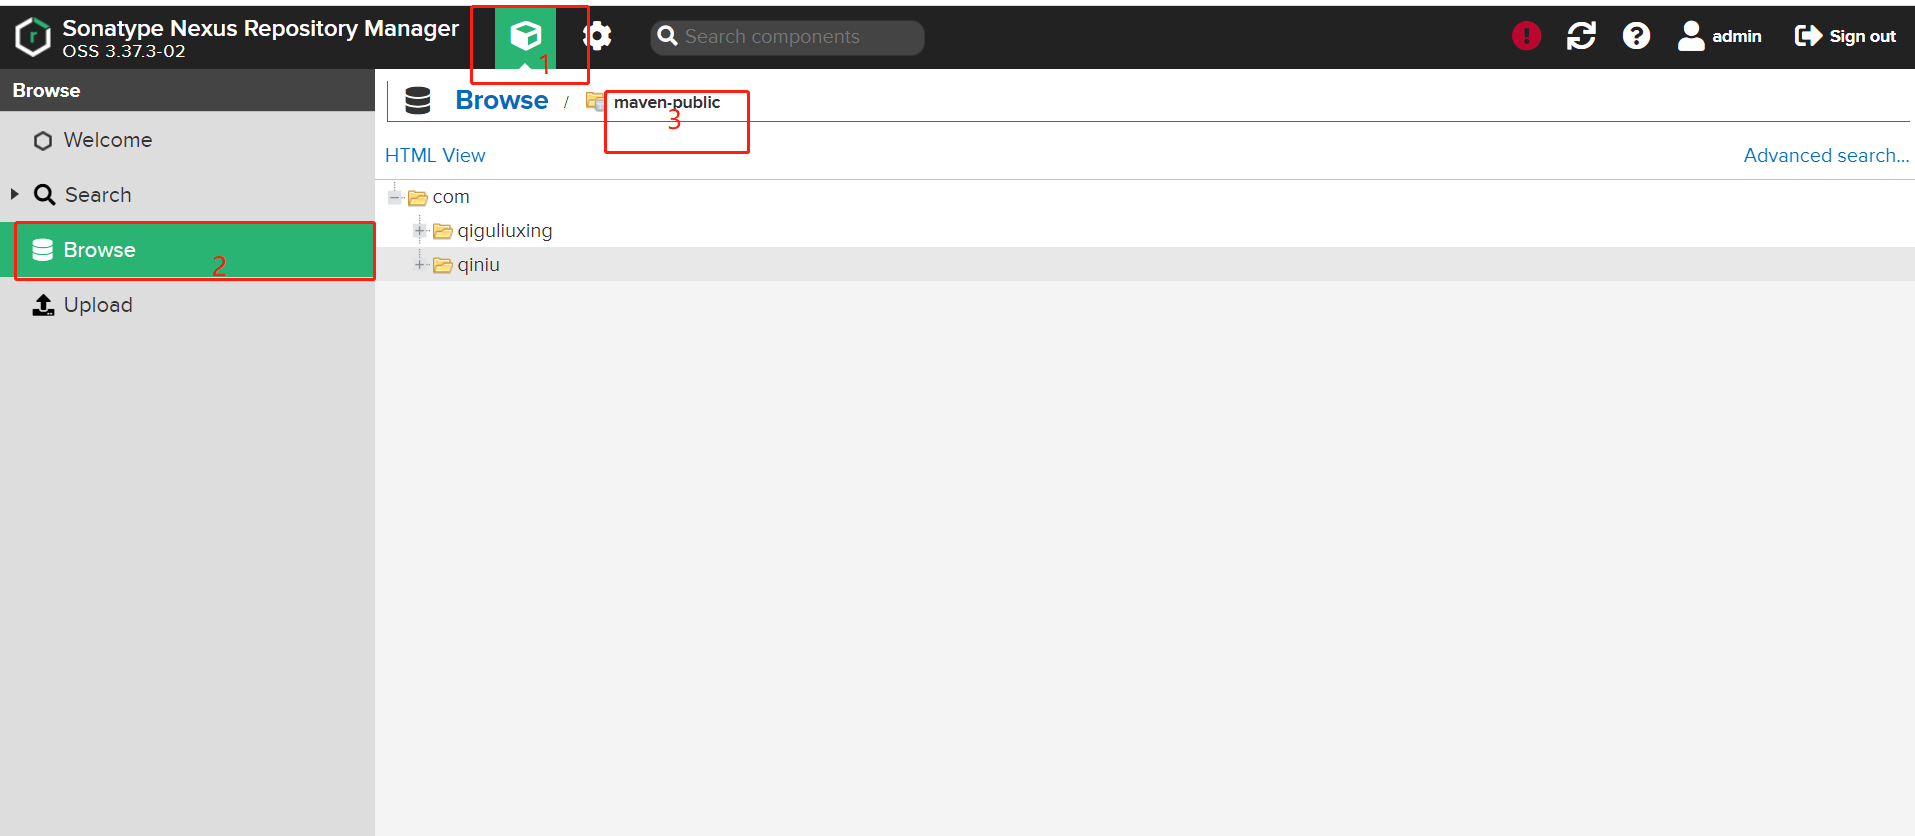
- After publishing successfully, you can see that the package has been in the warehouse
Install Jenkins
1. Download dependency
wget -O /etc/yum.repos.d/jenkins.repo https://pkg.jenkins.io/redhat-stable/jenkins.repo
2. Installation key
rpm --import https://pkg.jenkins.io/redhat-stable/jenkins.io.key
3. install jenkins
yum install jenkins
-
Definitions of jenkins related directories:
/usr/lib/jenkins/ jenkins installation directory. The war package will be placed here
/etc/sysconfig/jenkins jenkins configuration file, "port", "JENKINS_HOME" and so on can be configured here.
/var/lib/jenkins / default JENKINS_HOME.
/var/log/jenkins/jenkins.log jenkins log file. -
Run Jenkins command
service jenkins restart
- Stop Jenkins
service jenkins stop
-
For external access to Jenkins, you need to turn off the firewall
-
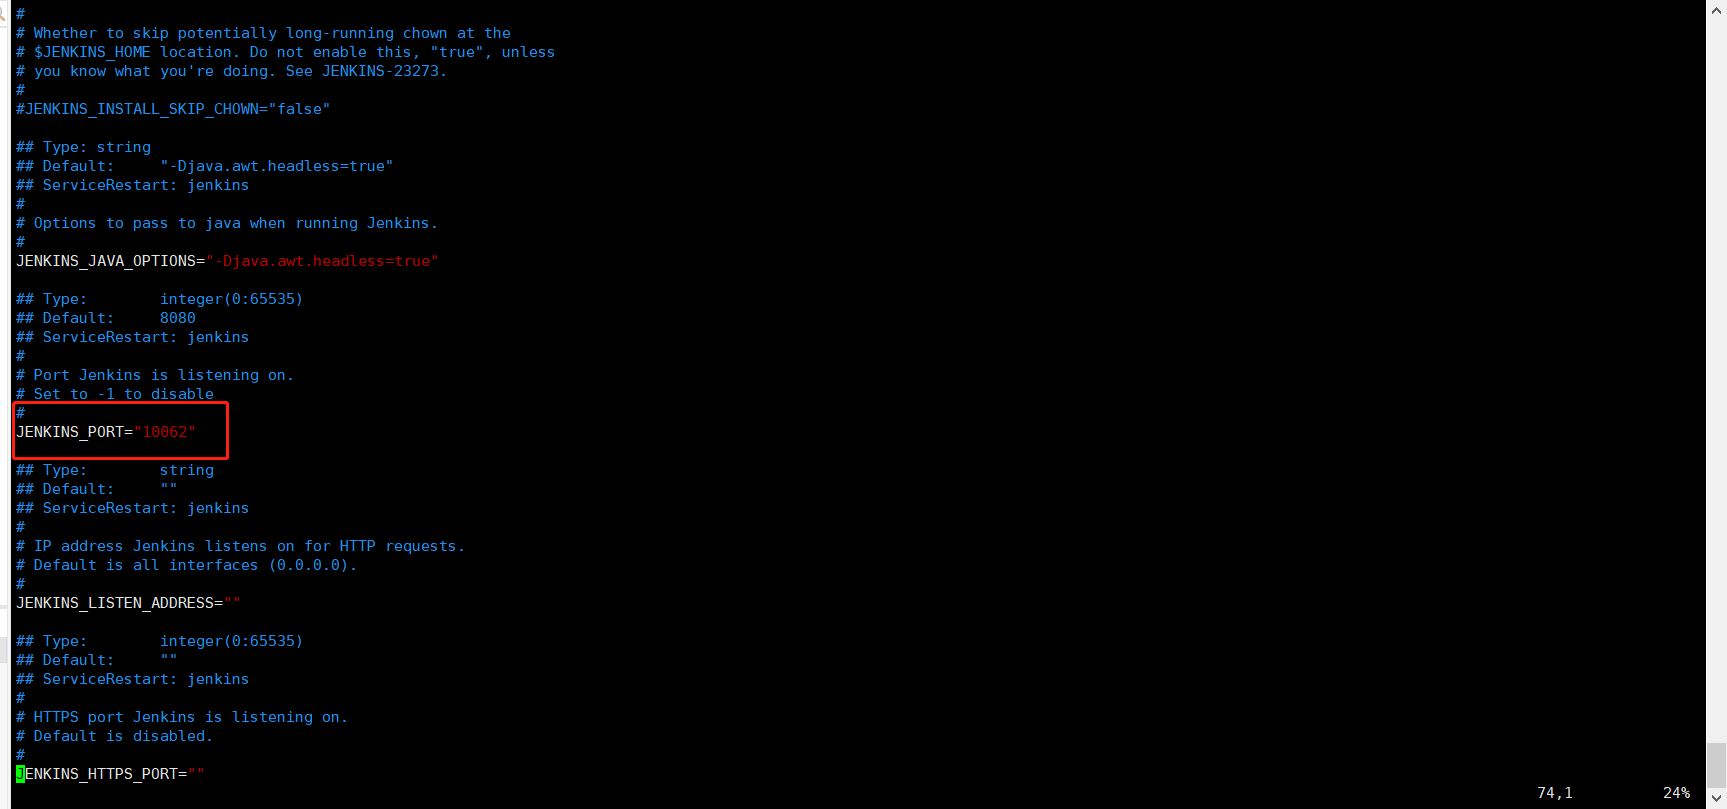
Modify port
vim /etc/sysconfig/jenkins
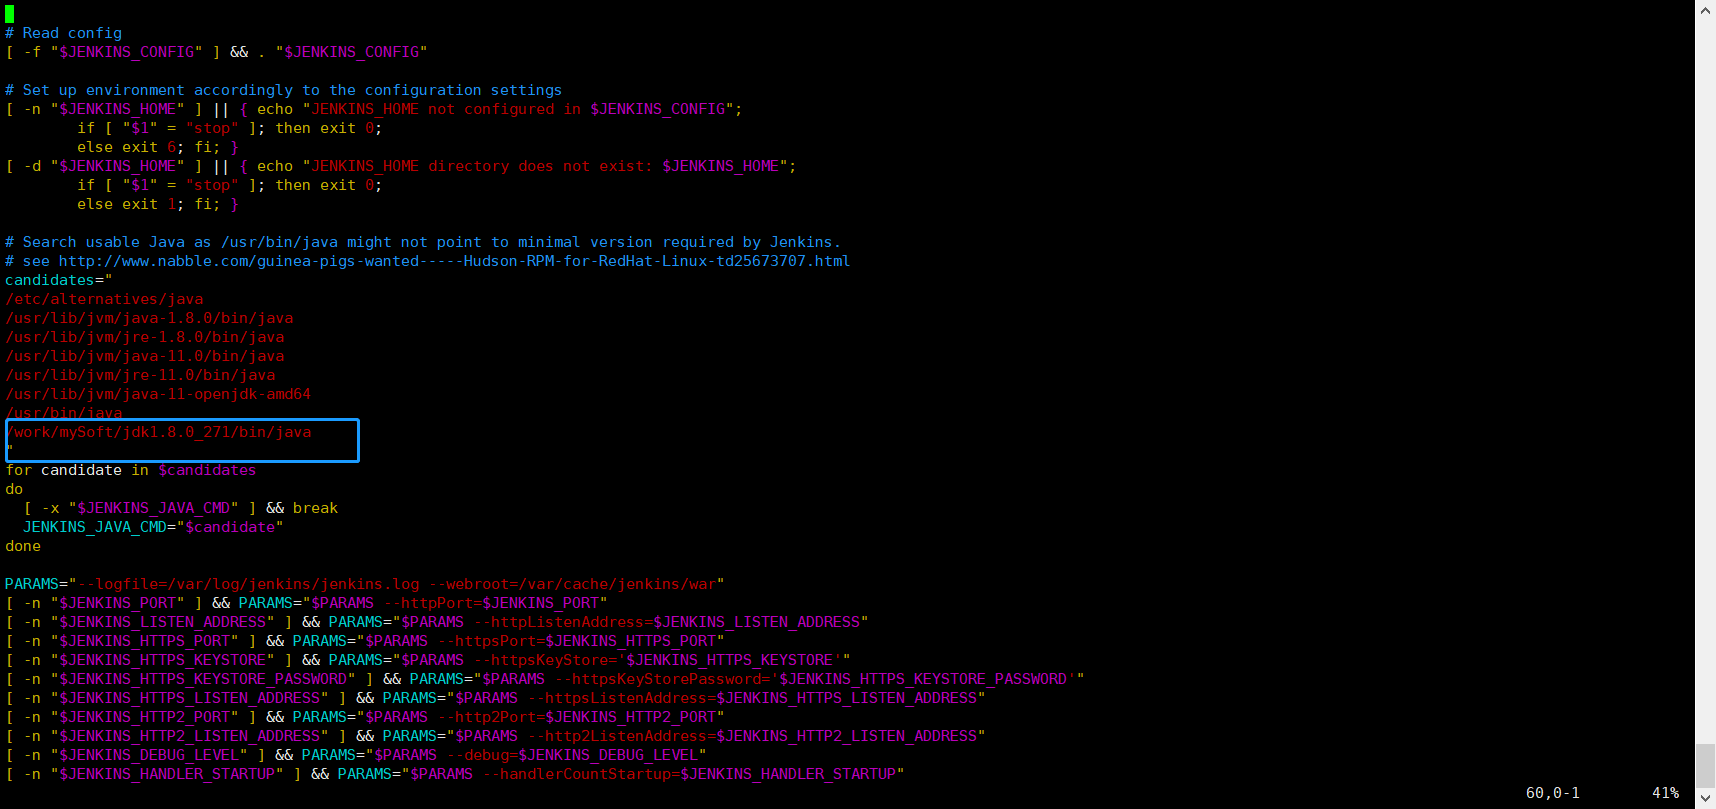
- Configure jdk
vim /etc/init.d/jenkins
visit: http://192.168.181.138:10062/
Automated Deployment Project
Deploy spring boot project
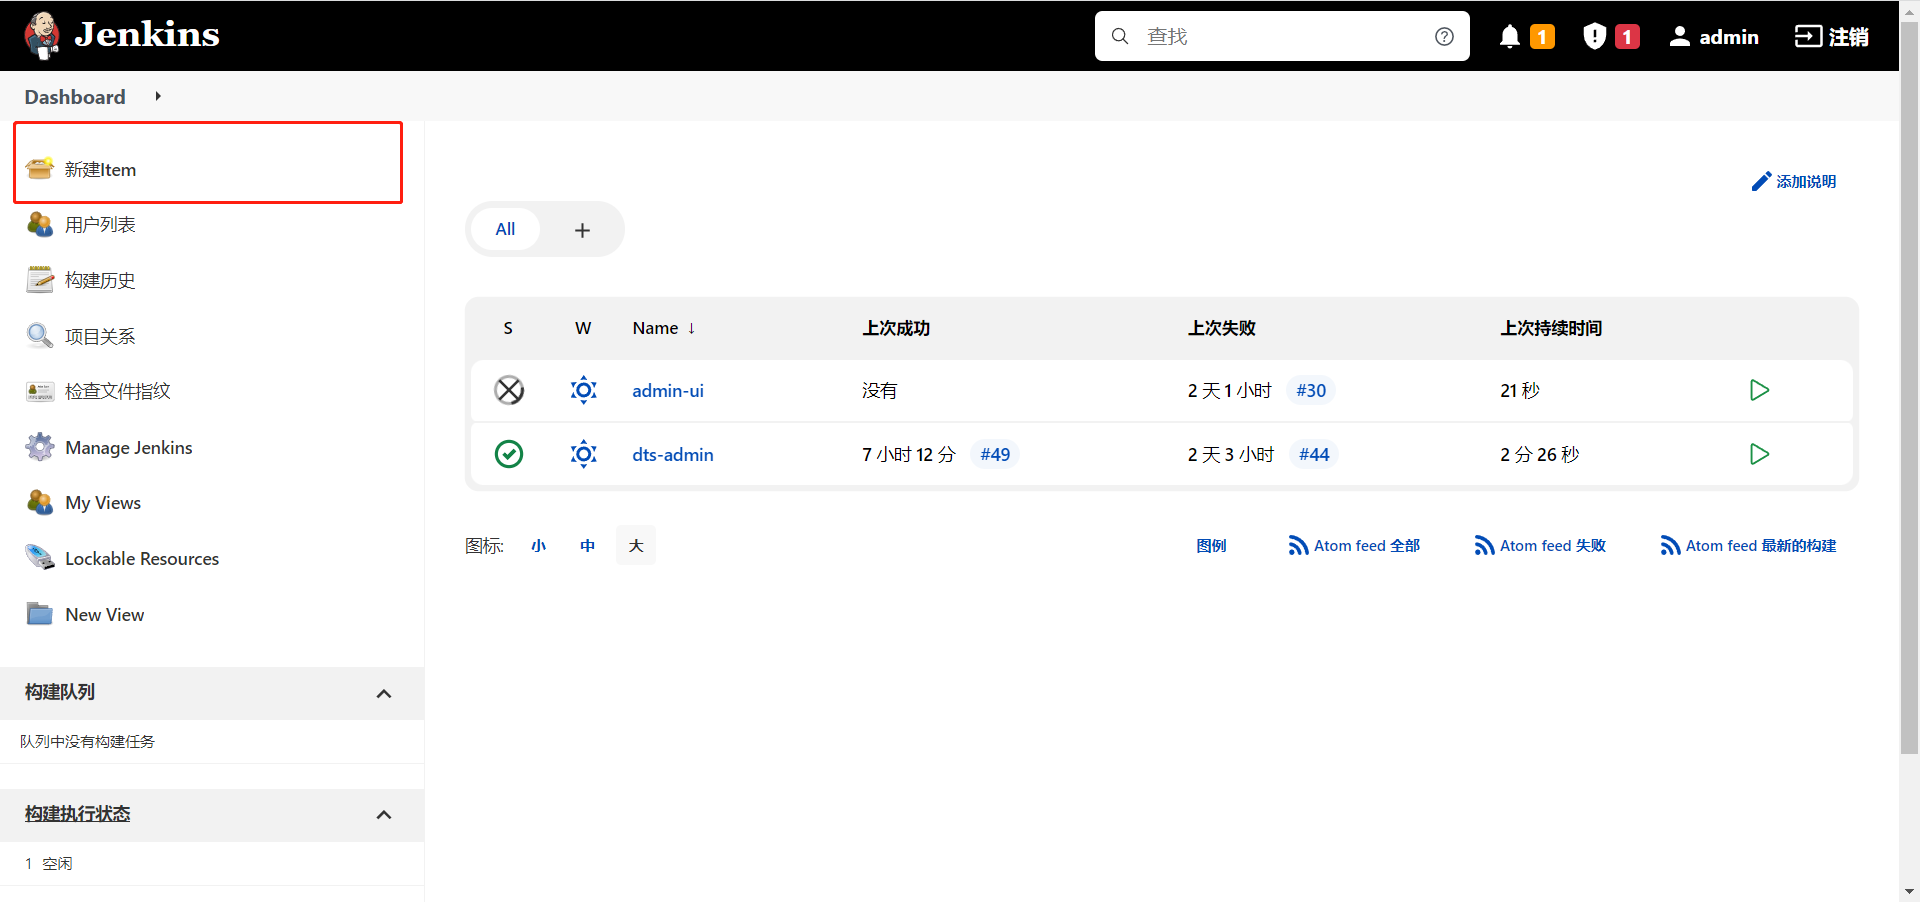
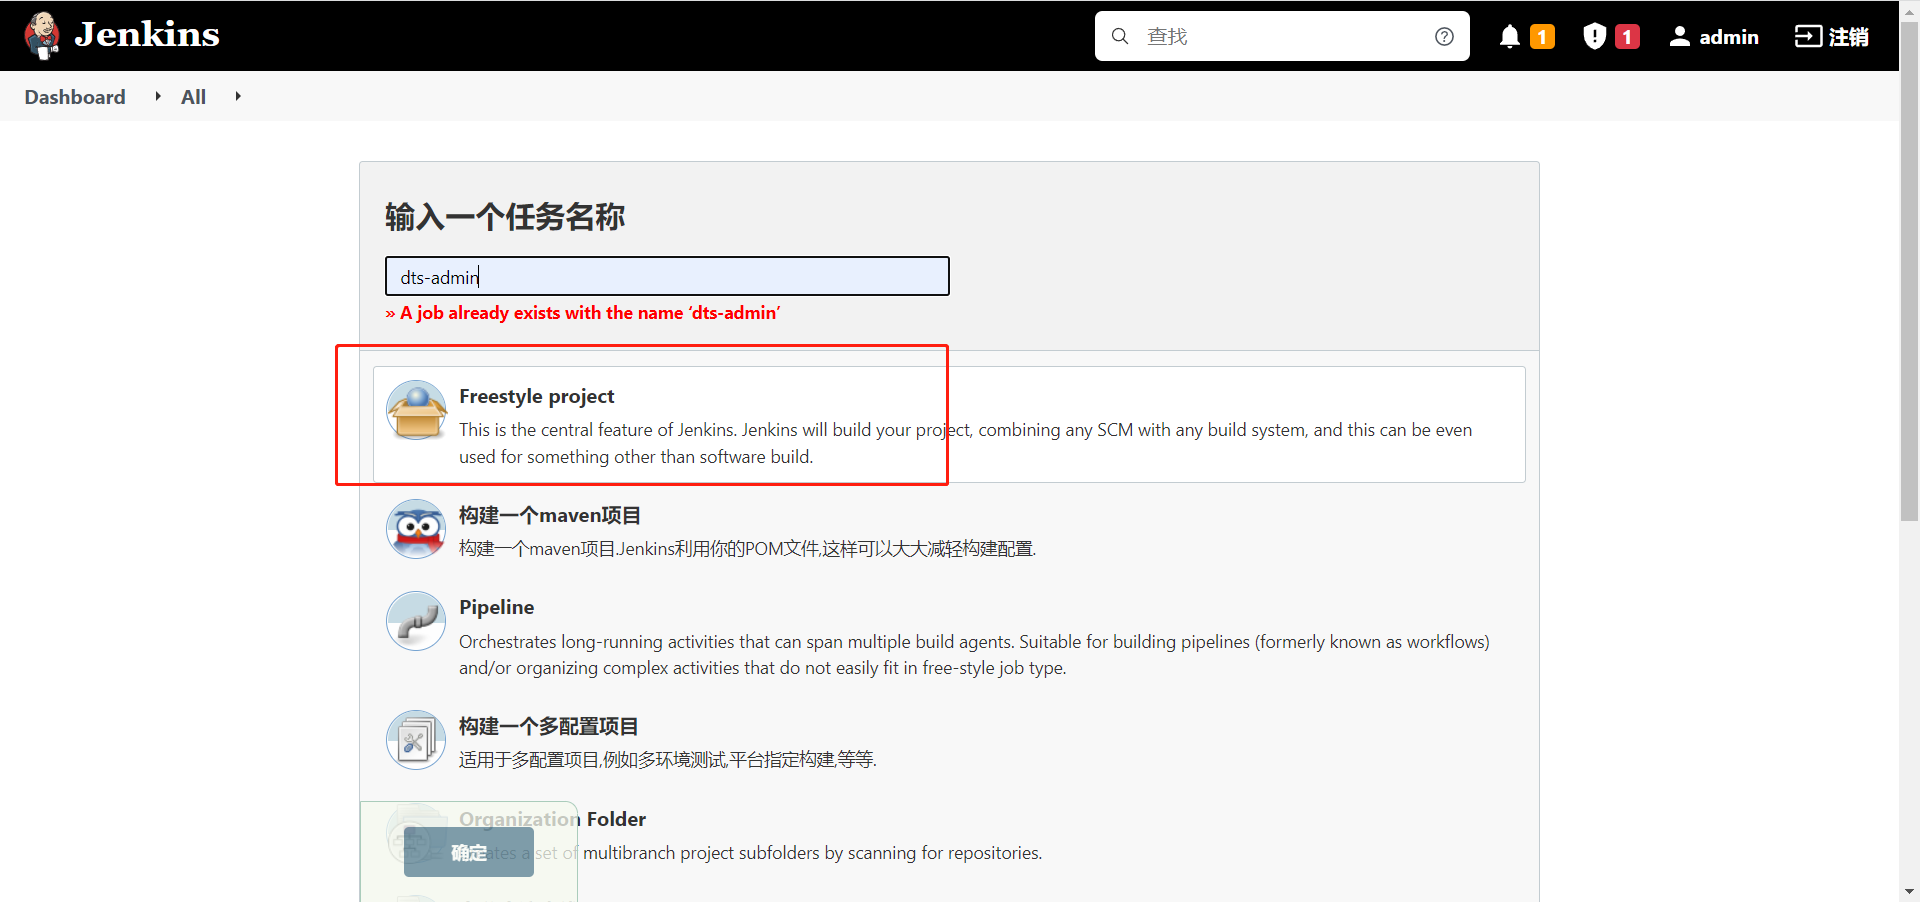
- Create a new item and select freestyle project
2. Select git and fill in the warehouse address

-
Create password credentials
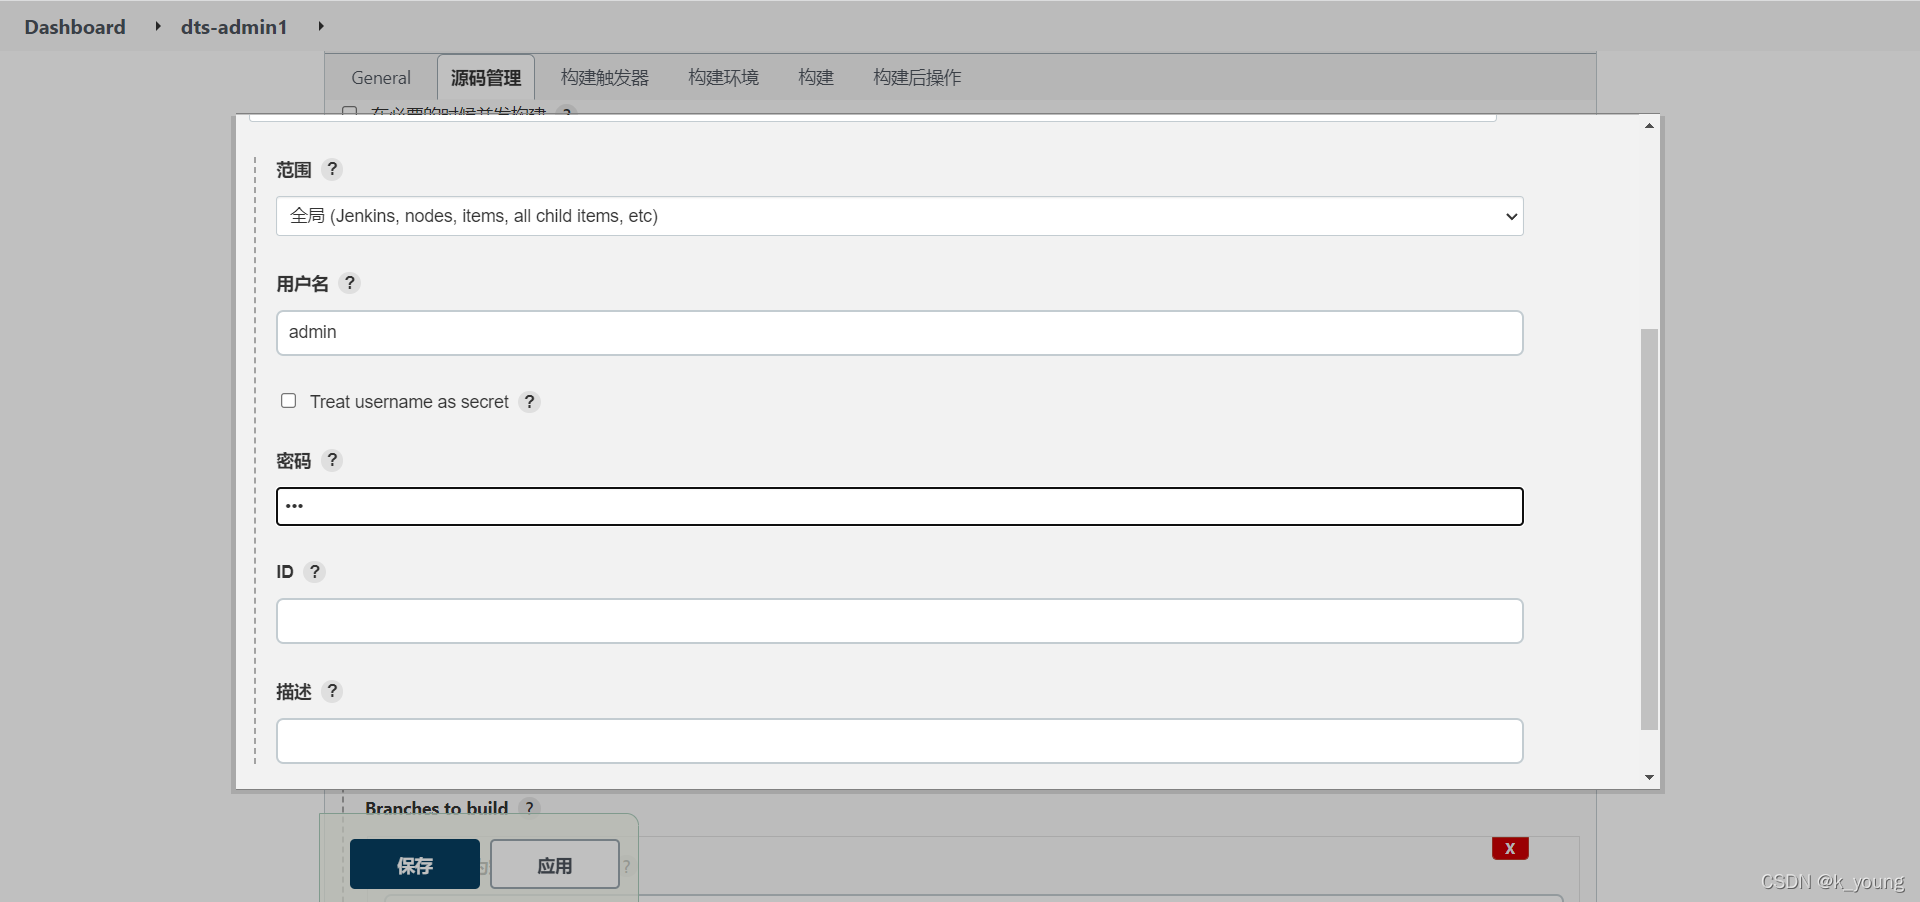
-
Build – > add build steps – > execute shell
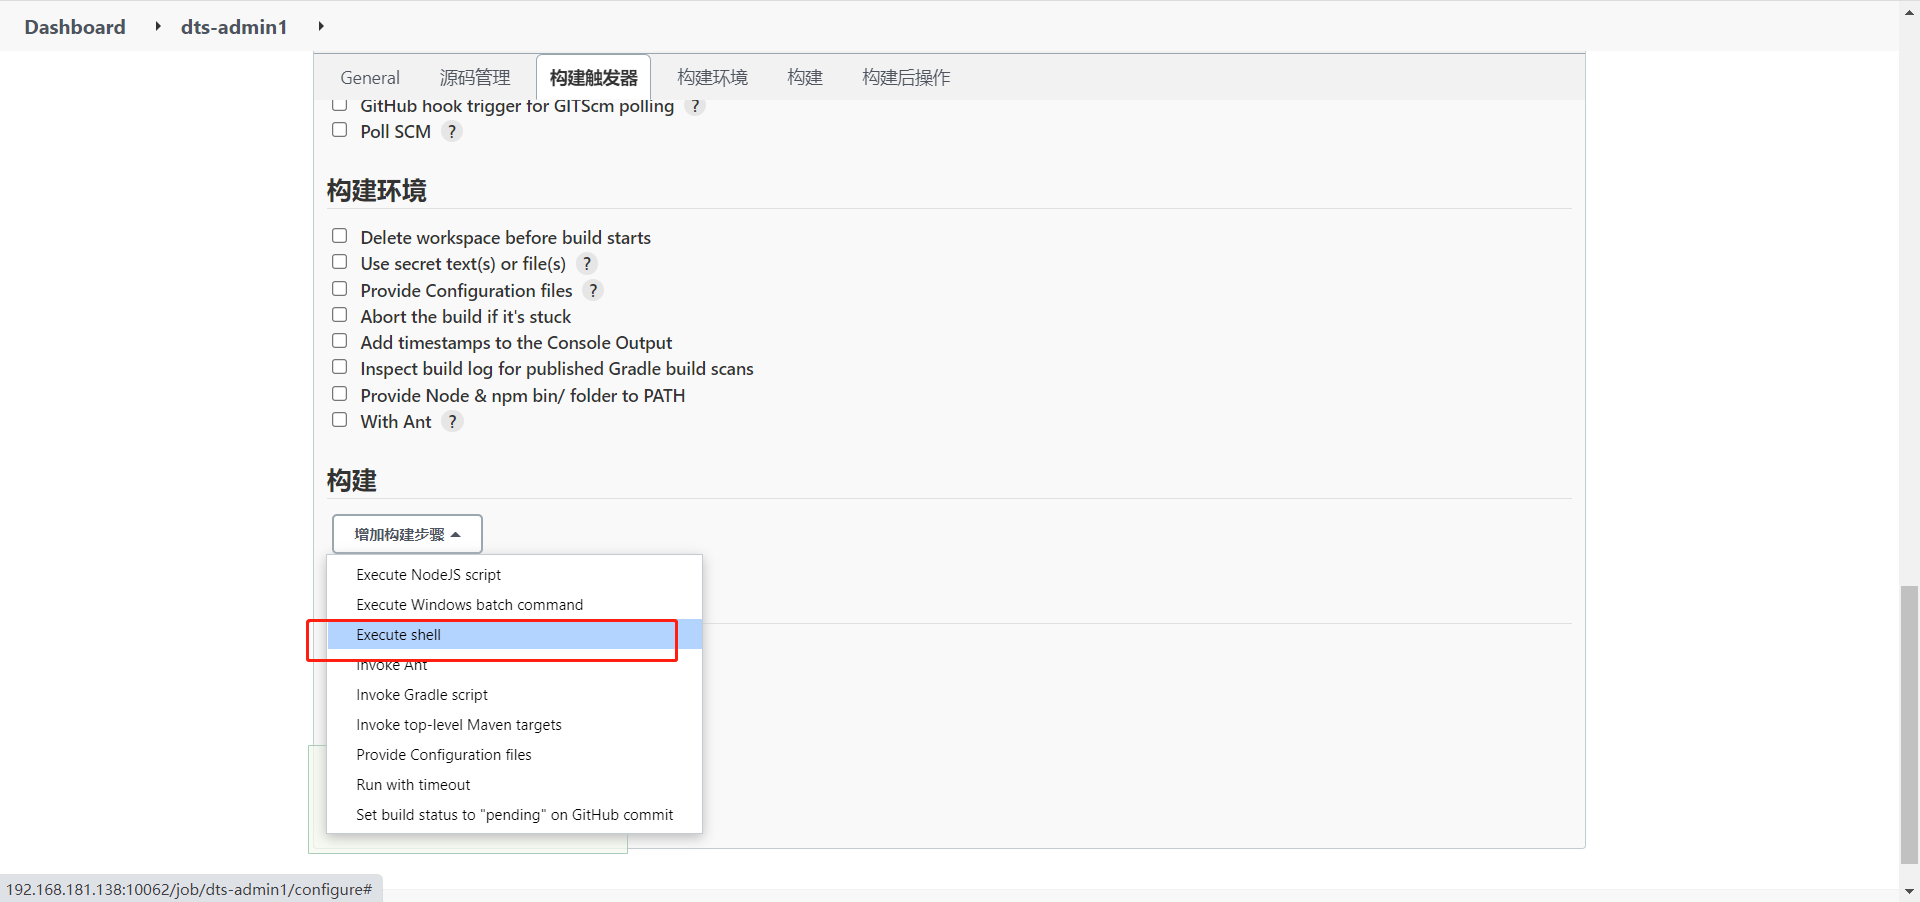
-
Fill in the shell script
/work/mySoft/apache-maven-3.8.4/bin/mvn clean install
rm -f /work/dts-admin/dts-admin-api-0.0.1-SNAPSHOT.jar
cp /var/lib/jenkins/workspace/dts-admin/dts-admin-api/target/dts-admin-api-0.0.1-SNAPSHOT.jar /work/dts-admin/dts-admin-api-0.0.1-SNAPSHOT.jar
cd /work/dts-admin
BUILD_ID=123456
/work/dts-admin/start.sh
- Create a new script start sh
#!/bin/bash

export JAVA_HOME=/work/mySoft/jdk1.8.0_271
export JRE_HOME=$JAVA_HOME/jre

## service name
APP_NAME=dts-admin

SERVICE_DIR=/work/dts-admin
SERVICE_NAME=$APP_NAME
JAR_NAME=$APP_NAME*.jar
PID=$APP_NAME\.pid

cd $SERVICE_DIR
nohup $JRE_HOME/bin/java -Xms256m -Xmx512m -jar $JAR_NAME >null 2>&1 &
echo $! > $SERVICE_DIR/$PID
- Execute command
chmod 777 start.sh
Click apply – > save, the task is created, and click build to automatically deploy the spring boot project