catalogue
2 identity authentication + session
1Web development mode
At present, there are two mainstream Web development modes
The traditional Web development mode based on server rendering and the new Web development mode based on the separation of front and back ends.
Based on the server side: the HTML page sent by the server to the client is dynamically generated through string splicing in the server. Therefore, the client does not need to use technologies such as Ajax to request additional page data
const express = require('express')
const app = express()

// Mount routing
app.get('/', (req, res) => {
  res.send('hello world.')
})
app.post('/', (req, res) => {
  res.send('Post Request.')
})

app.listen(80, () => {
  console.log('http://127.0.0.1')
})
This is the simplest use of Express components. The advantages and disadvantages of server-side rendering are
- The front-end takes less time, because the server is responsible for dynamically generating HTML content, and the browser only needs to render the page directly
- It is conducive to SEO, because the server side corresponds to the complete HTML content, so the crawler is easier to crawl and obtain information
- Occupying server resources
- It is not conducive to the separation of front and rear ends, and the development efficiency is low
Based on the separation of front and back ends: it depends on Ajax, the back end is responsible for the API interface, and the front end uses Ajax to call the interface
The advantages and disadvantages of front and rear end separation are
- Good development experience. The front end focuses on UI page development and the back end focuses on API development
- Good user experience and easy local refresh of the page
- It reduces the pressure of server-side rendering, because the page is finally generated in each user's browser
- It is not conducive to SEO. The solution is to use the SSR technology of the front frame such as Vue and React to solve the SEO problem
2 identity authentication + session
In Web development, it mainly designs mobile authentication code login, email password login and QR code login of major websites.
At present, server-side rendering adopts session authentication mechanism
JWT authentication mechanism is adopted for front and rear end separation
HTTP protocol has statelessness. What is statelessness? It means that each HTTP request of the client is independent, and there is no relationship between consecutive requests. The server will not actively retain the status of each HTTP request. Therefore, we can use cookies to break through this restriction. So what is a Cookie? If the Cookie shown is Baidu page
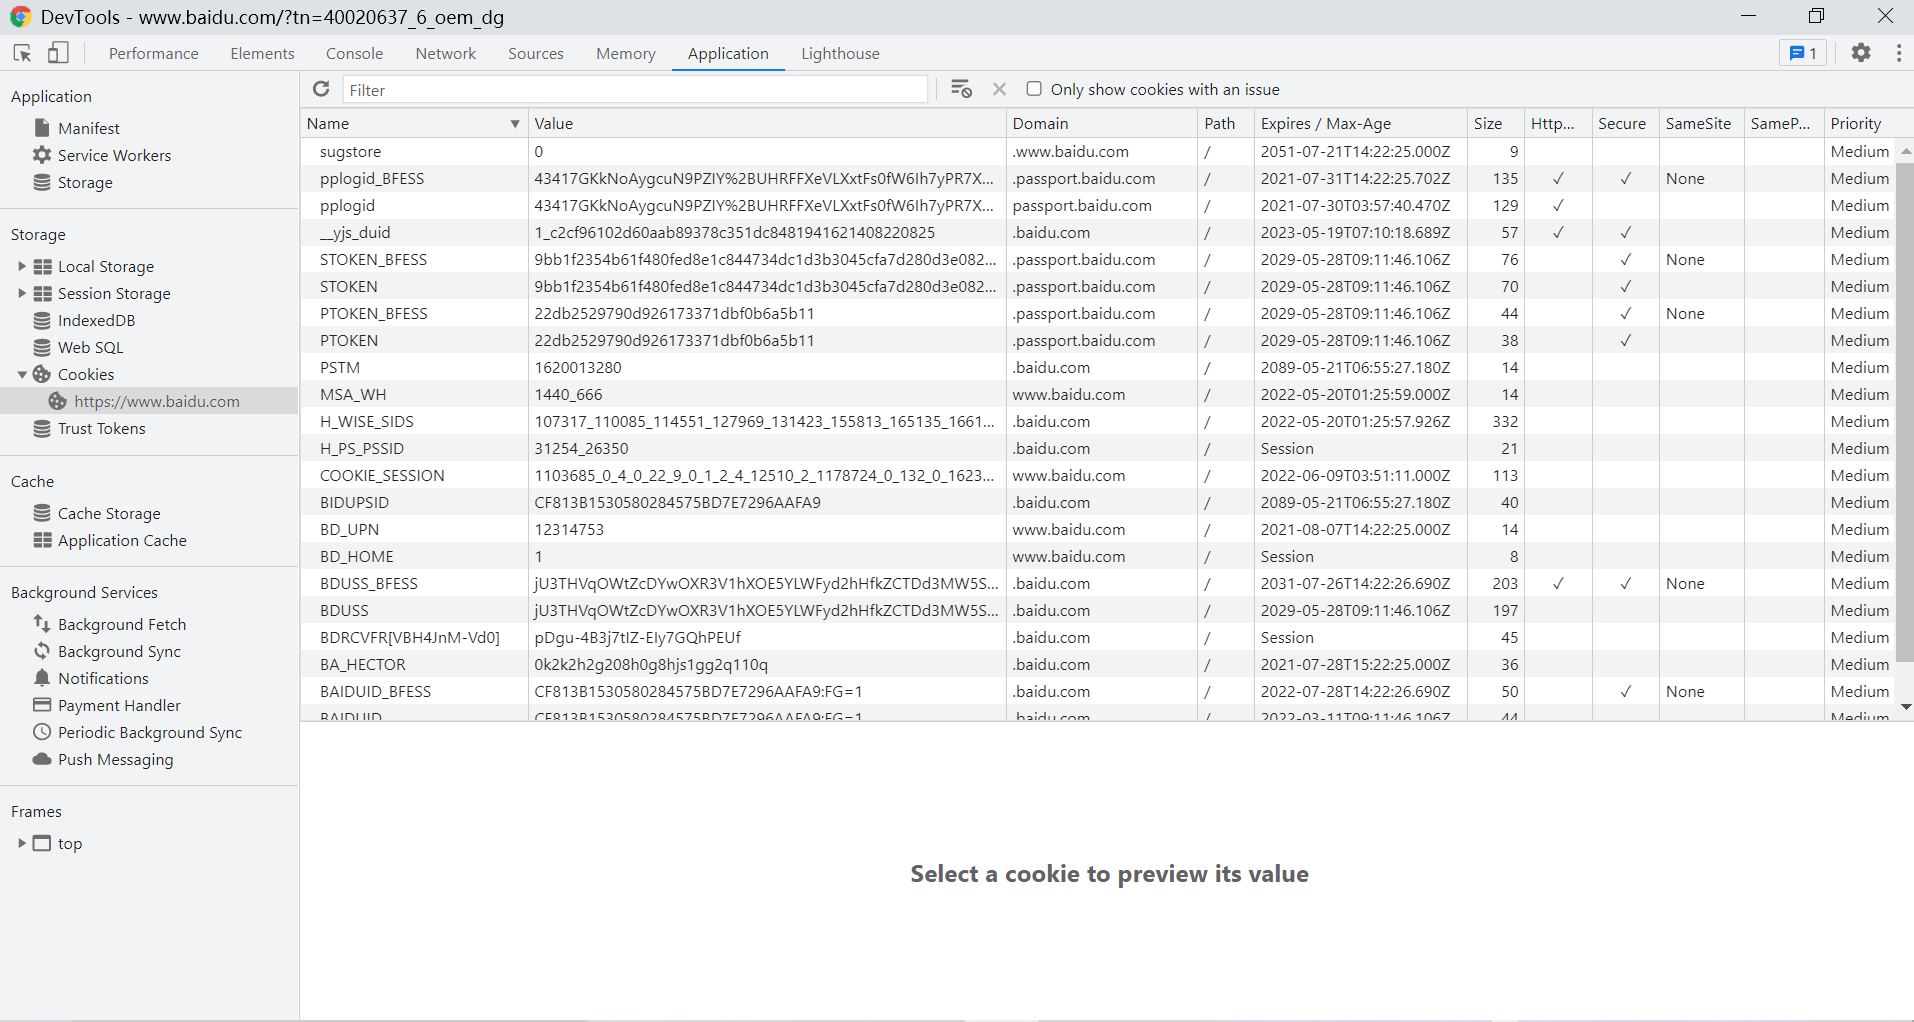
A Cookie is a string of no more than 4KB stored in the user's browser. It consists of a name, a value and several other optional attributes used to control the validity, security and scope of use of the Cookie. Cookies under different domain names are independent. Whenever the client initiates a request, it will automatically send all unexpired cookies of the current domain name to the server.
- Auto send
- Domain name independence
- Expiration time limit
- 4KB limit
The role of cookies in identity authentication

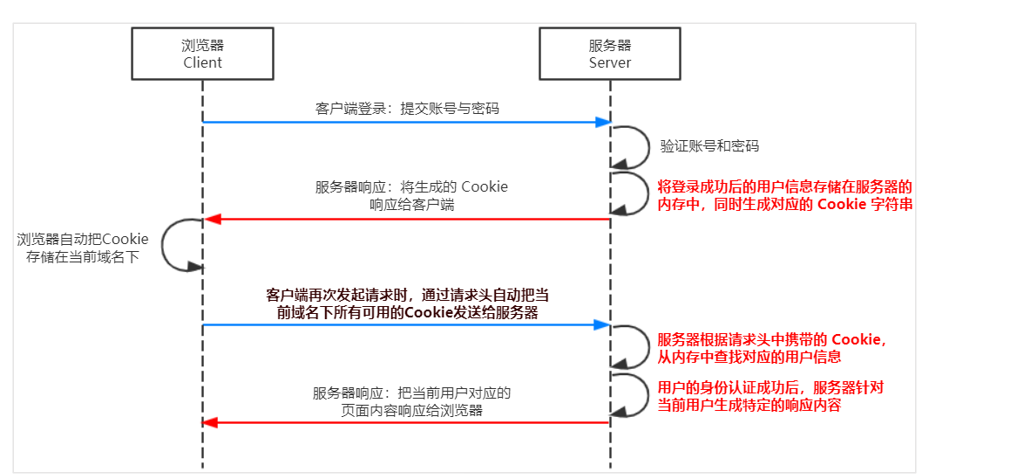
When the client requests the server for the first time, the server sends an authentication Cookie to the client in the form of response header, and the client will automatically save the Cookie in the browser.
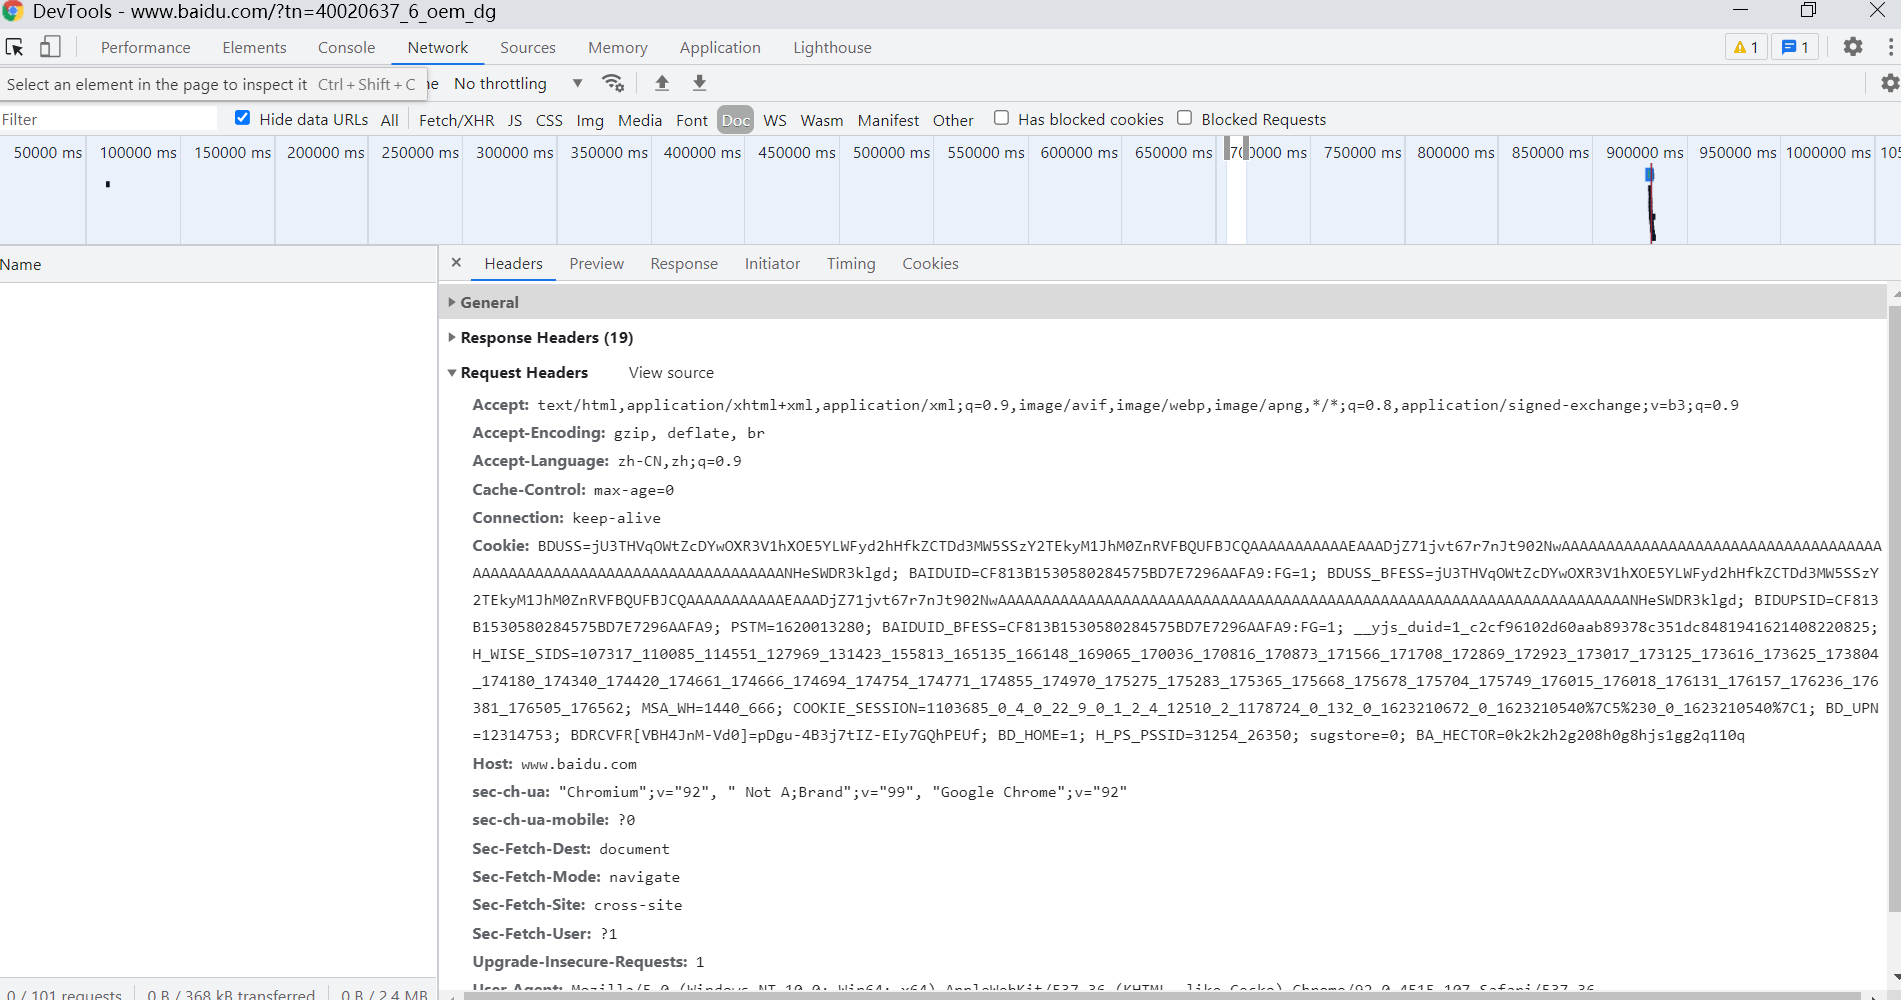
Then, when the client browser requests the server every time, the browser will automatically send the relevant cookies of identity authentication to the server in the form of request header, and the server can verify the identity of the client. The cookies of identity authentication are in the request header
Therefore, when it comes to this, we may realize that cookies are insecure, that is, because cookies are stored in the browser and the browser also provides an API for reading and writing cookies, cookies are easy to be forged and have no security. Therefore, it is not recommended that the server send important privacy data to the browser in the form of cookies. (never use cookies to store important and private data, such as user's identity information and password, because it is very unsafe).
So what should we do? Session authentication mechanism. The key is that the user's sensitive information is stored in the memory of the server
Using session in Express
// Import express module
const express = require('express')
    // Create a server instance of express
const app = express()

// TODO_01: Please configure Session middleware
const session = require('express-session')
app.use(
    session({
        secret: 'itheima',//Arbitrary string
        resave: false,//Fixed writing
        saveUninitialized: true,//Fixed writing
    })
)
Next, we will host the static page, that is, I will host the page of the client browser and its CSS and JS code
The purpose of hosting is to directly access the page in the local domain name. At this time, we may think that we can define POST and GET interfaces in the server to complete the relevant operations of the interface, and then turn to the page to define POST and GET requests. This is equivalent to realizing our own simple front and rear matching project.
// Managed static pages
app.use(express.static('./pages'))
    // Parsing the form data submitted by POST
app.use(express.urlencoded({ extended: false }))
Next, we should define the GET request interface address and POST request interface address on the server side. In short, it is the login API interface, the interface to obtain the user name API, and exit the login API interface.
// Login API interface
app.post('/api/login', (req, res) => {
    // Judge whether the login information submitted by the user is correct
    if (req.body.username !== 'admin' || req.body.password !== '000000') {
        return res.send({ status: 1, msg: 'Login failed' })
    }

    // TODO_02: please save the user information after successful login to the Session
    // Note: only after the middleware express session is successfully configured,
    // The session attribute can be found by req
    req.session.user = req.body // User information
    req.session.islogin = true // User login status

    res.send({ status: 0, msg: 'Login succeeded' })
})

// Interface to get user name
app.get('/api/username', (req, res) => {
    // TODO_03: please get the user's name from the Session and respond to the client
    if (!req.session.islogin) {
        return res.send({ status: 1, msg: 'fail' })
    }
    res.send({
        status: 0,
        msg: 'success',
        username: req.session.user.username,
    })
})

// Exit the logged in interface
app.post('/api/logout', (req, res) => {
    // TODO_04: clear Session information
    req.session.destroy()
    res.send({
        status: 0,
        msg: 'Log out successfully',
    })
})

// Call app Listen method, specify the port number and start the web server
app.listen(8000, function() {
    console.log('Express server running at http://127.0.0.1:8000')
})
3jwt
So what are the limitations of session?
Session authentication can only be realized by matching with cookies. Because cookies do not support cross domain access, when cross domain requests are involved, many additional configurations need to be made to realize session authentication across domains. In other words, if we need to cross domain, we will use jwt authentication mechanism.
jwt, whose full name is JSON Web Token, is the most popular cross domain authentication solution. The working mechanism is as follows

The user's information is saved in the client browser in the form of Token string, and the server authenticates the user's identity by restoring the form of Token string. jwt usually consists of three parts: header, payload, signature. The three are separated by commas, such as
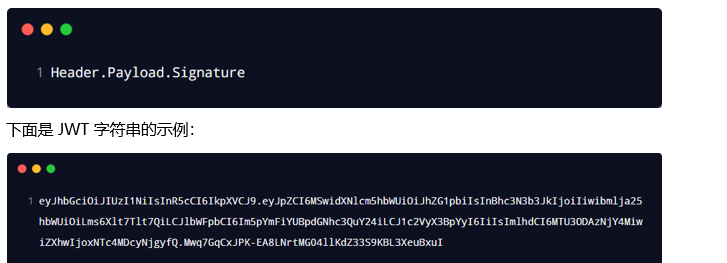
The Payload part is the real user information, which is the string generated after the user information is encrypted. Header and Signature are only used to ensure the security of Token.
After receiving the JWT returned by the server, the client will usually store it in localstorage or sessionstorage. After that, the client will bring this JWT string every time it communicates with the server for identity authentication, and put the JWT in the Authorization field of the HTTP request header.
Here is a simple code demonstration
// Import express module
const express = require('express')
// Create a server instance of express
const app = express()

// TODO_01: install and import two JWT related packages, jsonwebtoken and express JWT
const jwt = require('jsonwebtoken')
const expressJWT = require('express-jwt')

// Allow cross domain resource sharing
const cors = require('cors')
app.use(cors())

// Middleware for parsing post form data
const bodyParser = require('body-parser')
app.use(bodyParser.urlencoded({ extended: false }))

// TODO_02: define the secret key. It is recommended to name the key as secret key
const secretKey = 'itheima No1 ^_^'

// TODO_04: register middleware to restore JWT string parsing to JSON object
// Note: once the middleware express JWT is successfully configured, the parsed user information can be attached to req On the user attribute
app.use(expressJWT({ secret: secretKey }).unless({ path: [/^\/api\//] }))
Then we will define the POST interface. Note that this is the user login interface. After successful login, call jwt,sign method to generate the string, and send the token attribute to the client. The generated string is sent to the client through the send method, and the valid period of the token can be set to 30s. At this time, we call the authorized interface admin, that is, I configured it in the last line of the above code. The meaning of the last line is that access is required for all interfaces except the interface at the beginning of the api, In other words, you can access these interfaces only after you get the token key first and within the validity period of the token.
// Login interface
app.post('/api/login', function (req, res) {
  // Put req The data in the body request body is transferred to the userinfo constant
  const userinfo = req.body
  // Login failed
  if (userinfo.username !== 'admin' || userinfo.password !== '000000') {
    return res.send({
      status: 400,
      message: 'Login failed!',
    })
  }
  // Login succeeded
  // TODO_03: after login success, call jwt. The sign () method generates a JWT string. And send it to the user through the token attribute
  // client
  // Parameter 1: user information object
  // Parameter 2: encrypted secret key
  // Parameter 3: configure the object to configure the validity period of the current token
  // Remember: never encrypt the password into the token character
  const tokenStr = jwt.sign({ username: userinfo.username }, secretKey, { expiresIn: '30s' })
  res.send({
    status: 200,
    message: 'Login succeeded!',
    token: tokenStr, // The token string to send to the client
  })
})

// This is a privileged API interface
app.get('/admin/getinfo', function (req, res) {
  // TODO_05: use req User gets the user information and sends the user information to the client using the data attribute
  console.log(req.user)
  res.send({
    status: 200,
    message: 'User information obtained successfully!',
    data: req.user, // User information to send to the client
  })
})
Next, I use POSTMAN to simulate the page for interface requests.
First, POST the login request, passing two parameters.
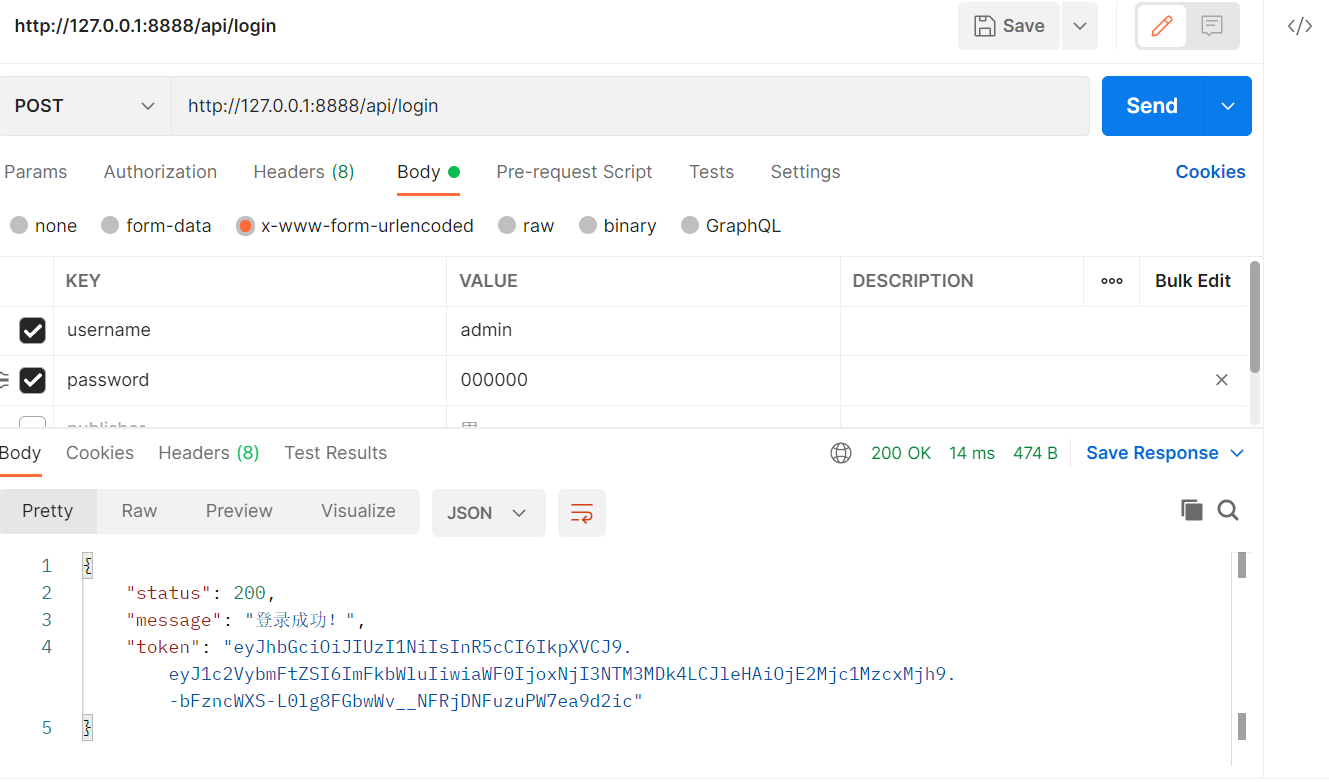 Then we simulate two cases: one is when the token is obtained but the token expires, and the other is when the get interface is successfully accessed and the client gets the user information. The following figure shows the token expiration
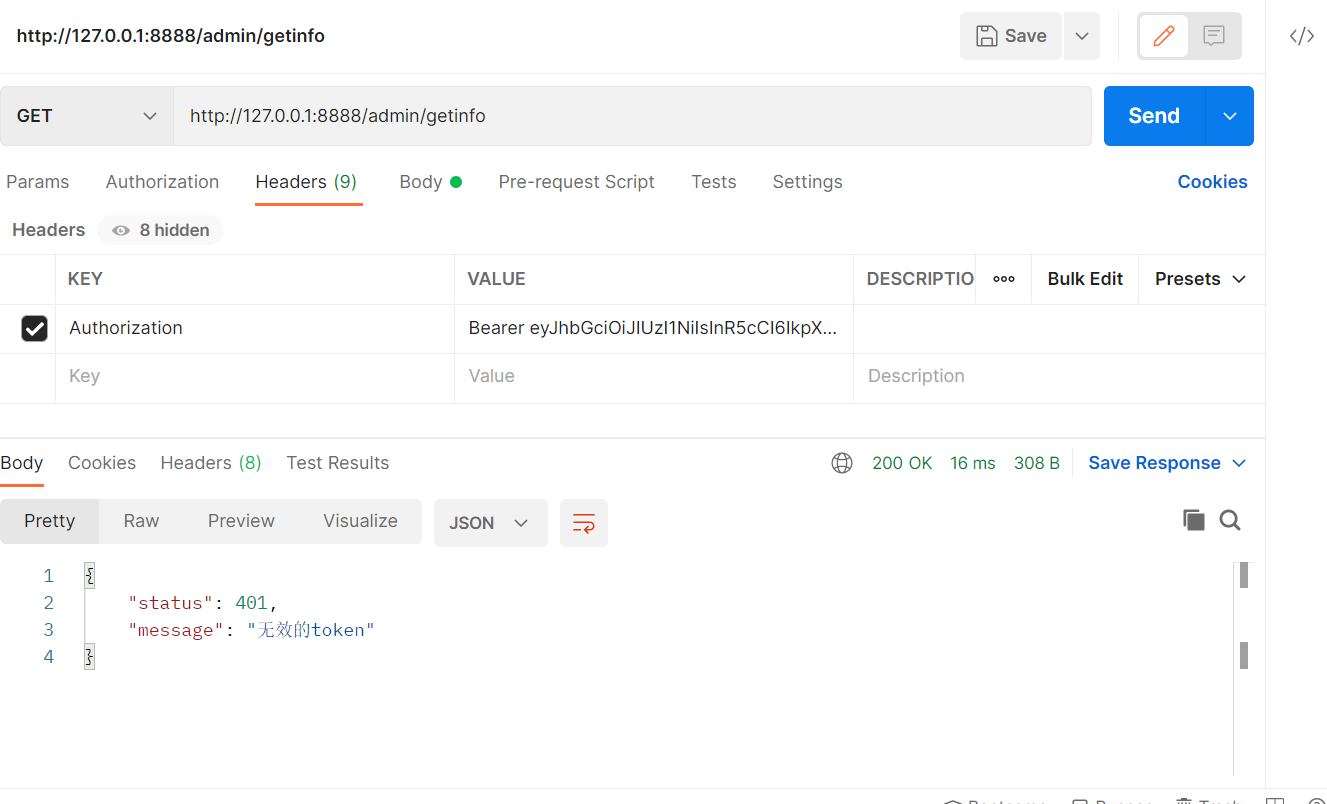
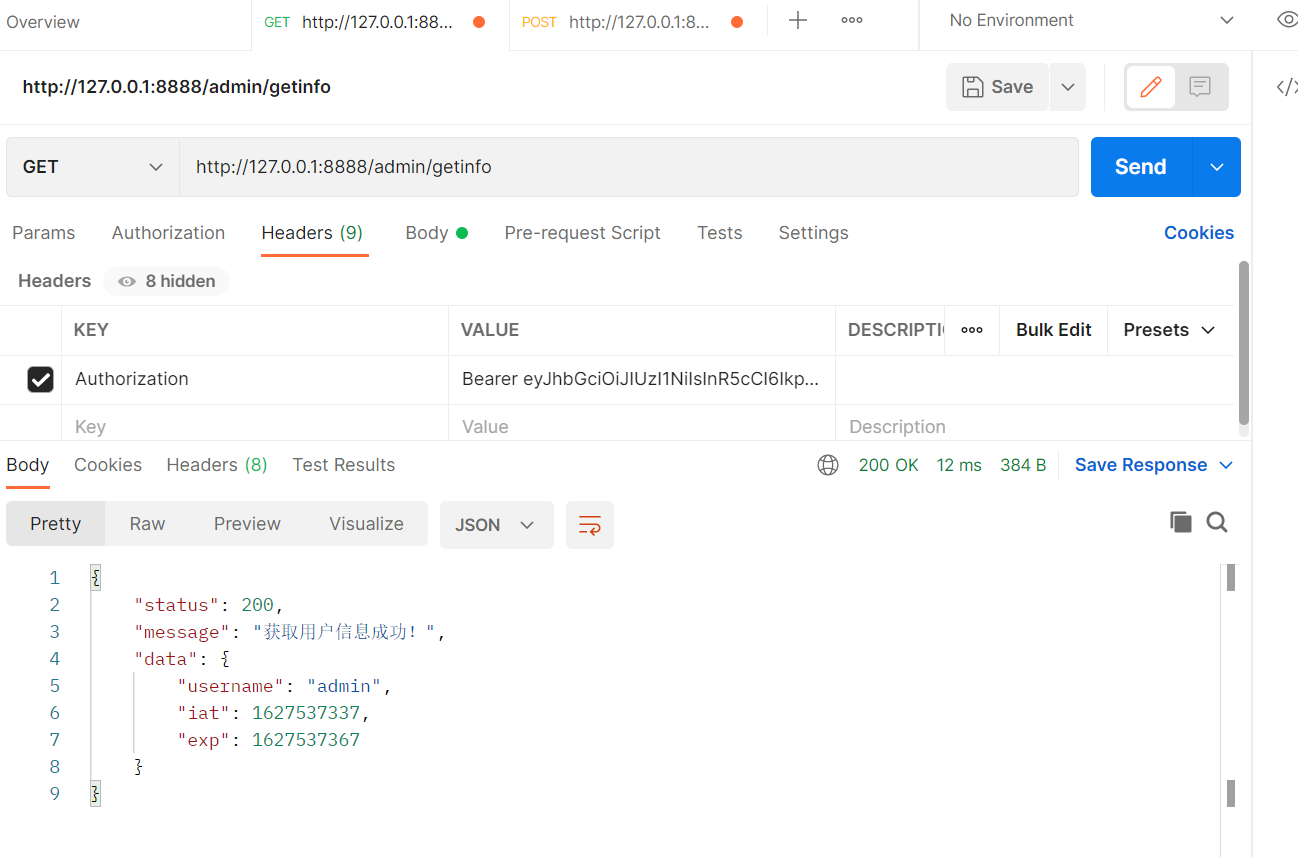
The figure shows that the information obtained by the client from the server is successful. We can understand that the user information is stored in the server. As long as the token does not expire, we can access it directly from the server through Authorization. If it expires, we can only log in again. Think about it carefully. It is indeed in line with our habits in life. If a website has not logged in for a long time, it must log in again. In other words, for some recently logged in websites, as long as the token has not expired, we don't need to log in next time, and the client will get the data directly. Of course, we can also log off the login status. The essence is to delete the token.
Next, we need to handle some exceptions and use the global error handling middleware to capture the errors generated after JWT fails.
// TODO_06: use the global error handling middleware to capture the error generated after the failure of parsing JWT
app.use((err, req, res, next) => {
  // This error is caused by the failure of token parsing
  if (err.name === 'UnauthorizedError') {
    return res.send({
      status: 401,
      message: 'invalid token',
    })
  }
  res.send({
    status: 500,
    message: 'unknown error',
  })
})
The above is the front and back content of the whole front and rear identity authentication. The content is easy to understand, but what we need to do is to skillfully use them, which can be more handy in later project development.