Articles Catalogue
1 Front and rear end separation crud
First, annotate the mock simulation of the front end and let the request background code
/*import Mock from './mock'
  Mock.bootstrap(); front-end personnel use*/
- When sending ajax requests, cross-domain issues arise
- Receive the returned value for processing
1.1 What is cross-domain
Cross-domain: Services accessing different domain names
== Cross-domain problems: ==== Not all cross-domain problems exist, browsers for ajax requests, there is cross-domain interception processing
Solution:
- Disadvantage: You need server support, only get (no need) src= "http:"
- Nginx (reverse proxy) server (last project):
(1) Let access cross-domain requests, turn to access nginx, nginx for processing - cors scheme (recommendation):
(1) Browsers support this access: to send ajax requests, you need to ask the server (preview process), if the server agrees, before you can access it.
Handle:
Spring MVC write corsFilter filter
(2) By annotation==@CrossOrigin==--recommended version spring 4.2.5 or more
1.2 Added
Modify department.vue page
Prepare forms
Click on the new process:
Pop-up dialog box
//Control whether a dialog box pops up
this.departmentFormVisible = true;
Clean up form data
//Clear form data
this.department = {
   name: ''
Click Save Process:
Check whether the validation has passed
If passed, send axios request
Preservation
Return to the Close dialog box to re-query the data
//Added Modification Save
editSubmit: function () {
    //The following code must be validated before it can be executed
    this.$refs.departmentForm.validate((valid) => {
        if (valid) {
            //Ask if you want to submit
            this.$confirm('Confirmation of submission?', 'Tips', {}).then(() => {
                //Display Loading Circle
                this.editLoading = true;
                //Back up the data in the form and share it with the para variable
                let para = Object.assign({}, this.department);
                //Send ajax requests
                //editUser(para).then((res) => {
                let url = '/department/save';
                if(this.department.id){
                    console.log(this.department.id);
                    url='/department/update';
                }
                this.$http.put(url,para).then(res=>{
                    //Close the scroll ring
                    this.editLoading = false;

                    this.$message({
                        message: 'Successful submission',
                        type: 'success'
                    });
                    //Reset the form information to null
                    this.$refs['departmentForm'].resetFields();
                    //close dialog boxes
                    this.departmentFormVisible = false;
                    //Center of gravity query data
                    this.getDepartments();
                });
            });
        }
    });
},
1.3 Amendment
Pop-up dialog box:
Modify this.departmentFormVisible = true;
Echo this.department = Object.assign({}, row);
Preservation:
By judging whether id exists
Existing modifications - update
No new additions - save
//Display edit interface pop-up edit box
handleEdit: function (index, row) {
    this.departmentFormVisible = true;
    this.department = Object.assign({}, row);
},
1.4 Delete
Get the id value to delete
Send requests for deleted data
Reload data
//delete
handleDel: function (index, row) {
    this.$confirm('Are you sure to delete the record??', 'Tips', {
        type: 'warning'
    }).then(() => {
        this.listLoading = true;
        //Get the deleted id
        let para = {id: row.id};
        this.$http.delete('/department/' + row.id).then(res => {
            this.listLoading = false;
if (res.data.success){
	this.$message({
		message: 'Successful deletion',
		type: 'success'
	});
}else {
	this.$message({
		message: 'Delete failed',
		type: 'error'
	});
}

            //Query data
            this.getDepartments();
        });
    }).catch(() => {

    });
},
2 Use SVN
2.1 Installation of svn
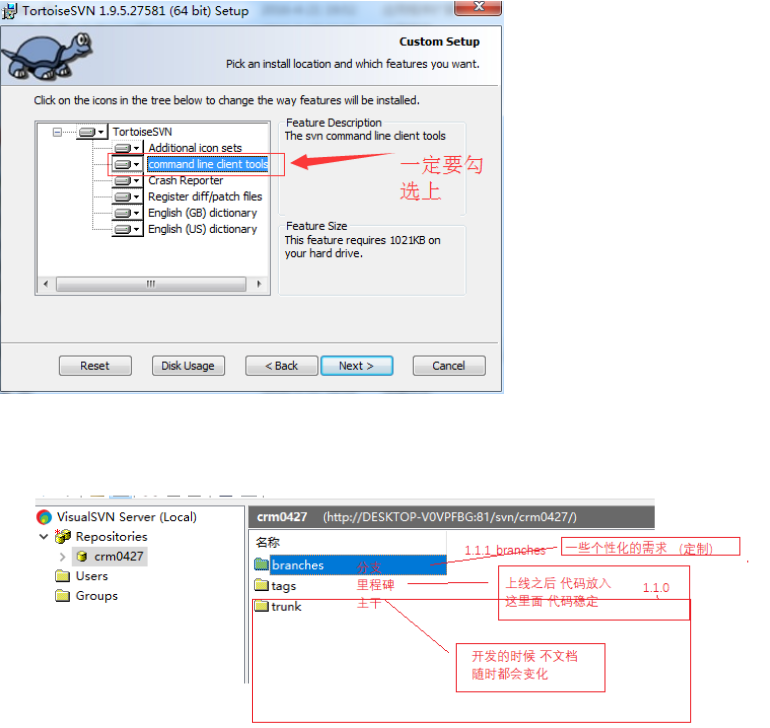
2.2 Use of SVN
- Check out
- Upload commit
- Download update
- Add add
- Delete - Submit commit after deleting the file
2.3 svn conflict
What causes the following
Version inconsistencies lead to conflicts
Conflict Resolution -- Conflict Resolution by Manually Merging Codes
3 idea uses svn
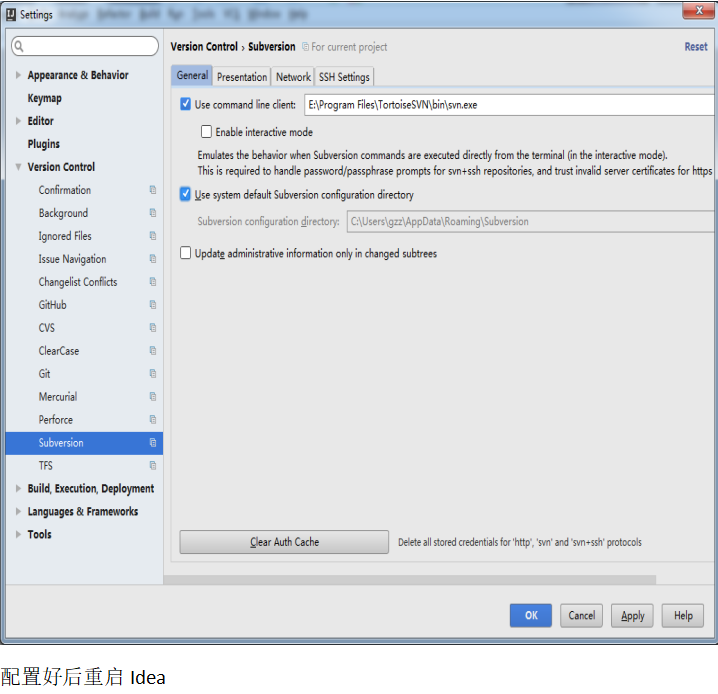

3.1 Detection of items from svn Libraries

Enter the company's svn address to check out the project you want, OK
3.2 Upload Code
Select the files and folders that need to be uploaded in the project. Be careful not to submit the whole project. The first submission must submit the whole project.
If no submission is possible, it is recommended to use the Tortoise SVN client for submission
3.3 Update Code
Select new directories and files to follow
Or update using Tortoise SVN client