Wechat applet day 3
1. Page navigation
1.1 two ways to realize page navigation in applet
-
What is page navigation
Page navigation refers to the mutual jump between pages. For example, there are two ways to realize page navigation in the browser:
- a label
- location.href
-
Two ways to realize page navigation in applet
-
Declarative navigation
- Declare a < navigator > navigation component on the page
- Click the < navigator > component to jump the page
-
Programming navigation
- Call the navigation API of the applet to realize the jump of the page
-
1.2 navigate to the tabBar page
tabBar page refers to the page configured as tabBar
When using the < navigator > component to jump to the specified tabBar page, you need to specify the url attribute and open type attribute, where:
- url indicates the address of the page to jump to, which must start with /
- Open type indicates the jump mode, which must be switchTab

1.3 navigate to non tabBar pages
Non tabBar pages refer to pages that are not configured as tabBar
When using the < navigator > component to jump to an ordinary non tabBar page, you need to specify the url attribute and open type attribute, where:
- url indicates the address of the page to jump to, which must start with /
- Open type indicates the jump mode, which must be navigate

1.4 reverse navigation
If you want to go back to the previous page or multi-level page, you need to specify the open type attribute and delta attribute, where
- The value of open type must be navigateBack, indicating that backward navigation is required
- The value of delta must be a number, indicating the level to go back

1.5 navigate to tabBar page
Call Wx The switchtab (Object object) method can jump to the tabBar page, where the attribute list of the Object parameter Object is as follows:
| attribute | type | Required | explain |
|---|---|---|---|
| url | string | yes | The path of the tabBar page to jump to. The path cannot be followed by parameters. |
| success | function | no | Interface calls the callback function successfully |
| fail | function | no | Interface call failed callback function |
| complete | function | no | Callback function at the end of interface call (both successful and failed calls will be executed) |
Example code:

1.6 navigate to non tabBar pages
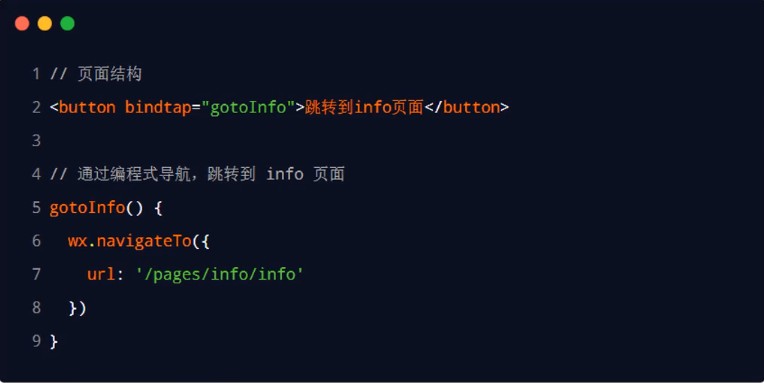
Call Wx The navigateto (Object object) method can jump to a page that is not a tabBar. The attribute list of the Object parameter Object is as follows
| attribute | type | Required | explain |
|---|---|---|---|
| url | string | yes | The path of the non tabBar page in the application that needs to jump. The path can be followed by parameters |
| success | function | no | Interface calls the callback function successfully |
| fail | function | no | Interface call failed callback function |
| complete | function | no | Callback function at the end of interface call (both successful and failed calls will be executed) |
Example code:
1.7 reverse navigation
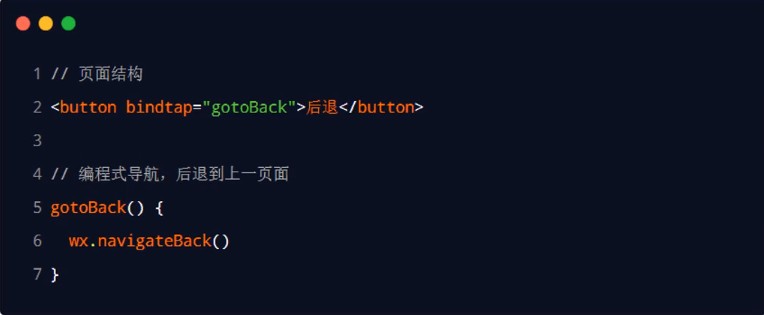
Call Wx The navigateback (Object object) method can return to the previous page or multi-level pages. The optional attributes of the Object parameter Object are listed as follows:
| attribute | type | Default value | Required | explain |
|---|---|---|---|---|
| delta | number | 1 | no | The number of returned pages. If the delta is greater than the number of existing pages, return to the home page. |
| success | function | no | Interface calls the callback function successfully | |
| fail | function | no | Interface call failed callback function | |
| complete | function | no | Callback function at the end of interface call (both successful and failed calls will be executed) |
Example code:
1.8 acoustic navigation and parameter transmission
- The url attribute of the navigator component is used to specify the path of the page to jump to. At the same time, parameters can also be carried behind the path:
- Use between parameter and path? separate
- The parameter key is connected with the parameter value with =
- Different parameters are separated by &
- Cannot pass parameters to tabBar page
-
Code examples are as follows:

1.9 programming navigation parameters
-
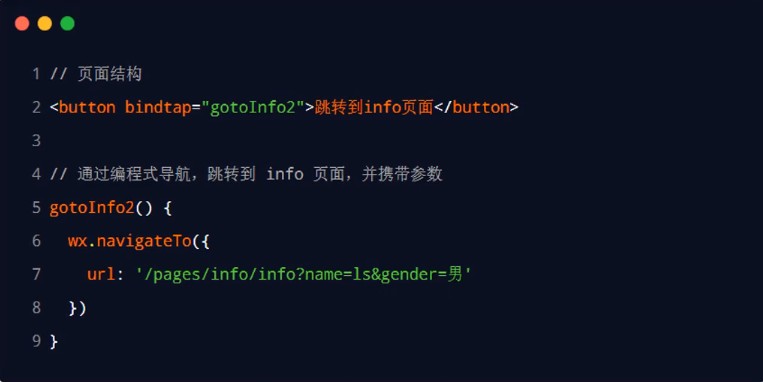
Call Wx When the navigateto (object object) method jumps to the page, it can also carry parameters. The code example is as follows:
- Cannot pass parameters to tabBar page
-
Example code:
1.10 receive navigation parameters in onLoad
-
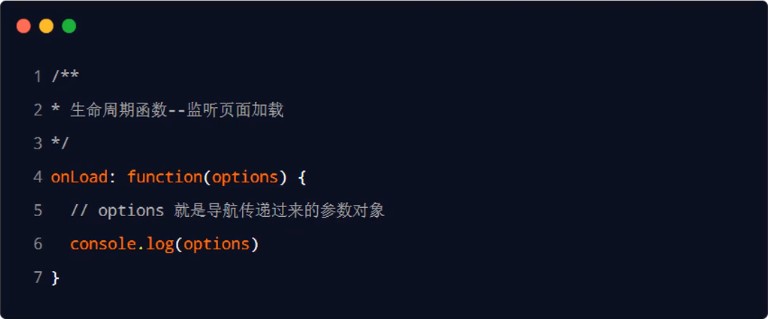
The parameters written and carried by declarative navigation parameters or programmed navigation parameters can be obtained directly in onLoad event
-
Example code:
2. Page events
2.1 understand what pull-down refresh is
- Pull down refresh is a proper term of mobile terminal, which refers to the behavior of reloading page data through the pull-down sliding operation of fingers on the screen
2.2 start pull-down refresh
After the pull-down refresh is enabled, how to stop the pull-down manually? The pull-down action will always exist and will not bounce back
It will bounce back in the simulator, but not in the real machine
-
Three ways to start pull-down refresh
-
Global enable pull-down refresh
- On app In the window node of JSON, set enablePullDownRefresh to true
-
Local open pull-down refresh
- At the bottom of the page In the json configuration file, set enablePullDownRefresh to true
-
Use the API provided by the applet to realize the pull-down refresh
- wx.startPullDownRefresh()
-
-
In actual development, it is recommended to use the second method to open the pull-down refresh effect separately for the required pages
2.3 configure the style of the drop-down refresh window
In global or page json configuration file, configure the style of the drop-down refresh window through backgroundColor and backgroundTextStyle, where
- backgroundColor is used to configure the background color of the drop-down refresh window. It only supports hexadecimal color values
- backgroundTextStyle is used to configure the style of drop-down refresh loading. It only supports dark and light
2.4 drop down refresh event of listening page
-
At the bottom of the page js file, you can listen for the pull-down refresh event of the current page through onPullDownRefresh() function
-
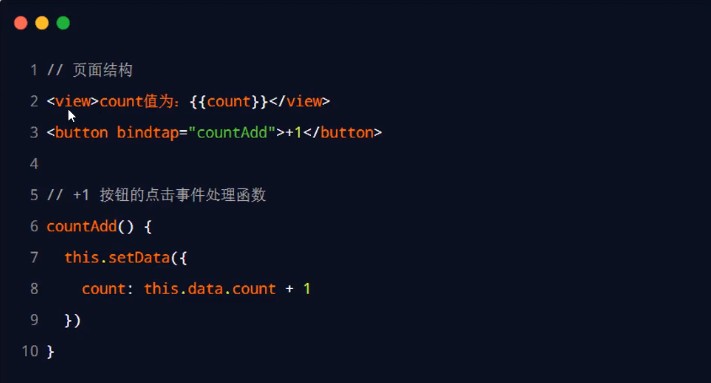
Case 1: there is the following UI structure in the wxml of the page. Click the button to increase the count value by + 1
-
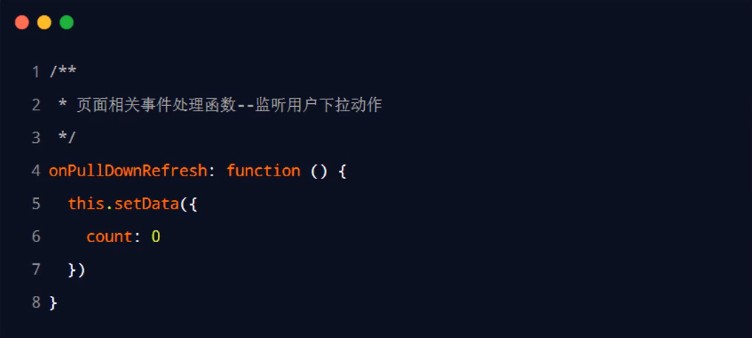
Case 2: when triggering the pull-down refresh event of the page, if you want to reset the value of count to 0, the example code is as follows:
2.5 effect of stopping pull-down refresh
-
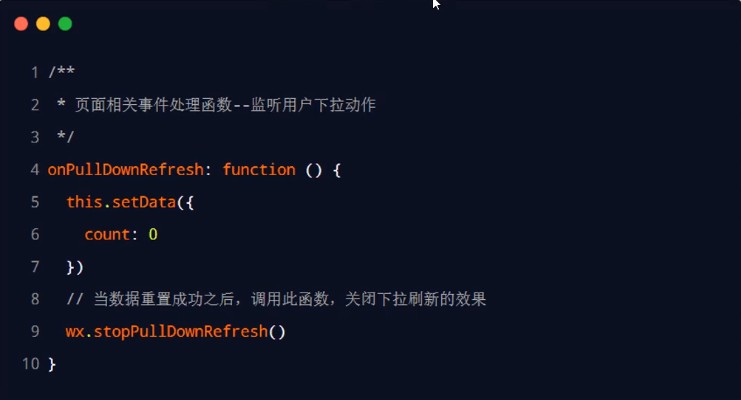
After the pull-down refresh is processed, the loading effect of the pull-down refresh will always be displayed and will not disappear. Therefore, it is necessary to manually hide the loading effect. At this time, call Wx Stoppulldownrefresh() can stop the pull-up refresh of the current page
-
Example code:
2.6 understand what is pull-up touch bottom
Pull up and touch the bottom is a proper term for the mobile terminal. It loads more data through the pull-up and sliding operation of the finger on the screen
2.7 pull up and touch the bottom of the listening page
-
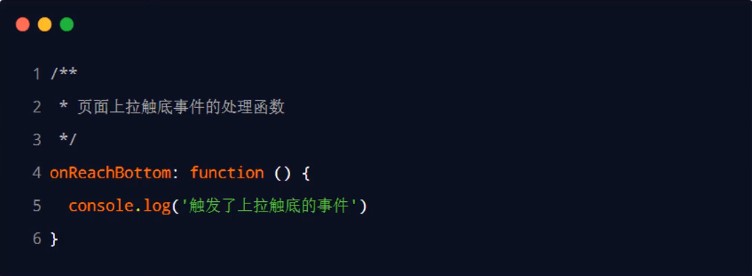
At the bottom of the page js file, you can listen for the pull-up bottom event on the current page through the onReachBottom function
-
The example code is as follows
2.8 configure the pull-up bottom contact distance
- The pull-up bottom touch distance refers to the distance from the scroll bar to the bottom of the page when the pull-up bottom touch event is triggered
- It can be displayed globally or on the page In the json configuration file, configure the distance to pull up and touch the bottom through the onReachBottomDistance attribute
- The default bottom touch distance of applet is 50px. In actual development, you can modify this default value according to your own needs
3. Life cycle
3.1 what is the life cycle
- Life cycle refers to the whole stage of an object from creation - > operation - > destruction, emphasizing a time period
- Applet lifecycle
- The start of the applet indicates the beginning of the life cycle
- The closing of the applet indicates the end of the life cycle
- The process of running an intermediate applet is the life cycle of the applet
3.2 two classifications of applet life cycle
-
Application lifecycle
- It refers specifically to the process of applet destruction from Startup -- > run -- >
-
Page lifecycle
- It refers to the loading -- > rendering -- > destruction process of each page in the applet
-
Note: the life cycle range of the page is small, and the life cycle range of the application is large

3.3 what is a lifecycle function
-
The built-in functions provided by the applet framework will be automatically executed in order with the life cycle
-
Function of life cycle function:
- Allows programmers to perform certain operations at specific life cycle time points
- For example, when a page is just loaded, a data request is automatically initiated in the life cycle function to obtain the data of the current page
-
Note: life cycle emphasizes time period, and life cycle function emphasizes time point.
3.4 two classifications of life cycle function in applet
The life cycle functions in the applet are divided into two categories:
-
Application lifecycle function
- It refers to those functions that are called successively by the applet during startup -- > running -- > destruction
-
Page lifecycle function
- It refers to those functions that are called successively during loading -- > rendering -- > destruction of each page in the applet
3.5 application life cycle
-
app.js is the entry file for applet execution, which is in app The App() function must be called in JS and can only be called once. The app () function is used to register and execute applets
-
The App(Object) function receives an Object parameter, which can be used to specify the application life cycle function of the applet
-
app. Code in JS
App({

  /**
   * When the applet initialization is completed, onLaunch will be triggered (only triggered once globally)
   */
  onLaunch: function () { },

  /**
   * When the applet starts or enters the foreground display from the background, onShow will be triggered
   */
  onShow: function (options) { },

  /**
   * When the applet enters the background from the foreground, onHide will be triggered
   */
  onHide: function () { },

  /**
   * When a script error occurs in the applet or the api call fails, onError will be triggered with an error message
   */
  onError: function (msg) { }
})
3.6 page life cycle
-
Each applet page must have its own js file, and the Page() function must be called, otherwise an error will be reported. The Page() function is used to register the applet page
-
The Page(Object) function receives an Object parameter, which can be used to specify the life cycle function of the page
-
page.js
//index.js
//Get application instance
const app = getApp()

Page({

  /**
   * Initial data of the page
   */
  data: { },

  /**
   * Life cycle function -- listening for page loading
   */
  onLoad: function (options) { },

  /**
   * Life cycle function -- monitor the completion of the first rendering of the page
   */
  onReady: function () { },

  /**
   * Life cycle function -- monitor page display
   */
  onShow: function () { },

  /**
   * Life cycle function -- listening for page hiding
   */
  onHide: function () { },

  /**
   * Life cycle function -- monitor page unloading
   */
  onUnload: function () { },

  /**
   * Page related event handling function -- listening to user drop-down actions
   */
  onPullDownRefresh: function () { },

  /**
   * Handler for bottom pull event on page
   */
  onReachBottom: function () { },

  /**
   * User click share in the upper right corner
   */
  onShareAppMessage: function () { }
})
4. wxs
4.1 what is wxs
-
What is wxs
- WXS (WeiXin Script) is a set of script language for small programs. Combined with WXML, the structure of pages can be constructed
-
Application scenario of wxs
- A typical application scenario in wxs an applet is a filter
Relationship between WXS and JavaScript
-
Although the syntax of wxs is similar to JavaScript, wxs and JavaScript are two completely different languages
-
wxs has its own data type
- number numeric type
- String string type
- Boolean boolean type
- Object object type
- Function function type
- Array array type
- Date date type
- regexp regular
-
wxs does not support syntax forms similar to ES6 and above
- ECMAScript
-
-
JavaScript: DOM,BOM,ECMAScript
-
wxs follows the CommonJS specification
- module object:
- module.export
- require function
4.3 expansion: wxs follow CommonJS modular specification
CommonJS is one of the modular specifications of javascript. The scripting language wxs of the applet follows the CommonJS specification. Therefore, the experience of using wxs and node JS experience is similar.
-
module object
- Each wxs is an independent module, each module has a built-in module object, and each module has its own independent scope.
-
module.exports
- Because wxs has an independent scope, the variables and functions defined in one module are private by default and invisible to other modules,
- Through module Exports attribute, which can share the private variables and functions of this module.
-
require function
- To reference other wxs file modules in the wxs module, you can use the require function.
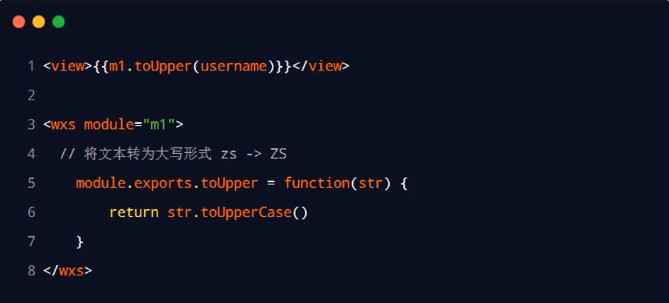
4.4 embedded wxs script
-
Rules used
- wxs code can be written in the < wxs > < / wxs > tag in wxml file, just as javascript code can be written in the < script > < / script > tag in html file.
- Each < WXS > < / WXS > tag in the wxml file must provide a module attribute to specify the module name of the current < WXS > < / WXS > tag. Within a single wxml file, it is recommended that its value be unique.
- The naming of module attribute value must comply with the following two rules:
- The first character must be: letter (A-Z, A-Z), underscore ()
- The remaining characters can be letters (A-Z, A-Z), underscores (), Number (0-9)
-
Case code
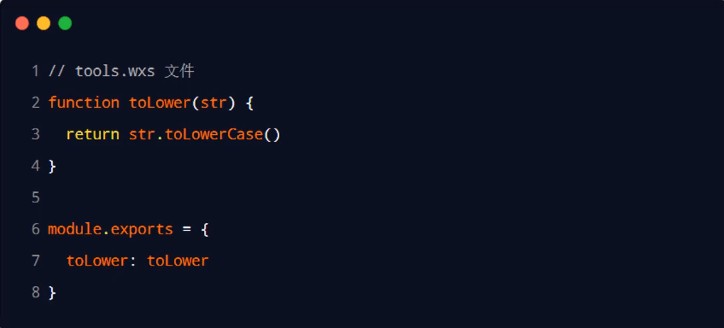
4.5 defining wxs scripts for outreach
-
Rules used
- wxs code can be written in wxs is a file with suffix, just like javascript code can be written in js is the suffix, which is the same as in the file.
-
Example code
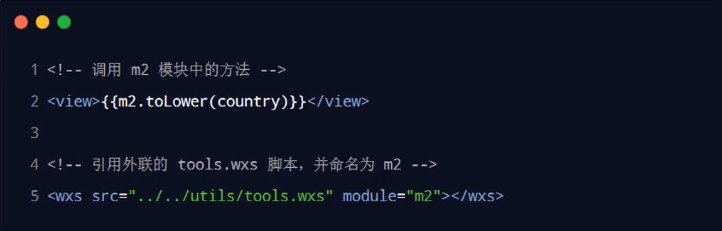
4.6 wxs script using outreach
-
If you want to introduce an external wxs script in wxml, you must add module and src attributes to the < wxs > < / wxs > tag
- Module is used to specify the module name for the < WXS > < / WXS > tag as the identification name of the module accessed by the current page
- src is used to specify the script path to be introduced by the current < WXS > < / WXS > tag. It must be a relative path
-
Sample code
4.7 understand the four characteristics of wxs
-
No compatibility
wxs does not depend on the basic library version of the runtime and can run in all versions of applets
-
Different from javascript
-
In order to reduce the learning cost of wxs, wxs language draws heavily on JavaScript syntax in its design
-
But in essence, wxs and javascript are different languages and have their own syntax, which is not consistent with javascript
-
-
Isolation
- The operating environment of wxs is isolated from other javascript code
- Functions defined in other javascript files cannot be called in wxs
- Nor can you call the API provided by the applet
- The operating environment of wxs is isolated from other javascript code
-
Cannot be used as an event callback
-
The typical application scenario of wxs is filter, which is often configured with Mustache syntax

-
The wxs function cannot be used as an event callback for a component

-
-
Good performance
Faster than javascript on iOS devices
Due to the difference of running environment, wxs in applet on iOS device is 2 ~ 20 times faster than javascript code.
On android devices, there is no difference in operation efficiency between the two
5. Cases
5.1 effect display of product list page

- Page navigation and parameter transfer
- Load the next page of data when pulling up to touch the bottom
- Drop down refresh list data
5.2 load the project code into wechat developer tool
Open wechat developer tool -- > click Project -- > import project -- > select project directory -- > replace AppID if necessary
5.3 realize navigation jump and transfer parameters
-
Create page path
pages/shoplist/shoplist
-
Change the container component view of the Jiugong grid into the navigation component navigator component, and bind the jump Id
<view class="grid-list">
  <navigator url="/pages/shoplist/shoplist?id={{ item.id }}&title={{ item.name }}" class="grid-item" wx:for="{{ gridList }}" wx:key="id">
    <image src="{{ item.icon }}"></image>
    <text>{{ item.name }}</text>
  </navigator>
</view>
5.4 dynamically set the title content of the product list page
-
Assign a value to the title block in the onReady() lifecycle function
/** * Life cycle function -- monitor the completion of the first rendering of the page */ onReady: function () { wx.setNavigationBarTitle({ title: 'test' }) } -
Get the parameters passed from the commodity list in the onLoad() life cycle function
/** * Life cycle function -- listening for page loading */ onLoad: function (options) { console.log(options) } -
Assign the data in options to the data in data
data: {
  query: {}
}
/** * Life cycle function -- listening for page loading */ onLoad: function (options) { this.setData({ query: options }) } -
Assign a value to the title block in the onReady() lifecycle function
/**
 * Life cycle function -- monitor the completion of the first rendering of the page
 */
onReady: function () {
  wx.setNavigationBarTitle({
    title: this.data.query.title
  })
}
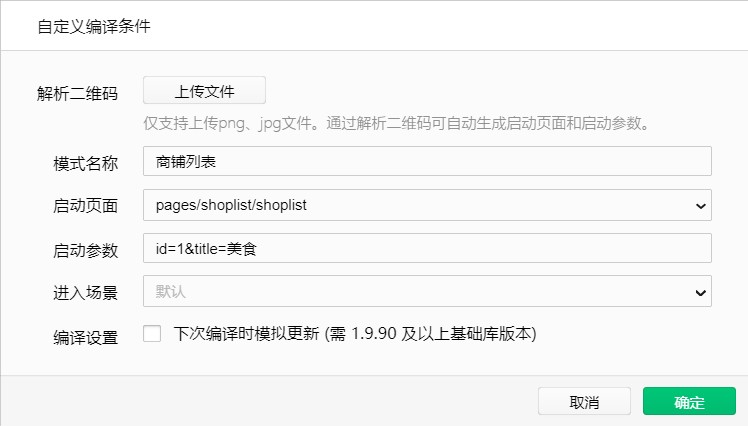
5.5 compilation mode of creating shop list page
6.5 understand the data of API nodes
Load the data of the shop list under the specified classification in the form of pagination:
-
Interface address
- https://www.xxxx.cn/categories/:cate_id/shops
- Cat in URL address_ Id is a dynamic parameter, indicating the Id of the classification
-
Request mode
- GET request
-
Request parameters
- _ Page indicates the page on which the data is requested
- _ limit indicates how many pieces of data are requested per page
-
Response parameters
- The total number of responses is in the header field
-
Case code
data: {
  query: {},
  shoplist: [], // Shop list array
  page: 1,  // Page number
  pagesize: 10,  // Number of requests per page
  total: 0 // Total number
}
5.7 define getShopList method to obtain commodity list data
-
Define the method of obtaining commodity data, and assign the data to shoplist and total in data
getShopList() { wx.request({ url: `https://www.xxxx.cn/categories/${this.data.query.id}/shops`, method: 'GET', data: { _page: this.data.page, _limit: this.data.pagesize }, success: (res) => { this.setData({ shoplist: [...this.data.shoplist, ...res.data], total: res.header['X-Total-Count'] - 0 }) } }) } -
In the onLoad hook function, the getShopList method is called.
/**
 * Life cycle function -- listening for page loading
 */
onLoad: function (options) {
  this.setData({
    query: options
  })
  this.getShopList()
}
5.8 render the ui structure of the commodity store list and beautify the style
<!-- Loop traversal to generate a list of shops -->
<view wx:for="{{shoplist}}" wx:key="id" class="shop-item">
  <view class="thumb">
    <image src="{{item.images[0]}}"></image>
  </view>
  <view class="info">
    <text class="shop-title">{{item.name}}</text>
    <!-- use wxs The method of processing mobile phone numbers -->
    <text>Telephone: {{item.phone}}</text>
    <text>Address: {{item.address}}</text>
    <text>Business Hours: {{item.businessHours}}</text>
  </view>
</view>
/* pages/shoplist/shoplist.wxss */
.shop-item {
  display: flex;
  padding: 15rpx;
  border: 1rpx solid #efefef;
  border-radius: 8rpx;
  margin: 15rpx;
  box-shadow: 1rpx 1rpx 15rpx #ddd;
}

.thumb image {
  width: 250rpx;
  height: 250rpx;
  display: block;
  margin-right: 15rpx;
}

.info {
  display: flex;
  flex-direction: column;
  justify-content: space-around;
  font-size: 24rpx;
}

.shop-title {
  font-weight: bold;
}
5.9 display the loading prompt effect
-
Call wx. before the network request is launched. Showloading method to display the loading effect
wx.showLoading({ title: 'Data loading...', }) -
Hide the loading display after the network request returns
complete: () => { wx.hideLoading() } -
Complete code
getShopList() {
  wx.showLoading({
    title: 'Data loading...',
  })

  wx.request({
    url: `https://www.xxxx.cn/categories/${this.data.query.id}/shops`,
    method: 'GET',
    data: {
      _page: this.data.page,
      _limit: this.data.pagesize
    },
    success: (res) => {
      this.setData({
        shoplist: [...this.data.shoplist, ...res.data],
        total: res.header['X-Total-Count'] - 0
      })
    },
    complete: () => {
      wx.hideLoading()
    }
  })
}
5.10 request the next page of data when pulling up and touching the bottom
-
Configure the distance to the bottom of the page
{ "usingComponents": {}, "onReachBottomDistance": 100 } -
Processing logic in the onReachBottom event handler
/**
 * Handler for bottom pull event on page
 */
onReachBottom: function () {
  this.setData({
    page: this.data.page + 1
  })

  this.getShopList()
}
5.11 throttle control for the event of pulling up and touching the bottom
-
Throttle the pull-up contact bottom
-
Define isLoading throttle valve in data
- false indicates that no data request is currently in progress
- true indicates that a data request is currently in progress
-
Modify the value of the isLoading throttle valve in the getShopList method
- Set the throttle valve to true when getColors is first called
- In the complete callback function of the network request, reset the throttle valve to false
-
Judge the value of the throttle valve in onReachBottom to throttle the data request
- If the throttle value is true, the current request is blocked
- If the position of the throttle valve is false, a data request is initiated
-
-
code implementation
/**
 * Initial data of the page
 */
data: {
  isLoading: false // Controls whether loading is displayed
}
getShopList() { this.setData({ isLoading: true }) // coding...... wx.request({ url: `https://www.xxxx.cn/categories/${this.data.query.id}/shops`, // coding...... complete: () => { wx.hideLoading() this.setData({ isLoading: false }) } }) }/** * Handler for bottom pull event on page */ onReachBottom: function () { if (this.data.isLoading) return this.setData({ page: this.data.page + 1 }) this.getShopList() }
5.12 demonstrate and analyze data loading problems
- When there is no data, data requests can still be initiated, which leads to a waste of bandwidth
- In actual development, if there is no data, no additional data request should be initiated
5.13 introduce the formula for judging whether there is data on the next page
-
If the following formula holds, it proves that there is no data on the next page:
-
Page number value * number of data displayed per page > = total number of data
- page * pageSize >= total
- Example 1: suppose there are 77 pieces of data in total. If 10 pieces of data are displayed on each page, it is divided into 8 pages in total, of which there are only 7 pieces of data on page 8
	- page (7)*  pageSize (10) >= total(77)Not established, So there is the next page of data
	- page (8)*  pageSize (10) >= total(77)establish, So there is no data on the next page
- Example 2: suppose there are 80 pieces of data in total. If 10 pieces of data are displayed on each page, it is divided into 8 pages in total, including 10 pieces of data on page 8
 	- page (7)*  pageSize (10) >= total(80)Not established, So there is the next page of data
 	- page (8)*  pageSize (10) >= total(80)establish, So there is no data on the next page
-
-
Mode 2:
- You can compare the value of total with the length of the array
5.14 judge whether there is data on the next page according to the formula
-
Judge whether the data has been loaded in the onReachBottom hook function
- If the loading is completed, you need to prompt the user that there is no more data
onReachBottom: function () {
  if (this.data.page * this.data.pagesize >= this.data.total) {
    // No more user prompts
    return wx.showToast({
      title: 'Data loading completed!',
      icon: 'none'
    })
  }

  if (this.data.isLoading) return

  this.setData({
    page: this.data.page + 1
  })

  this.getShopList()
}
5.15 open the drop-down refresh effect for the shop list page
-
Enable pull-down refresh effect
{
  "usingComponents": {},
  "onReachBottomDistance": 100,
  "enablePullDownRefresh": true,
  "backgroundColor": "#efefef",
  "backgroundTextStyle": "dark"
}
5.16 logic to realize pull-down refresh
-
Listen for user drop-down actions in onPullDownRefresh logic function
- Reset critical data
- Reissue data request
/**
 * Page related event handling function -- listening to user drop-down actions
 */
onPullDownRefresh: function () {
  // Need to reset critical data
  this.setData({
    page: 1,
    shoplist: [],
    total: 0
  })
  // Reissue data request
  this.getShopList()
}
5.17 solve the problem that the drop-down window effect will not close automatically
- In the complete callback function, call the API that closes the dropdown line window.
- When we don't need to load more methods, we need to pull them up
- Therefore, in the method of performing drop-down, resetting data and retrieving data, we pass in the callback function
/**
 * Page related event handling function -- listening to user drop-down actions
 */
onPullDownRefresh: function () {
  // Need to reset critical data
  this.setData({
    page: 1,
    shoplist: [],
    total: 0
  })
  // Reissue data request
  this.getShopList(() => {
    wx.stopPullDownRefresh()
  })
}
complete: () => {
  wx.hideLoading()

  this.setData({
    isLoading: false
  })
  cb && cb()
}
5.18 use wxs to process mobile phone numbers
-
Create tools in the utils directory WXS file and create the splitPhone method
- splice()
- First parameter: Add / delete item location
- Second parameter: quantity to be deleted
- The third parameter: optional, a new item added to the array
function splitPhone(str) { if (str.length !== 11) return str var arr = str.split('') arr.splice(3, 0, '-') arr.splice(8, 0, '-') return arr.join('') } module.exports = { splitPhone: splitPhone } - splice()
-
At shoplist Import tools.xml from wxml file WXS file
<wxs src="../../utils/tools.wxs" module="tools"></wxs>
-
Use encapsulated splitPhone method
<text>Telephone: {{tools.splitPhone(item.phone)}}</text>
5.19 problems that cannot be previewed on the mobile phone
-
problem
-
If the applet needs to initiate a network request, the domain name must be configured in the server domain name,
-
The applet will send a request to the configured domain name,
-
However, we have not configured the server domain name in the background, so we can't access it on the mobile phone
-
-
Solution
- Mobile phone code scanning -- > click the three points in the upper right corner of the applet -- > to pop up the panel, click development debugging -- > to pop up a new panel, and click Open debugging
- Click the suspended box vConsole, and the structure of the page and log will be displayed. In the actual development, the simulator can be configured for testing
If there are deficiencies, please give more advice,
To be continued, keep updating!
Let's make progress together!