preface
Don't be afraid of the unknown, don't be afraid of making mistakes, be a Creator!
1, Introduction
HTML/Hyper Text Markup Language (Hypertext Markup Language), a front-end development technology, is used to control the Web page structure in Web development.
1. Language grammar
< tag > content < / tag >
The label symbol is generally composed of a "start symbol" and an "end symbol". The end symbol just adds a slash "/" before the start symbol.
2. Development environment: VScode
3.HTML structure
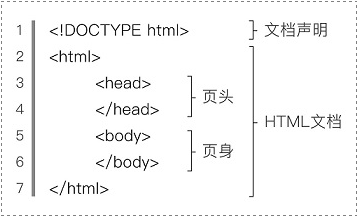
(1) Document declarations: HTML pages
(2) html tag pair: html /html
(3) Head tag pair: head /head
(4) Body tag pair: body /body
2, Basic label
1. Introduction
A complete HTML page is composed of tags. Take the label as the cornerstone to realize each target function.
2. Label use
head tag
The "header" of a web page is used to define page title, regular refresh, external files, etc.
body tag
Web content, most of the code is written inside this tag pair.
Label title
The only function is to define the title of the web page.
<title>Page title</title>
meta tag
Set page special information: page keyword and page description (provide browser identification)
name attribute: basic content of management
<meta name="keywords" content="Front end development,Back end development" />
HTTP equiv attribute: defines the encoding used by the web page; Define page auto refresh jump
<meta charset="utf-8" />
<meta  http-equiv="refresh" content="6;url=http://www.baidu.com"/>
Annotation method
<!--Contents of notes-->
3. Example (the web page displays the following content)
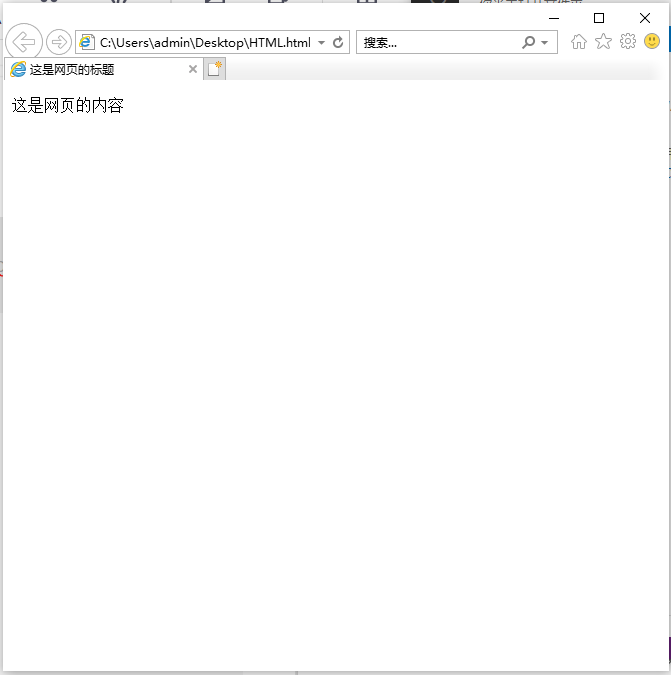
The code implementation is as follows:
<!DOCTYPE html>
<html>
<head>
    <meta charset="utf-8" />
    <title>This is the title of the page</title>
</head>
<body>
    <p>This is the content of the web page</p>
</body>
</html>
3, Text label
1. Introduction
The text content is the basis of the web page. The text of the web page is realized by the following tags:
(1) Title label
(2) Paragraph label
(3) Wrap label
(4) Text label
(5) Horizontal line label
(6) Special symbols
2. Label use
< H1 ~ 6 > label
Title label. In HTML, there are 6 levels of title tags: h1, h2, h3, h4, h5, h6., Among them, h1 label is the most important and h6 label is the least important. Generally, a page can only have one h1 tag, while h2 to h6 tags can have multiple tags.
 <h1>Primary title</h1>
 <h2>Secondary title</h2>
p tag
Paragraph labels. Used to display a piece of text. (with line feed)
<p>The bright moon in front of the bed is suspected to be frost on the ground. Raising my head, I see the moon so bright; withdrawing my eyes, my nostalgia comes around.</p>
br label
Wrap label. Used to wrap text.
<p>The bright moon in front of the bed is suspected to be frost on the ground.<br/>Raising my head, I see the moon so bright; withdrawing my eyes, my nostalgia comes around.</p>
Text control label
Bold labels: strong, b
Italic labels: i, em, cite
Superscript label: sup
Subscript label: sub
Middle dash label: s
Underline label: u
Large label: big
Small label: smal
Hrlabel
Horizontal line label. Used to achieve a horizontal line.
  <h3>In the Quiet Night</h3>
  <hr/>
  <h3>spring morning</h3>
div tag
Divide the HTML structure, so as to cooperate with CSS to control the style of a piece as a whole
    <div>
        <h3>In the Quiet Night</h3>
        <p>The bright moon in front of the bed is suspected to be frost on the ground.</p>
        <p>Raising my head, I see the moon so bright; withdrawing my eyes, my nostalgia comes around.</p>
    </div>
 
Space symbol. One Chinese character is about three.
3. Example (the web page displays the following text content)
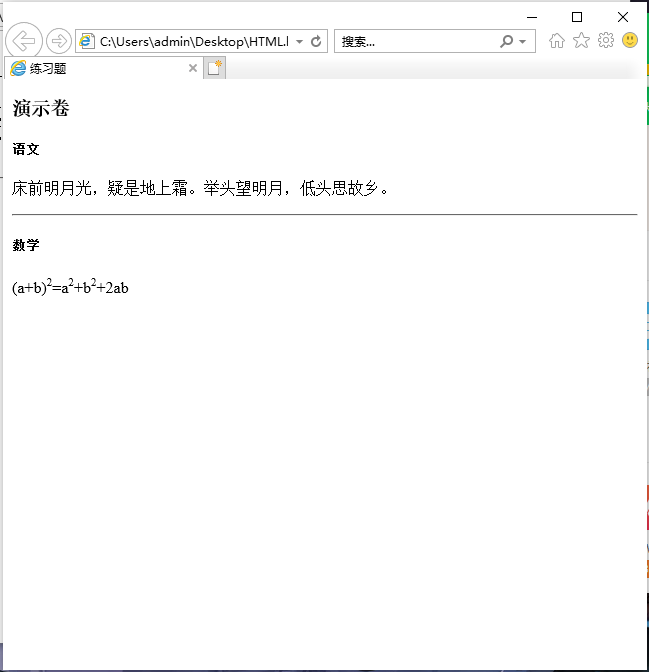
The code implementation is as follows:
<!DOCTYPE html>
<html>
<head>
    <meta charset="utf-8" />
    <title>Exercises</title>
</head>
<body>
    <h3>Demo volume</h3>
    <div>
        <h5>language</h5>
        <p>The bright moon in front of the bed is suspected to be frost on the ground. Raising my head, I see the moon so bright; withdrawing my eyes, my nostalgia comes around.</p>
    </div>
    <hr/>
    <div>
        <h5>mathematics</h5>
        <p>(a+b)<sup>2</sup>=a<sup>2</sup>+b<sup>2</sup>+2ab</p>
    </div>
</body>
</html>
4, List and table labels
1. Introduction
List is the most commonly used data arrangement in web pages. There are three kinds of lists: ordered list, unordered list and defined list.
Tables are used in web layout to arrange data more clearly. In HTML, a table usually consists of three parts: table, row and cell.
2. Label use
ol tag and li tag
It is used in combination to realize the ordered list function.
ol, i.e. ordered list; li, that is, list. Syntax:
<ol>
    <li>List item</li>
    <li>List item</li>
    <li>List item</li>
</ol>
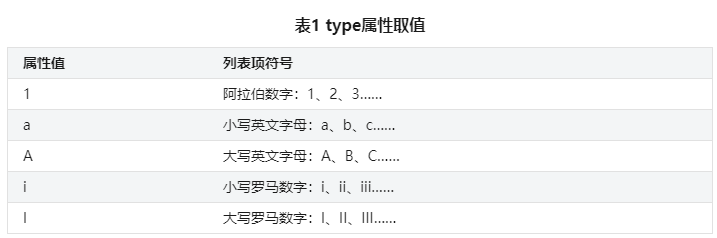
type attribute: used to change the symbol of the list item.
ul tag and li tag
Used in combination to realize the function of unordered list.
ul, namely unordered list; li, that is, list. Syntax:
<ul>
    <li>List item</li>
    <li>List item</li>
    <li>List item</li>
</ul>
The type attribute is the same as ol tag and li tag.
Note: the child element of ul can only be li, not other elements.
table tag, tr tag, td tag, th tag, caption tag
Combination is used to realize the table function.
Table and represent the beginning and end of the entire table
tr refers to table row
td refers to table data cell
caption, the title of the table
th refers to table header cell
td refers to table data cell. Syntax:
<table>
    <caption>Table title</caption>
    <tr>
        <th>Header cell 1</th>
        <th>Header cell 2</th>
    </tr>
    <tr>
        <td>Table row cell 1</td>
        <td>Table row cell 2</td>
    </tr>
    <tr>
        <td>Table row cell 3</td>
        <td>Table row cell 4</td>
    </tr>
</table>
rowspan label and colspan label
Use the rowspan attribute to merge in parallel, that is, merge N cells vertically.
Use the colspan property to merge columns. That is, the horizontal N cells are merged.
<td rowspan = "Number of rows spanned"></td>
<td colspan = "Number of columns spanned"></td>

        <tr>
            <td rowspan="2">Like fruit:</td>
            <td>Apple</td>
        </tr>
        <tr>
            <td>Banana</td>
        </tr>
3. Example: Web page
The following table and list contents are displayed
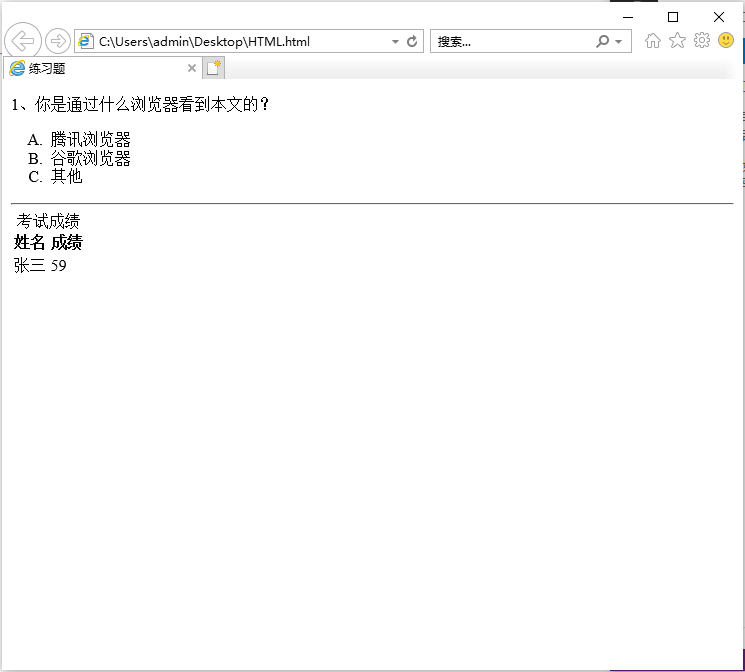
The code implementation is as follows:
<!DOCTYPE html>
<html>
<head>
    <meta charset="utf-8" />
    <title>Exercises</title>
</head>
<body>
    <p>1,What browser did you see this article through?</p>
    <ol type="A">
        <li>Tencent browser</li>
        <li>Google browser</li>
        <li>other</li>
    </ol>
    <hr/>
    <table>
        <caption>Examination results</caption>
        <tr>
            <th>full name</th>
            <th>achievement</th>
        </tr>
        <tr>
            <td>Zhang San</td>
            <td>59</td>
        </tr>
    </table>
</body>
</html>
5, Picture and hyperlink labels
1. Introduction
Web pages often use images to give users a better experience.
Web pages can be associated with each other through hyperlinks, which can facilitate users to work independently in various fields.
2. Label use
img tag
Use img tag to display a picture. The main properties of img tag are src and alt
The src attribute is used to specify the path where the picture is located. This path can be either a relative path or an absolute path.
The alt attribute is the prompt text when the picture is not displayed.
<img src="Picture path" />
<img src="img/haizei.png" alt="Sauron of the pirate king" />
a label
Use the a tag to implement hyperlinks.
<a href="Link address">Text or picture</a>
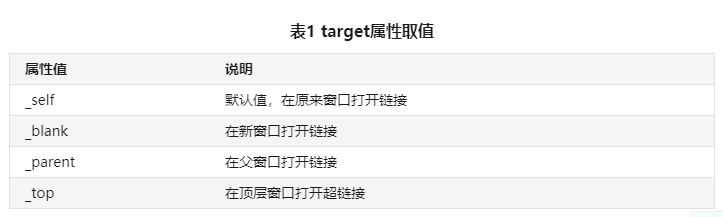
target attribute
Use the target attribute to define how the hyperlink opens the window
<a href="Link address" target="Open mode"></a>
3. Example: go to the target link by clicking on the picture
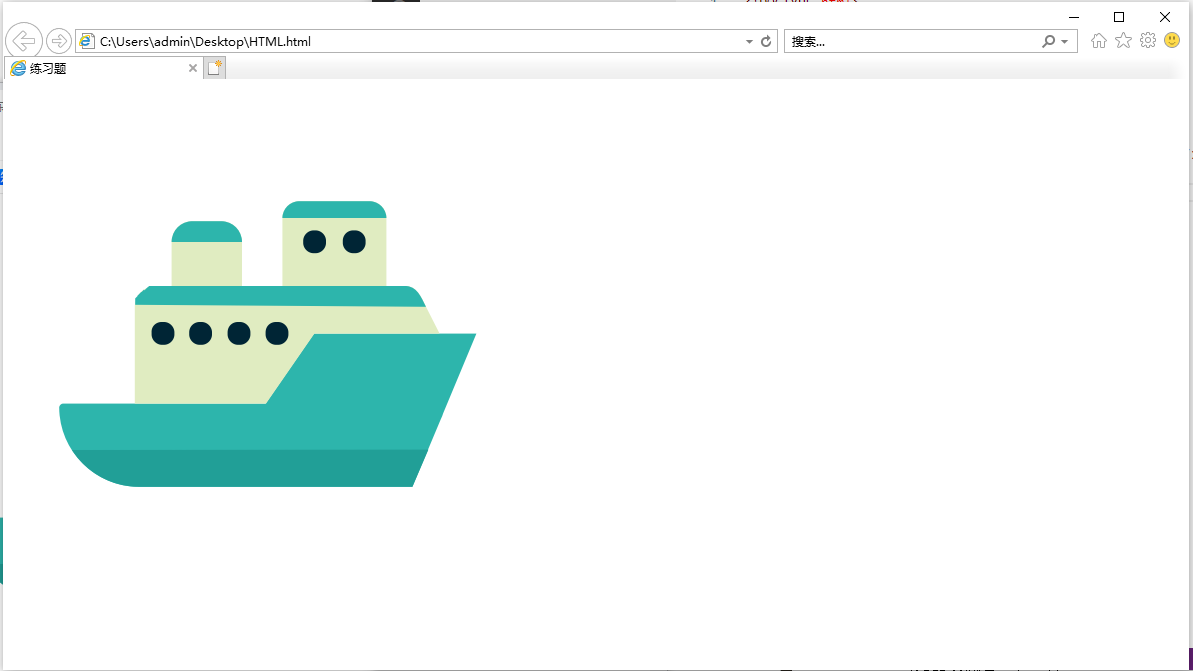
The code implementation is as follows:
<!DOCTYPE html>
<html>
<head>
    <meta charset="utf-8" />
    <title>Exercises</title>
</head>
<body>
    <form>
        <a href="http://www.baidu.com"><img src="11.png" /></a>
</body>
</html>
6, Form label
1. Introduction
The form is mainly responsible for data collection in the web page. The form collects user information on the browser side, and then submits the data to the server for processing. It mainly includes: single line text box, password text box, radio box, check box, button, file upload, multi good text box and drop-down list.
2. Label use
form label
Define the form interval and set the basic properties of the form.
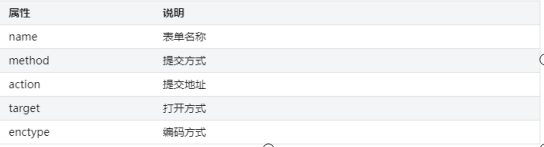
Name attribute: name the form
Method property: Specifies the http data submission method
Action attribute: Specifies the data submission address
target attribute: specifies how the window is opened
<form name="myForm"></form>
<form method="post"></form>
<form action="index.php"></form>
<form target="_blank"></form>
input tag
Insert the form content and set it accordingly.
<input type="form types " />
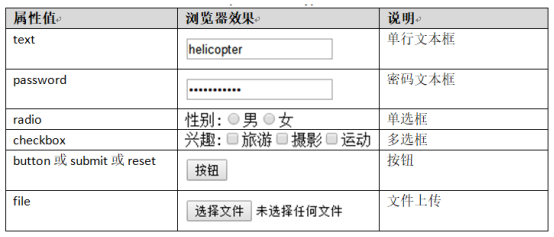
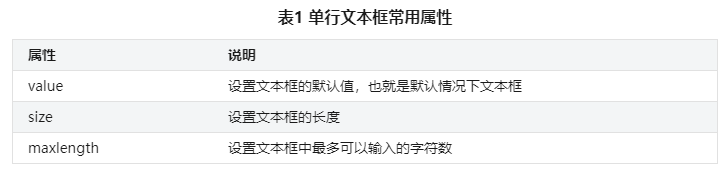
Single line text box
The value of the type attribute is "text", and the attribute is set through the following figure.
<form method="post">
     full name:<input type="text" value="helicopter"/>
 </form>
Password text box
A special single line text box in which the entered characters are not visible. Property to set the same single line text box.
<input type="password" />
password:<input type="password" size="15" maxlength="10" />
Radio
The value of type attribute is "radio".
<input type="radio" name="Group name" value="Value" />
The name attribute indicates the group name of the radio button, and the value indicates the value of the radio button. These two attributes must be set. For the same group of radio boxes, you must set the same name.
    <form method="post">
        Gender:
        <input type="radio" name="gender1" value="male" />male
        <input type="radio" name="gender2" value="female" />female
    </form>
check box
The value of type attribute is "checkbox".
<input type="checkbox" name="Group name" value="Value" />
Property settings are the same as radio boxes.
Button
There are three common buttons: ordinary button; submit button; Reset button (reset).
Ordinary buttons usually cooperate with JavaScript to perform various operations.
<input type="button" value="Value" />
The submit button is generally used to submit data to the server. It is a common button with special functions.
<input type="submit" value="Value" />
The reset button is generally used to clear the content entered by the user in the form. When we enter the content in the text box and press the reset button, we will find that the form content is cleared.
<input type="reset" value="Value" />
File upload
File upload is also realized by using the input tag, where the value of the type attribute is file.
<input type="file" />
Multiline text box
The multi line text box can enter multi line text, using the textarea label.
<textarea rows="Number of rows" cols="Number of columns" value="Value">Default content</textarea>
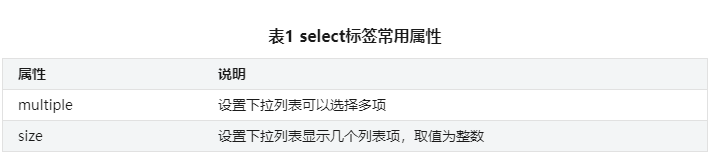
Drop down list
The drop-down list is represented by the combination of select and option tags.
<select>
    <option>Option content</option>
    ......
    <option>Option content</option>
</select>
The select attribute setting is shown in the following figure:
3. Example: the web page displays the following form
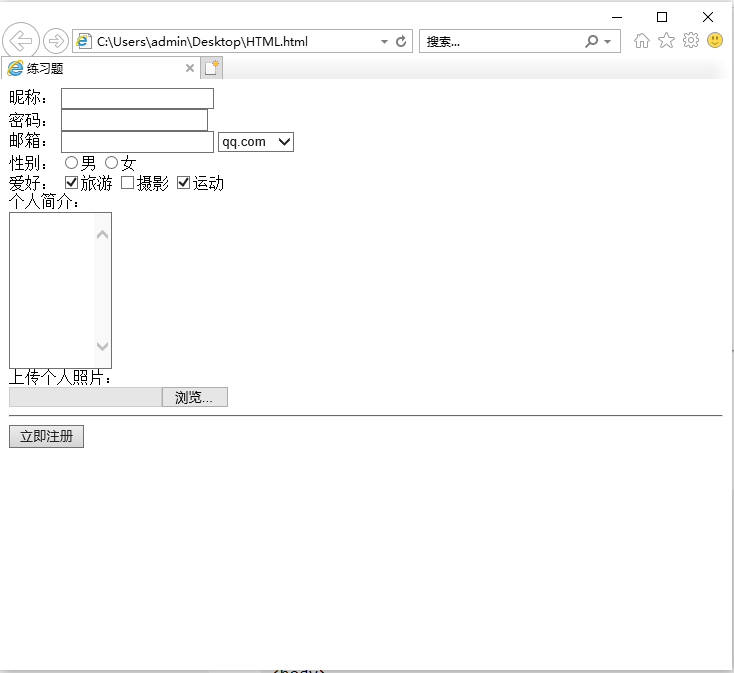
The code implementation is as follows:
<!DOCTYPE html>
<html>
<head>
    <meta charset="utf-8" />
    <title>Exercises</title>
</head>
<body>
    <form>
        Nickname?
        <input type="text" /><br/>
        password:
        <input type="password" /><br/>
        Email:
        <input type="text" />
        <select>
            <option value="qq.com">qq.com</option>
            <option value="163.com">163.com</option>
        </select><br/>
        Gender:
        <input type="radio" name="gender" value="male" />male
        <input type="radio" name="gender" value="female" />female<br/>
        Hobbies:
        <input type="checkbox" name="hobby" value="Travel" checked/>Travel
        <input type="checkbox" name="hobby" value="Photography"/>Photography
        <input type="checkbox" name="hobby" value="motion" checked/>motion <br/>
        Personal profile:<br/>
        <textarea rows="10" cols="10"></textarea> <br/>
        Upload personal photos:<br/>
        <input type="file" />
        <hr/>
        <input type="submit" value="Register now" />
    </form>
</body>
</html>
Tip: this content is learned from green leaf learning network. It is recommended that you can use it for learning. If there are mistakes and deficiencies, you are welcome to criticize and correct them. This series of articles is for reference only. Welcome to learn from each other.
Thank you for reading and look forward to your attention and collection!