Hello, I'm A bowl week , a front end that doesn't want to be drunk. If you are lucky enough to get your favor, I am very lucky~
Write in front
Webpack is a modern packaging modular JavaScript tool. In webpack, all files are modules. Internally, the files are converted through Loader, the hooks are injected through Plugin, and finally the files composed of multiple modules are output.
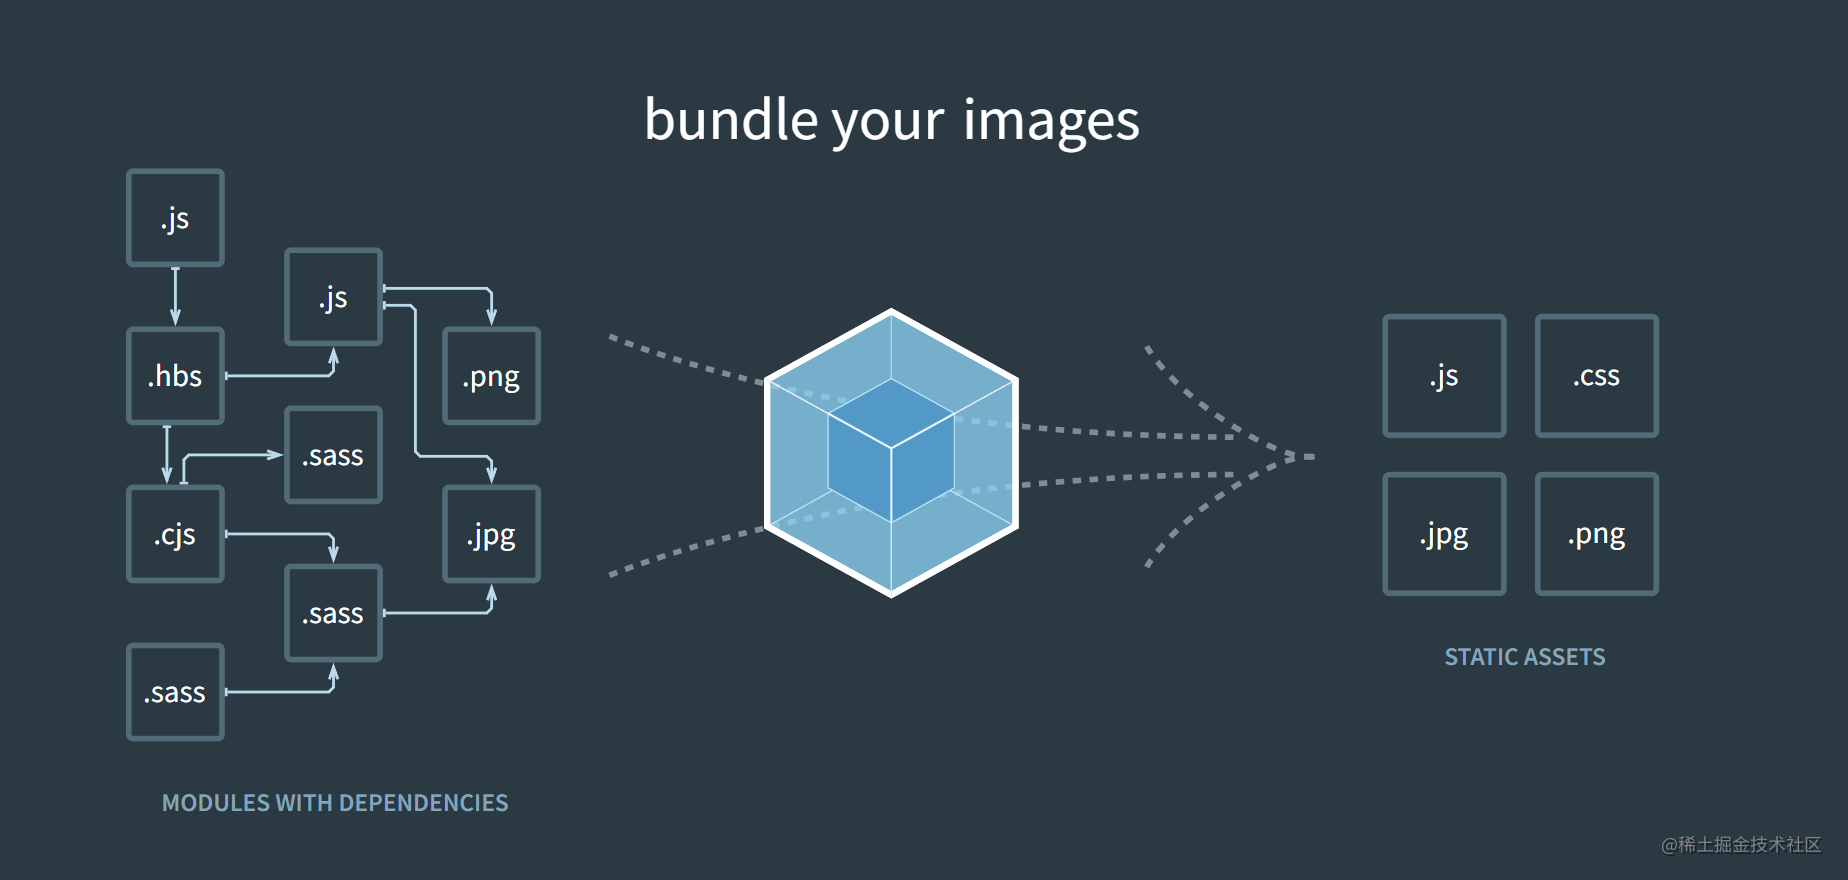
The above figure is a screenshot of the official website of webpack. It can be seen that for webpack, all files such as JavaScript, CSS, SCSS and pictures are used as modules. After being processed by webpack, these modules will eventually be output as resources available to the browser.
The advantages of webpack are as follows:
- The community is huge and active. Today, with the rapid development of the front-end, you can quickly find the latest Plugin;
- Usage scenarios are not limited to Web development;
- Have a good development experience;
webpack first experience
Get started quickly
Webpack belongs to an npm tool module, so before installation, you need to initialize npm, and then install webpack and webpack cli. The commands are as follows:
npm init -y
npm i webpack webpack-cli -D
Since webpack 4.0, 0 configuration can also be used directly. Here, our project directory structure is as follows:
.
├── src
│   ├── module.js
│   └── index.js
├── index.html
└── package.json
The code in the directory is as follows:
src/module.js
export default () => {
  // Create a DOM element
  const element = document.createElement('h2')

  element.textContent = 'Hello A bowl week'
  element.addEventListener('click', () => {
    alert('Hello webpack')
  })

  return element
}
src/index.js
import createTitle from './module.js'

const title = createTitle()

document.body.append(title)
index.html
<!DOCTYPE html>
<html lang="en">

<head>
  <meta charset="UTF-8">
  <meta http-equiv="X-UA-Compatible"
        content="IE=edge">
  <meta name="viewport"
        content="width=device-width, initial-scale=1.0">
  <title>webpack Get started quickly</title>
</head>

<body>
  <script type="module"
          src="./src/index.js"></script>
</body>

</html>
Then execute the following command:
npx webpack
Finally, you can see that a dist directory appears under the root directory, and there is a main JS file, the contents of the file are as follows:
(()=>{"use strict";const e=(()=>{const e=document.createElement("h2");return e.textContent="Hello A bowl week",e.addEventListener("click",(()=>{alert("Hello webpack")})),e})();document.body.append(e)})();
Now we can change the index The reference address of the < script > tag in HTML. The code is as follows:
<script type="module"
        src="./dist/main.js"></script>
Then you can see whether the effect is consistent with that before.
configuration file
Since webpack 4, webpack supports 0 configuration. Its default entry file is Src / index JS, the default export file is dist / main JS, if we want to customize these contents, we need to create a webpack. JS in the root directory config. JS file to customize these configurations.
webpack.condfig.js is a js file running under node, so we should write this file in the way of CommonJS. This file exports an object, and all configuration items appear as the properties of the object.
The example code is as follows:
const path = require('path')
module.exports = {
  // Entry file
  entry: './src/main.js',
  // Exit configuration
  output: {
    // Configuration exit file name
    filename: 'index.js',
    // The file output directory must be absolute
    path: path.join(__dirname, 'output'),
  },
}
Now run webpack and you can package according to our configuration.
Working mode
There are three working modes in webpack. There are two ways to set the working mode. The first is through the mode option provided in the configuration file, and the other is through the - mode option on the command line. The specific values are 'none' | 'development' | 'production'. The three modes are distinguished as follows:
- none: it does not optimize the code. It has the highest readability and the fastest packaging speed
- production: the default value. This mode compresses the code
- development: automatically optimize the packaging speed and add some assistance to the debugging process
Resource module
In addition to js files, we can also load any type of resource modules through Loader. Here, we take css resources as an example. First, install the two loaders. The commands are as follows:
npm i style-loader css-loader -D
Then we create two CSS files in the src directory and modify the original content. The code is as follows:
src/module.js
import './module.css'
export default () => {
  // Create a DOM element
  const element = document.createElement('h2')

  element.textContent = 'Hello A bowl week'
  element.classList.add('title')
  element.addEventListener('click', () => {
    alert('Hello webpack')
  })

  return element
}
src/main.js
import createTitle from './module.js'
import './main.css'
const title = createTitle()

document.body.append(title)
src/module.css
.title {
  background-color: silver;
  color: #444;
}
src/main.css
body {
  margin: 0 auto;
  width: 1200px;
  background-color: antiquewhite;
}
Then our webpack config. JS configuration file information is as follows:
const path = require('path')
module.exports = {
  mode: 'none',
  entry: './src/main.js',
  output: {
    filename: 'index.js',
    path: path.join(__dirname, 'dist'),
    // publicPath is used to represent the packaged resource prefix of resources. It is empty by default
  },
  module: {
    rules: [
      {
        // Matching rules for modules
        test: /.css$/,
        // From the back to the front, each item is a loader
        use: ['style-loader', 'css-loader'],
      },
    ],
  },
}
Now you can package the four resources under src into a js file by running webpack.
Loader is the core of the whole front-end modularization of webpack. By loading different loaders, you can load any type of resources.
url-loader
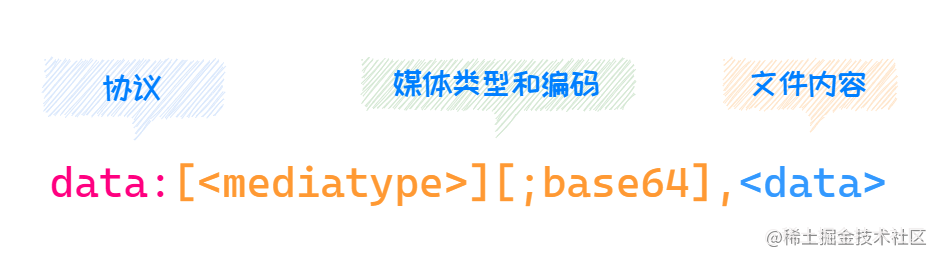
URL loader allows the specified file to return a data URL when it is lower than the specified size. Otherwise, the file is processed through file loader.
The DataURL is the URL prefixed with the data: protocol, which allows the content creator to embed small files into the document. As shown in the figure below:
First, install the necessary npm package. The command is as follows:
npm i url-loader file-loader -D
URL loader is generally used together with file loader.
Now we introduce a picture through js and add it to the page. The code is as follows:
src/main.js
import createTitle from './module.js'
import './main.css'
import logo from './logo.png'
const title = createTitle()
document.body.append(title)
// Insert picture in body
const img = new Image()
img.src = logo
document.body.append(img)
Then let's configure webpack config. JS, the code is as follows:
const path = require('path')
module.exports = {
  mode: 'none',
  entry: './src/main.js',
  output: {
    filename: 'index.js',
    path: path.join(__dirname, 'dist'),
  },
  module: {
    rules: [
      {
        // Matching rules for modules
        test: /.css$/,
        // From the back to the front, each item is a loader
        use: ['style-loader', 'css-loader'],
      },
      {
        test: /.png$/,
        use: {
          loader: 'url-loader',
          options: {
            // Those less than this value are converted to data URLs through URL loader; otherwise, file loader is used
            limit: 10 * 1024,
          },
        },
      },
    ],
  },
}
Then execute the following command on the command line:
npx webpack
You can output all the contents, and then run our index HTML, you can get the following:
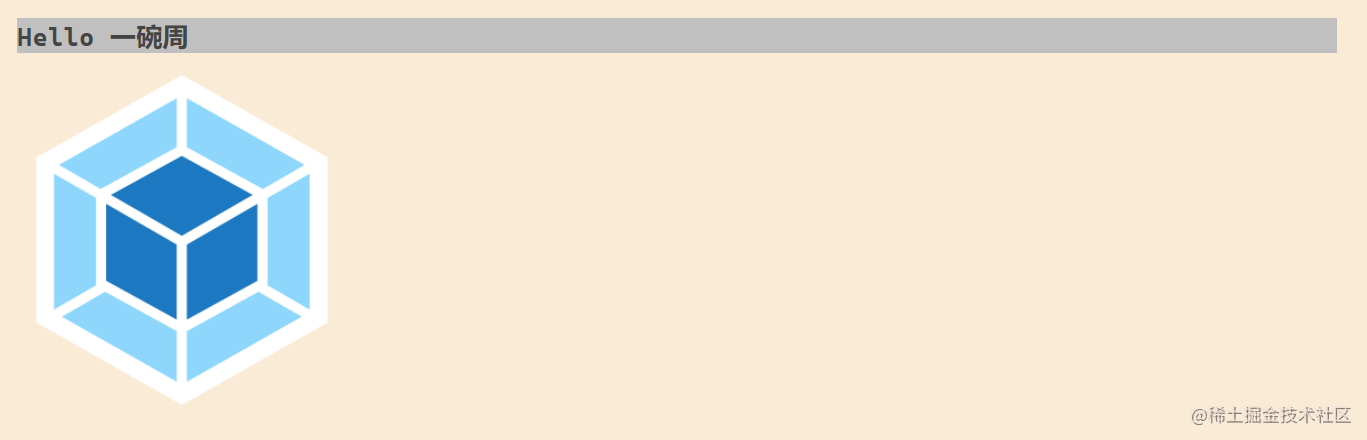
The above is how to use URL loader.
When to use a DataURL and when to exist alone?
- For small files, we can use DataURLs to reduce the number of requests
- For large files, we can store them separately to improve the loading speed
Process ES6+
webpack only completes the packaging function and does not convert the new features of ES6 +. We need to convert them through some loaders, the most common of which is babel Loader. If you use babel Loader, you also need to rely on related babel core modules. The installation commands are as follows:
npm i babel-loader @babel/core @babel/preset-env -D
Then webpack config. JS configuration information is as follows:
module: {
  rules: [
    {
      test: /.js$/,
      use: {
        loader: 'babel-loader',
        options: {
          presets: ['@babel/preset-env'],
        },
      },
    },
    {/* more code */},
  ],
},
Now our packaged code is written in ES5.
How webpack loads resources
In addition to supporting ES Module specification to introduce resources, webpack also supports the use of CommonJS specification and AMD specification. Although it supports multiple specifications, try not to mix them unless necessary. How to mix them may greatly reduce the maintainability of the project.
In addition to the three methods provided by JavaScript, the loading provided by some independent loaders will also trigger resource loading. For example, in CSS Loader, we use the @ import instruction and url() function to trigger resource loading; In addition, the src attribute of the < img > tag in HTML Loader will also trigger resource loading. In addition to the src attribute of the < img > tag, many attributes are supported by default.
Develop a Loader
As the core mechanism of webpack, the implementation principle of Loader is relatively simple. Now let's develop our own Loader.
The Loader we developed is used to convert Markdown syntax into HTML code. The development steps are as follows:
- Export a working function, which accepts a parameter, and the parameter is the input of the current module;
- Install the Markdown parsing module, where marked is used, and the installation name is npm i marked -D;
- Finally, return the processed content. The returned result must be a piece of JavaScript code.
If the content we return is not a piece of JavaScript code, we have two ways to process it. One is to write a Loader that processes our results into JavaScript code, and the other is to process it with the help of an existing Loader.
The core code is as follows:
markdown-loader.js
const marked = require('marked')

// source. Here is Markdown syntax
module.exports = source => {
  // Process through the marked plug-in, and then hand over the HTML string to the next loader for processing
  return marked.parse(source)
}
The webpack configuration file is as follows:
module: {
  rules: [
    {
      test: /.md$/,
      // In addition to using the file name, you can also use the path to introduce the loader
      use: ['html-loader', './markdown-loader'],
    },
  ],
},
After the configuration is completed, we execute the npx webpack command to complete the packaging.
The above execution flow is as follows:

The Loader is like a pipeline that processes the input and outputs it.
webpack plugin
Plug in mechanism is another core feature of webpack besides Loader. Its purpose is to enhance the ability of webpack in project automation. We learned earlier that Loader is to load various resources, so as to realize modular packaging; Plugin is to solve the automation work other than resource loading; For example, plugin can help us empty the dist directory before packaging.
Loader+Plugin can help us achieve most of the work in front-end engineering, which gives us an illusion that webpack is front-end engineering, but it is not.
Plug ins commonly used in webpack
First, we introduce some plug-ins commonly used in a webpack and use them in the project.
- clean-webpack-plugin : a plug-in that can help us automatically check the dist directory;
- html-webpack-plugin : automatically generate HTML using packaged results;
- copy-webpack-plungin : copy an existing single file or entire directory to the build directory.
Let's take a look at webpack config. JS how to use these three plug-ins. The code is as follows:
const path = require('path')
// Import corresponding plug-ins
const { CleanWebpackPlugin } = require('clean-webpack-plugin')
const HtmlWebpackPlugin = require('html-webpack-plugin')
const CopyWebpackPlugin = require('copy-webpack-plugin')

module.exports = {
  mode: 'none',
  entry: './src/main.js',
  output: {
    filename: 'index.js',
    path: path.join(__dirname, 'dist'),
  },
  module: {
    rules: [/* more code */],
  },
  plugins: [
    // Used to empty the dist directory
    new CleanWebpackPlugin(),
    // Used to generate index html
    new HtmlWebpackPlugin({
      // Add the title attribute in the HTML file through htmlwebpackplugin options. Title is obtained and written in Lodash template syntax
      title: 'Webpack Plugin Sample',
      // Add a meta element with name as viewport and content as width = device width
      meta: {
        viewport: 'width=device-width',
      },
      // Which HTML file to use as a template
      template: 'index.html',
    }),
    // Generate multiple pages and create multiple HtmlWebpackPlugin instances for generating about html
    new HtmlWebpackPlugin({
      // filename defaults to index html
      filename: 'about.html',
    }),
    // Copy content that does not need to be packaged
    new CopyWebpackPlugin([
      // 'public/**'
      // Directly copy all contents under public to the output directory
      'public',
    ]),
  ],
}
The templates used here are as follows:
index.html
<!DOCTYPE html>
<html lang="en">

<head>
  <meta charset="UTF-8">
  <meta http-equiv="X-UA-Compatible"
        content="IE=edge">
  <meta name="viewport"
        content="width=device-width, initial-scale=1.0">
  <title>Webpack</title>
</head>

<body>
  <div class="container">
    <h1>
      <!-- use Lodash Template syntax can be used directly webpack Data in -->
      <!-- htmlWebpackPlugin.options.title yes htmlWebpackPlugin Provided by plug-in -->
      <%= htmlWebpackPlugin.options.title
          %>
    </h1>
  </div>
</body>

</html>
The template syntax here is Lodash Provided.
Index. After webpack packaging The contents of the HTML file are as follows:
<!DOCTYPE html>
<html lang="en">

<head>
  <meta charset="UTF-8">
  <meta http-equiv="X-UA-Compatible"
        content="IE=edge">
  <meta name="viewport"
        content="width=device-width, initial-scale=1.0">
  <title>Webpack</title>
<meta name="viewport" content="width=device-width"></head>

<body>
  <div class="container">
    <h1>
      <!-- use Lodash Template syntax can be used directly webpack Data in -->
      <!-- htmlWebpackPlugin.options.title yes htmlWebpackPlugin Provided by plug-in -->
      Webpack Plugin Sample
    </h1>
  </div>
<script type="text/javascript" src="index.js"></script></body>

</html>
In addition to the plug-ins described above, there are hundreds of plug-ins in webpack. We don't need to understand them all. If necessary, we can search Github directly.
Develop a plug-in
Compared with Loader, Plugin has a wider range of capabilities, and its plug-in mechanism is actually realized through the hook mechanism. There are many links in the work of webpack. In each link, webpack embeds some hooks to facilitate us to use these hooks to perform some tasks, so as to develop a plug-in, as shown in the figure below:

We can view the specific predefined hooks through the official webpack document and jump to the link Point me.
webpack requires that the plug-in must be a function or an object containing an apply method. Generally, we will define a class that contains an apply method, and then instantiate this class for use.
Let's write a program to empty the packed The implementation code of / * * / plug-ins without necessary comments in js file is as follows:
myWebpackPlugin.js
module.exports = class myWebpackPlugin {
  apply(compiler) {
    console.log('my webpack The plug-in starts executing')

    compiler.hooks.emit.tap('myWebpackPlugin', compilation => {
      // Compilation = > can be understood as the context of this packaging
      // You can use compilation Assets gets the objects of all files
      for (const name in compilation.assets) {
        // Via for The in statement traverses all file names
        // Name / / current file name
        // compilation.assets[name].source() gets all the contents under the file
        if (name.endsWith('.js')) {
          // If by js file, get the content and delete the corresponding comments
          const contents = compilation.assets[name].source()
          const withoutComments = contents.replace(/\/\*\*+\*\//g, '')
          // Repackage content to an object
          compilation.assets[name] = {
            source: () => withoutComments,
            // The contract contains a size attribute
            size: () => withoutComments.length,
          }
        }
      }
    })
  }
}
It is referenced in the webpack. The code is as follows:
webpack.config.js
const path = require('path')
// Import corresponding plug-ins
/* more code */
const myWebpackPlugin = require('./myWebpackPlugin')
module.exports = { /* more code */ },
  module: { /* more code */ },
  plugins: [
    /* more code */
    new myWebpackPlugin(),
  ],
}
After performing the webpack packaging, you will find the packaged The useless comments in the js code are cleared.
From the above demo, we know that the plug-in is implemented by attaching functions to the hooks in the webpack life cycle.
Development experience Optimization
After the above study, we have a preliminary understanding of webpack, but the current situation can not meet our development environment. A comfortable development environment must meet the following requirements:
- Run our code using HTTP services (closer to the production environment)
- Auto compile + auto refresh
- Provide SourceMap support (quickly locate error information)
Automatic compilation
The automatic compilation of webpack only needs to start the Watch mode. After starting this mode, webpack will listen to the changes of files. When they are modified, webpack will repackage and compile.
There are two ways to start Watch mode:
-
When running webpack, add a parameter -- watch. The example is as follows:
npx webapck --watch
-
In webpack config. JS, add the configuration of watch: true as follows:
module.exports = {
  //...
  watch: true,
};
Ti
Automatically refresh browser
The browser can be refreshed automatically through browser-sync The tool is also relatively simple to use. You only need to listen for file changes. The steps are as follows:
-
Install the module first
npm install -g browser-sync
-
Start the command and listen to the corresponding file
browser-sync dist --files "**/*"
The disadvantages of using this method are as follows:
- It is more cumbersome in operation, because we need to start two commands at the same time;
- The execution efficiency is reduced because the webpack needs to write to the disk after packaging. After writing, the Browser Sync needs to read the disk after listening to the corresponding file changes.
Due to various problems, webpack provides webpack-dev-server Tool. Next, let's learn about the tool.
webpack-dev-server
The tool integrates functions such as automatic compilation and automatic browser refresh. It is also relatively simple to use. After installation, a cli command will be provided. First, we need to install the tool. The commands are as follows:
npm i webpack-dev-server -D
After installation, you can directly use the following commands to create an HTTP service, listen to file changes, automatically package and refresh the browser. The running commands are as follows:
npx webpack-dev-server # Or npx webpack server
After startup, the default listening port is port 8080. Access http://127.0.0.1:8080 You can access our packaged program.
It is worth noting that using webpack dev server does not put our packaging results into disk, but only temporarily puts the packaging results into our memory, so as to speed up the construction efficiency and improve our development experience.
Here are two configuration items for webpack dev server:
Static resource access configuration item
First, let's introduce the configuration of static resource access. This configuration item is different in webpack4 and webpack5, as follows:
- The configuration item in webpack4 * is contentBase , its parameters can be a string or an array, representing the static file directory;
- The configuration item in webpack5 * is static , its default directory is public. You can pass it a false and set it to disabled.
The following code shows how static resources are handled in webpack4 *:
webpack.config.js
const path = require('path')
// Import corresponding plug-ins

module.exports = {
  /* more code */
  devServer: {
    contentBase: path.join(__dirname, 'public'),
  },
  /* more code */
  plugins: [
    /* more code */
    // The development environment does not need to copy static resources every time. The package will be compiled and compiled only before the package is launched
    // new CopyWebpackPlugin([
    //   // 'public/**'
    //   //Directly copy all contents under public to the output directory
    //   'public',
    // ]),
  ],
}
Agent API configuration item
At present, in most cases, the front-end applications and back-end interfaces in the development process are from different sources( What is homology strategy ), leading to cross domain request failure. One of the solutions to this problem is that the server interface supports CORS (cross domain resource sharing), but not all API s support CORS; If we deploy the front-end and back-end homology, there is no need for the back-end interface to start CORS.
In addition to the one described above, the best way to solve this problem is to configure the proxy server, turn the API request into a proxy server (development server), and then the proxy server requests the real API server, as shown in the following figure:
Webpack dev server supports the implementation of proxy server directly through configuration, mainly through devserver Proxy configuration item implementation.
demo: we will GitHubAPI Proxy to the local proxy server. The configuration information is as follows:
const path = require('path')
module.exports = {
  /* more code */
  devServer: {
    contentBase: path.join(__dirname, 'public'),
    proxy: {
      // All interfaces starting with / api will be proxied
      '/api': {
        // For example, we request http://localhost:8080/api/users Will be represented to https://api.github.com/api/users
        target: 'https://api.github.com',
        // In fact, our real request address is https://api.github.com/users We need to rewrite the path through the pathRewrite configuration item
        pathRewrite: { '^/api': '' },
        // By default, the source of the host header is retained when the agent is, and you can set changeOrigin to true to override this behavior.
        changeOrigin: true,
      },
    },
  },
  /* more code */
}
Now let's start the project by executing the following command
npx webpack server
visit http://localhost:8080/api/users To access https://api.github.com/users .
Source Map
summary
At present, the code of the production environment is packaged and compiled, which is very different from the source code, but there will be a problem, that is, it is unable to quickly locate bug s and affect the development efficiency.
Source Map can help us solve this problem. In short, Source Map is an information file that stores the corresponding information of the source code and the compiled code. Source Map can help us locate quickly.
The use of Source Map is relatively simple. You only need to add a line at the end of the converted code
//@sourceMappingURL=map file path
Open the Source map file, which looks like this:
{
 version : 3,
 file: "test.js",
 sourceRoot : "",
 sources: ["testB.js", "testB.js"],
 names: ["print", "maps", "list", "func"],
 mappings: "AAgBC,SAAQ,CAAEA"
}
The whole file is a JavaScript object that can be read by the interpreter. It mainly has the following attributes:
- Version: the version of the Source Map.
- File: converted file name.
- sourceRoot: the directory where the files before conversion are located. If it is in the same directory as the file before conversion, this item is empty.
- sources: files before conversion. This item is an array indicating that there may be multiple file merges.
- Names: all variable names and attribute names before conversion.
- mappings: a string that records location information. It is a base64 vLQ encoded string.
webpack configuring Source Map
It is easy to configure the Source Map in the webpack. You can start it through the devtool configuration item. The example code is as follows:
module.exports = {
  // ...
  devtool: none // Do not generate source map
}
There are many Source Map modes provided in webpack. Please refer to the documentation for details, Point me in.
Although webpack provides us with so many Source Map modes, the following are mainly used in the actual development process:
- Soap module Eval source map: applicable to the development environment;
- none: applicable to production environment;
- Hidden source map: development modules are usually used more;
- Nosources source map: applicable to the production environment. This mode can locate the error message to a specific line, but will not expose the source code information.
HMR
summary
Although automatically refreshing the browser helps us solve some problems, there is also a problem. It will not save the state of the current page. The HMR provided by webpack can solve this problem. The full name of HMR is Hot Module Replacement, which translates to module hot replacement, The so-called module hot replacement is to replace a module in real time during the operation of the program, and the operation state of the application is not affected.
Start HMR
HMR has been integrated into the webpack dev server module, which means that we do not need to install HMR separately. There are two ways to start HMR.
-
Start from the command line:
npx webpack-dev-server --hot
-
Open via profile
// 2. Reference the HMR plug-in provided by webpack
const { HotModuleReplacementPlugin } = require('webpack')

module.exports = {
  /* more code */
  devServer: {
    // 1. Set devserver Hot set to true
    hot: true,
    proxy: {
      /* more code */
    },
  },
  module: {
    /* more code */
  },
  plugins: [
    /* more code */
    // 3. Use HMR plug-in
    new HotModuleReplacementPlugin(),
  ],
}
Now we can experience HMR in the project, but webpack requires us to manually write the module hot replacement logic through the HMR API. The hot replacement of style files has been completed in the style loader without us.
It is worth noting that the manual HMR API is mainly used by framework and tool authors. As an end user, HMR may have been handled for you in a framework specific manner.
Production environment optimization
Although the HMR, Source Map and other functions provided by webpack optimize the development experience, if these codes are used as the code of the production environment, there must be problems and there are many redundant codes.
The concept of mode has been introduced in webpack 4. Different modes have different experiences. Now let's learn how to create different configurations for different environments.
Create different configurations
There are two main ways for webpack to create different configurations for different environments,
- The configuration file exports different configurations according to the environment
- One environment corresponds to one configuration file
Next, let's take a look at how to use these two methods.
The configuration file exports different configurations according to the environment
First, let's see how to export different configurations according to the environment. webpack allows us to export a function that return s a configuration object. This function accepts two parameters:
- The first represents the current mode
- The second represents a parameter on the command line
Now let's implement the following configuration file according to the introduced information. The code is as follows:
const webpack = require('webpack')
const { CleanWebpackPlugin } = require('clean-webpack-plugin')
const HtmlWebpackPlugin = require('html-webpack-plugin')
const CopyWebpackPlugin = require('copy-webpack-plugin')

module.exports = (env, argv) => {
  // Env represents the current mode, which can be specified through the -- env parameter in the command line
  // argv other parameters on the command line
  const config = {
    // Configuration in development environment
    /* mroe code... */
  }

  if (env === 'production') {
    // For the configuration in the production environment, rewrite some configurations or add some configurations
    config.mode = 'production'
    config.devtool = false
    config.plugins = [
      ...config.plugins,
      new CleanWebpackPlugin(),
      new CopyWebpackPlugin(['public']),
    ]
  }
  return config
}
At this time, we can pass specific parameters through -- env, such as production mode. The package is as follows:
npx webpack --env production
This method is more suitable for small and medium-sized projects.
One environment corresponds to one configuration file
This method is usually used to create multiple webpack configuration files and specify the specific configuration file through the -- config parameter.
Generally speaking, we create three webpack configuration files:
webpack.common.js  # Public configuration
webpack.dev.js     # Development configuration
webpack.prod.js    # Production configuration
Configure according to the classification, and then use the merge provided by the webpck merge module to merge the configurations. The commands for installing the module are as follows:
npm i webpack-merge -D
The following code shows how to configure in the production environment:
const merge = require('webpack-merge')
const { CleanWebpackPlugin } = require('clean-webpack-plugin')
const CopyWebpackPlugin = require('copy-webpack-plugin')
const common = require('./webpack.common')
// Merge configuration through merge
module.exports = merge(common, {
  mode: 'production',
  plugins: [new CleanWebpackPlugin(), new CopyWebpackPlugin(['public'])],
})
Then the command to use the configuration file is as follows:
npx webpack --config webpack.prod.js
DefinePlugin
DefinePlugin allows you to create a global constant that can be configured at compile time. This plug-in is provided by webpack itself. It can help us distinguish between development environment and production environment. Its usage is as follows:
const webpack = require('webpack')

module.exports = {
  mode: 'none',
  entry: './src/main.js',
  output: {
    filename: 'bundle.js',
  },
  plugins: [
    new webpack.DefinePlugin({
      /**
       * If the value is a string, it will be used as a code fragment.
       * If the value is not a string, it will be converted to a string (including functions).
       * If this value is an object, all its key s will be defined in the same way.
       * If typeof is added before a key, it will be defined as a typeof call.
       */
      API_BASE_URL: JSON.stringify('https://api.example.com'),
    }),
  ],
}
Use the following code:
console.log(API_BASE_URL)
Tree-shaking
Tree shaking is a technical term commonly used to describe removing dead code from a JavaScript context. It relies on the modularity of ES6. It should be noted that tree shaking is not a configuration option in webpack, but a combination of a group of configuration options in webpack. This group of functions will be automatically enabled in production mode.
Next, let's take a look at how to manually start tree shaking. The code is as follows:
module.exports = {
  mode: 'none',
  entry: './src/index.js',
  output: {
    filename: 'bundle.js',
  },
  optimization: {
    // The module exports only the used members
    usedExports: true,
    // Merge each module into a function as much as possible. This function is called scope hosting. This concept is proposed in webpack3
    concatenateModules: true,
    // Compress the output results and delete unused members
    minimize: true,
  },
}
sideEffects
sideEffects is added to webpack4. It allows us to identify whether our files have side effects by configuration. The so-called side effects refer to what the module does except exporting Members during execution.
This function will also be turned on automatically in production mode, or through optimization Start the sideeffects configuration item and set it to true.
After being enabled in the webpack, you also need to open the package There are no side effects when marking our code in the JSON file. The code is as follows:
{
  "sideEffects": false
}
If your code does have some side effects, you can provide an array instead. The array is our code path with side effects (relative path and absolute path are supported):
{
  "sideEffects": [
    "./src/some-side-effectful-file.js"
  ]
}
Code subcontracting
The so-called code subcontracting is to package different code logic into different files. For example, we have a Vue multi page application. Except for some common components in each page, the rest are irrelevant. Here, we can package each page into a file, reduce the size of a single file and avoid a file being too large.
At present, we mainly have two ways to realize code subcontracting, as follows:
- Multi entry packaging
- Dynamic import
Next, let's take a specific look.
Multi entry packaging
Configuring multiple packaging entries is also relatively simple. Here, you only need to configure the entry configuration item as an object. Each attribute in the object represents an entry, and the attribute name is the file name. The example code is as follows:
/* more code ... */
module.exports = {
  /* more code ... */
  entry: {
    // Each attribute in the object represents an entry, and the attribute name represents the file name
    index: './src/index.js',
    album: './src/album.js',
  },
  output: {
    // [name] indicates the attribute name in the entry. The output result here is finally two files
    filename: '[name].bundle.js',
  },
  /* more code ... */
}
It should be noted here that all js files will be imported into the packaged HTML by default. If you need to formulate specific files, you can use the following code:
new HtmlWebpackPlugin({
  title: 'Multi Entry',
  template: './src/index.html',
  filename: 'index.html',
  // The value is the property name in the entry
  chunks: ['index'],
}),
In addition, we want to abstract public modules, which can be implemented through the following configuration:
optimization: {
  splitChunks: {
    // Automatically extract all common modules to a separate bundle
    chunks: 'all',
  },
},
Because the client has a caching mechanism, if we republish a version, but the client has a cache, our code will not be updated in time; To solve this problem, we can add Hash to our file name. webpack provides three kinds of Hash, namely:
- Hash: item level hash
- Chunkash: block level Hash
- contenthash: file level Hash, recommended
The example code is as follows:
/* more code... */
module.exports = {
  /* more code... */
  output: {
    filename: '[name]-[contenthash:8].bundle.js'
  },
 /* more code... */
}
Dynamic import
The implementation of dynamic import is also relatively simple. You only need to use the import() method. Dynamically imported modules will be automatically subcontracted. The advantage of this method is that a module is used. When loading the module, it greatly saves our bandwidth and traffic.
We can also use the specified name of subcontracted modules through "magic Annotation", such as
import(/* webpackChunkName: 'components1' */ './posts/posts').then(
({ default: posts }) => {
  mainElement.appendChild(posts())
},
import(/* webpackChunkName: 'components2' */ './album/album').then(
  ({ default: album }) => {
    mainElement.appendChild(album())
  },
)
Two packaging entries will appear here. If the names in the "magic notes" are the same, they will be packaged into the same page.
Extract CSS to a single file
Finally, let's introduce how to provide CSS to a single file. Here, we recommend using the mini CSS extract plugin, which can directly extract CSS to a single file.
If the final CSS is not greater than 150kb, it is friendly to store the CSS in the < style > tag of HTML.
Write at the end
With the increasing complexity of the front-end, webpack has become a necessary skill for all front-end developers. It's really out without learning.