1, HTML
1.1 Web Foundation
1.1.1 concept
JavaWeb: developing Internet based projects using the Java language
Web is a distributed application framework.
1.1.2 software architecture
1.1.2.1 C/S architecture
C/S: Client / Server, Client / Server.
- There is a client program locally and a server program remotely
- Such as QQ, Xunlei
- advantage
Good user experience
- shortcoming
Trouble in development, installation, deployment and maintenance
1.1.2.2 B/S architecture
B/S: Browser/Server, Browser/Server side.
- Only one browser is needed. Users can access different browser-side programs through different web addresses (URLs).
-
advantage
Development, installation, deployment and maintenance are simple
-
shortcoming
If the application is too large, the user experience may be affected
Excessive hardware requirements -
Resource classification
- Static resources
- Resources developed using static web development technology
- characteristic
1. All users access and get the same results.
2. Static resources, such as text, pictures, audio, video, HTML,CSS,JavaScript
3. If the user requests static resources, the server will directly send the static resources to the browser. The browser has a built-in parsing engine for static resources, which can display static resources. - Static resources:
- HTML: used to build a basic web page and display the content of the page
- CSS: used to beautify pages and layout pages
- JavaScript: control the elements of the page to make the page have some dynamic effects
- dynamic resource
- Resources published using dynamic web technology.
- characteristic
1. All users may get different results when accessing.
2. Dynamic resources, such as jsp/servlet,php,asp
3. If the user requests dynamic resources, the server will execute dynamic resources, convert them into static resources, and then send them to the browser.
- Static resources
-
be careful
- The browser can only parse static resources (the browser has a built-in parsing engine).
- To learn dynamic resources, you must first learn static resources!
-
Browser kernel
The browser kernel, formerly called rendering engine, is used to parse the web page structure according to the specified standards and render the text, pictures, links, audio, video and other contents of the structure to the page.
| Browser name | rendering engine |
|---|---|
| Chrome/Safari | WebKit |
| Firfox | Gecko |
| IE | Trident |
| Opera | Presto (latest is Blink) |
1.2 HTML Basics
1.2.1 concept
HTML: Hyper Text Markup Language.
It mainly describes the text, pictures, sounds and other contents in the web page through html tags (notes).
- Hypertext
Hypertext is a kind of Web text that organizes text information in different spaces by hyperlink - Markup Language
A language consisting of labels< Tag name > e.g. html, xml
The markup language is not a programming language - html document suffix html or htm
1.2.2 basic structure
<!DOCTYPE html><!--Tell the browser which encoding type to use  html5-->
<html lang="en"><!--Site root tag lang express language,en:english Tell the search engine that this is an English station-->
<head><!--The header tag is used to define the header letter and is mainly used to encapsulate other tags in the document header-->
	<meta charset="UTF-8"><!--charset Define the character encoding method, such as utf-8:Contains characters needed by all countries in the world gb2312:Simple Chinese GBK:Including all Chinese characters, traditional BIG5:Traditional Chinese-->
	<title>Document</title><!--Title label for defining HTML Title of the page-->
</head>
<body><!--Body tag defines the content to be displayed on the page, including text, pictures, video, audio, etc. it is mainly displayed to users-->

</body>
</html>
1.3 development tools
| Tool name | Tool logo | Download address |
|---|---|---|
| Sublime Text |  | http://www.sublimetext.com/3 |
| HBuilder |  | https://www.dcloud.io/hbuilderx.html |
| VS code |  | https://code.visualstudio.com/Download |
| WebStorm |  | https://www.jetbrains.com/webstorm/download/ |
1.4 common labels
1.4.1 title label
    <!-- Title label -->
    <!-- Used to write the title in the page h1~h6 The larger the value, the smaller the display -->
    <!--The pixels are 42, and the font is the smallest with BOLD effect-->
    <!-- html If a label is encountered during parsing, the parsing operation will be carried out, and the content will be set according to the function of the label -->
    <!-- If the parsed tag is not recognized, the content will also be displayed -->
    <h1>Primary title</h1>
    <h2>Secondary title</h2>
    <h3>Tertiary title</h3>
    <h4>Four level title</h4>
    <h5>Five level title</h5>
    <h6>Six level title</h6>
    <h7>Seven level title</h7>
    <!--The title of level 7 is the same as writing without a label-->
1.4.2 paragraph labels
<!-- Paragraph label -->
<!-- There are no additional effect settings for the content in the paragraph -->
<!-- The only setting is the paragraph spacing -->
<p>
Used for writing a paragraph
</p>
<p>
You can write multiple paragraphs to achieve the specified format of the content on the page
</p>
<!-- stay html No matter how many spaces and carriage returns are resolved to a space and displayed on the page -->
<!-- We usually use line breaks<br>We usually use escape character to set space -->
this If there is no paragraph set</br>
1.4.3 line feed label
	<!-- Wrap label -->
	<br>
1.4.4 horizontal line label
	<!-- Horizontal line label -->
	<!-- width Sets the horizontal width of the horizontal line -->
	<!-- size Sets the vertical width, or height, of the horizontal line -->
	<hr size="5" width="500px" color="gray" title="aaa">
1.4.5 list labels
	<!-- Unordered list -->
    <!-- Unordered means that there is no corresponding serial number identification -->
    <!-- type Change the style of the black dot in front of the list
         disc The default is black circle
         square Black Square
         circle Hollow circle
     -->
    <ul>
        <li>The girl with deflagration burn while the battery car is driving is critically ill</li>
        <li>Typhoon "fireworks" is gradually approaching the coast of Fujian and Zhejiang</li>
        <li>Yunnan 18 new local confirmed cases of 5 cases</li>
    </ul>

    <!-- Ordered list -->
    <!-- type Sn style: 1 a,A,I,i -->
    <!-- start initial position  -->
    <ol type="1" start="2">
        <li>The girl with deflagration burn while the battery car is driving is critically ill</li>
        <li>Typhoon "fireworks" is gradually approaching the coast of Fujian and Zhejiang</li>
        <li>Yunnan 18 new local confirmed cases of 5 cases</li>
    </ol>

    <!-- Custom list -->
    <!-- The label of a custom sequence can have multiple contents corresponding to one title -->
    <dl>
        <dt>COVID-19</dt>
        <dd>1,COVID-19 appears in Chengdu</dd>
        <dd>2,After the outbreak, all relevant personnel have been isolated and tested</dd>
        <dt>Taiwan, China</dt>
        <dd>1,Taiwan is China's Treasure Island</dd>
        <dd>2,I have thought about Taiwan independence for many years, but I can only think about it</dd>
    </dl>
1.4.6 picture labels
	<!-- Picture label -->
    <!-- The type of label picture that is introduced into the page for display can be any picture type -->
    <!--
        src:Path of picture (general writing relative positioning)
        alt: The content displayed when the picture fails to load
        width: Set the width of the picture display (if only the ratio of width to height is set)
        height: Set the height of the picture display (if only the ratio of height to width is set)
        title: Used to set the prompt information after the label mouse is moved in (all labels can write this attribute)
    -->
    <img src="../image/pk.gif" alt="No" width="500px" height="500px" title="Set width height 500"> <br>
    <img src="../image/pk.gif" alt="No" height="500px" title="Set height 500"> <br>
    <img src="../image/pk.gif" alt="No" width="500px" title="Set width 500"><br>
    <img src="../image/pk.gif" alt="No" title="Width and height are not set">
    <img src="../image/pk1.gif" alt="No" title="Width and height are not set">
1.4.7 hyperlink labels
	<!-- Hyperlink label -->

    <!-- Function 1 -->
    <!-- Write in the web page, define the jump connection, and when the customer clicks the corresponding link, jump to the corresponding address -->
    <!-- Note: you need to a Set the label to display text, otherwise the page will not be displayed -->
    <!--
        href: Link address label (must be written, otherwise it will lose the meaning of hyperlink label),have access to#To represent the current page)
        target: Open style, used to define the style of opening links. It is opened in the current window by default_top
            _top: By default, opening in the current tab will replace the contents of the original tab
            _blank: Open in a new tab. Each click will create a new tab
            _myself: Opens a new tab in the current browser. If it already exists, it does not open
        download: Download Web page
     -->
    <a href="#">sadasdas</a><br>
    <!-- You can jump directly to other service pages, but you need to enter the complete url address -->
    <a href="https://www.baidu. com" target="_ Myself "> Baidu < / a > < br >

    <!-- If you jump to the current service page, you can use the form of relative address url write -->
    <a href="h1~h6.html" target="_top">View Title labels</a><br>

    <a href="../day0719/img.html" target="_blank">View picture labels</a><br>


    <!-- Function 2 -->
    <!-- Writing in the page can define the anchor point to make it switch quickly in the page -->
    <!-- 1.Define anchor -->
    <!-- In progress a Use when writing labels id Make unique identification -->
    <!-- 2.Jump anchor -->
    <!-- stay a Tagged url Used in #Jump to anchor point by anchor point id -- >
    <a href="#D1 "> for the first time, Heavenly Master Zhang prayed for plague, and Tai Wei Hong mistakenly walked away from the demon < / a > < br >
    <a href="#D2 "> the second time, coach Wang went to jiuwenlong, Yan'an mansion to make trouble in Shijia village < / a > < br >

    <a href="shz.html#d1" target="_ Myself "> for the first time, Heavenly Master Zhang prayed for plague, and Tai Wei Hong mistakenly left the demon < / a > < br >
    <a href="shz.html#d2" target="_ Myself "> the second time, coach Wang privately went to jiuwenlong village in Yan'an residence < / a > < br >

	<!-- download Download Web page -->
	<a href="shz.txt" download="shz.txt">Download article</a>
1.4.8 table labels
1.4.8.1 table basic attributes and labels
    <!-- Table label -->
    <!-- Writing on the page is used for the storage and display of specific grid data -->
    <!-- The format of data can be displayed in the form of tables -->

    <!-- Table root label -->
    <!-- Other tags used to wrap the current table have no special semantics -->
    <!-- border Set table border line-->
    <!-- cellspacing Sets the space between cells -->
    <!-- cellpadding Sets the space between cells and cell borders -->
    <table border="1" cellspacing="0"  width="500px" height="500px" align="center">
        <!-- Continue to write the secondary label in the table to further divide the data in the table -->
        <!-- thead -->
        <!-- The header label is used to write the title row of the definition table, which is bold and centered -->
        <!-- caption Set the title, centered above the table-->
        <thead>
            <!-- tr Table row label pair tr Represents a row of data -->
            <tr>
                <!-- th Header labels each pair represents a header -->
                <th>full name</th><th>Gender</th><th>Age</th>
            </tr>
        </thead>
        <!-- tbody -->
        <!-- Table data labels are used to write data rows stored in tables -->
        <tbody>
            <tr>
            	<!-- tr Can only take the lead in td,td Can accommodate all elements-->
                <!-- Data row usage td Data wrapping -->
                <td>Zhang San</td><td>male</td><td>18</td>
            </tr>
            <tr>
                <!-- Data row usage td Data wrapping -->
                <td>Li Si</td><td>male</td><td>18</td>
            </tr>
            <tr>
                <!-- Data row usage td Data wrapping -->
                <td>Wang Wu</td><td>male</td><td>18</td>
            </tr>
        </tbody>
        <!-- tfoot -->
        <!-- The table at the bottom of the table is used to write data at the bottom of the table, such as sum remarks, etc -->
        <tfoot>
            <tr><td>remarks:</td><td>Careful modification</td></tr>
        </tfoot>
    </table>
1.4.8.2 cross row and cross column attributes
    <!-- Cross row and cross column attributes -->
    <!-- When writing a table, you sometimes need to merge cells -->
    <!-- At this time, you need to use cross row and cross column attributes -->
    <!-- rowspan Cross row, merge columns-->
    <!-- colspan Cross column, merge rows-->
    <!-- Note: in html When merging tables in, the operation is performed according to the table on the upper left, and the corresponding code of the table overwritten by the merge needs to be deleted -->
    <table border="1" cellspacing="0">
        <tr>
            <td>full name</td>
            <td width="100px"></td>
            <td>major</td>
            <td  width="100px"></td>
            <!-- rowspan Cross row enter the number of rows in the current table -->
            <td rowspan="2"><img src="../image/jrm.jpg" width="100px"></td>
        </tr>
        <tr>
            <td>date of birth</td>
            <td></td>
            <td>contact information</td>
            <td></td>

        </tr>
        <tr>
            <td>Native place</td>
            <!-- colspan Cross column enter the number of columns in the table -->
            <td colspan="4"></td>

        </tr>
        <tr>
            <td colspan=5>work experience</td>
        </tr>
        <tr>
            <td>1</td>
            <!-- Write cross row and cross column operations at the same time -->
            <td colspan="3" rowspan="2">1</td>
            <td>1</td>
        </tr>
        <tr>
            <td>1</td>
            <td>1</td>
        </tr>
    </table>
1.4.8.3 advantages and disadvantages of the table
-
advantage
1. Simple layout (because it is the area division of pure tables)
2. Uniform style (as long as the style of the first line is confirmed, the following will change) -
shortcoming
Maintenance is extremely troublesome (there are cross row and cross column operations in the table. Once a row or column needs to be added or deleted, all associated consolidation operations need to be repeated)
1.4.8.4 table application scenario
When the layout is simple and the possibility of change is relatively small, consider using tables
For example: login, registration page, Baidu news hot search news word module
1.4.9 form labels
1.4.9.1 basic form labels
	<!-- Form label -->
    <!-- It is one of the important means to obtain foreground data in the early background
    You can also write expressions to display data
    -->
    <!-- form Is the root label of the form -->
    <!-- It is used to wrap the current label information. When submitting data, submit the current form data according to the current form button -->
    <!-- action: Action attribute data submission url address -->
    <!-- method: Form submission method
            get Default by url Address for data transmission,The amount of data submitted is relatively small and efficient;get The data submitted in this way will be displayed in the address bar, which is very unsafe
            post Encapsulate the data for transmission,Low efficiency, security, carrying a large amount of data, will not be displayed in the address bar
    -->
    <!-- enctype: Data packaging method
            application/x-www-form-urlencoded By default, the form data is parsed and transmitted in a simple form
            multipart/form-data Transfer data as a binary stream ()
    -->
    <form action="#" method="get" enctype="application/x-www-form-urlencoded">
        <!-- input The input boxes vary according to the type Different types of input boxes are displayed on the page for data input -->
        <!-- Must be specified if data submission is performed name attribute -->
        <!-- text The default text entry box is used for data text information -->
        account number:<input type="text" name="un" placeholder="Prompt information"><br>
        <!-- password The password input box will be used after entering*Substitute input -->
        password:<input type="password" name="pwd"><br>
        <!-- radio Radio buttons cannot input data because they are buttons. They need to be preset value Set data -->
        <!-- And in order to realize the function of radio selection, the same must be written name -->
        <!-- You can also add checked Make default selection -->
        <!-- radio:Radio
					* be careful:
						1. If you want multiple radio boxes to achieve the effect of radio selection, you must select multiple radio boxes name Property values must be the same.
						2. Generally, each radio box will be provided with value Property to specify the value to submit when it is selected
						3. checked Property, you can specify a default value checked
				* checkbox: check box
					* be careful:
						1. Generally, each radio box will be provided with value Property to specify the value to submit when it is selected
						2. checked Property, you can specify a default value checked
		-->
        Gender: <input type="radio" name="sex" value="male" checked> male
        <input type="radio" name="sex" value="female"> female <br>
        <!-- checkbox The multi selection button allows you to select multiple items. Generally, the settings are the same name -->
        <!-- If not set value Returns the status of the current multi selection box -->
        Hobbies:<input type="checkbox" name="like" value="cy">smoking
        <input type="checkbox" name="like" value="hj">drink
        <input type="checkbox" name="like" value="tt">Hot head<br>
        <!-- The file selection input box is used when uploading files. You can select files on the client -->
        <!-- Note: file upload cannot be used get -->
        Avatar upload:<input type="file" name="fname" ><br>
        <!-- image Picture submit button -->
        Picture box:<input type="image" src="../image/pk.gif" width="100px" >
        <!-- hidden The label hidden on the page needs to be set value Submit data -->
        Hidden fields:<input type="hidden" name="yc" value="noneVlaue"><br>
        <!-- button Ordinary buttons need to be written vlue Information can only be displayed on the button -->
        <input type="button" value="Sign in">
        <!-- submit Submit button if not written value The default is submit -->
        <input type="submit">
        <!-- reset Reset press to reset all input boxes in the current form to the default state -->
        <input type="reset">
    </form>
1.4.9.2 drop down box label
	<form action="#">
        <!-- Drop down box/Selection box -->
        <!-- from select as well as option Option composition -->
        <!-- size Property is used to set the number of data displayed in the current drop-down box. The default value is 1 -->
        <!-- multiple Property enables multiple selections in the drop-down box, which is generally used for size Greater than 1 -->
        <select name="city" size="5" multiple>
            <!-- option The Options tab is used to define the option information of the drop-down list -->
            <!-- value If the defined selection option is not written, the data when submitting is the same as the data in the label -->
            <!-- select The first option is displayed by default selected Make default selection -->
            <option>==Please select a city==</option>
            <option value="zz">Zhengzhou</option>
            <option value="hrb" selected>Harbin</option>
            <option>Beijing</option>
        </select>
        <input type="submit">
    </form>
1.4.9.3 text field labels
	<!--  textarea: Text field
			* cols: Specify the number of columns and how many characters are in each row
			* rows: The default number of rows.
	-->
	<form action="#">
        <!-- textarea You can enter multiple lines of text on the page and zoom in and out by dragging the mouse -->
          <!-- The size of multi line text field can be expanded freely by default, and the free expansion of width and height will affect the page layout
 Disable mode(style):
1,Specify the maximum and minimum width and height style='max-width: 200px;min-width: 200px;max-height: 200px;min-height: 200px;'
2,Disable reset size style="resize: none;"
-->
        <textarea name="wby" cols="30" rows="10">
Multiline text field. Can write multi line text information, no value Property, default
 And data are written directly between the two labels</textarea>
        <input type="submit">
    </form>

	<!-- label Label label -->
	<!-- label: Specifies the text description of the entry
	be careful:
		label of for Properties are generally associated with input of id Attribute values correspond. If so, click label Area, will let input Input box to get focus.
	-->
    <!-- It is usually written in a form and used to link text and labels in the form -->
    <input type="checkbox" name="like" id="c1"><label for="c1">smoking</label>
    <input type="checkbox" name="like" id="c2"><label for="c2">drink</label>
    <input type="checkbox" name="like" id="c3"><label for="c3">Hot head</label>

	<!-- iframe label -->
	<!-- You can nest the contents of other pages in one page -->
	<!-- Bring in other pages
frameborder: Controls whether border line 1 is displayed and 0 is not displayed
scrolling: Controls whether the scroll bar is displayed yes display no Do not display auto Browser automatic control based on page size
-->
	<iframe src="../day01/Common label 01.html" width="100%" height="800px" frameborder="0" scrolling="auto"></iframe>
1.4.10 text formatting labels
	<b> Label definition bold text</b>
	<strong>Define bold text usage and b almost</strong>
	<i>Label definition italic text</i>
	<em>The definition emphasizes that the text is almost italicized</em>
	<s>delete</s>
	<del>delete</del>
	<u>Underline</u>
	<ins>Underline</ins>
1.4.11 annotation syntax
- Annotation syntax: <! --- >
- Shortcut key: ctr +/
- effect
The comments will not be displayed on the page to explain the code for easy viewing in the future
1.4.12 span and div
- In line labels: inline and occupy the whole line separately (with line break character). The width and height attributes can be set
- Block width and block height can be set at the same line, but not at the same level
- Inline block labels: inline block labels can be set in width and height or displayed on the same line
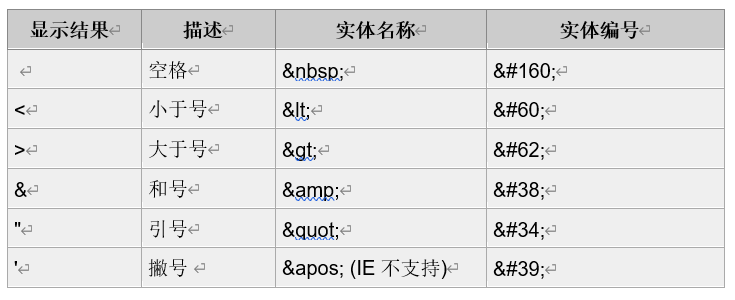
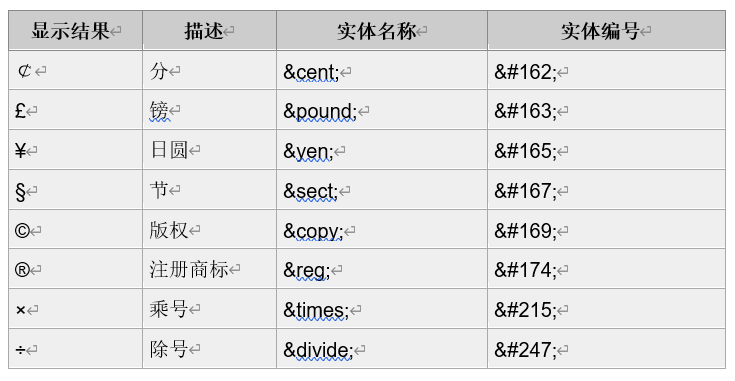
1.4.13 special symbols
2, CSS
CSS: Cascading style sheets.
Cascade: multiple styles can act on the same html element and take effect at the same time
- benefit
- Powerful
- Separating content presentation from style control
- Reduce coupling. decoupling
- Make division of labor and cooperation easier
- Improve development efficiency
2.1 CSS introduction method
2.1.1 inline style
Write in the label, use style to write, and operate the style in the form of style: value
	<!-- Inline style -->
    <!-- By writing in the label style Writing style -->
    <!-- The syntax of style writing is style name: value. Multiple styles are used;separate -->
	<!-- The currently set style takes effect only for the current label -->
    <div style="width: 200px; height: 200px; background-color: yellowgreen;">
    </div>
This method can be used to improve the priority of styles. Repeated use will lead to bloated code and is not conducive to later maintenance
2.1.2 internal style (inline style)
When writing in html pages, use the feature selector to select tags (multiple tags can be selected) for unified style operation
Separate the page content from the presentation form to facilitate the unified management of the style
<style>
  div{
    color:deepskyblue;
    font-size: 20px;
  }
  p{
    color: darkslateblue;
  }
</style>
<div style="color: red;">Inline style, unified management style</div>
<div>Inline style, unified management style</div>
<div>Inline style, unified management style</div>
<hr>
<p>The style introduction method is optional, not necessarily one</p>
<p>The style introduction method is optional, not necessarily one</p>
<p>The style introduction method is optional, not necessarily one</p>
2.1.3 external style (external style)
The inline style is further separated to facilitate multiple pages to share the same style and create a css file. The HTML of this style can directly reference the style
/*Note: css files themselves represent styles, so you can write the corresponding styles directly without style tags or attributes*/
div{
    height: 200px;
    width: 200px;
   background-color: bisque  ;
}
	<!-- The external style cannot take effect until it is referenced on the corresponding page after writing -->
    <!-- Introduction method -->
    <link rel="stylesheet" href="../css/wb.css">
2.2 selector
2.2.1 simple selector
There are three basic choices: label selector, class selector and id selector
2.2.1.1 label selector
The tag selector mainly selects elements according to the name of the tag
- grammar
Tag name {}
For example: div {color: red; font size: 20px;}
<style>
    /* tag chooser  */
    /*  Select the specified label for style operation */
    div {
        background-color: grey;
    }
    span {
        background-color: green;
    }
    p {
        background-color: greenyellow;
    }
</style>

<body>
    <div>d1</div>
    <div>d2 </div>
    <p>p1</p>
    <p>p2</p>
    <span>s1</span>
    <span>s2</span>
</body>
2.2.1.2 class selector
Class selector is used to obtain elements through class attribute, and can be used to set the same style for multiple elements
- grammar
Class name {}
For example: div-cls{color:red;}
<style>
    /* Class selector  */
    /* When setting a class of labels with the same style, select use */
    /* .Class name {} */
    /* .The class name identifier is matched by the value of the class attribute */
    .c1{
        background-color: greenyellow;
    }
</style>

<body>
    <div id="d1" class="c1">d1</div>
    <div id="d2">d2 </div>
    <p id="p1" class="c1">p1</p>
    <p id="p2">p2</p>
    <span>s1</span>
    <span class="c1">s2</span>
</body>
2.2.1.3 id selector
The id selector gives the element a unique id through the id attribute (setting multiple IDs to be the same will not result in an error, which will affect the later js learning. It is recommended that the id value be unique)
- grammar
#id name {}
For example: #div-id{color:red;}
<style>
	/* id selector */
    /* Select a tag by its unique id */
    /* #id{}Make a selection */
    /* #If the identification of the representative id is not written #, it will be looked up as a tag */
    d1{
        background-color: greenyellow;
    }
    #d2{
        background-color: red;
    }
    #p1{
        background-color: blue;
    }
</style>

<body>
    <div id="d1">d1</div>
    <div id="d2">d2 </div>
    <p id="p1">p1</p>
    <!-- same id It can also be selected, but writing is not recommended -->
    <p id="p1">p2</p>
    <span>s1</span>
    <span>s2</span>
    <d1>aaaa</d1>
</body>
2.2.2 combined selector
The combination selector selects elements based on their sibling relationship in the page
2.2.2.1 offspring selector
The descendant selector selects elements by region according to the relative (nested) position of elements in the page
<style>
    /* Descendant Selectors  */
    /* All custom selector labels under the specified selector */
    /* Parent selector empty lattice selector */

    /* Select all span tags in div tags and p tags */
    div p span{
        background-color: grey;
    }

    /* id The class in the label of d1 is the a label in the label of c1 */
    #d1 .c1 a{
        background-color: hotpink;
    }
</style>

<body>
    <div>
        <p>ppppp<span>ssssss</span>pppp</p>
        <span>sssss</span>
        <span>s1s1s1<span>s2s2s2</span>s1s1s1s1</span>
    </div>
    ----------------------
    <div>
        <span>sssss</span>
    </div>
    <a href="">a label</a>
    <div id="d1">
        <div class="c1">
            <div>
                <div>
                    <div>
                        <div>
                            <!-- as long as a The label can be inside the corresponding label without considering how many layers there are -->
                            <a href="">a1 label</a>
                        </div>
                    </div>
                </div>
            </div>
        </div>
        <div class="c2"><a href="">a2 label</a></div>
    </div>
</body>
2.2.2.2 descendant selector
<style>
    /* Progeny selector */
    /* Select the matching content of the next level selector under the current selector */
    /* First, the label will be selected according to the first selector, and the second selector will be matched in the label next to the first selector label */
    /* Select the p tag in the sub tags under the div tag */
    div > p{
        background-color: grey;
    }
    /* Select all div sub tags under the tag with id d1 */
    #d1>.c1{
        background-color: hotpink;
    }
</style>
<body>
     <div>
         <p>p1</p>
         <span>
             <p>p2</p>
         </span>
     </div>

     <div id="d1">
         <div class="c1">c1</div>
         <div>
            <div class="c1">c2</div>
         </div>
     </div>
</body>
2.2.2.3 adjacent selectors
<style>
    /* sibling selector  */
    /* Select the next element that matches the selection of the first selector sibling */

    /* Select the next div tag at the same level as the div tag */
    div + div{
        background-color: hotpink;
    }
    /* Select the tag with id d1 followed by the next tag with class c1 */
    #d1 + .c1{
        background-color: red;
    }
    .c1 + div{
        background-color: green;
    }
</style>
<body>
     <div>
         <p>p1</p>
         <span>
             <p>p2</p>
         </span>
     </div>
     <div id="d1">
         <div class="c1">c1</div>
         <div>
            <div class="c1">c2</div>
         </div>
     </div>
     <span class="c1">ccc</span>
</body>
2.2.2.4 universal brother selector
<style>
    /* Universal brother selector */
    /* The selection matches the next element selection after the first selector sibling */


    /* Select span tags for all peers after id d1 */
    #d1~span {
        background-color: greenyellow;
    }
</style>

<body>
    <span class="c1">ccc1</span>
    <span class="c1">ccc2</span>
    <div id="d1">
        <div class="c1">c1</div>
        <div>
            <div class="c1">c2</div>
        </div>
    </div>
    <div>
        <p>p1</p>
        <span>
            <p>p2</p>
        </span>
    </div>
    <span class="c1">ccc1</span>
    <span class="c1">ccc2</span>
</body>
2.2.3 pseudo class selector
<style>
    /* Pseudo class selector */
    /* Select labels according to the special status of element labels */
    /* Pseudo class: it means that there is no such label when the page is displayed normally, but it is just some special status */
    /* The corresponding status of the corresponding label is selected */

    /* Unreached links */
    a:link {
        color: #FF0000;
    }
    /* Visited links */
    a:visited {
        color: #00FF00;
    }
    /* Mouse over link */
    a:hover {
        color: #FF00FF;
    }
    /* Selected links */
    a:active {
        color: #0000FF;
    }
    div {
        height: 50px;
        width: 200px;
        background-color: hotpink;
    }
    #d1:hover {
        background-color: black;
        color: white;
    }
    /* input is generally used when an element gets focus*/
    #input1:focus {
        background-color: aquamarine;
    }
    input:disabled {
        background-color: brown;
    }
    /* Select the nth input of all tags */
    /* Get the first input tag under the tag where all input tags are located */
    input:nth-of-type(1) {
        background-color: chartreuse;
    }
    div input:disabled {
        background-color: red;
    }
    td:nth-of-type(1){
        background-color: chartreuse;
    }
    td:nth-of-type(2){
        background-color: red;
    }
    td:nth-of-type(3){
        background-color: aqua;
    }
    tr:hover{
        background-color: chartreuse;
    }
    div:hover+div{
        background-color: red;
        height: 200px;
    }
</style>

<body>
    <!-- a By default, the tag has been configured with four pseudo elements. Select and set the corresponding status respectively-->
    <a href="#"> a label</a>

    <div id="d1">Please hover over me
        <input id="input1" type="text"><br>
        <div>
            <input type="text" disabled><br>
        </div>
    </div>
    <input type="text"><br>
    <input type="text" disabled><br>
    <input type="text"><br>
    <input type="text"><br>
    <table border="1">
        <tbody>
            <tr>
                <td>1111</td>
                <td>1111</td>
                <td>1111</td>
            </tr>
            <tr>
                <td>1</td>
                <td>1</td>
                <td>1</td>
            </tr>
            <tr>
                <td>1</td>
                <td>1</td>
                <td>1</td>
            </tr>
        </tbody>
    </table>
<hr>
<div>1</div>
<div>2</div>
<div>1</div>
<div>2</div>
<div>1</div>
<div>2</div>
</body>
2.2.4 pseudo element selector
<style>
    /* Pseudo element selector */
    /* Like the pseudo class selector, it can also be regarded as the selection of element content in a specific case */
    /* It provides methods to operate the first character or first line of label content, and can also add content */

    /* Style operation */
    /* The first character of the content in all div tags */
    div::first-letter {
        color: red;
    }
    /* Set the first line of all div */
    div::first-line {
        background-color: palegreen;
    }
    div::selection {
        background-color: pink;
    }
    /* Add content before and after */
    div::after{
        content: "Content added later";
    }
    div::before{
        content: "Previously added";
    }
</style>

<body>
    <div>
        It is said that the emperor Renzong of the great song dynasty reigned, Jia??At five o'clock in March of the third year, the emperor sat in the Zichen hall and was congratulated by all officials. But see:
        Auspicious clouds fan the Phoenix Pavilion and auspicious Qi covers the Dragon Tower. Smoke the Royal willow, brush the flags, and bring dew palace flowers to meet the sword halberd. In the shadow of natural fragrance, jade hairpins and pearls gather in Danlong; In the sound of fairy music, embroidered jackets and brocade clothes helped Yujia. Pearl curtain roll, cash on the golden palace; The phoenix feather fan opens and the precious chariot stops in front of the White Jade Terrace. The net whip sounded three times, and the civil and military classes were in line.

    </div>
    <div>
        When an official at the head of the hall shouted, "if you have something to play early, roll up the curtain and retreat." Among the classes, Prime Minister Zhao Zhe and Wen Yanbo, who participated in politics, came out of the class and said, "at present, the plague in the capital is prevalent and many soldiers and civilians are injured. I hope your majesty will be lenient, save punishment and taxes, pray for natural disasters and relieve all the people." When the emperor listened to the play, he urgently ordered the Imperial Academy and immediately issued a draft edict: on the one hand, he pardoned the world's prisoners, and should be pardoned by civil taxes; On the one hand, he ordered the temple in Beijing to build good deeds and disasters.
        Unexpectedly, the plague became prosperous in the year. When the emperor of Renzong heard that the dragon was uneasy, he resumed the discussion of all officials. To that group, there was a minister, Yue ban. When the emperor saw it, he was Fan Zhongyan, who knew about political affairs. After worshipping his daily life, he said, "now that the natural disaster is prevalent, the army and the people are besieged with charcoal, and can't make a living day and night. With the intention of a foolish minister, if you want to prevent this disaster, you can announce that the Heavenly Master of the heir Han is coming to the dynasty at night, and build a 3600% Luo Tian festival in the forbidden court of the capital. Hearing God, you can protect the civil plague." Renzong emperor Zhuo. He urgently ordered the imperial scholar Cao Zhao to write a letter by the emperor and send a royal incense. The imperial envoy appointed Hong Xin, the Taiwei in front of the hall, as an angel, to go to Longhu Mountain in Xinzhou, Jiangxi Province and ask immortal Zhang, the Heavenly Master of the Han Dynasty, to pray for the plague at night. He burned Royal incense in the golden hall and personally gave the Dan imperial edict to Tai Wei Hong, even if he set out.
        Hong Xin took the imperial edict and said goodbye to the son of heaven. He carried the imperial edict, filled the imperial incense, took dozens of people, got on the horse shop, left Tokyo and took the path to Guixi County, Xinzhou. On the road, but see:

    </div>
    <div>
        Distant mountains are emerald and distant waters are clear. Wonderful flowers bloom in the beautiful forest. The tender willows danced and the golden silk brushed the ground. When the wind is warm and the sun is warm, it passes through YEDIAN mountain village; The road is straight to shaping and sleeps in the post office at night. Luo Yi rippled in the world of mortals, and the horse drove in the purple street.
        Let's say that the imperial edict was issued by Taiwei Hong Xinyun, and the party went on the road from to Xinzhou, Jiangxi Province for more than one day. Officials, big and small, went out to meet him. Then he sent someone to inform the abbot of the Qing Palace on Longhu Mountain that he was ready to receive the imperial edict. The next day, all the officials sent the Taiwei to the foot of Longhu Mountain.
        I saw many Taoists in the Shangqing palace, ringing bells and drums, fragrant flowers, lanterns and candles. A banner, a treasure cover and a school of fairy music all went down the mountain to meet the Danzhao until they dismounted in front of the Shangqing palace. When the Taiwei looked at the palace, it was a good Shangqing palace. But see:

    </div>
    <div>
        The pine is flexing and the cypress is gloomy. The door is hung with a gold book, and the household is listed with a spirit talisman and a jade seal. On the Bank of the virtual emperor altar, there are weeping willows and famous flowers; By the side of the medicine refining stove, the old cypress of the pines is hidden. Tianding Lishi in the left compartment follows Taiyi Zhenjun; On the right, the jade girl and golden boy hold the purple emperor. With hair and sword, the northern Zhenwu steps on the turtle and snake; Encourage to wear the crown, the Antarctic old man subdues the dragon and the tiger. The 28 star kings in the front row and the 32 emperor and son of heaven in the back row. The water flows down the steps?,The wall is surrounded by mountains behind the courtyard. Cranes have red tops and turtles have green fur. At the top of the tree, there is a fruit Cang ape, and a Ganoderma white deer in the sedge. On the Sanqing hall, hit the golden bell Taoist step empty; In front of the four holy halls, the real people knocked out the jade and made a ritual fight. The incense offering platform is built, and the rosy clouds shine on the blue colored glass; Call the Yao altar, red sun shadow and red agate. I'll see you in the auspicious cloud outside the door early. It's suspected that the Heavenly Master sent Lao Jun away.
        Now, the abbot, the Taoist boy's attendants, welcome in front and lead in back, and connect them to the Sanqing hall. Please provide the imperial edict in the middle. Hong Taiwei asked the immortal in the palace, "where is the Heavenly Master now?" The abbot told him: "the good teacher, Tai Wei, learned that this generation of grandmaster, named Xujing Heavenly Master, has a good and noble nature. He is tired of greeting and seeing off. He built a Maoan on the top of the dragon and tiger mountain to cultivate his nature. Therefore, he can't live in this palace." The Tai Wei said, "now that the emperor has announced the imperial edict, how can I see it?" The immortal replied, "let's report: the imperial edict is on the hall. I don't dare to read it. Please ask the Taiwei to offer tea to the abbot and worry about it again." At that time, he raised the Dan Zhao in the Sanqing hall and went to the abbot with all the officials. The Taiwei sat down in the middle. When the Deacon offered tea, he went into fasting and offered food, both water and land. After fasting, the Taiwei asked the immortal again, "since the Heavenly Master is in the peak nunnery, why don't you ask someone to come down to meet you and announce the Dan edict?" The immortal said:
        "Although the ancestors of this generation are on the top of the mountain, they are actually very good at Taoism. They can drive fog and clouds, and their traces are uncertain. It's hard to see the poor Taoist priest as usual. How can you teach people to come down? " The Tai Wei said, "how can you see this? Now that the plague is prevalent in the capital, the emperor has sent an official to hold the imperial calligraphy Dan imperial edict and personally offer dragon incense to invite the Heavenly Master to make a 3600% Luo Tian festival to relieve the natural disaster and the people. What can I do if it is like this?" The immortal said: "the emperor wants to save all the people, except that the Taiwei has a little sincerity, fasts and bathes, changes cloth clothes, doesn't take people, carries the imperial edict, burns Royal incense, walks up the mountain to worship, and knocks at the Heavenly Master. If he doesn't have sincerity, it's hard to see if he walks empty." When the Taiwei heard about it, he said, "I've come here from the capital to eat vegetarian food. How can I be sincere? In that case, according to you, I'll go up the mountain early tomorrow." Each had his own right to rest that night.
        At five o'clock the next day, the Taoists got up, prepared fragrant soup and asked the Taiwei to get up and bathe.
    </div>
</body>
2.2.5 attribute selector
The attribute selector is selected according to the existing attribute ID on the element
- grammar
[property name = ''] {}
<style>
    /* attribute selectors  */
    /* When parsing in html, tags with special functions will be parsed, but you can also write automatically defined tags like xml */
    /* Therefore, in the process of page writing, we cannot determine whether the tag can be used (no error is reported). The same is true for attributes  */
    /* Different attributes can be written for different tags, but the browser cannot determine whether it has the attribute when writing, and any attribute can be written on the tag */
    /* Attribute selection is the selection of corresponding labels through attributes and attribute values */

    /* Select based on whether you have the specified attribute */
    *[class]{
        background-color: powderblue;
    }
    /* Select a tag with type attribute and attribute value_ blanK label */
    a[type="_blank"]{
        background-color: silver;
    }
    /* Select the div tag that has the class attribute and contains a single c character */
    div[class~="c"]{
        background-color: slateblue;
    }
    /* Select a label that begins with the special character c and is separated by - */
    *[class|="c"]{
        background-color: red;
    }
    /* Select a label that begins with the specified character */
    /* If there are multiple values, the first character judgment of multiple values will also be obtained */
    *[class^="c"]{
        background-color: teal;
    }
    /* Select a label that ends with the specified character */
    a[type$="k"]{
        background-color: tomato;
    }

    /* Select the label whose attribute value contains the specified character */
    span[class*="a"]{
        background-color: blue;
    }
</style>

<body>
    <div class="c-div" ai>div</div>
    <input type="text" class="c-input" ai>
    <span class="cspan" ai>span</span>

    <a href="#" type="_ Blank "> a label</a>
    <a href="#" type="_ Top "> a label</a>
    <a href="#" type="_ Myself "class =" CA "> a label</a>
    <a href="#" type="_ Blank "> a label</a>

    <div class="a b c d">d1</div>
    <div  class="b c d">d2</div>
    <div  class="c d">d3</div>
    <div  class="d">d4</div>
</body>
2.2.6 wildcards
*Wildcards are used on all labels in the page. They are not recommended for development and affect the rendering performance of web pages
*{
  color:red;
  font-size:20px;
}
2.2.7 priority of selector
When writing a page in the actual development process, usually in order to facilitate the writing of code, the label is quickly set through the selector. However, sometimes when setting, multiple selectors will set different styles for the same label. At this time, the style must be set according to the priority of the selector
Priority is calculated as follows
!important>Inline style>id selector>Class selector >tag chooser
1000				100 		10 		1
When selecting a selector, calculate the corresponding weight according to the selector used (abbreviated method). It can also be understood that the weight of the selector with small effective range is greater than that with large effective range
Note: the corresponding value written above refers to the value of the corresponding position. The hexadecimal relationship is not 10. The weight value is similar to 0000. During weight comparison, it will be compared from front to back. If it is the same, the next bit will be compared
<link rel="stylesheet" href="../css/wb.css">
<style>

    /* When multiple selectors set the same label style, the effective style is determined according to the weight */
    /* The solution is to set the same attribute style */

    /* tag chooser  */
    /* Weight 1 */
    div{
        height: 200px;
        width: 200px;
        background-color:red;
    }

    /* Class selector  */
    /* Weight 10 */
    .c1{
        background-color: rosybrown;
    }


    /* id selector */
    /* Weight 100 */
    #i1{
        background-color: seagreen;
    }
    /* Tag selection + id selection */
    /* Weight 101 */
    div#i1{
        background-color: tan;
    }
    /* Effective after the weight is the same */
    div#i1{
       background-color: tomato;
    }

    /* The writing weight of the internal style is the same as that of the external style, but the external style is usually introduced before the internal style*/
    /* Therefore, when the weight is the same, the internal style takes effect (written after referencing the external style) */

    /* Label selector weight 1 cannot be compared with other selectors */
    /* If the attribute weight set in the label with low weight is required, the highest attribute weight can be written after the attribute! important */
    div{
        background-color: violet !important;
    }

</style>


<body>
    <div style="background-color: wheat;" id="i1" class="c1"></div>
</body>
Selector weight explicit
1. The higher the range of the selector, the lower the weight
2. The combination selector is used for calculation. Adding the two weights is just a simple calculation (base is not 10)
3. The weight is the same, and the last writing is the main
2.3 CSS box model
2.3.1 foundation style
| Style name | describe |
|---|---|
| text-align | The row element is centered horizontally |
| text-decoration | Control underline none no underline yes |
| line-hight | Row height |
| font-size | Font size settings |
| font-weight | Setting font weight |
| font-famliy | Set font style |
| letter-spacing | Sets the spacing between Chinese fonts |
| word-spacing | Sets the spacing between English words |
Line height: sets the height occupied by single line text. The actual position is the size of the text + the space between the top and bottom
p{
  height: 40px;
  text-align: center;
  line-height: 40px;
  border: 1px solid black;
}
Font is the compound attribute of font, which sets font size, color, thickness, etc. the order of abbreviation is bold, size and type
*{
  /* The median - is called a composite attribute */
  /* font-size: 18px;
  font-weight: bold;
  font-family: "Italics "; */
  font: bold 20px "Song typeface";
}
2.3.2 box model
Each element in the page can be called a box. The main purpose is to calculate the actual position of the element in the web page. You can intuitively view the box model through F12
2.3.2.1 border line
It is used to set the border color, thickness and style of elements, or to control the style of an edge separately
| Attribute name | describe |
|---|---|
| border-width | Set border line width |
| border-style | Set border line style |
| border-color | Set border line color |
div{
  width: 200px;
  height: 200px;
  /* border-width: 5px;
  border-style: dashed;
  border-color: #008B8B; */
  /* Controls the style of the four edges */
  border: 3px double #7B68EE;
  /* border-top-color: red;
  border-top-width: 5px;
  border-top-style: dotted; */
  border-top: red 5px dotted;
}
2.3.2.2 background
It is used to set the background style of the element, including background color, background image, size, etc. the premise of setting the background style is that the element has size
| Attribute name | describe |
|---|---|
| background-color | Set background color |
| background-image | Set background picture |
| background-position | Set the position of the background picture |
| background-size | Sets the size of the background picture |
| background-repeat | Set whether the background picture is repeated |
| background-attachment | Set the positioning position of the background picture relative to the browser |
div{
  width: 1000px;
  height: 1000px;
  /* background-color: #008B8B;
  background-image: url(./timg.jpg);
  background-size: 50px 50px;
  background-repeat: no-repeat;
  background-position: center;
  background-attachment: fixed; */
  background: #008B8B url(./timg.jpg) no-repeat;
}
Background image size and position attributes have two values, which are not easy to distinguish. It is recommended to set them separately
2.3.2.3 outer margin
The space between boxes is called the outer margin, which is divided into four directions (upper right lower left clockwise)
| Attribute name | describe |
|---|---|
| margin-left | Distance from left |
| margin-right | Distance from right |
| margin-top | Distance from top |
| margin-bottom | Distance from bottom |
Note: when two relative elements, one uses margin bottom and the other uses margin top, the spacing between the two takes a larger value
<div>
  <p></p>
  <h4></h4>
</div>
*{
  margin: 0;
  padding: 0;
}
div{
  width: 200px;
  height: 200px;
  background-color: #008B8B;
}

p,h4{
  width: 50px;
  height: 50px;
}
p{
  margin-left: 20px;
  margin-bottom: 15px;
  background-color: #7B68EE;
}
h4{
  margin-left: 15px;
  margin-top: 20px;
  background-color: #B8860B;
}
Note: when margin top is used for the first child element in the parent element, the margin will collapse (the parent element will sink with the first child element as a whole)
1. It is inappropriate not to use it as the first child element (adding an empty element will affect the actual distance when there is content)
2. It is inappropriate to add a border line to the parent element (the size of the border line will also affect the position and size occupied by the element)
3. Use inner margin instead
margin sets the horizontal alignment of block elements
div{
  margin:0 auto;//Center the block element horizontally
}
Short form of margin
| Attribute name | describe |
|---|---|
| margin:20px 10px 15px 25px; | They represent upper right lower left |
| margin:20px 10px 15px; | They represent up, left, right and down respectively |
| margin:20px 10px; | They represent up, down, left and right respectively |
| margin:20px; | Up, down, left and right |
| auto | self-adaption |
Note: for row elements, the margin left attribute can be used, and the top and bottom attributes do not take effect
2.3.2.4 inner margin
The space between the box and the content is called the inner margin. The nested two boxes are called the outer margin when the inner box is the center, and the inner margin when the outer box is the center
| Attribute name | describe |
|---|---|
| padding:20px 10px 15px 25px; | They represent upper right lower left |
| padding:20px 10px 15px; | They represent up, left, right and down respectively |
| padding:20px 10px; | They represent up, down, left and right respectively |
| padding:20px; | Up, down, left and right |
When using padding, the parent element will be stretched out. After stretching, the position and size of the element on the page will be changed
Note: when the inner margin is used, subtract the corresponding value from the width and height, and the remaining area size can still wrap the content size. Otherwise, it is not suitable for use
2.3.2.5 display attribute
display is used to change the generation type of elements, so as to increase the use of elements
| Attribute name | describe |
|---|---|
| display:none; | Hide element |
| display:block; | Change element to block element |
| display:inline; | Change element to row element |
| display:inline-block; | Change element to inline block element |
<a href="http://www.taobao.com">
  <img src="./timg.jpg" alt="" width="200px" height="300px">
  <p>Picture description text</p>
</a>
*{
  margin: 0;
}
a{
  display: inline-block;
}
Case: use the display attribute to achieve the navigation bar effect
<ul>
  <li>
    <a href="">home page</a>
  </li>
  <li>
    <a href="">Company profile</a>
  </li>
  <li>
    <a href="">Business direction</a>
  </li>
  <li>
    <a href="">contact information</a>
  </li>
</ul>
a{
  text-decoration: none;
  color: white;
}
ul{
  list-style: none;
  font-size: 0px;
}

/* After using the inline block attribute, a gap appears between element blocks
 Scheme: set the font size of the parent element to 0, and then set the font size of specific elements
*/
ul li{
  display: inline-block;
  width: 120px;
  height: 35px;
  color: white;
  text-align: center;
  line-height: 35px;
  background-color: darkslateblue;
}
ul li{
  font-size: 16px;
}
ul li:hover{
  background-color: #008B8B;
}
ul li:hover a{
  color: #483D8B;
}
visibility controls the display and hiding of elements
body:hover div{
  /* display: none; */
  visibility: hidden;
}
The display attribute does not occupy the position of the page when hiding elements. After visibility is hidden, the position is still occupied
2.3.2.6 floating
Floating is to change the rules of elements in the document flow (the default layout of elements from top to bottom is called document flow), so that elements can be typeset in the horizontal direction
float:left/right
1. A floating element, no matter what type of box it is, will become a block element
<head>
  <meta charset="utf-8">
  <style type="text/css">
    a{
      float: left;
      height: 100px;
      width: 200px;
      color: white;
      text-decoration: none;
      background-color: #008B8B;
    }
  </style>
</head>
<body>
  <a href="">No width or height</a>
</body>
2. Floating elements will automatically change to the next line when there is not enough space in the same line
div{
  float: left;
  width: 24%;
  height: 100px;
  color: red;
  margin-right: 1%;
  background-color: black;
}
div:nth-of-type(1){
  width: 30%;
}
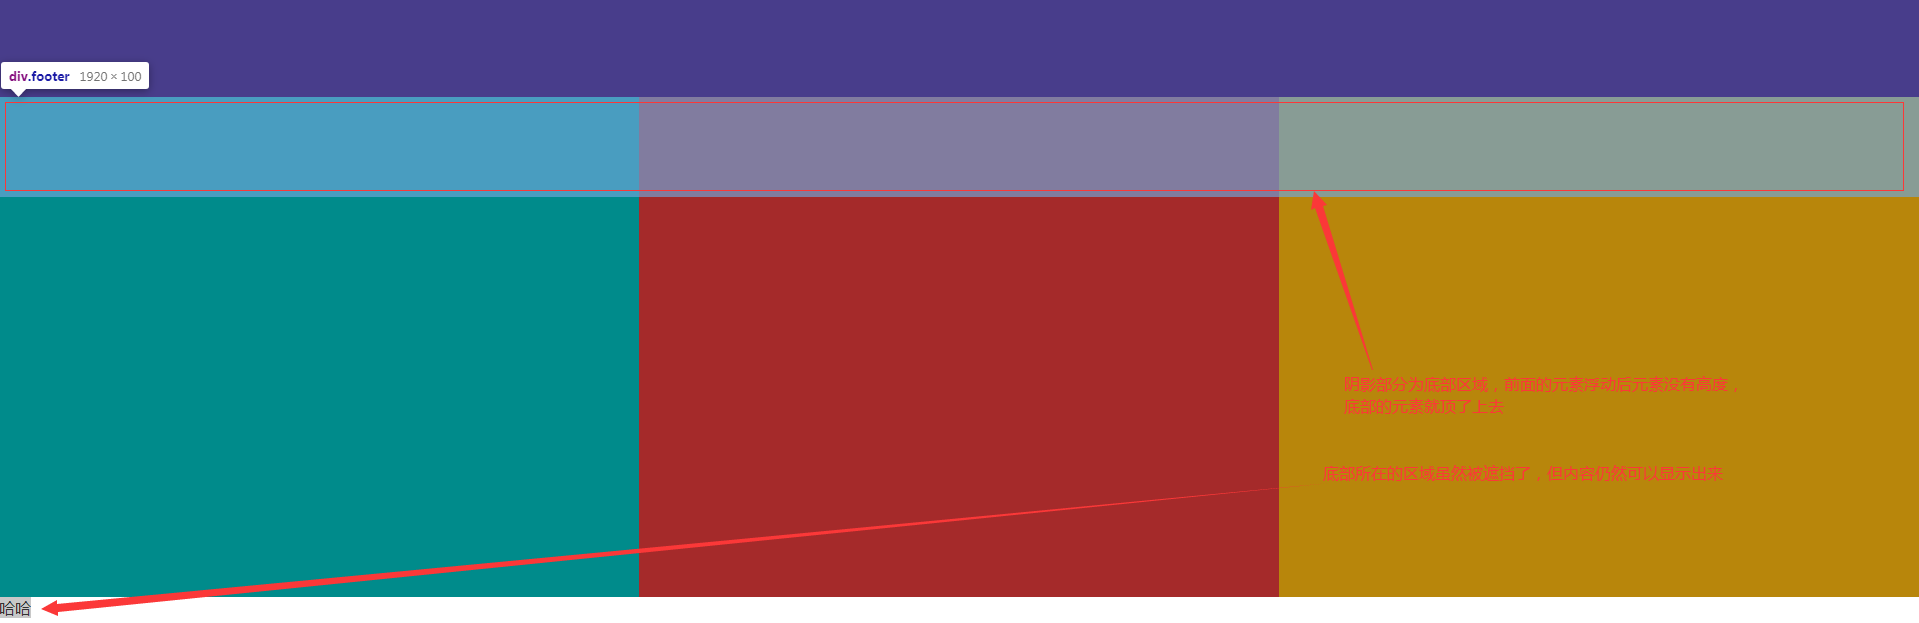
3. The floating element will block the area of the next non floating element, but not the content
<div class="header"></div>
<div class="content">
  <div class="left"></div>
  <div class="center"></div>
  <div class="right"></div>
</div>
<div class="footer">ha-ha</div>
*{
  margin: 0;
}
.header{
  height: 100px;
  background-color: #483D8B;
}
.content{
  /* height: 500px; */
  background-color: #008000;
}
.footer{
  height: 100px;
  background-color: black;
}
.content div{
  float: left;
  width: 33.33%;
  height: 500px;
}
.content .left{
  background-color: #008B8B;
}
.content .center{
  background-color: #A52A2A;
}
.content .right{
  background-color: #B8860B;
}
2.3.2.7 clear float
Syntax: clear:left/right/both;
1. It is common to set a fixed height for the parent element of the floating element, but the parent element is fixed, which is inconvenient for maintenance and modification
2. Add an empty tag to the end of the parent element. Specifying the clear attribute is not commonly used. There will be many empty tags in the page, which will affect the resolution speed of the browser
3. Set the style overflow for the parent element. It is not commonly used to cut the area. After cutting, the content in the page will be lost
4. Common methods of adding pseudo class styles to parent elements (recommended)
/* It is equivalent to adding an empty block element at the end of the parent element */
.clearfix:after{
display: block;
clear: both;
content: ".";
/* Enhance code robustness */
height: 0;
visibility: hidden;
}
2.3.2.8 positioning
Floating is more used for the overall layout of modular (no specific pixel value requirements) areas. Positioning is required for page adjustment accurate to pixel values, such as the number of shopping carts, message notifications, etc
| Attribute name | describe |
|---|---|
| position:relative; | Relative positioning (positioning relative to the default position, not separated from the document flow, still occupying the page position) |
| position:absolute; | Absolute positioning (positioning relative to the first parent element with positioning attribute, the default is browser) |
| position:fixed; | Absolute positioning relative to the browser |
stack order
When positioning elements, they will be in the same position. You can set their stacking order to determine the display priority
Syntax: the larger the value of z-index, the higher the value
<div></div>
<div></div>
<div></div>
div{
  position: absolute;
  top: 0;
  left: 0;
  width: 300px;
  height: 300px;
}
div:nth-of-type(1){
  z-index: 1;
  background-color: #008B8B;
}
div:nth-of-type(2){
  z-index: 2;
  background-color: #483D8B;
}
div:nth-of-type(3){
  background-color: #808080;
}
Note: the premise of using z-index is that the element must have a positioning attribute
2.4 CSS common effects
CSS3 has further optimized the style, and some common effects in development are shown here
2.4.1 fillet effect
Controls the radians of the four corners of the box
Syntax: border radius
It controls the radians of the four corners of the element. When the radian value is greater than or equal to half of the width and height of the element, the element will become a circle
<div>
  Message notification
  <span>1</span>
</div>
div{
  position: relative;
  width: 60px;
  height: 30px;
  font-size: 14px;
  color: grey;
  margin: 50px auto;
}
span{
  position: absolute;
  right: -5px;
  top: -7px;
  display: block;
  width: 16px;
  height: 16px;
  color: white;
  font-size: 12px;
  text-align: center;
  line-height: 16px;
  border-radius: 50%;
  background-color: red;
}
2.4.2 transparency effect
Transparent effect is widely used, especially in the picture + text description in the mall website
2.4.2.1 transparent background
Background transparency is transparent only for the background color
Background color: RGBA (x, x, x, x) transparency is between 0 and 1
<div>
  <p>50% off seckill autumn clothes and trousers set</p>
</div>
div,p{
  margin: 0;
}
div{
  position: relative;
  width: 200px;
  height: 200px;
  color: white;
  margin: 50px auto;
  background-size: cover;
  background-image: url(./timg.jpg);
}
p{
  position: absolute;
  bottom: 0;
  width: 100%;
  height: 35px;
  line-height: 35px;
  text-align: center;
  background-color: rgba(0,0,0,0.2);
}
2.4.2.2 overall transparency
Transparent for the entire element, including all child elements of the element
opacity is between 0 and 1
p{
  position: absolute;
  bottom: 0;
  width: 100%;
  height: 35px;
  line-height: 35px;
  text-align: center;
  opacity:.2;
}
2.4.3 box shadow
Add shadow effects to block elements to achieve a three-dimensional visual effect
div{
width: 200px;
height: 200px;
margin: 50px auto;
/* Parameter 1 X-axis offset parameter 2 Y-axis offset parameter 3 shadow blur degree
[Parameter 4 shadow extension radius] parameter 5 shadow color parameter 6 inset inner shadow */
box-shadow: 3px 3px 9px grey;
}
2.4.4 text shading
Add shadows to the text to achieve a three-dimensional visual effect
p{
    text-align: center;
    text-shadow: 3px 3px 9px grey;
}
2.4.5 responsive effect (understanding)
The development of early pages requires front-end personnel, Android engineers and IOS engineers. Because the screen sizes of PC and mobile terminals are quite different, a complete set of projects need to be developed for PC and mobile terminals respectively; Since the emergence of H5, the front-end personnel can adapt on both IPAD and mobile terminals through the pages of the PC side of the technology award, so the front-end becomes more important.
There are two adaptive modes: responsive and elastic box; At present, almost all popular frameworks for front-end page development encapsulate the operation of responsive or elastic boxes
2.4.5.1 adaptation of mobile phone screen
The emergence of H5 allows PC applications to be used in equal proportion directly on the mobile phone, and its view mode needs to be set
<meta name="viewport" content="width=device-width, initial-scale=1">
2.4.5.2 page adaptation
The size of the elements in the web page is dynamically set according to the size of the computer screen, so as to achieve a responsive effect
@media (max-width:900px) {
  div{
    width: 25%;
  }
}
@media (max-width:900px) and (min-width:720px) {
  div{
    width: 50%;
  }
}
@media (max-width:720px) {
  div{
    width: 100%;
  }
}
A little progress every day
move forward , or you 'll fall behind