1.Promise, Async, timer execution sequence
JS tasks are divided into synchronous tasks and asynchronous tasks. JS is single threaded and can only do the same thing at the same time. Therefore, execute synchronous tasks first and then asynchronous tasks. Synchronization tasks will be executed in order in the execution stack; Asynchronous tasks will be placed in a task queue and wait for the JS engine to execute.
Asynchronous tasks are divided into macro tasks and micro tasks. Micro tasks take precedence over macro tasks. SetTimeout belongs to macro tasks, promise and Async belong to micro tasks. Macro tasks generally include script, setTimeout and setInterval. Micro task: promise, process nextTick.
Once promise is defined, it will be executed immediately. Its reject and resolve are asynchronous callbacks. After await is executed, give up the thread, and the async marked function returns a promise object.
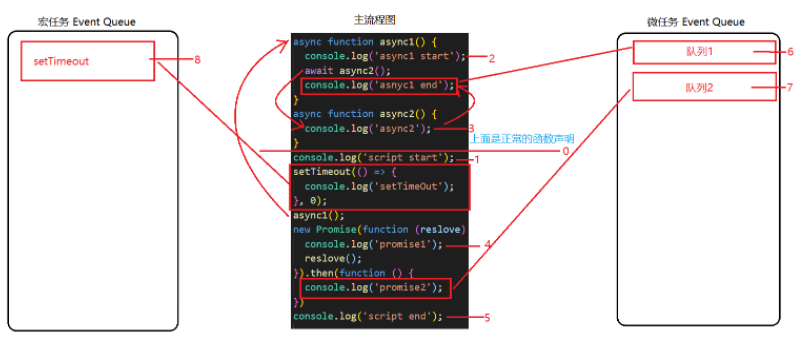
Let's sort out the process according to the picture:
1. Execute console Log ('script start '), output script start;
2. Executing setTimeout is an asynchronous action, which is put into the macro task asynchronous queue;
3. Execute async1(), output async1 start, and continue to execute downward;
4. Execute async2(), output async2, and return a promise object. await gives up the thread and adds the returned promise to the micro task asynchronous queue. Therefore, the code under async1() should continue to execute after the above is completed;
5. Execute new Promise, output promise 1, and then put resolve into the micro task asynchronous queue;
6. Execute console Log ('script end '), output script end;
7. The synchronized code is completed, and then go to the micro task asynchronous queue to get the task
8. Next, execute resolve (returned by promise returned by async2) and output async1 end.
9. Then, execute resolve (new Promise) and output promise 2.
10. Finally, execute setTimeout and output setTimeout.
2. Network layer 7 model
Application layer, presentation layer, session layer, transport layer (TCP/IP), network layer (IP), data link layer and physical layer
TCP is a connection oriented protocol, which is oriented to byte stream communication and ensures the transmission sequence of data. It is suitable for applications requiring reliable transmission. One-to-one communication is suitable for file transmission, three handshakes and four waving operations.
UDP is a connectionless protocol. It does not guarantee reliable delivery, does not use flow control and congestion control, and is oriented to message communication. It does not guarantee the sequence of data transmission. It is suitable for real-time applications, network telephony, video conference, etc.
3.BFC
Block level formatting context
4. Block level scope
Defined variables are invisible outside the code block, which is called block level scope; Function scope means that the parameters and variables in a function are not visible externally.
5. The difference between let , const , var
(1) the var global variable will be promoted (only after the variable is declared can it be promoted), and cannot be declared again.
//The output is 10
for (var i = 0; i < 10; i++) {
    setTimeout(function(){
        console.log(i);
    },100)
};
//The output is 0 ~ 9
for (let i = 0; i < 10; i++) {
    setTimeout(function(){
        console.log(i);
    },100)
};
(2) the variables declared by let belong to block level scope and cannot be redeclared
(3) the variable declared by const belongs to the block level scope. It is a constant and its value cannot be modified.
6. Front end anti shake and throttling
The purpose of anti chattering and throttling is to avoid frequent triggering at a certain time. Function anti shake means that it is executed only once in a certain period of time, while throttling means that it is executed once at an interval. The input without anti shake will be timed every time it is input, and the anti shake input will execute the function only when there is no output within the specified interval. If you stop input but enter again within the specified interval, the timing will be triggered again. Throttling refers to the execution of a function at an interval, which will trigger the timing again.
//Simulate an ajax request
function ajax(content) {
  console.log('ajax request ' + content)
}

//input after anti shake
function debounce(fun, delay) {
    return function (args) {
        let that = this
        let _args = args
        clearTimeout(fun.id)
        fun.id = setTimeout(function () {
            fun.call(that, _args)
        }, delay)
    }
}

let inputa = document.getElementById('unDebounce')

inputa.addEventListener('keyup', function (e) {
    ajax(e.target.value)
})

let biu = function () {
    console.log('biu biu biu',new Date().Format('HH:mm:ss'))
}

let boom = function () {
    console.log('boom boom boom',new Date().Format('HH:mm:ss'))
}


setInterval(debounce(biu,500),1000)
setInterval(debounce(boom,2000),1000)
Applicable scenarios:
(1) search searches Lenovo. When users constantly input values, they use anti shake to save request resources.
(2) When window triggers resize, this event will be triggered by constantly adjusting the browser window size. You can only trigger it once with anti shake.
(3) Mouse click trigger continuously, mousedown is triggered only once per unit time.
(4) Listen for scrolling events, such as whether to slide to the bottom and automatically load more. Use throttle to judge.
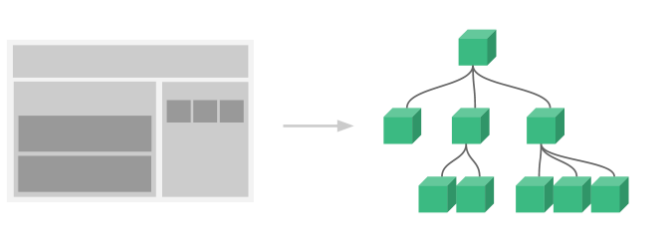
7. Component communication of Vue
vue applications are usually composed of a nested component tree.
(1)props/$emit
The parent component communicates with the child component through props; The child component communicates with the parent component v-on by binding the event $emit.
//The parent component passes values to the child component
//App.vue parent component
<template>
    <div>
        <users v-bind:users="users"></users>
    </div>
</template>

<script>
    import Users from "./components/Users"

    export default{
        name: "App",
        data(){
            return{
                users:{"Henry","Bucky","Emily"}
            }
        },
        components:{
            "users": Users
        }
    }
</script>
----------------------------------
//users subcomponent
<template>
  <div class="hello">
    <ul>
      <li v-for="user in users">{{user}}</li>//Traverse the passed value and render it to the page
    </ul>
  </div>
</template>
<script>
export default {
  name: 'HelloWorld',
  props:{
    users:{           //This is the custom name of the child tag of the parent component
      type:Array,
      required:true
    }
  }
}
</script>
//The child component passes values to the parent component
// Subcomponents
<template>
  <header>
    <h1 @click="changeTitle">{{title}}</h1>//Bind a click event
  </header>
</template>
<script>
export default {
  name: 'app-header',
  data() {
    return {
      title:"Vue.js Demo"
    }
  },
  methods:{
    changeTitle() {
      this.$emit("titleChanged","The child passes values to the parent component");//Custom event pass value "pass value from child to parent component"
    }
  }
}
</script>
// Parent component
<template>
  <div id="app">
    <app-header v-on:titleChanged="updateTitle" ></app-header>//Consistent with the child component titleChanged custom event
   // updateTitle($event) accepts the passed text
    <h2>{{title}}</h2>
  </div>
</template>
<script>
import Header from "./components/Header"
export default {
  name: 'App',
  data(){
    return{
      title:"A value is passed"
    }
  },
  methods:{
    updateTitle(e){   //Declare this function
      this.title = e;
    }
  },
  components:{
   "app-header":Header,
  }
}
</script>
(2)$emit / $on
The empty Vue instance is used as the event center to trigger and listen to events and realize the communication between components.
//example
<div id="itany">
	<my-a></my-a>
	<my-b></my-b>
	<my-c></my-c>
</div>
<template id="a">
  <div>
    <h3>A Components:{{name}}</h3>
    <button @click="send">Send data to C assembly</button>
  </div>
</template>
<template id="b">
  <div>
    <h3>B Components:{{age}}</h3>
    <button @click="send">Send array to C assembly</button>
  </div>
</template>
<template id="c">
  <div>
    <h3>C Components:{{name}},{{age}}</h3>
  </div>
</template>
<script>
var Event = new Vue();//Define an empty Vue instance
var A = {
	template: '#a',
	data() {
	  return {
	    name: 'tom'
	  }
	},
	methods: {
	  send() {
	    Event.$emit('data-a', this.name);
	  }
	}
}
var B = {
	template: '#b',
	data() {
	  return {
	    age: 20
	  }
	},
	methods: {
	  send() {
	    Event.$emit('data-b', this.age);
	  }
	}
}
var C = {
	template: '#c',
	data() {
	  return {
	    name: '',
	    age: ""
	  }
	},
	mounted() {//Execute after template compilation
	 Event.$on('data-a',name => {
	     this.name = name;//No new this will be generated inside the arrow function. If not = >, this refers to Event
	 })
	 Event.$on('data-b',age => {
	     this.age = age;
	 })
	}
}
var vm = new Vue({
	el: '#itany',
	components: {
	  'my-a': A,
	  'my-b': B,
	  'my-c': C
	}
});
</script>
(3)Vuex
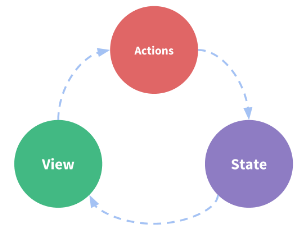
vuex implements one-way data flow. There is a global data storage manager, state, to store data. Mutation monitors data changes and modifies data in the state. At the same time, only synchronous operations can be performed in the mutation, which is the only recommended method to modify the state, and its method name can only be globally unique. Asynchronous operation of mutation is carried out in actions. The module can be encapsulated by Promise and supports chain triggering of actions. commit is the state change submission operation method and the only method to execute mutation. getters is the method of reading the object of the state. The so-called one-way data flow refers to: State: the data source driving the application; View: map the state to the view in a declarative manner; action: state changes in response to user input on the view.

When multiple component sharing states are encountered in one-way data flow: ① multiple views depend on the same state; ② Different views need to change the same state. Adopting component delivery will lead to many unavoidable problems. For example, the content between brother components cannot be delivered. Therefore, the shared state of components can be extracted and managed in the global singleton mode. The code can be structured and maintainable by defining and isolating various concepts of state management and maintaining the independence between views and states through mandatory rules.
When the data in Vuex changes, a copy of the data is saved in localStorage. After refreshing, the data saved in localStorage is taken out to replace the state in the store. It should be noted that the data stored in Vuex is an array, while the data in localStorage only supports strings, so JSON conversion is required.
let defaultCity = "Shanghai"
try {   // The user has turned off the local storage function. At this time, a try is added to the outer layer catch
  if (!defaultCity){
    defaultCity = JSON.parse(window.localStorage.getItem('defaultCity'))
  }
}catch(e){}
export default new Vuex.Store({
  state: {
    city: defaultCity
  },
  mutations: {
    changeCity(state, city) {
      state.city = city
      try {
      window.localStorage.setItem('defaultCity', JSON.stringify(state.city));
      // When the data changes, a copy of the data is saved in local storage
      } catch (e) {}
    }
  }
})
//JSON conversion
JSON.stringify(state.subscribeList);   // array -> string
JSON.parse(window.localStorage.getItem("subscribeList"));    // string -> array
(4) $attrs / $listeners multi-level component nesting only transfers data without other processing. Use this method.
$attrs: a feature in the parent scope that is not recognized by prop. v-bind="$attrs" is passed into the internal component, which is used together with interittrs.
$listeners: pass in internal components via v-on="$listeners".
In short, $attrs stores the non Props attributes bound in the parent component, while $listeners stores the non-native events bound in the parent component.
(5)provide / inject
Allow ancestor components to inject dependencies into their descendant components, provide to provide variables, and descendant components inject variables through inject.
// A.vue
export default {
  provide: {
    name: 'Boating in the waves'
  }
}
// B.vue
export default {
  inject: ['name'],
  mounted () {
    console.log(this.name);  // Boating in the waves
  }
}
(6) $parent / $children and ref
ref: it is used on ordinary Dom elements. The reference points to Dom elements. If it is on sub components, the reference points to component instances$ parent / $children: access parent / child instances. However, it cannot realize cross level or inter brother communication.
// component-a subcomponent
export default {
  data () {
    return {
      title: 'Vue.js'
    }
  },
  methods: {
    sayHello () {
      window.alert('Hello');
    }
  }
}
// Parent component
<template>
  <component-a ref="comA"></component-a>
</template>
<script>
  export default {
    mounted () {
      const comA = this.$refs.comA;
      console.log(comA.title);  // Vue.js
      comA.sayHello();  // Popup
    }
  }
</script>
Summary:
Parent child communication: parent - > child (Props), child - > parent ($emit); Communication through parent chain / child chain ($parent/$children); ref can also access component instances.
Brother communication: Bus; Vuex
Cross level communication: Bus, Vuex, provide/inject API, $attrs/$listeners
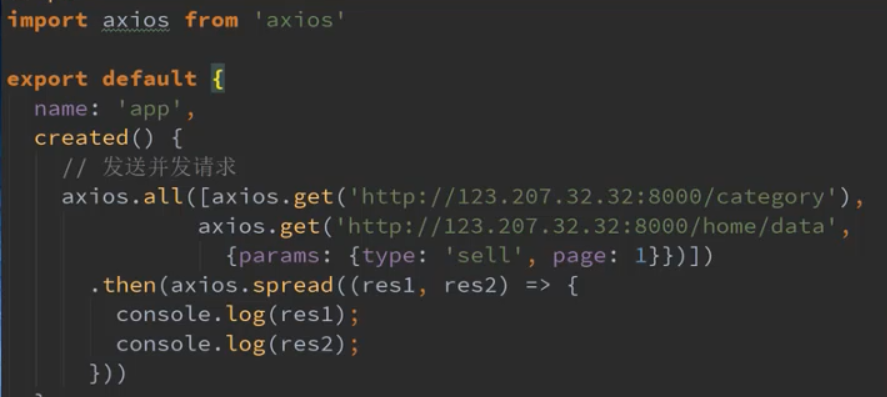
8.axios implementation principle
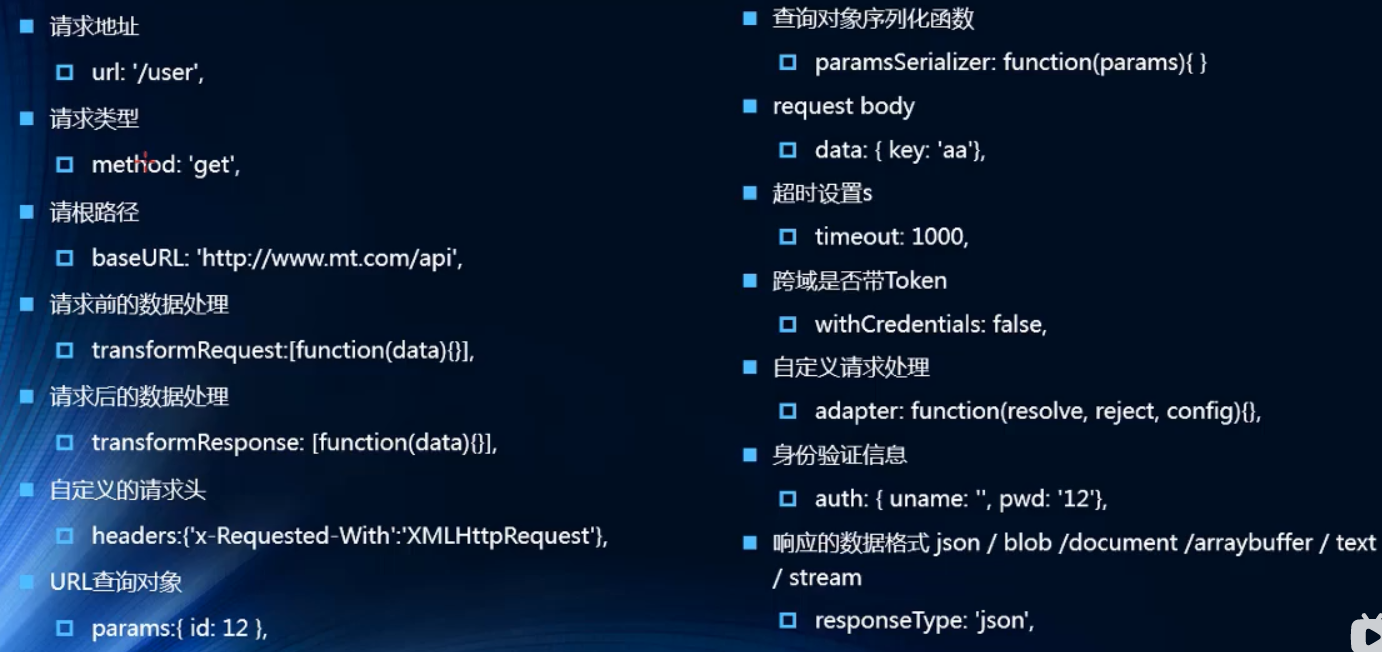
Axios request mode: axios(config); axios.request(config); axios.get(url[,config]); axios.delete(url[,config]); axios.head(url[,config]); axios.post(url[,data[,config]]); axios.put(url[,data[,config]]); axios.patch(url[,data[,config]]). Config is the corresponding object content:
//By default, it is a get request
axios({
  url: "",
//Method is the request method. It defaults to get or other post
  method: ''
}).then(res=>{
    conlose.log(res);
})
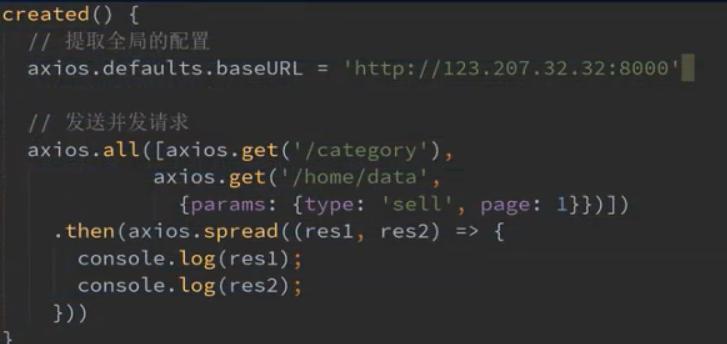
Global configuration in axios, parameter extraction in development:
axios common configuration options
The use of axios is similar to the use of promise. It is executed first and then entered Then performs a series of operations. The global} axios and the corresponding configuration are used for network requests, but the global default address may be wrong. Therefore, you can establish a public address or request time by creating an instance. Each instance has its own configuration. If the dependency of a third party is referenced, it should be extracted and encapsulated into a file. axios can be encapsulated into the network to establish a request JS file
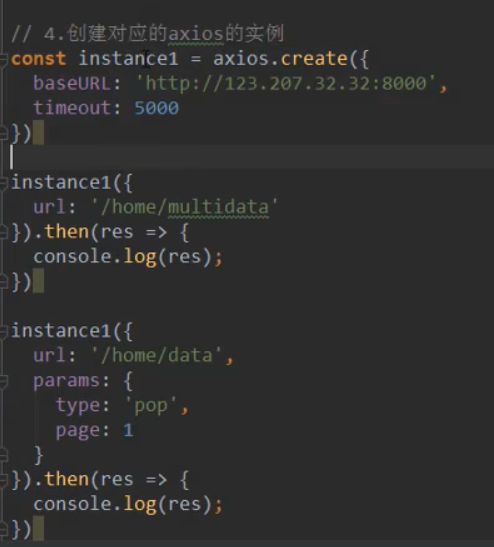
axios is simply encapsulated
//rrequest.js file
export function request(config){
    //1. Create an instance of axios
    const instance = axios.create({
        baseURL: "http://123.207.32.32:8000",
        timeout:5000
    })

    //Send a real network request
    return instance(config)
}

//main.js
import {request} from "./network/request";
request({
    url: '/home/multidata'
}, res=>{
    conlose.log(res);
}, err=>{
    console.log(err);
})

request({
    baseConfig:{
    },
    success: function(res){

    },
    failure:function(err){

    }
})
9. Add token to Axios request interceptor? Configure the public request prefix.
axios provides interceptors for processing each request or response.
Configure and respond to interceptors:
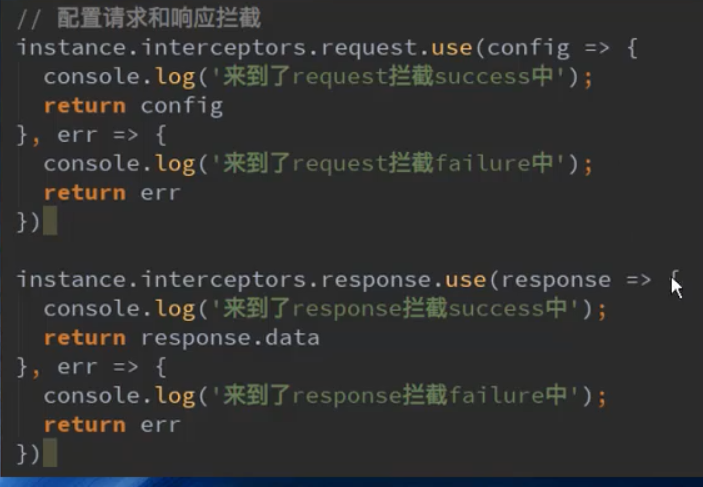
axios interceptor
//One step operation of axios interceptor
export function request(config) {
    return new Promise((resolve, reject) => {
        const instanse1 = axios.create({
            baseURL: 'http://123.207.32.32:8000',
            timeout: 5000
        })

        // axios interceptor
        // Request interception
        instanse1.interceptors.request.use(backMsg =>{
            console.log(backMsg);
            // 1. If some information in config does not meet the requirements, you can use interception to change config

            // 2. For example, when sending a network request, you want to display an icon in the interface

            // 3. Some network requests (such as login (token)) must carry some information


            // config has been intercepted and needs to be returned again
            return config
        },err=>{
            console.log(err); //This error will be displayed if the request is not sent
        })


        // Response interception
       instanse1.interceptors.response.use(res=>{
        console.log(res);
        return res.data
       },err=>{
           console.log(err);

       })

        // Send network request
        instanse1(config)
            .then(res => {
                // console.log(res);
                resolve(res)
            })
            .catch(err => {
                // console.log(err);
                reject(err)
            })

        // return instanse1(config)
    })
}
10. Differences between MVVM and MVC
MVVM is model -- View -- ViewModel. The model refers to the data transmitted by the back end, the view refers to the page seen by the front end, and the view model is the bridge between the view and the model. It is mainly divided into two directions: ① model is transformed into view, that is, the back-end transfer data is transformed into the seen page (implementation method: data binding). ② The view is transformed into a model, that is, the front-end page is transformed into back-end data (implementation mode: DOM listening). The implementation of both directions is called two-way binding of data. That is, in MVVM, the model and view can communicate only through the view model as an intermediary. The view model listens for data changes and notifies the corresponding view to update automatically, so as to realize two-way binding of data.
MVC is the model -- View -- controller. MVC is one-way communication, and the model and view must communicate with each other through the controller.
In MVVM, the use of VM separates the business logic shown in the controller, not replaces the controller, that is, MVVM is the reuse of business logic components. In Vue, Model refers to the data in js, such as objects, arrays, etc., while view refers to the page view, and viewModel refers to the instantiated object of Vue.
The mainstream framework implements two-way binding:
(1) dirty value check: starting from the root event, each node compares whether the data has changed through dirty value detection to determine whether to update the view. diff algorithm compares the old and new data through the depth first traversal algorithm to determine whether to update the view, but it will check all sub components from top to bottom.
(2) Observer - subscriber: listen to all attributes of data through observer and through object The defineproperty () method converts the property into getter and setter methods, uses the compile instruction parser to parse each element, replace the template data, and initialize the corresponding subscription. The watcher subscriber executes the corresponding callback function bound by the instruction. The Dep message subscriber maintains an array internally, which is used to trigger the notifu function from the mobile subscriber's watcher data, and then call the subscriber update method. Proxy proxy is also used to listen and subscribe.