1, Foreword
For front-end projects, especially the middle and back office management system projects, permission design is one of the most complex points.
Generally speaking, permission design needs to be checked by the back end. After all, the front end is relatively unable to ensure security, and the code and data requests of the front end can be forged. The authority design of the front end is more for the consideration of user experience. The front end ensures the experience and the back end ensures the security.
Due to the different development and focus of the front and rear end, the permission design is also different. The back-end is more divided into different permission modules according to the function object, and makes corresponding permission judgment for the interface; The front-end is more for page routing module division, for the page can be accessed to judge.
Next, take the background management system as an example to share personal opinions on the front-end permission design.
(the specific content should be independent of the technical framework as far as possible. Both vue and react are just differences in code implementation, and the main idea is the same. However, the implementation of vue is much simpler than react, so the following codes take react as an example)
2, Page level
1. Comparison of several methods
Let's start with a few common permission design methods.
-
Method 1: the filtered route configuration is returned by the back end and rendered by the front end
- Description:
This is that the front end stores all routing configuration data to the back end, and the back end filters the routing data according to user permissions and returns it to the front end, which then renders it. - Existing problems:
Routing is used by the front end. Why store it to the back end? If you want to adjust the routing structure or modify the routing, you have to find the back-end to modify it. The front-end development is not willing, and the back-end is not willing. In the era of separation of front and rear ends, this is not going backwards.
- Description:
-
Method 2: the back end returns the user role, and the front end performs routing filtering according to the role
- Description:
This method optimizes the first method. The first method is that the back end filters the routes according to the permissions and returns to the front end. Now the filtering process is put on the front end, the back end returns the role information, the front end traverses the route configuration, and filters the routes with permissions according to the roles. - Existing problems:
However, there is another problem with this method, that is, the role permissions are not invariable. Once the role permissions are changed, the front-end routing configuration should be checked and modified one by one. If the system designs the function of dynamically modifying the role permissions, this design method will not work.
- Description:
-
Method 3: the back end returns all permission IDS, and the front end performs routing filtering according to the permission id
- This is also the way I want, which is described in detail below.
Specifically, a matching access id is set for each page route. The back end only needs to give all the user's permission IDs to the front end without role information.
Some people may not be able to get around the role. In fact, no matter whether your system has the concept of role or not, role is just an appellation. Just show this appellation where necessary.
A role can have multiple permissions. You generally don't need to care about the specific permissions. This data is only needed on the page that dynamically configures the role permissions. When necessary, traverse the routing configuration and display and edit it with a tree tree component.
In fact, you can also understand each permission id as a different role, but this role has only one permission.
As for where to configure the permission id of the route, it depends on the route management scheme of your project. It is best to have a unified management of the route, and then dynamically filter the route according to the user permission, or intercept and judge when accessing the route.
2. Processing of navigation menu
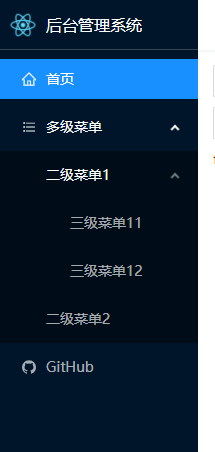
Generally speaking, the background management system will have a navigation menu, mostly the side bar navigation. For users, this is also the access entrance of all pages, so the navigation menu needs to be displayed dynamically according to the user's permissions.
It is recommended to store all routing configuration information in a configuration array, and the navigation menu will be dynamically generated according to the routing configuration array. At the same time, judge the permissions and filter them.
- For vue, it is very convenient to use vue router to manage routing;
- And react is a little troublesome,
- For react router V5 and below, you can use react router config to uniformly manage routes,
- For the react router V6 version, Amway introduces the route management scheme of personal encapsulation, react router water( Portal).
Routing configuration example:
const routes = [
  {
    path: '/index',
    component: Index,
    meta: { // meta, custom data are put here
      title: 'home page', // menu title
      accessId: 10000, // Permission id
      hideMenu: false, // Hide current route menu in sidebar
      noLogin: false, // Whether login is required for current route access
    },
  },
  {
    path: '/nest',
    meta: {
      title: 'Multi level menu',
    },
    children: [
      {
        path: 'nest1',
        component: Nest1,
        meta: {
          title: 'Secondary menu',
          accessId: 10001,
        }
      },
    ]
  },
]
Example of dynamic generation of navigation menu:
function getMenuList () {
  const getList = (routeList = [], prePath = '') => {
    let menuList = []
    // Traversal routing
    routeList.forEach(v => {
      v.meta = v.meta || {}
      // Exclude routes that do not need to display menus
      if (v.redirect || v.path === '*' || v.meta.hideMenu) {
        return
      }
      // Exclude routes without access
      if (!getIsCanAccess(v.meta.accessId)) {
        return
      }
      const currentPath = prePath + v.path
      if (v.children) {
      	// There are nested routes, adding menus recursively
        menuList.push((
          <SubMenu key={currentPath} title={v.meta.title}>
            {getList(v.children, currentPath + '/')}
          </SubMenu>
        ))
      } else {
        // No nested route, end of menu addition
        menuList.push((
          <ItemMenu key={currentPath}>
            <Link to={currentPath}>{v.meta.title}</Link>
          </ItemMenu>
        ))
      }
    })
    return menuList
  }

  return getList(routes)
}
3. Routing access control
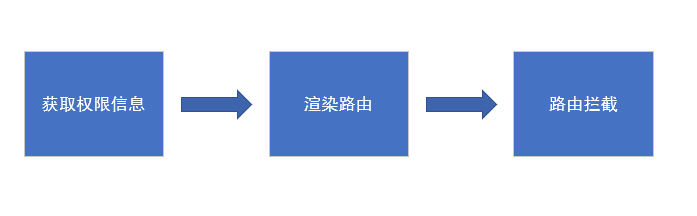
The dynamic generation of navigation menu limits the user's access to unauthorized routes to a certain extent, but it is not enough. If the user jumps to a route without permission, or manually enters the route URL without permission in the address bar, he can also access the page, which needs to be handled.
Generally, the user's permission information is obtained asynchronously from the interface, so we need to request the interface to get the permission information before the user opens the project and enters the page, and then display the subsequent pages, so as to ensure that the permission judgment and route interception can be effectively carried out in the scenario where the user manually enters the url.
There are two ways:
- 1. Simply, get permission information - filter routing configuration data - render routing. That is, after getting the permission information, filter the routing configuration data, only retain the routing data with permission, and then render the route, so that the user can display the 404 page when accessing the routes without permission.
- 2. For complex points, obtain permission information - render route - route interception processing. That is, after getting the permission information, directly render the complete route data, and then judge and intercept through the navigation guard of the route. This can control the user to display 403 page and more prompt information when accessing the route without permission, which is more customized.
Control before rendering route, in the portal component app Vue or app JS, code example:
import RouterWaiter from 'react-router-waiter'

export default function App () {
  const [isRender, setIsRender] = useState(false)

  useEffect(() => {
    // Parse the url and get the path route
    const path = getRoutePath()
    // Exclude routes that do not require permission, such as login pages
    if (['/login'].includes(path)) {
      setIsRender(true)
    } else {
      // Judge whether permission information has been obtained
      if (!store.isGotUserInfo) {
        api.getUserInfo().then(res => {
          const data = res.data || {}
          // The permission information is stored in the store state management data
          store.setUserInfo(data)
          // After obtaining the permission information, release the route rendering
          setIsRender(true)
        })
      }
    }
  }, [])

  return isRender ? <RouterWaiter /> : null
}
- The implementation of vue is also simple. In app In vue, you can control < router view / > through v-if binding.
4. Route interception
This is a supplementary description of mode 2 of the above "routing access control".
To realize route interception, it is necessary to make pre judgment on the access of each route.
- For vue, there is its own routing global navigation guard beforeEach, which is very convenient for processing.
- But react doesn't, so it can only be encapsulated by itself and Amway again react-router-waiter , routing interception is also encapsulated.
Code example of interception judgment:
meta = meta || {} // meta field of routing configuration data
if (!meta.noLogin && store.isLogin) { // Login judgment
  const { accessId } = meta
  if (!store.isGotUserInfo) { // Has the user (permission) information been obtained
      api.getUserInfo().then(res => {
        const data = res.data || {}
        store.setUserInfo(data)
		// Unauthorized time limited interception and jump to page 403
        if (!getIsCanAccess(accessId)) {
          toPage403()
        }
      })
  } else {
    if (!getIsCanAccess(accessId)) {
      toPage403()
    }
  }
} else {
  // Block jump to login page when not logged in
  toPageLoin()
}
3, Button level
Button level, that is, finer grained permission control in the page.
This is actually very simple. You only need to control whether the relevant dom is displayed.
Each operation area dom that needs to be controlled is assigned a permission id, then judge whether the user has the permission, and control the display and hiding of the dom in this area.
The back end only needs to give all page permission IDs and button level permission IDs to the front end.
- vue can be processed by binding dom with v-if, encapsulating a public method to judge whether it has permission, or encapsulating a user-defined instruction. It is more convenient to use with permission id as input parameter.
- The same is true in react. if control in jsx can also encapsulate a public method or a public component for processing.
Code example:
return (
  <div>
    {getIsCanAccess('10008')
      ? (
      <div>I'm authority dom1</div>
        )
      : null}

    <div>hello</div>

    {getIsCanAccess('10009')
      ? (
      <div>I'm authority dom2</div>
        )
      : null}
  </div>
)
4, Other
Based on this permission design scheme, I built a react background management system react-antd-mobx-admin , which has a complete authority design code for reference.