1. Preface
Welcome to read Spring Boot 2 series Although e-mail has been "annealed" in recent years, it still plays an important role in the development. In more formal occasions, we still send messages and receipts by email. Today, let's learn how to send email under Spring Boot.
2. dependence
Java sends e-mail based on the jakarta.mail component provided by the Jakarta project (the original Java EE). Maven coordinates:
   <dependency>
      <groupId>com.sun.mail</groupId>
      <artifactId>jakarta.mail</artifactId>
      <version>1.6.4</version>
      <scope>compile</scope>
    </dependency>
Spring officially further encapsulates it as an out of the box spring boot starter mail project:
 <dependency>
        <groupId>org.springframework.boot</groupId>
        <artifactId>spring-boot-starter-mail</artifactId>
 </dependency>
In the Spring Boot project, we introduce the above Spring Boot starter mail dependency to integrate the mail function for your project. Next, we will configure the parameters of the mail function.
3. Mailbox configuration
The configuration of spring boot starter mail is provided by the MailProperties configuration class. Prefix the application.yml configuration file with spring.mail. Let's see which configuration items are available.
#  Character set encoding default UTF-8
spring.mail.default-encoding=UTF-8
# smtp.qq.com port 465 587 for SMTP server host QQ mailbox
spring.mail.host=smtp.qq.com
# Different service providers of different SMTP server ports
spring.mail.port=465
#   Protocol used by SMTP server
spring.mail.protocol=smtp
# SMTP server requires authentication, so configure user password

# Sender's user mailbox name
spring.mail.username=business@felord.cn
# The sender's password should be kept confidential
spring.mail.password=oooooxxxxxxxx
# The jndi name of the specified mail session has a higher priority. Generally, we do not use this method
spring.mail.jndi-name=
# This is important. Different SMTP servers have their own characteristics. This property provides key value encapsulation schemes for these configurations. For example, Gmail SMTP server timeout configuration spring.mail.properties.mail.smtp.timeout= 5000
spring.mail.properties.<key> =
# Specifies whether to test mail server connections at startup, default is false
spring.mail.test-connection=false
There are different configurations for different mailboxes, so we introduce several common mailbox configurations, which can be directly used for configuration.
However, please note that many mailboxes need to turn on the SMTP function manually. Please make sure that the function is turned on. If you deploy on a public cloud, avoid using port 25.
3.1 QQ email
# smtp needs to be turned on
spring.mail.host=smtp.qq.com
spring.mail.port=465
# Sender's mailbox
spring.mail.username=master@felord.cn
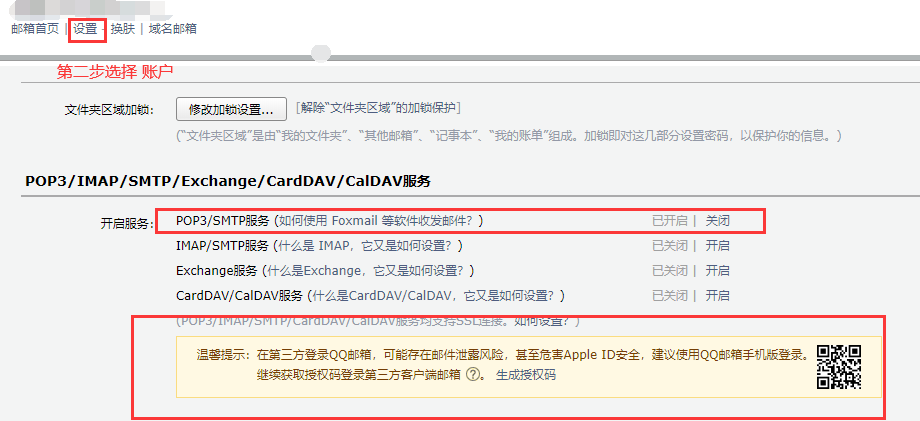
# Third party authorization code of qq email is not personal password
spring.mail.password=qztgbzfftdwdbjcddff
#Enable ssl or 503 error
spring.mail.properties.mail.smtp.ssl.enable=true
For the way to obtain the authorization code, see the following figure and click generate authorization code:

3.2 box 163
# Need to turn on smtp in settings
spring.mail.host=smtp.163.com
spring.mail.port=465
# Sender's mailbox
spring.mail.username=youraccount@163.com
# The authorization code of the email is not a personal password
spring.mail.password=qztgbzfftdwdbjcddff
spring.mail.properties.mail.smtp.ssl.enable=true
spring.mail.properties.mail.imap.ssl.socketFactory.fallback=false
spring.mail.properties.mail.smtp.ssl.socketFactory.class=javax.net.ssl.SSLSocketFactory
spring.mail.properties.mail.smtp.auth=true
spring.mail.properties.mail.smtp.starttls.enable=true
spring.mail.properties.mail.smtp.starttls.required=true
3.3 gmail
spring.mail.host=smtp.gmail.com
spring.mail.port=587
spring.mail.username=youraccount@gmail.com
# Security recommends using an application password instead of a Gmail password. See related documents
spring.mail.password=yourpassword

# Personality disposition
spring.mail.properties.mail.debug=true
spring.mail.properties.mail.transport.protocol=smtp
spring.mail.properties.mail.smtp.auth=true
spring.mail.properties.mail.smtp.connectiontimeout=5000
spring.mail.properties.mail.smtp.timeout=5000
spring.mail.properties.mail.smtp.writetimeout=5000

# TLS , port 587
spring.mail.properties.mail.smtp.starttls.enable=true

# SSL, post 465
#spring.mail.properties.mail.smtp.socketFactory.port = 465
#spring.mail.properties.mail.smtp.socketFactory.class = javax.net.ssl.SSLSocketFactory
3.4 outlook
spring.mail.host=smtp-mail.outlook.com
spring.mail.port=587
spring.mail.username=youraccount@outlook.com
spring.mail.password=yourpassword

spring.mail.properties.mail.protocol=smtp
spring.mail.properties.mail.tls=true

spring.mail.properties.mail.smtp.auth=true
spring.mail.properties.mail.smtp.starttls.enable=true
spring.mail.properties.mail.smtp.ssl.trust=smtp-mail.outlook.com
4. Mail sending service
After configuration, we can build our own mail sending service.
4.1 plain text mail
The simplest is to send a plain text email. The complete code is as follows:
package cn.felord.mail.service;

import org.springframework.beans.factory.annotation.Autowired;
import org.springframework.beans.factory.annotation.Value;
import org.springframework.mail.SimpleMailMessage;
import org.springframework.mail.javamail.JavaMailSender;
import org.springframework.stereotype.Component;

import javax.annotation.Resource;

/**
 * The Email service.
 *
 * @author felord.cn
 * @since 2020 /1/14 23:22
 */
@Component
public class EmailService {
    @Resource
    private JavaMailSender javaMailSender;
    @Value("${spring.mail.username}")
    private String from;


    /**
     * Send a plain text message
     *
     * @param to      Target email address
     * @param subject Mail theme
     * @param text    Plain text content
     */
    public void sendMail(String to, String subject, String text) {
        SimpleMailMessage message = new SimpleMailMessage();

        message.setFrom(from);
        message.setTo(to);
        message.setSubject(subject);
        message.setText(text);
        javaMailSender.send(message);
    }
}
4.2 mail with attachments
Sometimes we need to carry attachments with us. We need to send Mime information. The code is as follows:
    /**
     * Send email with attachments
     * Please note whether the mail size is limited by the from and to mail servers
     *
     * @param to       Target email address
     * @param subject  Mail theme
     * @param text     Plain text content
     * @param filePath The path of the attachment, of course, you can overwrite the incoming file
     */
    public void sendMailWithAttachment(String to, String subject, String text, String filePath) throws   MessagingException {

        File attachment = new File(filePath);
        MimeMessage mimeMessage = javaMailSender.createMimeMessage();
        MimeMessageHelper helper=new MimeMessageHelper(mimeMessage,true);
        helper.setFrom(from);
        helper.setTo(to);
        helper.setSubject(subject);
        helper.setText(text);
        helper.addAttachment(attachment.getName(),attachment);
        javaMailSender.send(mimeMessage);

    }
Here, we need to pay attention to whether the from and to mail servers limit the mail size to avoid the mail exceeding the limit size.
4.3 rich text mail
Now many scenes are to send rich text of marketing through e-mail, even with links with pictures and texts. So this function is very practical. You can write the html template of the adaptive mail through the front end. Just inject the data into the template dynamically. Let's write an html first:
<html lang="en">
<head>
    <meta http-equiv="content-type" content="text/html" charset="UTF-8">
    <title></title>
</head>
<body>
<h2>Hello, friend.</h2>
<div>
    <p>Welcome to the public address:<strong>Felordcn</strong></p>
    <p>Welcome to visit: <a href="https://felord.cn">felord.cn</a></p>
    <p><img src="cid:qr" alt=""></p>
</div>
</body>
</html>
The above is basically consistent with our usual html. The difference is that if there are embedded image elements such as img tags, placeholders need to be used in their src. The rule is cid: followed by a tag you define. For example, qr. This qr will be reflected in the code later. If you use placeholders, you must specify < meta http-equiv = "content type" content = "text / HTML" charset = "UTF-8" > otherwise the picture cannot be displayed! Of course, you can also directly write the url link of the image into the template, as follows:
<html lang="en">
<body>
  <h2>Hello, friend.</h2>
  <div>
      <p>Welcome to the public address:<strong>Felordcn</strong></p>
      <p>Welcome to visit: <a href="https://felord.cn">felord.cn</a></p>
      <p><img src="https://ae01.alicdn.com/kf/H29f220acefaa49469b5507ef296085abk.png" alt=""></p>
  </div>
</body>
</html>
Then we write Java code. The actual logic is enhanced in Chapter 4.2, as follows:
    /**
     * Send rich text mail
     *
     * @param to       Target email address
     * @param subject  Mail theme
     * @param text     Plain text content
     * @param filePath The path of the attachment, of course, you can overwrite the incoming file
     */
    public void sendRichMail(String to, String subject, String text, String filePath) throws   MessagingException {

        MimeMessage mimeMessage = javaMailSender.createMimeMessage();
        MimeMessageHelper helper=new MimeMessageHelper(mimeMessage,true);
        helper.setFrom(from);
        helper.setTo(to);
        helper.setSubject(subject);

        helper.setText(text,true);
        // If the picture link is written in the line below the template comment
        helper.addInline("qr",new FileSystemResource(filePath));
        javaMailSender.send(mimeMessage);

    }
If you use the second HTML template like the one above, you don't need picture logic. Just comment out the helper.addInline() method.
5. summary
Today, we have made a detailed summary of Spring Boot email sending and listed the commonly used mailbox configurations. At the same time, it also discusses the implementation and details of sending various types of mail. In the actual development, we should pay special attention to the port problem and the attachment size problem. I hope it can help you. More attention, more dry goods felord.cn.
Pay attention to the public address: Felordcn for more information