Full convolution network (FCN) practice: using FCN to realize semantic segmentation
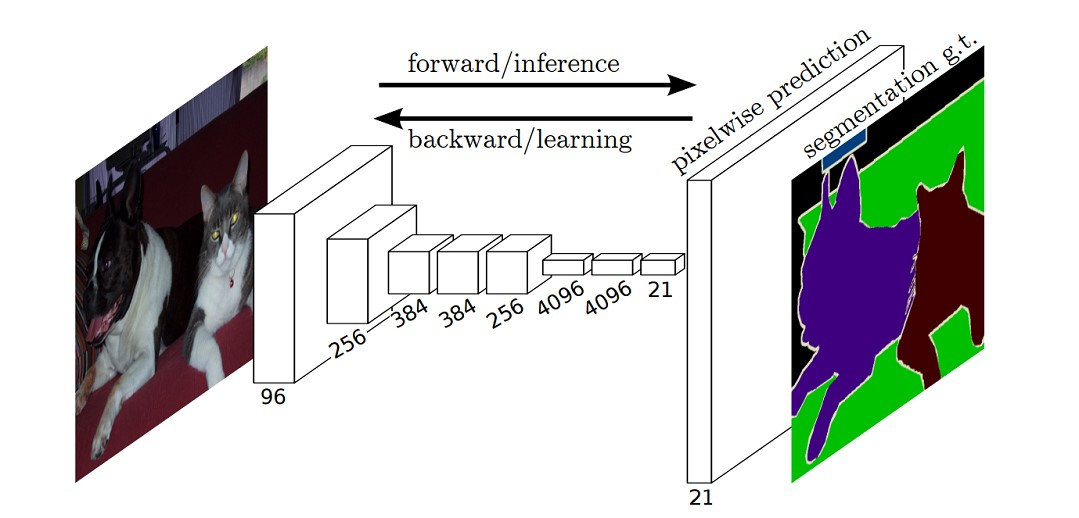
FCN classifies images at pixel level, which solves the problem of semantic segmentation. Unlike the classical CNN, which uses the full connection layer to obtain a fixed length feature vector for classification after the convolution layer (full connection layer + softmax output), FCN can accept the input image of any size, and use the anti convolution layer to up sample the feature map of the last convolution layer to restore it to the same size as the input image, Thus, a prediction can be generated for each pixel, while retaining the spatial information in the original input image. Finally, pixel by pixel classification is carried out on the up sampled feature map.
The following figure is the structural diagram of full convolution network (FCN) used in semantic segmentation:
What are the disadvantages of traditional CNN based segmentation methods?
Traditional segmentation method based on CNN: in order to classify a pixel, an image block around the pixel is used as the input of CNN for training and prediction. This method has several disadvantages:
1) Large storage overhead. For example, use 15 * 15 image blocks for each pixel, and then continuously slide the window to input the image blocks into CNN for category judgment. Therefore, the required storage space increases sharply with the number and size of sliding windows;
2) The efficiency is low, and the adjacent pixel blocks are basically repeated. The convolution is calculated one by one for each pixel block, which is repeated to a great extent;
3) The size of the pixel block limits the size of the sensing area. Usually, the size of the pixel block is much smaller than the size of the whole image, and only some local features can be extracted, resulting in the limitation of classification performance.
Full convolution network (FCN) recovers the category of each pixel from the abstract features. That is, the classification is further extended from the image level to the pixel level.
What has FCN changed?
For general classified CNN networks, such as VGG and Resnet, some full connection layers will be added at the end of the network, and the category probability information can be obtained after softmax. However, this probability information is one-dimensional, that is, it can only identify the category of the whole picture, not the category of each pixel, so this full connection method is not suitable for image segmentation.
FCN proposes that the following full connections can be replaced by convolution, so that a two-dimensional feature map can be obtained, followed by the softmax layer to obtain the classification information of each pixel, so as to solve the segmentation problem, as shown in Fig. 4.
[the external chain image transfer fails, and the source station may have anti-theft chain mechanism. It is recommended to save the image and upload it directly (img-gkah3lkw-16467801355) (C: \ users \ wh \ appdata \ roaming \ typora user images \ image-20220301144624435. PNG)]
FCN disadvantages
(1) The results are still not fine enough. Although the effect of 8x up sampling is much better than that of 32x, the result of up sampling is still fuzzy and smooth, and is not sensitive to the details in the image.
(2) The classification of each pixel does not fully consider the relationship between pixels. The spatial regularization step used in the usual segmentation method based on pixel classification is ignored, which lacks spatial consistency.
data set
The data set of this example adopts PASCAL VOC 2012 data set, which has 20 categories:
**Person:**person
Animal: bird, cat, cow, dog, horse, sheep
**Vehicle:**aeroplane, bicycle, boat, bus, car, motorbike, train
Indoor: bottle, chair, dining table, potted plant, sofa, tv/monitor

Download address: The PASCAL Visual Object Classes Challenge 2012 (VOC2012) (ox.ac.uk).
Structure of data set:
VOCdevkit
    └── VOC2012
         ├── Annotations               All image annotation information(XML file)
         ├── ImageSets
         │   ├── Action                Human behavior action image information
         │   ├── Layout                Image information of each part of human body
         │   │
         │   ├── Main                  Target detection classification image information
         │   │     ├── train.txt       Training set(5717)
         │   │     ├── val.txt         Validation set(5823)
         │   │     └── trainval.txt    Training set+Validation set(11540)
         │   │
         │   └── Segmentation          Target segmentation image information
         │         ├── train.txt       Training set(1464)
         │         ├── val.txt         Validation set(1449)
         │         └── trainval.txt    Training set+Validation set(2913)
         │
         ├── JPEGImages                All image files
         ├── SegmentationClass         Semantic segmentation png Figure (based on category)
         └── SegmentationObject        Instance segmentation png Figure (target based)
Data sets include object detection and semantic segmentation. We only need semantic segmentation data sets, so we can consider deleting redundant pictures. The idea of deletion is as follows:
1. Get the name of all pictures.
2. Get the name s of all semantic segmentation mask s.
3. Find the difference set between them, and then delete the name of the difference set.
The code is as follows:
import glob
import os
image_all = glob.glob('data/VOCdevkit/VOC2012/JPEGImages/*.jpg')
image_all_name = [image_file.replace('\\', '/').split('/')[-1].split('.')[0] for image_file in image_all]

image_SegmentationClass = glob.glob('data/VOCdevkit/VOC2012/SegmentationClass/*.png')
image_se_name= [image_file.replace('\\', '/').split('/')[-1].split('.')[0] for image_file in image_SegmentationClass]


image_other=list(set(image_all_name) - set(image_se_name))
print(image_other)
for image_name in image_other:
    os.remove('data/VOCdevkit/VOC2012/JPEGImages/{}.jpg'.format(image_name))
Code link
The code selected in this example is from deep-learning-for-image-processing/pytorch_segmentation/fcn at master · WZMIAOMIAO/deep-learning-for-image-processing (github.com)
There are many other codes, which is easy to understand!
In fact, there is a good image segmentation Library: https://github.com/qubvel/segmentation_models.pytorch
This image segmentation set was created by Pavel Yakubovskiy, a Russian programmer. In later articles, I will also use this library to demonstrate.
Project structure
├── src: Modelled backbone as well as FCN Construction of
├── train_utils: Training, validation and multi GPU Training related modules
├── my_dataset.py: custom dataset For reading VOC data set
├── train.py: with fcn_resnet50(Used here Dilated/Atrous Convolution)Conduct training
├── predict.py: Simple prediction script, using the trained weight for prediction test
├── validation.py: Using trained weight verification/Of test data mIoU And other indicators, and generate record_mAP.txt file
└── pascal_voc_classes.json: pascal_voc Label file
Because there are many codes that can't be explained one by one, we will analyze the important codes next.
Custom dataset reading
my_dataset.py custom data reading method. The code is as follows:
import os
import torch.utils.data as data
from PIL import Image

class VOCSegmentation(data.Dataset):
    def __init__(self, voc_root, year="2012", transforms=None, txt_name: str = "train.txt"):
        super(VOCSegmentation, self).__init__()
        assert year in ["2007", "2012"], "year must be in ['2007', '2012']"
        root = os.path.join(voc_root, "VOCdevkit", f"VOC{year}")
        root=root.replace('\\','/')
        assert os.path.exists(root), "path '{}' does not exist.".format(root)
        image_dir = os.path.join(root, 'JPEGImages')
        mask_dir = os.path.join(root, 'SegmentationClass')

        txt_path = os.path.join(root, "ImageSets", "Segmentation", txt_name)
        txt_path=txt_path.replace('\\','/')
        assert os.path.exists(txt_path), "file '{}' does not exist.".format(txt_path)
        with open(os.path.join(txt_path), "r") as f:
            file_names = [x.strip() for x in f.readlines() if len(x.strip()) > 0]

        self.images = [os.path.join(image_dir, x + ".jpg") for x in file_names]
        self.masks = [os.path.join(mask_dir, x + ".png") for x in file_names]
        assert (len(self.images) == len(self.masks))
        self.transforms = transforms
Import the required package.
Define VOC dataset reading class vocrepresentation. In the init method, the core is to read the image list and mask list.
    def __getitem__(self, index):
        img = Image.open(self.images[index]).convert('RGB')
        target = Image.open(self.masks[index])

        if self.transforms is not None:
            img, target = self.transforms(img, target)
        return img, target
__ getitem__ The method is to obtain a single picture and the mask corresponding to the picture, and then enhance it.
 def collate_fn(batch):
        images, targets = list(zip(*batch))
        batched_imgs = cat_list(images, fill_value=0)
        batched_targets = cat_list(targets, fill_value=255)
        return batched_imgs, batched_targets
collate_fn method is to call cat for data in a batch_ List to align data.
In train Torch in py utils. data. Dataloader call
 train_loader = torch.utils.data.DataLoader(train_dataset,
                                               batch_size=batch_size,
                                               num_workers=num_workers,
                                               shuffle=True,
                                               pin_memory=True,
                                               collate_fn=train_dataset.collate_fn)
  val_loader = torch.utils.data.DataLoader(val_dataset,
                                             batch_size=1,
                                             num_workers=num_workers,
                                             pin_memory=True,
                                             collate_fn=val_dataset.collate_fn)
train
Important parameters
Open train Py, let's first understand the important parameters:
def parse_args():
    import argparse
    parser = argparse.ArgumentParser(description="pytorch fcn training")
    # The folder where the root directory of the dataset (VOCdevkit) is located
    parser.add_argument("--data-path", default="data/", help="VOCdevkit root")
    parser.add_argument("--num-classes", default=20, type=int)
    parser.add_argument("--aux", default=True, type=bool, help="auxilier loss")
    parser.add_argument("--device", default="cuda", help="training device")
    parser.add_argument("-b", "--batch-size", default=32, type=int)
    parser.add_argument("--epochs", default=30, type=int, metavar="N",
                        help="number of total epochs to train")

    parser.add_argument('--lr', default=0.0001, type=float, help='initial learning rate')
    parser.add_argument('--momentum', default=0.9, type=float, metavar='M',
                        help='momentum')
    parser.add_argument('--wd', '--weight-decay', default=1e-4, type=float,
                        metavar='W', help='weight decay (default: 1e-4)',
                        dest='weight_decay')
    parser.add_argument('--print-freq', default=10, type=int, help='print frequency')
    parser.add_argument('--resume', default='', help='resume from checkpoint')
    parser.add_argument('--start-epoch', default=0, type=int, metavar='N',
                        help='start epoch')
    # Whether to use mixed accuracy training
    parser.add_argument("--amp", default=False, type=bool,
                        help="Use torch.cuda.amp for mixed precision training")

    args = parser.parse_args()

    return args
Data path: defines the folder where the root directory (VOCdevkit) of the dataset is located
Num classes: number of detection target classes (excluding background).
Aux: whether to use aux_classifier.
device: use cpu or gpu for training. cuda is the default.
Batch size: batch size setting.
epochs: number of epoch s.
lr: learning rate.
resume: select the model to use when continuing training.
Start Epoch: the initial epoch. It is unnecessary to start from 0 when training again.
amp: whether to use torch's automatic hybrid accuracy training.
Data enhancement
Enhanced call to transforms Py.
Enhancements to the training set are as follows:
class SegmentationPresetTrain:
    def __init__(self, base_size, crop_size, hflip_prob=0.5, mean=(0.485, 0.456, 0.406), std=(0.229, 0.224, 0.225)):
        # Minimum size of random Resize
        min_size = int(0.5 * base_size)
        # Resize random maximum size
        max_size = int(2.0 * base_size)
        # Random Resize enhancement.
        trans = [T.RandomResize(min_size, max_size)]
        if hflip_prob > 0:
            #Random horizontal flip
            trans.append(T.RandomHorizontalFlip(hflip_prob))
        trans.extend([
            #Random clipping
            T.RandomCrop(crop_size),
            T.ToTensor(),
            T.Normalize(mean=mean, std=std),
        ])
        self.transforms = T.Compose(trans)

    def __call__(self, img, target):
        return self.transforms(img, target)
Training set enhancement, including random Resize, random horizontal flip and random clipping.
Validation set enhancements:
class SegmentationPresetEval:
    def __init__(self, base_size, mean=(0.485, 0.456, 0.406), std=(0.229, 0.224, 0.225)):
        self.transforms = T.Compose([
            T.RandomResize(base_size, base_size),
            T.ToTensor(),
            T.Normalize(mean=mean, std=std),
        ])

    def __call__(self, img, target):
        return self.transforms(img, target)
The enhancement of validation set is relatively simple, with only random Resize.
Main method
I made some modifications to the Main method. The modified code is as follows:
#Define the model and load the pre training
model = fcn_resnet50(pretrained=True)
# The default class is 21. If it is not 21, you need to modify the class.
if num_classes != 21:
model.classifier[4] = torch.nn.Conv2d(512, num_classes, kernel_size=(1, 1), stride=(1, 1))
model.aux_classifier[4] = torch.nn.Conv2d(256, num_classes, kernel_size=(1, 1), stride=(1, 1))
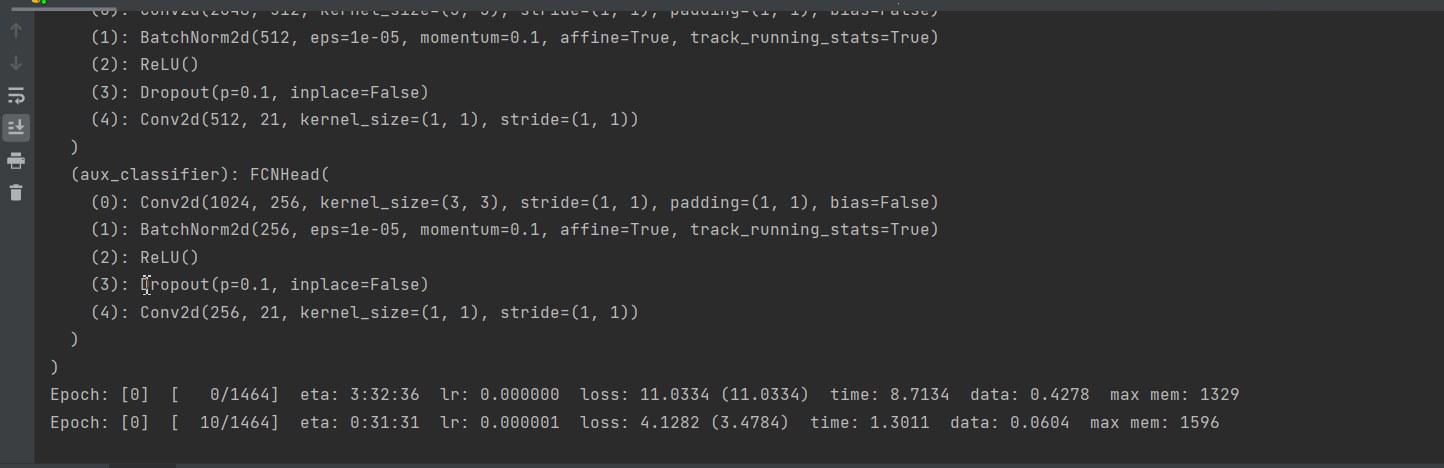
print(model)
model.to(device)
# If there are multiple graphics cards, use multiple graphics cards
if torch.cuda.device_count() > 1:
print("Let's use", torch.cuda.device_count(), "GPUs!")
model = torch.nn.DataParallel(model)
Model, I changed it to the official model of pytorch. If you can use the official model, try to use the official model.
The default category is 21. If it is not 21, you need to modify the category.
Check whether there are multiple cards in the system. If there are multiple cards, use multiple cards without wasting resources.
If you do not want to use all cards, but specify several of them, you can use:
os.environ['CUDA_VISIBLE_DEVICES'] = '0,1'
You can also set in the DataParallel method:
model = torch.nn.DataParallel(model,device_ids=[0,1])
If you use multiple graphics cards, you need to change the parameters of the model to model module. XXX, for example:
  params = [p for p in model.module.aux_classifier.parameters() if p.requires_grad]
            params_to_optimize.append({"params": params, "lr": args.lr * 10})
After the above is completed, you can start training, as shown in the figure below:
 test
test
Before starting the test, we also need to get the palette and create a new script get_palette.py, the code is as follows:
import json
import numpy as np
from PIL import Image
# Read mask tag
target = Image.open("./2007_001288.png")
# get palette
palette = target.getpalette()

palette = np.reshape(palette, (-1, 3)).tolist()
print(palette)
# Convert to dictionary sub form
pd = dict((i, color) for i, color in enumerate(palette))

json_str = json.dumps(pd)
with open("palette.json", "w") as f:
    f.write(json_str)
Select a mask, and then use the getpalette method to obtain it, and then save it in the format of a dictionary.
Next, start the prediction section and create a new prediction Py, insert the following code:
import os
import time
import json
import torch
from torchvision import transforms
import numpy as np
from PIL import Image
from torchvision.models.segmentation import fcn_resnet50
The package file required by the importer, but in the mian method:
def main():
    aux = False  # inference time not need aux_classifier
    classes = 20
    weights_path = "./save_weights/model_5.pth"
    img_path = "./2007_000123.jpg"
    palette_path = "./palette.json"
    assert os.path.exists(weights_path), f"weights {weights_path} not found."
    assert os.path.exists(img_path), f"image {img_path} not found."
    assert os.path.exists(palette_path), f"palette {palette_path} not found."
    with open(palette_path, "rb") as f:
        pallette_dict = json.load(f)
        pallette = []
        for v in pallette_dict.values():
            pallette += v
-
Define whether aux is required_ Classifier, aux is not required for prediction_ Classifier, so it is set to False.
-
Set the category to 20, excluding the background.
-
Define the path of the weight.
-
Defines the path to the palette.
-
Read the palette.
Next, load the model. There is a difference between the model trained by a single graphics card and the model trained by multiple graphics cards. Let's first see how to load the model trained by a single graphics card.
   model = fcn_resnet50(num_classes=classes+1)
    print(model)
    # Single graphics card trained model, loading
    # delete weights about aux_classifier
    weights_dict = torch.load(weights_path, map_location='cpu')['model']
    for k in list(weights_dict.keys()):
        if "aux_classifier" in k:
            del weights_dict[k]

    # load weights
    model.load_state_dict(weights_dict)
    model.to(device)
Define model fcn_resnet50,num_classes set to category + 1 (background)
Load the trained model and put aux_classifier delete.
Then load the weights.
Let's look at how to load the model of multi graphics card
    # create model
    model = fcn_resnet50(num_classes=classes+1)
    model = torch.nn.DataParallel(model)
    # delete weights about aux_classifier
    weights_dict = torch.load(weights_path, map_location='cpu')['model']
    print(weights_dict)
    for k in list(weights_dict.keys()):
        if "aux_classifier" in k:
            del weights_dict[k]
    # load weights
    model.load_state_dict(weights_dict)
    model=model.module
    model.to(device)
Define model fcn_resnet50,num_ Set classes to category + 1 (background), and put the model into DataParallel class.
Load the trained model and put aux_classifier delete.
Load weights.
Execute torch nn. When dataparallel (model), the model is placed in the model Module, so model Module is the model you really need. So we will be here Module is assigned to model.
Next is the processing of image data
  # load image
    original_img = Image.open(img_path)

    # from pil image to tensor and normalize
    data_transform = transforms.Compose([transforms.Resize(520),
                                         transforms.ToTensor(),
                                         transforms.Normalize(mean=(0.485, 0.456, 0.406),
                                                              std=(0.229, 0.224, 0.225))])
    img = data_transform(original_img)
    # expand batch dimension
    img = torch.unsqueeze(img, dim=0)
Load image.
Resize, standardize and normalize the image.
Use torch Unsqueeze adds a dimension.
After the prediction processing is completed, you can start.
	model.eval()  # Enter verification mode
    with torch.no_grad():
        # init model
        img_height, img_width = img.shape[-2:]
        init_img = torch.zeros((1, 3, img_height, img_width), device=device)
        model(init_img)

        t_start = time_synchronized()
        output = model(img.to(device))
        t_end = time_synchronized()
        print("inference+NMS time: {}".format(t_end - t_start))

        prediction = output['out'].argmax(1).squeeze(0)
        prediction = prediction.to("cpu").numpy().astype(np.uint8)
        np.set_printoptions(threshold=sys.maxsize)
        print(prediction.shape)
        mask = Image.fromarray(prediction)
        mask.putpalette(pallette)
        mask.save("test_result.png")
Save the predicted results to test_result.png. View run results:
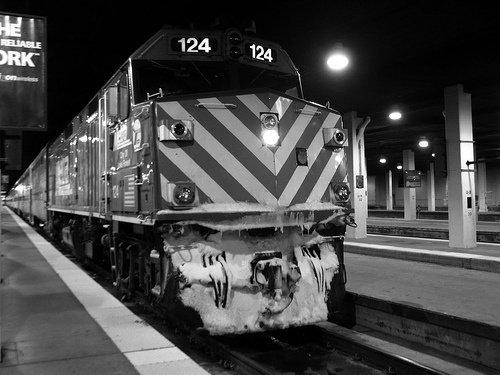
Original drawing:
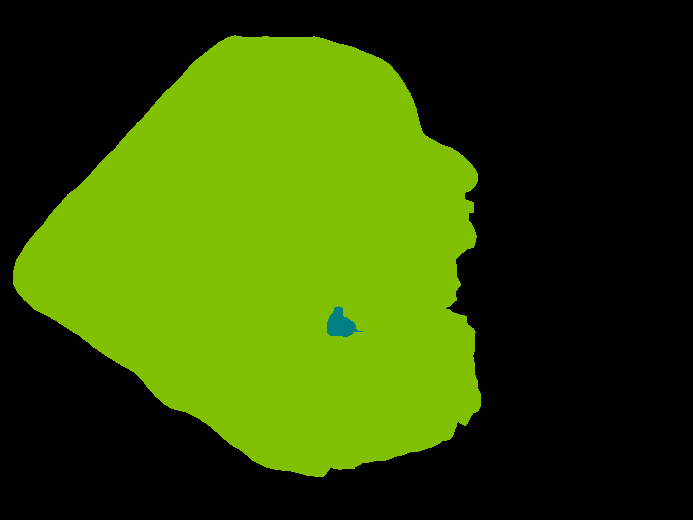
result:
Printed data:
Category list:
{
    "aeroplane": 1,
    "bicycle": 2,
    "bird": 3,
    "boat": 4,
    "bottle": 5,
    "bus": 6,
    "car": 7,
    "cat": 8,
    "chair": 9,
    "cow": 10,
    "diningtable": 11,
    "dog": 12,
    "horse": 13,
    "motorbike": 14,
    "person": 15,
    "pottedplant": 16,
    "sheep": 17,
    "sofa": 18,
    "train": 19,
    "tvmonitor": 20
}
From the results, it has been predicted that the category on the image is "train".
summary
The core content of this article is to explain how to use FCN to realize image semantic segmentation.
At the beginning of the article, we talked about the structure, advantages and disadvantages of FCN.
Then, I explained how to read the data set.
Next, let's tell you how to achieve training.
Finally, the test and result display.
I hope this article can help you.
Full code:
https://download.csdn.net/download/hhhhhhhhhhwwwwwwwwww/83778007