IOT gateway artifact Kong (II)
We already know what Kong is in the last article. This article will lead you to understand how to install Kong. Next, we will install using Docker. If you have other special requirements, please refer to Official documents .
Docker installs Kong.
First, if you want to install it, you need Docker. If you don't have or don't know what Docker is, please click Portal
1, Get image
Get the docker image of Kong
docker pull kong
View Docker image
docker images

2, Create network
The same network needs to be created for the communication between the database and Kong.
docker network create kong-net

3, Create database
We will use PostgreSQL as Kong's configuration store.
docker run -d --name kong-db \
  --network=kong-net \
  -p 5432:5432 \
  -e "POSTGRES_USER=kong" \
  -e "POSTGRES_DB=kong" \
  -e "POSTGRES_PASSWORD=kong" \
  postgres:9.6

Next, look at the container status
docker ps

Now you can see that PostgreSQL has been started normally and port 5432 has been opened to the outside world.
4, Initialize database structure
We need to initialize the newly created database and generate the table structure and data required by Kong.
docker run --rm --network=kong-net \
  -e "KONG_DATABASE=postgres" \
  -e "KONG_PG_HOST=kong-db" \
  -e "KONG_PG_PASSWORD=kong" \
  -e "KONG_PASSWORD=kong123456" \
  kong kong migrations bootstrap

Tips: if you don't understand the following command, look at this paragraph. kong kong migrations bootstrap According to the specification of docker run docker run [OPTIONS] IMAGE [COMMAND] [ARG...] Note: the first Kong is the container name, the second Kong is the Command, and the following is the parameter. Simply put, the process is:
- Run a Kong container.
- Enter the container and execute the kong migrations bootstrap command
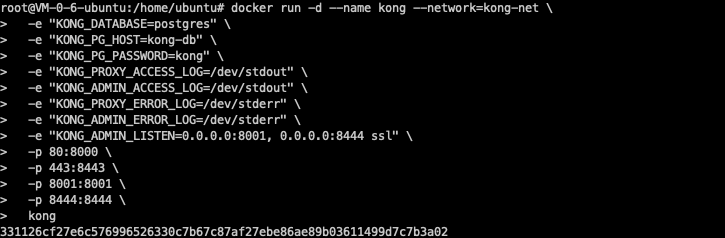
5, Start the Kong container
We have done so much preparatory work to start the Kong container, and now it is finally running.
docker run -d --name kong --network=kong-net \
  -e "KONG_DATABASE=postgres" \
  -e "KONG_PG_HOST=kong-db" \
  -e "KONG_PG_PASSWORD=kong" \
  -e "KONG_PROXY_ACCESS_LOG=/dev/stdout" \
  -e "KONG_ADMIN_ACCESS_LOG=/dev/stdout" \
  -e "KONG_PROXY_ERROR_LOG=/dev/stderr" \
  -e "KONG_ADMIN_ERROR_LOG=/dev/stderr" \
  -e "KONG_ADMIN_LISTEN=0.0.0.0:8001, 0.0.0.0:8444 ssl" \
  -p 80:8000 \
  -p 443:8443 \
  -p 8001:8001 \
  -p 8444:8444 \
  kong
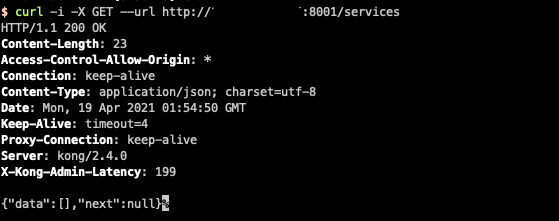
6, Test whether the installation is successful
curl -i -X GET --url http://<DNSorIP>:8001/services
Replace < dnsorip > with your IP or DNS.
If successful, HTTP/1.1 200 OK will be returned
General configuration Kong
Kong provides an Http/Rest interface to dynamically create configuration files.
Configure reverse proxy
Kong is based on Nginx, so it will dynamically build the configuration file of Nginx based on the configuration.
Nginx profile
upstream example{
    server localhost:8080 weight=100;
}

server{
    listen:80;
    location /hi {
        proxy_pass http://example
    }
}
Configuring using the Kong API
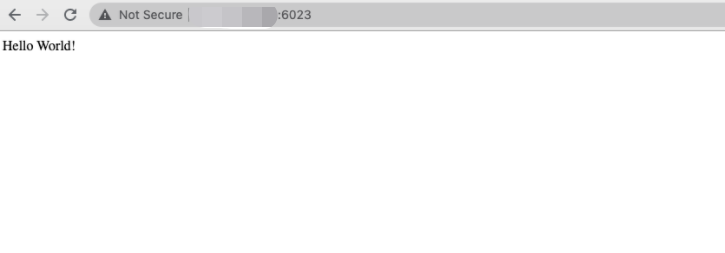
Access services for testing
We have previously run a Docker service to map the port service to port 6023. Now we can see that our request has been reverse proxied to port 6023 through the Kong API.
summary
In this article, we explained how to use Docker to install Kong and use Kong's Rest API for dynamic configuration. Let's take a closer look at these APIs. Is it a light in our head? Yes, we can make the function of dynamic configuration of Rest API into a graphical interface. In this way, it can be configured more conveniently. In the next article, we will continue to talk about Kong's graphical management interface - Konga.