1. Generating relevant SSL certificates
Relevant knowledge points:
- Java SSL authentication: SSL (Secure Socket Layer Secure Socket Layer) and its successor Transport Layer Security (TLS) are security protocols that provide security and data integrity for network communication. TLS and SSL retransmit layer encrypt the network connection safely.
- ** Kerberos Authentication + ACL Authentication: ** Kerberos is a network authentication protocol designed to provide powerful authentication services for client/server applications through a key system. ACL is based on Kerberos authentication measures, general Kerberos authentication is enough to use.
1.1 Server-side SSL certificate issuance
1.1.1 Modify the / etc/hosts file to customize a hosts name
1.1.2 Create a directory to save certificates to facilitate certificate storage and management
mkdir -p /usr/ca/{root,server,client,trust}
Note: These four directories are used to store root certificate, server certificate, client certificate and trusted certificate, respectively.
1.1.3 Generate the server.keystore.jks file (that is, generate the keystore file on the server side)
keytool -keystore /usr/ca/server/server.keystore.jks -alias ds-name-27 -validity 365 -genkey -keypass 123456 -keyalg RSA -dname "CN=kafka-single,OU=aspire,O=aspire,L=beijing,S=beijing,C=cn" -storepass 123456 -ext SAN=DNS:name-27
Tip: Customize the password in this command and change the host name to the host name configured in Step 1
** Key tool instructions: **
| instructions | Meaning |
|---|---|
| -alias | alias |
| -keystore | Specify the name of the keystore (like a database certificate library, there can be many certificates, cacerts is a file that jre comes with, or can use other file names, if there is no such file name, he will create such a file) |
| -storepass | The password of the specified keystore |
| -keypass | Specify the password for an alias entry |
| -list | Display certificate information in keystore |
| -v | Display certificate details in the keystore |
| -export | Export an alias-specified certificate to a file |
| -file | Parameter specifies the file name exported to the file |
| -delete | Delete an entry in the keystore |
| -import | Import the signed data certificate into the keystore |
| -keypasswd | Modify the password of the specified entry in the keystore |
| -dname | Specified certificate owner information, where: CN = name and surname / domain name, OU = name of organization unit, O = name of organization, L = name of city or region, ST = name of state or province, C = two-letter country code of unit |
| -keyalg | Algorithms for Designated Key |
| -validity | Specify the validity date of the creation certificate |
| - keysize: Specified key length |
1.1.4 Generating CA Certificate
Aim: To ensure the security of the whole certificate, CA is used to guarantee the signature of the certificate.
openssl x509 -req -CA /usr/ca/root/ca-cert -CAkey /usr/ca/root/ca-key -in /usr/ca/server/server.cert-file -out /usr/ca/server/server.cert-signed -days 365 -CAcreateserial -passin pass:123456
1.1.5 Create a Client Trust Certificate through CA Certificate
keytool -keystore /usr/ca/trust/client.truststore.jks -alias CARoot -import -file /usr/ca/root/ca-cert -storepass 123456
Note 1: Certificate validity can only be checked with a trust certificate
Note 2: Certificates must be certified by CA before they can be used.
1.1.6 Create a server-side trust certificate through CA certificate
keytool -keystore /usr/ca/trust/server.truststore.jks -alias CARoot -import -file /usr/ca/root/ca-cert -storepass ds1994
1.1.6 Server Certificate Signature Processing:
1.1.6.1 Export the server-side certificate server-cert-file:
keytool -keystore /usr/ca/server/server.keystore.jks -alias ds-name-27 -certreq -file /usr/ca/server/server.cert-file -storepass 123456
1.1.6.2 Use CA to sign the server-side certificate:
openssl x509 -req -CA /usr/ca/root/ca-cert -CAkey /usr/ca/root/ca-key -in /usr/ca/server/server.cert-file -out /usr/ca/server/server.cert-signed -days 365 -CAcreateserial -passin pass:123456
1.1.6.3 Import CA certificate into server-side keystore
keytool -keystore /usr/ca/server/server.keystore.jks -alias CARoot -import -file /usr/ca/root/ca-cert -storepass 123456
1.1.6.4 Import the signed server certificate into the server keystore
keytool -keystore /usr/ca/server/server.keystore.jks -alias ds-name-27 -import -file /usr/ca/server/server.cert-signed -storepass 123456
So far as this step is concerned, the "Kafka Configuration SSL Authentication" link can be implemented, and the client's certificate can be generated in advance for the convenience of the future. Specific steps for reference: https://blog.csdn.net/justry_deng/article/details/88383081
2. Kafka configures SSL authentication
2.1 Modify the server.properties file in the config directory of the Kafka installation directory
############################# Server Basics #############################
# The id of the broker. This must be set to a unique integer for each broker.

listeners=SSL://name-27:9095
advertised.listeners=SSL://name-27:9095
ssl.keystore.location=/usr/ca/server/server.keystore.jks
ssl.keystore.password=123456
ssl.key.password=123456
ssl.truststore.location=/usr/ca/trust/server.truststore.jks
ssl.truststore.password=123456
ssl.client.auth=required
ssl.enabled.protocols=TLSv1.2,TLSv1.1,TLSv1
ssl.keystore.type=JKS
ssl.truststore.type=JKS
ssl.endpoint.identification.algorithm=
security.inter.broker.protocol=SSL
broker.id=0
#port=9092
hostname=name-27
#listeners=PLAINTEXT://name-27:9092
delete.topic.enable=true
############################# Socket Server Settings #############################
num.network.threads=3
num.io.threads=8
socket.send.buffer.bytes=102400
socket.receive.buffer.bytes=102400
socket.request.max.bytes=104857600
############################# Log Basics #############################
log.dirs=/usr/data/kafka
num.partitions=1
num.recovery.threads.per.data.dir=1
############################# Internal Topic Settings  #############################
offsets.topic.replication.factor=1
transaction.state.log.replication.factor=1
transaction.state.log.min.isr=1
############################# Log Retention Policy #############################
log.retention.hours=168
log.segment.bytes=1073741824
log.retention.check.interval.ms=300000
############################# Zookeeper #############################
zookeeper.connect=localhost:2181
zookeeper.connection.timeout.ms=6000
############################# Group Coordinator Settings #############################
group.initial.rebalance.delay.ms=0
Note: The SSL configuration is best written at the top of the configuration file, otherwise it may cause Kafka to fail to configure the SSL.
Important Note: ssl.endpoint.identification.algorithm
At first, I set ssl.endpoint.identification.algorithm=https, which is HTTPS access, to prevent attacks, is to strengthen HTTP access. But I have been reporting errors since I used this configuration:
Exception in thread "main" org.apache.kafka.common.errors.SslAuthenticationException: SSL handshake failed
Caused by: javax.net.ssl.SSLHandshakeException: General SSLEngine problem
. . .
Caused by: javax.net.ssl.SSLHandshakeException: General SSLEngine problem
. . .
Caused by: java.security.cert.CertificateException: No subject alternative names present
Modified to an empty string (that is, to use the original access mode) can be used properly... I don't know how to configure Https access to distinguish from the original access. Welcome to add
2.2 (optional)
If there is Kafka data before configuring SSL, it is recommended to replace the location to store the data; if you ensure that the previous data is no longer useful, you can also delete the previous data directly.
Note: The reason for this folder is that we specified the data directory when installing kafka. See https://blog.csdn.net/justry_deng/article/details/88381595 for details.
2.3 Restart kafka
# Background start zookeeper
/var/local/kafka/bin/zookeeper-server-start.sh /var/local/kafka/config/zookeeper.properties > /usr/data/zookeeper.log 2>&1 &
# Front Start kafak
/var/local/kafka/bin/kafka-server-start.sh /var/local/kafka/config/server.properties
Note: When starting kafka, it is better to use the way that the process monopolizes a shell to start the foreground, so that it can be very intuitive to see whether the Kafka is successful.
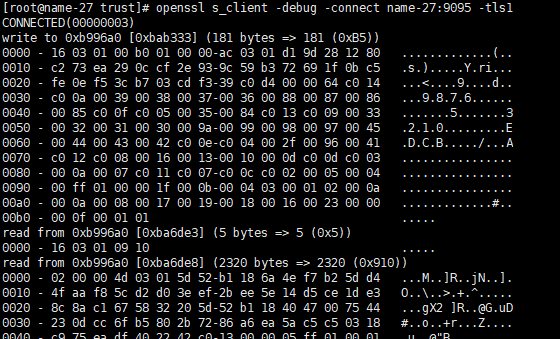
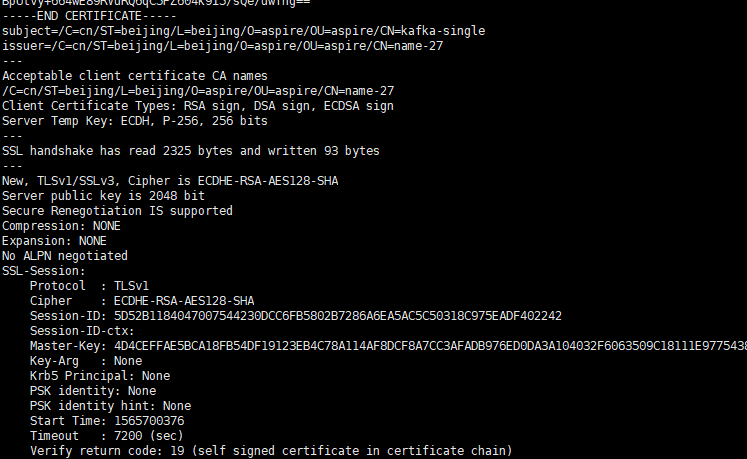
2.4 Use Linux's own openssl to test whether the configured SSL is valid.
openssl s_client -debug -connect name-27:9095 -tls1
The following pop-up shows success:

3. Using Kafka test
3.1 Consumption of data in Kafka with conventional commands
/usr/kafka/kafka_2.12-2.2.1/bin/kafka-console-consumer.sh --bootstrap-server name-27:9095 --topic test --from-beginning

It has been blocking, but it has not been able to consume data. Because it failed to verify by SSL
3.2 Create a consumer profile under SSL
security.protocol=SSL
ssl.endpoint.identification.algorithm=
group.id=test
ssl.truststore.location=/usr/ca/trust/server.truststore.jks
ssl.truststore.password=123456
ssl.keystore.password=123456
ssl.keystore.location=/usr/ca/server/server.keystore.jks
3.2 Use the reconfiguration file when consuming data again
/usr/kafka/kafka_2.12-2.2.1/bin/kafka-console-consumer.sh --bootstrap-server name-27:9095 --topic test --from-beginning --consumer.config /usr/kafka/kafka_2.12-2.2.1/config/song_consumer.properties

Can normal consumption data!
3.3 kafka producers also need to create an SSL configuration file to produce data in previous Topic s.
Configuration files such as:
Production orders such as:
/usr/kafka/kafka_2.12-2.2.1/bin/kafka-console-producer.sh --broker-list 192.168.251.27:9095 --topic test --producer.config /usr/kafka/kafka_2.12-2.2.1/config/song_consumer.properties
So far, Kafka has completed the configuration of SSL.