
Definition of Axios method
function Axios(instanceConfig) {
  //Accept the default configuration parameters
  this.defaults = instanceConfig;
  //Define interceptors for requests and responses
  this.interceptors = {
    request: new InterceptorManager(),
    response: new InterceptorManager()
  };
}
When we create an Axios object, we will pass in a default configuration object, assign it to internal properties, and finally merge it with our own configured parameters. Then, the interception object of request and response will be defined, and the user can manually add the interception function.
Axios.prototype.request = function request(config) {
  //Here is the parameter preprocessing, because axios can pass in parameters in several ways
  if (typeof config === 'string') {
    config = arguments[1] || {};
    config.url = arguments[0];
  } else {
    config = config || {};
  }
  //Merge our configured parameters with the original parameters
  config = mergeConfig(this.defaults, config);

  // Set config.method
  if (thod) {
    config.methconfig.meod = config.method.toLowerCase();
  } else if (this.defaults.method) {
    config.method = this.defaults.method.toLowerCase();
  } else {
    config.method = 'get';
  }

  // The chain array is used to store the functions for processing config or result. At the same time, these processing functions appear in pairs. By default, dispatchRequest and undefine are passed in. dispatchRequest will initiate real XML requests.
  var chain = [dispatchRequest, undefined];
  var promise = Promise.resolve(config);
//Put the request interception function added by the user into the chain. At this time, the queue head is put in, because it needs to be executed before the request is initiated.
  this.interceptors.request.forEach(function unshiftRequestInterceptors(interceptor) {
    chain.unshift(interceptor.fulfilled, interceptor.rejected);
  });
//Put the response interception function added by the user into the chain. At this time, the end of the queue is put in, because this is to process the returned data.
  this.interceptors.response.forEach(function pushResponseInterceptors(interceptor) {
    chain.push(interceptor.fulfilled, interceptor.rejected);
  });
  //Loop execution, and the final promise gets the final data
  while (chain.length) {
    promise = promise.then(chain.shift(), chain.shift());
  }

  return promise;
};
The request method in Axios actually does three things:
- Merge the configuration parameters passed in by the user
- Add user configured request interception and response interception to the execution queue
- Execute request interception function ----- > initiate request ----- > execute response interception function
//Add ['delete ',' get ',' head ',' options'] methods to the Axios prototype
utils.forEach(['delete', 'get', 'head', 'options'], function forEachMethodNoData(method) {
  Axios.prototype[method] = function(url, config) {
    return this.request(utils.merge(config || {}, {
      method: method,
      url: url
    }));
  };
});
//Add ['post ',' put ',' patch '] methods to the Axios prototype
utils.forEach(['post', 'put', 'patch'], function forEachMethodWithData(method) {
  Axios.prototype[method] = function(url, data, config) {
    return this.request(utils.merge(config || {}, {
      method: method,
      url: url,
      data: data
    }));
  };
});
In fact, some of our common request methods are added to the Axios prototype, so that we can directly initiate requests by calling the request method on the Axios object, such as Axios Get ('xxx ', {}), in fact, the final call is the request method on our Axios.
Creation of axios object
function createInstance(defaultConfig) {
  //Create an axios object and pass in the default configuration parameters
  var context = new Axios(defaultConfig);
  //Recreate a function through the bind method and copy the methods and properties on the Axios prototype to this function
  var instance = bind(Axios.prototype.request, context);
  utils.extend(instance, Axios.prototype, context);
  utils.extend(instance, context);
  return instance;
}
//Create a request method. This object is the method we finally use to send the request. Under this reminder, axios is a function.
var axios = createInstance(defaults);
The purpose of the createInstance function is first clear: it creates a function. We can directly call this function or the request method on the prototype to send a request. The process is explained in detail below:
-
Create an axios object and pass in our default configuration parameters
-
Call the bind function to create a new function. The return value of the function is to execute Axios The return value after request. In fact, the implementation of bind is very simple:
function bind(fn, thisArg){
	return function wrap(...args){
		return fn.apply(thisArg,args);
	}
}
args is the parameter configured when we send the request, and finally aegs will be handed over to Axios Request function, and the reason why we can finally use Axios Get () sends the request because we copied the method on the Axios prototype to the wrap function, that is, the extend function above.
axios.Cancel = require('./cancel/Cancel');
axios.CancelToken = require('./cancel/CancelToken');
axios.isCancel = require('./cancel/isCancel');
This is the method of adding cancellation request to axios, so that we can interrupt the sent request. The specific implementation will be described later.
Call dispatchRequest to initiate the request
  config.data = transformData(
    config.data,
    config.headers,
    config.transformRequest
  );
The first is to convert the parameters we passed in, Axios defaults. By default, there is a function in the transformrequest array, which will perform different transformations according to the type of our parameters. For example, we pass * * {"name": "zhangsan", "age": 12} * * as parameters. The final results are as follows:
[the external chain image transfer fails. The source station may have an anti-theft chain mechanism. It is recommended to save the image and upload it directly (img-2htym5qg-1629534374862) (C: \ users \ 1 \ appdata \ roaming \ typora \ typora user images \ image-20210819220851881. PNG)]
It will be converted to a JSON string. If we want to customize the conversion function, we can link the customized function through concat.
axios.get('xxxx', {
  transformResponse: axios.defaults.transformResponse.concat(function (data, headers) {
    //....
    return data;
  })
})
When transformData is executed, it will traverse Axios defaults. The conversion function in the transformrequest array converts the data, and then sends the request.
return adapter(config).then(function onAdapterResolution(response) {
    throwIfCancellationRequested(config);
    //.... Process the response
    return response;
  }, function onAdapterRejection(reason) {
    if (!isCancel(reason)) {
      throwIfCancellationRequested(config);

      // Transform response data
      if (reason && reason.response) {
        //... Process reason
      }
    }
    return Promise.reject(reason);
  });
The key here is to call the adapter function to send the request and then process the returned data, that is, the dispatchRequest function finally returns a Promise, and we can get the data by calling its then method.
adapter method
First, let's trace back to how adapter was called in dispatchRequest.
var adapter = config.adapter || defaults.adapter;
We can see from this that the adapter is obtained from our config. By default, the adapter on config is inherited from the default configuration. Let's look at defaults How did the adapter come from
var defaults = {
	adapter: getDefaultAdapter(),
    //.....
}

function getDefaultAdapter() {
  var adapter;
  //Judge whether the current browser environment is based on XMLHttpRequest. If not, judge whether it is in the node environment based on process
  if (typeof XMLHttpRequest !== 'undefined') {
    adapter = require('./adapters/xhr');
  } else if (typeof process !== 'undefined' && Object.prototype.toString.call(process) === '[object process]') {
    adapter = require('./adapters/http');
  }
  return adapter;
}
From getDefaultAdapter, we can know that axios supports the browser and node environment. If it is in the browser environment, XMLHttpRequest will be introduced. If it is in the node environment, http will be introduced. The following is mainly about the browser environment.
module.exports = function xhrAdapter(config) {
  return new Promise(function dispatchXhrRequest(resolve, reject) {
    //... data processing
    var request = new XMLHttpRequest();
	//...
    request.open();
    //Set timeout
    request.timeout = config.timeout;
    request.onreadystatechange = function handleLoad() {
      //... Processing returned data
      settle(resolve, reject, response);
      request = null;
    };
    //Monitor interrupt operation
    request.onabort = function handleAbort() {};
    //Listening error
    request.onerror = function handleError() {};
    //Listening timeout
    request.ontimeout = function handleTimeout() {};
    if (requestData === undefined) {
      requestData = null;
    }
    request.send(requestData);
  });
};
The above is the general process of XML request. From the above, we can know that axios can perform error handling, request interception, interrupt request, request timeout processing and other functions. Other functions will be introduced below.
withCredentials :
 if (!utils.isUndefined(config.withCredentials)) {
      request.withCredentials = !!config.withCredentials;
 }
Students who know CORS should be familiar with withCredentials. This attribute is a Boolean value used to set whether to carry authorization information, such as cookie s or authorization header headers, when making cross domain requests.
Monitor upload and download progress:
//Monitor download progress
if (typeof config.onDownloadProgress === 'function') {
      request.addEventListener('progress', config.onDownloadProgress);
}
//Monitor upload progress
if (typeof config.onUploadProgress === 'function' && request.upload) {
      request.upload.addEventListener('progress', config.onUploadProgress);
}
Progress is an event that comes with XML. It will be triggered periodically when the request receives more data. When defining config, we can customize the upload or download events, and then know the upload or download progress through the event object.
axios.post(action, formData, {
   onUploadProgress: (e) => {
       //Gets the current upper volume and the total volume
       let percentage = Math.round((e.loaded * 100) / e.total) || 0;
       if(percentage < 100) {
            //.... The progress bar shows the current progress
       }
    }
})
Interrupt request:
First, let's take an example of how to interrupt a request:
const CancelToken = axios.CancelToken;
const source = CancelToken.source();
axios.get('xxxxx', {
  cancelToken: source.token
}).then((res) => {
    console.log(res)
}).catch((err) => {
  console.log(err);
});
source.cancel('Interrupt request');
From the code, we can know that we first need to configure the cancelToken attribute on our request, and then we can call the cancel method to interrupt the request at any time before the request returns,
Next, we will analyze this process step by step.
-
Get CancelToken
axios.CancelToken = require('./cancel/CancelToken');Now I know that the CancelToken on axios is from/ cancel/CancelToken is exported from this module.
function CancelToken(executor) {
  var resolvePromise;
  this.promise = new Promise(function promiseExecutor(resolve) {
    resolvePromise = resolve;
  });
  var token = this;
  executor(function cancel(message) {
    if (token.reason) {
      return;
    }
    token.reason = new Cancel(message);
    resolvePromise(token.reason);
  });
}
It turns out that CancelToken is a method that binds a promise to this. According to past experience, this either points to the instance calling CancelToken or to the new object from new, which will be put first for the time being.
Then execute the executor function, which passes a cancel method. In fact, the cancel method is the cancel method called by the user.
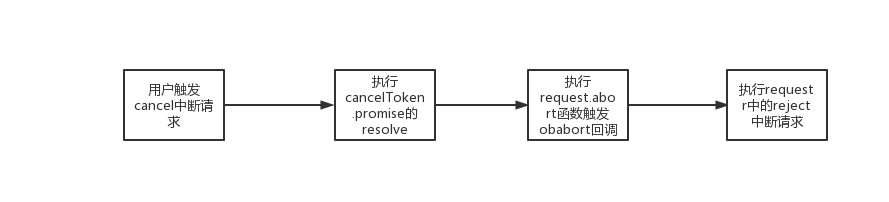
In the cancel method, we can see that it calls promise's resolve method to throw out the message. Here, we can take a look at the above flowchart.
-
Execute canceltoken source
CancelToken.source = function source() {
  var cancel;
  var token = new CancelToken(function executor(c) {
    cancel = c;
  });
  return {
    token: token,
    cancel: cancel
  };
};
The source method first helps us create a new instance token. Now we know that this above points to the new instance, that is, there is a promise in pending status on the token, waiting for the user to trigger cancel.
This function returns a token, which will be used as the value of the CancelToken attribute of config. The other return value is the cancel function, that is, the parameter passed by the executor function in the CancelToken.
-
Execute the cancel function
We now know that the purpose of canceling is to change the promise state in the CancelToken from pendinig to resolve. What's the use of this? Because the generated token will eventually be passed in as the value of the CancelToken attribute, let's see how to deal with the CancelToken attribute in the end.
if (config.cancelToken) {
      config.cancelToken.promise.then(function onCanceled(cancel) {
        if (!request) {
          return;
        }

        request.abort();
        reject(cancel);
        request = null;
      });
}
It should be clear now that this code will be executed when executing the xml request. If we configure CancelToken, we will enter the judgment condition, which will call CancelToken promise. Then, if the user does not call the cancel method, let CancelToken Promise changes from pending state to resolve state, then its then method will not be executed and will not affect normal requests.
If we call the cancel method, the code in the then method will be executed. We see that the abort function of xml is triggered and the reject function is executed. We know that the final return value of axios is a promise, and the reject here corresponds to the promise.
summary
axios is a very powerful library, which is generally used in daily development. At the same time, it is also worth learning some calling logic. For example, in the final cancel logic, he gives the user the promise control returned by axios. When the user wants to terminate, he can directly trigger his reject method.