1. Definitions
Doing experiments requires high-performance computing, so turn it out and learn its usage.
The purpose of Compute Shader (CS for short) is parallel computing, which is suitable for algorithms with simple algorithms but a large number of algorithms
Application scenarios: liquid simulation, cloth solution, settlement simulation, etc.
Now try to make a demo of CS
I saw a CS application on yt before, and the effect is very handsome
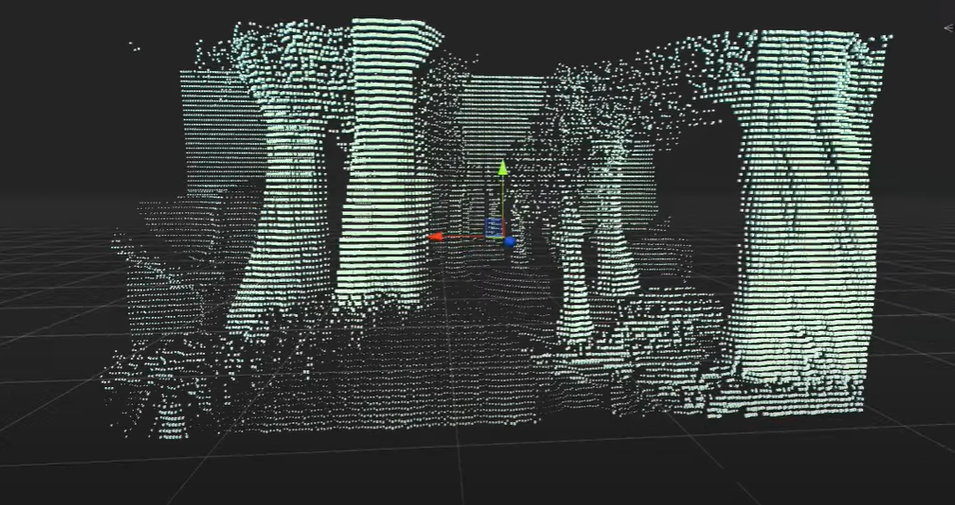
Using a method similar to voxel to render a "fake" screen, which is equivalent to a three-dimensional screen, has the visual feeling of holographic projection.
It is not difficult to think about the principle. Generate X*Y quads to form a false screen square array. Use two cameras, one main camera for normal observation and the other camera for rendering the depth map. Finally, map the depth map information to the false screen, and you can get the final result.
If the CPU is used to calculate, it is to obtain a depth for each Quad, then calculate the world matrix, and finally render.
Now try CS
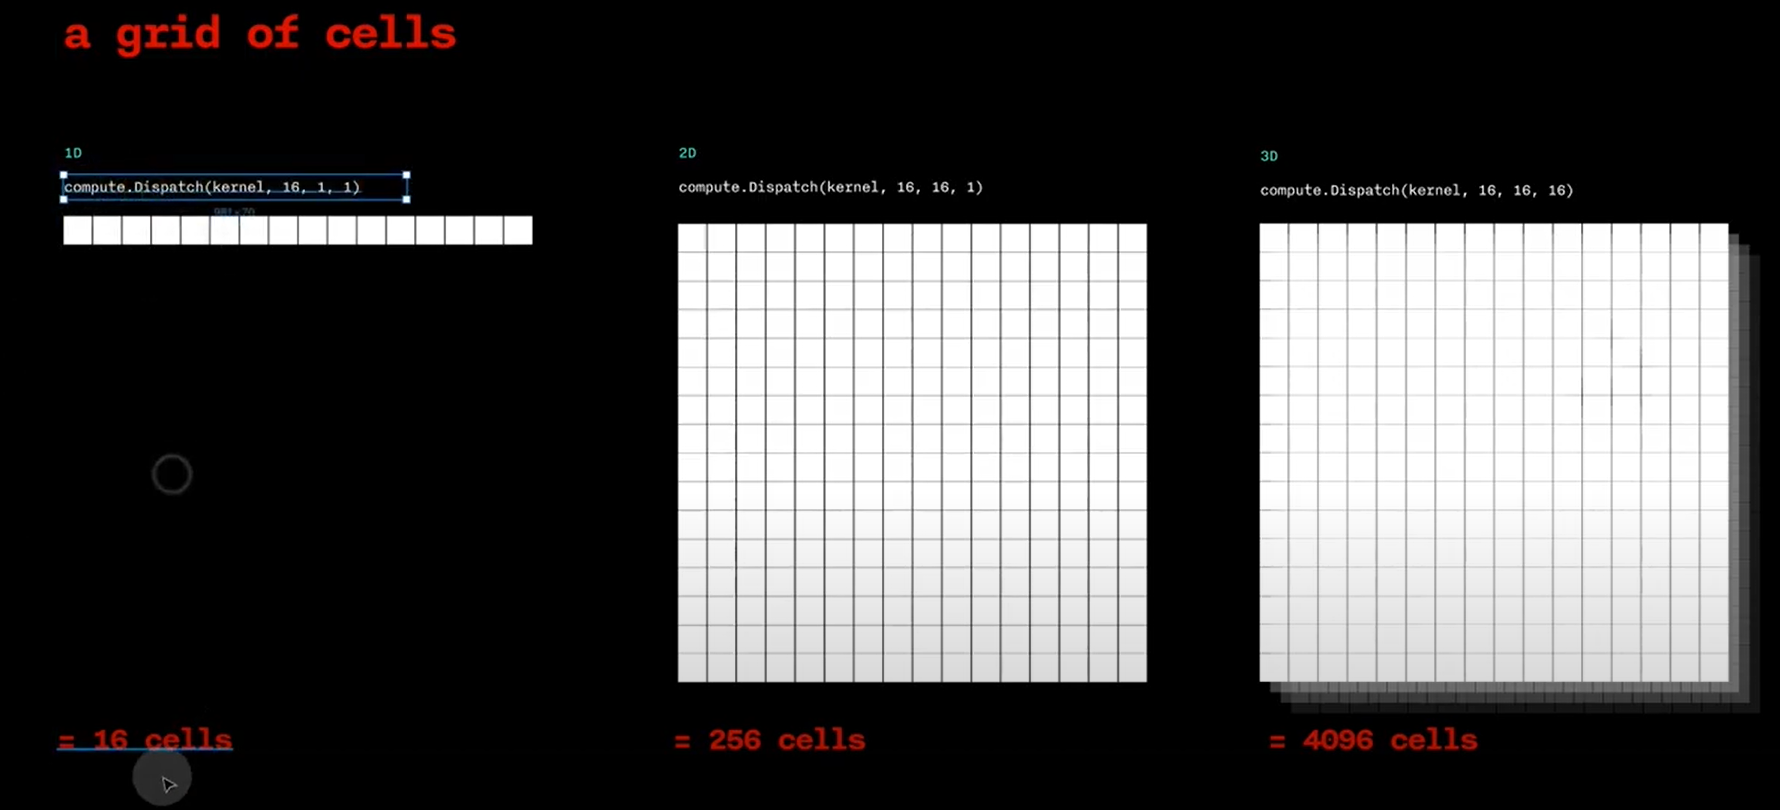
2. Thread group
Before computing, we must first define the layout of parallel computing units.
Logically, cells are divided into two layers. The first layer is a pile of cells with a structure of [X,Y,Z]. The second layer abstracts several groups from a pile of cells to work at the same time.
If we want to calculate ✖ 32, or 1024 quads, can be designed like this
[8, 8, 1] in a single Group, 4 in total ✖ The four groups add up to exactly 1024 computing units, corresponding to 1024 data.
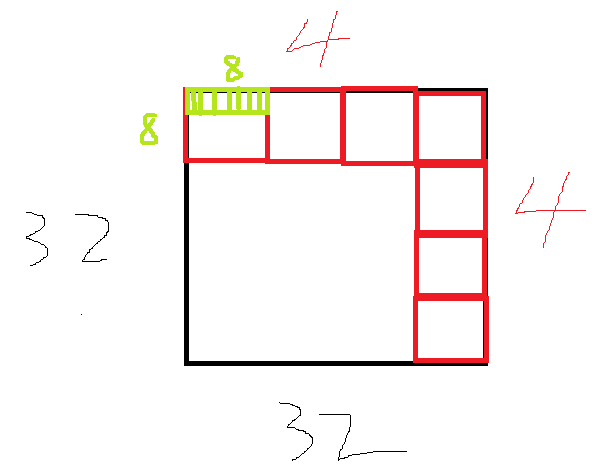
Black is the data volume, red is the ThreadGroup, and green is the Thread
Of course, it can also be divided into other ways
3. Data preparation
Regardless of how the shader writes, prepare the data first.
Since the communication mode between CPU and GPU is similar to that between client and server, the CPU needs to sort out the data, send the data to GPU for calculation, and then Retrieve it. So if the CPU delays time, you have to wait for the GPU, and vice versa.
3.1 obtaining depth map
There are many ways to obtain the depth map, and I used the most convenient one
Rewrite the OnRenderImage of the depth camera to render the image in the build in pipeline_ Cameradepthtexture is taken out through a post-processing Shader.
Shader "Custom/DepthShader"
{
    Properties
    {
        //_MainTex ("Texture", 2D) = "white" {}
    }
    SubShader
    {
        // No culling or depth
        Cull Off ZWrite Off ZTest Always

        Pass
        {
            CGPROGRAM
            #pragma vertex vert
            #pragma fragment frag

            #include "UnityCG.cginc"

            struct appdata
            {
                float4 vertex : POSITION;
                float2 uv : TEXCOORD0;
            };

            struct v2f
            {
                float2 uv : TEXCOORD0;
                float4 vertex : SV_POSITION;
            };

            v2f vert (appdata v)
            {
                v2f o;
                o.vertex = UnityObjectToClipPos(v.vertex);
                o.uv = v.uv;
                return o;
            }

            //sampler2D _MainTex;
            sampler2D _CameraDepthTexture;

            fixed4 frag(v2f i) : SV_Target
            {
                float depth = SAMPLE_DEPTH_TEXTURE(_CameraDepthTexture, i.uv);
                float linearDepth = Linear01Depth(depth);
                return fixed4(linearDepth, linearDepth, linearDepth, 1.0);
            }
            ENDCG
        }
    }
}
3.2 submit Buffer
Two types of buffers are required
- ComputeBuffer, as rwstructuredbuffer < >, supports generics in CS
- RenderTexture, as rwtexture2d < > in CS, is a texture. For depth texture, only one float is required
The submitted RenderTexture depth map returns the ComputeBuffer, which contains the calculated coordinates.
The specific API will not be written. Finally, it will be put in the back.
There is also a constant buffer, which is submitted directly through ComputeShader
3.3 hardware instantiation
Rendering 1023 cubes is completed in one DrawCall, which can speed up the speed. Because every DrawCall involves the setting of rendering state, that is, the set of binding at the bottom of D3D, as well as various other acceleration principles. The same mesh can be rendered up to 1023 at a time. If there are more than 1023, Draw again.
The api is graphics DrawMeshInstanced()
I've seen the article before comparing the rendering efficiency of unity grid renderer and GraphicsAPI. It's really fast to directly adjust the rendering API, because the grid renderer also needs to consider sorting when rendering. I don't know what it is. It may be a transparent object.
To support hardware instantiation, the mesh must be unchanged, the parameters must be variable, and the shader must also support it. In addition, mark enable under the shader_ In addition to the check box of Instancing, many macros should be added. If you are curious about the code under the macro, it is recommended to refer to the source code analysis of Unity built-in shader.
It seems that DX12 has some black technology supporting deformable mesh batch. mark it and see it later.
Shader "Custom/UnlitShader"
{
    Properties
    {
        _Color ("Color", Color) = (1, 1, 1, 1)
    }

    SubShader
    {
        Tags { "RenderType"="Opaque" }
        LOD 100

        Pass
        {
            CGPROGRAM
            #pragma vertex vert
            #pragma fragment frag
            #pragma multi_compile_instancing
            #include "UnityCG.cginc"

            struct appdata
            {
                float4 vertex : POSITION;
                UNITY_VERTEX_INPUT_INSTANCE_ID
            };

            struct v2f
            {
                float4 vertex : SV_POSITION;
                UNITY_VERTEX_INPUT_INSTANCE_ID // necessary only if you want to access instanced properties in fragment Shader.
            };

            UNITY_INSTANCING_BUFFER_START(Props)
                UNITY_DEFINE_INSTANCED_PROP(float4, _Color)
            UNITY_INSTANCING_BUFFER_END(Props)

            v2f vert(appdata v)
            {
                v2f o;

                UNITY_SETUP_INSTANCE_ID(v);
                UNITY_TRANSFER_INSTANCE_ID(v, o); // necessary only if you want to access instanced properties in the fragment Shader.

                o.vertex = UnityObjectToClipPos(v.vertex);
                return o;
            }

            fixed4 frag(v2f i) : SV_Target
            {
                UNITY_SETUP_INSTANCE_ID(i); // necessary only if any instanced properties are going to be accessed in the fragment Shader.
                return UNITY_ACCESS_INSTANCED_PROP(Props, _Color);
            }
            ENDCG
        }
    }
    FallBack "Diffuse"
}
4. Calculate shader code
#pragma kernel CSMain / / define kernel function entries

#define thread_group_x 4 / / refer to Section 2
#define thread_group_y 4 / / refer to Section 2
#define thread_x 8 / / refer to Section 2
#define thread_y 8 / / refer to Section 2

RWTexture2D<float> DepthMap;
RWStructuredBuffer<float3> ResultPosition;

float Offset;

[numthreads(8,8,1)]
void CSMain (uint3 id : SV_DispatchThreadID)
{
    int index = id.x
        + (id.y * thread_x * thread_group_x)
        + (id.z * thread_group_x * thread_group_y * thread_x * thread_y);
    float depth = DepthMap[id.xy];
    ResultPosition[index] = float3(id.xy, depth * Offset);
}
The calculation of this index is reduced from three-dimensional to one-dimensional, because the coordinate array is one-dimensional and the depth map is two-dimensional.
SV_DispatchThreadID represents the position of the current thread in all thread groups. It uniquely determines a thread, or a Cell, so it can directly represent a pixel in the depth map (if the depth map is 32) ✖ 32 resolution)
4.2 submit and obtain calculation shader task results
Call the Dispatch method on the CPU side. The index of the core and the number of thread groups in three dimensions are provided in the parameters. In this example, it is 4 ✖ four ✖ 1. Review section 2.
After calling Dispatch, the CPU will send the data to the GPU for calculation.
Call buffer GetData can return the calculation result of GPU. There are pits here. GetData is synchronous. Before the GPU is finished and returned, the CPU will block here and consume a lot of main thread time. In the analyzer, you can see that there is a blagetdata function at the bottom, which takes tens of ms.
After a certain version of unity2018, an asynchronous version is added.
AsyncGPUReadback.Request(resultBuffer, CallBackAction). The former is the buffer to receive data, and the latter is the callback after receiving.
The disadvantage of asynchrony is the introduction of delay, which is obvious. It may be that my FPS gene is too strong (ruo).
5. C# code and results
The amount of calculation is small, mainly to understand the use method and pave the way for the big move in the future
If you want to achieve the effect on yt, you can increase the amount of data.
using System.Collections;
using System.Collections.Generic;
using UnityEngine;
using UnityEngine.Rendering;
using UnityEngine.SceneManagement;

public class TestComputeShader : MonoBehaviour
{
    public Mesh mesh;  // The built-in Cube of the towbar unit
    public Material mat; // Hand drag, rendering Cube
    private Matrix4x4[] matrixs;
    private MaterialPropertyBlock block;

    public Camera DepthCam;  // Hand mop
    public Material DepthMat; // Hand mop
    private RenderTexture depthRT;

    public ComputeShader cs;  // Hand mop
    private const int Resolution = 32;
    private ComputeBuffer resultBuffer;
    private Vector3[] resultPositions;
    private const float Offset = 10.0f;

    private void Start()
    {
        InitDepthCam();
        InitCubeScreen();
        InitCS();
    }

    // Update is called once per frame
    private void Update()
    {
        UpdatePositionsFromCS();

        Graphics.DrawMeshInstanced(mesh, 0, mat, matrixs, 1023, block, ShadowCastingMode.Off, false);
    }

    private void InitCubeScreen()
    {
        matrixs = new Matrix4x4[1023];
        block = new MaterialPropertyBlock();
        Vector4[] colors = new Vector4[1023];

        for (var i = 0; i < 32; i++)
            for (var j = 0; j < 32; j++)
            {
                var ind = j * 32 + i;
                if (ind >= 1023) break;
                matrixs[ind] = Matrix4x4.TRS(new Vector3(i, j, 0), Quaternion.identity, Vector3.one * 0.5f);
                colors[ind] = new Vector4(1 - i / 32.0f, 1 - j / 32.0f, 1, 1);
            }

        block.SetVectorArray("_Color", colors);
    }

    private void InitCS()
    {
        resultPositions = new Vector3[Resolution * Resolution];
        resultBuffer = new ComputeBuffer(resultPositions.Length, sizeof(float) * 3);
        cs.SetFloat("Offset", Offset);
    }

    private void InitDepthCam()
    {
        depthRT = new RenderTexture(Resolution, Resolution, 24)
        {
            enableRandomWrite = true
        };
        depthRT.Create();

        DepthCam.depthTextureMode |= DepthTextureMode.Depth;
        DepthCam.targetTexture = depthRT;
    }

    private void UpdatePositionsFromCS()
    {
        int kernelHandle = cs.FindKernel("CSMain");

        cs.SetTexture(kernelHandle, "DepthMap", depthRT);
        cs.SetBuffer(kernelHandle, "ResultPosition", resultBuffer);

        cs.Dispatch(kernelHandle, Resolution / 8, Resolution / 8, 1);

        /*resultBuffer.GetData(resultPositions);
        for (int i = 0; i < matrixs.Length; ++i)
        {
            matrixs[i] = Matrix4x4.TRS(resultPositions[i], Quaternion.identity, Vector3.one * 0.5f);
        }*/
        AsyncGPUReadback.Request(resultBuffer, CSBufferCallBack);
    }

    private void OnRenderImage(RenderTexture source, RenderTexture destination)
    {
        Graphics.Blit(source, depthRT, DepthMat);
    }

    private void CSBufferCallBack(AsyncGPUReadbackRequest request)
    {
        if (request.hasError)
        {
            Debug.Log("GPU readback error detected.");
            return;
        }

        resultPositions = request.GetData<Vector3>().ToArray();

        for (int i = 0; i < matrixs.Length; ++i)
        {
            matrixs[i] = Matrix4x4.TRS(resultPositions[i], Quaternion.identity, Vector3.one * 0.5f);
        }
    }

    private void OnDestroy()
    {
        depthRT.Release();
        resultBuffer.Release();
    }
}