catalogue
3.1. Create and merge branches
3.3 revocation of modification
4.1. Create SSH Key connection gitHub
4.2. Create remote warehouse gitee
4.3 cloning from remote library
4.4 multi person collaborative development
1. Install Git
Git official website direct Download installer , and then install it according to the default option.
Official website: https://git-scm.com/download/
After installation, find "Git" - > "Git Bash" in the start menu and pop up something similar to the command line window, which indicates that Git installation is successful!
After installation, the last step is to set -- git initialization. Enter on the command line:
$ git config --global user.name "Your Name" //Your Name
$ git config --global user.email "email@example.com" //Your email
Note the -- global parameter of git config command. Using this parameter means that all Git warehouses on your machine will use this configuration. Of course, you can also specify different user names and Email addresses for a warehouse
2. Create version Library
First of all, select a suitable place and create an empty directory (project file). It is not necessary to create a Git warehouse under the empty directory. It is also possible to select a directory that already has something.
The second step is to turn this directory into a repository that Git can manage through the git init command
git init //Create version Library
If you don't see it git directory, because this directory is hidden by default. You can see it with the ls -ah command
The third step is to put a file into Git warehouse in two steps:
 git add readme.txt //In the first step, use the command git add to tell Git to add the file to the warehouse
 git commit -m "wrote a readme file" //In the second step, use the command git commit to tell Git to submit the file to the warehouse
Instruction Summary:
The first step is to add the file with git add, which is actually to add the file modification to the temporary storage area;
The second step is to commit the changes with git commit, which actually commits all the contents of the staging area to the current branch.
    //Version library management
1. git status  //Check whether the local code is consistent with the warehouse code
2. git diff  //Check for specific code inconsistencies
   //Workspace and staging area
1. work area
2. Staging area  git add
3. Version Library  git commit
3. Branch Management
3.1. Create and merge branches
1. git checkout -b dev  //Create and switch branches
2. git branch  //View branch
3. git checkout master  //Switch branch
4. git branch dev  //Create branch
5. git merge dev  //Merge branch
6. git branch -d dev  //Delete branch
7. git switch master //Switch branch
3.2 version fallback
1. git log  //View historical submission information
2. git log --pretty=oneline  //View simple history information
3. git reset --hard HEAD^  //Version fallback
4. git reset --hard //Version number version fallback

 //Note: manage changes
//Git tracks and manages changes, not files.
3.3 revocation of modification
1. git checkout -- filename  //Discard changes to workspace
2. git reset HEAD filename  //The modification of the staging area is undone
3. git reset --hard Version number   //Discard changes to the version Library
3.4 deleting files
1. rm filename  //Delete workspace file
2. git reset HEAD filename
rm filename  //Delete staging area file
3. rm filename
git checkout -- filename  //Undo deletion of warehouse
4. rm filename
git rm filename
git commit -m 'delete'   //Delete version library file
4. Remote warehouse
Git is a distributed version control system. The same git warehouse can be distributed to different machines.
Please register your GitHub account. Since the transmission between your local Git warehouse and GitHub warehouse is encrypted through SSH, you need to set:
4.1. Create SSH Key connection gitHub
1. Enter the command: cd~
2. Then enter: SSH keygen exe
Then press enter, press enter again, after entering, press enter three times:
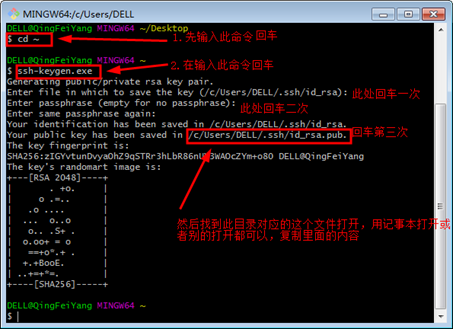
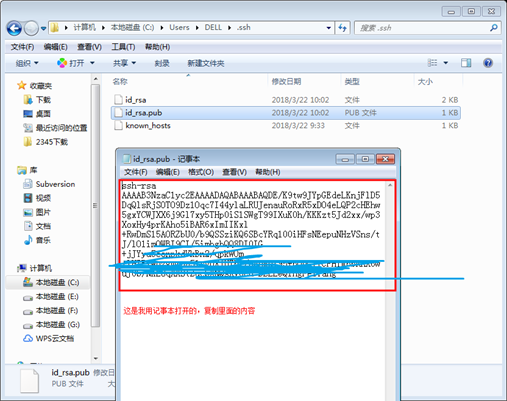
Then find the ID corresponding to the above directory_ rsa. Open the public key file. You can open it with Notepad or other files to copy the contents
Find the settings in your remote warehouse and configure SSH to succeed
Use GitHub to illustrate:
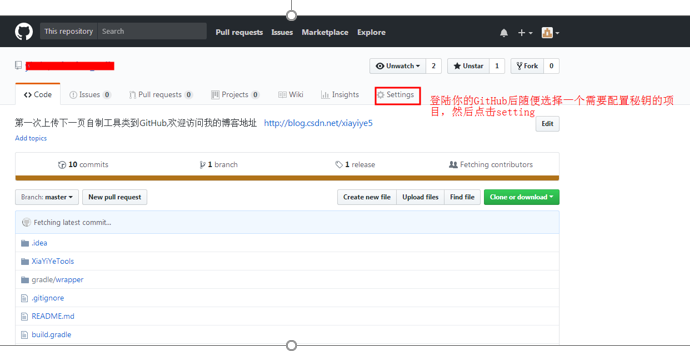
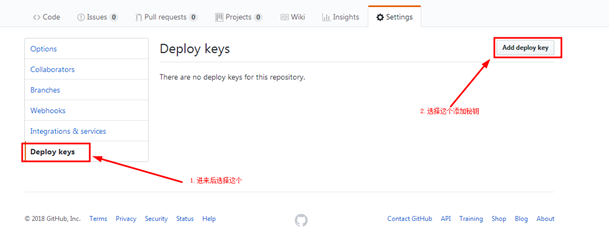
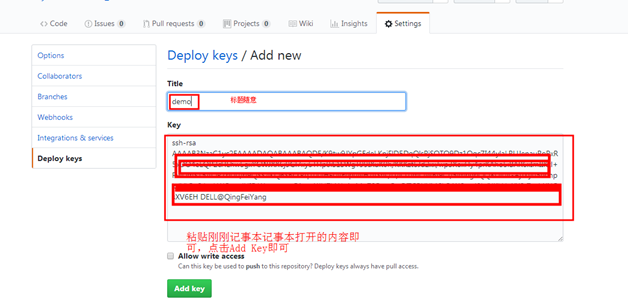 ,
,
Click Add as shown in the figure above to see the added secret key information:
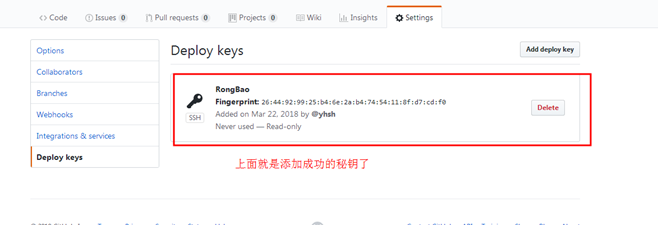
//Upload warehouse code
git init
git add *
git commit -m "first commit"
git branch -M main
git remote add origin git@gitee.com:huojiefuren/entry name.git
git push -u origin main
4.2. Create remote warehouse gitee

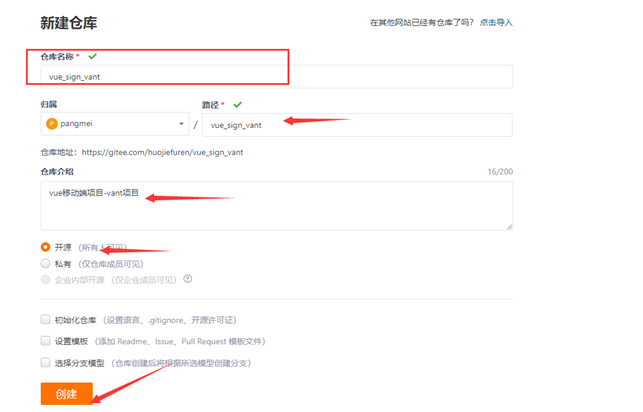
//Upload warehouse code
git init
git add *
git commit -m "first commit"
git branch -M main
git remote add origin git@gitee.com:huojiefuren/entry name.git
git push -u origin main
4.3 cloning from remote library
Now that the remote library is ready, the next step is to clone a local library with the command git clone
git clone git@github.com:michaelliao/gitskills.git
You may also notice that GitHub gives more than one address, which can also be used https://github.com/michaelliao/gitskills.git Such an address. In fact, git supports a variety of protocols. The default git: / / uses ssh, but other protocols such as HTTPS can also be used.
In addition to the slow speed of using https, the biggest trouble is that you must enter a password for each push. However, in some companies that only open the http port, you can't use the ssh protocol but only use https.
Summary: to clone a warehouse, you must first know the address of the warehouse, and then clone it with the git clone command.
Git supports a variety of protocols, including https, but ssh is the fastest.
4.4 multi person collaborative development
 1. Add member
  2. Members can clone projects for development: git clone url
  3. The modification is uploaded to the local warehouse and pushed to the remote warehouse: git push
  4. Pull the latest code of remote warehouse: git pull
     Summary:
       Add member remote warehouse and create other sub branches (operation sub branches)
       1. git clone url Clone project for development
       2. git branch -a View remote branches
       3. git checkout -b dev origin/dev  Switch branch-Corresponding branch on pull line
       4. Local modification dev Branch code
       5. git pull Update (pull)
       6. git add file name
       7. git commit -m 'remarks'
       8. git push Push (upload)
5. Instruction Summary
Reference website: https://www.liaoxuefeng.com/wiki/896043488029600
be careful:
. gitignore ignore files
All directories and files written in this file will be ignored and will not be added to the warehouse
// Install git
git config --global user.name "Your Name"
git config --global user.email "email@example.com"
// Create version Library
git init
// Submit add file
git add 'File name'
git commit -m 'Remark information'

//Upload local project to gitHub
// Step: create a remote warehouse -- local warehouse -- git warehouse -- push the remote warehouse gitHub
1.  git init   //Initialize warehouse
2.  git add *  //Upload all files
3.  git commit -m 'Remark information'
4.  git branch -M main //Create branch main
5.  git remote add origin git@github.com:michaelliao/learngit.git //Connect to remote warehouse
6.  git push -u origin main  //(push all contents of the local library to the remote library)


//Multi person collaborative development
 Add member remote warehouse and create other sub branches (operation sub branches)
1. git clone url  //Clone project for development
2. git branch -a  //View remote branches
3. git checkout -b dev origin/dev   //Switch branch - pull the corresponding branch on the line
4. //Modify dev branch code locally
5. git pull  //Update (pull)
6. git add file name
7. git commit -m 'remarks'
8. git push  //Push (upload)
Attachment: many instructions are dying. It is recommended not to check them easily
1. Git Collaborative tools
 Multi person collaborative development tools, common tools are Git and SVN
Git Installation website:
    https://blog.csdn.net/weixin_41714277/article/details/79399270
 Reference website
    https://www.liaoxuefeng.com/wiki/896043488029600

2. Git establish
    2.1  install git
    git config --global user.name "Your Name"
    git config --global user.email "email@example.com"

    2.2 Create version Library
        git init

    2.3 Submit add file
        git add 'File name'
        git commit -m 'Remark information'

    2.4 Version library management
        1. git status  Check whether the local code is consistent with the warehouse code
        2. git diff    Check for specific code inconsistencies - +

    2.5 Workspace and staging area
        1. Workspace local folder directory
        2. Staging area  git add
        3. Version Library  git commit

3. Version fallback ( Operate remote warehouse)
    1. git log  View historical submission information
    2. git log --pretty=oneline  View simple history information
    3. git reset --hard HEAD^  Version fallback
    4. git reset --hard Version number version fallback


4. Remote warehouse
    1. register gitHub account number  gitee account number
    2. establish SSHkey connect gitHub
        Generate secret key: SSHKEY
        1. cd ~
        2. ssh-keygen.exe
        Public key location: C:\Users\Administrator\.ssh  (id_rsa.pub)

    3. to configure gitHub Secret key
        Click on the avatar---setting--SSH and GPS ---> new sshkey

    4. Create an empty project in remote warehouse

    5. Upload local items to gitHub
        Step: create a warehouse remotely--Local warehouse---git Warehouse--Push remote warehouse gitHub

        1.  git init   Initialize warehouse
        2.  git add *  Upload all files
        3.  git commit -m 'Remark information'
        4.  git branch -M main Create branch main
        4.  git remote add origin git@github.com:michaelliao/learngit.git Connect to remote warehouse
        5.  git push -u origin main (Push all contents of the local library to the remote library)

        6. Clone project
            git clone project git address

     6. Remote warehouse

        ### gitee
        1. Step 1: create SSH Key If it already exists, find it directly c Disk user .ssh file
        2. Step 2: open Gitee,add to SSH
        3. Create warehouse and upload code
            cd learngit
            git remote add origin https://gitee.com / warehouse git
            git push -u origin master

        5. Multi person collaborative development
            1. Add member
            2. Members can clone projects for development: git clone url
            3. The modification is uploaded to the local warehouse and pushed to the remote warehouse: git push
            4. Pull the latest code of remote warehouse: git pull
            Summary:
                Add member remote warehouse and create other sub branches (operation sub branches)

                1. git clone url Clone project for development
                2. git branch -a View remote branches
                3. git checkout -b dev origin/dev  Switch branch-Corresponding branch on pull line
                4. Local modification dev Branch code
                5. git pull Update (pull)
                6. git add file name
                7. git commit -m 'remarks'
                8. git push Push (upload)

5. Branch Management
        ### Create and merge branches
        1. git checkout -b dev  Create and switch branches
        2. git branch  View branch
        3. git checkout master  Switch branch
        4. git branch dev  Create branch
        5. git merge dev  Merge branch
        6. git branch -d dev  Delete branch
        7. git switch master Switch branch

6.  Delete file
    1. rm filename  Delete workspace file
    2. git reset HEAD filename
       rm filename  Delete staging area file
    3. rm filename
       git checkout -- filename  Undo deletion of warehouse
    4. rm filename
        git rm filename
        git commit -m 'delete'   Delete version library file


7. extend
        The branch is not synchronized after pulling the remote warehouse
        git clone Remote warehouse
        git branch -a View remote branches
        git checkout -b master origin/master  Switch branch-Corresponding branch on pull line


8. Delete branch
	Delete remote branch
	git push origin --delete release

	Delete local branch
 	git branch -d release