Git notes tutorial (contents of chapters 1 to 4 of this article)
My first blog, a rookie (student), I hope the big guys will give me some advice.
Chapter 1 initial of git
1.1 what is git?
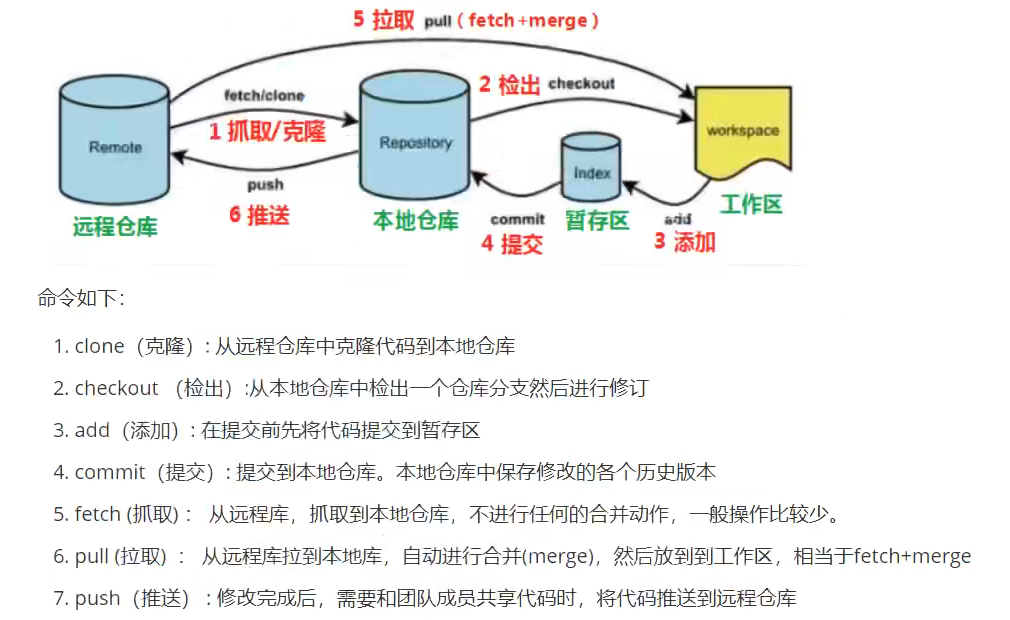
git is a distributed version control system, which is simply understood as version superposition, as shown in the following figure
We are developing a new project, which is updated on the basis of the original project, and then a version. We constantly update the project, and each updated project is a version.
For example, when a customer puts forward a new requirement, we change the project and generate a version. But after the customer experience, they didn't feel that it was easy to use. The customer wants to use the previous version. We can restore git to the previous version.
1.2 role of GIT
Backup collaborative development code merge code restore traceability
1.3 installation and configuration of GIT
https://git-scm.com/download/win
After downloading, install as a fool and configure git after installation
Right click to select Git Bush Here
to configure
git config --global user.name='user name'
git confif --global user.email='mailbox'
Check for success
git config --global user.name
git config --global user.name
1.4 working flow chart of GIT
Chapter II use of git
2.1 create local warehouse
Create a new folder, right-click and select Git Bush Here, which is equivalent to Linux system and can execute linux commands
Enter command
git init **Create local warehouse**
Will generate git file

If not, turn on the file hiding function of the system
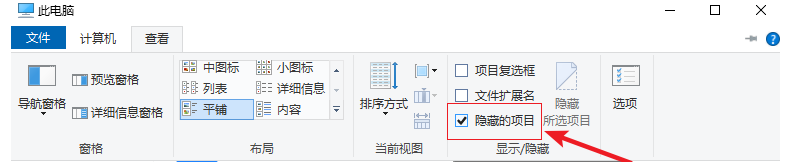
. git is the local repository we created
2.2 use of basic commands of GIT
First, let's look at this picture
The first task is to create a file and save it in the local warehouse.
First, let's understand several concepts:
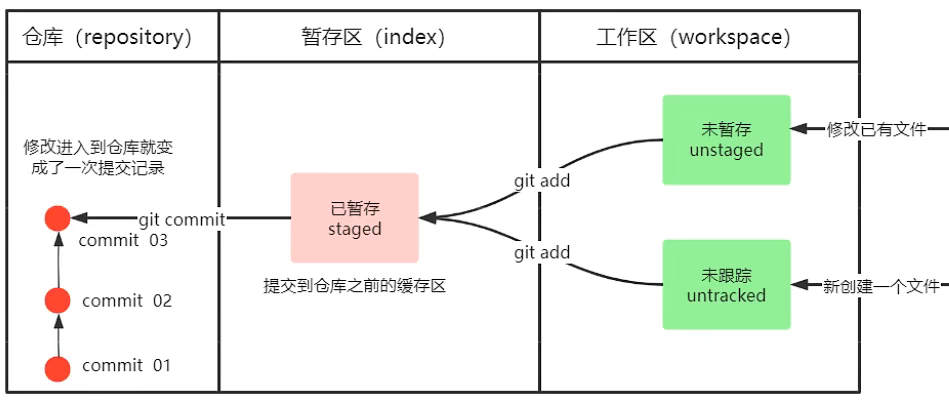
Work area: just out The area we see outside git is the workspace
Staging area: the cache area before submitting to the warehouse
touch file01.txt 1.create a file
vim file01.txt   2.Edit content
git status       3.View current file01.txt Status of the file[The current file is saved to the cache]
git add . or git add file01.xt 4.adopt git add Naming is to save the changed file to the cache
git status 5.View current file01.tx The file is now in the status of submitting to the local warehouse
git commit -m 'describe' 6.adopt git commit Command to submit the updated file to the local warehouse
git log 7.After submitting, you can view the submitted records
Process: changed file ----- git add ----- "cache ----- git commit -----" local warehouse
2.3 deleting files and viewing changed contents
Process: changed file ----- git add ---- "cache ----- git commit ----" local warehouse ----- git rm ---- "delete
git rm file01.txt ***Delete file***
ll ***View files in directory***
View changes
Process: change file - git diff - change content
Note: if git add is added to the cache, git diff cannot see the changed content
vim file01.txt ***Edit file***
git diff file01.txt  ***View changes***
2.4 use of GIT log
Display information referring to local warehouse
git log

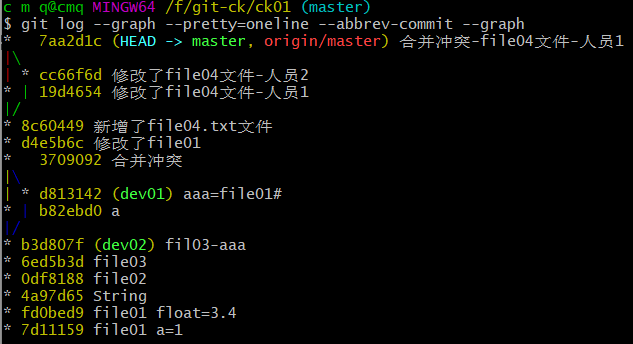
git log --pretty=oneline

git log --abbrev-commit
git log --graph

git log --pretty-oneline --abbrev-commit --graph ***This naming makes it easier to see the [conflict resolution] branch***
***Let's take a look at the display effect of this command. Later, we will talk about [cooperation and conflict]***
Note: the three attribute commands behind git log can be located at any position, as long as the three attribute commands are guaranteed
2.5 alias configuration
git log --pretty-oneline --abbrev-commit --graph ***This command is relatively long. We can customize the alias***
to configure
touch ~/.bashrc  ***Create this file and enter configuration***
vim ~/.bashrc ***Write the following line of code to save and exit***
alias git-log='git log --pretty=oneline --all --abbrev-commit --graph'
***Save and exit, execute the following command OK Yes***
source ~/.bashrc
***We can use it****
git-log
Chapter III withdrawal of documents, creation of branches and merger
3.1 withdrawal of documents and versions
- Document withdrawal
Process: file change ----- git checkout ----- withdraw the content just modified
vim file01.txt  ***Modification content***
git diff file01.txt ***View the modified content to facilitate the withdrawal and observation of changes in the file***
git checkout file01.txt  ***Recall the currently modified content***
cat file01.txt ***view file contents***
- Withdrawal of version
Process: change the file ----- git add ----- cache ----- git commit ----- local warehouse ----- git reset ----- back to the specified version
Note: as long as we modify the file and submit it to the local warehouse, it is the latest version
git reset --hard HEAD^ ***Fallback to previous version***
git reset --hard HEAD^^ ***Back to previous version***
***If I have 100 versions back to the original version, it's particularly cumbersome***
git reset --hard HEAD~100  ***Through this method, it is relatively simplified***
git reset --hard HEAD~1
Above, we return to the old version from the new version. Now we want to return to the new version from the old version
git reflog ***View the submission record. There is one for each submission Id,One for each version Id***
git reset --hard id
git reset --hard 14a9f07
The yellow font is the corresponding Id

3.2 create branch
git branch ***View all branches***
git branch [Branch name] ***Create branch***
git branch dev  ***I created dev branch***
git checkout dev  ***Switch branch***
git checkout -b dev  ***Create branches directly and switch branches***
git branch -d dev  ***Delete branch***
3.3 merger and merger conflict
- merge
First, we create a new branch, create a new file, save it to the local warehouse of the current branch, and then switch to the master branch for merging
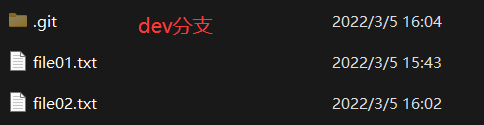
Look at the picture: I created file02. 0 in the dev branch Txt file

git ckeckout -b dev  ***Create branches and switch***
touch file02.txt  ***new file***
vim file02.txt  ***Edit content***
git add file02.txt  ***Save to cache***
git commit -m 'newly added file02.txt file'  ***Save to local warehouse***
git checkout master  ***Switch to master branch***
git merge [Branch name]
git merge dev  ***merge dev Content to master***
git log --pretty-oneline --abbrev-commit --graph ***View submitted and merged records***
- Merge conflict
For example, there is a file01.0 under the master branch Txt file
We create two branches and open Git Bush Here respectively.
For example, dev01 and dev02 branches are created.
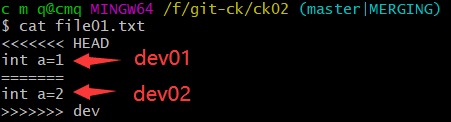
file01.txt: int a=5
Note: both branches change the same line
technological process:
dev01
file01.txt----vim---->git add------>git commit---->git checkout----->master----->git merge
vim file01.tx
git add file01.txt  ***Change the content to: int a=1   ***
git commit -m 'dev01 change file01.txt file'
git checkout master
git merge dev01
dev02
file01.txt----vim---->git add------>git commit---->git checkout----->master----->git merge
vim file01.tx
git add file01.txt  ***Change the content to: int a=2   ***
git commit -m 'dev02 change file01.txt file'
git checkout master
git merge dev02 ***At this time, it is combined dev02,There is conflict***
As shown in the figure: there is a conflict

- Conflict resolution
cat file01.txt ***view file contents***
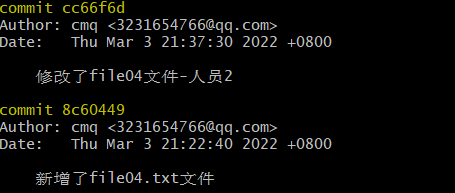
First, dev01 merges the master content successfully: int a=1.
At this time, we can make changes according to the content we view: we need to keep that part.
For example: I want both
vim file01.txt ***Edit***
***Change content to***
int a=1
int a=2
***Then execute the following command***
git add file01.txt
git commit -m 'master-Synthetic conflict'
Chapter 4 remote warehouse, push, clone, grab, pull
4.1 registration and creation of remote warehouse
4.1 remote warehouse
-
register
Here I code cloud, also can use github,gitLab
https://gitee.com/
Registered account is not mentioned here -
Create remote warehouse
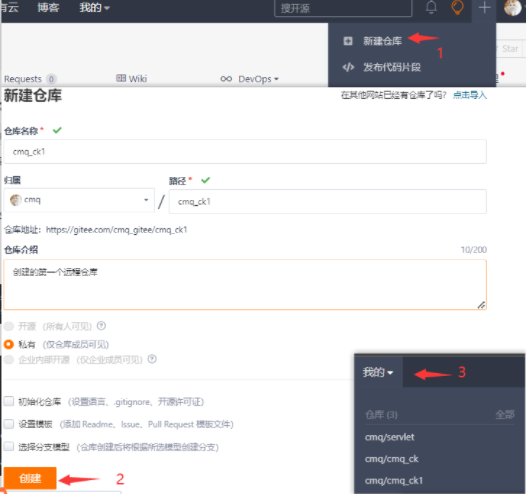
-
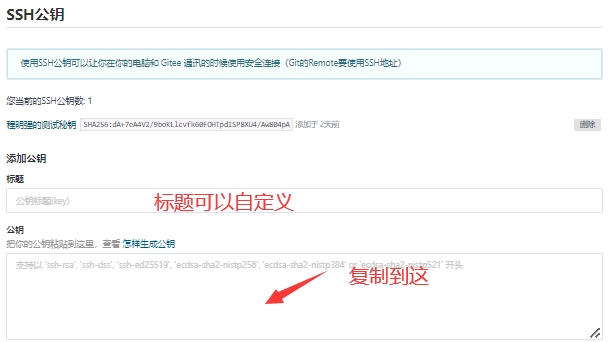
Configure public key
Open Git Bush Here
***Enter the next command***
Generate secret key: ssh-keygen -t rsa
 Get secret key: cat ~/ssh/id_rsa.pub
Open the code cloud settings and find the SSH public key configuration.
***open Git Bush Here,Associate with remote***
git remote add Remote warehouse HHTS  [Remote inventory name can be customized]
git remote add origin git@gitee.com:cmq_gitee/cmq_ck1.git ***Added remote warehouses***
git remote ***View the currently added remote warehouse***
git remote -v
Purpose of configuring public key: files from local warehouse can be uploaded to remote warehouse
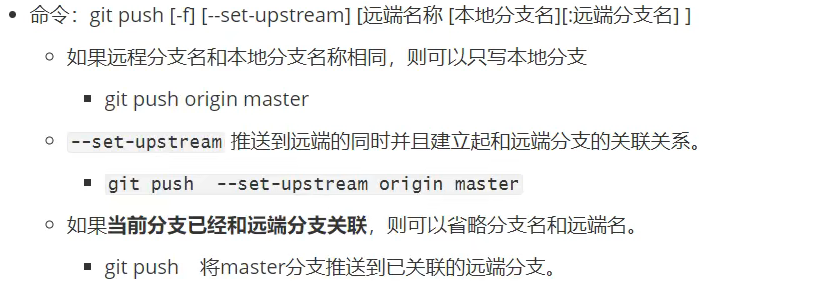
4.2 push
git push [Remote warehouse name] [local branch]:[[remote branch]
git push origin master
git push --set-upstream origin master:master [[establish relationship]
git push ***Can be used directly git push ***
***The local branch name is the same as the remote branch name, and one can be omitted***
***After successful push, open the code cloud and my inventory to see the uploaded files***
4.3 cloning
Process: open Git Bush Here ------- git clone
Here I open Git Bush Here on the desktop
git clone HHS [Custom local warehouse name]
git clone git@gitee.com:cmq_gitee/cmq_ck1.git ***Can not be specified, default cmq_ck1 ***
git clone git@gitee.com:cmq_gitee/cmq_ck1.git test_ck ***After execution, you can see the cloned project***
4.4 grasping and pulling
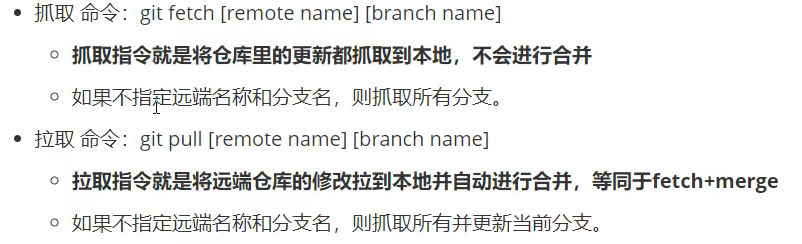
Grab [fetch]:
For example, we push the file to the remote warehouse: file01 Txt, our local warehouse only has file01 Txt, local and remote content are the same.
For example, we have: [employee A] [employee B]
[employee A] added file02 Txt push to remote warehouse. At this time, the remote warehouse has: file01 txt feil02. Txt two files.
The code of [employee B] is not up-to-date, so we need to grab [git fetch], which is not the latest code,
In this case, you need to merge [git merge remote branch name]
[staff A]
touch file02.txt
git add file02.txt
git commit -m 'newly added file02.txt file'
git push origin master
[employee B]
git fetch [Remote inventory name] [current branch]
git fetch origin master***There is no merge to at this time master branch***
git merge [[remote warehouse name]/[[remote branch]
git merge origin/master ***merge to master branch***
Pull [pull]
For example, we have: [employee A] [employee B]
[employee A] added file02 Txt push to remote warehouse. At this time, the remote warehouse has: file01 txt feil02. Txt two files.
The code of [employee B] is not up-to-date, so you need to grab [git pull] = = [fetch+pull]
[staff A]
touch file02.txt
git add file02.txt
git commit -m 'newly added file02.txt file'
git push origin master
[employee B]
git pull[Remote inventory name] [current branch]
git pull origin master ***Pull***
git log --pretty-oneline --abbrev-commit --graph ***View submitted and merged records***