1, What is a branch?
Almost every version control system supports branching in some form. Using branches means that you can separate from the development main line and continue to work without affecting the main line. Some people call git's branching model a must kill feature. It is precisely because of it that Git is distinguished from the family of version control systems.
2, Basic commands for branch management
Create branch:
$ git branch dev #Create branch
Switch branches:
$ git checkout dev #Switch to dev branch
When you switch branches, Git will replace the contents of the working directory of your new branch with the last submitted snapshot of the branch. Therefore, multiple branches do not need multiple directories and remain consistent with the master of the main branch.
Simplify creating and switching branches:
$ git checkout -b dev #Means to create a dev branch and immediately switch to the dev branch; If dev exists, switch directly
We notice that git checkout < Branch > is used to switch branches, while git checkout -- < File > is used to undo modification. The same command has two functions, which is really confusing.
In fact, the action of creating and switching branches is more scientific with switch. Therefore, the latest version of Git provides a new git switch command to switch branches:
$ git branch dev  #Create dev branch
$ git switch dev   #switch to dev branch
$ git switch -c dev  #It can also be done in one step, - c stands for create
List all local branches:
$ git branch  #List all local branches
* dev       #The asterisk represents the current branch
  master
List all branches of the remote warehouse:
$ git branch -r  #List all branches of the remote warehouse
  origin/HEAD -> origin/master
  origin/master
List all local and remote branches:
$ git branch -a   #Displays all branches, both local and remote
* dev             #The asterisk represents the current branch
  master
  remotes/origin/HEAD -> origin/master
  remotes/origin/master
Delete branch:
$ git branch -d (branchname) #Delete specified branch
Merge branch content:
$ git merge dev #This means that the contents of the branch dev are merged under the current branch
3, Branch function demonstration and
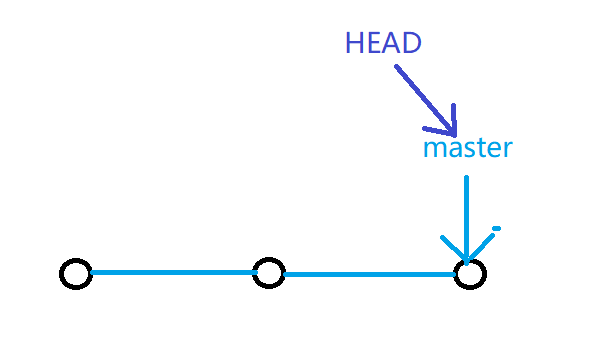
We have learned about version fallback earlier, that is, Git will string them into a timeline each time it is submitted, and this timeline is a branch. So far, there is only one timeline. In Git, this branch is called the main branch, that is, the master branch. Strictly speaking, HEAD does not point to submission, but to master, which points to submission. HEAD points to the current branch (the branch that HEAD points to is the latest submission).
3.1 direction between HEAD and master
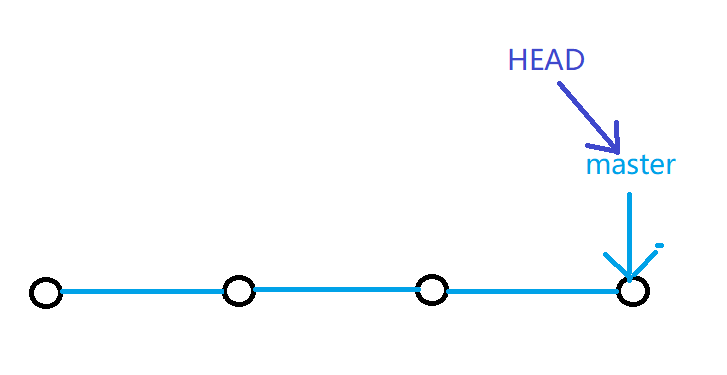
At the beginning, the master branch is a line. Git uses the master to point to the latest submission, and then HEAD to point to the master to determine the current branch and the submission point of the current branch, as shown in the following figure:
Each time you commit, the master main branch will move forward one step. With the continuous submission, the timeline of the master main branch will become longer and longer.
3.2. Create a dev branch
When we create a new dev branch, Git creates a new pointer called dev, pointing to the same submission as the master. We switch to the new dev branch, and the HEAD pointer will automatically point to dev from the master, indicating that the current branch is on dev:
$ git checkout -b dev    #Create a new dev branch and immediately switch to dev
Switched to a new branch 'dev'
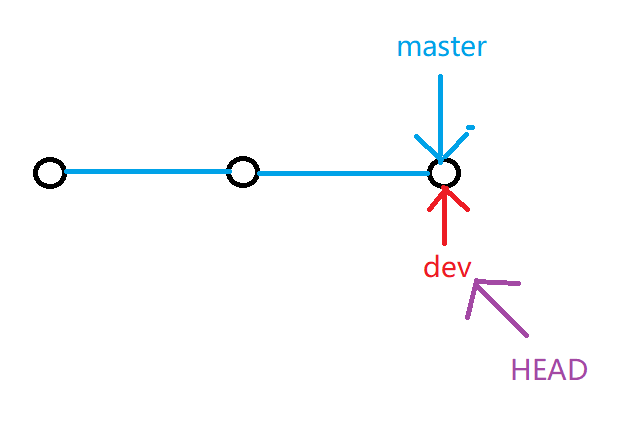
Git creates branches very quickly, because in addition to adding a dev pointer, it changes the direction of the next HEAD, and there is no change in the files in the workspace!!!
As like as two peas, we have switched to the new branch dev, which we can understand as dev branch is the main branch of master. All the contents of the dev branch are exactly the same as the master main branch, because master main branch is a template of local warehouse. Generally, we do not allow direct modification to the master main branch. Subsequently, we also create new branches for operation. After testing and tuning, we finally merge them into the local master branch, and then push them to the master branch of the remote warehouse:
First, check whether the contents of the master branch and the dev branch are consistent:
itwbs@matebook13-mini MINGW64 /d/gitspace/learngit (master)   #View under master main branch
$ ls
readme.txt  test.txt  #Consistent content

itwbs@matebook13-mini MINGW64 /d/gitspace/learngit (dev)   #View under dev branch
$ ls
readme.txt  test.txt  #Consistent content
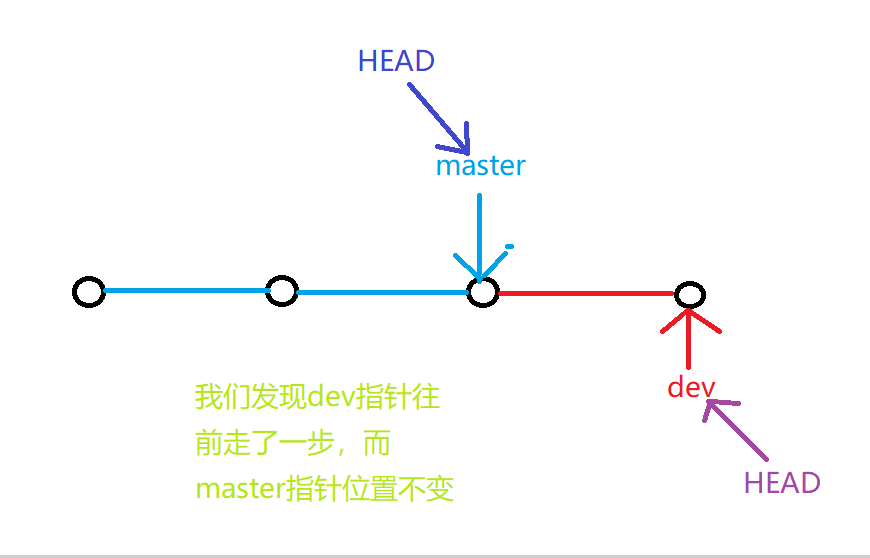
**Switch to the dev branch. From now on, the modification and submission of the workspace are aimed at the dev branch. For example, we create a new file test2 Txt, and then submit it to the local warehouse to view the dev pointer:**
$ touch test2.txt  #New test2 Txt file

$ ls
readme.txt  test.txt  test2.txt

$ git add test2.txt   #Add to staging area

$ git commit -m "dev new add test2.txt"   #Submit to dev local warehouse
[dev 4229aad] dev new add test2.txt
 1 file changed, 0 insertions(+), 0 deletions(-)
 create mode 100644 test2.txt
3.3 merge dev branches
If our work on the dev branch is completed, switch to the master main branch and view the file:
$ ls
readme.txt  test.txt    #Found test2 without dev branch Txt file
At this time, if we want to have dev branches in the master main branch, merge dev branches in the current master main branch, as follows:
$ git merge dev   #Merge dev branches in the current master main branch
Updating b1fe536..4229aad
Fast-forward
 test2.txt | 0
 1 file changed, 0 insertions(+), 0 deletions(-)
 create mode 100644 test2.txt

 $ ls    #Check again and you will have test2 Txt file
readme.txt  test.txt  test2.txt
Noting the fast forward information above, Git told us that the merge is in the "fast forward mode", that is, directly pointing the master to the current commit of dev, so the merge speed is very fast. Of course, not every merge can be fast forward. We will talk about other merging methods later.
How did Git merge? In fact, it is easy to understand that the merge is completed by directly pointing the pointer of the master main branch to the latest submission of the dev branch, as shown in the following figure:
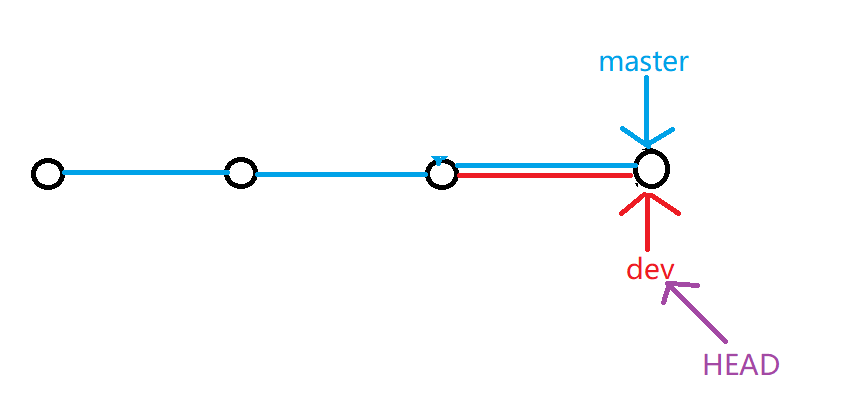
It can be seen that merging branches is also very fast. The pointer is changed and the work content remains unchanged!
3.4 delete the dev branch after merging
After merging the branches, you can safely delete the dev branch. Deleting the dev branch is to delete the pointing of the dev pointer, and then only the master branch is left, and the HEAD points to the master main branch again, as shown in the following figure:
$ git branch  #View all branches of local warehouse
  dev
* master   #The asterisk represents the branch currently pointing to the master

$ git branch -d dev   #Delete dev branch
Deleted branch dev (was 4229aad).

$ git branch   #Then, the dev branch is
* master
3.5. Resolving merger conflicts
Merging branches is often not plain sailing, and there will be conflicts!!!
New feature branch:
$ git switch -c feature    #Create a new feature branch and switch immediately
Switched to a new branch 'feature'
To test2 Txt file newly added:
$ vim test2.txt  #Edit test2 Txt file, add the following
Create a new branch is quick AND simple.
Submit to local Git warehouse:
$ git add test2.txt   #Add staging area
warning: LF will be replaced by CRLF in test2.txt.
The file will have its original line endings in your working directory

$ git commit -m "feature commit test2.txt"    #Submit to local warehouse
[feature ebc5a6f] feature commit test2.txt
 1 file changed, 1 insertion(+)
At this time, we switch to the master main branch:
$ git switch master
Switched to branch 'master'
Your branch is ahead of 'origin/master' by 1 commit.
  (use "git push" to publish your local commits)
It can be seen that Git tells us that the master branch in the current local warehouse is committed ahead of the master branch in the remote warehouse.
In the master branch, go to test2 Txt file also adds a line
$ vim test2.txt  #edit

$ cat test2.txt  #View content
Creating a new branch is quick & simple.
Also submit to local warehouse:
$ git add test2.txt   #Add to staging area
warning: LF will be replaced by CRLF in test2.txt.
The file will have its original line endings in your working directory

$ git commit -m "master commit test2.txt update & simple"   #Submit to local warehouse
[master 53a6882] master commit test2.txt update & simple
 1 file changed, 1 insertion(+)
Take a closer look. At present, even branches have a new commit, as shown in the following figure:

At this time, we merge the feature branches in the master main branch to see what happens:
$ git merge feature   #Merge feature branches
Auto-merging test2.txt
CONFLICT (content): Merge conflict in test2.txt
Automatic merge failed; fix conflicts and then commit the result.
As you can see, test2 Txt file conflicts. Check the current status git status:
$ git status
On branch master
Your branch is ahead of 'origin/master' by 2 commits.
  (use "git push" to publish your local commits)

You have unmerged paths.
  (fix conflicts and run "git commit")
  (use "git merge --abort" to abort the merge)

Unmerged paths:
  (use "git add <file>..." to mark resolution)
        both modified:   test2.txt

no changes added to commit (use "git add" and/or "git commit -a")
It can be seen that the reason is test2 Txt file both are modified, and then when merging, the HEAD does not know who to point to, and then conflicts!!!
At this point, let's look at test2 Txt file contents:
$ cat test2.txt  #View content
<<<<<<< HEAD
Creating a new branch is quick & simple.
=======
Create a new branch is quick AND simple.
>>>>>>> feature
Well, if there is a conflict, Git will automatically help us record which operations caused the conflict in the conflict file. The above expression is obvious, because the master branch pointed to by HEAD is modified to create a new branch is quick & simple, The modified content of the feature branch is Create a new branch is quick AND simple.
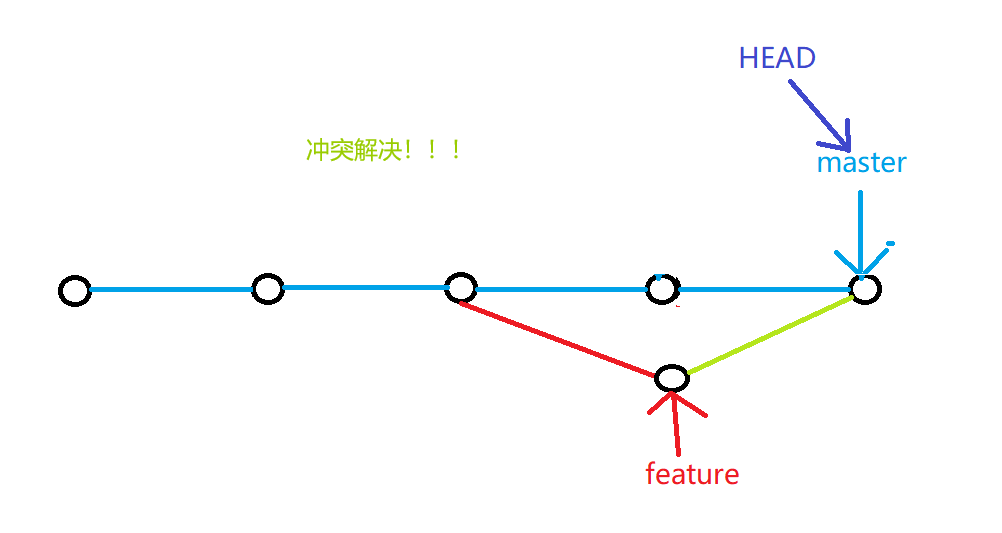
Git uses < < <, ==========, > > > > > to record different operations of different branches. At this time, we can manually edit test2 in order to end the conflict Txt file with the following contents (in fact, the final consolidated version we want to see), and then submit it again:
$ vim test2.txt  #Re edit test2 Txt file is the final merge result we want

$ cat test2.txt
Creating a new branch is quick & simple.   #Modifications made to master main branch
Create a new branch is quick AND simple.   #Changes made to the feature branch

$ git add test2.txt  #Add to staging area again

$ git commit -m "conflict fixed"   #Resubmit to local warehouse
[master 29e8de2] conflict fixed
Has it really been solved? You can view the current status:
$ git status
On branch master
Your branch is ahead of 'origin/master' by 4 commits.
  (use "git push" to publish your local commits)

nothing to commit, working tree clean
No problem, it's really solved. Moreover, Git also tells you that the master branch of the local warehouse is 4 commit s ahead of the master of the remote warehouse, prompting you to push the latest version of the local warehouse to the remote warehouse and merge.
You can also use the command to view the merging of branches:
$ git log --graph --pretty=oneline --abbrev-commit
*   29e8de2 (HEAD -> master) conflict fixed
|\
| * ebc5a6f (feature) feature commit test2.txt
* | 53a6882 master commit test2.txt update & simple
|/
* 4229aad dev new add test2.txt
* b1fe536 (origin/master, origin/HEAD) update test.txt.
* cd180c8 update test.txt.
* 1d07bf6 add new test.txt
* 89789d5 Git tracks changes of files
* bf9deee git tracks changes
* 4f489e7 append GPL
* 0931364 wrote a readme file
No way is so strong!!!
When Git cannot automatically merge branches, the conflict must be resolved first. After the conflict is resolved, submit and merge is completed.
Conflict resolution is to manually edit the failed Git merge file to the content we want, and then submit it.
Summary:
- Git encourages extensive use of branches:
- View branch: git branch
- Create branch: git branch < name >
- Switch branches: git checkout < name > or git switch < name >
- Create + switch branch: git checkout - B < name > or git switch - C < name >
- Delete branch: git branch - d < name >
- Merge a branch to the current branch: git merge < name >
- View branch merge graph: git log --graph