1, Initialize warehouse (init)
# If you don't want git to manage tracking files, you can add them in the root directory of the warehouse gitignore file, write the corresponding rules in it
$ git init              Initialize the current directory to git Warehouse
Initialized empty Git repository in D:/Study research/underway/Git study/learngit/.git/
2, Add file to warehouse (add, commit)
The files managed by Git are divided into workspace and version library. The version library is divided into staging area stage and staging area branch master (warehouse).
**Working Directory: * * for example, my learngit folder is a Working Directory
Repository: the workspace has a hidden directory Git, this is not a workspace, but a git version library. There are many things stored in Git's version library, the most important of which is the temporary storage area called stage (or index), the first branch master automatically created by git for us, and a pointer to the master called HEAD.
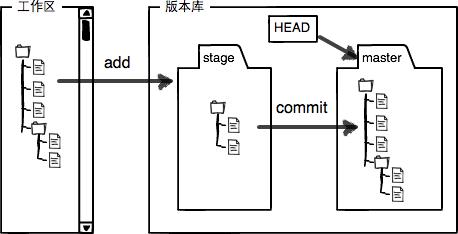
As mentioned earlier, when we add files to Git version library, it is implemented in two steps:
The first step is to add the file with git add, which is actually to add the file modification to the temporary storage area;
The second step is to submit the changes with git commit, which is actually to submit all the contents of the staging area to the current branch.
When we create Git version library, Git automatically creates the only master branch for us, so now, git commit is to submit changes to the master branch.
More workspace and staging area concepts, Workspace and staging area - Liao Xuefeng's official website (liaoxuefeng.com).
# Create a readme Txt file, and submit the file to the temporary storage area, and then submit it to the warehouse

$ git add readme.txt	# Tell Git to add the file to the repository
						# To add many files of the same type, you can use wildcard * (remember to add quotation marks). For example, git add "*.txt" command is to add all files txt file
						# Use git add All current files will be added to the warehouse

$ git commit -m "wrote a readme file"	# Tell Git to submit the file to the warehouse
[master (root-commit) 4309065] wrote a readme file
 1 file changed, 2 insertions(+)
 create mode 100644 readme.txt

$ git status # Check the current status of the warehouse (whether the project has been modified, added, untracked files, etc.)
On branch master
nothing to commit, working tree clean
3, Comparison file (diff)
-
git diff to view the differences between the workspace and the staging area,
-
git diff --cached view the differences between the staging area and the warehouse,
-
git diff HEAD view the differences between the workspace and the warehouse,
-
The reverse command git checkout of git add cancels the modification of the work area, that is, the latest version of the temporary storage area is transferred to the work area,
-
The reverse command git reset HEAD of git commit is to transfer the latest version of the warehouse to the temporary storage area.
-
In git diff, there are two situations: the temporary storage area is empty and the temporary storage area is not empty.
First of all, we clearly know that git diff compares the files in the workspace and the staging area. If the staging area is empty at this time, it is slightly different, that is:
-
If the staging area is empty, use git diff: because the staging area is empty, using git diff also compares the workspace and warehouse, that is, the result is the same as using git diff HEAD
-
If the staging area is not empty, use git diff: because the staging area is not empty at this time, the working area and staging area are compared by using git diff at this time
Discussion - Liao Xuefeng's official website (liaoxuefeng.com)
# 1. After modifying a file, check the status of the warehouse
$ git status
On branch master
Changes not staged for commit:
  (use "git add <file>..." to update what will be committed)
  (use "git restore <file>..." to discard changes in working directory)
        modified:   readme.txt

no changes added to commit (use "git add" and/or "git commit -a")

# 2. View the modified content and the file difference
$ git diff
diff --git a/readme.txt b/readme.txt
index d8036c1..013b5bc 100644
--- a/readme.txt
+++ b/readme.txt
@@ -1,2 +1,2 @@
-Git is a version control system.
+Git is a distributed version control system.
 Git is free software.
\ No newline at end of file

# 3. Add the modified file to the warehouse
$ git add readme.txt

# 4. View the current status
$ git status
On branch master
Changes to be committed:
  (use "git restore --staged <file>..." to unstage)
        modified:   readme.txt

# 5. Submit to warehouse
git commit -m "add distributed"
[master f06eedd] add distributed
 1 file changed, 1 insertion(+), 1 deletion(-)

# 6. Check the current warehouse status again
$ git status
On branch master
nothing to commit, working tree clean
Changes to be committed
4, Submit records and version fallback (log, reset)
HEAD indicates the current version, that is, the latest submission
HEAD ^ previous version
HEAD ^ ^ previous version
HEAD~100 up to 100 versions
# 1. View version submission records
$ git log
commit ba9933f71761b488c284c5ddb9a2331276e4d7f8 (HEAD -> master)
Author: ********
Date:   Mon Feb 21 12:47:00 2022 +0800

    append GPL

commit f06eedd97fcbeff70c2a44bf79fe3eeedba97ff5
Author: ********
Date:   Mon Feb 21 12:43:10 2022 +0800

    add distributed

commit 430906517e1d196c45297edba787623e64acad9e
Author: ********
Date:   Mon Feb 21 12:20:55 2022 +0800

    wrote a readme file

# 2. Back to the previous version
$ git reset --hard HEAD^
HEAD is now at f06eedd add distributed

# 3. View the version submission record again
$ git log
commit f06eedd97fcbeff70c2a44bf79fe3eeedba97ff5 (HEAD -> master)
Author: ********
Date:   Mon Feb 21 12:43:10 2022 +0800

    add distributed

commit 430906517e1d196c45297edba787623e64acad9e
Author: ********
Date:   Mon Feb 21 12:20:55 2022 +0800

    wrote a readme file
The latest version of append GPL can no longer be seen! For example, you've been on the time shuttle from the 21st century to the 19th century. If you want to go back, you can't go back. What should you do?
-
If the command line window has not been closed: you can go up and find that the commit id of the append GPL is 1094adb, Then you can specify to return to a future version:
$ git reset --hard ba9933
HEAD is now at ba9933f append GPL
-
If the command line window is closed: in git, there is always regret medicine to take. When you use $git reset --hard HEAD ^ to go back to the add distributed version, if you want to restore to the append GPL, you must find the commit id of the append GPL. Git provides a command git reflog to record your every command:
$ git reflog
f06eedd (HEAD -> master) HEAD@{0}: reset: moving to HEAD^
ba9933f HEAD@{1}: reset: moving to ba9933
f06eedd (HEAD -> master) HEAD@{2}: reset: moving to HEAD^
ba9933f HEAD@{3}: commit: append GPL
f06eedd (HEAD -> master) HEAD@{4}: commit: add distributed
4309065 HEAD@{5}: commit (initial): wrote a readme file

$ git reset --hard ba9933
5, Undo modification (checkout, reset)
-
Undo changes in the workspace
If the file is modified at this time, but has not been submitted to the staging area. You can undo the changes using the command git checkout -- file.
# 1. Check the contents of the file (add a line of text in the last paragraph) $ cat readme.txt Git is a distributed version control system. Git is free software distributed under the GPL. Git has a mutable index called stage. Git tracks changes of files. My stupid boss still prefers SVN... # 2. View workspace status $ git status On branch master Changes not staged for commit: (use "git add <file>..." to update what will be committed) (use "git restore <file>..." to discard changes in working directory) modified: readme.txt no changes added to commit (use "git add" and/or "git commit -a") # 3. Undo changes to the workspace $ git checkout -- readme.txt # 4. View the current workspace status $ git status On branch master nothing to commit, working tree clean # 5. View the content after canceling the modification (back to the content before modification at this time) $ cat readme.txt Git is a distributed version control system. Git is free software distributed under the GPL. Git has a mutable index called stage. Git tracks changes of files. -
Undo changes in staging area
If the file is modified and submitted to the staging area. You can use the command git reset HEAD < File > to undo the modification of the staging area and put it back into the workspace. The GIT reset command can either roll back the version or the modification of the staging area to the workspace. When we use HEAD, it means the latest version.
# 1. Check the contents of the file (add a line of text in the last paragraph) $ cat readme.txt Git is a distributed version control system. Git is free software distributed under the GPL. Git has a mutable index called stage. Git tracks changes of files. My stupid boss still prefers SVN... # 2. Add files to staging area $ git add readme.txt # 3. View the current workspace status $ git status On branch master Changes to be committed: (use "git restore --staged <file>..." to unstage) modified: readme.txt # 4. Undo changes in staging area $ git reset HEAD readme.txt Unstaged changes after reset: M readme.txt # 5. View the current workspace status $ git reset HEAD readme.txt Unstaged changes after reset: M readme.txt -
It has been submitted to the version Library (warehouse)
Using the version fallback of the previous chapter, you can fallback to the previous version, but only if it is not pushed to the remote library.
6, Delete file (rm)
# 1. Add a new file to the staging area
$ git add test.txt

# 2. Submit the files in the staging area to the version library
$ git commit -m "add test.txt"
[master 160a0ae] add test.txt
 1 file changed, 0 insertions(+), 0 deletions(-)
 create mode 100644 test.txt

# 3. Delete files from workspace
$ rm test.txt

# 4. View the current status
$ git status
On branch master
Changes not staged for commit:
  (use "git add/rm <file>..." to update what will be committed)
  (use "git restore <file>..." to discard changes in working directory)
        deleted:    test.txt

no changes added to commit (use "git add" and/or "git commit -a")

# 5. Delete the file from the version library
$ git rm test.txt
rm 'test.txt'

# 6. commit execution
$ git commit -m "remove test.txt"
[master 930e953] remove test.txt
 1 file changed, 0 insertions(+), 0 deletions(-)
 delete mode 100644 test.txt

# 7. View the current status
$ git status
On branch master
nothing to commit, working tree clean
Tip: first delete the file manually, and then use git RM < File > and git add < File > to have the same effect. Note: files deleted without being added to the version library cannot be recovered!
The command git rm is used to delete a file. If a file has been submitted to the version library, you never have to worry about accidental deletion, but be careful. You can only restore the file to the latest version, and you will lose the content you modified after the last submission.
7, Remote warehouse (remote, push, clone)
SSH or HTTPS protocol can be selected when cloning or pushing the warehouse. The main differences between these two methods are:
-
clone project: When Using ssh, you must first be the manager or owner of the project, and you need to configure your own ssh key. For the use of https, there are no such requirements.
-
Push: When Using ssh, you do not need to verify the user name and password. If you set the password when configuring ssh key, you only need to verify the pairing password. For using https, the user name and password need to be verified every time you push.
Using SSH
-
Create SSH Key. Under the user's home directory, if the windows path is C:\Users\Admin, see if there is one ssh directory. If yes, check whether there is ID in this directory_ RSA and id_rsa. If you already have these two files, you can skip to the next step directly. If not, open Shell (open Git Bash under Windows) and create SSH Key:
$ ssh-keygen -t rsa -C "youremail@example.com"
You need to change your email address to your own email address, then enter all the way and use the default value. Since this Key is not used for military purposes, there is no need to set a password. If all goes well, you can find it in the user's home directory ssh directory with id_rsa and id_rsa.pub two files, which are the secret Key pair and ID of SSH Key_ RSA is the private Key and cannot be disclosed. id_rsa.pub is a public Key that can be confidently told to anyone.
-
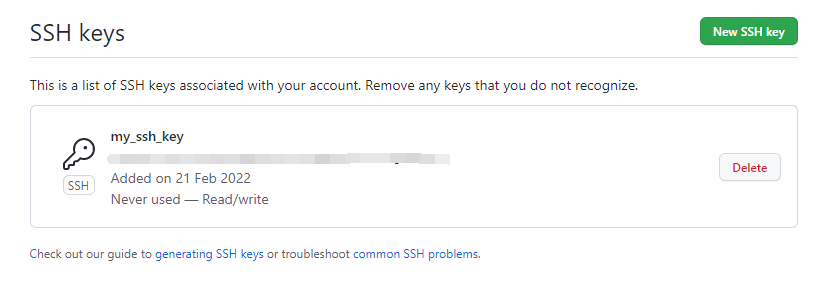
Log in to GitHub, click the avatar, select Settings - SSH and GPG keys, then click "New SSH Key", fill in any Title, and paste ID in the Key text box_ rsa. The final effect of the contents of the pub file is as follows
1. Add remote library
# 1. View remote address
$ git remote -v

# 2. Add remote address
$ git remote add origin git@gitee.com:yiymou/learngit.git # The name of the remote library is origin, which is the default name of Git. It can also be changed to something else,
													 # But the name origin is a remote library.

# 3. View remote address
$ git remote -v
origin    git@gitee.com:yiymou/learngit.git (fetch)
origin    git@gitee.com:yiymou/learngit.git (push)

# 4. push to remote warehouse (origin)
$ git push -u origin master # Push the current branch master to the remote warehouse
Counting objects: 20, done.
Delta compression using up to 4 threads.
Compressing objects: 100% (15/15), done.
Writing objects: 100% (20/20), 1.64 KiB | 560.00 KiB/s, done.
Total 20 (delta 5), reused 0 (delta 0)
remote: Resolving deltas: 100% (5/5), done.
To github.com:michaelliao/learngit.git
 * [new branch]      master -> master
Branch 'master' set up to track remote branch 'master' from 'origin'.

# 5. Delete remote library address
$ git remote rm origin
What is the - u parameter in $git push -u origin master?
Since the remote library is empty, when we first push the master branch, we add the - u parameter. Git will not only push the contents of the local master branch to the new remote master branch, but also associate the local master branch with the remote master branch. In future push or pull, we can simplify the command. After adding the - u parameter, Later, you can directly use git push instead of git push origin master.
2. Clone library from remote
$ git clone git@gitee.com:yiymou/learngit.git
Cloning into 'learngit'...
remote: Enumerating objects: 28, done.
remote: Counting objects: 100% (28/28), done.
remote: Compressing objects: 100% (24/24), done.
remote: Total 28 (delta 8), reused 0 (delta 0), pack-reused 0
Receiving objects: 100% (28/28), done.
Resolving deltas: 100% (8/8), done.

$ cd learngit/
$ ls
LICENSE.txt  readme.txt  test.txt
8, Branch (branch, switch, checkout, merge)
Branch Management - Liao Xuefeng's official website (liaoxuefeng.com)
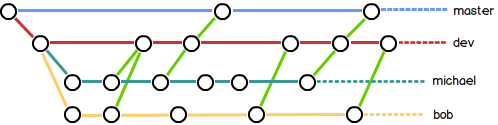
In actual development, we should carry out branch management according to several basic principles:
First, the master branch should be very stable, that is, it is only used to release new versions and cannot work on it at ordinary times;
Where do you work? Work on the dev branch, that is, the dev branch is unstable. At some time, for example, when version 1.0 is released, merge the dev branch into the master, and release version 1.0 in the master branch;
You and your friends, everyone works on the dev branch. Everyone has their own branch. Just merge on the dev branch from time to time.
So the branch of teamwork looks like this:
1. Create and merge branches
What is the use of branching in practice? Suppose you are going to develop a new function, but it takes two weeks to complete it. In the first week, you wrote 50% of the code. If you submit it immediately, because the code has not been written, the incomplete code base will make others unable to work. If the code is written and submitted again, there is a huge risk of losing the daily progress.
Now that you have branches, you don't have to be afraid. You create a branch that belongs to you, but others can't see it and continue to work normally on the original branch. You work on your own branch and submit it if you want. After the development is completed, you can merge it into the original branch at one time. In this way, it is safe and does not affect the work of others.
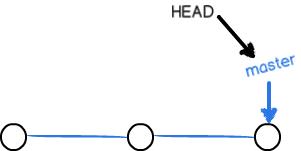
As shown by the circle in the figure below, the master branch will move forward one step every time you submit. In this way, as you continue to submit, the line of the master branch will become longer and longer.
At the beginning, the master branch is a line. Git uses master to point to the latest submission and HEAD to point to master to determine the current branch and the submission point of the current branch:
When we create a new branch, such as dev, Git creates a new pointer called dev, which points to the same commit as the master, and then points the HEAD to dev, indicating that the current branch is on dev:
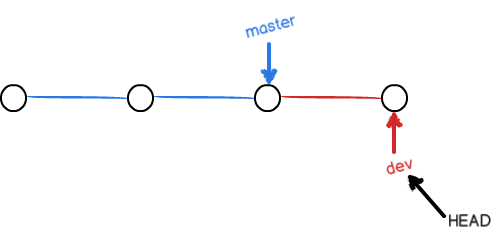
You see, Git creates a branch very quickly, because in addition to adding a dev pointer and changing the direction of HEAD, there is no change in the files in the workspace!
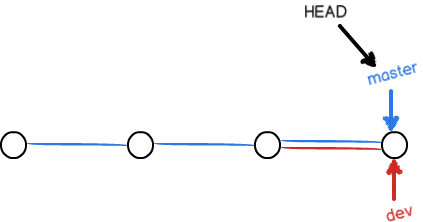
However, from now on, the modification and submission of the workspace are aimed at the dev branch. For example, after a new submission, the dev pointer moves forward one step, while the master pointer remains unchanged:
[the external chain image transfer fails. The source station may have an anti-theft chain mechanism. It is recommended to save the image and upload it directly (img-Vwul02tG-1645691343821)(images/l.png)]
If our work on dev is completed, we can merge dev into the master. How does Git merge? The simplest way is to directly point the master to the current commit of dev to complete the merge:
So Git merges branches very quickly! Just change the pointer and the content of the workspace will remain the same!
After merging the branches, you can even delete the dev branch. Deleting the dev branch is to delete the dev pointer. After deletion, we have a master branch left:

Create a new branch dev, commit once in the dev branch, and then switch back to the master branch, because the commit is on the dev branch, and the commit point of the master branch does not change at the moment:

# 1. Create branch
$ git branch dev

# 2. Switch branches
$ git checkout dev
Switched to branch 'dev'

# Create a new branch and switch to the above two parameters (- b. create a new branch and switch.)
$ git checkout -b dev	# Equivalent to the command git switch -c dev
Switched to a new branch 'dev'

# 4. View the current branch (the current branch will be marked with a * sign in front)
$ git branch

# 5. Modify readme Txt file
 Add on the last line
Creating a new branch is quick.

# 6. Commit normally on dev branch
$ git add readme.txt
$ git commit -m "branch test"
[dev b17d20e] branch test
 1 file changed, 1 insertion(+)

# 7. Switch back to the master branch
$ git checkout master	# You can also use the command git switch master
Switched to branch 'master'

# 8. Merge dev branch to current branch (master branch)
$ git merge dev
Updating d46f35e..b17d20e
Fast-forward
 readme.txt | 1 +
 1 file changed, 1 insertion(+)

 # 9. Delete dev branch
 $ git branch -d dev
Deleted branch dev (was 74c2f05).

# 10. View the current branch (only the master branch is left at this time)
$ git branch
* master
What does fast forward mean?
This indicates that the merge is in "fast forward mode", that is, direct the master to the current commit of dev, so the merge speed is very fast. Of course, not every merge can be fast forward. There are other merge methods behind.
Why create branches, merge branches, and then delete branches?
Because creating, merging and deleting branches are very fast, Git encourages you to use branches to complete a task and delete branches after merging. This has the same effect as working directly on the master branch, but the process is safer.
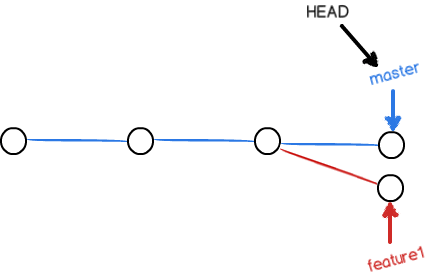
2. Conflict resolution
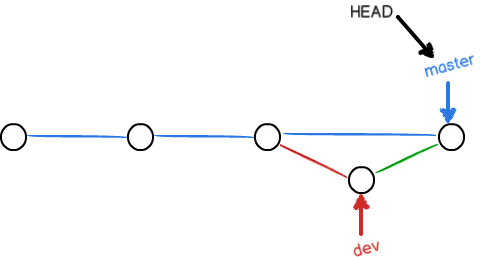
Imagine creating a branch feature1, modifying and submitting the readme file in this branch, and then returning to the branch master. At this time, the readme file is also modified and submitted. Now, both the master branch and feature1 branch have new submissions respectively, which turns into this:
[the external link image transfer fails. The source station may have an anti-theft chain mechanism. It is recommended to save the image and upload it directly (img-2YdBwAXt-1645691343827)(images/0.png)]
**In this case, Git cannot perform "quick merge" and can only try to merge their changes, but this merge may have conflicts** At this point, we need to manually resolve the conflict before submitting.
# 1. Create and switch to branch feature1
$ git switch -c feature1
Switched to a new branch 'feature1'

# 2. Modify readme Txt last line, change to
Creating a new branch is quick AND simple.

# 3. Submit on feature1 branch
$ git add readme.txt
$ git commit -m "AND simple"
[feature1 f4ca0f9] AND simple
 1 file changed, 1 insertion(+), 1 deletion(-)

# 4. Switch to the master branch
$ git switch master
Switched to branch 'master'

# 5. Put readme. On the master branch The last line of the txt file is changed to
Creating a new branch is quick & simple.

# 6. Submit on the master branch
$ git add readme.txt
$ git commit -m "& simple"
[master afc8945] & simple
 1 file changed, 1 insertion(+), 1 deletion(-)

# 7. In this case, Git cannot perform "quick merge" and can only try to merge their modifications, but such merging may have conflicts (corresponding to the situation shown in the above figure)
$ git merge feature1
Auto-merging readme.txt
CONFLICT (content): Merge conflict in readme.txt
Automatic merge failed; fix conflicts and then commit the result.

# 8. git status can also tell us conflicting files
$ git status
On branch master
You have unmerged paths.
  (fix conflicts and run "git commit")
  (use "git merge --abort" to abort the merge)

Unmerged paths:
  (use "git add <file>..." to mark resolution)
        both modified:   readme.txt

no changes added to commit (use "git add" and/or "git commit -a")

# 9. Check readme Txt (Git marks the contents of different branches with < < < <, ========, > > > > > >)
$ cat readme.txt
Git is a distributed version control system.
Git is free software distributed under the GPL.
Git has a mutable index called stage.
Git tracks changes of files.
My stupid boss still prefers SVN.
<<<<<<< HEAD
Creating a new branch is quick & simple.
=======
Creating a new branch is quick AND simple.
>>>>>>> feature1

# 10. Save after modifying as follows
$ vim readme.txt

# 11. Submit on the master branch
$ git add readme.txt
$ git commit -m "conflict fixed"
[master 550cb7f] conflict fixed

# 11. With the parameter git log, you can see the merging of branches
$ git log --graph --pretty=oneline --abbrev-commit
*   550cb7f (HEAD -> master) conflict fixed
|\
| * f4ca0f9 (feature1) AND simple
* | afc8945 & simple
|/
* 74c2f05 branch test
* 5859117 (origin-github/master, origin-gitee/master) add test.txt
* 930e953 remove test.txt
* 160a0ae add test.txt
* d1b9a9c git tracks changes
* 50859fa git tracks changes
* 7fc353e git tracks changes
* c595fa0 git tracks changes
* cc7e8f4 understand how stage works
* f06eedd add distributed
* 4309065 wrote a readme file

# 12. Delete feature1 branch
$ git branch -d feature1
Deleted branch feature1 (was 14096d0).
In the above example, my understanding is that when there is a conflict, using git merge will fail to merge and be in the state of waiting to resolve the conflict. At the same time, it will be used to mark the contents of different branches in the file with < < < <, ========, > > > > > >. After the next submission, Git will default that the conflict has been modified and merge the two branches (no matter whether the conflict is really resolved at this time, GIT will consider that the conflict has been resolved as long as it is submitted again).
When Git cannot automatically merge branches, the conflict must be resolved first. After resolving the conflict, submit and merge.
Conflict resolution is to manually edit the failed Git merge file to the content we want, and then submit it.
Use the git log --graph command to see the branch merge diagram.
Conflicts do not occur when the same file is changed.
3. Disable Fast forward mode (– git merge in no FF mode)
Usually, when merging branches, Git will use Fast forward mode if possible, but in this mode, branch information will be lost after deleting branches.
If the Fast forward mode is to be forcibly disabled, Git will generate a new commit when merging, so that the branch information can be seen from the branch history.

# 1. Create and switch to branch dev
$ git switch -c dev
Switched to a new branch 'dev'

# 2. In readme Txt last line added
Creating a new branch is quick AND simple.

# 3. Commit on dev branch
$ git commit -m "add a newline"
[dev f52c633] add merge
 1 file changed, 1 insertion(+)

# 4. Switch back to master
$ git switch master
Switched to branch 'master'

# 5. Use the -- no FF parameter to merge dev branches, which means Fast forward is disabled
$ git merge --no-ff -m "merge with no-ff" dev
Merge made by the 'recursive' strategy.
 readme.txt | 1 +
 1 file changed, 1 insertion(+)

# 6. Check the branch history with git log
$ git log --graph --pretty=oneline --abbrev-commit
*   e1e9c68 (HEAD -> master) merge with no-ff
|\
| * f52c633 (dev) add merge
|/
*   cf810e4 conflict fixed
...
Because it is necessary to create a new commit when merging dev branches with the merge – no FF parameter, add the - m parameter and write the commit description. The Fast forward mode is not used. After merging, it is like this:
4. Bug branch (stash)
Imagine if we have two branches, master and dev. If you are working on the dev branch at this time and the co-operation has not been completed at this time, it has not been submitted to the warehouse. At this point, if a very urgent bug needs to be repaired, then it is necessary to switch from the dev branch to the master branch. Then the problem arises. If we switch over directly, the modification of the current dev workspace will be lost, and because the current co operation is not completed, we do not wish to commit at this time. There is another solution. Through the stash function, you can "store" the current work site and continue to work after restoring the site in the future.
At this time, we first use the stash function to save the current work site, then switch to the master branch to start bug repair, create and switch to the issue-101 branch to solve the bug, then return to the master branch and merge the issue-101 branch into the master branch. At this time, the bug is solved. Then we need to continue the work of the dev branch. At this time, switch to the dev branch, Because the bug was solved on the master branch, the same bug on the dev branch has not been repaired. At this time, we can first use the cherry pick command provided by Git to copy 4c805e2 fix bug 101, submit the modifications, and then use git stash pop to return to the work site and continue the work.
# 1. Create and switch to branch dev
$ git switch -c dev
Switched to a new branch 'dev'

# 2. Add the file hello Py. Modify the file readme Txt to view the current status
$ git status
On branch dev
Changes to be committed:
  (use "git reset HEAD <file>..." to unstage)

	new file:   hello.py

Changes not staged for commit:
  (use "git add <file>..." to update what will be committed)
  (use "git checkout -- <file>..." to discard changes in working directory)

	modified:   readme.txt

# 3. Store the work site
$ git stash
Saved working directory and index state WIP on dev: f52c633 add merge

# 4. Switch to the branch master, create from the master branch and switch to the issue-101 branch
$ git switch master
Switched to branch 'master'
$ git switch -c issue-101
Switched to a new branch 'issue-101'

# 5. To fix the bug, you need to put "Git is free software..." Change to "Git is a free software...", Then submit
$ git add readme.txt
$ git commit -m "fix bug 101"
[issue-101 4c805e2] fix bug 101
 1 file changed, 1 insertion(+), 1 deletion(-)

# 5. Switch to the master branch, complete the merge, and finally delete the issue-101 branch
$ git switch master
Switched to branch 'master'
Your branch is ahead of 'origin/master' by 6 commits.
  (use "git push" to publish your local commits)

$ git merge --no-ff -m "merged bug fix 101" issue-101
Merge made by the 'recursive' strategy.
 readme.txt | 2 +-
 1 file changed, 1 insertion(+), 1 deletion(-)

$ git branch -d issue-101
Deleted branch issue-101 (was 1057024).

# 6. Go back to dev branch
$ git switch dev
Switched to branch 'dev'

$ git status
On branch dev
nothing to commit, working tree clean

# 7. Use cherry pick to copy the changes made by 4c805e2 fix bug 101 submission
$ git cherry-pick 4c805e2
[master 1d4b803] fix bug 101
 1 file changed, 1 insertion(+), 1 deletion(-)

 # 8. Use git stash pop to restore the work site
 $ git stash pop
Auto-merging readme.txt
On branch dev
Changes to be committed:
  (use "git restore --staged <file>..." to unstage)
        new file:   hello.py

Changes not staged for commit:
  (use "git add <file>..." to update what will be committed)
  (use "git restore <file>..." to discard changes in working directory)
        modified:   readme.txt

Dropped refs/stash@{0} (4e26ea25447ee003f180d78a72c054be3763545f)

# 8. Use git stash list to view all saved work sites (since only one work site was pop ped before, the current work site is empty)
$ git stash list
Multi person collaboration
Local branches must be pushed to remote locations. Which branches need to be pushed and which do not?
- The master branch is the main branch, so it should be synchronized with the remote branch at all times;
- dev branch is a development branch. All members of the team need to work on it, so they also need to synchronize with remote;
- The bug branch is only used to fix bugs locally, so there is no need to push it to the remote, unless the boss wants to see how many bugs you fix every week;
- Whether the feature branch is pushed to the remote depends on whether you develop it with your small partners.
In short, in Git, branches can hide and play locally. Whether to push depends on your mood!
The working mode of multi person cooperation is usually as follows:
- First, you can try to push your own modifications with git push origin < branch name >;
- If the push fails, you need to use git pull to try to merge because the remote branch is newer than your local branch;
- If there is a conflict in the merger, resolve the conflict and submit it locally;
- If there is no conflict or the conflict is solved, then push it with git push origin < branch name > to succeed!
If git pull prompts no tracking information, it indicates that the link relationship between the local branch and the remote branch has not been created. Use the command git branch -- set upstream to < branch name > origin / < branch name >.
This is the working mode of multi person cooperation. Once you are familiar with it, it is very simple.
$ git remote # View remote library information
$ git remote -v # View remote information (including address)
$ git remote add origin git@gitee.com:yiymou/learngit.git # Add remote library address

$ git remote rm origin # Delete the associated remote library origin

$ git push -u origin master # Push the current branch master to the remote warehouse (for the first time)
$ git push origin master # Push the current branch master to the remote warehouse
$ git push origin dev # Push the current branch dev to the remote warehouse

$ git clone git@gitee.com:yiymou/learngit.git # Clone library from remote
$ git pull origin develop # Pull code from the develop ment branch of the remote origin

$ git branch --set-upstream branch-name origin/branch-name # Establish association between local branch and remote branch
9, git multi account settings
# 1. View remote address
$ git remote -v

# 2. Add remote address
$ git remote add origin-gitee git@gitee.com:yiymou/learngit.git
$ git remote add origin-github git@github.com:YIYMOU/learngit.git

# 3. View remote address
$ git remote -v
origin-gitee    git@gitee.com:yiymou/learngit.git (fetch)
origin-gitee    git@gitee.com:yiymou/learngit.git (push)
origin-github   git@github.com:YIYMOU/learngit.git (fetch)
origin-github   git@github.com:YIYMOU/learngit.git (push)

# 4. push to remote warehouse respectively
$ git push origin-gitee master
Enumerating objects: 28, done.
Counting objects: 100% (28/28), done.
Delta compression using up to 8 threads
Compressing objects: 100% (24/24), done.
Writing objects: 100% (28/28), 2.35 KiB | 481.00 KiB/s, done.
Total 28 (delta 8), reused 0 (delta 0), pack-reused 0
remote: Powered by GITEE.COM [GNK-6.2]
To gitee.com:yiymou/learngit.git
 * [new branch]      master -> master
10, Common command lookup
# 1. Warehouse configuration and initialization
$ git config --global user.name "Your Name" # Configure the user name and email of all Git warehouses
$ git config --global user.email "youremail@example.com" # Configure the user name and email of all Git warehouses

$ git config user.name "Your Name" # Configure the user name and email of the current Git warehouse
$ git config user.email "youremail@example.com" # Configure the user name and email of the current Git warehouse

$ git config --global user.name # View user name and email of global configuration
$ git config --global user.email # View user name and email of global configuration

$ git config user.name # View the user name and email of the current warehouse configuration
$ git config user.email # View the user name and email of the current warehouse configuration

$ git init # Initialize the current directory as a git repository

# 2. Add file to warehouse
$ git add readme.txt	# Tell Git to add the file to the repository
$ git commit -m "wrote a readme file"	# Tell Git to submit the file to the warehouse
$ git status # Check the current status of the warehouse (whether the project has been modified, added, untracked files, etc.)

# 3. Comparative documents
$ git diff <file> # View the modified content and the file difference
$ git diff --cached
$ git diff HEAD -- <file>
# git diff view the difference between work dict and stage
# git diff --cached view the difference between staging and master
# Git diff head -- < File > check the difference between the latest version in the workspace and the version library
 as: git diff readme.txt  Indicates view readme.txt What has been modified,Any difference?

# 4. Submit records and version fallback
HEAD    Indicates the current version, that is, the latest submission
HEAD^   Previous version
HEAD^^  Previous version
HEAD~100   Up to 100 versions


$ git log # View submission records
$ git log --graph  # View branch merge diagram
$ git log --graph --pretty=oneline --abbrev-commit
$ git log --oneline     #Beautify the output information, and each record is displayed as one line, showing commit_ First few digits of ID
$ git log --pretty=oneline     #Beautify the output information. Each record is displayed as one line, showing the complete commit_id
$ git log --graph --pretty=format:'%h -%d %s (%cr)' --abbrev-commit --

$ git reset --hard HEAD^	# Fallback to previous version
$ git reflog # View version change records
$ git reset --hard <commit_id>	# Through commit_id to specify the version to roll back

# 5. Revocation of modification
$ git checkout -- readme.txt	# Undo changes to the workspace
$ git restore readme.txt	# Undo changes to the workspace
$ git reset HEAD readme.txt	# Undo changes in staging area
$git resotre --worktree readme.txt	# Restore workspace from staging area,
$git restore --staged readme.txt	# Recover staging area from master
$git restore --source=HEAD --staged --worktree readme.txt	# Restore both workspace and staging area from master

# 6. Delete files
$ rm test.txt	# Delete file from workspace
$ git rm test.txt	# Delete file from version Library

# 7. Remote warehouse
$ git remote # View remote library information
$ git remote -v # View remote address
$ git remote add origin git@gitee.com:yiymou/learngit.git # Add remote library address
$ git remote rm origin # Delete the associated remote library origin
$ git push -u origin master # Push the current branch master to the remote
$ git clone git@gitee.com:yiymou/learngit.git # Clone library from remote
$ git pull origin develop # Pull code from the develop ment branch of the remote origin

$ git branch								# View branch
$ git branch dev							# Create branch dev
$ git checkout <name>						# Switch branch
$ git switch <name>							# Switch branch
$ git checkout -b <name>					# Create + switch branch
$ git switch -c <name>						# Create + switch branch
$ git merge <name>							# Merge a branch to the current branch
$ git merge --no-ff -m "merge with no-ff" dev  # Merge dev branch to current branch (disable Fast forward merge Policy)
$ git branch -d <name>						# Delete branch
$ git branch -D dev   						# Force delete dev branch

$ git stash # Save the modification status of the current workspace and staging area, switch to other branches to fix bug s, and then continue to work when you come back
$ git stash list # View the list of saved sites
$ git stash pop # Delete the stash content while restoring
$ git stash apply # Restore the scene, and the stash content will not be deleted
$ git stash drop # Delete stash content
$ git stash apply stash@{0} # Multiple stash. When restoring, first check with git stash list, and then restore the specified stash

$ git cherry-pick <commit> # Copy a specific submission to the current branch (the contents of the current branch need to be committed first, and then the conflicting files need to be resolved, and then commit)
$ git rebase # Organize the local forked submission history that is not push ed into a straight line (making it easier for us to check the changes of historical submission, because forked submission requires three-party comparison)

# other

$ git                           see git Related commands (git --help)
$ git --version                 see git Version of
$ git config                    see git config Related commands

$ git config core.autocrlf	# View core Autocrlf configuration status
$ git config --global core.autocrlf false # Configure core Autocrlf status is false/input/true

# Linux general commands
$ clear # Clear screen
$ mkdir learngit		# Create directory
$ cd learngit			# Change directory
$ pwd					# Used to display the current directory
$ ls -ah                # View the files in the current directory, including hidden files (without -ah hidden files)
$ cat readme.txt # View text file
$ rm test.txt	# Delete file
11, Supplement
In fact, all version control systems can only track the changes of text files, such as TXT files, web pages, all program codes, etc. Git is no exception. The version control system can tell you every change. For example, add a word "Linux" in line 5 and delete a word "Windows" in line 8. Although the binary files such as pictures and videos can also be managed by the version control system, they can't track the changes of files. They can only string up the changes of binary files every time, that is, they only know that the picture has changed from 100KB to 120KB, but the version control system doesn't know or know what has changed.
Never edit any text files using the notepad that comes with Windows. The reason is that the Microsoft Notepad team used a very retarded behavior to save UTF-8 encoded files. They cleverly added 0xefbbbf (hexadecimal) characters at the beginning of each file. You will encounter many incredible problems. For example, a "?" may be displayed in the first line of the web page, The correct program will report syntax errors as soon as it is compiled, and so on, which are brought about by the retarded behavior of Notepad. I suggest you download it Visual Studio Code Instead of Notepad, it is not only powerful, but also free!
Why Git is better designed than other version control systems, because git tracks and manages changes, not files.
12, Frequently asked questions
-
Error encountered while git add
warning: LF will be replaced by CRLF in test.txt.
The file will have its original line endings in your working directory
First of all, the problem is that the line breaks used in different operating systems are different
Uinx/Linux uses the line feed character LF to represent the next line (LF:LineFeed, which means line feed in Chinese);
Windows uses enter + line feed CRLF to represent the next line (CRLF: carragereturn linefeed, which means enter and line feed in Chinese);
Mac OS uses enter CR to indicate the next line (Cr: carragereturn, which means enter in Chinese).
If you're writing a program on windows, or if you're working with someone else who's programming on windows and you're on another system, you may encounter end of line problems. This is because Windows uses carriage return and line feed to end a line, while Mac and Linux only use line feed. Although this is a small problem, it can greatly disrupt cross platform collaboration.
Use the command to view the configuration status
git config core.autocrlf
The results obtained may be input, true and false, respectively
true When add, git will convert CRLF to LF false remain unchanged input When add ing, git will convert CRLF into LF, and it will still be lf when checking out You can refer to this article git warning: LF will be replaced by CRLF in XXXX.The file will have its original line endings in …_ qi_sheng_ Blog - CSDN blog
-
Error encountered while git push
$ git push origin-gitee master
The authenticity of host 'gitee.com (212.64.62.183)' can't be established.
ED25519 key fingerprint is SHA256:+ULzij2u99B9eWYFTw1Q4ErYG/aepHLbu96PAUCoV88.
This key is not known by any other names
Are you sure you want to continue connecting (yes/no/[fingerprint])?
A known is missing from the folder_ Hosts file. There should have been three key files, but now there are only two. This error is reported. At this time, enter yes and press enter to generate the missing known_ The hosts file can solve this problem.
-
Error encountered while deleting branch
$ git branch -d issue-101
error: The branch 'issue-101' is not fully merged.
If you are sure you want to delete it, run 'git branch -D issue-101'.
Background: now I have three branches: Master, Dev and issue-101. Modify the issue-101 branch, then switch to the master branch and merge the issue-101 into the master branch. At this time, switch to the dev branch and try to delete the issue-101 branch in the dev branch. The above error will appear first.
Reason: the branch to be deleted has not been merged into the current branch.
Solution: switch to the master branch and delete the issue-101 branch in the master branch. Because the issue-101 branch has been merged into the master branch, it can be deleted. If you want to delete issue-101 from the dev branch, you can use force delete git branch -D issue-101.
reference
Git tutorial - Liao Xuefeng's official website (liaoxuefeng.com)