Installing Hexo
Before installing Hexo, you need to install the following two tools:
Install Git
-
Windows: Download and install git.
-
Mac: Using Homebrew, MacPorts : brew install git ; Or download erection sequence Installation.
-
Linux (Ubuntu, Debian): sudo apt-get install git-core
-
Linux (Fedora, Red Hat, CentOS): sudo yum install git-core
-
Linux (Arch Series): sudo pacman -S git
remind
Due to the wall, it's best to hang an agent to download git for windows from the above link, otherwise the download speed is very slow. You can also refer to This page , including the download address stored in Baidu cloud.
remind
If you are on a CentOS server, you can use it directly HexoOneClickInstallation This script quickly installs Hexo.
Install node js
Install node JS is the best way to use nvm.
cURL:
$ curl https://raw.github.com/creationix/nvm/v0.33.11/install.sh | sh
Wget:
$ wget -qO- https://raw.github.com/creationix/nvm/v0.33.11/install.sh | sh
After installation, restart the terminal and execute the following commands to install node js.
$ nvm install stable
Or you can download it erection sequence To install. (it's best to download the version with LTS)
remind
In Chinese mainland, as everyone knows the Internet, it is recommended to use. Taobao NPM image:
npm install -g cnpm --registry=https://registry.npm.taobao.org
Use cnpm install instead of all npm install instructions.
Start installing Hexo
After installation, you can use npm to complete the installation of Hexo.
$ npm install -g hexo-cli
If the installation is too slow, you can use the Taobao image above
$ cnpm install -g hexo-cli
Start and beautify Hexo
First create a folder. Enter the folder, right-click and select git bash here (Note: this command is available only when Git is installed), and then enter the following command to install Hexo in this folder.
$ hexo init
Run Hexo
$ hexo g
$ hexo s
Enter in the browser http://localhost:4000/ You can see that Hexo is deployed locally
Detailed explanation of Hexo command
If you know this part, you can skip it by yourself
Here are some basic commands of Hexo.
hexo init [folder]
This command is the Hexo initialization command. [folder] indicates the folder you want to initialize. If you want to initialize the local, go directly to hexo init.
hexo new [layout] <title>
This command is used to create a new article or page. Where [layout] represents his template (i.e. page or article), < title > represents the title.
Usage:
- hexo new post 001 indicates that a new article with the title 001 has been created.
- hexo new page 001 indicates that a new page with the title 001 has been created.
If you don't want to create a new article or page in the terminal, you can directly in the blog root directory / source/_ Create a Markdown file in the post / directory to write articles. Or create a folder in the blog root directory / source / directory, and then create index in the new folder MD write the page.
remind
When you create a new page, the link of the page is the name of the folder where your page is located.
For example: I created a new folder named test under the blog root directory / source /, and then wrote the Markdown file under the test folder, then the link of this page is the website / test.
$ hexo server (Can be abbreviated as hexo s)
You can use this command when you want to view the website locally.
Default in http://localhost:8080/ Here, it may be different. Just pay attention to the prompt information.
remind
If you want to change the port number (8080 above is the port number), you can enter the hexo s -p port number in the terminal.
$ hexo generate (Can be abbreviated as hexo g)
This command is used when generating static files of the website. After generation, the web page will be placed in the public folder under the root directory.
$ hexo deploy (Can be abbreviated as hexo d)
This command is used to deploy the website. Using this command will deploy the generated page (i.e. the content in the public folder) to the specified place.
$ hexo clean (Can be abbreviated as hexo cl)
This command is used to empty the public folder.
$ hexo version
This command is used to output the current version number of Hexo you are using.
Configuration Hexo
Note: if you use the 'Volantis' theme modified by Blackstone, you can understand the content of this part without configuration
warning
This section may be out of date, see Hexo official documents.
Yes, it's in the Hexo root directory_ config.yml is configured in this file!
warning
In YAML syntax, there must be a space after the colon to continue writing.
website
# Site
title:
subtitle:
description:
keywords:
author:
language:
timezone:
| parameter | describe |
|---|---|
| title | Website title |
| subtitle | Website subtitle |
| description | Website description |
| keywords | Website keywords |
| author | Author's name |
| language | Language of the website |
| timezone | Website time zone: see Time zone list |
URL
# URL
## If your site is put in a subdirectory, set url as 'http://yoursite.com/child' and root as '/child/'
url:
root:
permalink: :year/:month/:day/:title/
permalink_defaults:
pretty_urls:
  trailiing_index: true
| parameter | describe |
|---|---|
| url | website |
| root | Site root |
| permalink | Permanent link format for articles |
| permalink_defaults | Default values for sections in persistent links |
| pretty_urls | Rewrite the value of permalink to beautify the URL |
| pretty_urls.trailing_index | Whether to keep the index at the end in the permanent link HTML, removed when false |
remind
If your website is in a subdirectory, such as: https://yoursite.com/blog , set your url to http://yoursite.com/blog And set root to / blog /.
For example:
# For example, the permanent link of a page is http://example.com/foo/bar/index.html
pretty_urls:
  trailing_index: false
# The permanent link of the page changes to http://example.com/foo/bar/
catalogue
# Directory
source_dir: source
public_dir: public
tag_dir: tags
archive_dir: archives
category_dir: categories
code_dir: downloads/code
i18n_dir: :lang
skip_render: README.md
| parameter | describe |
|---|---|
| source_dir | Resource folder |
| public_dir | Public folder |
| tag_dir | Label folder |
| archive_dir | Archive folder |
| category_dir | Category folder |
| code_dir | Include code folder |
| i18n_dir | Internationalized folder |
| skip_render | Skip rendering of files. The matched files will be copied directly to the public directory. You can use glob Expression to match the path. |
remind
Generally, this part does not need to be modified.
For example:
skip_render: "mypage/**/*"
# 'source / mypage / index HTML ` and ` source / mypage / code JS ` output to the 'public' directory without change
# You can also use this method to skip the rendering of the specified article file
skip_render: "_posts/test-post.md"
# This will ignore the 'test post Rendering of MD '
article
# Writing
new_post_name: :title.md # File name of new posts
default_layout: post
auto_spacing: false
titlecase: false # Transform title into titlecase
external_link: true # Open external links in new tab
  enable: true
  field: site
  exclude: []
filename_case: 0
render_drafts: false
post_asset_folder: true
relative_link: false
future: true
highlight:
  enable: true
  line_number: true
  auto_detect: false
  tab_replace:
| parameter | describe |
|---|---|
| new_post_name | File name of the new article |
| default_layout | Preset layout |
| auto_spacing | Add a space between Chinese and English |
| titlecase | Convert title to title case |
| external_link | Open in new label |
| external_link.enable | Open link in new tab |
| external_link.field | Applicable to the whole website or articles only |
| external_link.exclude | Exclude host names. Specify subdomains where applicable, including www |
| filename_case | Convert the file name to (1) lowercase or (2) uppercase |
| render_drafts | Show draft |
| post_asset_folder | start-up Asset folder |
| relative_link | Change the link to the relative address of the root directory |
| future | Show future articles |
| highlight | Code block settings |
| highlight.enable | Turn on syntax highlighting |
| highlight.auto_detect | If no language is specified, automatic detection is enabled |
| highlight.line_number | Display rows |
| highlight.tab_replace | Replace tabs with n spaces; If the value is empty, tabs will not be replaced |
Classification & Labeling
# Category & Tag
default_category: uncategorized
category_map:
tag_map:
| parameter | describe |
|---|---|
| default_category | Default classification |
| category_map | Category alias |
| tag_map | Tag alias |
Date / time format
# Date / Time format
## Hexo uses Moment.js to parse and display date
## You can customize the date format as defined in
## http://momentjs.com/docs/#/displaying/format/
date_format: YYYY-MM-DD
time_format: HH:mm:ss
use_date_for_updated: true
| parameter | describe |
|---|---|
| date_format | Date format |
| time_format | Time format |
| use_date_for_updated | If the update date is not provided previously, use post The release date in updated. Typically used with Git workflows. |
remind
Hexo use Moment.js To parse and display time.
paging
# Pagination
## Set per_page to 0 to disable pagination
per_page: 10
pagination_dir: page
| parameter | describe |
|---|---|
| per_page | Number of articles displayed per page (0 = turn off paging) |
| pagination_dir | Page Directory |
extend
# Extensions
## Plugins: https://hexo.io/plugins/
## Themes: https://hexo.io/themes/
theme:
theme_config:
deploy:
meta_generator:
| parameter | describe |
|---|---|
| theme | The name of the current topic. Disable theme when value is false |
| theme_config | The profile for the topic. The configuration placed here will overwrite the configuration under the theme directory_ config. Configuration in YML. |
| deploy | Deployed settings |
| meta_generator | Meta generator label. When the value is false, Hexo will not insert the label in the header. |
Use the Volantis theme modified by Blackstone
Give the original link first: https://www.heson10.com/volantis/posts/3882.html
Own configuration * * (it is recommended not to use my configuration unless you are yourself. Go to the original link above and use the boss's configuration step by step)**
Enter the blog root directory and right-click Git Bash Here to open Git
Download theme
git clone https://gitee.com/colzry/volantis-heson.git themes/volantis-heson
Change theme
Open root directory_ config.yml file
theme: volantis-heson
Installation dependency
Change the package under the root directory JSON file
{
  "name": "hexo-site",
  "version": "0.0.0",
  "private": true,
  "scripts": {
    "build": "hexo generate",
    "clean": "hexo clean",
    "deploy": "hexo deploy",
    "server": "hexo server"
  },
  "hexo": {
    "version": "5.1.1"
  },
  "dependencies": {
    "hexo": "^5.1.1",
    "hexo-abbrlink": "^2.2.1",
    "hexo-deployer-git": "^2.1.0",
    "hexo-generator-archive": "^1.0.0",
    "hexo-generator-category": "^1.0.0",
    "hexo-generator-feed": "^3.0.0",
    "hexo-generator-index": "^2.0.0",
    "hexo-generator-json-content": "^4.2.3",
    "hexo-generator-tag": "^1.0.0",
    "hexo-related-popular-posts": "^5.0.1",
    "hexo-renderer-ejs": "^1.0.0",
    "hexo-renderer-marked": "^3.0.0",
    "hexo-renderer-stylus": "^2.0.0",
    "hexo-server": "^2.0.0",
    "hexo-wordcount": "^6.0.1"
  }
}
Then enter the following command to preview locally
npm install && hexo cl && hexo g && hexo s
Modify theme configuration
In the theme directory of config ☆ symbol found in YML
These are items that must be modified, and the content of modification has been explained in it
FAQ
Q1: how to add the header of the home page article?
A1: add the headimg: link address in the frontmater at the head of the md article
How to add labels and Q2?
A2: enter command:
hexo new page categories
hexo new page tags
hexo new page bb
hexo new page links
hexo new page guestbook
Then, in the generated two indexes Add layout: category and layout: tag and layout: bb and layout: friends to the frontmate in MD
| command | Corresponding template |
|---|---|
| hexo new page categories | layout: category |
| hexo new page tags | layout: tag |
| hexo new page bb | layout: bb |
| hexo new page links | layout: friends |
| hexo new page guestbook | nothing |
Q3: how to call links?
A3: I use gitee dynamic call. The advantage is that I can apply for approval directly without moving the code and adding links.
I have to call the code:
{% issues sites | api=https://gitee. com/api/v5/repos/heson525_ admin/links/issues? sort=created&direction=asc&labels=active&state=open&page=1&per_ Page = 100 | group = group: technology leaders, friends%}
Among them, the api should be replaced with its own gitee link. In my link, heson525_admin is my user name, links is the warehouse name, followed by group is the group, and active is the label to judge whether to display.
Q4: how to add categories and labels on the categories and Labels page?
A4: in article XXX Add tags: tag name categories: category name to frontmate in MD. For example:
# A label and classification
title: Initial installation Git Configuration of
author: Colzry
tags: Git
categories: Git
headimg: Link address

# Multiple labels and classifications
title: Raspberry Pie 4 B Power on without display
author: Colzry
tags:
- Linux
- Raspberry pie
categories:
- Raspberry pie
headimg: Link address
Deploy to Gitee
open Gitee
Add ssh public key to Gitee (Baidu)
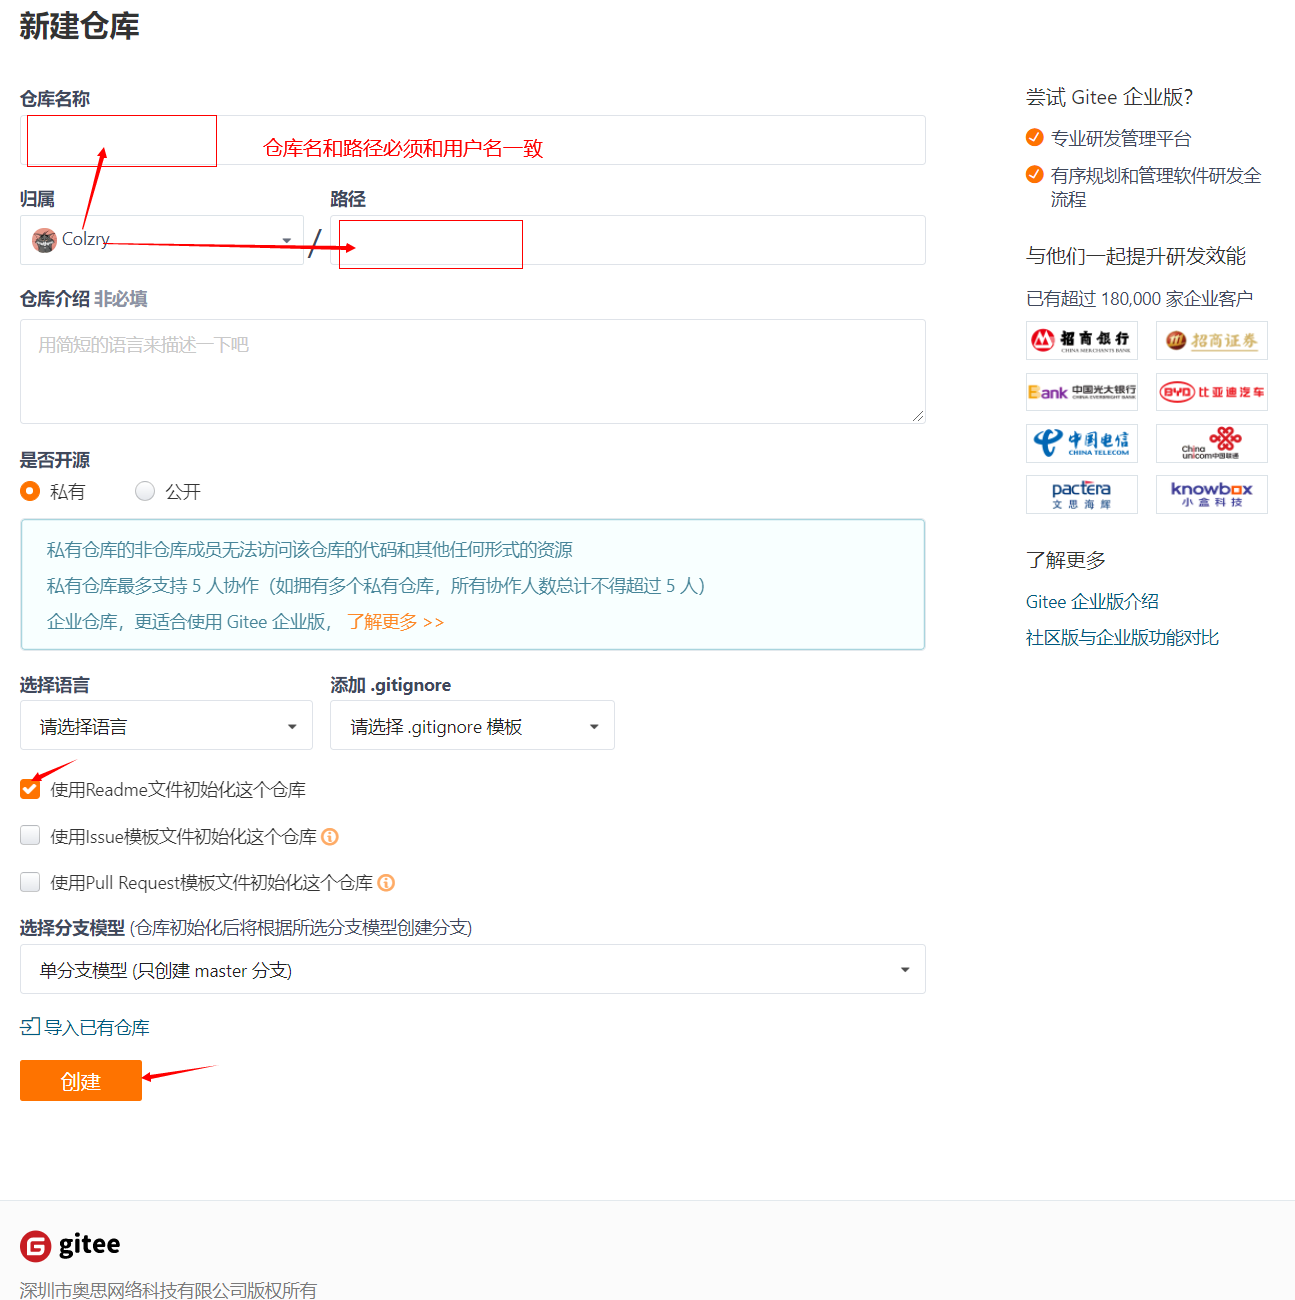
Create a new warehouse
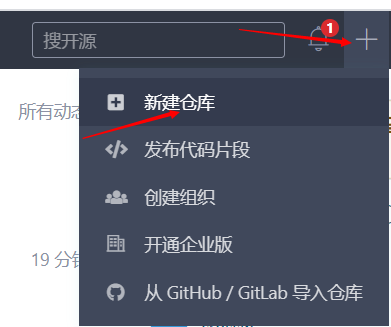
The warehouse name and path must be consistent with the user name
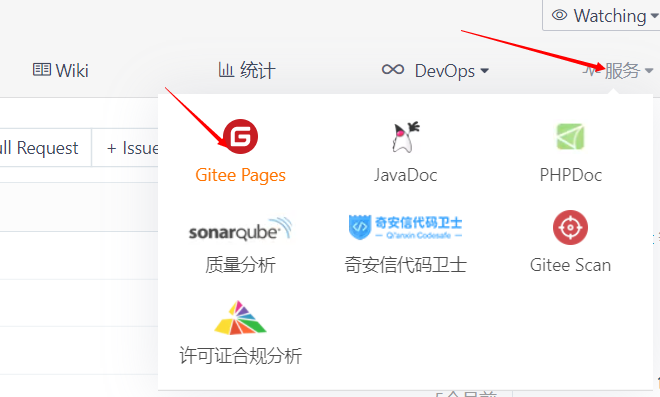
Click on the Gitee Pages of the service
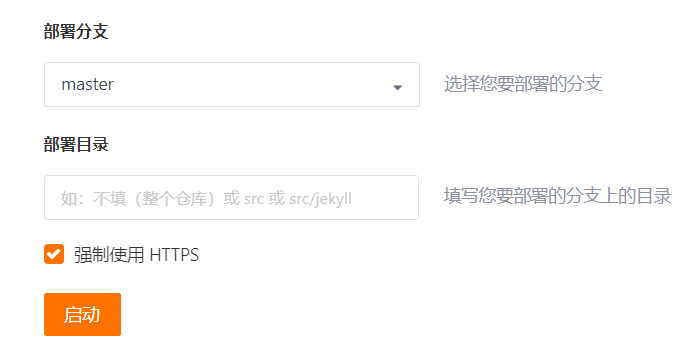
Check force HTTPS and start
Install deployment plug-ins
$ npm install hexo-deployer-git --save
$ npm install hexo-server --save
Configure Git
If you just installed git but haven't configured your git, the first thing you need to do now is to set your git user name and email. Execute the following two commands in Git Bash to configure your user name and mailbox. It is recommended that your user name and mailbox be consistent with your GitHub user name and mailbox.
$ git config --global user.name "Your_user_name"
$ git config --global user.email Your_email@example.com
remind
Each Git submission will be accompanied by these two pieces of information, which are used to record who submitted the update, and will be recorded in the history along with the update. In short, it is used to mark your identity
Configure site_ config.yml file
deploy:
  type: git # Type fill in git
  repo: <repository url> # Your Gitee warehouse address (both https and ssh)
  branch: master # Branch name.
  message: # Submission information can be customized. If it is not filled in, it will be the submission time by default
Publish to Gitee
In the root directory of the local Hexo site, execute the following command to deploy to GitHub Pages.
$ hexo clean && hexo d -g
remind
If you need to log in to GitHub for the first time, a login box will pop up.
Then go to the Gitee Pages page, click the update button and redeploy it
Recommendation: to learn more about Hexo's tutorials and contents, please open Easy Hexo