preface
During the two days of continuous integration and delivery, the company considered using the ci/cd provided by gitlab to handle it, and hereby wrote down the whole process steps.
1, Install gitlab
This naturally goes without saying
2, Using the docker container to install the gitlab runner component
Create a docker - compose The contents of the YML file are as follows. It's good to run with the docker compose up - D command under linux system (if not, you can search, install and use it)
 1 version:  "3.3"
 2 services:
 3   gitlab-runner:
 4     image:  gitlab/gitlab-runner:latest
 5     container_name: gitlab-runner
 6     #Always start after restart
 7     restart: always
 8     privileged: true
 9     volumes:
10       - ./config:/etc/gitlab-runner
11       - /var/run/docker.sock:/var/run/docker.sock
12       - /bin/docker:/bin/docker
13     networks:
14       - gitlab_runner_net
15
16 networks:
17   gitlab_runner_net:
18     driver: bridge
3, Gitlab runner registers with gitlab
After installation, you need to register the installed gitlab runner with gitlab. Here we need to use the token token in the red box in the figure below.

1. Enter the inside of the container
docker exec -it 96d4d3170eaf /bin/bash
2. Open registration
gitlab-runner register
3. After entering the above command, enter the specified information according to the prompt
 1 Enter the GitLab instance URL (for example, https://gitlab.com/):
 2 http://192.168.1.250: address of 9080 / #gitlab
 3 Enter the registration token:
 4 XLccjJJ_mDkNRyzdyXsY   #The token in the above picture allows gitlab runner to connect gitlab without secret
 5 Enter a description for the runner:
 6 [96d4d3170eaf]: signbox-service-message shell #Enter comments here and leave blank
 7 Enter tags for the runner (comma-separated):
 8 deploy,master,dev #Enter the tag here, preferably corresponding to the tag in the git branch
 9 Registering runner... succeeded                     runner=XLccjJJ_
10 Enter an executor: docker-ssh, shell, virtualbox, docker-ssh+machine, kubernetes, custom, docker, parallels, ssh, docker+machine:
11 shell  #Just enter the shell directly here
12 Runner registered successfully. Feel free to start it, but if it's running already the config should be automatically reloaded!
After registration, you can see the registered gitlab runner information in gitlab, as shown in the following figure
4, Add gitlab runner account authorization
1. Add a gitlab runner user (usually this user does not exist)
sudo adduser gitlab-runner
2. Add gitlab runner user to docker group
sudo gpasswd -a gitlab-runner docker
3. Check whether the docker group is successful (if docker: X: 973: root and gitlab runner appear, it is successful)
cat /etc/group |grep docker
4. Restart docker container service
sudo systemctl restart docker
5. To docker Sock setting permissions
sudo chmod a+rw /var/run/docker.sock
5, Create a file named gitlab-ci.yml file
Create a file named in the project root directory gitlab-ci.yml file, which is used to build the packaged deployment
 1 stages:
 2   - build
 3   - deploy
 4
 5 build:
 6   stage: build
 7   script:
 8     - cd ./
 9     - docker build -f "./src/Test.Web/Dockerfile" --force-rm -t image-test  --label "com.microsoft.created-by=visual-studio" --label "com.microsoft.visual-studio.project-name=Test.Web" "./"
10   only:
11     - master
12
13 deploy:
14   stage: deploy
15   script:
16     - cd ./
17     - docker stop image-test18     - docker rm image-test19     - docker run -d --name image-test -p 8080:80 image-test-app20   only:
21     - master
Here, I divide the construction into two phases, one is compilation and the other is deployment
1. The build phase is responsible for compiling the source code into a container image It should be noted here that the cd is only cd to the root directory. Instead of directly cd to the directory where the Dockerfile file is located, specify the Dockerfile file directory in the compilation command
2. Start the container according to the compiled container image It should be noted here that you need to make a further judgment. If the container is new, you should rule out stopping and deleting the container, otherwise the deployment will fail
6, Submitting code using git automatically triggers the build
When each step is green, it indicates that the construction is successful, as shown in the following figure

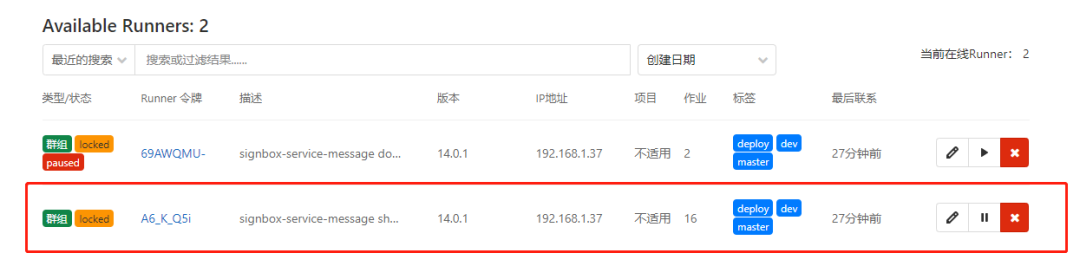
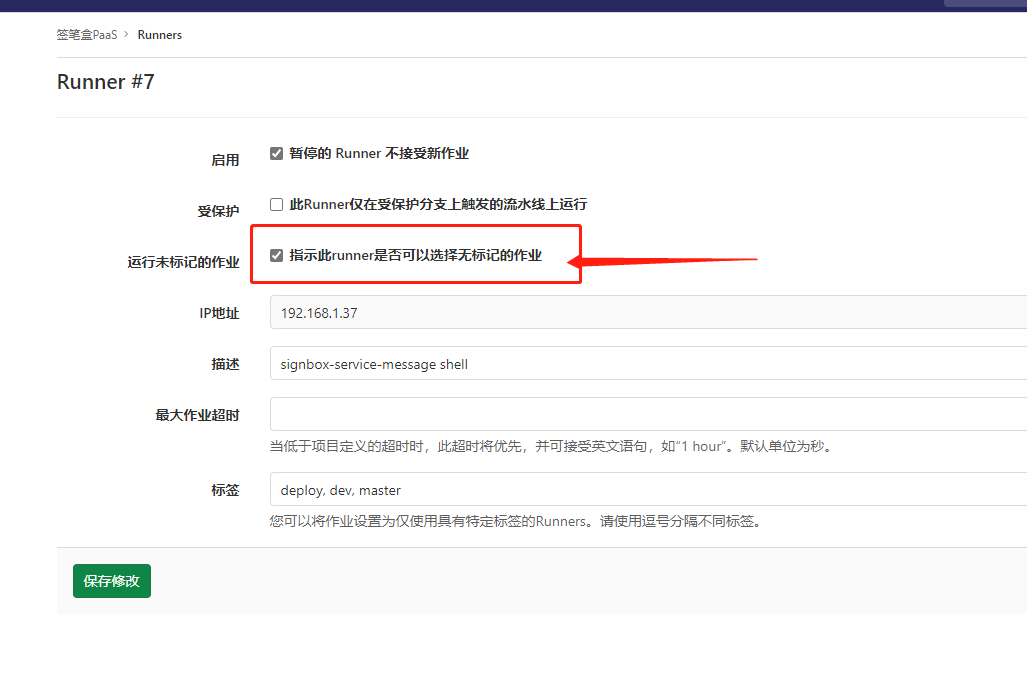
Warm tip: go to figure 1 and check the red box in Figure 2 to support the construction even if there is no tag tag when submitting the code
Figure 1

Figure 2
Transferred from: Yu Pingyong
Link: cnblogs com/yupingyong/p/14987472. html
- EOF -