

From a practical point of view, this article introduces how to combine our commonly used GitLab and Jenkins to realize the automatic deployment of the project through K8s. The production architecture diagram currently used by the company is the focus of this explanation, as shown in the figure:
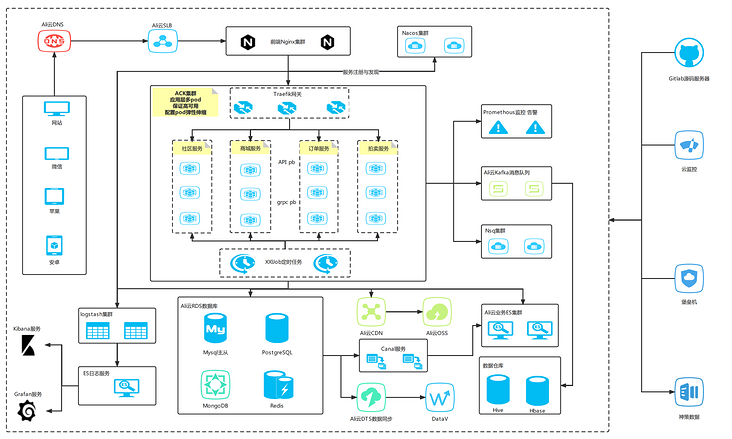
The tools and technologies involved in this paper include:
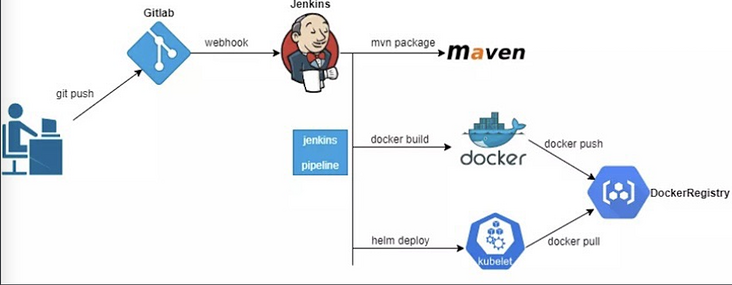
- GitLab: common source code management system;
- Jenkins (Jenkins Pipeline): a commonly used automatic construction and deployment tool. Pipeline organizes the construction and deployment steps in a pipeline manner;
- Docker (dockerfile): container engine. All applications should run in the docker container. Dockerfile is the docker image definition file;
- Kubernetes: Google's open source container orchestration management system.
Environmental background:
- GitLab has been used for source code management. The source code establishes different branches according to different environments, such as dev (Development Branch), test (test branch), pre (advance branch) and master (production branch);
- Jenkins service has been set up;
- The existing docker Registry service is used to store docker images (it can be self built based on docker Registry or Harbor, or use cloud services. Alibaba cloud container image service is used in this paper);
- K8s cluster has been deployed.
Expected effect:
- Deploy applications in different environments to separate the development environment, test environment, pre launch environment and production environment. The development, test and pre launch environments are deployed in the same K8s cluster, but use different namespace s. The production environment is deployed in Alibaba cloud and uses ACK container services;
- The configuration should be as general as possible, and the automatic deployment configuration of new projects can be completed only by modifying a small number of configuration attributes of a small number of configuration files;
- The development, testing and pre issuance environment can be set to automatically trigger the construction and deployment when push ing code. The specific configuration is based on the actual situation. The production environment uses a separate ACK cluster and a separate Jenkins system for deployment;
- The overall interaction flow chart is as follows:
Project profile
First, we need to add some necessary configuration files under the root path of the project. As shown in the figure
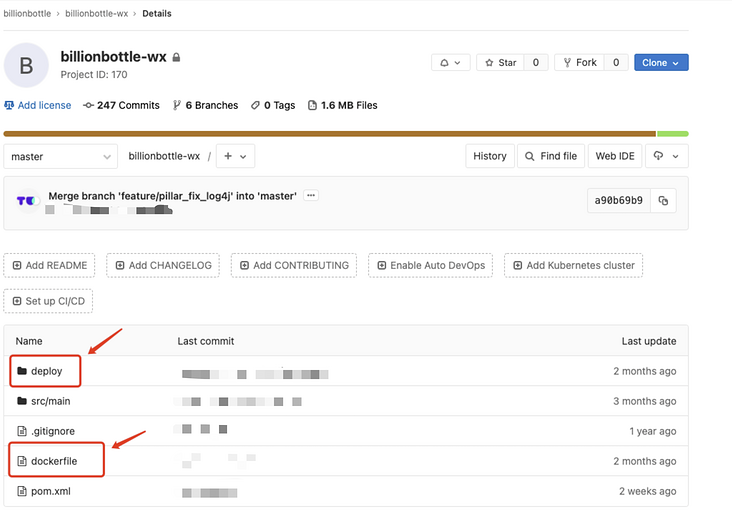
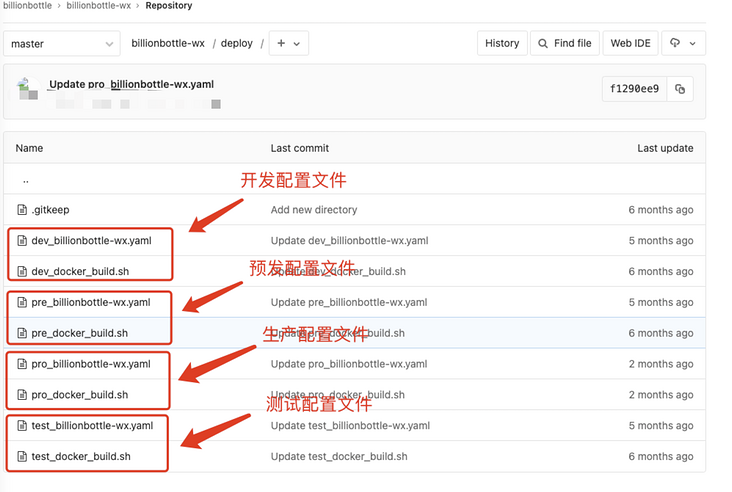
include:
- dockerfile file, which is used to build docker image file;
- Docker_build.sh file, which is used to Tag the docker image and then push it to the image warehouse;
- Project Yaml file, which is the main file for deploying the project to K8s cluster.
dockerfile
Add a dockerfile (the file name is dockerfile) in the root directory of the project to define how to build a docker image. Take a Java project as an example:
# Image source
FROM xxxxxxxxxxxxxxxxxxxxxxxxxx.cr.aliyuncs.com/billion_basic/alpine-java:latest

# Copy the of the current directory to the image
COPY target/JAR_NAME /application/

# Declare the working directory, otherwise the dependent package, if any, cannot be found
WORKDIR /application

# Declare dynamic container volumes
VOLUME /application/logs

# Start command
# Set time zone
ENTRYPOINT ["java","-Duser.timezone=Asia/Shanghai","-Djava.security.egd=file:/dev/./urandom"]
CMD ["-jar","-Dspring.profiles.active=SPRING_ENV","-Xms512m","-Xmx1024m","/application/JAR_NAME"]
docker_build.sh
Create a deploy folder under the root directory of the project, where the configuration files of various environment projects are stored, including docker_ build. The SH file is packaged as an image file for the trigger project, re tagged and then pushed to the image warehouse. Similarly, take the Java project as an example:
# !/bin/bash

# Module name
PROJECT_NAME=$1

# Namespace directory
WORKSPACE="/home/jenkins/workspace"

# Module directory
PROJECT_PATH=$WORKSPACE/pro_$PROJECT_NAME

# jar package directory
JAR_PATH=$PROJECT_PATH/target

# jar package name
JAR_NAME=$PROJECT_NAME.jar

# dockerfile directory
dockerFILE_PATH="/$PROJECT_PATH/dockerfile"

# sed -i "s/VAR_CONTAINER_PORT1/$PROJECT_PORT/g" $PROJECT_PATH/dockerfile
sed -i "s/JAR_NAME/$JAR_NAME/g" $PROJECT_PATH/dockerfile
sed -i "s/SPRING_ENV/k8s/g" $PROJECT_PATH/dockerfile

cd $PROJECT_PATH

# Log in to Alibaba cloud warehouse
docker login  xxxxxxxxxxxxxxxxxxxxxxxxxx.cr.aliyuncs.com -u Hundred bottle net -p xxxxxxxxxxxxxxxxxxxxxxxxxx

# Build module image
docker build -t $PROJECT_NAME  .
docker tag $PROJECT_NAME xxxxxxxxxxxxxxxxxxxxxxxxxx.cr.aliyuncs.com/billion_pro/pro_$PROJECT_NAME:$BUILD_NUMBER

# Push to Alibaba cloud warehouse
docker push xxxxxxxxxxxxxxxxxxxxxxxxxx.cr.aliyuncs.com/billion_pro/pro_$PROJECT_NAME:$BUILD_NUMBER
project.yaml file
project.yaml defines the project name, PV, PVC, namespace, number of copies, image address, service port, eye-catching self-test, project resource request configuration, file mount and service required for the project to be deployed to the K8s cluster:
# ------------------- PersistentVolume(definition PV) ------------------- #
apiVersion: v1
kind: PersistentVolume
metadata:
# entry name
  name: pv-billionbottle-wx
  namespace: billion-pro
  labels:
    alicloud-pvname: pv-billionbottle-wx
spec:
  capacity:
    storage: 5Gi
  accessModes:
    - ReadWriteMany
  csi:
    driver: nasplugin.csi.alibabacloud.com
    volumeHandle: pv-billionbottle-wx
    volumeAttributes:
      server: "xxxxxxxxxxxxx.nas.aliyuncs.com"
      path: "/k8s/java"
  mountOptions:
  - nolock,tcp,noresvport
  - vers=3

---
# ------------------- PersistentVolumeClaim(definition PVC) ------------------- #
kind: PersistentVolumeClaim
apiVersion: v1
metadata:
  name: pvc-billionbottle-wx
  namespace: billion-pro
spec:
  accessModes:
    - ReadWriteMany
  resources:
    requests:
      storage: 5Gi
  selector:
    matchLabels:
      alicloud-pvname: pv-billionbottle-wx

---
# ------------------- Deployment ------------------- #
apiVersion: apps/v1
kind: Deployment
metadata:
  labels:
    k8s-app: billionbottle-wx
  name: billionbottle-wx
# Define namespace
  namespace: billion-pro
spec:
# Define the number of copies
  replicas: 2
  revisionHistoryLimit: 10
  selector:
    matchLabels:
      k8s-app: billionbottle-wx
  template:
    metadata:
      labels:
        k8s-app: billionbottle-wx
    spec:
      serviceAccountName: default
      imagePullSecrets:
        - name: registrykey-k8s
      containers:
      - name: billionbottle-wx
# Define mirror address
        image: $IMAGE_NAME
        imagePullPolicy: IfNotPresent
# Define self test
        livenessProbe:
          failureThreshold: 3
          initialDelaySeconds: 60
          periodSeconds: 60
          successThreshold: 1
          tcpSocket:
            port: 8020
          timeoutSeconds: 1
        ports:
# Define service port
          - containerPort: 8020
            protocol: TCP
        readinessProbe:
          failureThreshold: 3
          initialDelaySeconds: 60
          periodSeconds: 60
          successThreshold: 1
          tcpSocket:
            port: 8020
          timeoutSeconds: 1
# Define project resource configuration
        resources:
          requests:
            memory: "1024Mi"
            cpu: "300m"
          limits:
            memory: "1024Mi"
            cpu: "300m"
# Definition file mount
        volumeMounts:
          - name: pv-billionbottle-key
            mountPath: "/home/billionbottle/key"
          - name: pvc-billionbottle-wx
            mountPath: "/billionbottle/logs"
      volumes:
        - name: pv-billionbottle-key
          persistentVolumeClaim:
            claimName: pvc-billionbottle-key
        - name: pvc-billionbottle-wx
          persistentVolumeClaim:
            claimName: pvc-billionbottle-wx

---
# ------------------- Dashboard Service(definition service) ------------------- #
apiVersion: v1
kind: Service
metadata:
  labels:
    k8s-app: billionbottle-wx
  name: billionbottle-wx
  namespace: billion-pro
spec:
  ports:
    - port: 8020
      targetPort: 8020
  type: ClusterIP
  selector:
    k8s-app: billionbottle-wx
Here, by default, the path of the image is defined through the Pipeline. You can directly replace $image with a variable_ Name, and you can directly specify the port of the container here without changing the dockerfile file template (the template file is reused in various environments and usually does not need to be modified). At the same time, the configuration of ENV is added, and the configuration file of configmap can be read directly. Change the Service type from the default NodePort to ClusterIp to ensure that projects communicate only internally. When deploying different projects, you only need to modify the docker_build.sh and project Environment variables, project names and a small number of other configuration items in yaml. The dockerfile file in the root directory can be reused in various environments.
During deployment, we need to pull images from the Docker image warehouse in the K8s cluster, so we need to create image pullsecrets in K8s first.
# Log in to docker Registry to generate / root / docker/config. JSON file
docker login --username=your-username registry.cn-xxxxx.aliyuncs.com
# Create namespace billion pro (the namespace I created here based on the name of the environment branch of the project)
kubectl create namespace billion-pro
# Create a secret in namespace bill pro
kubectl create secret registrykey-k8s aliyun-registry-secret --from-file=.dockerconfigjson=/root/.docker/config.json --type=kubernetes.io/dockerconfigjson --name=billion-pro
Jenkinsfile (Pipeline)
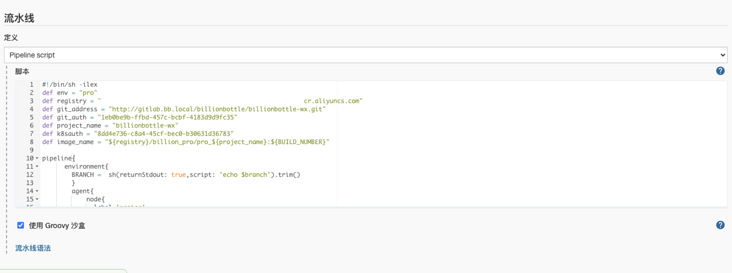
Jenkinsfile is the Jenkins Pipeline configuration file, which follows the Groovy script specification. For the construction and deployment of Java projects, the Pipeline script file of jenkinsfile is as follows:
#!/bin/sh -ilex
def env = "pro"
def registry = "xxxxxxxxxxxxxxx.cn-shenzhen.cr.aliyuncs.com"
def git_address = "http://xxxxxxxxx/billionbottle/billionbottle-wx.git"
def git_auth = "1eb0be9b-ffbd-457c-bcbf-4183d9d9fc35"
def project_name = "billionbottle-wx"
def k8sauth = "8dd4e736-c8a4-45cf-bec0-b30631d36783"
def image_name = "${registry}/billion_pro/pro_${project_name}:${BUILD_NUMBER}"

pipeline{
      environment{
        BRANCH =  sh(returnStdout: true,script: 'echo $branch').trim()
        }
        agent{
            node{
              label 'master'
            }
        }
        stages{
            stage('Git'){
            steps{
            git branch: '${Branch}', credentialsId: "${git_auth}", url: "${git_address}"
            }
        }
        stage('maven build'){
            steps{
            sh "mvn clean package -U -DskipTests"
            }
        }
        stage('docker build'){
            steps{
            sh "chmod 755 ./deploy/${env}_docker_build.sh && ./deploy/${env}_docker_build.sh ${project_name} ${env}"
            }
        }
        stage('K8s deploy'){
            steps{
                sh "pwd && sed -i 's#\$IMAGE_NAME#${image_name}#' deploy/${env}_${project_name}.yaml"
                kubernetesDeploy configs: "deploy/${env}_${project_name}.yaml", kubeconfigId: "${k8sauth}"
            }
        }
    }
}
Jenkinsfile's Pipeline script defines the entire automated build deployment process:
- Code Analyze: you can use static code analysis tools such as SonarQube to complete code inspection, which is ignored here first;
- Maven Build: start a maven program to complete the construction and packaging of the project Maven. You can also start a maven container and mount the local warehouse directory of Maven to the host to avoid downloading the dependent package every time;
- docker Build: build docker images and push them to the image warehouse. Images in different environments are distinguished by tag prefix. For example, the development environment is dev_, The test environment is test_, The pre issuance environment is pre_, The production environment is pro_;
- K8s Deploy: use Jenkins's own plug-in to complete the deployment of the project or the update iteration of existing projects. Different environments use different parameter configurations. The access credentials of k8s cluster can be Kube used_ Config to configure directly.
Jenkins configuration
Jenkins task configuration
Create a Pipeline task in Jenkins, as shown in the figure below:
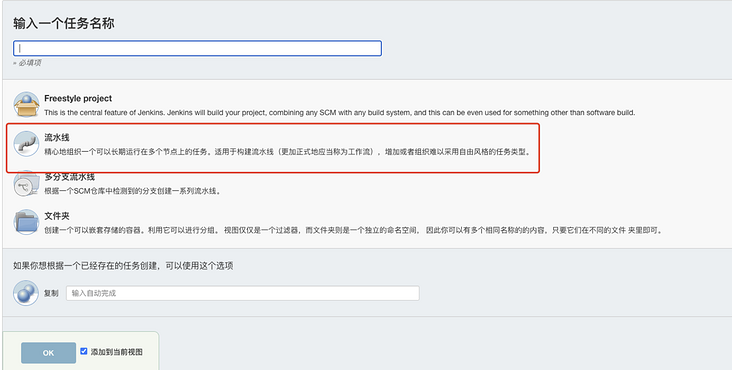
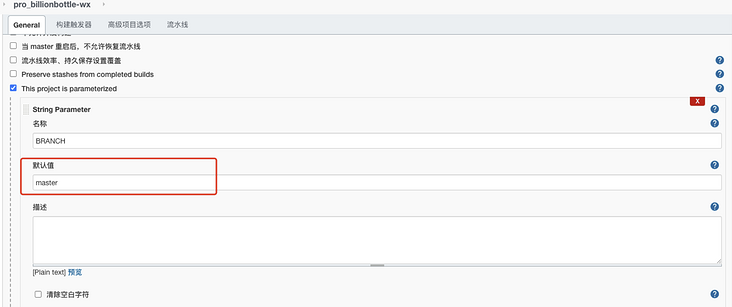
Configure the build trigger and set the target branch as the master branch, as shown in the figure:
Configure the Pipeline, select "Pipeline script" and configure the Pipeline script file, configure the project Git address, pull the source code certificate, etc., as shown in the figure:
The key credentials referenced in the above figure need to be configured in jenkins in advance, as shown in the following figure:

Saving completes the Jenkins configuration of the project production environment. The same is true for other environments. It should be noted that the branches corresponding to each environment should be distinguished
Kubernetes cluster function introduction
K8s is a container based cluster orchestration engine. It has the capabilities of expanding clusters, rolling upgrade rollback, elastic scaling, automatic healing, service discovery and other features. Combined with the actual situation of the current production environment, it focuses on several common function points. If you need to know more about other functions, please go directly to Kubernets official website Query.
Kubernetes architecture diagram
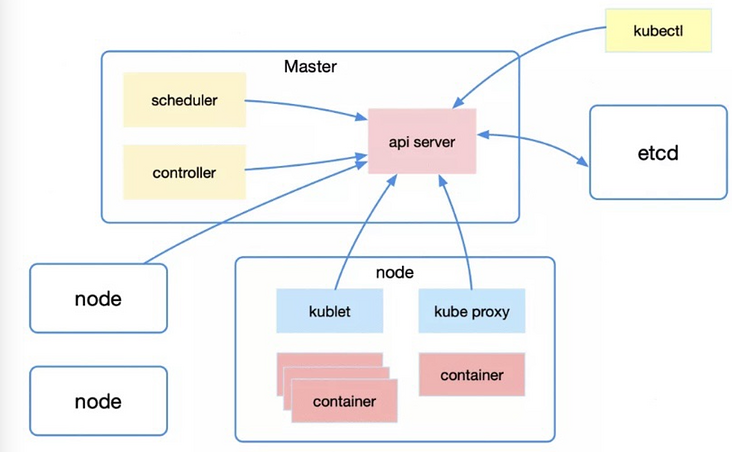
From a macro perspective, the overall architecture of Kubernetes includes Master, Node and Etcd.
Master is the master node, which is responsible for controlling the entire kubernetes cluster. It includes Api Server, Scheduler, Controller and other parts, all of which need to interact with Etcd to store data.
- Api Server: it mainly provides a unified entrance for resource operation, which shields the direct interaction with Etcd. Its functions include security, registration and discovery;
- Scheduler: responsible for scheduling the pod to the Node according to certain scheduling rules;
- Controller: resource control center to ensure that resources are in the expected state.
Node is the working node, which provides computing power for the whole cluster. It is the place where the container really runs, including running container, kubelet and Kube proxy.
- kubelet: the main work is to manage the life cycle of the container, monitor, check the health and report the node status regularly in combination with the C advisor;
- Kube proxy: it mainly uses services to provide service discovery and load balancing within the cluster, while monitoring service/endpoints changes to refresh load balancing.
Container orchestration
There are many scheduling related control resources in Kubernetes, such as scheduling the deployment of stateless applications, scheduling the statefulset of stateful applications, scheduling the daemon daemon daemon, and scheduling the job/cronjob of offline tasks.
Taking the deployment applied in the current production environment as an example, the relationship among deployment, replicatset and pod is a layer by layer control relationship. In short, replicatset controls the number of pods, while deployment controls the version attribute of replicatset. This design mode also realizes the basis for the two most basic choreography actions, that is, the horizontal expansion and contraction of quantity control, Update / rollback of version attribute control.
Horizontal expansion and contraction capacity
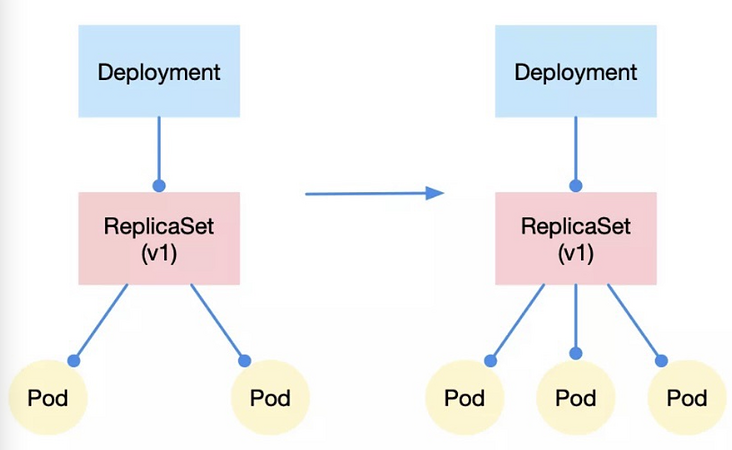
It's very easy to understand the horizontal expansion and contraction. We only need to modify the number of pod copies controlled by replicatset, for example, from 2 to 3, and then the action of horizontal expansion is completed. Otherwise, it's horizontal contraction.
Rolling Update deployment
Rolling deployment is the default deployment strategy in K8s. It replaces the previous version of the application with the new version of the pod one by one without any cluster downtime. Rolling deployment slowly replaces the previous version of the application instance with the new version of the application instance, as shown in the figure:
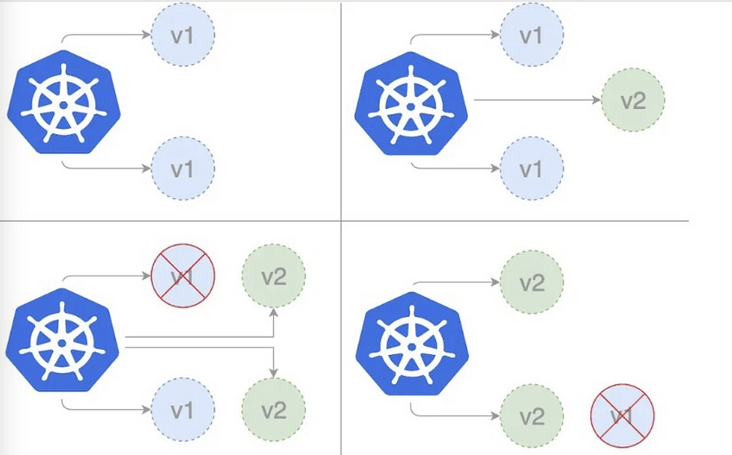
In the practical application of rolling update, we can configure rolling update strategy to control the rolling update strategy. In addition, there are two options for us to fine tune the update process:
- maxSurge: the number of pods that can be created during update exceeds the number of required pods, which can be the absolute number or percentage of copy count. The default value is 25%;
- maxUnavailable: the number of pod s that are unavailable during the update process. This can be the absolute number or percentage of the replica count. The default value is 25%.
Micro service
Before understanding microservices, we need to understand a very important resource object - service
In microservices, pod can correspond to instances, and service corresponds to microservices. In the process of service invocation, the emergence of service solves two problems:
- The ip of pod is not fixed, so it is unrealistic to use non fixed ip for network call;
- Service invocation requires load balancing for different pod s.
Service selects the appropriate pod through the label selector to build an endpoint, that is, the pod load balancing list. In practical application, we will generally label the pod instances of the same micro service with a label similar to app=xxx, and create a service with a label selector of app=xxx for the micro service.
Networks in Kubernetes
The network communication of K8s must first have the foundation of "three links":
- node and pod can be interconnected;
- pod of node can be interconnected;
- Pods between different node s can be interconnected.
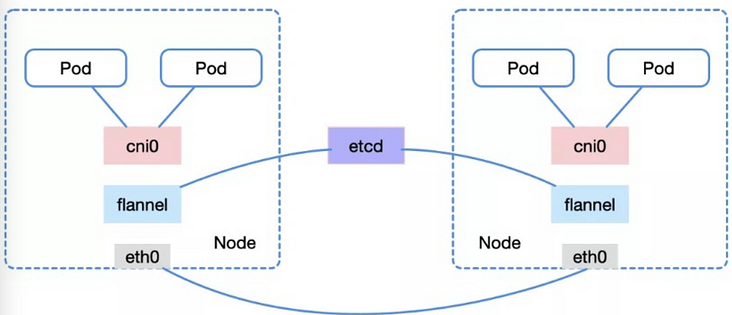
In short, different pods communicate through cni0/docker0 bridge, and node accesses pod through bridge,
There are many ways to realize pod communication between different nodes, including the vxlan/hostgw mode of flannel, which is more common now. Flannel obtains the network information of other nodes through etcd and creates a routing table for this node, so that cross host communication can be realized between different nodes.
Summary
So far, we have basically introduced the related concepts of the basic components used in the overall architecture of our production environment, how they operate, and how microservices operate in Kubernetes. However, some other components related to configuration center, monitoring and alarm have not been introduced in detail. We strive to update this part as soon as possible.