Grain mall advanced level chapter
Content directory:
1, ElasticSearch
1.1 introduction to elasticserch:
Full text search is the most common requirement. Open source Elasticsearch is the first choice of full-text search engines. It can quickly store, search and analyze massive data. Wikipedia, Stack Overflow and Github all use it. The bottom layer of elastic is the open source library Lucene. However, you can't use Lucene directly. You must write your own code to call its interface. Elastic is the package of Lucene and provides the operation interface of REST API, which can be used out of the box. REST API: natural cross platform.
Official documents: https://www.elastic.co/guide/en/elasticsearch/reference/current/index.html
Official Chinese: https://www.elastic.co/guide/cn/elasticsearch/guide/current/foreword_id.html
Community Chinese: https://es.xiaoleilu.com/index.html http://doc.codingdict.com/elasticsearch/0
1.2 related concepts
1.2.1 Index
Verb, equivalent to insert in MySQL; Noun, equivalent to Database in MySQL
1.2.2 Type
In Index, you can define one or more types. Similar to the Table in MySQL; Put each type of data together;
1.2.3 Document
A data (Document) of a certain Type saved under an Index. The Document is in JSON format, and the Document t is like the content in a Table in MySQL.
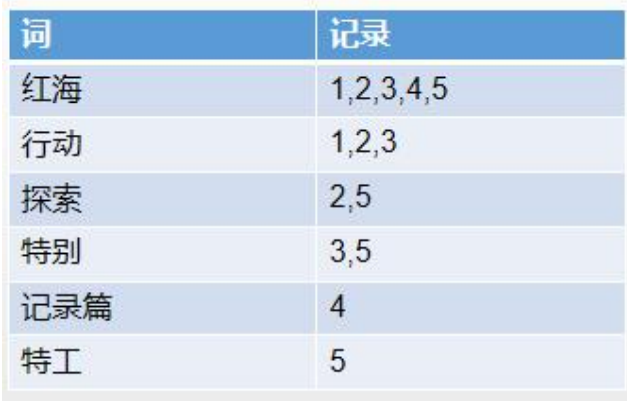
1.2.4 inverted index mechanism
Inverted index comes from the need to find records according to the value of attributes in practical applications. lucene is implemented based on inverted index.
Simply put, it is to get the index value according to the attribute value.
1.3 installation
To install using docker, you need to install ElasticSearch and Kibana images at the same time.
Please refer to the official documentation for more details.
ElasticSearch is RestFul
1.4 basic operation
Refer to relevant documents
It's like using RestFul style to manipulate the database with url.
1.5 combined with JAVA
1.5.1 introducing related dependencies
<dependency>
   <groupId>org.elasticsearch.client</groupId>
   <artifactId>elasticsearch-rest-high-level-client</artifactId>
   <version>7.4.2</version>
</dependency>
1.5.2 write configuration class
//Exclude data source dependencies introduced into the common project
//@SpringBootApplication(exclude = DataSourceAutoConfiguration.class)
@Configuration
public class ElasticSearchConfig {
    @Bean
    public RestHighLevelClient restHighLevelClient() {
           RestHighLevelClient client = new RestHighLevelClient(
                RestClient.builder(
                       new HttpHost("101.200.45.111", 9200, "http")));//You need to fill in the domain name and port number of the server where es is located
             return client;
    }
}
1.5.3 create index (add data)
    //Store data to ES (add update in one)
    @Test
    public void addIndex() throws Exception{
        //(the request to create the index specifies the index name (users))
        IndexRequest indexRequest = new IndexRequest("users");
        //Specify id
        indexRequest.id("1");
        //This method can also write json strings directly
        // indexRequest. Source ("username", "Zhan", "age", 18, "gender", "male");
        User user =new User();
        user.setUsername("Zhan San");
        user.setGender("f");
        user.setAge(123);
        //Parses an object into a JSON string
        String s = JSON.toJSONString(user);
        indexRequest.source(s,XContentType.JSON);
        //Get the response result after saving
  IndexResponse index = restHighLevelClient.index(indexRequest,COMMON_OPTIONS);
        System.out.println(index);
    }
    @Data
    class User{
    private String username;
    private String gender;
    private Integer age;
    }
1.5.4 query
    @Test
    public void searchData() throws Exception {
        //1. Create index request
        SearchRequest searchRequest = new SearchRequest();
        //2. Specify index
        searchRequest.indices("xxx");
        //3. Specify DSL search criteria
        //Searchsourcebuilder (query criteria encapsulated inside)
        SearchSourceBuilder searchSourceBuilder = new SearchSourceBuilder();
        //3.1 build search conditions
//        searchSourceBuilder.query();
//        searchSourceBuilder.from();
//        searchSourceBuilder.size();
//        searchSourceBuilder.aggregation();
        searchSourceBuilder.query(QueryBuilders.matchQuery("field", "xxx"));
        //Create aggregation condition
        //1. View value distribution aggregation
        TermsAggregationBuilder agg1 = AggregationBuilders.terms("Aggname").field("AggField").size(10);
        //Add aggregation criteria to query criteria
        searchSourceBuilder.aggregation(agg1);
        searchRequest.source(searchSourceBuilder);
        //4. Retrieve the data
        SearchResponse searchResponse = restHighLevelClient.search(searchRequest, ElasticSearchConfig.COMMON_OPTIONS);
        //5. Analysis results (Json string)
        //Get all the data found
       SearchHits hits = searchResponse.getHits();
       SearchHit[] searchHits = hits.getHits();
        for (SearchHit hit : searchHits) {
          String string = hit.getSourceAsString();
          XXClass xxClass =  JSON.parseObject(string,XXClass.class);
            System.out.println("xxClass"+xxClass);
        }
//    }
        //Get the retrieved analysis information
        Aggregations aggregations = searchResponse.getAggregations();
        Terms aggName = aggregations.get("AggName");
        for (Terms.Bucket bucket : aggName.getBuckets()) {
            String keyAsString = bucket.getKeyAsString();
            System.out.println("Age"+keyAsString+bucket.getDocCount());
        }
    }
1.6 combined with mall business
1.6.1 create a micro service gulimall search
Related configuration files:
application.properties
spring.cloud.nacos.discovery.server-addr=127.0.0.1:8848
spring.cloud.nacos.config.server-addr=127.0.0.1:8848
spring.application.name=gulimall-search

server.port=12000
1.6.2 writing configuration classes
@Configuration
public class GulimallElasticSearchConfig {

    //Configure es request OPTIONS
    public static final RequestOptions COMMON_OPTIONS;
    static {
        RequestOptions.Builder builder = RequestOptions.DEFAULT.toBuilder();

        COMMON_OPTIONS = builder.build();
    }

    //Configure es connection
    @Bean
    RestHighLevelClient client() {
        RestClientBuilder builder = RestClient.builder(new HttpHost("192.168.190.131", 9200, "http"));
        return new RestHighLevelClient(builder);
    }
}
1.6.3 Controller layer
@RequestMapping("/search")
@RestController
@Slf4j
public class ElasticSaveController {

    @Autowired
    ProductSaveService productSaveService;

    // Goods on the shelves
    @PostMapping("/product")
    public R productStatusUp(@RequestBody List<SkuEsModel> skuEsModels) {
        boolean flag = false;
        try {
             flag = productSaveService.productStatusUp(skuEsModels);
        } catch (IOException e) {
            log.error("ElasticSaveController Goods on the shelf error: {}", e);
            return R.error(BizCodeEnume.PRODUCT_UP_EXCEPTION.getCode(), BizCodeEnume.PRODUCT_UP_EXCEPTION.getMsg());
        }

        if (flag) {
            return R.ok();
        } else {
            return R.error(BizCodeEnume.PRODUCT_UP_EXCEPTION.getCode(), BizCodeEnume.PRODUCT_UP_EXCEPTION.getMsg());
        }

    }
}
1.6.4 Service layer
Note: use RestHighLevelClient for operation
@Slf4j
@Service
public class ProductSaveServiceImpl implements ProductSaveService {

    @Autowired
    RestHighLevelClient restHighLevelClient;

    @Override
    public boolean productStatusUp(List<SkuEsModel> skuEsModels) throws IOException {
        // Save to es
        //1. Index es. product, and establish the mapping relationship.
        //2. Save this data to es
        //BulkRequest bulkRequest, RequestOptions options
        BulkRequest bulkRequest = new BulkRequest();
        for (SkuEsModel model : skuEsModels) {
            // Construct save request
            IndexRequest indexRequest = new IndexRequest(EsConstant.PRODUCT_INDEX);
            //Specify the data id
            indexRequest.id(model.getSkuId().toString());
            //Convert the data object to be saved to JSON format
            String s = JSON.toJSONString(model);
            //Insert data and indicate that the data type is JSON
            indexRequest.source(s, XContentType.JSON);
			//Add the save request (indexRequest) to the batch save request
            bulkRequest.add(indexRequest);
        }
        //Create batch execution object
        //Use restHighLevelClient client to save the response results
        //The first parameter is the request for batch saving, and the second parameter is the request for OPTIONS
        BulkResponse bulk = restHighLevelClient.bulk(bulkRequest, GulimallElasticSearchConfig.COMMON_OPTIONS);

        //Analyze and save results
        boolean b = bulk.hasFailures();
        List<String> collect = Arrays.stream(bulk.getItems()).map(item -> {
            return item.getId();
        }).collect(Collectors.toList());
        log.info("Goods on the shelf successfully: {}", collect);
        //Return Boolean data. If true, there is an error. If false, there is no error
        return b;
    }
}
2, Mall business
2.1 using Nginx reverse proxy
2.1.1 differences between nginx and gateway
nginx:
C language, using server to achieve load balancing, high-performance HTTP and reverse proxy web server.
Gateway:
It is a microservice gateway developed by springcloud and built based on spring 5. It can realize responsive and non blocking Api and support long connection.
Asynchronous is supported.
More powerful functions, internal current limiting and load balancing, and stronger scalability. Spring Cloud Gateway clearly distinguishes between Router and Filter, and a great feature is that it has built-in many out of the box functions, which can be used through SpringBoot configuration or manual coding chain call.
It depends on spring weblux and is only suitable for Spring Cloud suite.
Complex code and few comments.
difference:
Nginx is suitable for server-side load balancing. Zuul and gateway are local load balancing and are suitable for implementing gateways in microservices. Spring Cloud Gateway is naturally suitable for Spring Cloud ecology.
Simulation test diagram:
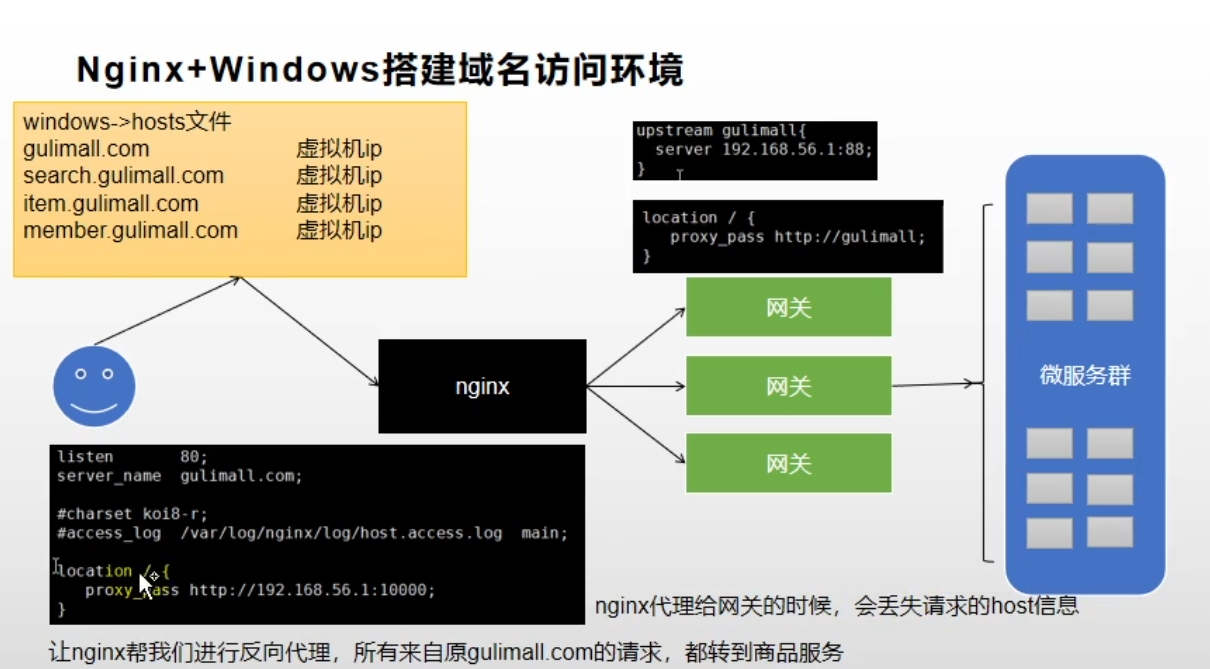
Configure gulimall. In the host file of the host COM and virtual machine ip binding.
2.1.2 process description
Visit gulimall.com through the browser Com will access the virtual machine and be processed by nginx of the virtual machine. Nginx forwards the request to our gateway, and then we configure the routing rules in the gateway, and finally transfer our request to the gulimall product service.
2.1.3 pit in nginx
When nginx performs load balancing, the request header will be lost. Therefore, we need to configure it in the relevant configuration files of nginx and add our request header information.
3, Performance stress testing & Performance Optimization
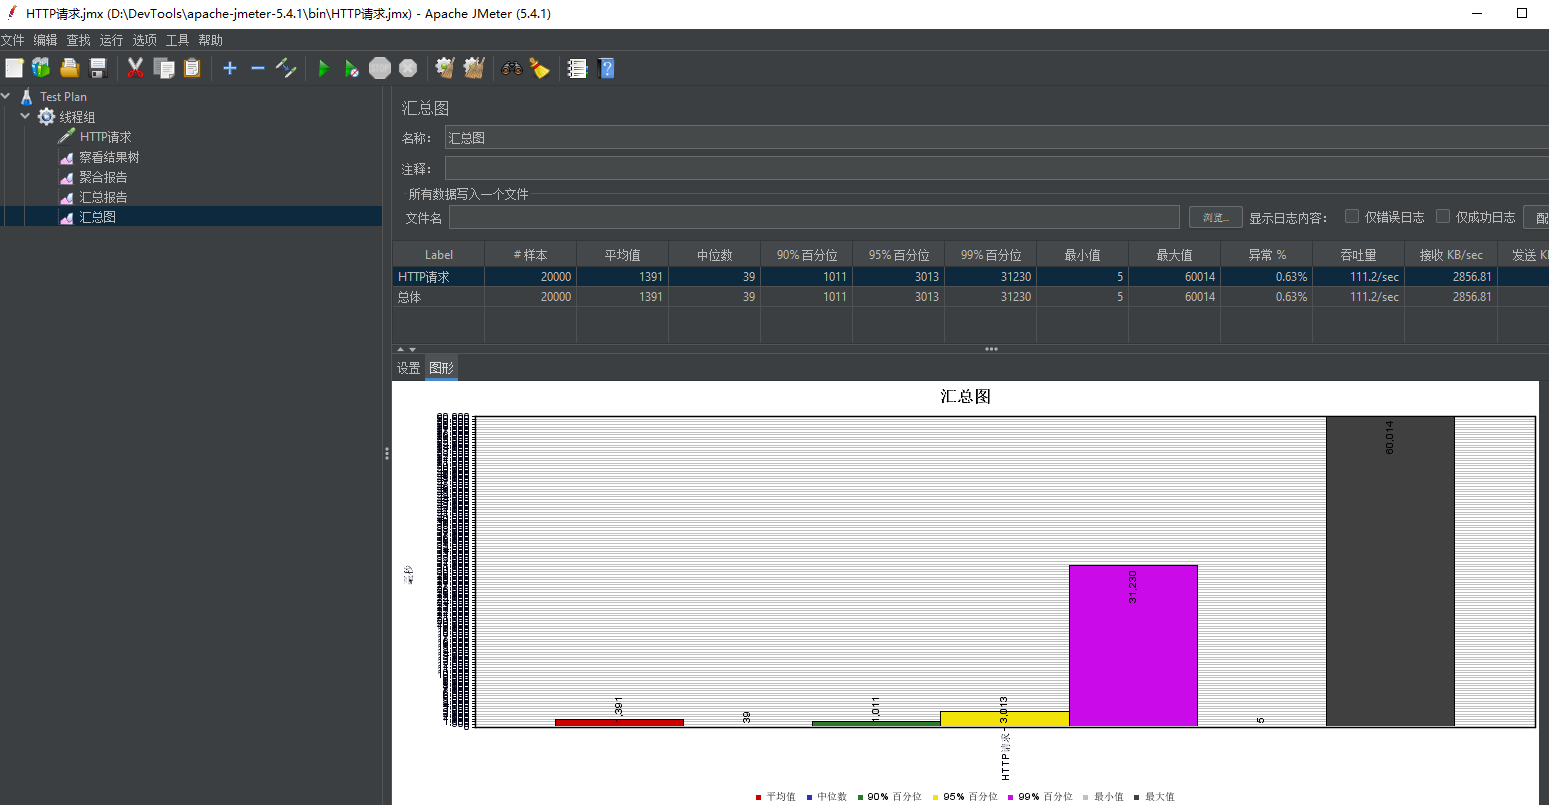
3.1 use of JMeter
1. Official website now
2. Click JMeter Bat usage
Use screenshot:
3.2 JVM optimization
The optimization tool JVISUALVM can be used to test the optimization.
cmd window input command: using jvisualvm
Optimized points:
- JVM memory
- View rendering
- database
3.3 Nginx dynamic and static separation
Put static pages, css, js, etc. into nginx, and set paths in nginx to realize dynamic and static separation.
Every time you visit the home page, the static page is provided by Nginx, and the data is provided by the local service.
4, Cache and distributed lock
4.1 cache usage
In order to improve the system performance, we usually put some data into the cache to speed up access. db is responsible for data dropping
What data is suitable for caching?
- The requirements for immediacy and data consistency are not high
- Data with large access and low update frequency (read more and write less)
For example, e-commerce applications, commodity classification, commodity list, etc. are suitable for caching and adding an expiration time (depending on the data update frequency). If a commodity is published in the background, the buyer needs 5 minutes to see the new commodity, which is generally acceptable.
flow chart:
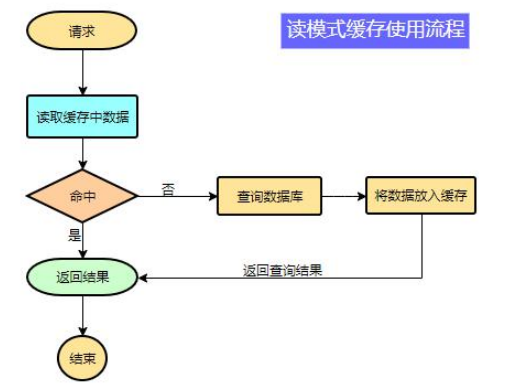
Strong consistency is not required, and final consistency is required
Note: during development, we should specify the expiration time for all data put into the cache, so that it can automatically trigger the process of data loading into the cache even if the system does not actively update the data. Avoid permanent data inconsistency caused by business collapse.
4.2 integrating redis
4.2.1 environment configuration
1) Introduce dependency
<!--introduce redis-->
<dependency>
      <groupId>org.springframework.boot</groupId>
      <artifactId>spring-boot-starter-data-redis</artifactId>
</dependency>
2) Configure the ip address and port number of redis in the configuration file (optional, because the default port number is 6379)
4.2.2 use of redis
Redis's configuration class has configured two kinds of bean s for us
RedisTemplate and StringRedisTemplate
@Configuration
@ConditionalOnClass(RedisOperations.class)
@EnableConfigurationProperties(RedisProperties.class)
@Import({ LettuceConnectionConfiguration.class, JedisConnectionConfiguration.class })
public class RedisAutoConfiguration {

	@Bean
	@ConditionalOnMissingBean(name = "redisTemplate")
	public RedisTemplate<Object, Object> redisTemplate(RedisConnectionFactory redisConnectionFactory)
			throws UnknownHostException {
		RedisTemplate<Object, Object> template = new RedisTemplate<>();
		template.setConnectionFactory(redisConnectionFactory);
		return template;
	}

	@Bean
	@ConditionalOnMissingBean
	public StringRedisTemplate stringRedisTemplate(RedisConnectionFactory redisConnectionFactory)
			throws UnknownHostException {
		StringRedisTemplate template = new StringRedisTemplate();
		template.setConnectionFactory(redisConnectionFactory);
		return template;
	}
}
It is used by injecting IOC container.
4.2.3 test use
@Autowired
    StringRedisTemplate stringRedisTemplate;
    @Test
    public void testStringRedisTemplate() {
        ValueOperations<String, String> ops = stringRedisTemplate.opsForValue();
        ops.set("hello", "world_" + UUID.randomUUID().toString());
        String hello = ops.get("hello");
        System.out.println("Previously stored data: " + hello);
    }
Actual business use:
//TODO generates external memory overflow: outofdirectoryerror
    @Override
    public Map<String, List<Catelog2Vo>> getCatalogJson() {
        //First judge whether there is data in Redis
        String catalogJSON = redisTemplate.opsForValue().get("catalogJSON");
        if (StringUtils.isEmpty(catalogJSON)) {
            // No data in cache, get data from database
            Map<String, List<Catelog2Vo>> catalogJsonFromDb = getCatalogJsonFromDb();
            // After obtaining the data, you need to store the obtained data in the redis cache
            // Because both key and value in redis are strings, if you want to store data in redis, you must first convert the data object into Json format and then save it in redis
            String value = JSON.toJSONString(catalogJsonFromDb);
            redisTemplate.opsForValue().set("catalogJSON", value);
            return catalogJsonFromDb;
        }

        //Logic when there is corresponding data in redis
        // You need to get data from redis, convert json data into objects, and then return
        Map<String, List<Catelog2Vo>> result = JSON.parseObject(catalogJSON, new TypeReference<Map<String, List<Catelog2Vo>>>() {
        });
        return result;
    }
4.2.4 generated BUG

springboot2.0 using lettuce will cause out of heap memory overflow, so we need to temporarily use another redis client jedis, but we use redisTemplate regardless of whether we use jedis or lettuce, because springboot encapsulates the two redis clients.
4.2.5 cache invalidation of high parallel delivery
(1) Cache penetration
The most straightforward meaning of cache penetration is that our business system does not find data in the cache when receiving the request, so it penetrates into the process of checking data in the back-end database.
Or it refers to a large number of external accesses to query the values that do not exist in the cache, which eventually leads to the need to constantly query the database, increasing the pressure on the database, and finally leading to program exceptions.
- Cache penetration refers to querying a certain nonexistent data. Due to the cache miss, we will query the database, but the database does not have this record. We do not write the null of this query into the cache, which will cause the nonexistent data to be queried in the storage layer every request, losing the significance of caching.
- When the traffic is heavy, the DB may hang up. If someone uses a non-existent key to frequently attack our application, this is a vulnerability.
solve:
Cache empty results and set a short expiration time.
(2) Cache avalanche
In short, it means that the key in the cache fails in a large area. At the same time, a large number of requests come to obtain data and view the cache, but the data in the cache has failed, so they go back to access the database, resulting in increased pressure on the database.
- Cache avalanche refers to an avalanche in which the same expiration time is used when we set the cache, resulting in the cache invalidation at the same time at a certain time, all requests are forwarded to the DB, and the DB is under excessive instantaneous pressure.
solve:
Add a random value based on the original expiration time, such as 1-5 minutes, so that the repetition rate of the expiration time of each cache will be reduced, and it is difficult to cause collective failure events
(3) Buffer breakdown
Cache breakdown means that there is no data in the cache but there is some data in the database. When a key is very hot (similar to a hot payment), it is constantly carrying large concurrency, and the large concurrency focuses on accessing this point; When the key fails, the continuous large concurrency breaks through the cache and directly requests the database, which is like cutting a hole in a barrier.
- For some keys with expiration time set, if these keys may be accessed in high concurrency at some time points, they are very "hot" data.
- At this time, we need to consider a problem: if the key fails just before a large number of requests come in at the same time, all data queries on the key will fall to db, which is called cache breakdown
solve:
Add mutex
① Use local lock (synchronized) monomer application
When a large number of requests access this data and find that it is not in the cache, they will access the database for query. If the method of accessing the database operation is locked with synchronized, these requests will be queued for access. After the first request completes the synchronization operation, the lock will be released. Before releasing the lock, the queried data will be stored in the cache. If other requests enter the synchronization operation, they will first judge whether there is corresponding data in the cache, so as to avoid the problem of multiple database searches.
//TODO generates external memory overflow: outofdirectoryerror
    @Override
    public Map<String, List<Catelog2Vo>> getCatalogJson() {
        //First judge whether there is data in Redis
        String catalogJSON = redisTemplate.opsForValue().get("catalogJSON");
        if (StringUtils.isEmpty(catalogJSON)) {
            // No data in cache, get data from database
            //Call the following method
            Map<String, List<Catelog2Vo>> catalogJsonFromDb = getCatalogJsonFromDb();
            return catalogJsonFromDb;
        }
        //Logic when there is corresponding data in redis
        // You need to get data from redis, convert json data into objects, and then return
        Map<String, List<Catelog2Vo>> result = JSON.parseObject(catalogJSON, new TypeReference<Map<String, List<Catelog2Vo>>>() {
        });
        return result;
    }


    //Query and encapsulate data from database
    public Map<String, List<Catelog2Vo>> getCatalogJsonFromDb() {

        synchronized (this) {
            //Change the query of the database to one time
            List<CategoryEntity> selectList = baseMapper.selectList(null);
            // Find out all primary classifications
            List<CategoryEntity> level1Categorys = getParent_cid(selectList, 0L);

            // Encapsulate data
            Map<String, List<Catelog2Vo>> parent_cid = level1Categorys.stream().collect(Collectors.toMap(k -> k.getCatId().toString(), v -> {
                .................Encapsulate data operations..................
            }));

            // After obtaining the data, you need to store the obtained data in the redis cache
            // Because both key and value in redis are strings, if you want to store data in redis, you must first convert the data object into Json format and then save it in redis
            String value = JSON.toJSONString(parent_cid);
            redisTemplate.opsForValue().set("catalogJSON", value);
            return parent_cid;
        }
    }
However, using local locks can cause problems in distributed situations: each service locks the current process and cannot lock other processes.

4.3 distributed lock
4.3.1 primary
The principle is to use the setnx command in redis according to the official document:
The Redis Setnx (SET if Not eXists) command sets the specified value for the specified key when the specified key does not exist. In this case, it is equivalent SET Command. When the key exists, do nothing.
Return value
- 1 if the key is set
- 0 if the key is not set
In Java, the corresponding method is:
public Boolean setIfAbsent(K key, V value) {
        byte[] rawKey = this.rawKey(key);
        byte[] rawValue = this.rawValue(value);
        return (Boolean)this.execute((connection) -> {
            return connection.setNX(rawKey, rawValue);
        }, true);
    }
// This method can set the expiration time and time type of the key
public Boolean setIfAbsent(K key, V value, long timeout, TimeUnit unit) {
        byte[] rawKey = this.rawKey(key);
        byte[] rawValue = this.rawValue(value);
        Expiration expiration = Expiration.from(timeout, unit);
        return (Boolean)this.execute((connection) -> {
            return connection.set(rawKey, rawValue, expiration, SetOption.ifAbsent());
        }, true);
    }
Final form:
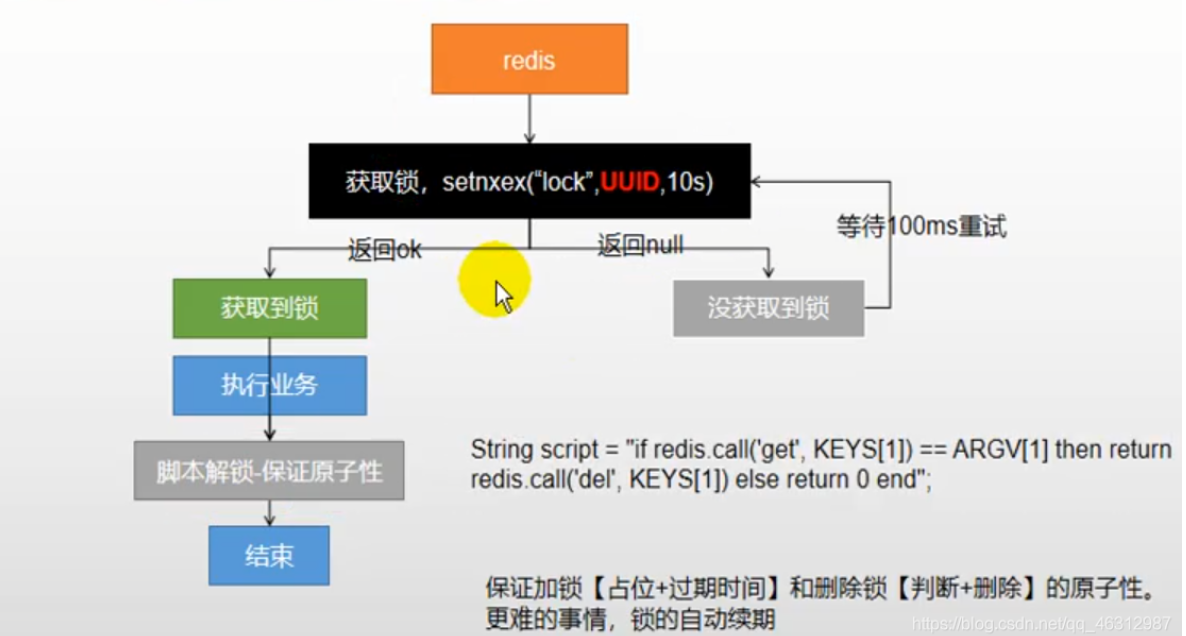
4.3.2 advanced
(1) Redisson Introduction & collection
1)Redisson is a more powerful Redis client than Jedis.
2) The operation of locking with Redisson is similar to the API under the JUC package. You can also refer to the relevant documents of JUC.
① Introduce dependency
<!--use redssion As a distributed lock-->
<dependency>
    <groupId>org.redisson</groupId>
    <artifactId>redisson</artifactId>
    <version>3.12.0</version>
</dependency>
② Configure redsession
Refer to the official documentation for more details
Write configuration class
@Configuration
public class MyRedissonConfig {

    /**
     * All use of Redisson is through the redissoclient object
     * @return
     */
    //Configure destruction in the specified way
    @Bean(destroyMethod = "shutdown")
    public RedissonClient redissonClient() {
        Config config = new Config();
        config.useSingleServer().setAddress("redis://192.168.190.131:6379");
        RedissonClient redissonClient = Redisson.create(config);
        return redissonClient;
    }
}
③ Redisson lock test
After redissoclient is configured, you can operate redissoclient instances to perform various locking operations.
1) Test (watchdog principle)
     @ResponseBody
     @GetMapping("/hello")
     public String hello(){
         //1. Get a lock. As long as the name of the lock is the same, it is the same lock
         RLock lock = redissonClient.getLock("my-lock");
         //2. Lock
         //This method does not specify an expiration time
         lock.lock();//Blocking wait, the lock will not be released until the previous thread is executed
         //1) The automatic lock renewal test found that if a business is too long, the lock will be automatically renewed for 30s during operation. There is no need to worry about the long business time and the lock will be deleted because it expires
         //2) As long as the operation of the lock adding business is completed, the lock will not be renewed. Even if it is not manually unlocked, the lock will be automatically deleted after 30s. Therefore, in the test, the service will be closed if the first request to obtain the lock is not unlocked, and the second thread can still obtain the lock
//**********************************************************************************
         //lock.lock(10,TimeUnit.SECONDS); Specifies the timeout for the lock
         //Question: lock lock(1,fimeUnit.SECONDS); After the lock time expires, it will not be automatically renewed.
        //1. If we pass the lock timeout, we will send it to redis to execute the script to occupy the lock. The default timeout is the time we specify
       //2. If we do not specify the lock timeout, we use 30 * 100 [LockWatchdogTimeout watchdog default time];
//As long as the lock is occupied successfully, a scheduled task will be started [reset the expiration time for the lock, and the new expiration time is the default time of the watchdog], which will be automatically activated every 10s
//internalLockLeaseTime [watchdog time] / 3,10s
//Best practice
// lock.Lock(30, TimeUnit.SECONDS); The whole renewal operation is omitted, and the specified expiration time is as long as possible than the business time
//**********************************************************************************
         try {
             System.out.println("Lock successfully executed business"+Thread.currentThread().getId());
             Thread.sleep(5000);
         }catch (Exception e){
         }finally {
             //3. Unlock
             System.out.println("Release lock"+Thread.currentThread().getId());
             lock.unlock();
         }
         return "hello";
}
④ Read lock and write lock
In order to ensure that the data can be read, during modification, the write lock is an exclusive lock (mutually exclusive lock and exclusive lock), while the read lock is a shared lock.
If the write lock is not released, you must wait
| Read / write operation | Effect description |
|---|---|
| Read + read | It is equivalent to unlocked and concurrent reads. It will only be recorded in Redis. All current read locks are successfully locked or locked at the same time. |
| Write + read | Wait for write lock release |
| Write + Write | Blocking mode |
| Read + Write | Lock the read operation first, and wait for the write operation |
Conclusion: as long as there is writing, we need to wait.
Test code:
  @GetMapping("/write")
    @ResponseBody
    public String write() {
        RReadWriteLock lock = redissonClient.getReadWriteLock("rw-lock");
        String s = "";
        RLock rLock = lock.writeLock();
        try {
            rLock.lock();
            System.out.println("Write lock and lock successfully..." + Thread.currentThread().getName());
            s = UUID.randomUUID().toString();
            redisTemplate.opsForValue().set("writeValue", s);
            Thread.sleep(30000);
        } catch (Exception e) {
        }finally {
            rLock.unlock();
            System.out.println("Write lock release..." + Thread.currentThread().getName());
        }
        return s;
    }


    @GetMapping("/read")
    @ResponseBody
    public String read() {
        RReadWriteLock lock = redissonClient.getReadWriteLock("rw-lock");
        String s = "";
        RLock rLock = lock.readLock();

        try {
            rLock.lock();
            System.out.println("Lock reading and locking succeeded..." + Thread.currentThread().getName());
            s = UUID.randomUUID().toString();
            redisTemplate.opsForValue().set("writeValue", s);
            Thread.sleep(30000);
        } catch (Exception e) {
        }finally {
            rLock.unlock();
            System.out.println("Read lock release..." + Thread.currentThread().getName());
        }
        return s;
    }
4.4 cache data consistency
Ensure consistency mode
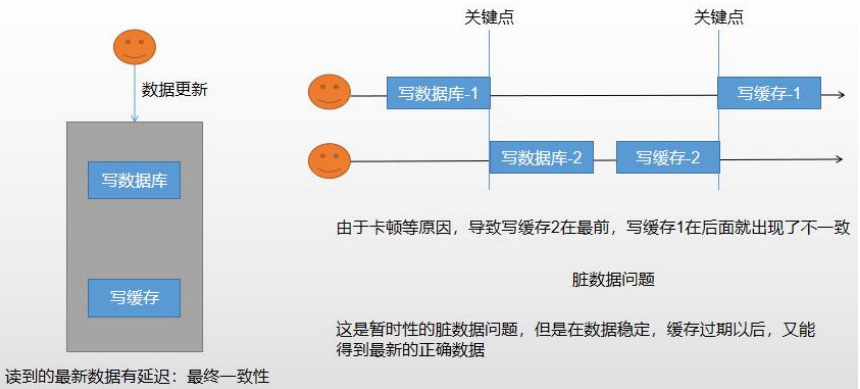
4.4.1 dual write mode
Write the data to the database before modifying the cache.
4.4.2 failure mode
As long as the database data is updated, the data in the cache will be deleted after the update, making the cache invalid.
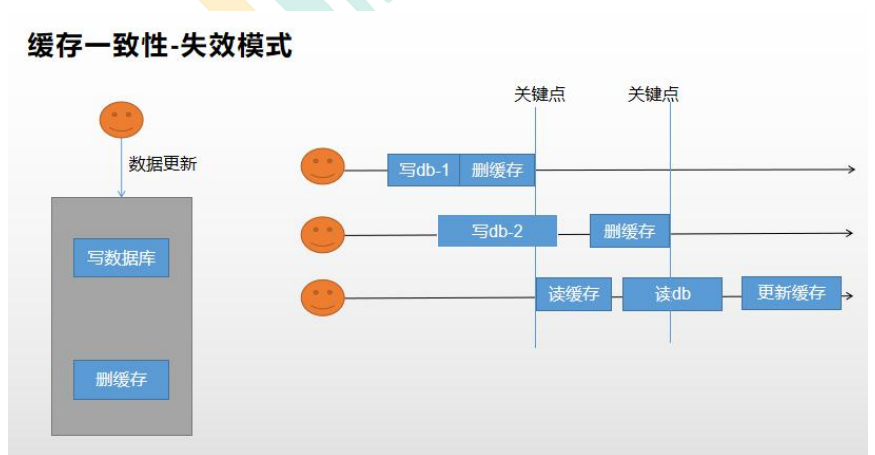
But both of them will produce inconsistent data.
4.4.3 improvement methods
(1) Distributed read / write lock
Distributed read-write lock. Read data and wait for the whole operation of writing data to complete
(2) cananl using alibaba
Cananl will record the update of the database, record the changed information in cananl, and then update redis.

4.5 SpringCache
Summarize the previous business logic:
When reading data, we need to check whether there is any data we want in the cache. If there is any data, we need to get the data directly from the cache and return it. If not, we need to query the database, place a copy in the cache and return it.
The read-write lock needs to be set for write and read operations, but each method needs to be operated manually, which is very troublesome. Therefore, we need to introduce SpringCache, which has encapsulated the relevant operations for us.
4.5.1 introduction
- Spring has defined org. Net since 3.1 springframework. cache. Cache and org springframework. cache. CacheManager interface to unify different caching technologies; It also supports the use of JCache (JSR-107) annotations to simplify our development.
Note: jsr is the abbreviation of Java Specification Requests, which means Java specification proposal.
-
The Cache interface is defined by the component specification of the Cache, including various operation sets of the Cache; Spring provides various Xcache implementations under the Cache interface; Such as RedisCache, ehcachecache and concurrentmapcache
-
Each time a method requiring caching is called, Spring will check whether the specified target method of the specified parameter has been called; If yes, get the result of the method call directly from the cache. If not, call the method and cache the result and return it to the user. The next call is taken directly from the cache.
When using Spring cache abstraction, we need to pay attention to the following two points:
(1) determine the methods that need to be cached and their caching strategies
(2) read the data stored in the previous cache from the cache
4.5.2 basic concepts
4.5.3 Introduction & Configuration
(1) Import dependency:
spring-boot-starter-cache,spring-boot-starter-data-redis
<dependency>
    <groupId>org.springframework.boot</groupId>
    <artifactId>spring-boot-starter-cache</artifactId>
</dependency>

<!--introduce redis-->
<dependency>
    <groupId>org.springframework.boot</groupId>
    <artifactId>spring-boot-starter-data-redis</artifactId>
    <exclusions>
        <!--exclude lettuce-->
        <exclusion>
            <groupId>io.lettuce</groupId>
            <artifactId>lettuce-core</artifactId>
        </exclusion>
    </exclusions>
</dependency>
(2) Write configuration
Configure to use redis as cache
spring.cache.type=redis
4.5.4 notes
- @Cacheable triggers cache filling, (triggers the operation of saving data to the cache)
- @CacheEvict triggers eviction from the cache (triggers the deletion of data from the cache)
- @CachePut updates the cache without interfering with the execution of the method
- @Caching recombines multiple cache operations to be applied on a method (combining more than one operation)
- @CacheConfig shares some common cache related settings at the class level
4.5.5 use & details
(1) Enable caching @ EnableCaching
Example:
@Cacheable({"category"})
@Override
public List<CategoryEntity> getLevel1Categorys() {
    List<CategoryEntity> categoryEntities = baseMapper.selectList(new QueryWrapper<CategoryEntity>().eq("parent_cid", 0));
    return categoryEntities;
}
1. For each data to be cached, we need to specify the cache to be put into that name. [cache partition (by business type)]
2,@Cacheable
The results representing the current method need to be cached. If there are in the cache, the method will not be called.
If there is no in the cache, the method will be called, and the result of the method will be put into the cache in the left back.
3. Default behavior
1) If there is data in the cache, the method will not be called
2) key is automatically generated by default: category::SimpleKey []
3) The cached value uses jdk serialization mechanism by default to store the serialized data in redis
4) TTL (default lifetime): - 1 never expires
4. Custom
1) specify the key: key attribute used by the generated cache, and accept a spiel expression
2) specify the survival time of data in the cache: modify ttl in the configuration file
3) save the data in json format
If we do not specify our own configuration, we will use the default configuration
Write a custom configuration class:
//Enable the function of loading preconditions
@EnableConfigurationProperties(CacheProperties.class)
@Configuration
@EnableCaching
public class MyCacheConfig {
    // @Autowired
    // public CacheProperties cacheProperties;

    /**
     * The configuration of the configuration file is not used
     * @return
     */
    @Bean
    public RedisCacheConfiguration redisCacheConfiguration(CacheProperties cacheProperties) {

        RedisCacheConfiguration config = RedisCacheConfiguration.defaultCacheConfig();
        // config = config.entryTtl();
        config = config.serializeKeysWith(RedisSerializationContext.SerializationPair.fromSerializer(new StringRedisSerializer()));
        config = config.serializeValuesWith(RedisSerializationContext.SerializationPair.fromSerializer(new GenericJackson2JsonRedisSerializer()));

        CacheProperties.Redis redisProperties = cacheProperties.getRedis();
        //All configurations in the configuration file will take effect
        if (redisProperties.getTimeToLive() != null) {
            config = config.entryTtl(redisProperties.getTimeToLive());
        }
        if (redisProperties.getKeyPrefix() != null) {
            config = config.prefixKeysWith(redisProperties.getKeyPrefix());
        }
        if (!redisProperties.isCacheNullValues()) {
            config = config.disableCachingNullValues();
        }
        if (!redisProperties.isUseKeyPrefix()) {
            config = config.disableKeyPrefix();
        }
        return config;
    }

}
spring.cache.type=redis

spring.cache.redis.time-to-live=3600000
#Set whether it is null to prevent cache penetration
spring.cache.redis.cache-null-values=true
#If a prefix is specified, the prefix we specified will be used. If not, the name of the cache will be used as the prefix by default
#spring.cache.redis.key-prefix=CACHE_
#Use prefix
spring.cache.redis.use-key-prefix=true
(2) @ cacheput (update a data and update the specified cache)
It can be used to solve the double write mode in cache consistency. It is required to return the latest data after updating the data. However, the return value of the general update operation is void, so it is generally not used
(3)@CacheEvict
According to the business logic, to enter the background management system for update operation, you need to modify the database first and then delete the cache.
However, the cache to be deleted involves two caches in the category created in redis: CACHE_getCatalogJson and CACHE_getLevel1Categorys
Deletion method 1:
 @Caching(evict = {
         @CacheEvict(value = "category",key = "'getLevel1Categorys'"),
         @CacheEvict(value = "category",key = "'getCatalogJson'")
 })
/**
     * Cascade updates all associated data
     * @CacheEvict:failure mode
     * @CachePut:Double write mode, return value required
     * 1,Multiple cache operations at the same time: @ Caching
     * 2,Specify to delete all data @ cacheevict under a partition (value = "category", allentries = true)
     * 3,Data of the same type can be specified as the same partition
     * @param category
     */
    // @Caching(evict = {
    //         @CacheEvict(value = "category",key = "'getLevel1Categorys'"),
    //         @CacheEvict(value = "category",key = "'getCatalogJson'")
    // })
    @CacheEvict(value = "category",allEntries = true)       //Delete all data under a partition
    @Transactional(rollbackFor = Exception.class)
    @Override
    public void updateCascade(CategoryEntity category) {
        RReadWriteLock readWriteLock = redissonClient.getReadWriteLock("catalogJson-lock");
        //Create write lock
        RLock rLock = readWriteLock.writeLock();
        try {
            rLock.lock();
            this.baseMapper.updateById(category);
            categoryBrandRelationService.updateCategory(category.getCatId(), category.getName());
        } catch (Exception e) {
            e.printStackTrace();
        } finally {
            rLock.unlock();
        }
        //Modify the data in the cache at the same time
        //Delete the cache and wait for the next active query to update
    }
4.5.6 shortcomings of spring cache
(1) Read mode
-
Cache penetration: query a null data. Solution: cache empty data
-
Cache breakdown: a large number of concurrent queries come in and query an expired data at the same time. Solution: lock? It is unlocked by default; Use sync = true to solve the breakdown problem
-
Cache avalanche: a large number of Keys expire at the same time. Solution: add random time. Plus expiration time
(2) Write mode: (CACHE consistent with database)
- Read write lock.
- Introduce Canal and sense the update of MySQL to update Redis
- Read more and write more. Just go to the database to query
4.5.7 summary
General data (spring cache can be used for data with more reads and less writes, instant, and low consistency requirements): write mode (as long as the cached data has an expiration time is enough)
Special data: special design
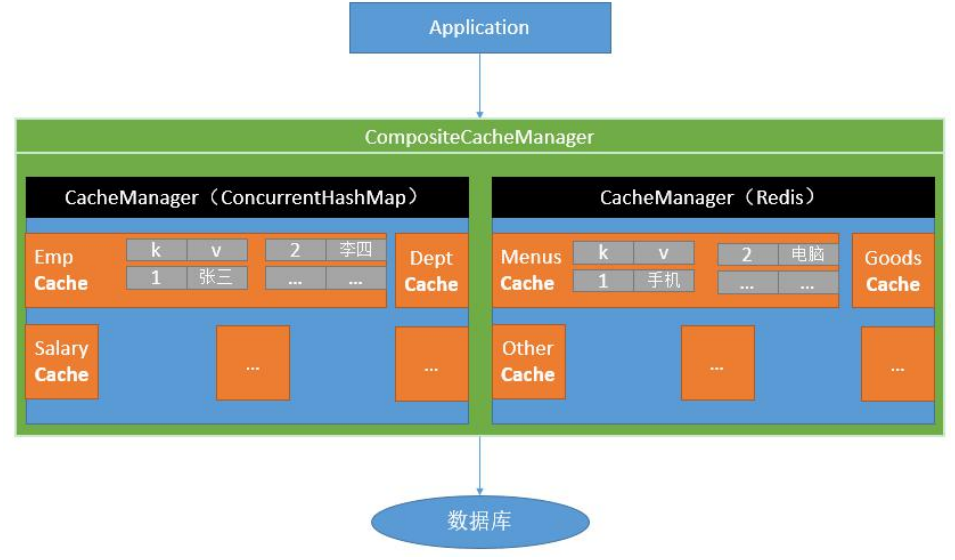
Principle:
CacheManager (rediscachemanager) - > cache (rediscache) - > cache is responsible for reading and writing the cache
5, Asynchronous & thread pool
5.1 thread review
5.1.1 method of initializing thread
(1) Inherit Thread class
class Thread01 extends Thread {
    @Override
    public void run() {
        for (int i = 0; i < 5; i++) {
            System.out.println("Thread name: " + Thread.currentThread().getName() + ", Thread number: " + Thread.currentThread().getId() + " : " + i);
        }
    }
}

public class ThreadTest {
    public static void main(String[] args) throws ExecutionException, InterruptedException {
       Thread01 t1 = new Thread01();
       t1.start();
    }
}
(2) Implement Runnable interface
class Thread03 implements Callable<Integer> {

    @Override
    public Integer call() throws Exception {
        int sum = 0;
        for (int i = 0; i < 5; i++) {
            System.out.println("Thread name: " + Thread.currentThread().getName() + ", Thread number: " + Thread.currentThread().getId() + " : " + i);
            sum += i;
        }
        return sum;
    }
}

public class ThreadTest {
    public static void main(String[] args) throws ExecutionException, InterruptedException {
        Thread02 thread02 = new Thread02();
        new Thread(thread02).start();
    }
}
(3) Implement Callable interface + FutureTask (you can get the returned results and handle exceptions)
class Thread03 implements Callable<Integer> {
    @Override
    public Integer call() throws Exception {
        int sum = 0;
        for (int i = 0; i < 5; i++) {
            System.out.println("Thread name: " + Thread.currentThread().getName() + ", Thread number: " + Thread.currentThread().getId() + " : " + i);
            sum += i;
        }
        return sum;
    }
}

public class ThreadTest {
    public static void main(String[] args) throws ExecutionException, InterruptedException {
        Thread03 thread03 = new Thread03();
        FutureTask<Integer> futureTask = new FutureTask<>(thread03);
        new Thread(futureTask).start();
        Integer integer = futureTask.get();
        System.out.println("sum = " + integer);
    }
}
(4) Thread pool
class Thread03 implements Callable<Integer> {
    @Override
    public Integer call() throws Exception {
        int sum = 0;
        for (int i = 0; i < 5; i++) {
            System.out.println("Thread name: " + Thread.currentThread().getName() + ", Thread number: " + Thread.currentThread().getId() + " : " + i);
            sum += i;
        }
        return sum;
    }
}

public class ThreadTest {
    public static ExecutorService service = Executors.newFixedThreadPool(10);

    public static void main(String[] args) throws ExecutionException, InterruptedException {
        Thread03 thread03 = new Thread03();
        FutureTask<Integer> futureTask = new FutureTask<>(thread03);

        Future<Integer> submit = service.submit(thread03);
        System.out.println(submit.get());

        service.shutdown();
    }
}
5.1.2 differences
- 1. 2 cannot get the return value after task execution, 3 can return the value
- 1. 2 and 3 cannot control resources. A new thread must be created whenever it is used
- 4 can control resources, performance, etc
5.2 completable future asynchronous orchestration
Future is a class added in Java 5 to describe the results of an asynchronous calculation.
You can use the isDone method to check whether the calculation is completed, or use get to block the calling thread until the calculation returns the result. You can also use the cancel method to stop the execution of the task.
Although Future and related usage methods provide the ability to execute tasks asynchronously, it is very inconvenient to obtain the results. The results of tasks can only be obtained by blocking or polling. The blocking method is obviously contrary to the original intention of our asynchronous programming. The polling method will consume unnecessary CPU resources and can not get the calculation results in time. Why not use the observer design mode to inform the listener when the calculation results are completed?
Many languages, such as node JS, using callback to realize asynchronous programming. Some Java frameworks, such as Netty, extend the Future interface of Java and provide multiple extension methods such as addListener; Google guava also provides a common extension Future; Scala also provides an easy-to-use and powerful Future/Promise asynchronous programming mode.
As an orthodox Java class library, should we do something to strengthen the functions of our own library?
In Java 8, a new class containing about 50 methods is added: completable Future, which provides a very powerful extension function of Future, helps us simplify the complexity of asynchronous programming, provides the ability of functional programming, processes calculation results through callback, and provides methods for converting and combining completable Future. The completabilefuture class implements the Future interface, so you can still get results by blocking or polling the get method as before, but this method is not recommended.
Completabilefuture and FutureTask belong to the implementation class of the Future interface. They can get the execution results of threads.

5.2.1 creating asynchronous objects
Completable future provides four static methods to create an asynchronous operation

- runXxxx does not return results, and supplyxx can obtain the returned results
- You can pass in a custom thread pool, otherwise the default thread pool will be used
5.2.2 callback method upon completion of calculation

whenComplete can handle normal and abnormal calculation results, and exceptionally handle abnormal situations.
The difference between whenComplete and whenCompleteAsync:
- whenComplete: the thread executing the current task executes the task that continues to execute whenComplete.
- whenCompleteAsync: the task of submitting whenCompleteAsync to the thread pool for execution
The method does not end with Async, which means that the Action uses the same thread to execute, while Async may use other threads to execute (if using the same thread pool, it may also be selected by the same thread to execute)
Example code:
public class CompletableFutureDemo {
    public static void main(String[] args) throws ExecutionException, InterruptedException {
        CompletableFuture future = CompletableFuture.supplyAsync(new Supplier<Object>() {
            @Override
            public Object get() {
                System.out.println(Thread.currentThread().getName() + "\t
                        completableFuture");
                int i = 10 / 0;
                return 1024;
            }
        }).whenComplete(new BiConsumer<Object, Throwable>() {
            @Override
            public void accept(Object o, Throwable throwable) {
                System.out.println("-------o=" + o.toString());
                System.out.println("-------throwable=" + throwable);
            }
        }).exceptionally(new Function<Throwable, Object>() {
            @Override
            public Object apply(Throwable throwable) {
                System.out.println("throwable=" + throwable);
                return 6666;
            }
        });
        System.out.println(future.get());
    }
}
5.2.3 handle method

Like complete, the result can be finally processed (exceptions can be handled) and the return value can be changed.
5.2.4 thread serialization method
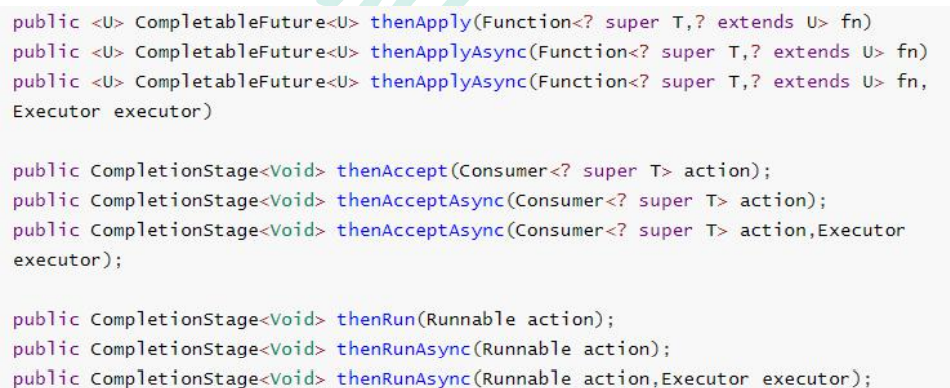
thenApply method: when a thread depends on another thread, it obtains the result returned by the previous task and returns the return value of the current task.
thenAccept method: consume the processing result. Receive the processing result of the task and consume it. No result is returned.
thenRun method: execute thenRun as long as the above task is completed, but execute the subsequent operations of thenRun after processing the task.
With Async, it is executed asynchronously by default. Same as before. All the above tasks must be completed successfully.
Function <? super , ? extends U>
T: The type of result returned by the previous task
U: Return value type of the current task
5.2.5 combination of two tasks - both to be completed
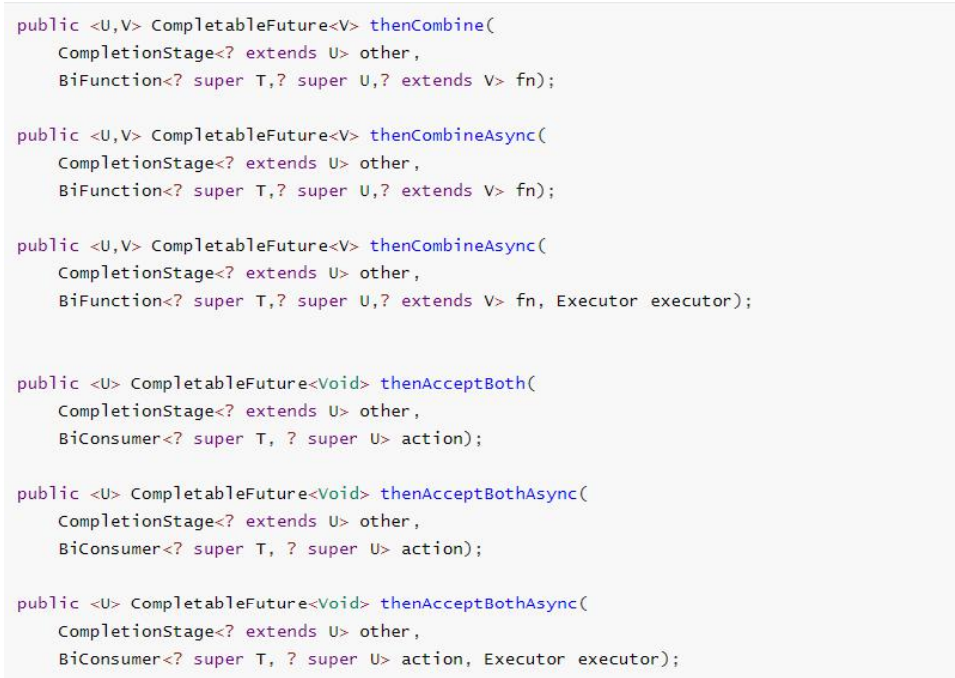
Both tasks must be completed to trigger the task.
thenCombine: combine two futures, obtain the return results of the two futures, and return the return value of the current task
Then accept both: combine the two future tasks, obtain the return results of the two future tasks, and then process the tasks without return value.
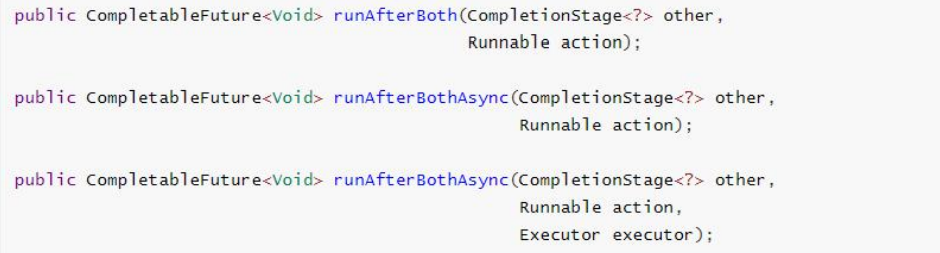
runAfterBoth: combine two futures. You don't need to obtain the results of the future. You only need to process the task after the two futures process the task
5.2.6 combination of two tasks - one completed
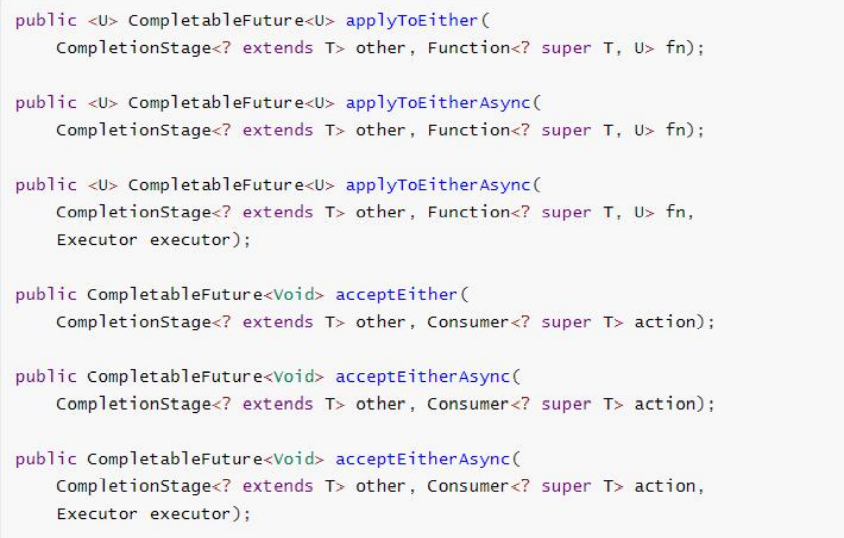
When either of the two future tasks is completed, execute the task.
applyToEither: when one of the two tasks is completed, get its return value, process the task and have a new return value.
acceptEither: one of the two tasks is completed. Get its return value and process the task. There is no new return value.
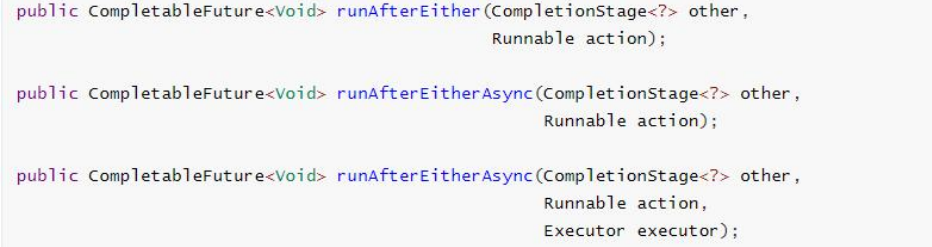
runAfterEither: one of the two tasks is completed. There is no need to obtain the future results, process the task, and there is no return value.
5.2.7 multi task combination

allOf: wait for all tasks to complete
anyOf: as long as one task is completed
5.3 asynchronous orchestration optimization cases
Business scenario:
The logic of querying the product details page is complex. Some data needs to be called remotely, which will inevitably take more time.
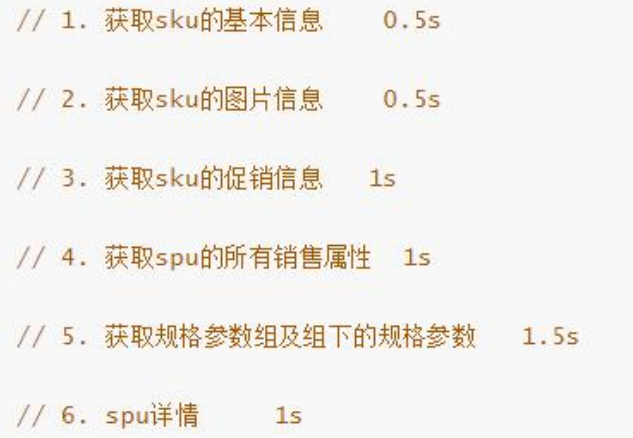
If each query on the product details page can be completed within the time indicated below, the user needs 5.5s to see the content of the product details page. Obviously, it is unacceptable. If multiple threads complete these six steps at the same time, it may take only 1.5s to complete the response.
Business Code:
@Override
    public SkuItemVo item(Long skuId) throws ExecutionException, InterruptedException {
        SkuItemVo skuItemVo = new SkuItemVo();
        CompletableFuture<SkuInfoEntity> infoFuture = CompletableFuture.supplyAsync(() -> {
            //1. Set sku basic information
            SkuInfoEntity info = getById(skuId);
            skuItemVo.setInfo(info);
            return info;
        }, executor);

        CompletableFuture<Void> saleAttrFuture = infoFuture.thenAcceptAsync((res) -> {
            //3. Get sku's sales attribute combination
            List<SkuItemSaleAttrVo> saleAttrVos = skuSaleAttrValueService.getSaleAttrsBySpuId(res.getSpuId());
            skuItemVo.setSaleAttr(saleAttrVos);
        }, executor);

        CompletableFuture<Void> descFuture = infoFuture.thenAcceptAsync((res) -> {
            //4 get the introduction PMS of SPU_ spu_ info_ desc
            SpuInfoDescEntity spuInfoDescEntity = spuInfoDescService.getById(res.getSpuId());
            skuItemVo.setDesc(spuInfoDescEntity);
        }, executor);

        CompletableFuture<Void> attrFuture = infoFuture.thenAcceptAsync((res) -> {
            //5. Get the specification parameter information of spu
            List<SpuItemAttrGroupVo> attrGroupVos = attrGroupService.getAttrGroupWithAttrsBySpuId(res.getSpuId(), res.getCatalogId());
            skuItemVo.setGroupAttrs(attrGroupVos);
        }, executor);

        // The above future is associated. All need to share the same future object, but the following obtaining sku picture information is not associated with other tasks, so you can use a new future to execute
        CompletableFuture<Void> imageFuture = CompletableFuture.runAsync(() -> {
            //2 sku picture information
            List<SkuImagesEntity> images = skuImagesService.getImagesBySkuId(skuId);
            skuItemVo.setImages(images);
        }, executor);

        // Wait for all asynchronous tasks to complete
        CompletableFuture.allOf(infoFuture, saleAttrFuture, descFuture, attrFuture, imageFuture).get();

        return skuItemVo;
    }
6, Certification services
6.1 environment construction
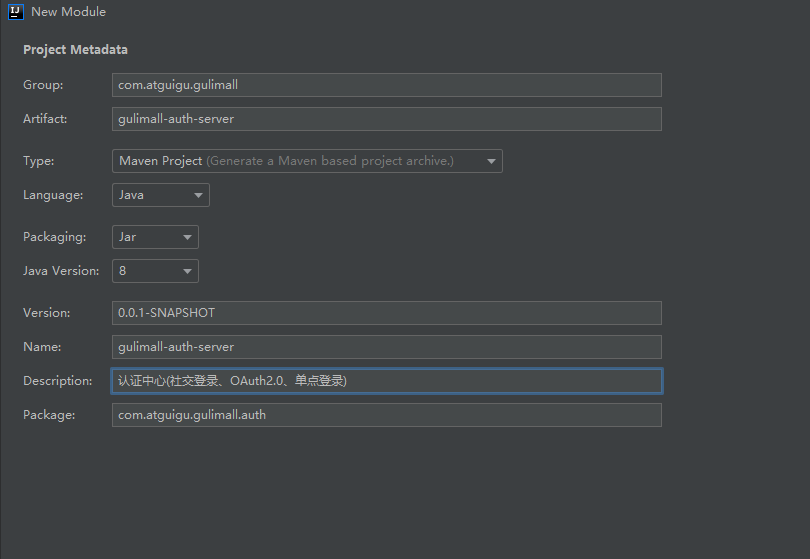
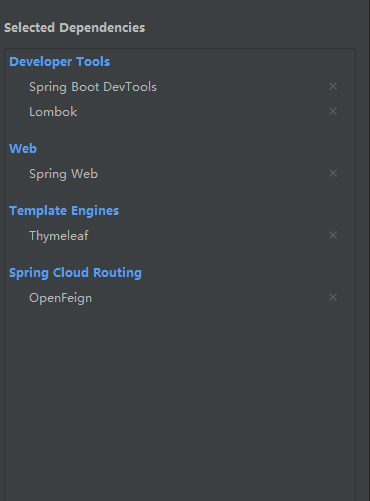
Create a new module
6.2 Integrated SMS verification code
6.2.1 use of webmvcconfigurer
More details:
SpringBoot - webmvcconfigurer details_ zhangpower1993 blog - CSDN blog_ webmvcconfigurer
In the past, whenever you want to jump to a page, you have to write a method in the controller layer to jump to the page, which is very troublesome, so you can use WebMvcConfigurer
(1) Write configuration class
Put our jump page operations into the configuration class, which greatly simplifies the development.
@Configuration
public class GulimallWebConfig implements WebMvcConfigurer {
    @Override
    public void addViewControllers(ViewControllerRegistry registry) {
        registry.addViewController("/login.html").setViewName("login");
        registry.addViewController("/reg.html").setViewName("reg");
    }
}
6.2.2 introduction of Alibaba cloud SMS service
-
Step 1: first purchase Alibaba cloud's SMS service

-
Step 2: write the SMS sending component gulimall third party (configuration class) in the module of the third-party service
@ConfigurationProperties(prefix = "spring.cloud.alicloud.sms")
@Data
@Component
public class SmsComponent {

    private String host;
    private String path;
    private String appcode;

    public void sendSmsCode(String phone,String code) {
//        String host = "https://dfsns.market.alicloudapi.com";
//        String path = "/data/send_sms";
        String method = "POST";
//        String appcode = "809227c6f6c043319ecd98f03ca61bed";
        Map<String, String> headers = new HashMap<String, String>();
        //Finally, the format in the header (English space in the middle) is authorization: appcode 83359fd73fe948385f570e3c139105
        headers.put("Authorization", "APPCODE " + appcode);
        //Define the corresponding content type according to API requirements
        headers.put("Content-Type", "application/x-www-form-urlencoded; charset=UTF-8");
        Map<String, String> querys = new HashMap<String, String>();
        Map<String, String> bodys = new HashMap<String, String>();
        bodys.put("content", "code:" + code);
        bodys.put("phone_number", phone);
        bodys.put("template_id", "TPL_0000");

        try {
            /**
             * Important tips are as follows:
             * HttpUtils Please from
             * https://github.com/aliyun/api-gateway-demo-sign-java/blob/master/src/main/java/com/aliyun/api/gateway/demo/util/HttpUtils.java
             * download
             *
             * For corresponding dependencies, please refer to
             * https://github.com/aliyun/api-gateway-demo-sign-java/blob/master/pom.xml
             */
            HttpResponse response = HttpUtils.doPost(host, path, method, headers, querys, bodys);
            System.out.println(response.toString());
            //Get the body of the response
            //System.out.println(EntityUtils.toString(response.getEntity()));
        } catch (Exception e) {
            e.printStackTrace();
        }

    }
}
Corresponding profile:
spring:
  cloud:
    alicloud:
      sms:
        host: https://dfsns.market.alicloudapi.com
        path: /data/send_sms
        appcode: 809227c6f6c043319ecd98f03ca61bed
For more operations, please refer to the help documents related to SMS service.
6.2.3 write SMS service controller
Process of sending verification code
First, the foreground page sends a request to the micro service related to registration, then the service calls the third micro service that sends SMS, and then the SMS service sends SMS.
At the same time, when sending the verification code, the interface sending the verification code is exposed, so redis should be added to realize the interface anti brushing function.
preparation:
- Introducing Redis dependency
<dependency>
      <groupId>org.springframework.boot</groupId>
      <artifactId>spring-boot-starter-data-redis</artifactId>
</dependency>
- Add the configuration in the application configuration file, and specify the redis address and port number
spring.redis.host=192.168.190.131
spring.redis.port=6379
SMS controller
@ResponseBody
@GetMapping("/sms/sendcode")
public R sendCode(@RequestParam("phone") String phone) {
    // Obtain the verification code from redis through the mobile phone number
    String redisCode = redisTemplate.opsForValue().get(AuthServerConstant.SMS_CODE_CACHE_PREFIX + phone);
    // Judge whether redis has saved the verification code
    if (!StringUtils.isEmpty(redisCode) || !(redisCode == null)) {
        long l = Long.parseLong(redisCode.split("_")[1]);
        // SMS verification code cannot be sent within 60 seconds
        if (System.currentTimeMillis() - l < 60000) {
            return R.error(BizCodeEnume.SMS_CODE_EXCEPTION.getCode(), BizCodeEnume.SMS_CODE_EXCEPTION.getMsg());
        }
   	 }

    // If the verification code has not been set or the time for sending the verification code has passed 60s, the verification code will be regenerated
    String code = UUID.randomUUID().toString().substring(0, 5) + "_" + System.currentTimeMillis();
    //Set key value key: SMS: codemobile number value: verification code in redis
    redisTemplate.opsForValue().set(AuthServerConstant.SMS_CODE_CACHE_PREFIX + phone, code, 10, TimeUnit.MINUTES);
    // Use OpenFeign to remotely call the interface of the third-party service and send the verification code
    thirdPartFeignService.sendCode(phone, code.split("_")[0]);
    return R.ok();
}
Third party related service controller
@Autowired
SmsComponent smsComponent;

@ResponseBody
@GetMapping("/sendcode")
public R sendCode(@RequestParam("phone") String phone, @RequestParam("code") String code) {
    smsComponent.sendSmsCode(phone, code);
    return R.ok();
}
6.2.4 realization of registration function
First consider our registration process:
First, the form data from the front end is encapsulated, so create a UserRegistVo to encapsulate it (the data in it should be verified at the same time of encapsulation), and then judge whether there is an error in the verification information. If there is an error, return the error information, and request redirection to register the page. If there is no error, first obtain the verification code from redis according to the mobile phone number. If the obtained result is null, it indicates that the verification code has expired and needs to be redirected to the login page. If the obtained is not null, judge whether the verification code is correct, call the remote service for registration, and delete the verification code (token mechanism), Judge whether the registration is successful according to the information returned by the remote service interface. If successful, request to redirect to the login page, otherwise redirect to the registration page.
(1) Registration form data verification
Form to submit when registering:
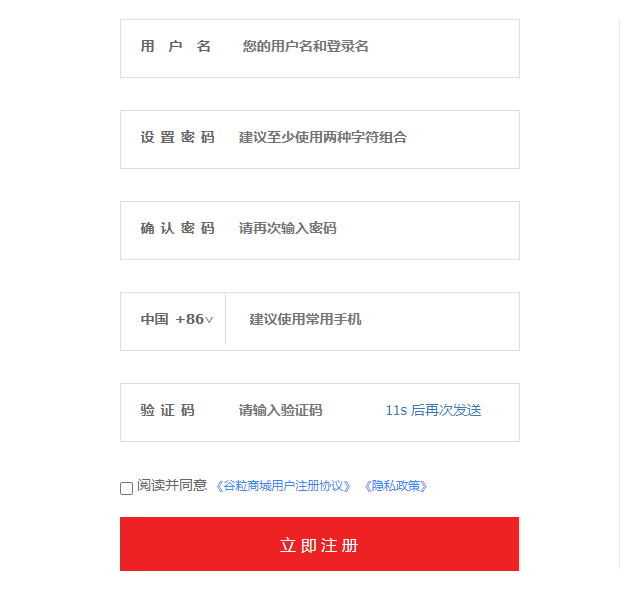
The data submitted according to the form is encapsulated into a Vo:
UserRegistVo
Not only the front-end part needs to be verified, but also the back-end part needs to verify the form data, so JSR303 verification rules are added.
@Data
public class UserRegistVo {

    @NotEmpty(message = "User name must be submitted")
    @Length(min = 6, max = 18 , message = "User name must be 6-18 Bit character")
    private String username;

    @NotEmpty(message = "Password must be submitted")
    @Length(min = 6, max = 18 , message = "Password must be 6-18 Bit character")
    private String password;

    @NotEmpty(message = "Mobile phone number must be filled in")
    @Pattern(regexp = "^[1]([3-9])[0-9]{9}$", message = "Incorrect mobile phone number format")
    private String phone;

    @NotEmpty(message = "Verification code must be filled in")
    private String code;
}
At the same time, you need to add the @ Valid annotation to the relevant controller that accepts the data and the bindingresult parameter to the parameter to obtain the exception information in the verification.
(2) MD5 & salt value & bcrypt
(1) MD5
The full name of MD5 is message digest algorithm 5
MD5 message digest algorithm belongs to Hash algorithm. MD5 algorithm runs the input message of any length to generate a 128 bit message summary (32-bit alphanumeric mixed code).
In the business logic registered in the grain mall, we use org springframework. security. crypto. bcrypt. BCryptPasswordEncoder in BCryptPasswordEncoder package
BCryptPasswordEncoder will generate random salt values for us and encrypt them.
Easy to use:
//Encrypted storage of passwords

// Encryption operation
BCryptPasswordEncoder bCryptPasswordEncoder = new BCryptPasswordEncoder();
memberEntity.setPassword(bCryptPasswordEncoder.encode(vo.getPassword()));

// Decryption operation
String password = vo.getPassword();
BCryptPasswordEncoder passwordEncoder = new BCryptPasswordEncoder();
//For the maches method, the first parameter is plaintext and the second parameter is ciphertext. After calling the maches side, a bool value will be returned
boolean matches = passwordEncoder.matches(password, memberEntity.getPassword());
(3) controller layer method writing
The controller of the authentication service (gulimall auth server):
@PostMapping("/regist")
public String regist(@Valid UserRegistVo vo, BindingResult result,
                     RedirectAttributes redirectAttributes) {
    // Determine whether there are errors in form data verification
    if (result.hasErrors()) {
        // Encapsulate the error attribute and error information one by one
        Map<String, String> errors = result.getFieldErrors().stream().collect(Collectors.toMap(FieldError::getField,
                fieldError -> fieldError.getDefaultMessage(),
                (fieldError1, fieldError2) -> {
                    return fieldError2;
                }));
        // The addFlashAttribute data is retrieved only once
        redirectAttributes.addFlashAttribute("errors", errors);
        return "redirect:http://auth.gulimall.com/reg.html";
    }

    //Check whether the verification code is correct
    String redisCode = redisTemplate.opsForValue().get(AuthServerConstant.SMS_CODE_CACHE_PREFIX + vo.getPhone());
    if (!StringUtils.isEmpty(redisCode)) {
        if (vo.getCode().equalsIgnoreCase(redisCode.split("_")[0])) {
            // The verification code is correct
            //Delete verification code, token mechanism
            redisTemplate.delete(AuthServerConstant.SMS_CODE_CACHE_PREFIX + vo.getPhone());
            //If the verification code passes, call the remote service for registration
            R r = memberFeignService.regist(vo);

            if (r.getCode() == 0) {
                //success
                // Registration succeeded, request directed from to login page
                return "redirect:http://auth.gulimall.com/login.html";
            } else {
                //fail
                Map<String, String> errors = new HashMap<>();
                errors.put("msg", r.getData(new TypeReference<String>() {
                }));
                redirectAttributes.addFlashAttribute("errors", errors);
                return "redirect:http://auth.gulimall.com/reg.html";
            }
        } else {
            Map<String, String> errors = new HashMap<>();
            errors.put("code", "Verification code error");
            redirectAttributes.addFlashAttribute("errors", errors);
            return "redirect:http://auth.gulimall.com/reg.html";
        }
    } else {
        Map<String, String> errors = new HashMap<>();
        errors.put("code", "Verification code expired");
        redirectAttributes.addFlashAttribute("errors", errors);
        return "redirect:http://auth.gulimall.com/reg.html";
    }
}
controller of gulimall member:
@Transactional
@Override
public void regist(MemberRegistVo vo) {
    MemberEntity memberEntity = new MemberEntity();

    //Set default level
    MemberLevelEntity levelEntity = this.baseMapper.getDefaultLevel();
    memberEntity.setLevelId(levelEntity.getId());

    //Set phone number
    //Check whether the user name and mobile phone number are unique in advance. If not, an exception will be thrown
    checkPhoneUnique(vo.getPhone());
    checkUsernameUnique(vo.getUsername());
    memberEntity.setMobile(vo.getPhone());
    memberEntity.setUsername(vo.getUsername());

    //Encrypted storage of passwords
    BCryptPasswordEncoder bCryptPasswordEncoder = new BCryptPasswordEncoder();
    memberEntity.setPassword(bCryptPasswordEncoder.encode(vo.getPassword()));
    save(memberEntity);
}
If the operation is successful, a new piece of data will be found in the database and redirected from the registration page to the login page.
6.2.5 realization of login function
Sorting process:
First obtain the login form data from the front page, and then remotely call the member service to judge the login logic.
When using OpenFeign for remote calls, data in json format is transmitted, so a Vo object is encapsulated for data transmission. At the same time, pay attention to the Post request mode.
Finally, the logic of the member service layer is to query the data in the database according to the transmitted data, and then judge the controller layer. If the obtained data is null, the error information will be encapsulated and returned.
(1) Registration form data verification
Method of controller layer:
@PostMapping("/login")
public R login(@RequestBody MemberLoginVo vo) {
    MemberEntity memberEntity = memberService.login(vo);
    if (memberEntity != null) {
        return R.ok();
    } else {
        return R.error(BizCodeEnume.LOGINACCT_PASSWORD_EXCEPTION.getCode(), BizCodeEnume.LOGINACCT_PASSWORD_EXCEPTION.getMsg());
    }
}
service layer method:
@Override
public MemberEntity login(MemberLoginVo vo) {
    String loginacct = vo.getLoginacct();

    // Query to database
    MemberEntity memberEntity = this.baseMapper.selectOne(new QueryWrapper<MemberEntity>()
            .eq("username", loginacct)
            .or().eq("email", loginacct)
            .or().eq("mobile", loginacct));

    if (memberEntity == null) {
        return null;
    } else {
        String password = vo.getPassword();
        BCryptPasswordEncoder passwordEncoder = new BCryptPasswordEncoder();
        boolean matches = passwordEncoder.matches(password, memberEntity.getPassword());
        if (matches) {
            return memberEntity;
        } else {
            return null;
        }
    }
}
6.3 social login
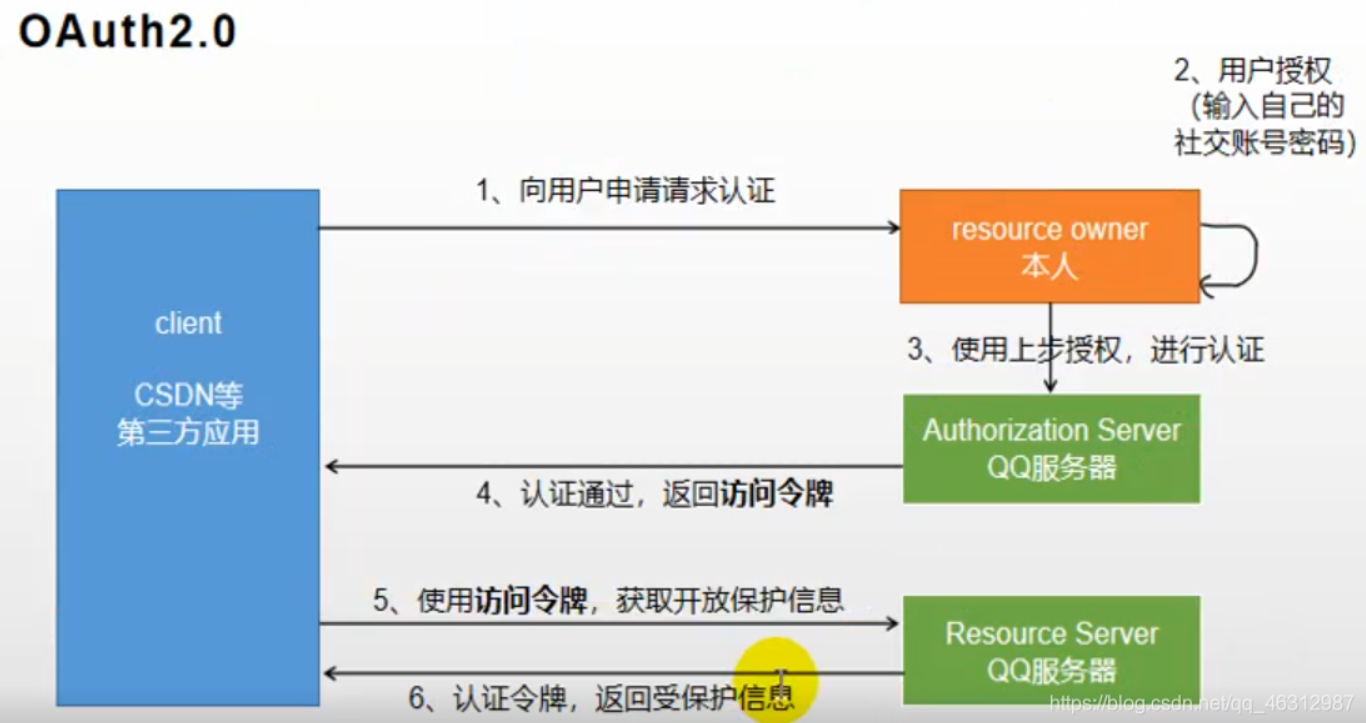
6.3.1 Oauth2.0
- brief introduction
OAuth is simply an authorization protocol. As long as the authorizer and the authorized party abide by this agreement to write code and provide services, both parties have realized OAuth mode. OAuth2.0 is a continuation of OAuth protocol. OAuth 2.0 focuses on the simplicity of client developers. Either organize the approved interaction between the resource owner and the HTTP service provider to represent the user, or allow the third-party application to obtain access rights on behalf of the user. At the same time, it provides a special certification process for Web applications, desktop applications and mobile phones, and living room equipment.
Let's say: we want to log in to CSDN, but we still don't register an account. Because it's troublesome to register an account, we want a faster way to log in, so we can choose QQ or microblog.
- flow chart
6.3.2 microblog authentication login
(1) Process
Microblog authentication flow chart:
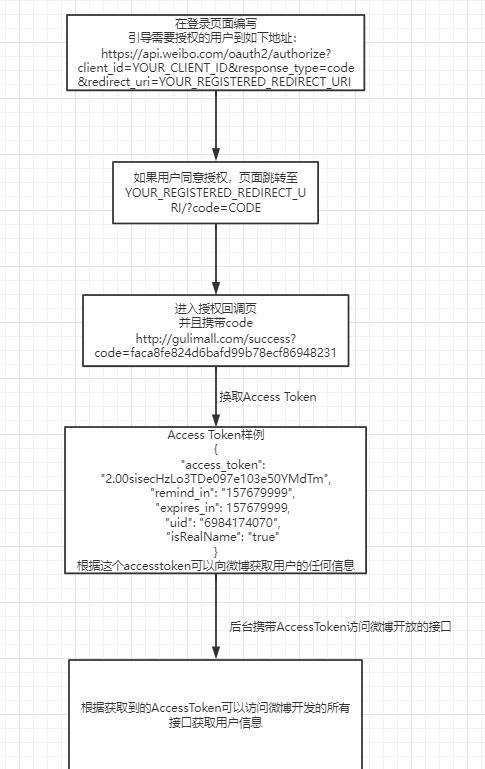
The general process is to visit the login page of Weibo through our page. After successful login, Weibo will call back the page according to the authentication and authorization filled in by us, such as: http://gulimall.com/success Request redirection will be performed, and a code will be carried in the request parameters. Our own server backend will obtain the AccessToken from the microblog according to this code, plus App Key and App Secret. Then, we can view the relevant interfaces provided by the microblog through the official documents of the microblog and use the AccessToken to obtain user information.
At the same time, it should be noted that the code will expire and become invalid after use.
(2) Authentication service Controller
package com.atguigu.gulimall.auth.controller;
/**
 * Third party authentication login controller
 */
@Slf4j
@Controller
public class OAuth2Controller {

    @Autowired
    MemberFeignService memberFeignService;

    @GetMapping("/oauth2.0/weibo/success")
    public String weibo(@RequestParam("code") String code) throws Exception {

        Map<String, String> map = new HashMap<String, String>();
        map.put("client_id", "3182348399");
        map.put("client_secret", "d3ca776d45c0c4158f4b200d85cd213e");
        map.put("grant_type", "authorization_code");
        map.put("redirect_uri", "http://auth.gulimall.com/oauth2.0/weibo/success");
        map.put("code", code);

        // Get AccessToken
        //Using HttpUtils
        HttpResponse response = HttpUtils.doPost("https://api.weibo.com", "/oauth2/access_token", "post", new HashMap<String, String>(), new HashMap<String, String>(), map);

        if (response.getStatusLine().getStatusCode() == 200) {
            String json = EntityUtils.toString(response.getEntity());
            // Encapsulate the obtained AccessToken and other related information into the SocialUser object
            SocialUser socialUser = JSON.parseObject(json, SocialUser.class);

            // If the social account is logged in for the first time, register it and call the member service remotely
            R r = memberFeignService.oauth2Login(socialUser);
            if (r.getCode() == 0) {
                MemberRespVo memberRespVo = r.getData("data", new TypeReference<MemberRespVo>() {
                });
                log.info("Returned user information: {}", memberRespVo);
                return "redirect:http://gulimall.com";
            } else {
                return "redirect:http://auth.gulimall.com/login.html";
            }
        } else {
            return "redirect:http://auth.gulimall.com/login.html";
        }

    }
}
(3) Authentication login method for remote call
/**
 * Social account login method
 *
 * @param socialUser
 * @return
 */
@Override
public MemberEntity login(SocialUser socialUser) {
    // Login and registration merge logic
    String uid = socialUser.getUid();

    MemberEntity memberEntity = this.baseMapper.selectOne(new QueryWrapper<MemberEntity>().eq("social_uid", uid));
    // Judge whether the current social user has logged in to the system
    if (memberEntity != null) {
        MemberEntity update = new MemberEntity();
        update.setId(memberEntity.getId());
        update.setAccessToken(socialUser.getAccess_token());
        update.setExpiresIn(socialUser.getExpires_in());
        this.baseMapper.updateById(update);

        memberEntity.setAccessToken(socialUser.getAccess_token());
        memberEntity.setExpiresIn(socialUser.getExpires_in());
        return memberEntity;
    } else {
        //If you don't find the user information, you have to register one yourself
        MemberEntity regist = new MemberEntity();
        // Relevant user information can be obtained by accessing the interface provided by HttpUtils microblog
        try {
            Map<String, String> query = new HashMap<String, String>();
            query.put("access_token", socialUser.getAccess_token());
            query.put("uid", socialUser.getUid());
            //https://api.weibo.com/2/users/show.json
            HttpResponse response = HttpUtils.doGet("https://api.weibo.com", "/2/users/show.json", "get", new HashMap<String, String>(), query);
            // Judge whether the remote acquisition of social user information is successful
            if (response.getStatusLine().getStatusCode() == 200) {
                String json = EntityUtils.toString(response.getEntity());
                JSONObject jsonObject = JSON.parseObject(json);
                String name = jsonObject.getString("name");
                String gender = jsonObject.getString("gender");

                regist.setNickname(name);
                regist.setGender("m".equals(gender) ? 1 : 0);
                // TODO can also set more information
            }
            regist.setAccessToken(socialUser.getAccess_token());
            regist.setExpiresIn(socialUser.getExpires_in());
            regist.setSocialUid(uid);

            int insert = this.baseMapper.insert(regist);
        } catch (Exception e) {
            e.printStackTrace();
        }
        return regist;
    }
}
**Summary: * * first send a request to the microblog to obtain the information of the authenticated user. The obtained information has the user's unique uid. After obtaining the user information, you need to remotely call the authentication login method of the member service. In the member authentication login method, you need to judge whether the current authenticated user logs in for the first time, If you log in for the first time, you need to obtain the information of the authenticated user according to the AccessToken, and create a new MemberEntity object. This object is used to encapsulate the relevant information of the authenticated user, save it to the database, and finally return the MemberEntity. If it is not the first login, the AccessToken and expires corresponding to this user in the database must be updated_ In (AccessToken expiration time), and finally return the relevant information of the user (through the MemberEntity object).
Problem: after successful authentication login, the login information needs to be echoed on the home page of the mall, but the domain name at the time of authentication login is auth gulimall.com, the domain name on the home page of the mall is gulimall COM, which involves the problem that cross domain data cannot be shared.
6.4 distributed Session
6.4.1 Session principle
The essence of a session is an object in the server memory. You can regard a session as a Map collection. All sessions in the server are managed in the sessionManager.
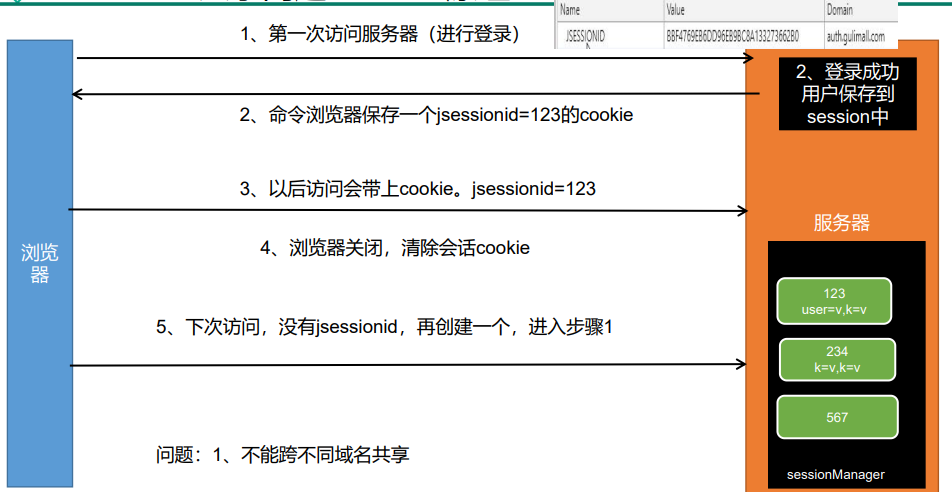
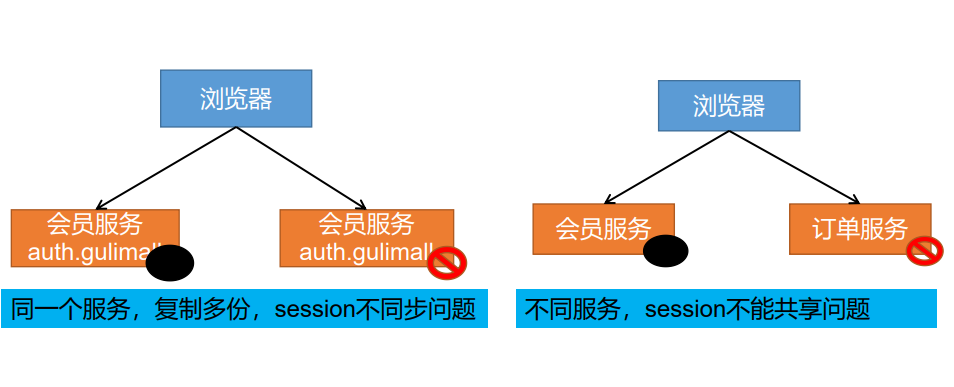
6.4.2 two major problems of distributed Session
After the login operation, it will jump to the home page. However, the information of successful login needs to be echoed, so we need to use the session to store the information we need.
Session is based on cookies. When the client accesses the server, the server will issue a cookie to the client. A JSSESSIONID will be saved in the cookie. When logging in for the second time, the browser will take this JSSESSIONID to find the response session in the server's memory, so as to obtain relevant data information.
However, problems may occur in distributed scenarios:
- Problem 1: session s will not cross domains
- Problem 2: the session will fail in a cluster
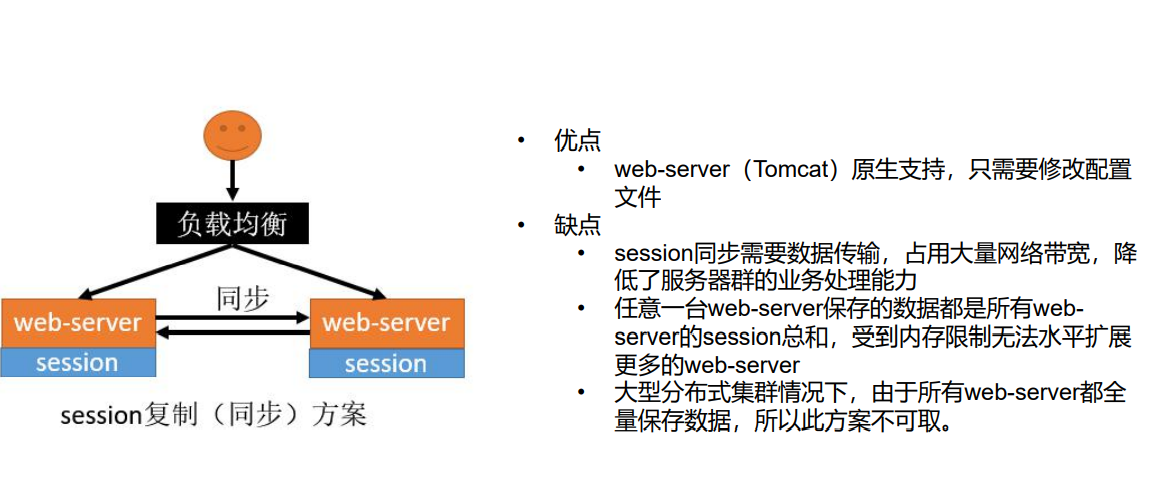
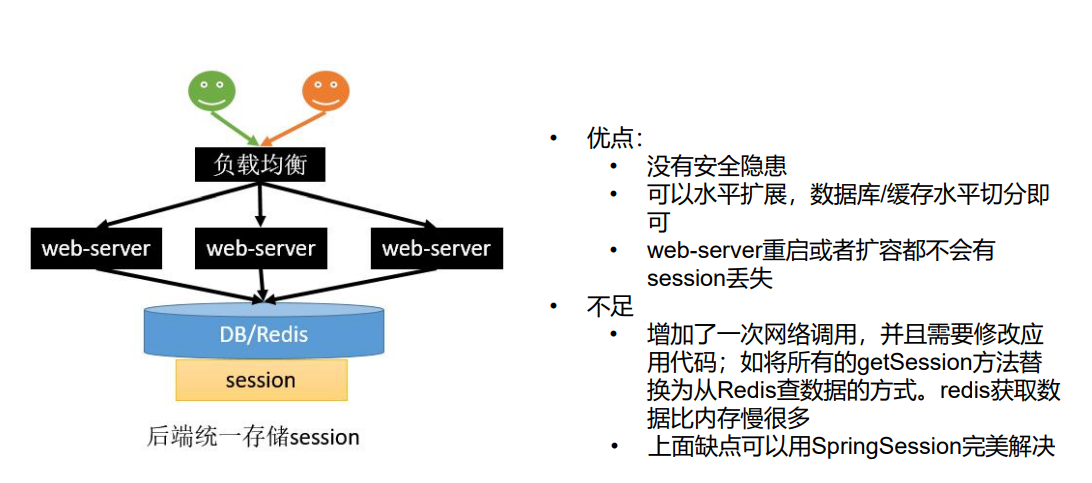
Solution 1: session replication
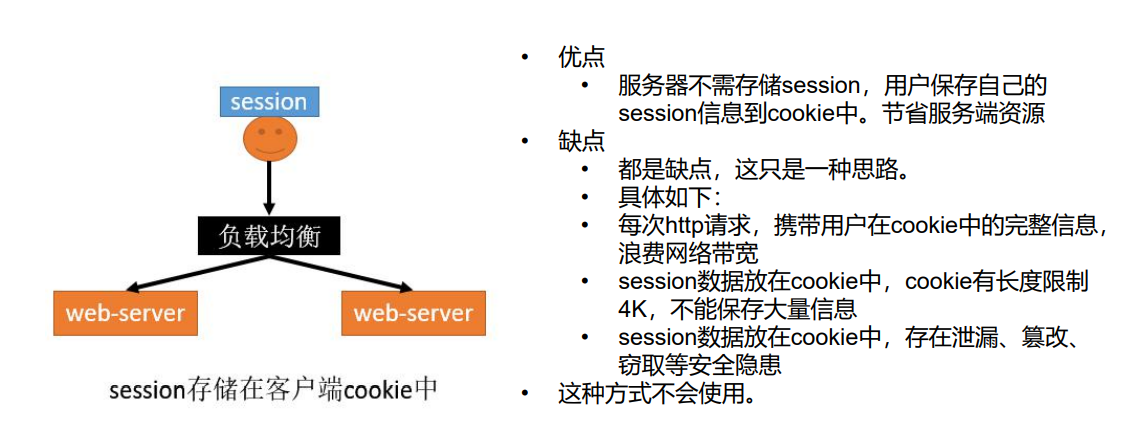
Solution 2: client storage
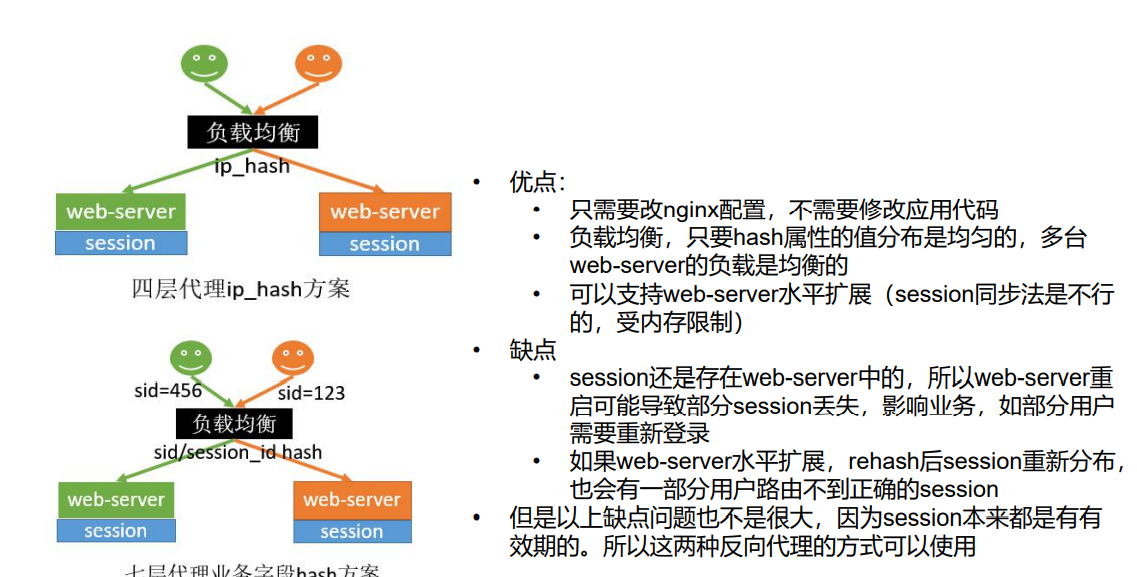
Solution 3: Hash consistency
Solution 4: use SpringSession
- Problem 3: sub domains are not shared
Set the jsessionid in the cookie to gulimall.com
So, auto gulimall. COM and other subdomains can share the data in the session
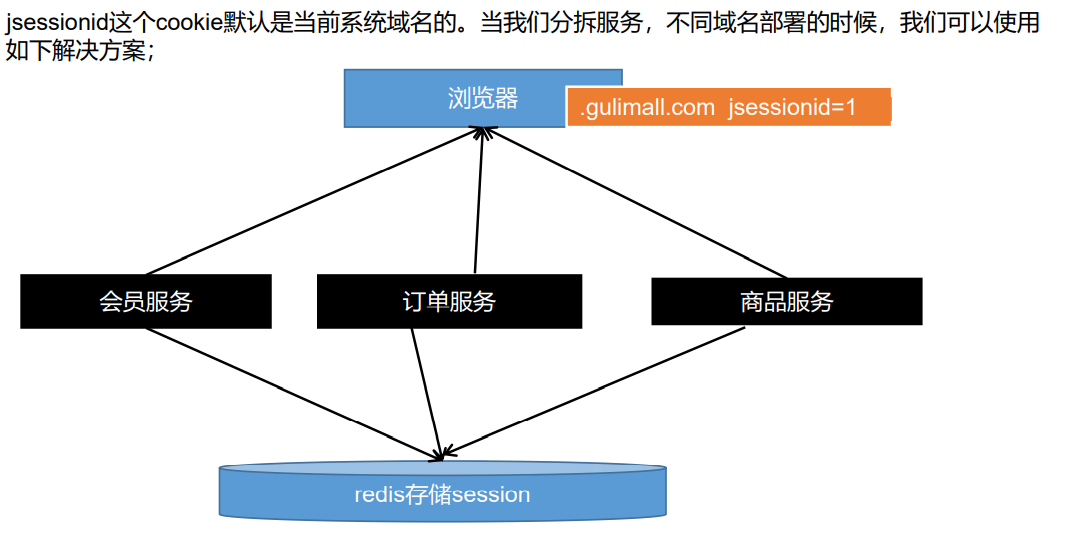
The browser's cookie is issued by our server by default. To customize the issued cookie content, we need to modify it manually, but this problem can be solved by introducing spring session
6.4.3 SpringSession
Refer to the blog: https://blog.csdn.net/qq_43371556/article/details/100862785
For more details, please refer to the official Spring documentation.
(1) Configure SpringSession
- Introduce dependency
<!-- integration SpringSession solve session Sharing problem -->
		<dependency>
            <groupId>org.springframework.session</groupId>
            <artifactId>spring-session-data-redis</artifactId>
        </dependency>
        <dependency>
            <groupId>org.springframework.boot</groupId>
            <artifactId>spring-boot-starter-data-redis</artifactId>
        </dependency>
- Configure application properties
spring.session.store-type=redis # Session store type.
- Mark the annotation @ enablereredishttpsession on the configuration class
@EnableRedisHttpSession
@EnableDiscoveryClient
@EnableFeignClients
@SpringBootApplication
public class GulimallAuthServerApplication {
    public static void main(String[] args) {
        SpringApplication.run(GulimallAuthServerApplication.class, args);
    }
}
- Write configuration class
@Configuration
public class SessionConfig {

    /**
     * Configure the Cookie serialization mechanism, convert the session object to JSON format, and set the domain name
     * @return
     */
    @Bean
    public CookieSerializer cookieSerializer() {
        DefaultCookieSerializer cookieSerializer = new DefaultCookieSerializer();
        cookieSerializer.setDomainName("xxx.com");
        cookieSerializer.setCookieName("YOUR_SESSION_NAME");

        return cookieSerializer;
    }

    /**
     * Configure serialization mechanism
     * @return
     */
    @Bean
    public RedisSerializer<Object> springSessionDefaultRedisSerializer() {
        return new GenericJackson2JsonRedisSerializer();
    }
}
(2) SpringSession principle
The @ enablereredishttpsession annotation is marked on the main startup class of the service to use SpringSession
@EnableRedisHttpSession
@Retention(RetentionPolicy.RUNTIME)
@Target(ElementType.TYPE)
@Documented
@Import(RedisHttpSessionConfiguration.class)// Import configuration
@Configuration
public @interface EnableRedisHttpSession {
@The configuration class RedisHttpSessionConfiguration is imported into enablereredishttpsession
In the RedisHttpSessionConfiguration configuration class, a component is added to the IOC container: RedisOperationsSessionRepository is used to use redis operation sessions, that is, the addition, deletion, modification and query encapsulation class of sessions.
public class RedisHttpSessionConfiguration extends SpringHttpSessionConfiguration
      implements BeanClassLoaderAware, EmbeddedValueResolverAware, ImportAware,
      SchedulingConfigurer {
RedisHttpSessionConfiguration inherits SpringHttpSessionConfiguration,
Spring httpsessionconfiguration adds another important component to the container: SessionRepositoryFilter
SessionRepositoryFilter is a filter for session storage. SessionRepositoryFilter inherits OncePerRequestFilter, which implements the filter interface, so SessionRepositoryFilter is a servlet filter, and all requests need to pass through the filter.
The most core method, doFilterInternal, is rewritten in SessionRepositoryFilter. This method is referenced in doFilter in the parent class of SessionRepositoryFilter, that is, OncePerRequestFilter rewrites doFilter of Fliter interface, and doFilterInternal is called in doFilter to realize core functions.
doFilterInternal method:
@Override
protected void doFilterInternal(HttpServletRequest request,
      HttpServletResponse response, FilterChain filterChain)
      throws ServletException, IOException {
   request.setAttribute(SESSION_REPOSITORY_ATTR, this.sessionRepository);

    // Wrap the native request with a wrapper class SessionRepositoryRequestWrapper
   SessionRepositoryRequestWrapper wrappedRequest = new SessionRepositoryRequestWrapper(
         request, response, this.servletContext);
    // Pack the native response with a wrapper class package SessionRepositoryResponseWrapper
   SessionRepositoryResponseWrapper wrappedResponse = new SessionRepositoryResponseWrapper(
         wrappedRequest, response);

   try {
      //Finally, the packaged request and response are released in the filter chain
      filterChain.doFilter(wrappedRequest, wrappedResponse);
   }
   finally {
      wrappedRequest.commitSession();
   }
}
Spring session mainly uses the decorator mode to encapsulate the native request and response. Originally, we obtained the session object with request Getsession () and now wrapperrequest Getsession gets the session from RedisOperationsSessionRepository, so we add, delete, modify and check the session in Redis.
// session is created using the createSession() method of sessionRepository
S session = SessionRepositoryFilter.this.sessionRepository.createSession();
Finally, the expiration time of the Session stored in Redis will be automatically extended.
6.5 single sign on
What is Single Sign On? The full name of Single Sign On is Single Sign On (SSO), which means that if you log in to one system in a multi system application group, you can be authorized in all other systems without logging in again, including Single Sign On and single sign off.
For example, after logging in the microblog, it is found that the websites of other products on the microblog show that they have logged in, even if the domain name is different.
SSO single sign on core principle:
First of all, a central authentication server is needed. The key is that users access a service and log in. The server will access the central authentication server and leave a login trace on the SSO server, that is, the server will save the login information, generate a token, and issue a card to the browser, that is, generate a cookie to save the token information, When the user logs in to other services, the browser will bring a cookie with the token information in the cookie. The server background obtains the token information and carries the token information to the central authentication server to obtain the user's relevant information, so as to realize the single sign on function.
7, Shopping cart
7.1 shopping cart data model analysis
7.3.1 shopping cart demand
- Users can add goods to shopping cart in login status [user shopping cart / online shopping cart]
- Put it into the database - mongodb - put it into redis (adopt) login, all the data of the temporary shopping cart will be merged, and the temporary shopping cart will be emptied;
- The user can add goods to the shopping cart without login [tourist shopping cart / offline shopping cart / temporary shopping cart]
- Put it into localstorage (client storage, not in the background)
- The cookie - WebSQL - is put into the redis (adopted) browser. Even if it is closed, the data of the temporary shopping cart will be stored in the next entry
- Users can use shopping carts to settle orders together
- Add items to shopping cart - users can query their shopping cart
- Users can modify the quantity of purchased goods in the shopping cart.
- Users can delete items in the shopping cart.
- Check or uncheck item
- Display product offer information in shopping cart
- Prompt shopping cart commodity price change
7.3.2 VO preparation
Cart
/**
 * In the whole shopping cart, the get method for calculating the quantity, type and total price of goods is specially processed. After calling the get method to calculate the quantity or total price
 */
public class Cart {
    List<CartItem> items;
    private Integer countNum;// Quantity of goods
    private Integer countType;//Commodity type quantity
    private BigDecimal totalAmount;//Total price of goods
    private BigDecimal reduce = new BigDecimal("0.00");//Reduced price

    public Integer getCountNum() {
        int count = 0;
        if (this.items != null && this.items.size() > 0) {
            for (CartItem item : this.items) {
                count += item.getCount();
            }
        }
        return count;
    }
    public Integer getCountType() {
        return this.items != null && this.items.size() > 0 ? this.items.size() : 0;
    }

    public BigDecimal getTotalAmount() {
        BigDecimal amount = new BigDecimal("0");
        //Calculate the total price
        if (items.size() > 0 && items != null) {
            for (CartItem item : this.items) {
                BigDecimal totalPrice = item.getTotalPrice();
                amount = amount.add(totalPrice);
            }
        }
        //Less preferential price
        amount = amount.subtract(getReduce());
        return amount;
    }
}
CartItem
public class CartItem {
    private Long skuId;
    private Boolean check = true;
    private String title;
    private String image;
    private List<String> skuAttr;
    private BigDecimal price;
    private Integer count;
    private BigDecimal totalPrice;
    /**
     * Calculate the total price of current shopping items
     * @return
     */
    public BigDecimal getTotalPrice() {
        return this.price.multiply(new BigDecimal("" + this.count));
    }
}
7.2 shopping cart and offline shopping cart functions
7.2.1 problem description
For reference, both jd.com and Taobao used to have the function of offline shopping cart, that is, they can add goods to the shopping cart when the user is not logged in. Moreover, after the user logs in, the goods in the temporary shopping cart will not be lost, but will be added to the user's shopping cart.
The question is: how to keep the goods in the shopping cart?
We can save the goods in the shopping cart to redis. Redis has a persistence strategy, and the data can be recovered when the server goes down.
But how do you remember who added the goods to the shopping cart? That is, what should be the key in Redis?
If we log in, this key can be generated by the user's account, but how can temporary users save it?
The solution for learning jd can do this:
When the user accesses the shopping cart for the first time, a cookie is issued to the user (whether logged in or not). The key of the cookie is called user key, and the value is randomly generated in the background. At the same time, set the expiration time of the cookie to 1 month and the scope of the cookie.
At the same time, when we enter the shopping cart page, we should judge whether the user logs in and whether we have issued cookie s to the user.
If we judge the methods in each controller layer, the code will become redundant.
Therefore, we use spring MVC's interceptor mechanism.
7.2.2 writing interceptors
To use the interceptor mechanism of spring MVC, you need to write a class to implement the HandlerInterceptor interface, and rewrite the methods in the interface according to y business requirements.
At the same time, you should also specify which requests the interceptor acts on.
(1) Interceptor logic code
/**
 * Before executing the target method, judge the user login status and encapsulate the target request passed to the controller
 */
public class CartInterceptor implements HandlerInterceptor {
    public static ThreadLocal<UserInfoTo> threadLocal = new ThreadLocal<UserInfoTo>();
    /**
     * Interception before business execution
     */
    @Override
    public boolean preHandle(HttpServletRequest request, HttpServletResponse response, Object handler) throws Exception {
        HttpSession session = request.getSession();
        MemberRespVo member = (MemberRespVo) session.getAttribute(AuthServerConstant.LOGIN_USER);
        UserInfoTo userInfoTo = new UserInfoTo();
        if (member != null) {
            // User login
            userInfoTo.setUserId(member.getId());
        }
        Cookie[] cookies = request.getCookies();
        if (cookies != null && cookies.length > 0) {
            for (Cookie cookie : cookies) {
                String name = cookie.getName();
                if (CartConstant.TEMP_USER_COOKIE_NAME.equals(name)) {
                    userInfoTo.setUserKey(cookie.getValue());
                    userInfoTo.setHasUserKey(true);
                    break;
                }
            }
        }

        // If the user key is empty, one is assigned
        if (StringUtils.isEmpty(userInfoTo.getUserKey())) {
            String uuid = UUID.randomUUID().toString();
            userInfoTo.setUserKey(uuid);
        }

        // Put the encapsulated UserInfo into threadLocal
        threadLocal.set(userInfoTo);
        return true;
    }

    /**
     * Intercept after business execution
     */
    @Override
    public void postHandle(HttpServletRequest request, HttpServletResponse response, Object handler, ModelAndView modelAndView) throws Exception {
        UserInfoTo userInfoTo = CartInterceptor.threadLocal.get();
        if (!userInfoTo.isHasUserKey()) {
            Cookie cookie = new Cookie(CartConstant.TEMP_USER_COOKIE_NAME, userInfoTo.getUserKey());
            //Set scope
            cookie.setPath("gulimall.com");
            cookie.setMaxAge(CartConstant.TEMP_USER_COOKIE_TIMEOUT);
            response.addCookie(cookie);
        }

    }
}
(2) WebConfig configuration class
@Configuration
public class GulimallWebConfig implements WebMvcConfigurer {
    @Override
    public void addInterceptors(InterceptorRegistry registry) {
        // Configure the CartInterceptor interceptor to intercept all requests
        registry.addInterceptor(new CartInterceptor()).addPathPatterns("/**");
    }
}
7.2.3 ThreadLocal
Because the interceptor passes a UserInfoVo object to the controller layer, in order to obtain this object, ThreadLocal is used
ThreadLocal shares data in the same thread. For a request, interceptor - > controller - > Service - > Dao are all the same thread.
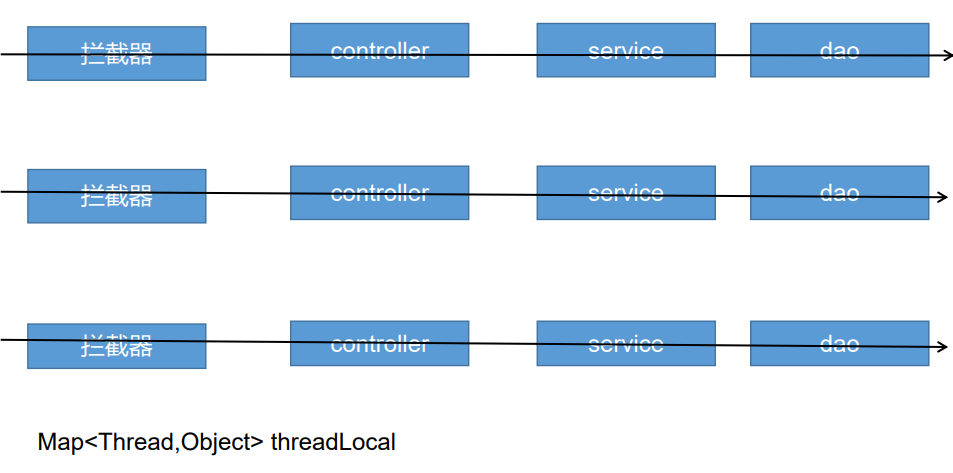
So set a static ThreadLocal variable at the Interceptor:
public static ThreadLocal<UserInfoTo> threadLocal = new ThreadLocal<UserInfoTo>();
After the data is placed, it can be passed to the back.
For more operations on ThreadLocal, please refer to this article:
https://blog.csdn.net/u010445301/article/details/111322569?ops_request_misc=%257B%2522request%255Fid%2522%253A%2522164125953316780357242735%2522%252C%2522scm%2522%253A%252220140713.130102334...%2522%257D&request_id=164125953316780357242735&biz_id=0&utm_medium=distribute.pc_search_result.none-task-blog-2alltop_positive~default-2-111322569.first_rank_v2_pc_rank_v29&utm_term=threadlocal&spm=1018.2226.3001.4187
8, Message queuemessage queue
8.1 overview of Message Oriented Middleware
1. In most applications, message service middleware can be used to improve the ability of asynchronous communication and extended decoupling of the system
2. Two important concepts in message service:
- message broker and destination
- After the message sender sends the message, it will be taken over by the message agent, which ensures that the message is delivered to the specified destination.
3. There are two main types of destinations for message queues
- queue: point-to-point message communication
- topic: publish / subscribe message communication
4. Point to point
- The message sender sends the message, the message agent puts it into a queue, the message receiver obtains the message content from the queue, and the message is removed from the queue after reading
- A message has only one sender and receiver, but it does not mean that there can only be one receiver
5. Publish subscribe:
- If a sender (publisher) sends a message to a topic, and multiple receivers (subscribers) listen to (subscribe to) the topic, they will receive the message at the same time when the message arrives
6.JMS (Java Message Service) Java Message Service:
- JVM based message broker specification. ActiveMQ and HornetMQ are JMS implementations
7.AMQP(Advanced Message Queuing Protocol)
-
Advanced message queuing protocol is also a specification of message broker, which is compatible with JMS
-
RabbitMQ is an implementation of AMQP
8.Spring support
-
Spring JMS provides support for JMS
-
Spring rabbit provides support for AMQP
-
An implementation of ConnectionFactory is required to connect to the message broker
-
JmsTemplate and RabbitTemplate are provided to send messages
-
@JmsListener (JMS), @ RabbitListener (AMQP) annotations listen to messages published by message agents on methods
-
@EnableJms, @ EnableRabbit enable support
9.Spring Boot auto configuration
-
**JmsAutoConfiguration **
-
RabbitAutoConfiguration
10. MQ products on the market
•ActiveMQ,RabbitMQ,RocketMQ,Kafka
When it comes to message oriented middleware, we should think of asynchronous, peak elimination and decoupling
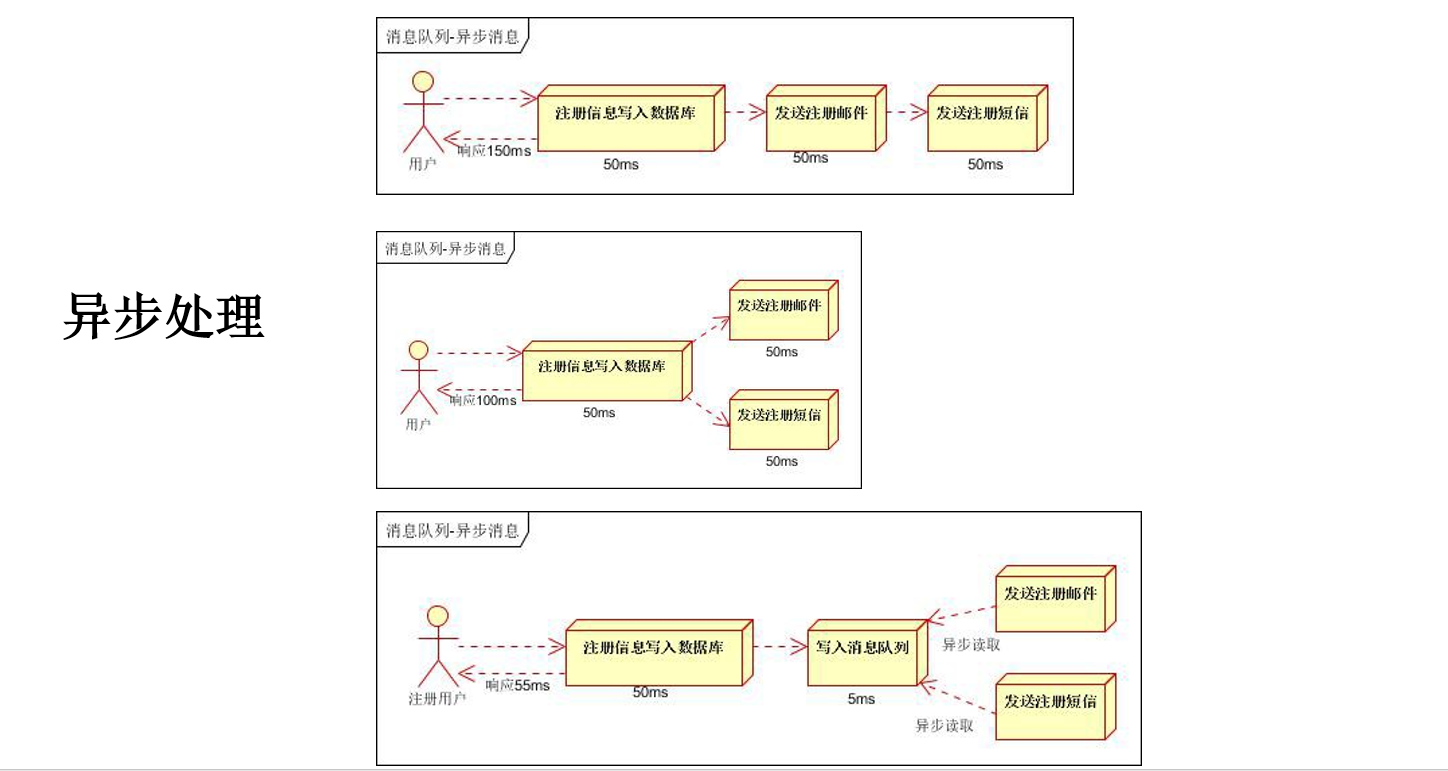
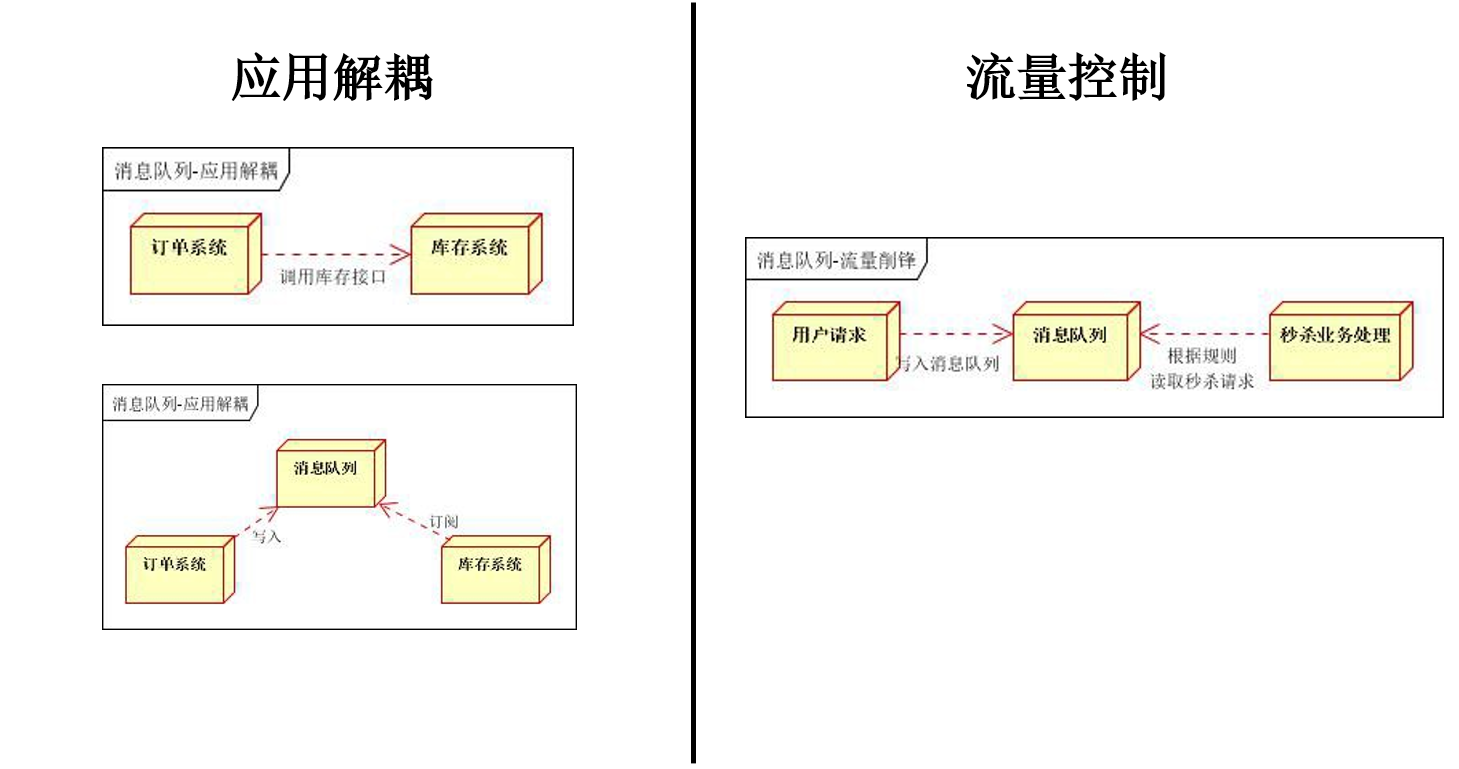
Message queues are mainly divided into two categories: JMS (Java Message Service) and AMQP (Advanced Message Queuing Protocol)
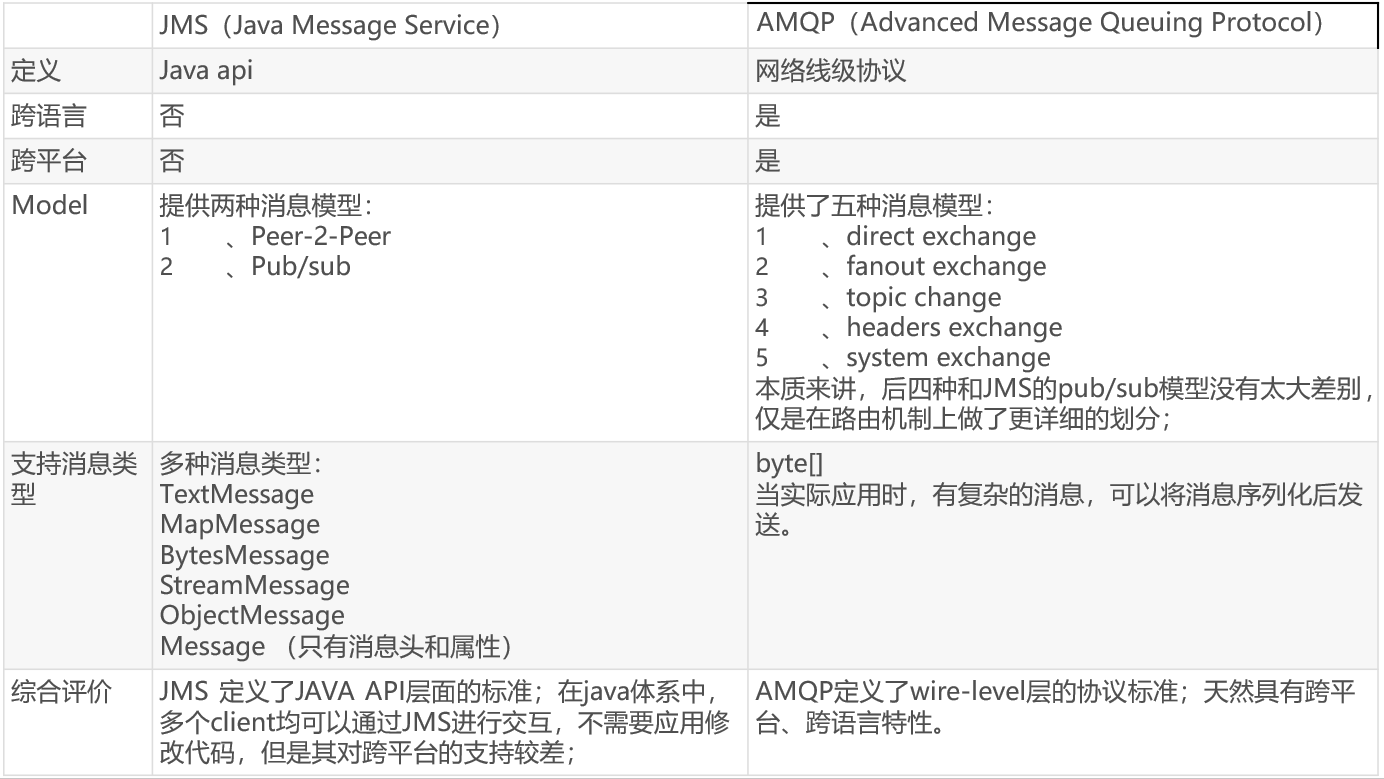
8.2 RabbitMQ
8.2.1 introduction to rabbitmq
RabbitMQ is an open source implementation of AMQP (Advanced message queue protocol) developed by erlang.
8.2.2 core concepts
Message
Message, which is unnamed, consists of a message header and a message body. The message body is opaque, while the message header consists of a series of optional attributes, including routing key, priority (priority relative to other messages), delivery mode (indicating that the message may need persistent storage), etc.
Publisher
The producer of messages is also a client application that publishes messages to the switch.
Exchange
The switch is used to receive the messages sent by the producer and route these messages to the queue in the server.
There are four types of Exchange: direct (default), fanout, topic, and headers. Different types of Exchange have different strategies for forwarding messages
Queue
Message queue, which is used to save messages until they are sent to consumers. It is the container of messages and the destination of messages. A message can be put into one or more queues. The message is always in the queue, waiting for the consumer to connect to the queue and take it away.
Binding
Binding for the association between message queues and switches. A binding is a routing rule that connects the switch and message queue based on the routing key, so the switch can be understood as a routing table composed of binding.
The binding of Exchange and Queue can be a many to many relationship.
Connection
A network connection, such as a TCP connection.
Channel
Channel, an independent bidirectional data flow channel in a multiplexed connection. The channel is a virtual connection established in a real TCP connection. AMQP commands are sent through the channel. Whether publishing messages, subscribing to queues or receiving messages, these actions are completed through the channel. Because it is very expensive to establish and destroy TCP for the operating system, the concept of channel is introduced to reuse a TCP connection.
Consumer
The consumer of a message, representing a client application that gets a message from a message queue.
Virtual Host
A virtual host that represents a batch of switches, message queues, and related objects. A virtual host is a separate server domain that shares the same authentication and encryption environment. Each vhost is essentially a mini RabbitMQ server with its own queue, switch, binding and permission mechanism. vhost is the basis of AMQP concept and must be specified during connection. The default vhost of RabbitMQ is /.
Broker
Represents a message queuing server entity.
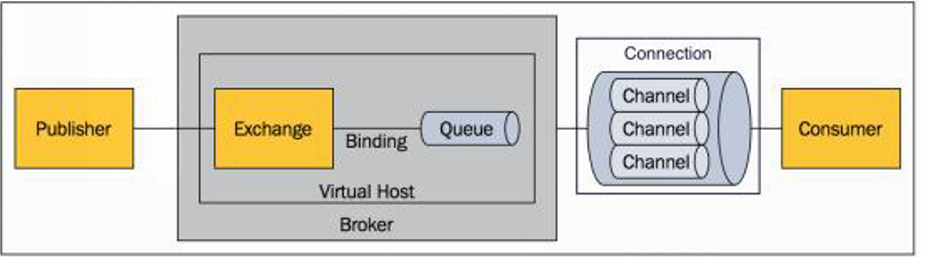
8.2.3 docker installation rabbitmq
Installation command:
docker run -d --name rabbitmq -p 5671:5671 -p 5672:5672 -p 4369:4369 -p 25672:25672 -p 15671:15671 -p 15672:15672 rabbitmq:management
Corresponding port number explanation:
- 4369, 25672 (Erlang Discovery & cluster port)
- 5672, 5671 (AMQP port)
- 15672 (web management background port)
- 61613, 61614 (STOMP protocol port)
- 1883, 8883 (MQTT protocol port)
Accessible ip address: 15672 access control page
8.2.4 RabbitMQ operation mechanism
Message routing in AMQP
There are some differences between the message routing process in AMQP and JMS familiar to Java developers. The roles of Exchange and Binding are added in AMQP.
The producer publishes the message to the Exchange. The message finally reaches the queue and is received by the consumer, and the Binding determines which queue the message of the Exchange should be sent to.
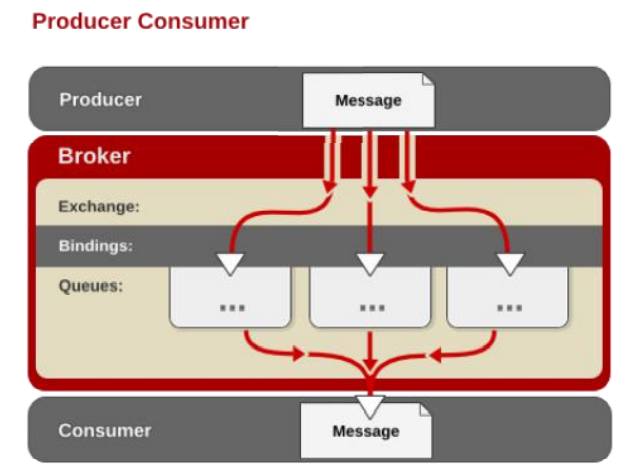
Exchange type
Exchange distributes messages according to different types. At present, there are four types: direct, fanout, topic and headers.
The headers match the headers of AMQP messages instead of the routing keys. The headers switch and the direct switch are completely the same, but their performance is much worse. At present, they are almost unavailable, so we can directly look at the other three types.
Direct Exchange
If the routing key in the message is consistent with the binding key in Binding, the switch will send the message to the corresponding queue. The routing key exactly matches the queue name. If a queue is bound to the switch and requires the routing key to be "dog", only the messages marked with the routing key "dog" will be forwarded, and neither "dog.puppy" nor "dog.guard" will be forwarded. It is an exact match, unicast mode
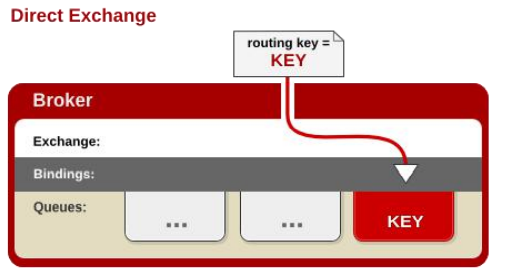
Fanout Exchange
Every message sent to the fan out type switch will be distributed to all bound queues.
The fanout switch does not handle routing keys, but simply binds queues to the switch. Each message sent to the switch will be forwarded to all queues bound to the switch.
Much like subnet broadcasting, hosts in each subnet get a copy of the message.
The fan out type is the fastest to forward messages.
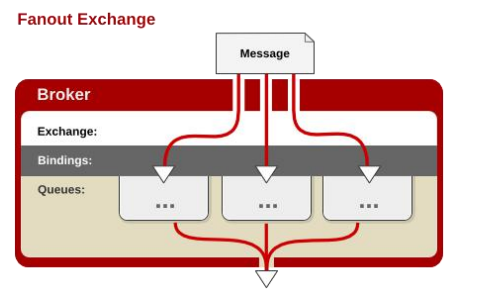
Topic Exchange
The topic switch allocates the routing key attribute of the message through pattern matching to match the routing key with a pattern. At this time, the queue needs to be bound to a pattern.
It cuts the strings of routing and binding keys into words separated by dots. It also recognizes two wildcards: the symbol "#" and the symbol "*".
#Match 0 or more words, * match one word.
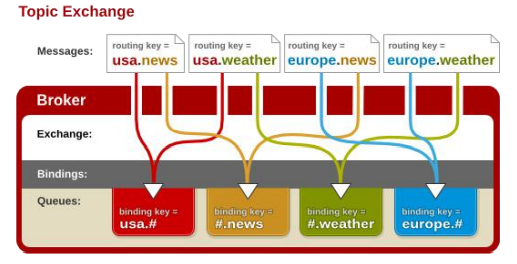
8.3 RabbitMQ integration SpringBoot
To POM Introducing springboot starter into XML:
<!-- introduce RabbitMQ -->
<dependency>
    <groupId>org.springframework.boot</groupId>
    <artifactId>spring-boot-starter-amqp</artifactId>
</dependency>
By observing the RabbitAutoConfiguration class, we can see that this configuration class injects several important Bean objects into the container: CachingConnectionFactory, RabbitTemplate and AmqpAdmin
(1) CachingConnectionFactory
RabbitTemplate uses CachingConnectionFactory as the connection factory
The configuration class is marked with the following annotation: @ EnableConfigurationProperties(RabbitProperties.class)
The code that injects cacheingconnectionfactory into the container loads configuration information from the configuration file.
spring.rabbitmq is the configured prefix. You can specify some port numbers, ip addresses and other information.
#Configure domain name and port number
spring.rabbitmq.host=192.168.190.131
spring.rabbitmq.port=5672
#Configure virtual address
spring.rabbitmq.virtual-host=/
(2) AmqpAdmin
AmqpAdmin is org springframework. amqp. Classes under core, through which Exchange, Queue and Binding can be created in code.
@Autowired
AmqpAdmin amqpAdmin;

@Test
public void createBinding() {
    // String destination
    // DestinationType destinationType binding type: queue / switch
    // String exchange switch name
    // String routingKey routing key
    //, map < string, Object > arguments parameters
    Binding binding = new Binding("hello.queue" , Binding.DestinationType.QUEUE, "hello", "hello.queue",null);
    amqpAdmin.declareBinding(binding);
}

@Test
public void createMQ() {
    /**
     * @param name The name of the queue
     * @param durable Persist queue
     * @param exclusive Declare as an exclusive queue
     * @param autoDelete Whether to automatically delete the queue if the service is not in use
     */
    Queue queue = new Queue("hello.queue", true, false, false);
    String s = amqpAdmin.declareQueue(queue);
    log.info("establish queue success... {}", queue);
}

@Test
public void createExchange() {
    // String name switch name
    // Is boolean durable
    // boolean autoDelete automatically delete
    Exchange exchange = new DirectExchange("hello", true, false);
    amqpAdmin.declareExchange(exchange);
    log.info("establish exchange success...");
}
(2) RabbitTemplate
Through the methods in the RabbitTemplate class, you can send messages and other operations to the queue like using the Rabbit client, and there are multiple overloaded "send" (send message) methods.
@Autowired
RabbitTemplate rabbitTemplate;

@Test
public void test() {
    // send message
    rabbitTemplate.convertAndSend("hello", "hello.queue"  ,"msg");
}
The message sent can be not only a serialized object, but also text data in Json format.
By specifying different messageconverters, we can inject the desired MessageConverter into the container to use.
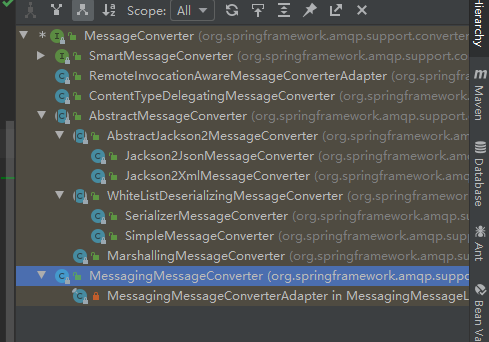
@Configuration
public class MyRabbitConfig {
    @Bean
    public MessageConverter messageConverter() {
        return new Jackson2JsonMessageConverter();
    }
}
(3) @RabbitListener and @ RabbitHandler annotations
@Both the RabbitListener annotation and @ RabbitHandler can accept and process messages in the message queue.
@RabbitListener annotation:
It can be used on marked methods or classes
The parameters of a custom method can be of the following types:
1. Message: native message details. Head + body
2. T < type of message sent > can be our customized object
3. Channel: the channel that currently transmits data.
@RabbitListener(queues = {"hello.queue"})
public String receiveMessage(Message message, OrderEntity content) {
    //Message body information
    byte[] body = message.getBody();
    // Message header information
    MessageProperties messageProperties = message.getMessageProperties();
    log.info("Message received: {}", content);
    return "ok";
}
At the same time, note that the Queue can be monitored by many methods. As long as a message is received, the Queue will delete the message, and only one method can receive the message. And a method receiving a message is a linear operation. Only after processing a message can it receive the next message.
@RabbitHandler annotation:
@RabbitHandler is marked on the method.
@The method of the RabbitHandler tag is combined with @ RabbitListener, @ RabbitHandler can become more flexible.
For example, when two methods listen to a message queue, the parameters of the two methods for listening to receive message content are different. The method can be automatically determined according to the message content.
@Slf4j
@Controller
@RabbitListener(queues = {"hello.queue"})
public class RabbitController {
    @RabbitHandler
    public String receiveMessage(Message message, OrderReturnReasonEntity content) {
        //Message body information
        byte[] body = message.getBody();
        // Message header information
        MessageProperties messageProperties = message.getMessageProperties();

        log.info("Message received: {}", content);
        return "ok";
    }

    @RabbitHandler
    public String receiveMessage2(Message message, OrderEntity content) {
        //Message body information
        byte[] body = message.getBody();
        // Message header information
        MessageProperties messageProperties = message.getMessageProperties();

        log.info("Message received: {}", content);
        return "ok";
    }
}
8.4 RabbitMQ message confirmation mechanism
Concept:
-
To ensure that messages are not lost and arrive reliably, transaction messages can be used, but the performance will be reduced by 250 times. Therefore, an acknowledgement mechanism is introduced
-
publisher confirmCallback confirmation mode
-
publisher returnCallback was not delivered to queue return mode
-
consumer ack mechanism
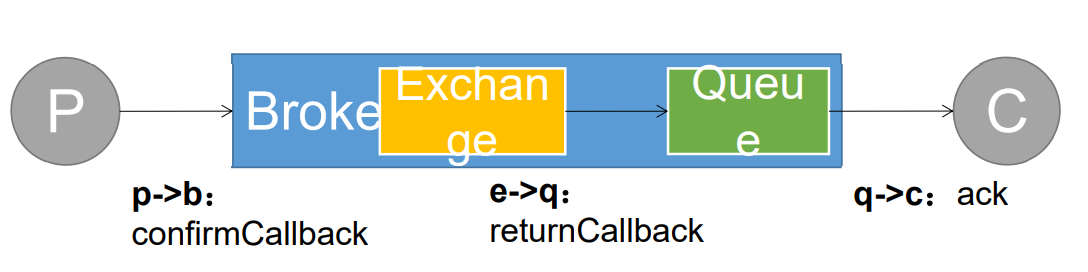
8.4.1 message confirmation mechanism - reliable arrival (sender)
① ConfirmCallback
ConfirmCallback, like RetruhnCallback, is an internal interface of RabbitTemplate.
As long as the message is received by the broker, confirmCallback will be executed. If it is in cluster mode, confirmCallback will be called only after all brokers receive it.
That is, when the message reaches the RabbitMQ server, the callback method will be executed.
First, you need to modify the configuration file:
spring.rabbitmq.publisher-confirms=true
Then prepare an interface for sending messages and two methods for listening to the message queue and receiving messages
Send message interface:
@RestController
public class SendMsgController {
    @Autowired
    RabbitTemplate rabbitTemplate;

    @GetMapping("/sendMsg")
    public String sendMsg() {
        for (int i = 0; i < 10; i++) {
            if (i % 2 == 0) {
                OrderEntity orderEntity = new OrderEntity();
                orderEntity.setId(1L);
                orderEntity.setMemberUsername("Tom");
                orderEntity.setReceiveTime(new Date());
                rabbitTemplate.convertAndSend("hello-java-exchange", "hello.news", orderEntity, new CorrelationData(UUID.randomUUID().toString()));
            } else {
                OrderReturnReasonEntity orderReturnReasonEntity = new OrderReturnReasonEntity();
                orderReturnReasonEntity.setCreateTime(new Date());
                orderReturnReasonEntity.setId(2L);
                orderReturnReasonEntity.setName("test");
                orderReturnReasonEntity.setSort(1);
                rabbitTemplate.convertAndSend("hello-java-exchange", "hello.news", orderReturnReasonEntity, new CorrelationData(UUID.randomUUID().toString()));
            }
        }
        return "ok";
    }
}
Methods of listening to message queue and receiving messages:
@RabbitListener(queues = {"hello.news"})
@Slf4j
@Service("orderItemService")
public class OrderItemServiceImpl extends ServiceImpl<OrderItemDao, OrderItemEntity> implements OrderItemService {
    @RabbitHandler
    public void receiveMessage1(Message message, OrderReturnReasonEntity content, Channel channel) {
        //Message body information
        byte[] body = message.getBody();
        // Message header information
        MessageProperties messageProperties = message.getMessageProperties();
        System.out.println("receiveMessage1 receive messages: " + content);
    }

    @RabbitHandler
    public void receiveMessage2(Message message, OrderEntity content, Channel channel) {
        //Message body information
        byte[] body = message.getBody();
        // Message header information
        MessageProperties messageProperties = message.getMessageProperties();
        System.out.println("receiveMessage2 receive messages: " + content);
    }
}
Step 3: customize RedisTemplate in the configuration class:
@Configuration
public class MyRabbitConfig {
    @Autowired
    RabbitTemplate rabbitTemplate;
    @PostConstruct // This annotation indicates that the custom RabbitTemplate is called after initializing the constructor
    public void initRabbitTemplate() {
        // Set confirmation callback
        rabbitTemplate.setConfirmCallback(new RabbitTemplate.ConfirmCallback() {
            /**
             *
             * @param correlationData Unique relevant data of the current message (this is the unique id of the message)
             * @param ack Whether the message was received successfully
             * @param cause Reasons for failure
             */
            @Override
            public void confirm(CorrelationData correlationData, boolean ack, String cause) {
                System.out.println("ConfirmCallback... correlationData: [" + correlationData + "] ==> ack: [" + ack + "] ==> cause: [" + cause + "]");
            }
        });
    }
}
Then visit localhost:9000/sendMsg, and a message will be sent. The observation results are as follows:
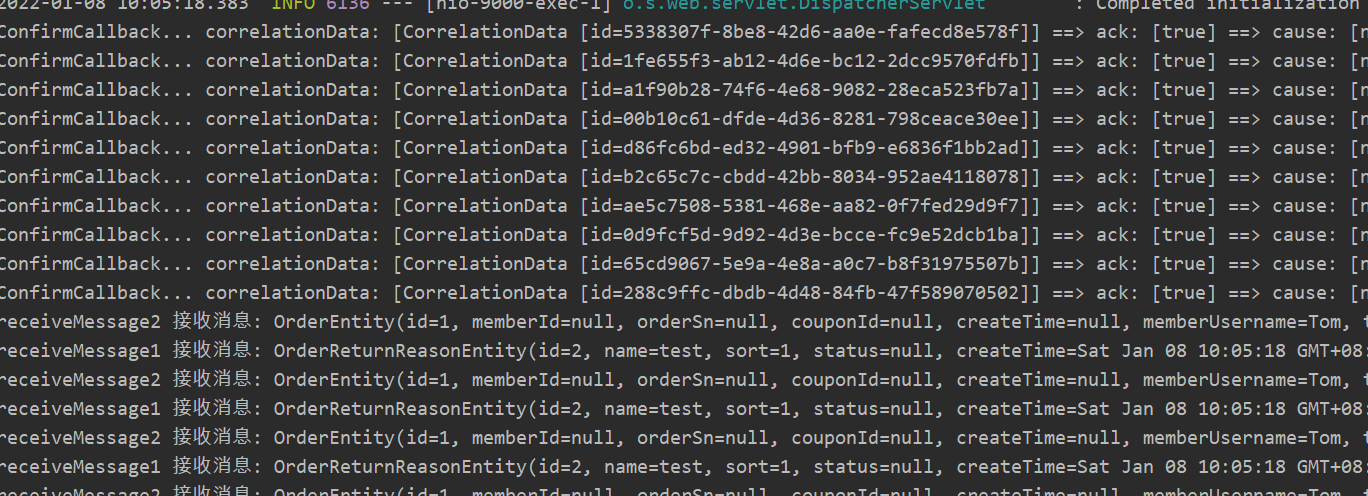
Both methods used to receive messages receive messages, and the customized ConfirmCallback callback method will print relevant information.
② ReturnCallback
The message received by the broker only indicates that the message has arrived at the server, and does not guarantee that the message will be delivered to the target queue. So you need to use the next returnCallback.
This method will be triggered if some problems occur in the process of message delivery to the queue by the switch, which eventually leads to message delivery failure.
Add this method to the customized RabbitTemplate:
rabbitTemplate.setReturnCallback(new RabbitTemplate.ReturnCallback() {
    /**
     * @param message Details of the failed message
     * @param replyCode Status code of reply
     * @param replyText Text content of reply
     * @param exchange But which switch is this message sent to
     * @param routingKey Which routing key was used for this message at that time
     */
    @Override
    public void returnedMessage(Message message, int replyCode, String replyText, String exchange, String routingKey) {
        System.out.println("FailMessage: [" + message + "] ==> replyCode: [" + replyText + "] ==> exchange: [" + exchange + "] ==> routingKey: [" + routingKey + "]");
    }
});
We deliberately write the wrong routing key at the sending end of the message, resulting in the failure of exchange to deliver the message. Finally, you will see the contents printed in the callback method ReturnCallback:

FailMessage: [(Body:'{"id":2,"name":"test","sort":1,"status":null,"createTime":1641608721639}' MessageProperties [headers={spring_returned_message_correlation=b6b21f2d-73ad-473d-9639-feec76953c7b, __TypeId__=com.atguigu.gulimall.order.entity.OrderReturnReasonEntity}, contentType=application/json, contentEncoding=UTF-8, contentLength=0, receivedDeliveryMode=PERSISTENT, priority=0, deliveryTag=0])] ==> replyCode: [NO_ROUTE] ==> exchange: [hello-java-exchange] ==> routingKey: [hello.news1]
Add: when sending a message, you can also specify a parameter of CorrelationData type (you can review the method of sending a message above). The constructor parameter of this CorrelationData class can be filled with a UUID to represent the unique id of the message. This is the first parameter of the method in rewriting ConfirmCallback. The unique id of the message can be obtained through this parameter.
Note: the return value of the listening method must be void, otherwise the console will continue to print error messages. (lesson of blood)
8.4.2 message confirmation mechanism - reliable arrival (consumer)
ACK(Acknowledge) message confirmation mechanism
The consumer obtains the message, processes it successfully, and can reply to the Ack to the Broker
- basic.ack is used for positive confirmation; The broker will remove this message
- basic.nack is used for negative confirmation; You can specify whether the broker discards this message, and you can batch it
- basic.reject is used for negative confirmation; Same as above, but not in batch
By default, the ACK message confirmation mechanism is that once messages arrive at the consumption method, they will be directly queued (deleted). However, if the server goes down during message consumption, these messages will also be deleted, resulting in message loss.
The message can be opened through configuration, and the message can be deleted from the queue only after manual confirmation
#Manual ack message
spring.rabbitmq.listener.simple.acknowledge-mode=manual
Rewrite method:
@RabbitHandler
public void receiveMessage2(Message message, OrderEntity content, Channel channel) {
    //Message body information
    byte[] body = message.getBody();
    // Message header information
    MessageProperties messageProperties = message.getMessageProperties();
    long deliveryTag = messageProperties.getDeliveryTag();
    //Receive messages manually
    //long deliveryTag is equivalent to the tag distributed by the current message, which is obtained from messageProperties and self incremented in the Channel
    //boolean multiple batch confirmation
    try {
        channel.basicAck(deliveryTag, false);
    } catch (Exception e) {
        e.printStackTrace();
    }
    System.out.println("receiveMessage2 receive messages: " + content);
}
We break the code above and observe the RabbitMQ client:

There are a total of 5 messages in the pair, and they enter the unacknowledged state.
However, there is a problem in using the debug mode to start and then shut down the service to simulate server downtime. Before shutting down the service, idea will execute the unfinished methods first and then shut down the service.
So you can kill the process in cmd to simulate downtime.
At this time, due to the breakpoint, the line of code for message confirmation is not reached, and the server goes down randomly. All unconfirmed messages will call back to the Ready state from the unacknowledged state.
If there are methods to receive messages, there are methods to reject messages: basicNack and basicReject
//long deliveryTag the label of the current message dispatch
//boolean multiple batch processing
//Is the message re queued after the Boolean request is rejected
channel.basicNack(deliveryTag, false, true);
channel.basicReject(deliveryTag, true);
Both basicNack and basicReject can be used to reject messages, but basicNack has one more parameter Boolean multiple (batch processing or not) than basicReject
If the request is set to true, the rejected messages will be re queued for consumption.
8.5 RabbitMQ delay queue (realizing scheduled tasks)
Scenario:
For example, if an unpaid order exceeds a certain period of time, the system will automatically cancel the order and release the occupied items.
Common solutions:
spring's schedule scheduled task polls the database
Disadvantages:
It consumes system memory, increases the pressure of database and has large time error
Solution: rabbitmq combines message TTL with dead letter Exchange
(1) TTL of message (Time To Live)
The TTL of a message is the lifetime of the message.
RabbitMQ can set TTL for queues and messages respectively.
Setting the queue is the retention time of the queue without consumers. You can also set each individual message separately. After this time, we think the news is dead, which is called dead letter.
If the queue is set and the message is set, the smaller value will be taken. Therefore, if a message is routed to different queues, the time of death of the message may be different (different queue settings). Here is a single message
TTL, because it is the key to delay tasks. You can set the time by setting the expiration field of the message or the x-message-ttl attribute. Both have the same effect.
(2) Dead Letter Exchanges (DLX) dead letter routing
A message will enter the dead letter route if it meets the following conditions. Remember that this is a route rather than a queue. A route can correspond to many queues.
What is a dead letter?
- A message is rejected by the Consumer, and the request in the parameter of the reject method is false. In other words, it will not be put in the queue again and used by other consumers* (basic.reject/ basic.nack)*requeue=false
- The TTL of the above message has arrived and the message has expired.
- The queue length limit is full. The messages in the front row will be discarded or thrown on the dead letter route.
**Dead Letter Exchange (dead letter routing) * * is actually an ordinary exchange, just like creating other exchanges. Only when a message expires in a queue set up for Dead Letter Exchange, the message forwarding will be automatically triggered and sent to Dead Letter Exchange.
We can not only control the message to become a dead letter after a period of time, but also control the message to be routed to a specified switch. In fact, a delay queue can be realized by combining the two.
Manual ack & two suggested methods of putting exception messages in one queue
- After the catch exception, manually send it to the specified queue, and then use channel to rabbitmq to confirm that the message has been consumed
- Bind the dead letter Queue to the Queue, and use nack (requque is false) to confirm that the message consumption fails
Implementation of delay queue:
Method 1: set a message queue with expiration time
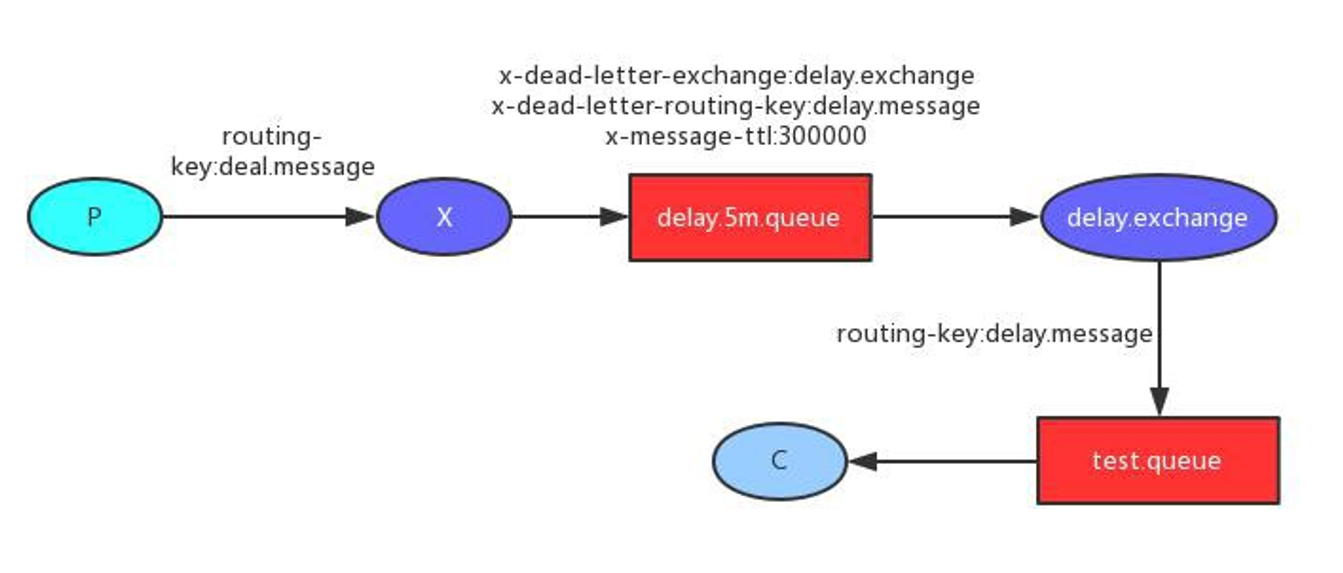
Method 2: the sent message is given an expiration time.
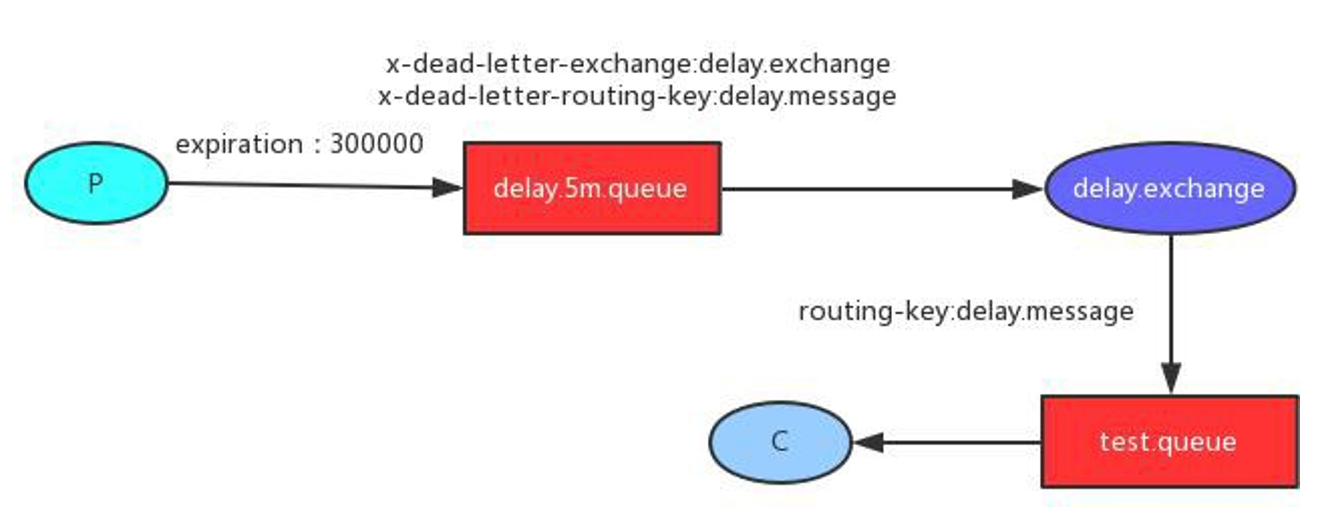
However, based on RabbitMQ's lazy processing of messages, mode 1 is usually selected.
(3) Delayed message queue sample test
Sketch Map:
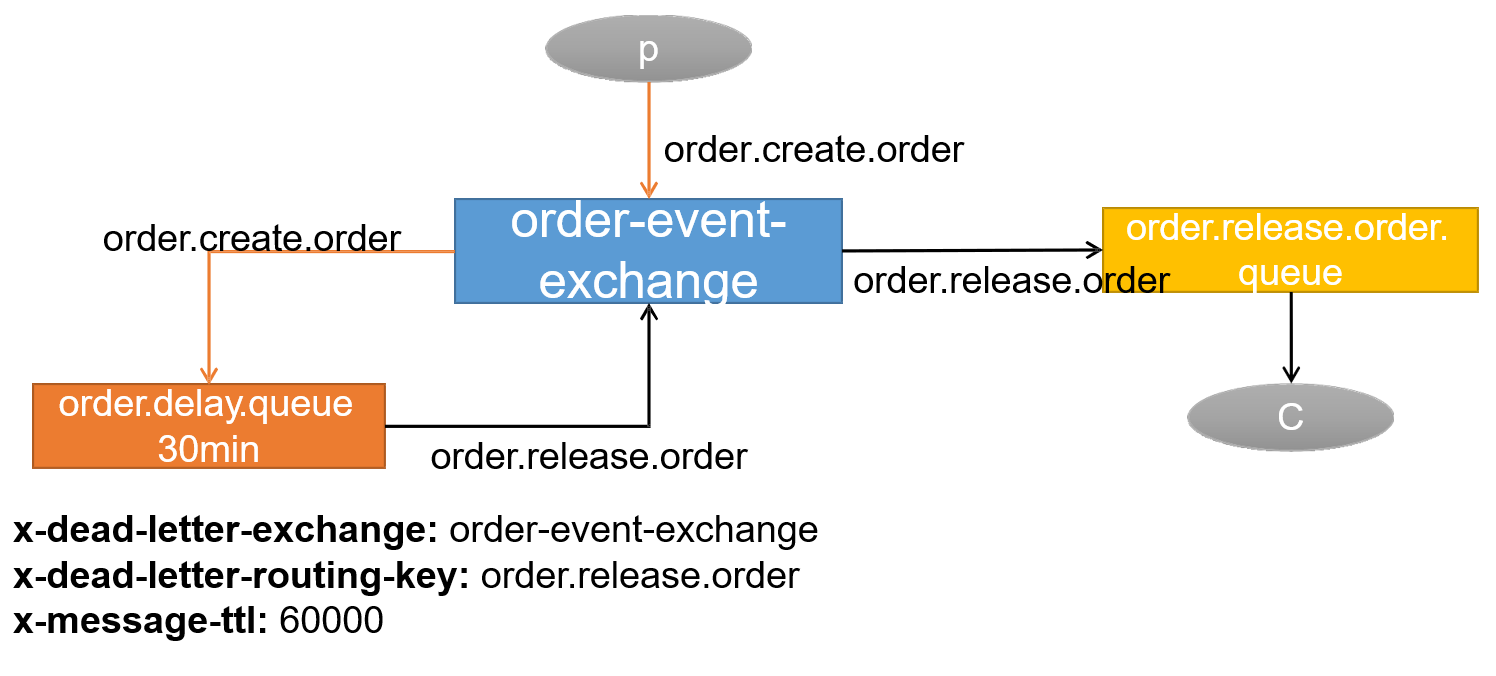
If no message queues and switches have not been created in RabbitMQ, they can be created through @ Bean injection container.
Configuration class:
@Configuration
public class MyRabbitMQConfig {
    @Bean
    public Queue orderDelayQueue() {
        /*
            Queue(String name,  Queue name
            boolean durable,  Persistent
            boolean exclusive,  Exclusive
            boolean autoDelete, Delete automatically
            Map<String, Object> arguments) attribute
         */
        Map<String, Object> arguments = new HashMap<String, Object>();
        arguments.put("x-dead-letter-exchange", "order-event-exchange");
        arguments.put("x-dead-letter-routing-key", "order.release.order");
        arguments.put("x-message-ttl", 60000);
        return new Queue("order.delay.queue", true, false, false, arguments);
    }

    @Bean
    public Queue orderReleaseOrderQueue() {
        return new Queue("order.release.order.queue", true, false, false);
    }

    /**
     * TopicExchange
     * @return
     */
    @Bean
    public Exchange orderEventExchange() {
        /**
         *   String name,
         *   boolean durable,
         *   boolean autoDelete,
         *   Map<String, Object> arguments
         */
        return new TopicExchange("order-event-exchange", true, false);
    }

    @Bean
    public Binding orderCreateBinding() {
        /*
         * String destination, Destination (queue name or switch name)
         * DestinationType destinationType, Destination type (Queue, exhrange)
         * String exchange,
         * String routingKey,
         * Map<String, Object> arguments
         * */
        return new Binding("order.delay.queue",
                Binding.DestinationType.QUEUE,
                "order-event-exchange",
                "order.create.order",
                null);
    }

    @Bean
    public Binding orderReleaseBinding() {

        return new Binding("order.release.order.queue",
                Binding.DestinationType.QUEUE,
                "order-event-exchange",
                "order.release.order",
                null);
    }
}
Methods of sending and receiving messages:
@Autowired
RabbitTemplate rabbitTemplate;

@RabbitListener(queues = "order.release.order.queue")
public void listener(Message message, Channel channel, OrderEntity entity) throws IOException {
    System.out.println("After receiving the expired message, the order to be closed:" + entity.getOrderSn());
    channel.basicAck(message.getMessageProperties().getDeliveryTag(),false);
}


@ResponseBody
@GetMapping("/test/createOrder")
public String testCreateOrder() {

    OrderEntity entity = new OrderEntity();
    // Set order number
    entity.setOrderSn(UUID.randomUUID().toString());
    entity.setCreateTime(new Date());
    rabbitTemplate.convertAndSend("order-event-exchange",
            "order.create.order",
            entity);
    return "ok";
}
8.6 message loss, duplication and backlog
1. Message loss
(1) The message was sent out because the network problem did not reach the server
Solution:
- Try catch, sending messages may lead to network failure. After the failure, there should be a retry mechanism, which can be recorded in the database and scanned and retransmitted regularly.
- Log whether each message status is received by the server or not.
- Do a good job of regular retransmission. If the message is not sent successfully, regularly scan the database for unsuccessful messages for retransmission.
(2) When the message arrives at the Broker, the Broker needs to write the message to disk (persistence) before it is successful. At this time, the Broker has not completed persistence and is down
Solution:
- publisher must also add a confirmation callback mechanism to confirm the successful message and modify the database message status.
(3) In the state of automatic ACK. Consumer receives the message but fails to get the message and goes down
- Make sure to enable manual ACK, remove it only after consumption is successful, or NoAck and rejoin the team before failure or processing in time
2. Duplicate message
(1) The message consumption is successful, the transaction has been committed, and the machine goes down during ack. As a result, no ack is successful, the Broker's message is changed from unack to ready again and sent to other consumers.
(2) Message consumption failed. Due to the retry mechanism, the message will be sent again automatically
(3) After successful consumption, the server goes down during ack, the message changes from unack to ready, and the Broker sends it again
Solution:
- The consumer's business consumer interface should be designed to be idempotent. For example, inventory deduction has the status flag of the work order.
- Using the anti duplication table (redis/mysql), each message sent has a unique identification of the business, and it will not be processed after processing.
- Each message of rabbitMQ has a redelivered field, which can obtain whether it is redelivered rather than delivered for the first time.
3. Message backlog
(1) Consumer downtime backlog
(2) Insufficient consumer spending power and backlog
(3) The sender sends too much traffic
Solution:
- Online more consumers for normal consumption
- Online special queue consumption service, take out messages in batches, record them in the database, and process them slowly offline
9, Order service
9.1 Feign remote call lost request header
According to the business process, in order to encapsulate the shopping items in the shopping Cart into the OrderConfirmVo object, it is necessary to remotely call the Cart service to obtain the shopping item information. During the remote call, the user's ID information is not passed in, but the information in the Cookie is obtained through the request header in the user's request to enter the order settlement page, so as to obtain the user ID and other related information, However, when using Feign to make a remote call, it is equivalent to a new request, and the request header information in the original request will be lost.
In order to solve the problem that Feign's remote call loses the request header, refer to Feign's relevant source code. Before Feign sends the request, the interceptor method will be executed first, and then the request will be sent. Therefore, an interceptor will be customized. Before Feign sends the request, the customized interceptor method will be called first to add the original request header information to Feign's request.
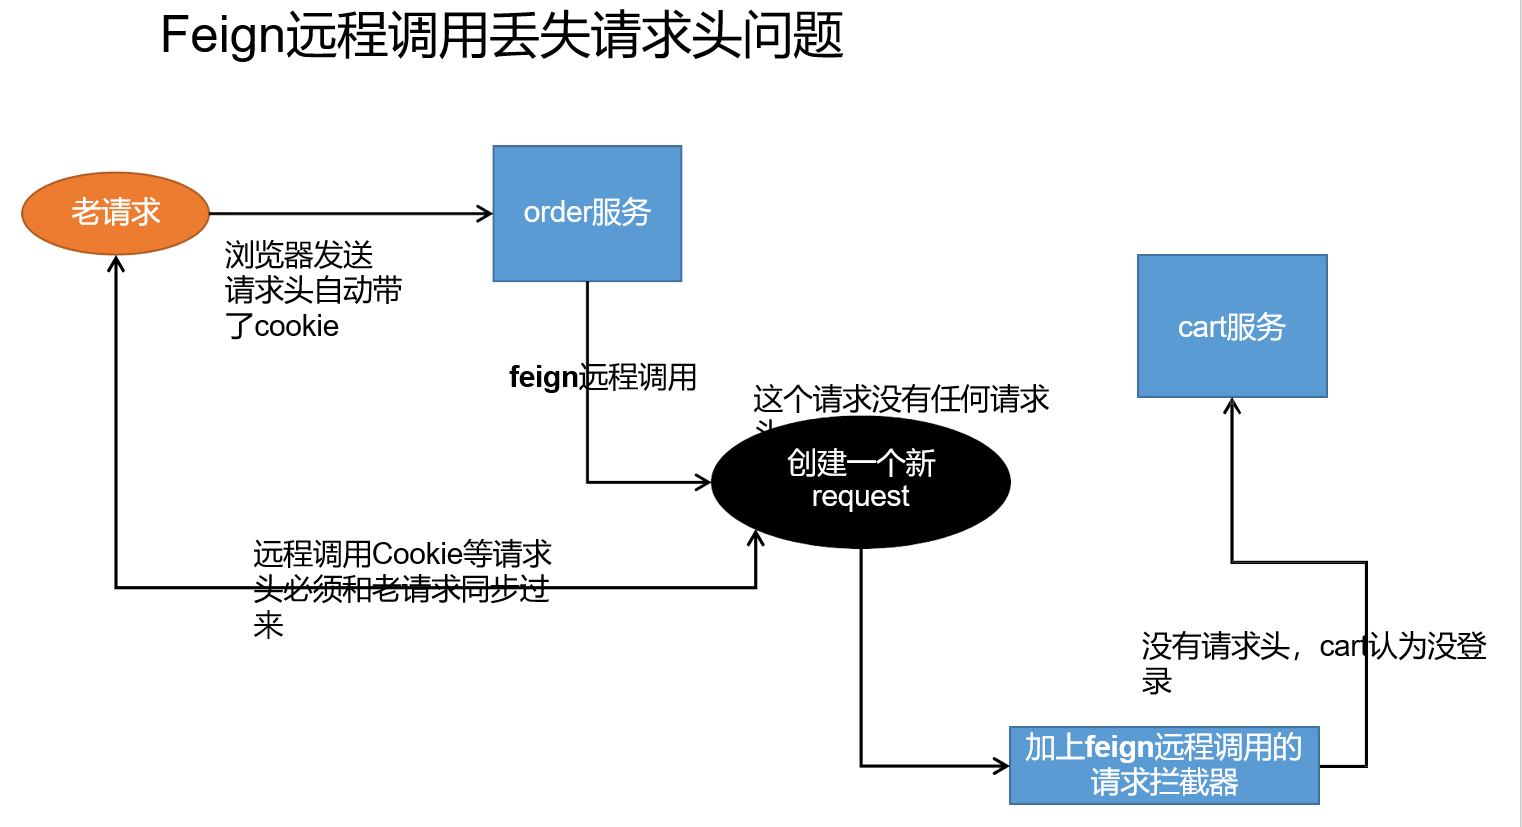
Preparation of Interceptor:
@Configuration
public class GuliFeignConfig {
    /**
     * Add feign's interceptor to the container
     * @return
     */
    @Bean("requestInterceptor")
    public RequestInterceptor requestInterceptor() {
        return new RequestInterceptor() {
            @Override
            public void apply(RequestTemplate requestTemplate) {
                // Synchronization request header
                ServletRequestAttributes attributes = (ServletRequestAttributes) RequestContextHolder.getRequestAttributes();
                HttpServletRequest request = attributes.getRequest();
                String cookie = request.getHeader("Cookie");
                //The new request to feign synchronizes the cookie of the old request
                requestTemplate.header("Cookie", cookie);
            }
        };
    }
}
9.2 Feign asynchronous call lost request header
In the logic of obtaining order information, multiple services need to be called remotely to obtain data, so asynchronous operation is required here, but null pointer error will occur in the interceptor. The request object cannot be obtained and is null.

Like the above figure: because we add request headers to Feign's requests using interceptors, but the process of obtaining request headers is carried out during the execution of a thread, but we conduct asynchronous operations and use the thread pool, which leads to the fact that the request headers are not in one thread, resulting in the loss of request header information.
Solution: now the main thread obtains the relevant information of the request header, and then adds the request header to the thread executing the asynchronous operation during the asynchronous call, so that the request header will not be lost.
//Get request header information from the main thread
RequestAttributes requestAttributes = RequestContextHolder.getRequestAttributes();

CompletableFuture<Void> getAddressesFuture = CompletableFuture.runAsync(() -> {
    RequestContextHolder.setRequestAttributes(requestAttributes);
    //Get user address information
    List<MemberAddressVo> addresses = memberFeignService.getAddresses(memberRespVo.getId());
    orderConfirmVo.setAddress(addresses);
}, executor);
9.3 interface idempotency
1. What is idempotency
Interface idempotency means that the results of one request or multiple requests initiated by the user for the same operation are consistent, and there will be no side effects due to multiple clicks; For example, in the payment scenario, when the user purchases goods, the payment is deducted successfully, but the network is abnormal when the result is returned. At this time, the money has been deducted. The user clicks the button again, and the second deduction will be made. The result is returned successfully. The user queries the balance and finds that more money has been deducted, and the flow records have become two, which does not guarantee the idempotency of the interface.
In short, no matter how many times the operation is repeated, the result is the same. Just like the number 1, no matter how many powers, the result is 1.
2. Those situations need to be prevented
The user clicks the button multiple times
User page fallback and resubmit
Microservices call each other. The request fails due to network problems.
feign triggers retry mechanism and other business conditions
3. When do I need idempotent
Taking SQL as an example, some operations are naturally idempotent.
SELECT * FROM table WHER id=?, No matter how many times it is executed, it will not change the state and is a natural idempotent.
UPDATE tab1 SET col1=1 WHERE col2=2. The status is consistent no matter how many times the execution is successful. It is also an idempotent operation.
delete from user where userid=1. Multiple operations result in the same idempotent.
insert into user(userid,name) values(1,'a') if userid is the only primary key, that is, repeating the above business will insert only one piece of user data, which is idempotent.
UPDATE tab1 SET col1=col1+1 WHERE col2=2. The result of each execution will change, not idempotent.
insert into user(userid,name) values(1,'a') if userid is not a primary key, it can be repeated. The above business has been operated for many times, and multiple pieces of data will be added, which is not idempotent.
4. Idempotent solution
(1) Token mechanism
① The server provides an interface for sending tokens. When we analyze the business, which businesses have idempotent problems, we must obtain the token before executing the business, and the server will save the token to redis.
Secondly, when calling the request of the business interface, token is carried in the past and is usually placed on the request head.
③ The server determines whether the token exists in redis. The presence indicates the first request, and then deletes the token to continue the business.
④ If it is judged that the token does not exist in redis, it means that the operation is repeated, and the duplicate flag is directly returned to the client, so as to ensure that the business code will not be executed repeatedly.
danger:
① Delete token first or delete token later
-
Deleting first may lead to the fact that the business has not been executed, and the previous token is brought when retrying. Due to the anti duplication design, the request still cannot be executed.
-
After deletion, the business may be processed successfully, but the service flashes off, timeout occurs, the token is not deleted, and others continue to retry, resulting in the business being executed twice.
-
We'd better design to delete the token first. If the business call fails, we'll get the token again and request again.
② Token acquisition, comparison and deletion must be atomic
redis.get(token) ,token.equals,redis.del(token) if these operations are not atomic, it may cause high concurrency, get the same data, judge that they are successful, and continue the business for concurrent execution.
Therefore, you can use lua script in redis to complete this operation:
if redis.call('get', KEYS[1]) == ARGV[1] then return redis.call('del', KEYS[1]) else return 0 end
(2) Various locking mechanisms
1. Pessimistic lock of database
select * from xxx where id = 1 for update;
Pessimistic locks are generally used with transactions, and the data locking time may be very long, which should be selected according to the actual situation. In addition, it should be noted that the id field must be a primary key or a unique index, otherwise it may cause the result of locking the table, which will be very troublesome to process.
2. Optimistic lock of database
This method is suitable for the updated scenario:
update t_goods set count = count -1 , version = version + 1 where good_id=2 and versio
According to the version, that is, obtain the version number of the current commodity before operating the inventory, and then bring this version number when operating. Let's sort it out. When we first operate the inventory, we get the version as 1 and call the inventory service, and the version becomes 2; However, there is a problem returning to the order service. The order service initiates to call the inventory service again. When the version passed by the order service is still 1 and the above sql statement is executed, it will not be executed; Because version has changed to 2, the where condition does not hold. This ensures that no matter how many times it is called, it will only be processed once. Optimistic lock is mainly used to deal with the problem of reading more and writing less.
(3) Business layer distributed lock
If multiple machines may process the same data at the same time, for example, multiple machine timing tasks have received the same data processing, we can add a distributed lock to lock the data and release the lock after processing. To obtain a lock, you must first judge whether the data has been processed.
(4) Various unique constraints
① Database unique constraint
When inserting data, it should be inserted according to the unique index. For example, if the order number is the same, it is impossible to insert two records in the same order. We prevent duplication at the database level.
This mechanism makes use of the unique constraint of the primary key of the database to solve the idempotent problem in the insert scenario. However, the requirement for a primary key is not a self increasing primary key, which requires the business to generate a globally unique primary key.
In the scenario of database and table splitting, the routing rules should be implemented in the same database and table under the same request. Otherwise, the database PK constraint will not work because different databases and table PK are not related.
② redis set anti duplication
Many data need to be processed and can only be processed once. For example, we can calculate the MD5 of the data and put it into the set of redis. Each time we process the data, we first see whether the MD5 already exists. If it exists, it will not be processed.
(5) Anti weight meter
Use the order number orderNo as the unique index of the de duplication table, insert the unique index into the de duplication table, and then conduct business operations, and they are in the same transaction. This ensures that the request fails due to the unique constraint of the de duplication table when the request is repeated, and avoids the idempotent problem. It should be noted here that the de duplication table and the business table should be in the same database, so as to ensure that the data of the de duplication table will be rolled back even if the business operation fails in the same transaction. This ensures data consistency.
The redis weight prevention mentioned earlier also counts.
(6) Global request unique id
When the interface is called, a unique id is generated. redis saves the data to the collection (de duplication). It is processed if it exists.
You can use nginx to set a unique id for each request.
proxy_set_header X-Request-Id $request_id
10, Distributed transaction
10.1 local affairs
1. Basic nature of transaction
Several characteristics of database transactions: atomicity, consistency, isolation, and persistence, which is called ACID for short.
-
Atomicity: a series of operations cannot be split as a whole. They either succeed or fail at the same time
-
Consistency: the data is consistent before and after the transaction.
-
Isolation: transactions are isolated from each other.
-
Persistence: once the transaction is successful, the data will be stored in the database.
In the previous single application, our multiple business operations use the same connection to operate different data tables. Once there is an exception, we can easily roll back the whole.
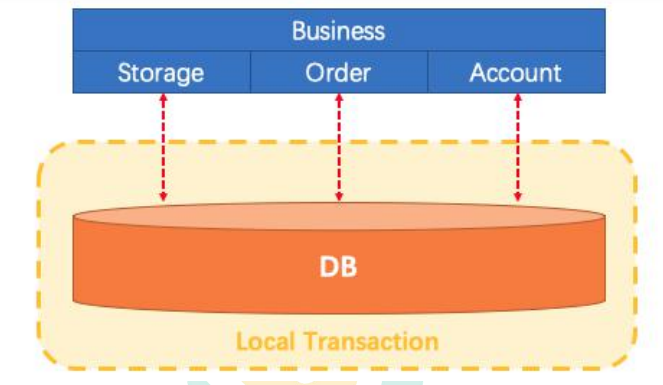
- Business: our specific business code
- Storage: inventory business code; Deduct inventory
- Order: order business code; Save order
- Account: account business code; Less: account balance
For example, shopping business, inventory deduction, order placement and account deduction are a whole; Must succeed or fail at the same time.
The start of a transaction means that all the following operations are in the same connection.
2. Isolation level of transaction
READ UNCOMMITTED
Transactions at this isolation level will read data from other uncommitted transactions. This phenomenon is also called dirty reading.
READ COMMITTED
One transaction can read another committed transaction. Multiple reads will result in different results. This phenomenon is called non repeatable read problem. The default isolation level of Oracle and SQL Server.
REPEATABLE READ
This isolation level is the default isolation level of MySQL. In the same transaction, the result of select is the state at the time point when the transaction starts. Therefore, the results read by the same select operation will be consistent, but there will be phantom reading. MySQL's InnoDB engine can avoid unreal reading through the next key locks mechanism (refer to the section "row lock algorithm" below).
For a data in the database, multiple queries within a transaction range return different data values because it is modified and committed by another transaction during the query interval.
When the isolation level is set to REPEATABLE READ, non repeatable reads can be avoided. When A takes the payroll card to consume, once the system starts reading the payroll card information (i.e. the transaction starts), A's wife cannot modify the record, that is, A's wife cannot transfer money at this time.
Unreal reading (read several times before and after, and the total amount of data is inconsistent):
Transaction A needs to count the total amount of data twice when performing the read operation. After querying the total amount of data the previous time, transaction B performs the operation of adding data and submits it. At this time, the total amount of data read by transaction A is different from the previous statistics. It is like an illusion. For no reason, there are A few more data, which becomes an illusion.
SERIALIZABLE (serialized)
At this isolation level, transactions are executed in serial order. The InnoDB engine of MySQL database will implicitly add a read sharing lock to the read operation, so as to avoid the problems of dirty read, non re read, re read and unreal read.
The difference between non repeatable read and dirty read is that dirty read is that one transaction reads the uncommitted dirty data of another transaction, while non repeatable read is that it reads the data committed by the previous transaction.
Both phantom reading and non repeatable reading read another committed transaction (this is different from dirty reading). The difference is that the non repeatable reading query is the same data item, while phantom reading is for a batch of data as a whole (such as the number of data).
3. Propagation behavior of transactions
1,PROPAGATION_REQUIRED: if there is no transaction currently, a new transaction will be created. If there is a transaction currently, the transaction will be added. This setting is the most commonly used setting.
2,PROPAGATION_SUPPORTS: supports the current transaction. If there is a transaction, join it. If there is no transaction, execute it as a non transaction.
3,PROPAGATION_MANDATORY: supports the current transaction. If there is a transaction, join it. If there is no transaction, throw an exception.
4,PROPAGATION_REQUIRES_NEW: create a new transaction, regardless of whether the transaction currently exists or not.
5,PROPAGATION_NOT_SUPPORTED: perform operations in a non transactional manner. If there is a transaction, suspend the current transaction.
6,PROPAGATION_NEVER: execute in a non transactional manner. If there is a transaction currently, an exception will be thrown.
7,PROPAGATION_NESTED: if a transaction currently exists, it is executed within a nested transaction. If there is no current transaction, execute the same as the deployment_ Required similar operations.
4. Key points of SpringBoot transaction
(1) Automatic configuration of transactions
TransactionAutoConfiguration
(2) Transaction issues
When two methods are written in the same class and called internally, the transaction settings will become invalid. The reason is that the proxy object is not used.
① Introducing spring boot starter AOP
② Enable @ EnableTransactionManagement(proxyTargetClass = true)
③ Open @ EnableAspectJAutoProxy(exposeProxy=true)
④ Use aopcontext when using method Currentproxy() calls the method
public void a() {
    //You can cast the type directly because aopcontext Currentproxy gets the proxy object of the current class
    XxxServiceImpl o = (XxxServiceImpl)AopContext.currentProxy();
    o.b();
    o.c();
}
public void b() {
    System.out.println("b...");
}

public void c() {
    System.out.println("c...");
}
10.2 distributed transactions
1. Why distributed transactions
Common exceptions in Distributed Systems
Machine downtime, network abnormality, message loss, message disorder, data error, unreliable TCP, storage data loss
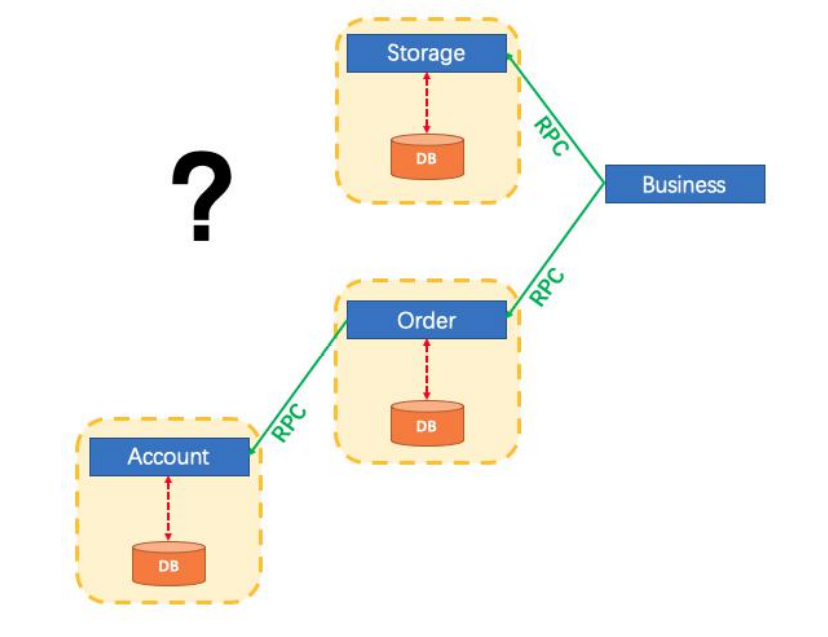
Distributed transaction is a technical difficulty in enterprise integration, and it is also involved in every distributed system architecture, especially in micro service architecture.
2. CAP theorem and BASE theory
(1) CAP theorem
CAP principle, also known as CAP theorem, refers to in a distributed system
① Consistency
Whether all data backups in the distributed system have the same value at the same time. (equivalent to all nodes accessing the same latest data copy)
② Availability
After some nodes in the cluster fail, whether the whole cluster can respond to the read-write requests of the client. (high availability for data updates)
③ Partition tolerance
Most distributed systems are distributed in multiple subnetworks. Each subnet is called a partition. Partition fault tolerance means that interval communication may fail. For example, one server is located in China and the other server is located in the United States. These are the two zones. They may not be able to communicate with each other.
CAP principle means that these three elements can only achieve two points at most at the same time, and it is impossible to give consideration to the three.
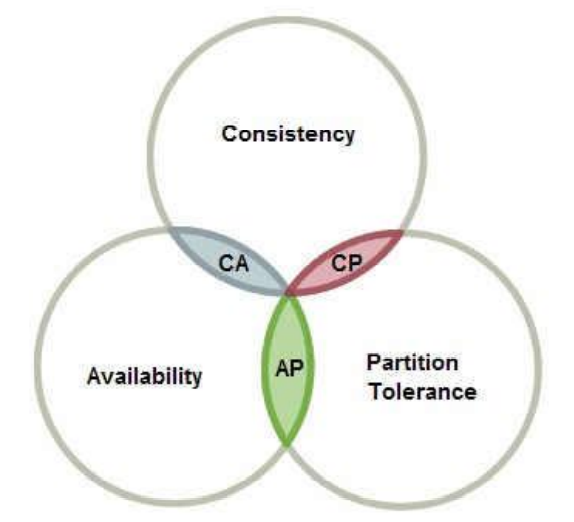
Generally speaking, partition fault tolerance cannot be avoided, so it can be considered that the P of CAP is always true. The CAP theorem tells us that the remaining C and A cannot be done at the same time.
You can refer to the article: https://blog.csdn.net/chen77716/article/details/30635543
raft and paxos for consistency in distributed system
raft animation demo:
Raft (thesecretlivesofdata.com)
(2) Problems faced
For most large-scale Internet application scenarios, there are many hosts and scattered deployments, and the current cluster scale is becoming larger and larger, so node failure and network failure are normal. In addition, it is necessary to ensure that the service availability reaches 99.99999% (N 9), that is, ensure P and A and abandon C.
(3) BASE theory
It is an extension of CAP theory. The idea is that even if strong consistency cannot be achieved (the consistency of CAP is strong consistency), appropriate weak consistency can be adopted, that is, final consistency.
BASE means:
Basically Available:
Basic availability refers to the loss of partial availability (such as response time and functional availability) and partial availability when the distributed system fails. It should be noted that basic availability is by no means equivalent to system unavailability.
- Loss of response time: under normal circumstances, the search engine needs to return the corresponding query results to the user within 0.5 seconds, but due to failure (such as power failure or network disconnection failure in some machine rooms of the system), the response time of query results has increased to 1 ~ 2 seconds.
- Loss of function: in order to protect the stability of the system, some consumers may be guided to a degraded page during the shopping peak (such as double 11).
Soft State:
Soft state means that the system is allowed to have an intermediate state, which will not affect the overall availability of the system. In distributed storage, there are usually multiple copies of a data, and the delay of allowing different copies to synchronize is the embodiment of soft state. Asynchronous replication of mysql replication is also an embodiment.
Final consistency:
Final consistency means that all data copies in the system can finally reach a consistent state after a certain period of time. Weak consistency is opposite to strong consistency, and final consistency is a special case of weak consistency.
(4) Strong consistency, weak consistency, final consistency
From the perspective of client, when multiple processes access concurrently, different strategies for obtaining updated data in different processes determine different consistency. For relational databases, it is required that the updated data can be seen by subsequent access, which is a strong consistency. If it can tolerate that some or all of the subsequent data cannot be accessed, it is weak consistency. If the updated data is required to be accessible after a period of time, it is the final consistency.
3. Several solutions of distributed transaction
(1) 2PC mode
The 2PC [2 phase commit second-order commit] supported by the database is also called XA Transactions. MySQL is supported from version 5.5, SQL Server 2005 and Oracle 7. Among them, XA is a two-stage submission protocol, which is divided into the following two stages:
The first stage: the transaction coordinator requires each database involved in the transaction to pre commit this operation and reflect whether it can be committed
Phase 2: the transaction coordinator requires each database to submit data. If any database rejects this commit, all databases will be required to roll back their information in this transaction.
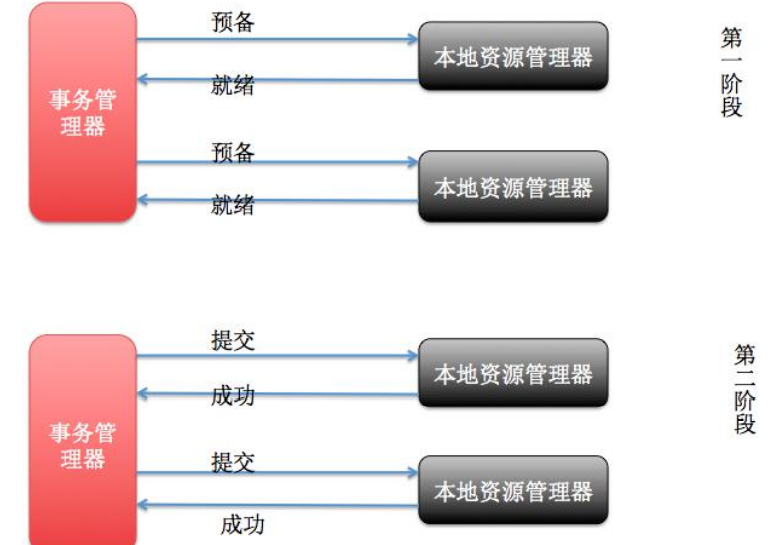
- Xa protocol is relatively simple, and once the commercial database implements XA protocol, the cost of using distributed transactions is relatively low.
- Xa performance is not ideal, especially in the case of single link transactions, which often have a high amount of concurrency, and XA cannot meet the high concurrency scenarios
- At present, XA support in commercial databases is ideal, but it is not ideal in mysql databases. The XA implementation of mysql does not record the prepare phase log, and the primary and standby databases are switched back, resulting in inconsistent data between the primary and standby databases.
- Many nosql s also do not support Xa, which makes the application scenario of XA very narrow
- There are also 3pcs, which introduce a timeout mechanism (whether the coordinator or the participant sends a request to the other party, if no response is received for a long time, they will deal with it accordingly)
(2) Flexible transaction TCC transaction compensation scheme
Rigid transaction: follow ACID principle and strong consistency
Flexible transaction: BASE compliant, final consistency
Different from rigid transactions, flexible transactions allow different nodes to have inconsistent data within a certain period of time, but the final consistency is required.
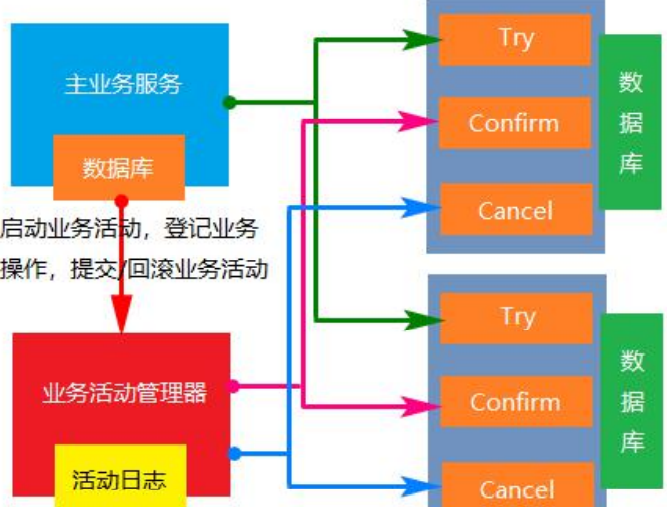
One stage prepare behavior: call custom prepare logic.
Two stage commit behavior: call custom commit logic.
Two stage rollback behavior: call custom rollback logic
The so-called TCC mode refers to the support of bringing custom branch transactions into the management of global transactions.
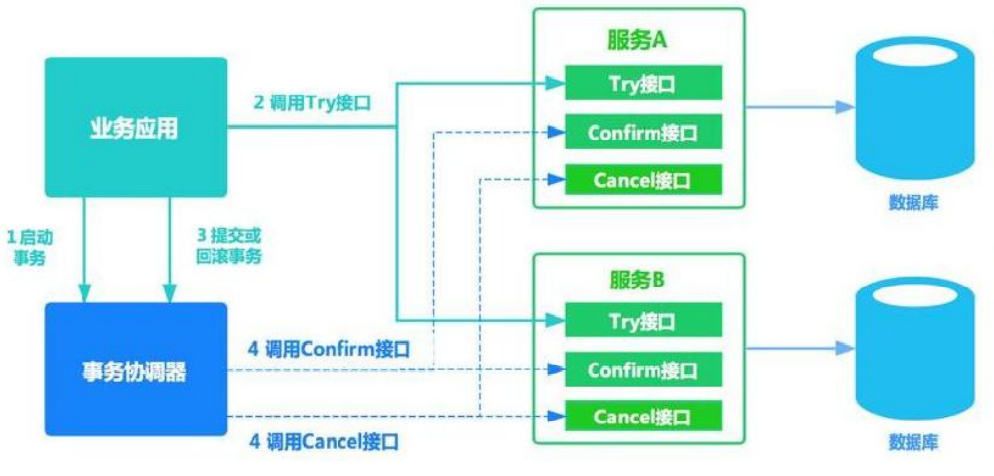
(3) Flexible transaction - best effort notification scheme
The notification is carried out according to the law, which does not guarantee the success of data notification, but a query operation interface will be provided for verification. This scheme is mainly used when communicating with the third party system, for example, the payment result notification after WeChat or Alipay is paid. This scheme is also implemented in combination with MQ. For example, send http requests through MQ and set the maximum number of notifications. When the number of notifications is reached, no notification will be made.
Cases: Bank notices, merchant notices, etc. (business notification among major trading platforms: multiple notification, query collation, reconciliation documents), Alipay's payment successfully asynchronous callback.
(4) Flexible transaction - reliable message + final consistency scheme (asynchronous guaranteed)
Implementation: the business processing service requests to send a message to the real-time message service before the business transaction is submitted. The real-time message service only records the message data, not the real sending. The business processing service confirms sending to the real-time message service after the business transaction is submitted. The real-time message service will not really send until the sending instruction is confirmed.
10.3 Seata
The grain mall uses Seata as a distributed transaction solution.
Seata's usage logic:
1. Create an undo in each database related to distributed transactions_ Log table:
CREATE TABLE `undo_log` (
  `id` bigint(20) NOT NULL AUTO_INCREMENT,
  `branch_id` bigint(20) NOT NULL,
  `xid` varchar(100) NOT NULL,
  `context` varchar(128) NOT NULL,
  `rollback_info` longblob NOT NULL,
  `log_status` int(11) NOT NULL,
  `log_created` datetime NOT NULL,
  `log_modified` datetime NOT NULL,
  `ext` varchar(100) DEFAULT NULL,
  PRIMARY KEY (`id`),
  UNIQUE KEY `ux_undo_log` (`xid`,`branch_id`)
) ENGINE=InnoDB AUTO_INCREMENT=1 DEFAULT CHARSET=utf8;
2. Install transaction coordinator: Seata server
Download from the Seata website.
For more operations, please refer to the official documents.
11, Payment & intranet penetration
1. Pay
Enter the open platform of the ant gold clothing, get the relevant interface of Alipay payment.
Extract relevant configurations and methods into a configuration class:
@ConfigurationProperties(prefix = "alipay")
@Component
@Data
public class AlipayTemplate {
    // With ID, your APPID account is your APPID corresponding Alipay account.
    public String app_id;
    // Merchant private key, your RSA2 private key in PKCS8 format
    public String merchant_private_key;
    // Alipay public key, see address: https://openhome.alipay.com/platform/keyManage.htm The Alipay public key corresponding to APPID.
    public String alipay_public_key;
    // The server [asynchronous notification] page path requires a full path in the format of http: / / and cannot be added? User defined parameters such as id=123 must be accessible from the Internet
    // Alipay will quietly send us a request to tell us about the success of the information.
    public String notify_url;
    // The page path of page Jump synchronization notification requires a full path in http: / / format, which cannot be added? User defined parameters such as id=123 must be accessible from the Internet
    //Synchronous notification, payment successful, generally jump to the success page
    public String return_url;
    // Signature method
    private  String sign_type;
    // Character encoding format
    private  String charset;
    //Order timeout
    private String timeout = "1m";
    // Alipay gateway; https://openapi.alipaydev.com/gateway.do
    public String gatewayUrl;
    public  String pay(PayVo vo) throws AlipayApiException {
        //AlipayClient alipayClient = new DefaultAlipayClient(AlipayTemplate.gatewayUrl, AlipayTemplate.app_id, AlipayTemplate.merchant_private_key, "json", AlipayTemplate.charset, AlipayTemplate.alipay_public_key, AlipayTemplate.sign_type);
        //1, generate a payment client according to the configuration of Alipay.
        AlipayClient alipayClient = new DefaultAlipayClient(gatewayUrl,
                app_id, merchant_private_key, "json",
                charset, alipay_public_key, sign_type);

        //2. Create a payment request. / / set the request parameters
        AlipayTradePagePayRequest alipayRequest = new AlipayTradePagePayRequest();
        alipayRequest.setReturnUrl(return_url);
        alipayRequest.setNotifyUrl(notify_url);

        //Merchant order number, the only order number in the merchant website order system, required
        String out_trade_no = vo.getOut_trade_no();
        //Payment amount, required
        String total_amount = vo.getTotal_amount();
        //Order name, required
        String subject = vo.getSubject();
        //Product description; can be blank
        String body = vo.getBody();
        alipayRequest.setBizContent("{\"out_trade_no\":\""+ out_trade_no +"\","
                + "\"total_amount\":\""+ total_amount +"\","
                + "\"subject\":\""+ subject +"\","
                + "\"body\":\""+ body +"\","
                + "\"timeout_express\":\""+timeout+"\","
                + "\"product_code\":\"FAST_INSTANT_TRADE_PAY\"}");
        String result = alipayClient.pageExecute(alipayRequest).getBody();
        //It will receive a response from Alipay, which responds to a page. As long as the browser displays this page, it will automatically come to Alipay's cash register page.
        System.out.println("Alipay's response:"+result);
        return result;
    }
}
When you want to use it, you can use it directly and automatically.
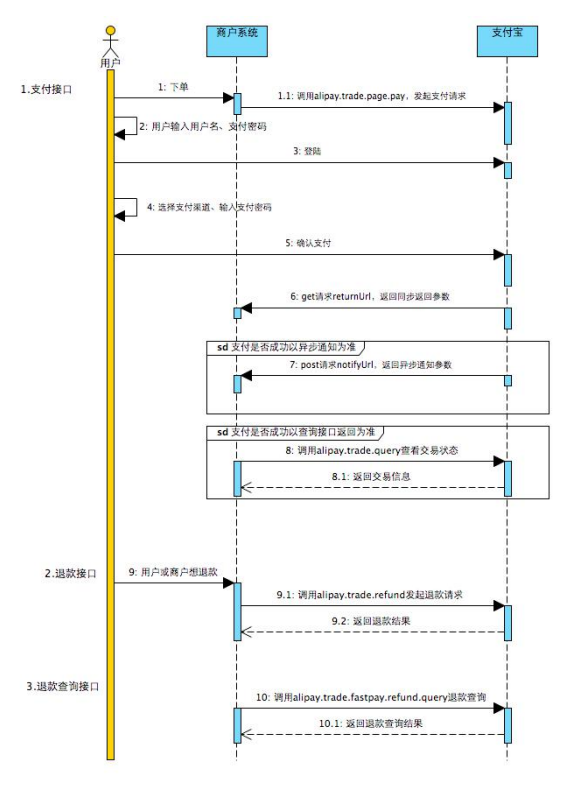
2. Intranet penetration
The intranet penetration function allows us to use the Internet address to access the host;
The normal process of accessing our project through the Internet is as follows:
1. Buy a server and have a public network fixed IP
2. The domain name is mapped to the IP address of the server
3. The domain name needs to be filed and reviewed
Therefore, intranet penetration is used to achieve the same function. Here, peanut shell is used.
Principle:
Intranet penetration service providers rent their sub domain names to us. When using them, they only need to configure the relevant local address and port number and create a mapping, so that they can access the local services through the public ip.
12, Second kill service
1. Second kill business
Seckill has the characteristics of instantaneous high concurrency. In view of this characteristic, we must do current limiting + asynchronous + caching (page static) + independent deployment.
Current limiting mode:
-
Front end current restriction: some highly concurrent websites directly start current restriction on the front-end page, such as Xiaomi's verification code design
-
nginx current limiting, direct load part of the request to the wrong static page: token algorithm, funnel algorithm
-
Gateway current limiting, current limiting filter
-
Using distributed semaphores in code
-
rabbitmq current limiting (those who can do more: chanel.basicQos(1)) ensures the performance of all servers
2. Second kill process
Second kill commodity distribution process:
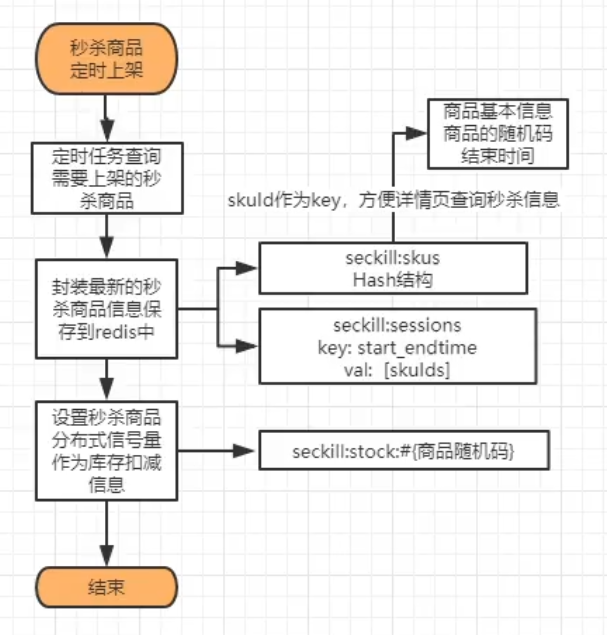
Second kill process:
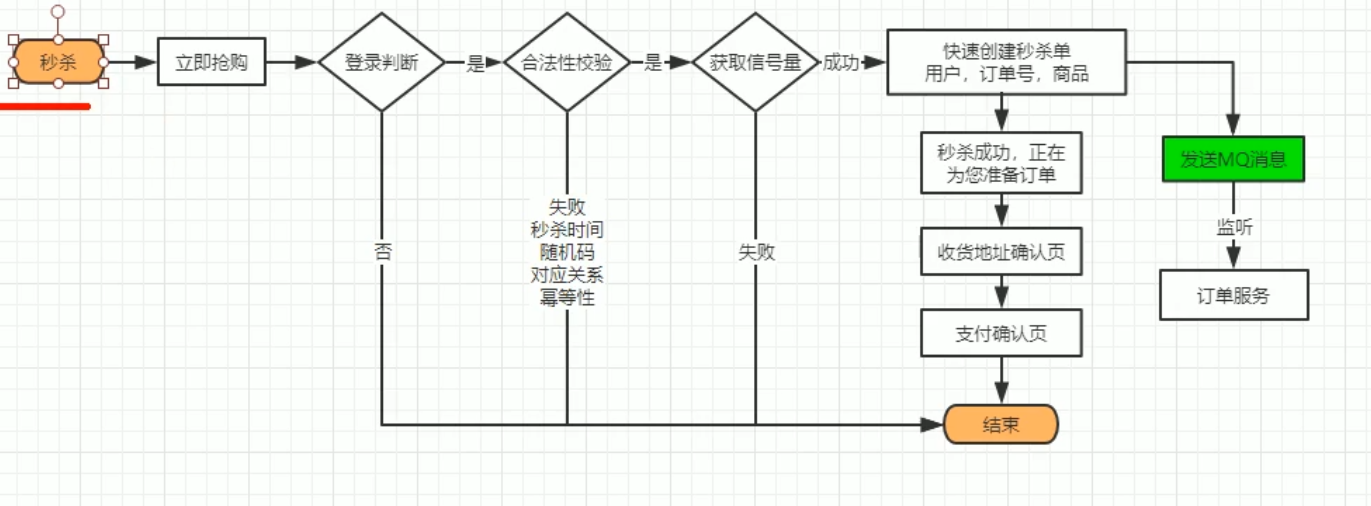
In the second kill process, idempotency needs to be guaranteed. Each user can only second kill once, and other return structures are consistent.
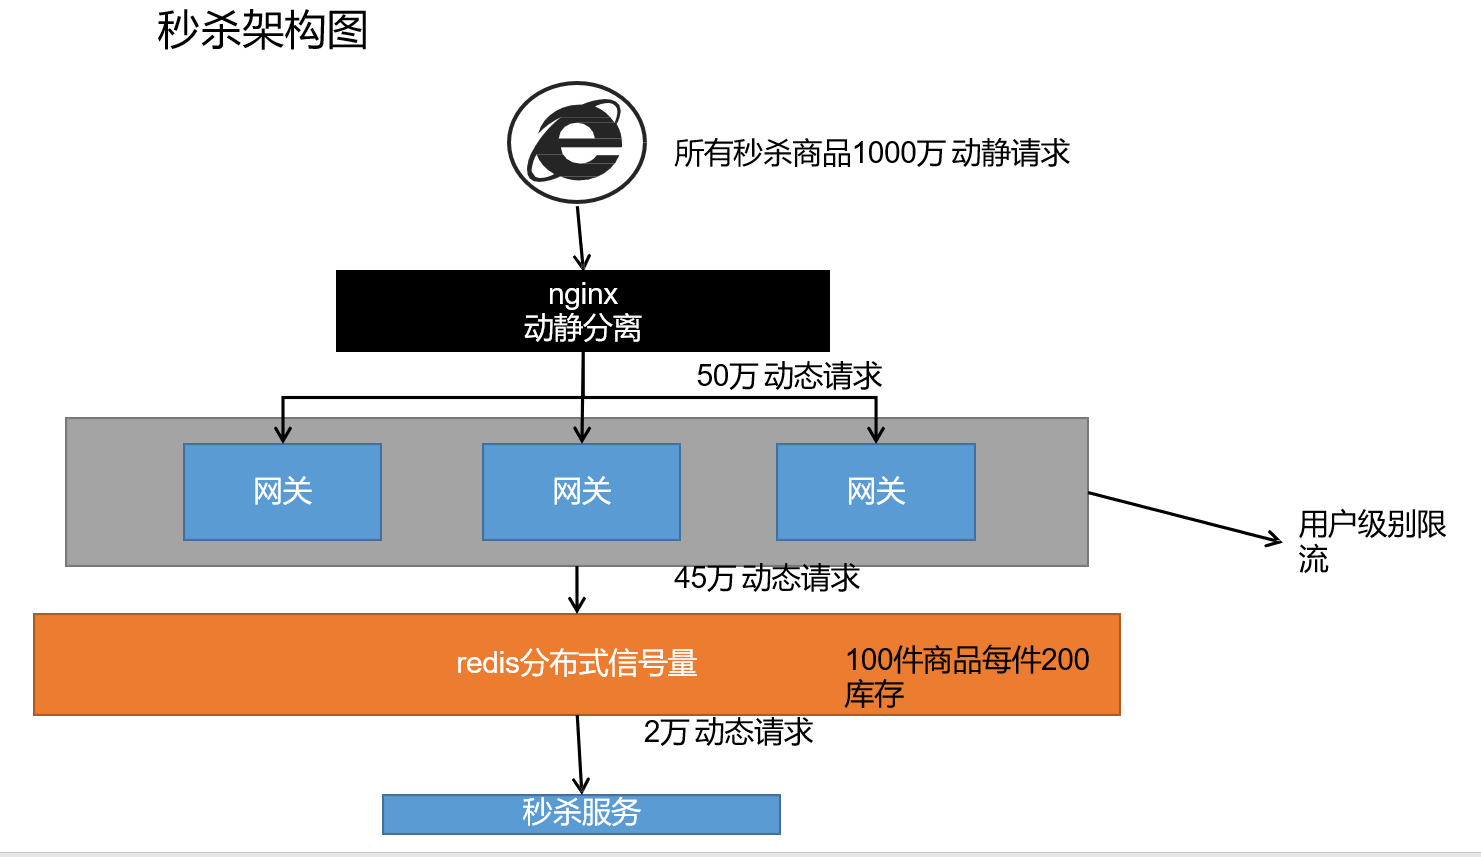
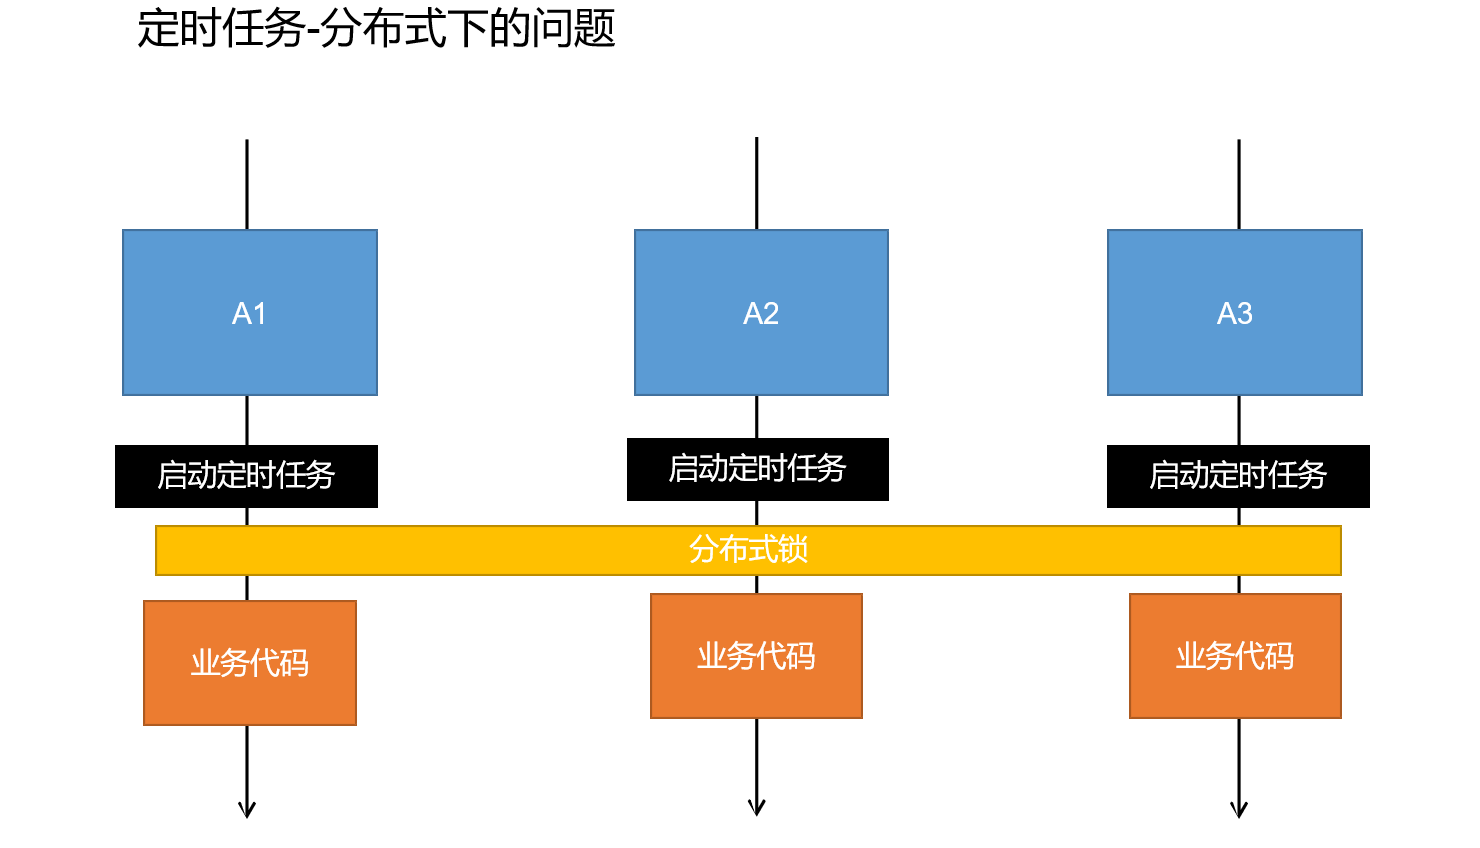
3. Scheduled task & cron expression
Use quartz to do scheduled tasks.
When using, you only need to mark relevant annotations.
Examples of use and related problems:
/**
 * Scheduled task
 *      1,@EnableScheduling Start scheduled task
 *      2,@Scheduled Start a scheduled task
 *
 * Asynchronous task
 *      1,@EnableAsync:Open asynchronous task
 *      2,@Async: Label the methods you want to execute asynchronously
 */

@Slf4j
@Component
@EnableAsync
@EnableScheduling
public class HelloScheduled {

    /**
     * 1,In Spring, the expression is composed of 6 bits, and the year of the seventh bit is not allowed
     * 2,In the position of the day of the week, 1-7 represents Monday to Sunday
     * 3,Scheduled tasks should not be blocked. The default is blocked
     *      1),It allows businesses to submit themselves to the thread pool in an asynchronous manner
     *              CompletableFuture.runAsync(() -> {
     *         },execute);
     *
     *      2),Support timed task thread pool; Setting TaskSchedulingProperties
     *        spring.task.scheduling.pool.size: 5
     *
     *      3),Let scheduled tasks execute asynchronously
     *          Asynchronous task
     *      Solution: use asynchronous task + scheduled task to complete the function of non blocking scheduled task
     */
    @Async
    @Scheduled(cron = "*/5 * * ? * 4")
    public void hello() {
        log.info("hello...");
        try { TimeUnit.SECONDS.sleep(3); } catch (InterruptedException e) { e.printStackTrace(); }
    }
}
Cron expression:
You can refer to blogs and official documents.
4. Problems needing attention in seckill system
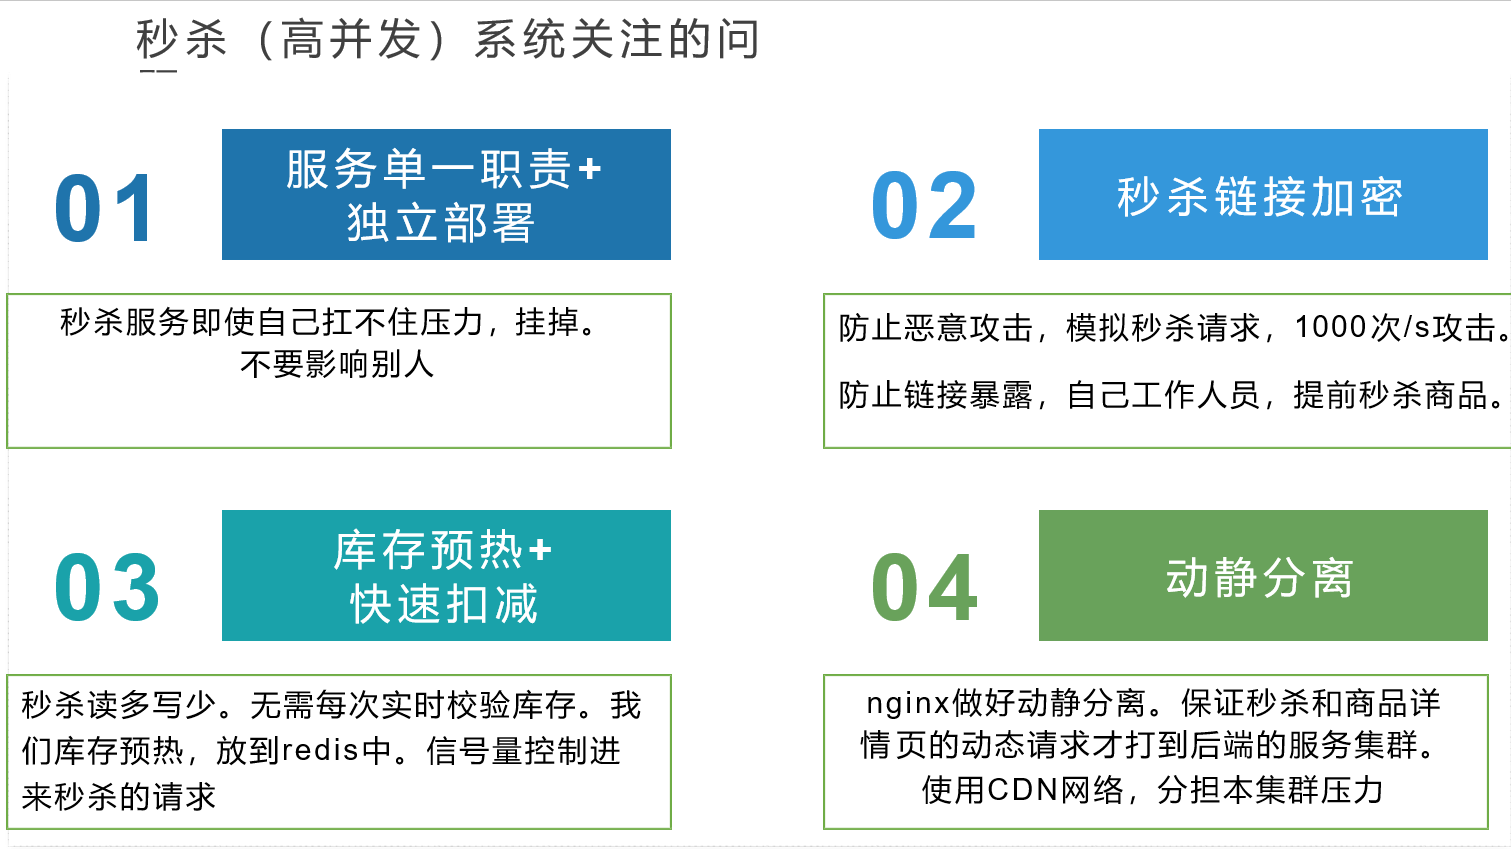
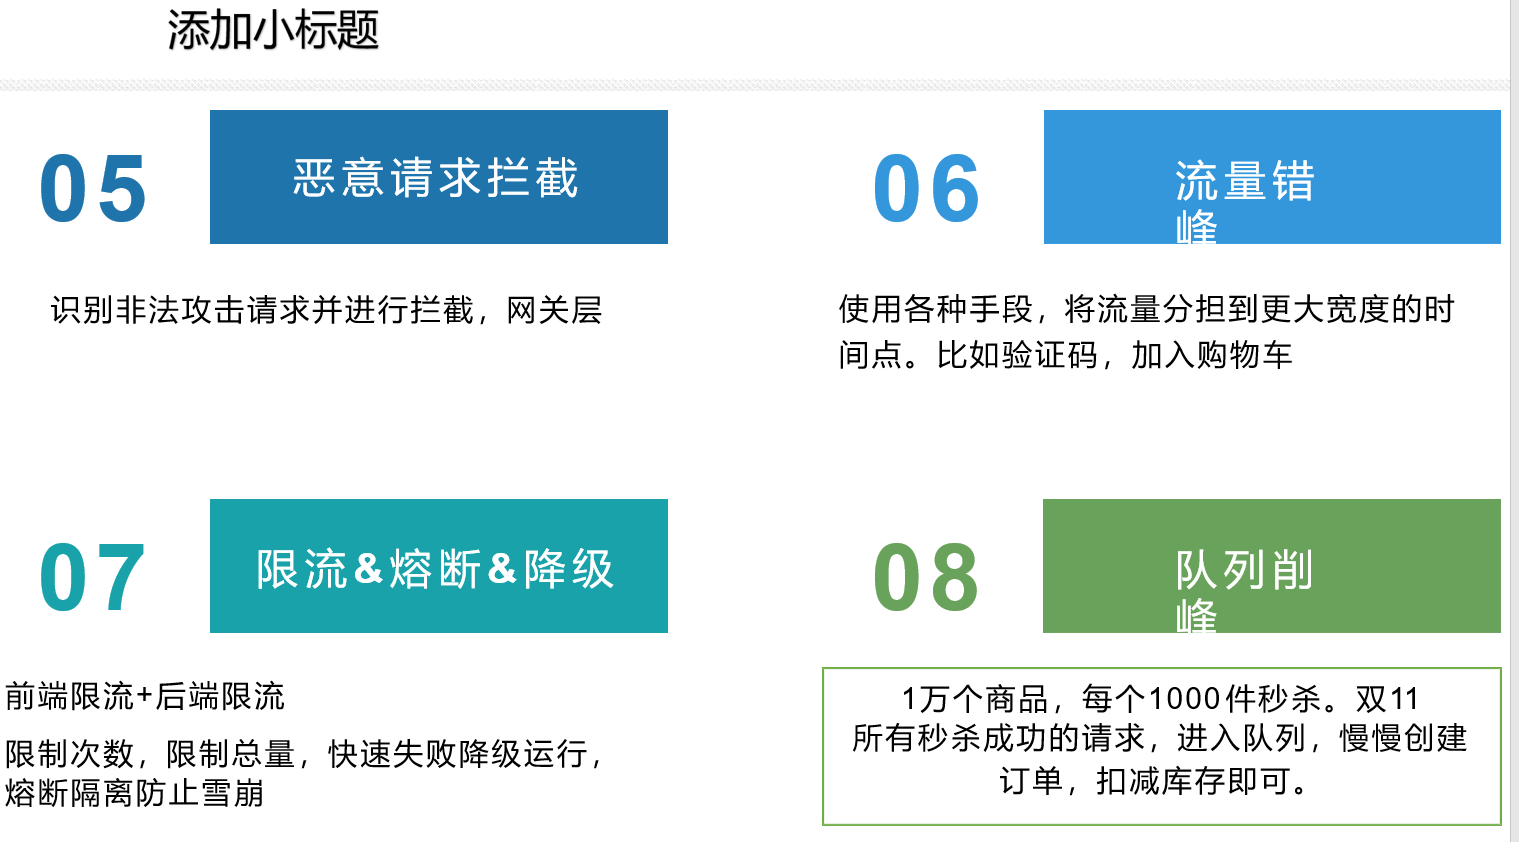
Grain mall advanced level chapter (end)