Layout manager
Determine the location and size of the component in the container.
Of course, if a container is created, there will naturally be a default layout manager.
classification
There are five layout managers in java.awt:
| FlowLayout | BorderLayout | GridLayout | GridBagLayout | Cardlayout |
|---|
Of the first and second:
FlowLayout-Panel\Applet
BoderLayout-Window\Frame\Dialog
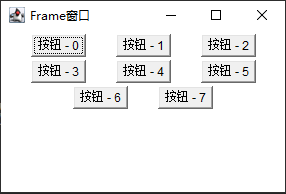
FlowLayout
Flow type
public static final int CENTER		//Center
public static final int	LEFT		//be at the left side
public static final int	RiGHT		//be at the right
public static final int LEADING		//Same as starting end
public static final int	TRAILING	//Same end


public FlowLayout()					//Construct a layout and align it in the center. The default horizontal and vertical spacing is 5 units
public FlowLayout(int align)		//Default construction, specifying alignment 	 align: arrange
public FlowLayout(int align,int hgap,int vgap)//Self construction
//horizontal gap, vertical gap horizontal distance, vertical distance
example
Here, the horizontal distance of each button is 30 and the vertical distance is 3
package test1;
import java.awt.*;
import java.awt.event.*;

public class Class1{
public static void main(String[] args){

	//Create Frame object
	Frame f = new Frame("Frame window");
	//Set up layout manager
	f.setLayout(new FlowLayout(FlowLayout.CENTER,30,3));
	Button b = null;
	for(int i = 0;i<8;i++){
		b = new Button("Button - " + i);
		f.add(b);
	}
	f.setSize(300,200);
	f.setLocation(800,400);//Sets the position relative to the screen
	f.setVisible(true);

}}
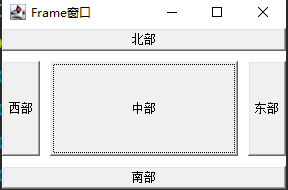
BorderLayout
Boundary type
Divide the window into five plates, Southeast, northwest and middle.
Constant and construction method of BorederLayout class
public static final StringCENTER		//Center
public static final StringNORTH
public static final StringSOUTH
public static final StringEAST
public static final SringWEST


public BorderLayout()					//Construct a layout with no spacing
public FlowLayout(int hgap,int vgap)	//Self construction
example
package test1;
import java.awt.*;
import java.awt.event.*;

public class Class1{
public static void main(String[] args){

//Create Frame object
	Frame f = new Frame("Frame window");

//Constructing the BorderLayout layout manager
	f.setLayout(new BorderLayout(10,10));
	f.add(new Button("east"),BorderLayout.EAST);
	f.add(new Button("west"),BorderLayout.WEST);
	f.add(new Button("south"),BorderLayout.SOUTH);
	f.add(new Button("north"),BorderLayout.NORTH);
	f.add(new Button("central section"),BorderLayout.CENTER);


//Set window position and visibility
	f.setSize(300,200);
	f.setLocation(800,400);//Sets the position relative to the screen
	f.setVisible(true);

}}
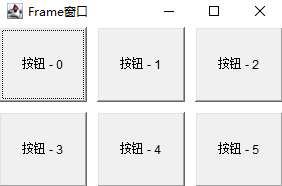
GridLayout
Net format
Arrange six buttons, two rows and three columns. The water bottle and vertical spacing of each button are 10;
GridLayout construction method
GridLayout()						//Construct the default layout,
GridLayout(int rows,int cols)		//Specify the number of rows and columns
GridLayout(int rows,int cols,int hgap,int vgap)//Specify the number of rows and columns; Horizontal distance, vertical distance
example
package test1;
import java.awt.*;
import java.awt.event.*;

public class Class1{
public static void main(String[] args){

	//Create Frame object
	Frame f = new Frame("Frame window");
	//The layout manager is set to BorderLayout
	f.setLayout(new GridLayout(2,3,10,10));
	Button b = null;
	for(int i = 0; i<6;i++){
		b = new Button("Button - " + i);
		f.add(b);
	}


	f.setSize(300,200);
	f.setLocation(800,400);//Sets the position relative to the screen
	f.setVisible(true);

}}
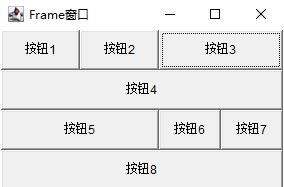
GridBagLayout
Grid packet
You can see from the name. It is developed based on GridLayout.
Unlike GridLayout, this allows each component of the container to have a different size.
The key is
GridBagConstraints object, then set relevant properties in this object, and then call setConstraints() to establish the direct association between the object and the controlled component
gridx,gridy				Set the horizontal and vertical indexes (i.e. rows and columns) of the grid where the upper left corner of the component is located

gridwidth,gridheight 	Set horizontal and vertical spanning several grids. The default attribute is 1

fill					If the display area obtained by the component is larger than the size originally set, set how to fill it

weightx,weighty		Set the proportion (weight!) that the component occupies the excess horizontal and vertical white space in the container
Among them, the values of girdx and gidy can be set to relax and are associated with each other
gidwidth,gridheight. . If it is set as reminder, the component will be the last one in this row or column. When both are set to relax, it is the penultimate component
The default values of weightx and weight are 0. For example, when there are two components in the container, weightx is 2 and 1 respectively, and the container width increases by 30px, the two components increase by 20 and 10 respectively
fill can select one of four attributes:
NONE	By default, the component size is not changed
HORIZONTAL	Horizontal fill
VERTICAL	Vertical fill
BOTH		Both directions expand together, large enough to fill the entire display area
example
package test1;
import java.awt.*;
import java.awt.event.*;

public class Class1{
public static void main(String[] args){

//Create a Frame object and select GridBagLayout
	Frame f = new Frame("Frame window");
	GridBagLayout gb1 = new GridBagLayout();
	f.setLayout(gb1);

//new a GridBagConstraints gbc
	GridBagConstraints gbc = new GridBagConstraints();

//Set properties of gbc
	gbc.fill = GridBagConstraints.BOTH;
	gbc.weightx = 2;
	gbc.weighty = 1;

	f.add(addButton("Button 1",gb1,gbc));
	f.add(addButton("Button 2",gb1,gbc));

//Setting add component is the last component on the line
	gbc.gridwidth = GridBagConstraints.REMAINDER;
//Button 3
	f.add(addButton("Button 3",gb1,gbc));
	gbc.weightx = 1;
	gbc.weighty = 1;
//Button 4
	f.add(addButton("Button 4",gb1,gbc));
	gbc.gridwidth  = 2;
//Button 5
	f.add(addButton("Button 5",gb1,gbc));
	gbc.gridheight = 1;
	gbc.gridwidth = 1;
//Button 6
	f.add(addButton("Button 6",gb1,gbc));
	//Set to add the last component of the line
	gbc.gridwidth = GridBagConstraints.REMAINDER;
	gbc.gridheight = 2;

	f.add(addButton("Button 7",gb1,gbc));
	f.add(addButton("Button 8",gb1,gbc));

	f.setSize(300,200);
	f.setLocation(800,400);//Sets the position relative to the screen
	f.setVisible(true);
	}

//Returns a control that can be added
private static Component addButton(String name,GridBagLayout gb1, GridBagConstraints gbc){
	Button butt = new Button(name);
	gb1.setConstraints(butt,gbc);
	return butt;
}}
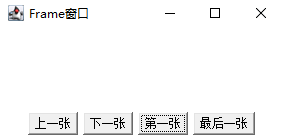
CardLayout
Some components are laid out overlapped, just like cards. Only one interface is displayed at a time
Construction methods and common methods
public CardLayout(int hgap,int vgap)	//The spacing between components of the structure is 0
public CardLayout(int hgap,int vgap)	//Specify Spacing

void show(Container parent,String name)//Displays the card with the specified component name
void next(Container parent)				//Turn next
void previous(Container parent)			//Turn it up
void first(Container parent)			//Turn to the first one
void last(Container parent)				//Turn to the last one
package test1;
import java.awt.*;
import java.awt.event.*;

public class Class1{
//Create a Frame object and select GridBagLayout
	Frame f = new Frame("Frame window");
	String[] names = {"First sheet","Second sheet","Third sheet","Sheet 4","Sheet 5"};
		Panel p1 = new Panel();
		public static void main(String[] args){
		new Class1().init();
		}
	public void init(){
		final CardLayout cl = new CardLayout();
		p1.setLayout(cl);
		for(int i = 0;i<names.length;i++){
			p1.add(names[i],new Button(names[i]));
		}

	Panel p = new Panel();
	//Create anonymous class
	ActionListener listener = new ActionListener(){
		public void actionPerformed(ActionEvent e){
			switch(e.getActionCommand()){
			case"Previous":
				cl.previous(p1);
				break;
			case"Next":
				cl.next(p1);
				break;
			case"First sheet":
				cl.first(p1);
				break;
			case"Last one":
				cl.last(p1);
				break;
			case"Second sheet":
				cl.show(p1,"Second sheet");
			}
		}
	};
	//Create five events and register listening events


	Button previous = new Button("Previous");
	previous.addActionListener(listener);
	Button next = new Button("Next");
	next.addActionListener(listener);
	Button first = new Button("First sheet");
	first.addActionListener(listener);
	Button last = new Button("Last one");
	last.addActionListener(listener);
	Button second = new Button("Second sheet");
	second.addActionListener(listener);

	p.add(previous);
	p.add(next);
	p.add(first);
	p.add(last);
	p.add(second);
	f.add(p,BorderLayout.SOUTH);
	f.setSize(300,150);
	f.setLocation(500,200);
	f.setVisible(true);


}}
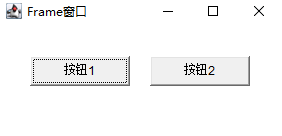
Do not use layout manager
After the container is created, there will be a default layout manager. Of course, you can cancel it
setLayout(null)
Corresponding trouble
The program must use the following methods
setSize()Set window size
etLocation()Position the window relative to the screen
setBounds()Set component location and size
example
package test1;
import java.awt.*;


public class Class1{
public static void main(String[] args){

//Create Frame object
	Frame f = new Frame("Frame window");
	f.setSize(300,150);
	f.setLocation(500,200);
	f.setVisible(true);
//Do not use layout manager
	f.setLayout(null);
	f.setSize(400,200);
//new two buttons and determine the position and size
	Button b1 = new Button("Button 1");
	Button b2 = new Button("Button 2");
	b1.setBounds(40,60,100,30);	//(x,y,length,height)
	b2.setBounds(160,60,100,30);
//Add the button to the frame window
	f.add(b1);
	f.add(b2);
	}

}
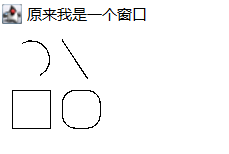
AWT drawing
Drawing geometry needs to be loaded into the library, including Graphics class
import java.awt.*;
Common methods of Graphics class
Arc arc
void drawArc(int x ,int y,int width,int height,int startAngle,int arcAngel)
Polygon (ellipse)
void drawPolygon(int[] xPoints,int[] yPoints,int nPoints)
There are also straight lines, rectangles, rounded rectangles, etc., but the number and type of given parameters are different.
package test1;
import java.awt.*;

class DrawFrame extends Panel{
	public void paint(Graphics g){
		g.drawArc(10,10,30,30,300,180);
		g.drawLine(50,10,70,40);
		g.drawRect(10,50,30,30);
		g.drawRoundRect(50,50,30,30,20,20);
	}
}

public class Class1 {
public static void  main(String[] args){

	//Set a window
	Frame f = new Frame("I was a window");
	Panel p = new DrawFrame();
	f.add(p);
	f.setSize(200,150);
	f.setLocation(500,400);
	f.setVisible(true);

}}